Get started with CAM modelling
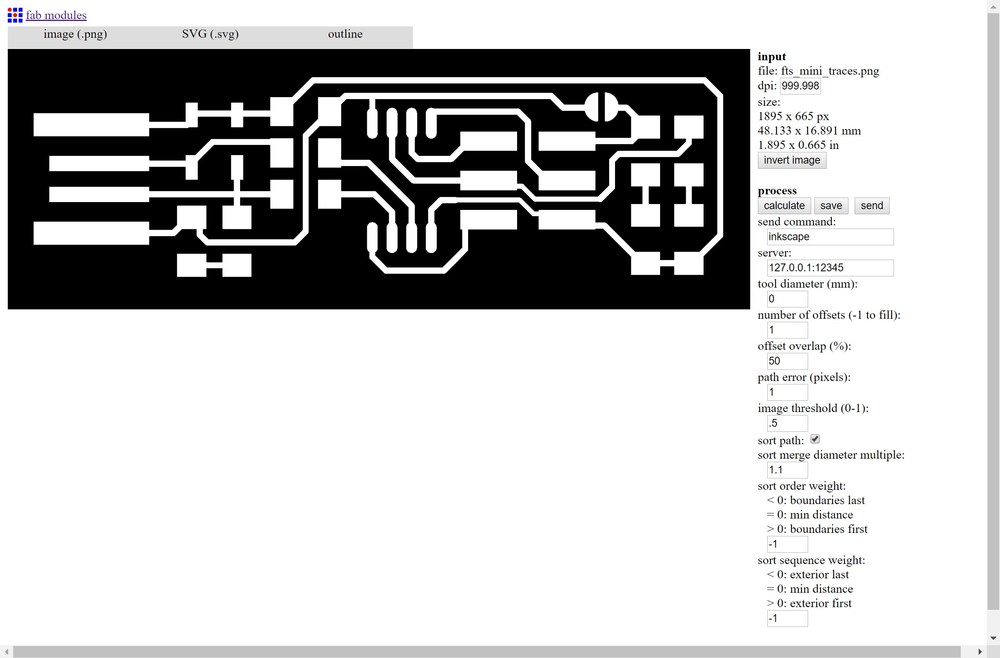
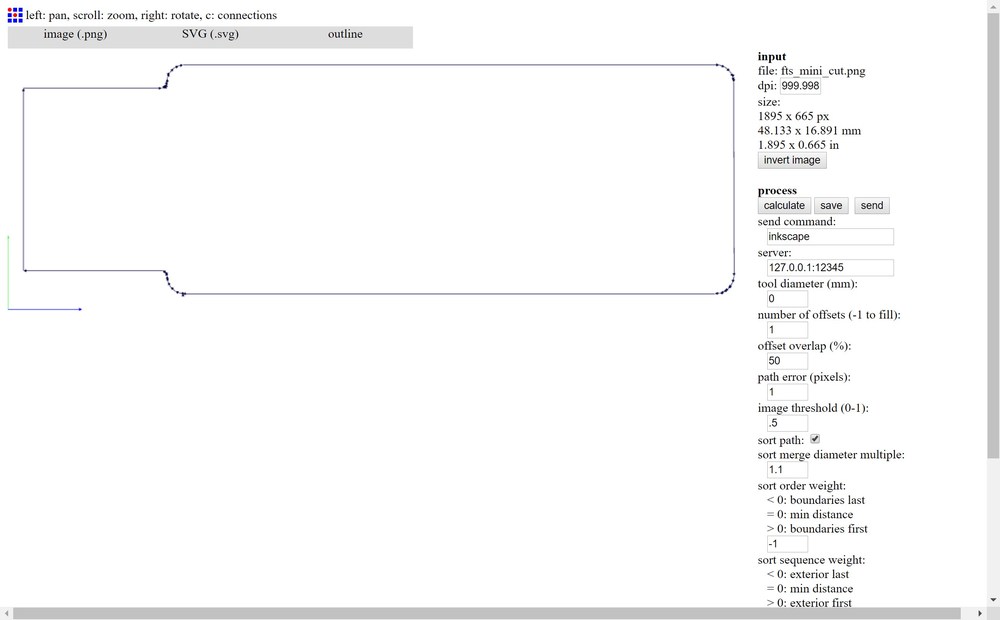
Get PNG file to mill
Advice : resolution of PNG should be around 1000-1200 dpi
Bas from Zaerc’s one :
http://fab.cba.mit.edu/classes/863.16/doc/projects/ftsmin/index.html
Download both of them :
http://fab.cba.mit.edu/classes/863.16/doc/projects/ftsmin/fts_mini_traces.png http://fab.cba.mit.edu/classes/863.16/doc/projects/ftsmin/fts_mini_cut.png
Transform the PNG in SVG via fabmodules
Go to :


IMPORTANT : note the dimensions (in mm or inches) of real part (on the right) for instance here : 48.133 x 16.891 mm 1.895 x 0.665 in
Integrate the SVG on stock FR1
This part is inspired by the following video (just to mention it) :
Source: www.youtube.com/embed/nNzeGittVXw
Download the FR1 Stock :
Source: www.youtube.com/embed/nNzeGittVXw
Create a new file in Fusion and save it with it’s name for instance FabTinyISP.


Open the tool bar on the left side :

Then upload the previous FR1 Stock just download from the web.

Then right click and select “insert into current design”, then click OK :

Create a new sketch on the top of the FR1 :

Draw a rectangle where you want to put the design and constraint it with dimensions previously noted :

Insert the previous SVGs on top of the FR1 stock :

Scale it to fit your target. A factor around 0.1 should work for scaling a 1000 dpi design (for this, it will be easier if you draw a new rectangle, on the left, where the SVG comes, to be sure you are applying the good scaling factor).

Modify your rectangle as a construction contour (right click) :

Then exit the sketch and break the link with the original FR1 stock :

If desired you can now apply a pattern to multiply the PCB produced :

Extrude to cut the desired shape(s) :


| [Back to summary](#tw-hreftoc) |
Assembly the FR1 on the B-Table with it’s fixture
Again create a new file, this time called “FabTinyISPWithFixture” :

Download the vise and fixture for Pocket NC :
The above one is derivated from this source : http://www.pocketnc.com/pocket-nc-vise/
It is coupled with a laser cutted sacrificial base :

You can get the RDWorks V8 file here : http://archive.fabacademy.org/2017/at3flo/students/3/assets/lcut/04/BambouCutV3.0.rld
Then insert the fixture into current design at zero position :

Define it as ground part (right ckick) :

Then assemble the previous so called “FabTinyISP” into the design, the video below could help before starting. Use a planar constraint and prefer the vertical axis, because it has more length on the PocketNC. Finally don’t pay attention to the letters of axis they are all inverted with the Pocket NC’s B-Table :

| [Back to summary](#tw-hreftoc) |
Initiate the machine setup and stock properties
Change to CAM environment inside Fusion 360 Ultimate :


| [Back to summary](#tw-hreftoc) |
Set the toolpath
Re: Setup tips: 3+2 with 5ax toolhead Options December in reply to: RandyKopf @matty.fuller I wanted to get you a simple example that can be studied without extra complexity. Here is a basic 3+2 example file that includes: 1) A CAM SETUP with a WCS 2) A as 3 Axis basic linear motion using the WCS and a Tool Axis that is matched. 3) The same tool path duplicated using the WCS and a rotated Tool Axis A90 degrees 4) A linear motion on a 3+2 Plane using WCS and Tool Orientation normal to the compound plane. 5) A duplicate of item 4 but NOT using WCS but only the Tool Axis. (Same as if you re oriented your part) The math looks correct to me in all situations as I have described previously. I hope this helps,
Randy Kopf
| [Back to summary](#tw-hreftoc) |
Add a new mill tool

You can get the tool table file with 1/64”, 1/32” and 1/8” geometries here : http://archive.fabacademy.org/2017/at3flo/students/3/assets/pnc/04/PCBFabAcademy.tools
| [Back to summary](#tw-hreftoc) |
Feeds and Speeds
Here some very conservative speeds :
*source : https://othermachine.co/support/materials/fr-1/*
Tool: 1/8” flat end mill Feed rate: 14.173 in/min (360 mm/min) Plunge rate: 1.81 in/min (30 mm/min) Spindle speed: 12,000 RPM Max pass depth: 0.005” (0.13 mm)
Tool: 1/16” flat end mill Feed rate: 14.173 in/min (360 mm/min) Plunge rate: 1.81 in/min (30 mm/min) Spindle speed: 12,000 RPM Max pass depth: 0.005” (0.13 mm)
Tool: 1/32” flat end mill Feed rate: 14.173 in/min (360 mm/min) Plunge rate: 1.81 in/min (30 mm/min) Spindle speed: 12,000 RPM Max pass depth: 0.006” (0.15 mm)
Tool: 1/64” flat end mill Feed rate: 5.669 in/min (144 mm/min) Plunge rate: 0.472 in/min (12 mm/min) Spindle speed: 12,000 RPM Max pass depth: 0.002” (0.05 mm)
| [Back to summary](#tw-hreftoc) |
Change the tool orientation


*Sources : * http://forums.autodesk.com/autodesk/attachments/autodesk/2070/7932/1/PNC%20Home%20Postion.jpg * http://forums.autodesk.com/autodesk/attachments/autodesk/2070/7932/2/Fusion%20360%20Setup%20WCS%20must%20Match%20PNC.jpg * http://forums.autodesk.com/autodesk/attachments/autodesk/2070/7932/3/Tool%20Path%20Setup%20with%20respect%20to%20WCS.jpg*

| [Back to summary](#tw-hreftoc) |
Set passes
To apply a correct load on the tool, use the Fraisa Catalog and it’s information. In our case a Microcut C3 will do the job (note that on the left part there is no 0.4mm so take the more conservative one) :

Select the correct application depending on your application, vertical penetration nor contours on the same level. In Fusion 360 represented by the multiple depths parameter and the optimal load parameter (also called Maximum Stepover) :


| [Back to summary](#tw-hreftoc) |
Set links
For rough tools just simply use helix penetration. For finishing tools use plunge and be sure to apply the Fraisa’s table value. See the difference between all the different penetrations :

| [Back to summary](#tw-hreftoc) |
Generate the GCode
http://www.pocketnc.com/post-processor-information/

http://archive.fabacademy.org/2017/at3flo/students/3/assets/gcode/04/1001.ngc
Extremely important : verify on line ~ N70 that you really have anA90 B0GCode command!
%
(AXIS,stop)
(1001)
(FABTINYISP)
N10 G21
N15 G90 G94 G40 G17 G91.1
N20 G53 G0 Z0.
(2D ADAPTIVE3)
N25 M9
N30 G49
N35 M5
N40 G53 G0 X63.5 Y63.5
N45 M0
N50 T2 M6
(132)
N55 S10000 M3
N60 G54 G0
N65 G53 G0 X63.5 Y63.5
N70 A90\. B0.
N75 M9
N85 G0 X-8.975 Y32.998
N90 G43 Z2.081 H2
N95 G0 Z-7.919
N100 Z-10.29
N105 G1 Z-10.369 F360.
N110 G3 X-9.504 Y32.463 Z-10.41 I-0.265 J-0.268 F30.
N115 X-8.975 Y32.998 Z-10.452 I0.265 J0.268
N120 X-9.504 Y32.463 Z-10.493 I-0.265 J-0.268
N125 X-8.975 Y32.998 Z-10.534 I0.265 J0.268
N130 X-9.504 Y32.463 Z-10.575 I-0.265 J-0.268
N135 X-8.975 Y32.998 Z-10.617 I0.265 J0.268
N140 X-9.504 Y32.463 Z-10.658 I-0.265 J-0.268
(...)
N83940 G2 X-22.942 Y20.803 I0.344 J0.197
N83945 G1 Y20.805
N83950 X-22.981 Y20.961
N83955 G2 X-22.993 Y21.057 I0.384 J0.096
N83960 G1 Y21.159
N83965 X-23.006 Y27.525
N83970 G3 X-23.085 Y27.604 I-0.079 J0.
N83975 G1 X-23.165
N83980 X-23.195 Z-14.513
N83985 X-23.221 Z-14.496
N83990 X-23.238 Z-14.47
N83995 X-23.244 Z-14.44
N84000 G0 Z2.081
N84010 M9
N84015 G53 G0 Z0.
N84020 G49
N84025 G53 G0 X63.5 Y63.5
N84030 A0\. B0.
N84035 M30
(AXIS,stop)
%
| [Back to summary](#tw-hreftoc) |
</div>

