Interface and Application programming Class
14th Worldwide gathering for Fabacademy 2015 feat. prof. Neil Gershenfeld
18 March
xx days to Final project
Week's work
Writing Computer Applications / Interfacing with Devices
For this week assignment we were introduced to the User interface and Application writing world. Being an absolute newbie new to this and, at the moment being a bit late with my general documentation I decided that the best choice was to make it simple to start with.
As suggested by Prof. Niel we should start with:
- picking up a Language
- How we are talking to the device through an Interface
- What kind of graphics will we use
- optional multimedia for sounds and video
- and often there is need for mathematical manipulations of data
Processing
Still having in mind the spiral development starting from Processing - the Desktop Development Environment that is very much like Arduino in spirit - seamed to be a wise choice.
Processing has a very well documented page suited for beginners filled with tutorials and examples and a wide community of developers most of them dedicated to the Arts sharing their files and achievements throughout the web. As I wanted to keep exploring the world through the skin of a Visual impaired so I thought that I could write an App that would introduce me to their own code language - Braille.
So for this first exercise I followed the research I did on the origin of Braille and it's architecture and brought that fresh knowledge into a previously written code that I found on Open Processing using a Keyboard as input. [+]
I took that first code and tutorials and came out with my own version of a Braille learning keyboard interface with graphics.
Adapting the existent code meant understanding the programs workflow and how could different instructions produce the desired graphical outcome and interaction, namely:
- While running the PDE you will have a working text editor with a toolbar for rapid access to a few of the available options as in
Tools>Creating Font/color selectorused in this example. The interface is very similar to Arduino, one that we had seen and used on previous weeks. - Defining the working cavas (350x350px) and its properties
- Understanding how and on what order you should define shapes in a drawing.In this case all the letters of the Alphabet from A to Z are defined by their respective binary order of 1 or 0 corresponding to a raised or flat dot in the Braille alphabet.
- In this case I added a change of background color every time a new letter is pushed otherwise I would get overlapping graphics producing wrong outcomes.
- changed the location of every drawn Braille Cell to the middle of the design adding the two coordinates X and Y after the text string of every letter
- changed the background color to my own RGB choice that would start in one color, change to a brighter value when showing letters and then back to the initial one on mouse-click
- In the bottom of the code the shapes are finally defined together with an if statement that sets the infill of the shapes to be changed accordingly.
- When pressed the higher dots should appear in white and the rest should remain in dark green
To this interface there will follow the production of small laser cut caps for the keyboard so that simultaneously the user can feel while typing that way getting used to the touch that corresponds to each of the keyboard letters.
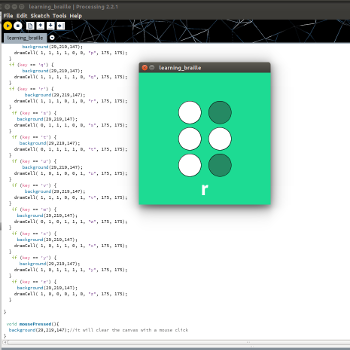
1st braille-learning processing test - interface/keyboard + mouse
Processing + input/output
The previous example was a nice research outcome but to complete this weeks assignment there needs to be comunication from the Desktop interface to an input or output device. I decided then to keep trying out with the fabkit since arduino environment is very much compatible with processing.
Here are the diferent outcomes:
In this clip you can see that The arduino was programed to blink in Arduino IDE when serial data is being sent. On the other hand the Processing interface Shows a black canvas with a small square that reacts to a mouse and creates hover action on the square making the LED on the fabkit board blink.
In the following example you can see that I had to change to a comercial arduino leonardo because the fabduino needed to be bootloaded again and the extremely-complicated-cable-for-programing was no longer available and I didn't have time to rebuild another one with still so many more things to update for documentation.
For that reason I Ended up adding an extra button with a current resistor in a breadboard then conected by wires to the defined pins in the arduino program. The program is the standart DigitalReadSerial that with the Processing interface and a mouse makes designing in a cavas possible.
In the clip you can see I start designing and when I want to clear canvas I press the button. Then I change settings from 1 to 0 and I then have it pressed to draw and when reliesed the drawing is cleared.
All examples in this page where modified versions of previously done code.
I really enjoyed interface and App design, I will probably be coming back soon to this to explore more options and create new designs. Really eye opening this weeks assigment. Another big window opened a lot of paths to still explore.