
3D Scanning and Printing Class
5th Worldwide gathering for Fab Academy 2015 feat. prof. Neil Gershenfeld
25 February
13 weeks to Final project
This weeks assignment was to 3D Scan and print our own design. We started using the Kinect to scan ourselves and, well, others too. My friend Montse was very excited about being scanned so I started with her.
Using Kinect sensor + Skanect software
What have I learned:
- setting proper light to the surroundings and target object are very relevant and might change drastically the outcome of your scan
- defining in software >Prepare what boundary box volume you want to scan and centrally place the object or person (70x70x70cm)
- While scanning perform a 360' circle and maintain the same distance to the scanned surface to achieve an uniform mesh
- hold the scanner with both hands for better results, be aware of darker areas as for ex.under the chin
- once you are done try to improve the mesh surface on Skanect cropping unnecessary parts and making it watertight
- If your machine is not powerful enough reduce the number of mesh faces before exporting
- If you are happy with the result and just want to publish it you can do it directly from the link on the last tab >Share and post it or just save it to .obj or .stl
From Mesh correction to 3d print
In this case I am lucky to own a gaming machine that computes beautiful with no complains so I could work with a full definition mesh - one that you can only get if you own a PRO version license of the software
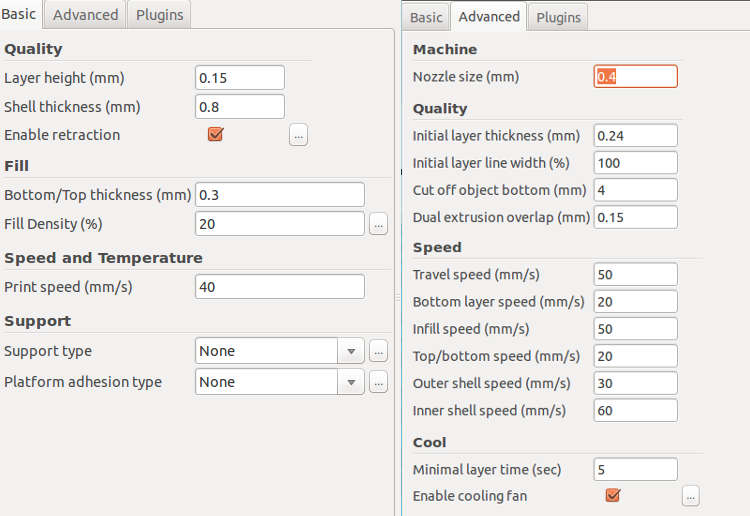
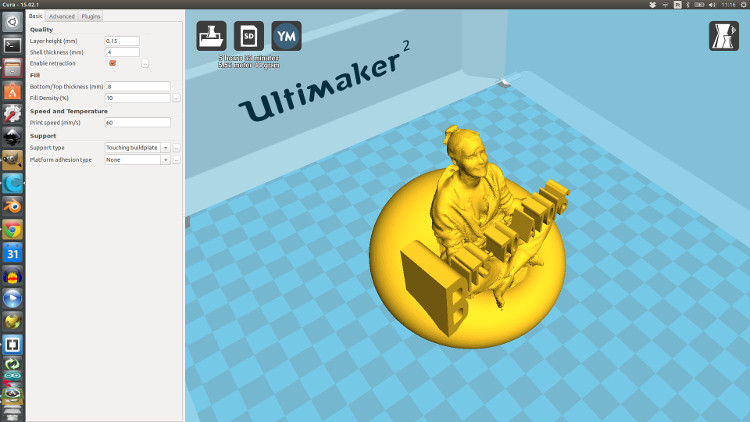
I edited it in Rhino scale and prepare it for 3D printing checking for naked edges or manifold faces. When I was done I export it to .stl and opened it on Cura software to get the G-code coordinates. The print would take around 2h 21min and these were the settings I've used:


Here in the lab between me and Anders we did a lot of testings, a bit to much time was lots on that task because we were carried away with ideas of what we could do next we our scanned self.
To make long story short with the meshes that came out with reasonable quality we saved them into .obj and went for a bit of reduction of mesh faces and some editing in Rhino. From then i did a bit of collage with previous designs, added the deformed torus I've design in Antimony and joined my mesh in sited position. Tweaked it a bit more and just for fun added a "Bits to Atoms" 3D Text.
But even after various mesh simplifications the 7cm mini-me 3D print was still going to take several hours so I decided not to print it, at least no for this week.
Print time: 5h 33min
5.56 meter and 44 grams of filament
- layer height: .15 mm
- layer thickness: .4 mm
- bottom top: .8 mm
- fill density: 10%
- print speed: 60
- support type: Touching build-plate
- platform adhesion type: none
Quality
Fill
Speed and Temperature
Support
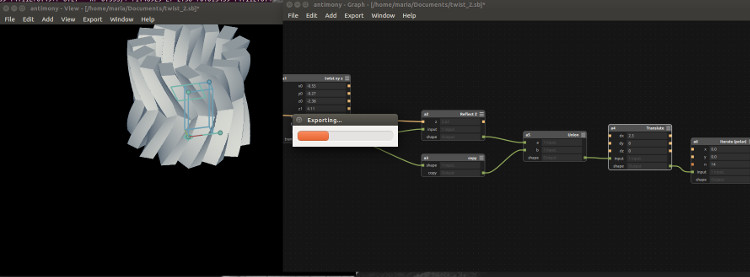
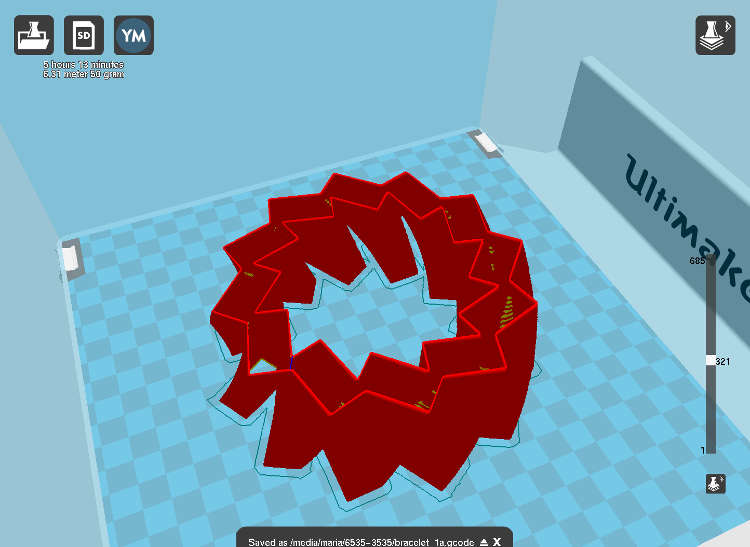
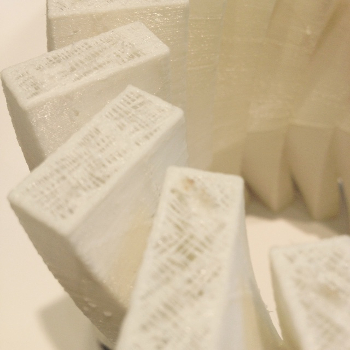
Design for 3D Print experiment - Antimony
For the 2nd part of the assignment we were supposed to create our own design and printed out later
As I am still playing around and testing shapes in Antimony I kept a bit more of form finding as training for this week
The Design consisted of a twisted cube, translated and polar iterated, so a kind of revolving shape would be the final result as the cube grow in height and finally it was mirrored in Z axis as one piece.
Failures
Strangely the antimony kept crashing when ever i moved the number slider for testing its parametric properties.
I wasn't a very complex computing so I think I reported that as an issue to M. Keeter and an updated version of the file was sent to me in the next couple of days.
Nevertheless, this file was successfully exported to mesh although I had to keep the low number of vortexes otherwise would take too long to compute as well.
Directly to Cura several tests were made to improve the printing results.
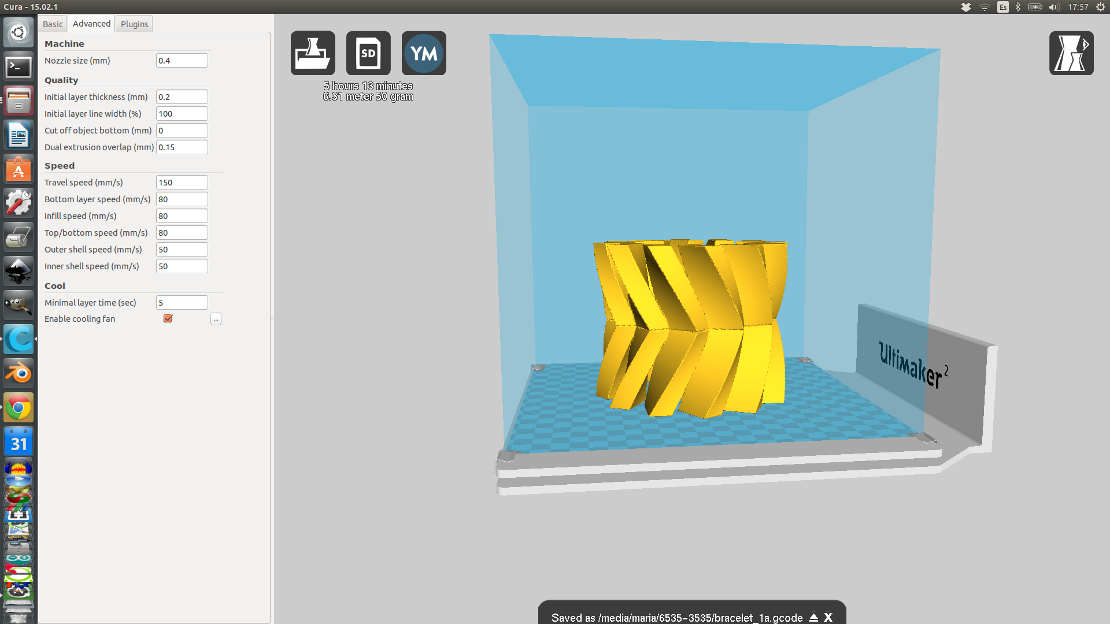


The final parameters where:
Print time: 5h 13min
6.31 meter and 50 grams of filament
- layer height: .15 mm
- layer thickness: .4 mm
- bottom top: .8 mm
- fill density: 5%
- print speed: 60
- support type: none
- platform adhesion type: none
Quality
Fill
Speed and Temperature
Support
Adjustments On ultimaker
PLA TEMP: 220
FLOW: 115%

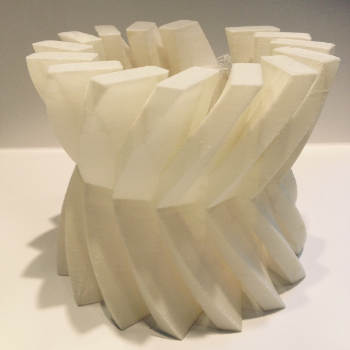
What I've learned:
- A bit of heat problems where encountered because of the special glow-in-the-dark PLA filament we were using without knowing its specific properties. That leads to non sticking to the bed filament and some parts failing.
- The Cura troubleshoot guide was very helpful.Check it here
- Too little of shell was given and infill was unnecessary because the shape was self structured/supported
- Should have done smaller piece for this exercise that way could control time and print in a more effective manner
- Top layer needed bigger number of layers to have better finish
- Some building plate adhesion should have been done in order to hold the piece during the full print
- temperature and size of the room where the printer is changes a lot the overall temperature of the final result 3d printed piece.