wk5 | 3D printing
Assignments :
- 3D scanning: Scan some object (test out as many as possible techniques)
- 3D printing: Print a design that can't be made by milling (like with some overhangs, or a nested shape)
Download : Blender file + stl - Dragon modeled
My notes :
3 march 2014 | Rigging in Blender
For this assignment I was curious how the model I made with Blender would look.
(How long it would take, how big it needs to be to see the details etc.)
Note : How I made the mesh of my model is explained in my wk2 notes.
step 1 : add some color to the object
(so you can see the difference better between you object and the rig)
- in object mode, select your object.
- go the the material tab menu (on the right side of your screen)
- click on diffuse and pick a color.
step 2 : apply the mirror modifier to mesh
- (in object mode) go to the modifiers tab menu, and click on the apply button.
step 3 : rigging
(Start with making the rig for the right side, later on this will be copied to the left side of the model.)
- start in edit mode of the object you want to rig.
- add > armature > bone (menu at the top of screen).
- go to edit mode (of that bone).
- in armature object data tab menu, click x-ray. (on the right of the screen, icon of a little doll).
- place the bone were you want it in your model (move, scale, rotate).
- To continue use extrude more bones. (E).
- want a new bone in stead of extruding? > back to object mode > add > armature > bone
- joining: keep all the bones in one object.
- Select the bones you like to join and Ctrl + J (in object mode)
Note : When making bones, keep then straight! (draw only on the x and y axes)
This keeps your rig from hopping into weird unexpected positions later on.
Toggle only between front view and right side view when adding bones,
in stead of panning around in 3D perspective.
step 4 : Re-name all your bones
- in the object data tab menu check 'name' (next to the x-ray check, it shows the names of the bones).
- Now re-name all your bones into sensible names (in armature tab menu, icon of a little bone). (Good housekeeping: name all your bones 'bone name .R' and the IK bones 'bone name IK .R'. This will help keeping organized later on)
step 5 : clear parent of the IK bones
- Clear parent of the bones that are there to only help (IK bones) with posing not directly reshaping the mesh (example: a knee or elbow).
- select bone: Alt + P (clear parent).
- also de-check the deform option in the bone tab menu (do this for all your IK bones).
step 6 : Group bones where necessary
(like for posing the feet, I'd like those 2 bones move as a group.)
- select multiple bones (in edit mode) : Ctrl + P (choose: keep offset).
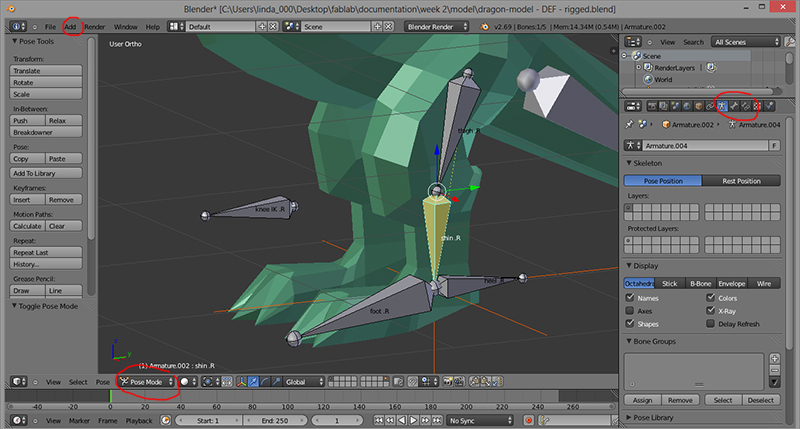
step 7 : inverse kinematics
(making the IK bones work, like a knee or elbow.)
- select your rig and switch to pose mode.
- select the shin bone.
- shift + ctrl + C
- choose 'inverse kinematics'
- go the the bone constraint tab menu (on right side of screen) :
- change target to armature.
- change bone to your feet IK .R
- change pole target to armature.
- change bone to knee .R
- if angle of the knee is now wrong : change the pole angle. (like -90 ).
- change chain length to 2
(do the same for the arm.)
step 8 : duplicate bones to the left side
- select the bones and switch to edit mode
- press C (the brush selector tool) and select the bones you want to copy
- position the 3D cursor in the center of the model : shift + C (press comma key (',') to stop rotating around the cursor)
- duplicate selection: shift + D
- and the press (in this order) : 'S + X + -1 + enter' (s=to scale mode, x=x-axes, -1=to a negative position)
- (while the duplicated bones are still selected) Go to armature > flip names. (menu at bottom of the screen). (now all the .R in the names have all been changed into .L)
step 9 : apply the bones to the mesh
- switch back to object mode.
- select the mesh and the rigging.
- set parent to the armature with automatic weight: ctrl + P
step 10 : clean up mesh to get the rig moving properly
-
Weight painting mode :
- in object mode select the mesh.
- now you can switch to weight painting mode (bottom of the screen).
- use a brush set to change to influence area of the bone. In the object data tab menu you can switch between all the bones (on the right side of the screen, little dotted triangle icon > vertex groups).
- Press N > display > de-check relationship lines.
- K = knife tool.
- select entire mesh (A).
- On left menu there is a button called 'remove doubles'.
- Select the entire mesh.
- Go to mesh > normals > recalculate outside (menu at bottom of screen).
- selected the bones (in edit mode)
- Press 'M'
- select in the popup menu to which layer you want to move the bones. (the bones in a different layer won't effect how the rigging is set up, it's used good housekeeping)
Editing the weight of each bone will help to keep the mesh from contorting in illogical ways, when moving the rig.
To get rid of all the relationship lines :
To split a face by drawing a line :
(adding extra faces will help to let the mesh bend smoothly).
Remove doubles :
(This will remove any double faces that aren't visible but you did accidentally drawn on or in your object).
Recalculate normals :
(to get all the face dots back on the outside).
Move bones layers to a other layer :
(select all the bones that you don't directly use to bend the mesh, like the spine, but leave the backbone).
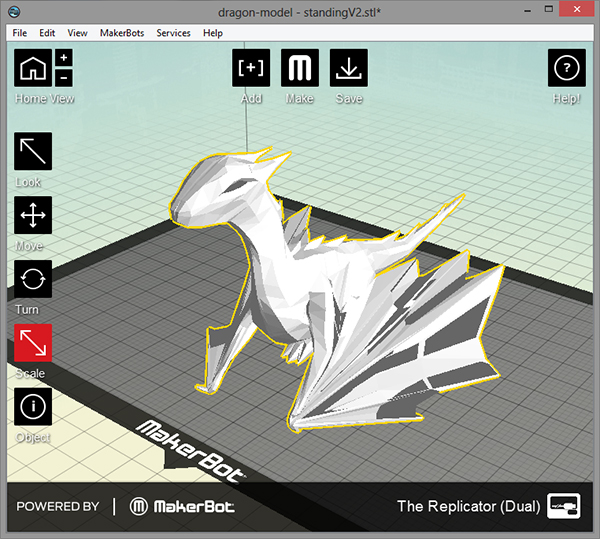
4 march 2014 2014 | 3D printing
-
Exporting Blender file :
- In object mode, select the object you want to export.
- File > export > .stl
- add > 'choose your .stl file' (big plus button in top of screen)
- adjust scale and placement of object if necessary (big buttons on the left).
- when ready click the 'make' button (big buton top center of screen).
- set the properties, and save it on the memory card of the 3D printer.
- now you're ready to print.
Start up Makerware
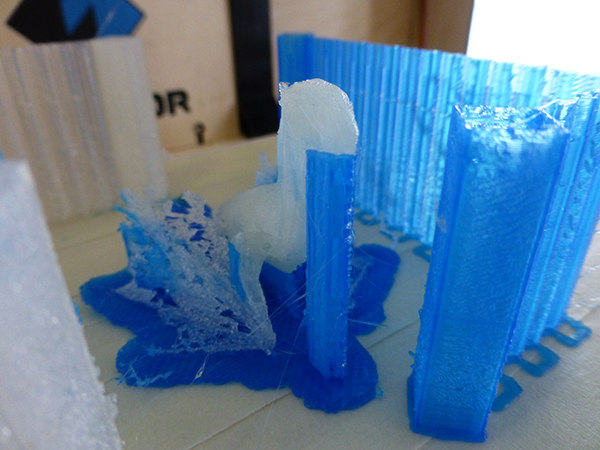
version 1 (printed to small, dislike the usage of 2 colors because blue smudges the white, and wing collapsed because the design is to thin).
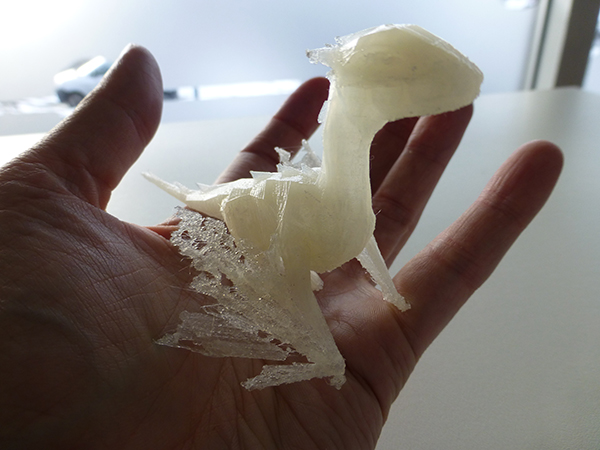
version 2 (a bigger print, printing takes about 4 hours (high res), using 1 color, wings still collapsed, although less then version 1).
10 march 2014 2014 | edditing wings
After consulting with my tutor the concluded on the reason for the collapsing of the wings during printing.
We imported the stl file in Rhino, and in this program is clearer why the wings aren't printable.
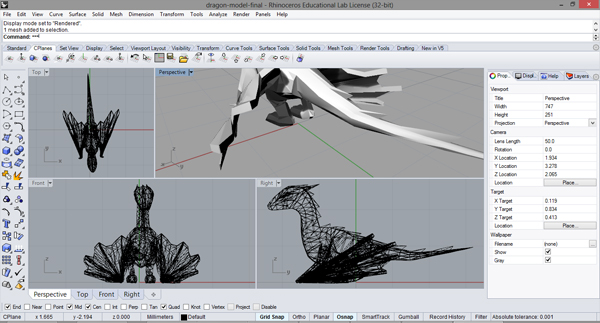
The mesh genarated in the body looks fine, but the mesh in the wing (even though drawn thick enough to be print)
is distorted by the use to the rigging.
Somehow the bottom part of the wing has gotten all compressed
and the inside and outside of the object get's all confused, resulting in a non-printable wing.
I've tried using the mesh repair tool and edit tool to fix this, but gave it up as a to time consuming project.
It would be a wiser course to go back to blender and figure out how to have a better control over the rigging.