|
Week9: Make something big
This week we are gonna practice with the CNC. This machine allow us to make things bigger....lets see whatit allow to do.
Maybe a chair
...that
was my first thought. A chair is something big and it can be usefull in
the future. So I start to investigate and my instructor Nuria told me
about a software, called SketchChair.This
is an opensource proyect made by Diatom Studios, that allow us to
design a chair from scratch, verify that it can stay stand and with a
person over it, and print the files with the design we made.Its pretty simple, at the first time, but when you must watch the consistence of the design ,isnt as simple as it seems.So
i start a design from scratch, learning the tool. It allow to design a
chair made of layers, and you can design all the layers independently.So after spend so many times trying to understand the program, I decide to make a chair but....for childs.I
take a look at instructables and find this easy way to make a
"proportional" big chair for small childs. So i decide to do a simple
layered chair for small childs.The design was something like that:
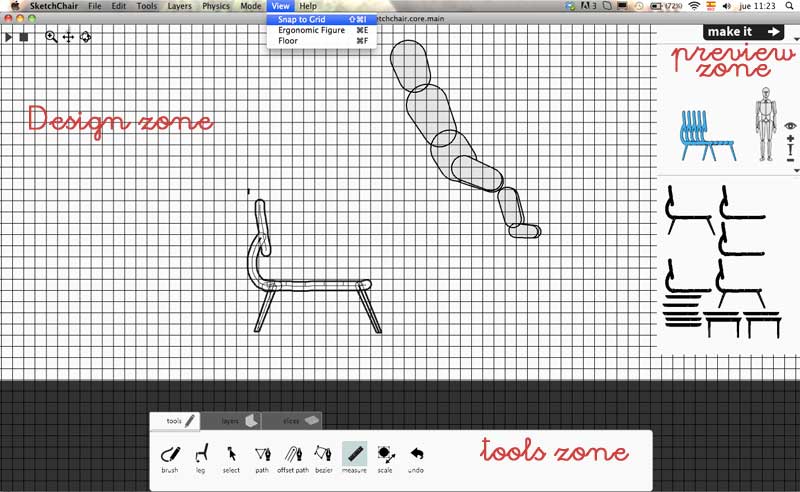
In
the Design zone you can draw the form of the chair. Brush is the tool
to make the seat and after there is a tool to maje the legs. The
program automatically design the layered chair, and the slice to put
together the layers....its really simple!I think in the future will
be a nice program, but right now i see a big problem: I dont find the
place (if its in the program) to configure how wide is my wood panel.
So the final layouts prints without the fit for my wood.So finally i left this program to make my own chair.
Make something "proportional" big
I
wanted to make a chair.A friend of mine has a montesory nursery,
an has a lot of small kids from 0 to 1 or 2 years old. She told me
he didnt find a "really" small chair to a really small kid....so i
decide to do it.Searching in instructables, i find this great proyect:
And
i love it. This instructable is made of cardboard, but i want to try it
with foam. So i design a new "cube-chair" from my own, taking the A
letter at the side of the chair. And here is the design: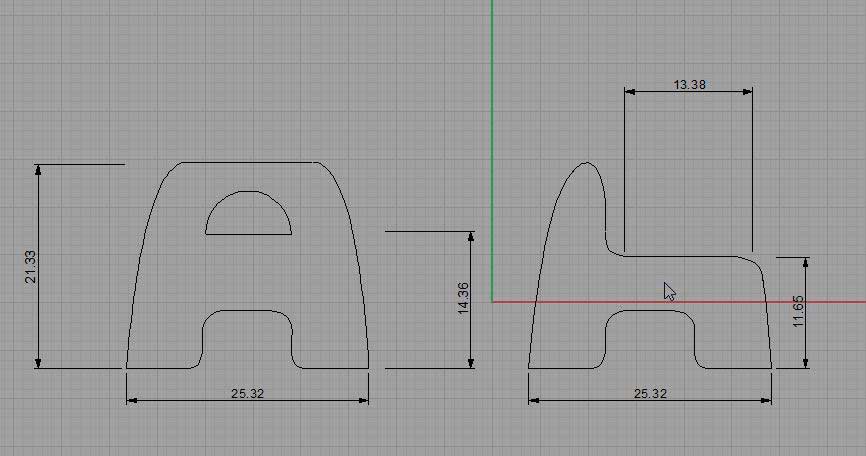
I
design it in Rhino and measures is in cm. The A is the side of the
chair (i need two of it) and the other is the central part of the
chair, and you can cut all what you want to make a wider or a thinest
chair. After design it, i use the program from our CNC to plan the cut. This proram is called Aspire.
I had a big problem:
the design has many of the curves opened, and the program can not make
a route in an open curve.Fixin the file could take me about 2 hours. I
go back to Rhino, try to join the curves and take back to Aspire to
check if there is some open curves....and so on.
After
some time, i realice that Aspire has its own tool to fix the open
curves, and even has a tool to cut the vectors right before planing the
cut. So that was a big joy to notice that i dont have to come back to
the rhino file to change something.
Then, all the file was done, i put the parameters to cut the foam. I hade a 3cm wide foam, and i use this to do the chair. Tip:
to make the Z alignement, our CNC has a small piece of metal, that
detects where is the Z=0. The foam is a flexible material, and the CNC
took the material down when measuring the Z automatically. So i use a
small cardboard over the foam to avoid this happen. See an image: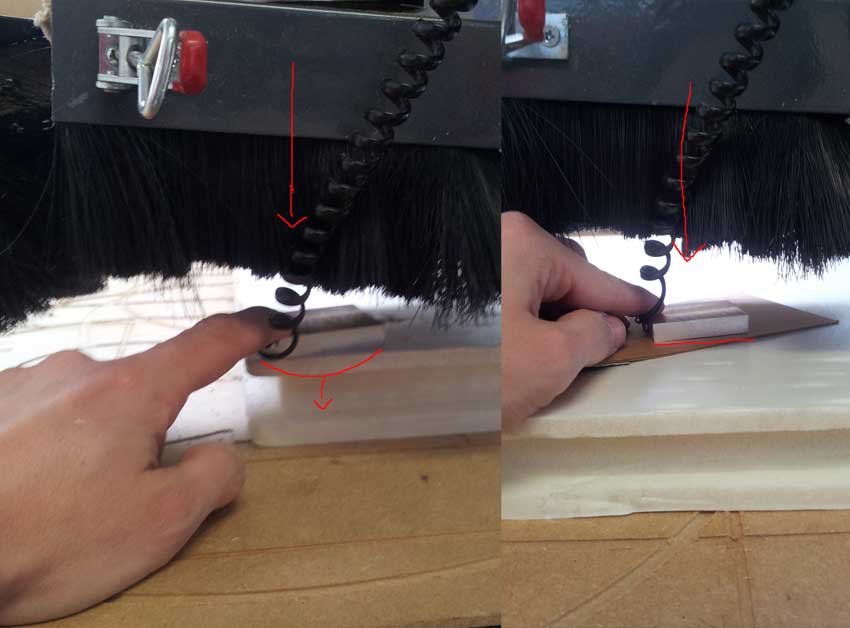
I made a mistake:
i use a end mill for wood instead a foam mill. The problem wasnt the
material of the mill, the problem was that the end mill for wood is
smaller than the foam. I didnt realice of it until i see this:

The
mill was smaller than the foam, and the mill holder touch the foam, and
melt it. Inmediatly the foam solidify and give me this beautiful ball
of melted foam.Remember: the mill must be longer than the material (i know, its obvious, but it wont happen again)
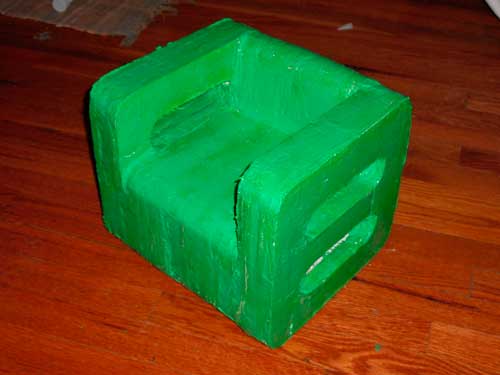
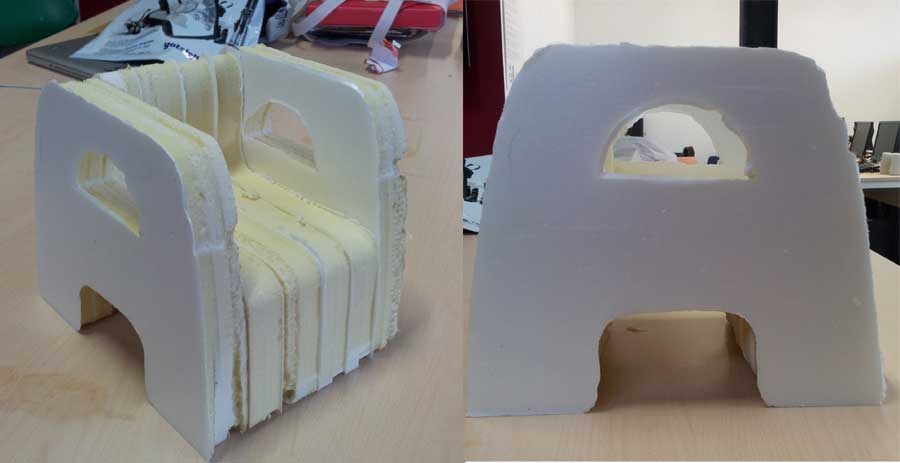
Taking
back to the job, i did the rest of the pieces and put it toghether with
a special foam glue, to conform the final chair...and here it is:
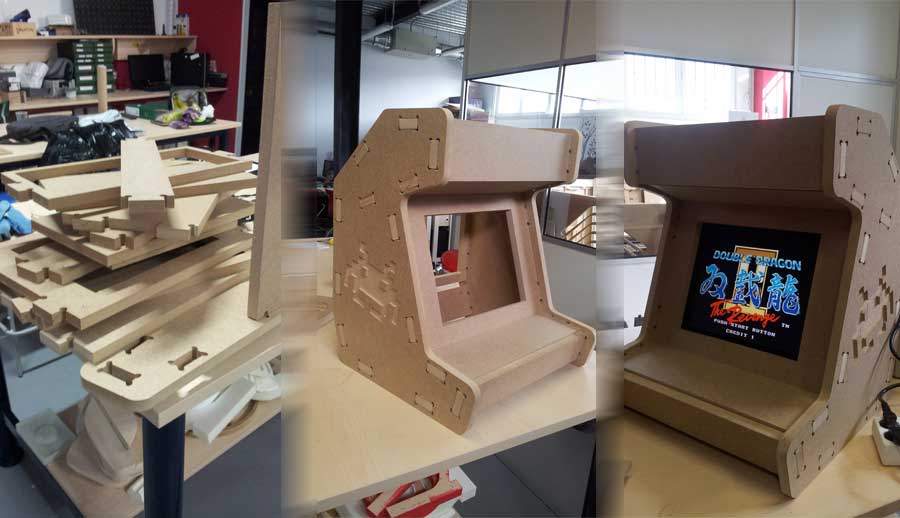
Making an Arcade Bartop Cabinet
Thats
my real proyect this week. Before i join the Fab Lab Leon, i wanted to
make an Arcade Cabinet for my childs (and for me, of course). And
finally this was the time.
First
i think to do a full cabinet, in a child scale, but was too many big
for the first time i try. So i decide to do a "Bartop Arcade", whish is
smaller than a normal arcade. Here is an example of a bartop arcade: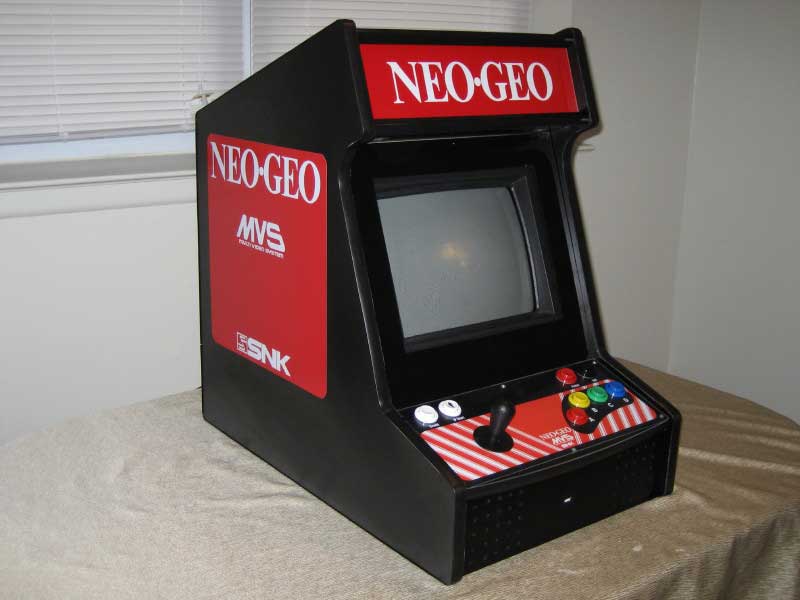
So
first i need to design it. Taking this great proyect of a bartop
arcade, which has his dwg file available to download, i start my design
making the laterals and putting some cross panels in the middle.
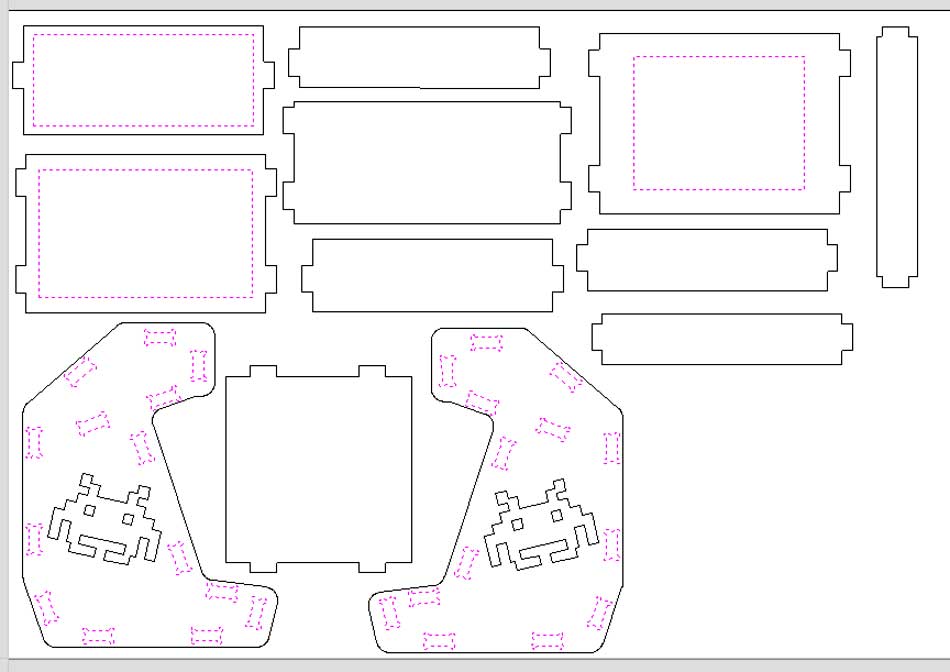
Starting the plans in Rhino from the side panel, in which i added a
"classical arcade" from the game Space Invaders.
To
make the Joins between the side panles and the rest of the panels, i
appeal on an interesting document that our instructor show us: 50 digital Wood Joints,
where you can watch multiple types of wood joints and decide which is
the best for your proyect. Also has the digital files that you can add
to your proyect.
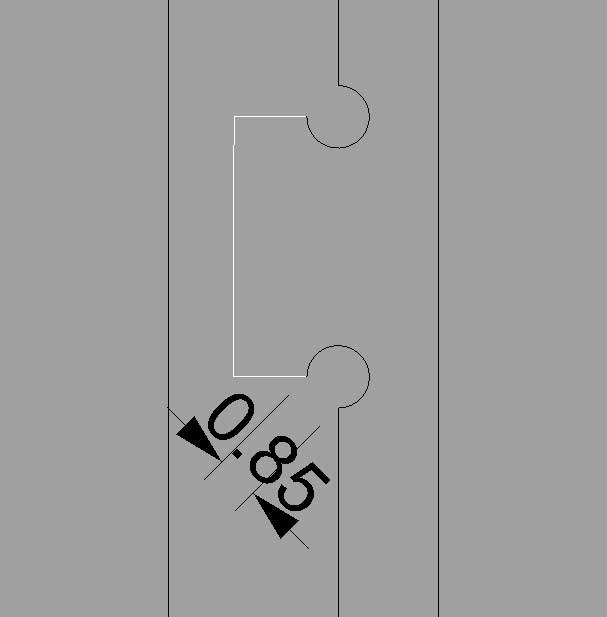
To make this join, i choose the Tenon Joint. It allow me to do a nice joint and very simple. Here is a sample: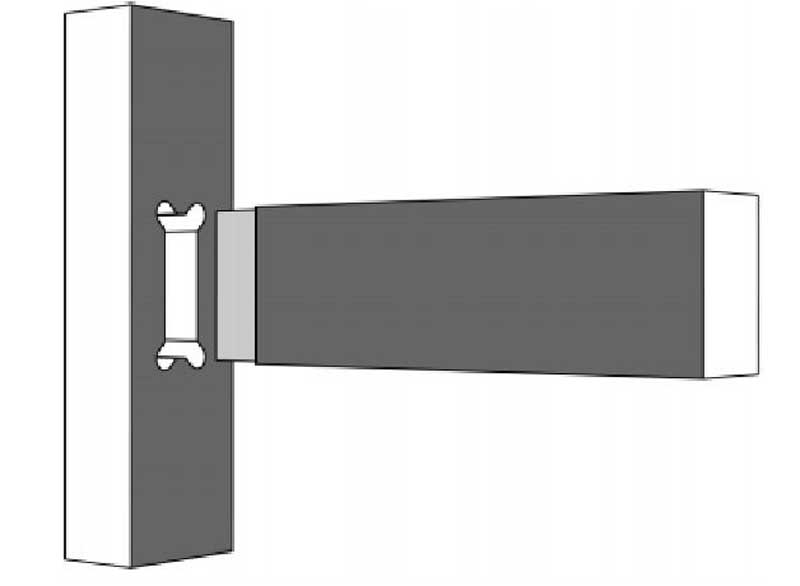
In this page or pdf you can also download the file with the model of the joint, and use it in your proyect.Also, and thanks to my Fab Academy mate Epifanio,
show me that in the corners of the flap the mill will make an arc,
instead a right angle. So i decide to add some circles to make a better
adjustement. Here is an overview:
After
this i pass to the Aspire. First i want to make a engraving to the two
space invaders (in 5mm). After i will drill the holes of the side
panel, from inside.Then i do a final cut with all the lines except the side panels. This pass will cut from outside of the line, in a 5mms step.
I had a problem
here: when i use the Aspire to define the pass, after i have all pass
defined, when i come back to the parameters, the end mill wasnt
selected. This cause that the end mill goes down 7mm in each pass, insted of 5mm i define. I
still dont know why this happens, but from now i will double ckeck this
parameter.
TIPS: - Clean the mill holder
before you start the milling work. Its important, because if the mill
holder is dirty, it cant hold well the mill, and the mill will slowly
fall down, spoiling all your job of measurement. - If you have a design with an exact dimension of the milling table, and you mark, in the CNC, a X=0 and Y=0 away from the edge of the machine limits, you could have this beautiful error message:
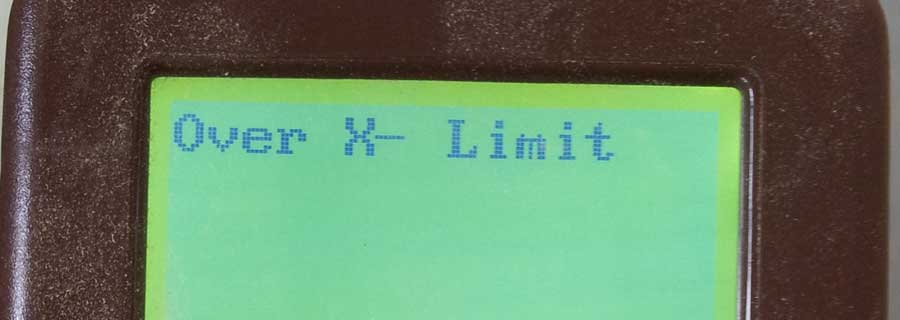
That
means that your design X dimension + the space from your X=0 to the
edge of the machine is greater than the whole X machine limit. To avoid
this is preferable design in a space as great as the piece you are
going to cut, and mark the X=0 and Y=0 in the point where you want to
start the job.After milling all the pieces, we just need to ensamble it....that looks great!!
|
