FabTiny*ISP - Programming the firmware
Using an Arduino as ISP
First we need an ISP to program our ISP.
As this is somewhat of a chicken and the egg problem (which came first?), I'll be using a bog standard Arduino Uno in combination with the "ArduinoISP" example included with the Arduino IDE.
This should also work with just about any other supported Arduino board if you don't have an Uno available.
You will need a working build environment that includes "make", "avr-gcc" and "avrdude", setting this up depends on your operating system and is unfortunately not covered here.
If you are using a different programmer like another usbtiny compatible (such as the one we're making here) for instance, then you should replace "stk500v1 -P/dev/ttyACM0 -b19200" with "usbtiny"
And when you're using a ATTiny85, replace "t45" with "t85" where needed.
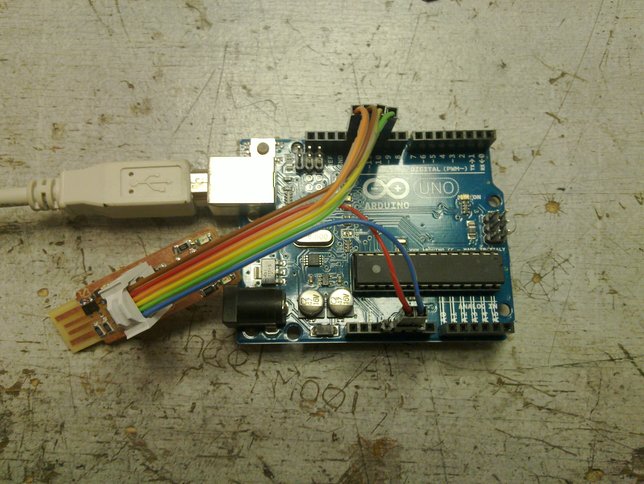
Hooking it up.
Connections
| Signal
| FabTiny*ISP
| Arduino Uno
|
| MISO
| 1
| 12
|
| VCC
| 2
| 5V
|
| SCK
| 3
| 13
|
| MOSI
| 4
| 11
|
| RESET
| 5
| 10
|
| GND
| 6
| GND
|
If you hook it up like in the picture, the slide-switch should be in the ON position so that the FabTiny*ISP will be powered by the Arduino.
Otherwise, if you connect the FabTiny*ISP to the USB already, then the slide-switch should be in the OFF position as the FabTiny*ISP now has it's own power from the USB port.
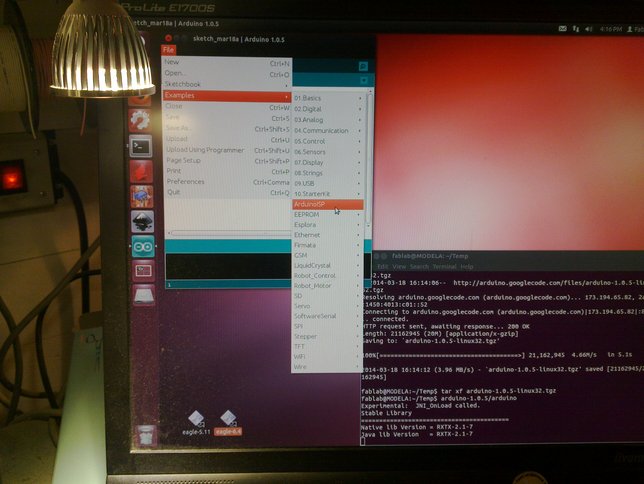
Opening the "ArduinoISP" example.
As you can see in the terminal window (if you have good eyes), I have just downloaded and extracted the current version (1.0.5 at the time this document was written) of the arduino IDE into a temporary working directory.
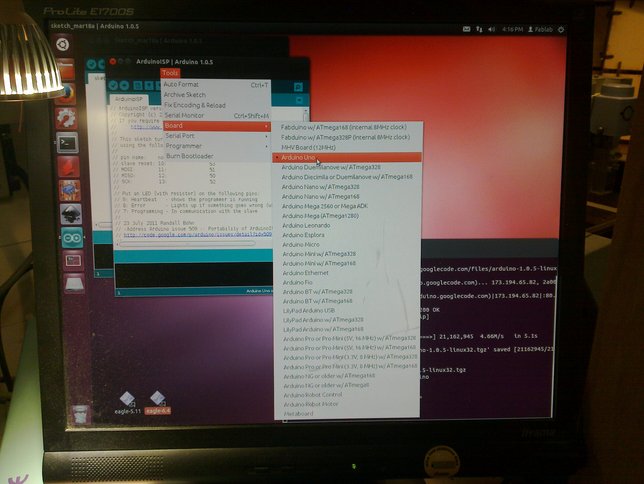
Selecting the board, an Arduino Uno in our case.
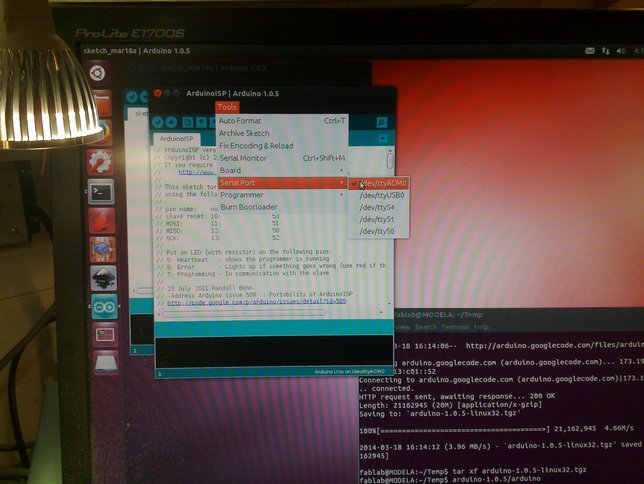
Which is connected to /dev/ttyACM0.
This may be different depending on your setup and the actual Arduino board used.
If so, you'll need to change this value in some of the steps below as well.
In that case, simply replace /dev/ttyACM0 with what you selected here.
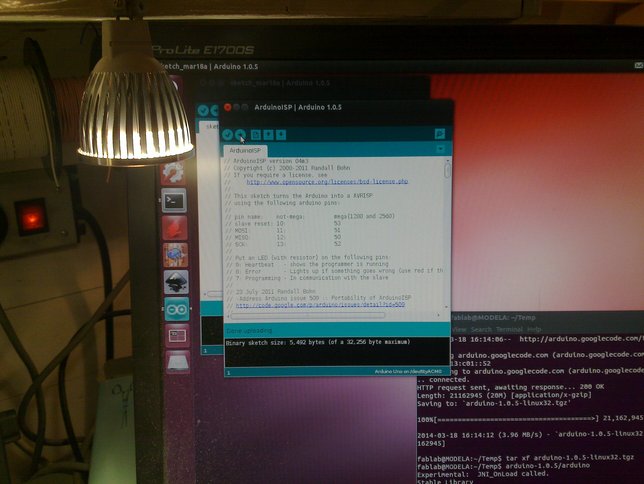
Uploaded the ArduinoISP example with the upload button as usual.
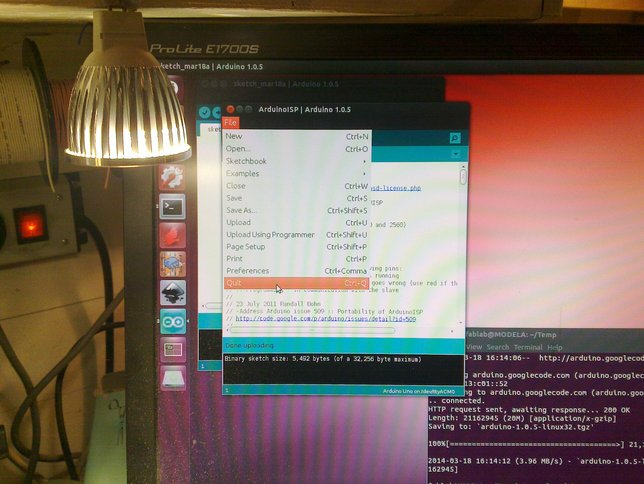
We're done with the Arduino IDE, so it can be closed.
In order to see if everything works according to plan, we'll program the fuses, initially WITHOUT disabling the reset pin, as it is still needed to program the flash further on. You will have to adjust the following command if using a different programmer or if your arduino is connected to another port.
Type the green text end press "Enter".
The text in blue is the response you should be getting if all went well.
$ avrdude -c stk500v1 -P/dev/ttyACM0 -b19200 -p t45 -V -U lfuse:w:0xe1:m -U hfuse:w:0xdd:m -U efuse:w:0xff:m
avrdude: please define PAGEL and BS2 signals in the configuration file for part ATtiny45
avrdude: AVR device initialized and ready to accept instructions
Reading | ################################################## | 100% 0.06s
avrdude: Device signature = 0x1e9206
avrdude: reading input file "0xe1"
avrdude: writing lfuse (1 bytes):
Writing | ################################################## | 100% 0.02s
avrdude: 1 bytes of lfuse written
avrdude: reading input file "0xdd"
avrdude: writing hfuse (1 bytes):
Writing | ################################################## | 100% 0.02s
avrdude: 1 bytes of hfuse written
avrdude: reading input file "0xff"
avrdude: writing efuse (1 bytes):
Writing | ################################################## | 100% 0.02s
avrdude: 1 bytes of efuse written
avrdude: safemode: Fuses OK
avrdude done. Thank you.
$
Some of the leds on both boards should be blinking during this operation.
If you get an error here then check the connections, the cable and your solder joints.
Also make sure that you're specifying the right options (if you have a different situation, like programmer or chip) to avrdude.
Obtaining the firmware
Now that we have a working programmer, we need to get the firmware and make a few minor adjustments.
If you downloaded the vusbtiny-fabtinystar.zip archive instead, then you can just unpack it and after moving into the directory you could simply skip to the next section and proceed with "Flashing the firmware" below if you want.
$ wget http://www.simpleavr.com/avr/vusbtiny/vusbtiny.tgz
--2014-03-18 16:20:31-- http://www.simpleavr.com/avr/vusbtiny/vusbtiny.tgz
Resolving www.simpleavr.com (www.simpleavr.com)... 74.125.136.121, 2a00:1450:4013:c01::79
Connecting to www.simpleavr.com (www.simpleavr.com)|74.125.136.121|:80... connected.
HTTP request sent, awaiting response... 302 Moved Temporarily
Location: http://www.simpleavr.com/avr/vusbtiny/vusbtiny.tgz?attredirects=0 [following]
--2014-03-18 16:20:31-- http://www.simpleavr.com/avr/vusbtiny/vusbtiny.tgz?attredirects=0
Reusing existing connection to www.simpleavr.com:80.
HTTP request sent, awaiting response... 302 Moved Temporarily
Location: http://8ce788a7-a-3518b5c4-s-sites.googlegroups.com/a/simpleavr.com/simpleavr/avr/vusbtiny/vusbtiny.tgz?attachauth=ANoY7crKEJkY_D7XizDeOiqfU49YvkAms2lb_NwPjzVbcIYQ1bBBS5iftTdBydax1yVq7vjvBDRxwmYrP8uVJxZuTli6TVVKhyvMCGr1GkRsv6s5PT-uNoxk9gCJwFwE_wQITZGUVLvK2hBm5Edd-XK0c7FYksq9V1xY_IDykcn82PK9Mc6Tvqzm-ME8MvoPeULl2dxbUCcMdaw0HSTXDYzSRNP0s2EKk7RoFvcB-5tvYQgn62b4yOg%3D&attredirects=0 [following]
--2014-03-18 16:20:31-- http://8ce788a7-a-3518b5c4-s-sites.googlegroups.com/a/simpleavr.com/simpleavr/avr/vusbtiny/vusbtiny.tgz?attachauth=ANoY7crKEJkY_D7XizDeOiqfU49YvkAms2lb_NwPjzVbcIYQ1bBBS5iftTdBydax1yVq7vjvBDRxwmYrP8uVJxZuTli6TVVKhyvMCGr1GkRsv6s5PT-uNoxk9gCJwFwE_wQITZGUVLvK2hBm5Edd-XK0c7FYksq9V1xY_IDykcn82PK9Mc6Tvqzm-ME8MvoPeULl2dxbUCcMdaw0HSTXDYzSRNP0s2EKk7RoFvcB-5tvYQgn62b4yOg%3D&attredirects=0
Resolving 8ce788a7-a-3518b5c4-s-sites.googlegroups.com (8ce788a7-a-3518b5c4-s-sites.googlegroups.com)... 74.125.136.137, 2a00:1450:4013:c01::89
Connecting to 8ce788a7-a-3518b5c4-s-sites.googlegroups.com (8ce788a7-a-3518b5c4-s-sites.googlegroups.com)|74.125.136.137|:80... connected.
HTTP request sent, awaiting response... 302 Moved Temporarily
Location: https://8ce788a7-a-3518b5c4-s-sites.googlegroups.com/a/simpleavr.com/simpleavr/avr/vusbtiny/vusbtiny.tgz?attachauth=ANoY7crKEJkY_D7XizDeOiqfU49YvkAms2lb_NwPjzVbcIYQ1bBBS5iftTdBydax1yVq7vjvBDRxwmYrP8uVJxZuTli6TVVKhyvMCGr1GkRsv6s5PT-uNoxk9gCJwFwE_wQITZGUVLvK2hBm5Edd-XK0c7FYksq9V1xY_IDykcn82PK9Mc6Tvqzm-ME8MvoPeULl2dxbUCcMdaw0HSTXDYzSRNP0s2EKk7RoFvcB-5tvYQgn62b4yOg%3D&attredirects=0 [following]
--2014-03-18 16:20:31-- https://8ce788a7-a-3518b5c4-s-sites.googlegroups.com/a/simpleavr.com/simpleavr/avr/vusbtiny/vusbtiny.tgz?attachauth=ANoY7crKEJkY_D7XizDeOiqfU49YvkAms2lb_NwPjzVbcIYQ1bBBS5iftTdBydax1yVq7vjvBDRxwmYrP8uVJxZuTli6TVVKhyvMCGr1GkRsv6s5PT-uNoxk9gCJwFwE_wQITZGUVLvK2hBm5Edd-XK0c7FYksq9V1xY_IDykcn82PK9Mc6Tvqzm-ME8MvoPeULl2dxbUCcMdaw0HSTXDYzSRNP0s2EKk7RoFvcB-5tvYQgn62b4yOg%3D&attredirects=0
Connecting to 8ce788a7-a-3518b5c4-s-sites.googlegroups.com (8ce788a7-a-3518b5c4-s-sites.googlegroups.com)|74.125.136.137|:443... connected.
HTTP request sent, awaiting response... 200 OK
Length: 151437 (148K) [application/x-compressed-tar]
Saving to: `vusbtiny.tgz'
100%[======================================>] 151,437 --.-K/s in 0.03s
2014-03-18 16:20:31 (5.09 MB/s) - `vusbtiny.tgz' saved [151437/151437]
$
Obtaining the original firmware archive from the simpleavr website.
$ tar xf vusbtiny.tgz
$ cd vusbtiny
$ ls -al
total 52
drwxr-xr-x 3 fablab fablab 4096 Nov 26 2010 .
drwxrwxr-x 4 fablab fablab 4096 Mar 18 16:21 ..
-rw-r--r-- 1 fablab fablab 11872 Nov 26 2010 main.c
-rw-r--r-- 1 fablab fablab 8522 Nov 26 2010 makefile
-rw-r--r-- 1 fablab fablab 12376 Nov 26 2010 usbconfig.h
drwxr-xr-x 2 fablab fablab 4096 Nov 26 2010 usbdrv
$
Unpacking the firmware source code and moving into its directory.
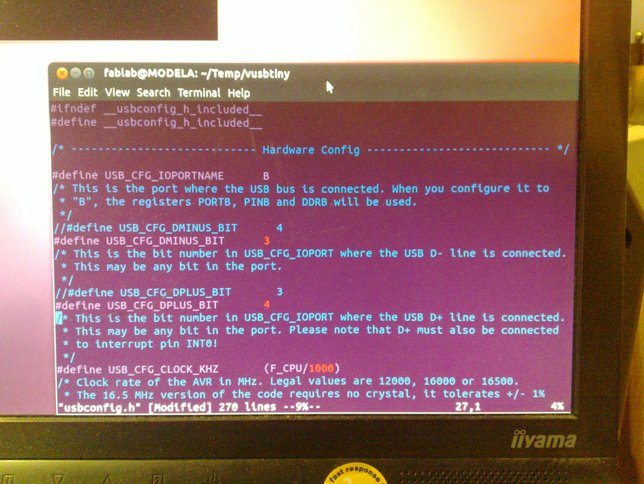
Editing usbconfig.h to swap the pins used for USB communication:
//#define USB_CFG_DMINUS_BIT 4
#define USB_CFG_DMINUS_BIT 3
//#define USB_CFG_DPLUS_BIT 3
#define USB_CFG_DPLUS_BIT 4
The red text should be changed by adding the green text, just like in the screenshot above.
Compiling the adjusted firmware by issuing the "make" command:
$ make
avr-gcc -I. -Iusbdrv -g -mmcu=attiny45 -Os -DF_CPU=16500000 -fpack-struct -fshort-enums -funsigned-bitfields -funsigned-char -Wall -Wstrict-prototypes -Wa,-ahlms=main.lst -c main.c -o main.o
avr-gcc -Wl,-Map,vusbtiny.out.map -mmcu=attiny45 -lm -o vusbtiny.out main.o usbdrv/usbdrv.o usbdrv/oddebug.o usbdrv/usbdrvasm.o
avr-objcopy -j .text \
-j .data \
-O ihex vusbtiny.out vusbtiny.hex
avr-objcopy -j .eeprom \
--change-section-lma .eeprom=0 \
-O ihex vusbtiny.out vusbtiny.ee.hex
avr-objcopy: --change-section-lma .eeprom=0x0000000000000000 never used
$
Unless you're using a pretty ancient build environment (like this one at the fablab) you will probably receive a bunch of errors while building.
If that happens, replace the "usbdrv" directory under vusbtiny with the one from the latest vusb-YYYYMMDD.tar.gz archive and try again.
Flashing the firmware
Now that we have the firmware all ready to go, it can be flashed onto the FabTiny*ISP's program memory.
If you have put an ATTiny85 on your board, I would recommend to put the micronucleus bootloader on it first, and then upload this firmware over USB with the micronucleus upload tool.
See the second example on the using page on how to do that.
This way you'll still be able to reprogram the board for other things as well even after blowing the reset-disable fuse!
First we need to adjust the programmer setting in the makefile:
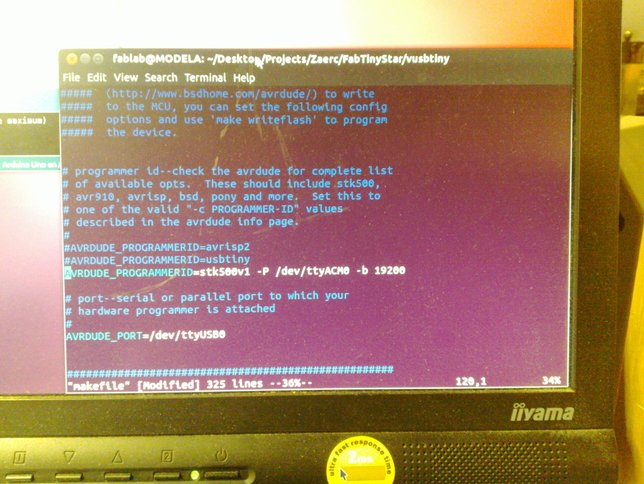
Adjusting the makefile to work with our improvised ISP.
Personally I prefer VIm, but of course you can use your favorite plain-text editor instead.
Simply add the green text below as shown in the picture above.
The red text is what's already there, just add that little '#' in front of it in order to comment it out.
#AVRDUDE_PROGRAMMERID=usbtiny
AVRDUDE_PROGRAMMERID=stk500v1 -P/dev/ttyACM0 -b19200
Note that the "AVRDUDE_PORT" line isn't used at all so it can be safely ignored.
We've already added the port settings to the AVRDUDE_PROGRAMMERID line anyway.
To flash the firmware enter the "make install" command:
$ make install
avrdude -c stk500v1 -P/dev/ttyACM0 -b19200 \
-p t45 -e \
-V -U flash:w:vusbtiny.hex
avrdude: please define PAGEL and BS2 signals in the configuration file for part ATtiny45
avrdude: AVR device initialized and ready to accept instructions
Reading | ################################################## | 100% 0.06s
avrdude: Device signature = 0x1e9206
avrdude: erasing chip
avrdude: please define PAGEL and BS2 signals in the configuration file for part ATtiny45
avrdude: reading input file "vusbtiny.hex"
avrdude: input file vusbtiny.hex auto detected as Intel Hex
avrdude: writing flash (2494 bytes):
Writing | ################################################## | 100% 4.15s
avrdude: 2494 bytes of flash written
avrdude: safemode: Fuses OK
avrdude done. Thank you.
$
Uploading the freshly compiled firmware with the "make install" command.
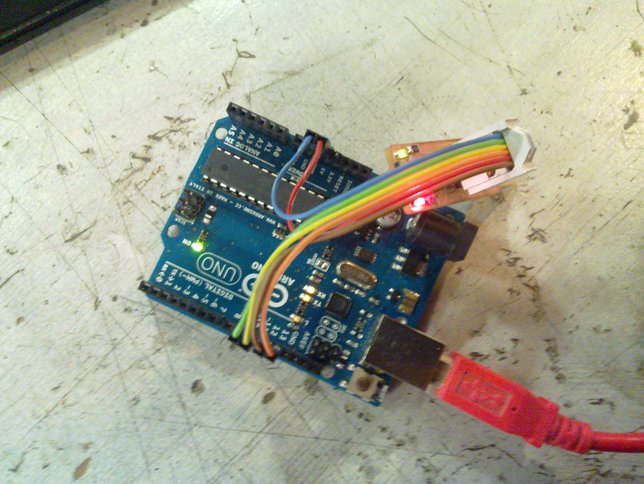
There should be some blinking leds on both boards again, this time long enough for me to be able to take a picture.
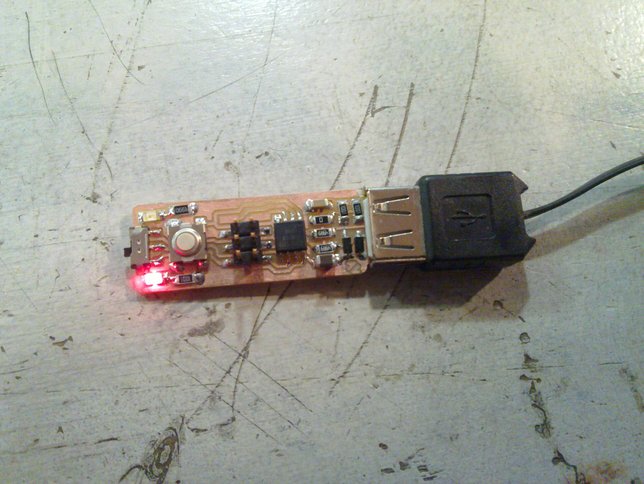
Before moving on, we'd like to make sure everything is in working order. Disconnect the FabTiny*ISP from the programmer (the Arduino Uno) and connect it to one of the computer's USB ports.
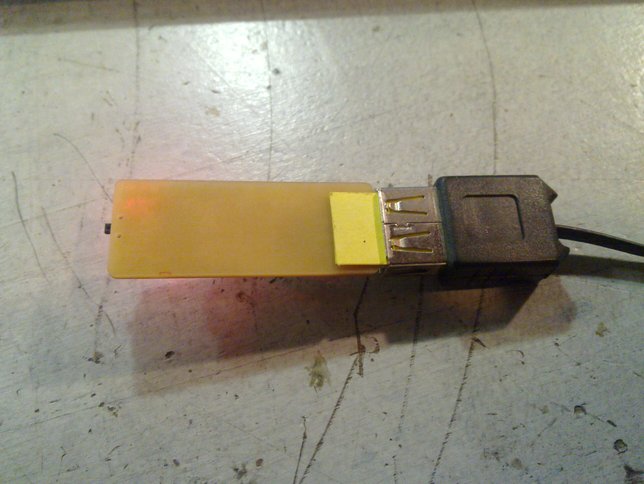
Temporarily using a piece of cardboard to fatten the connector because the regular PCB stock we're using is only 1.6mm thick while the USB connector needs to be 2mm thick.
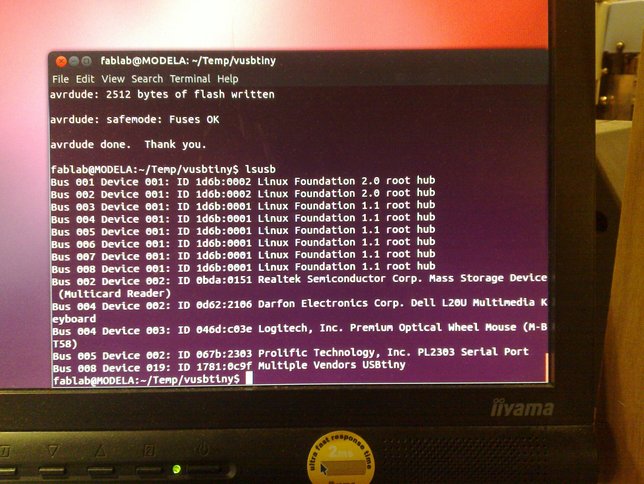
$ lsusb
Bus 001 Device 001: ID 1d6b:0002 Linux Foundation 2.0 root hub
Bus 002 Device 001: ID 1d6b:0002 Linux Foundation 2.0 root hub
Bus 003 Device 001: ID 1d6b:0001 Linux Foundation 1.1 root hub
Bus 003 Device 001: ID 1d6b:0001 Linux Foundation 1.1 root hub
Bus 005 Device 001: ID 1d6b:0001 Linux Foundation 1.1 root hub
Bus 006 Device 001: ID 1d6b:0001 Linux Foundation 1.1 root hub
Bus 007 Device 001: ID 1d6b:0001 Linux Foundation 1.1 root hub
Bus 008 Device 001: ID 1d6b:0001 Linux Foundation 1.1 root hub
...
Bus 008 Device 019: ID 1781:0c9f Multiple Vendors USBtiny
$
The computer has recognized the FabTinyStar and identified it as a "Multiple Vendors USBtiny".
Everything seems to be in working order, so now we can unplug it again and hook it back up to our programmer (the Arduino) for the final step.
[TODO: Add other ways to check]
Blowing the reset-disable fuse.
Note that this step canNOT easily be undone, as a HVSP (High Voltage Serial Programmer) will be required to reset the fuses again (probably the capacitors will have to be desoldered as well).
Because afterwards you can no longer program the FabTiny*ISP itself using ISP, so make sure everything is working properly before taking this final step!
This is basicly the equivalent of removing the reset solder jumper on the classic ATTiny44 FabISPs, which (in contrast) could easily be undone.
$ avrdude -c tk500v1 -P/dev/ttyACM0 -b19200 -p t45 -V -U lfuse:w:0xe1:m -U hfuse:w:0x5d:m -U efuse:w:0xff:m
avrdude: please define PAGEL and BS2 signals in the configuration file for part ATtiny45
avrdude: AVR device initialized and ready to accept instructions
Reading | ################################################## | 100% 0.06s
avrdude: Device signature = 0x1e9206
avrdude: reading input file "0xe1"
avrdude: writing lfuse (1 bytes):
Writing | ################################################## | 100% 0.02s
avrdude: 1 bytes of lfuse written
avrdude: reading input file "0x5d"
avrdude: writing hfuse (1 bytes):
Writing | ################################################## | 100% 0.02s
avrdude: 1 bytes of hfuse written
avrdude: reading input file "0xff"
avrdude: writing efuse (1 bytes):
Writing | ################################################## | 100% 0.02s
avrdude: 1 bytes of efuse written
avrdude: safemode: Fuses OK
avrdude done. Thank you.
$
The final step needed to get a working ISP is to disable the FabTiny*ISP's own reset pin, as we'll be using it to actually reset the target instead while programming.
So only when everything seems to be in proper working order, we should take the final step to disable the reset pin.
Again: there is no easy way to go back from this step!
Congratulations!
You are now in the possession of your very own In-System-Programmer.
And so there should be no reason to bore an Arduino with this mundane task ever again.
As a finishing touch I would recommend sticking a piece of plastic (packaging waste is often ideal) to the bottom with doublesided tape (and cut it to size with a hobby knife) to make the USB connector 2mm thick for a better fit.
Covering the USB contacts (or fingers) with a little solder can protect them from wearing out.
And some hot-glue under the ISP connector works wonders to keep it attached to the board after numerous uses.
I also like to put some hot-glue over the switch because it's fragile and the leds because it disperses the light nicely, you can see the hot-glue on the full FabTinyStar in the second example of the "using" chapter.
Last modified: 2015.03.01


