About me
Final project -
development
Final project
Weekly projects
Wk 7 Embedded
Programming (Mar 11)
Assignment:
• read a microcontroller
data sheet (ATtiny 44)
• program your board to do something, with as many
different programming languages and
programming environments as possible
I
decided that I would use the Arduino Integrated
Development Environment (IDE). Wikipedia: "An IDE
is a software application that provides
comprehensive facilities to computer programmers
for software development. An IDE normally consists
of a source code editor, build automation tools
and a debugger. Most modern IDEs have intelligent
code completion."
Resources
and useful guides
Tutorials
link from 2015 archive.
Downloaded
and installed Arduino
software and Java
for OSX
Downloaded ATtiny
support (driver, also known as 'core') from the
Github repository.
Downloaded and installed the FTDI
driver which enables the USB device to appear as
an additional COM port available to the computer.
Followed good tutorial on installation and programming an
ATtiny microcontroller with Arduino v1.6, at
highlowtech.org
Download, installing,
connect, power
I
followed the tutorials to download and install the
Arduino software, ATtiny support (driver) and the FTDI
driver. I took
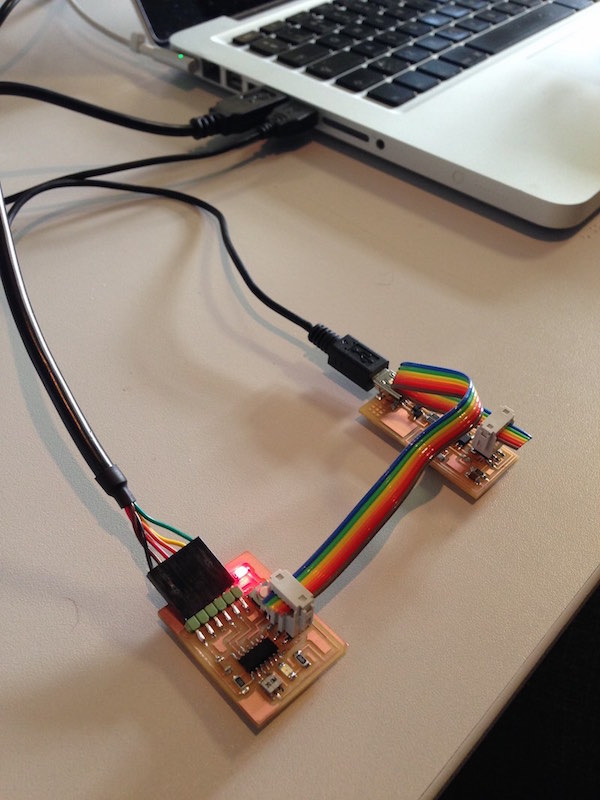
power from my laptop to the LED and
BUTTON (aka 'Hello Echo') board
(made in previous week) and connected
the FAB ISP to act as a
programmer.

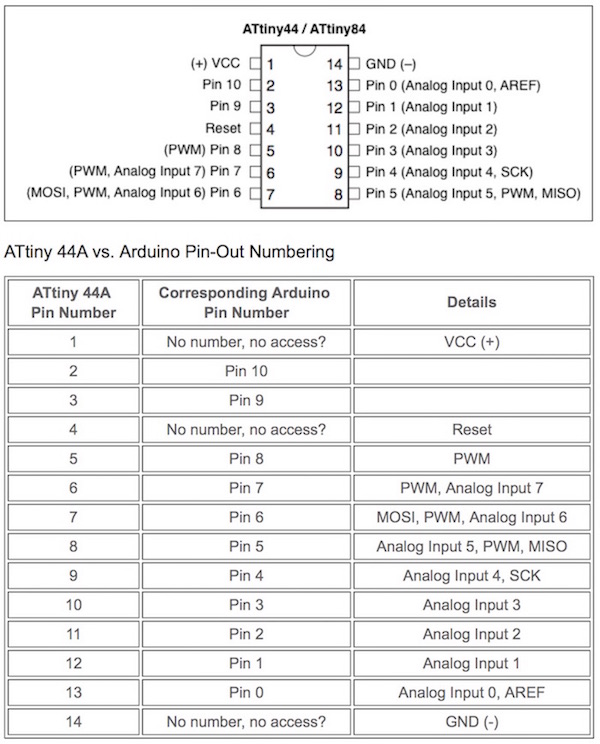
Important note
on
theATtiny
44A
Microcontroller
Pin-Outs
Note that
the pinouts on
the
microcontroller
are not the
same numbers
in the Arduino
code.
Check the
corressponding
numbers in the
diagram and
chart below:

Launching the IDE
When
I first went to launch
the IDE, the ATtiny would not show
up in the Arduino Tools/Board
list. The file
structure, following an automatic
unzip, kept a folder called
"attiny-ide-1.6.x" in the
pathway, which prohibited the
board showing up as a choice.
So, on the Mac, at
least this needs to be removed so that
you end up with
the following folder structure : Documents
> Arduino > hardware >
attiny > avr

Now, by launching the Arduino
IDE software again, and
through 'tools'
in the top menu, I was able
to select the specifics
for my set up:
board, clock, processor,
port and programmer.
Burn the
Bootloader
Run the "Burn Bootloader"
command from the Tools menu. This
configures the fuse bits of the
microcontroller. This step
is only required once for each
microcontroller. (This
doesn't actually burn a
bootloader onto the board;
you'll still need to upload new
programs using an external
programmer).
Exploring the
examples
I spent some
time trying to follow,
understand and make
very simple but successful
modifications to the
existing examples in the
Arduino IDE, such as
'Blink' and 'Fade'. This was my first
entry into coding and
slowly, I began
to see how programmers
build and develop programmes.
I used the very useful
feature in Arduino whereby, by
selecting specific syntax
(double click on the
word itself - if in colour),
then
selecting 'ctrl
click',
the
IDE opens up a
window on the
arduino website
describing the
meaning or
function
of that
syntax.
This
helped me
follow the logic
of Structure,
Variables and
Functions (see image
below). In
class we also
received very
key tutorials
from
our mentors,
thank you!

Assignment:
programming
my board to do
something
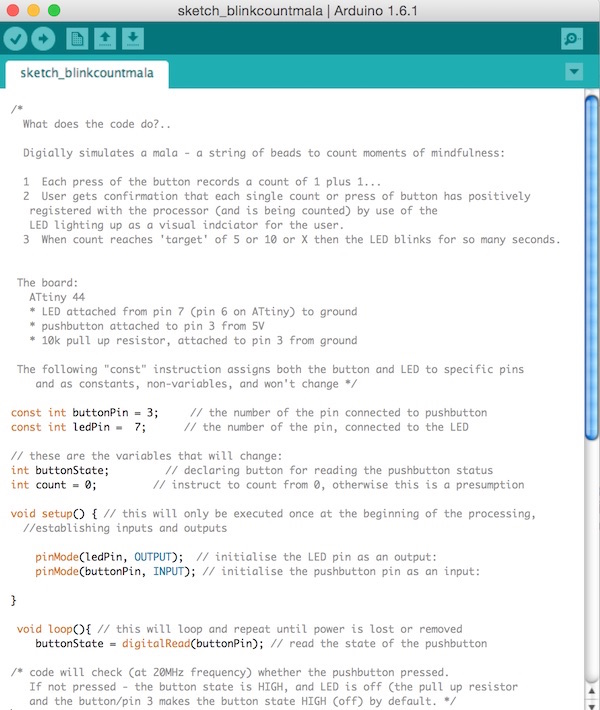
As
my final
project
involved digitally
counting and
recording
'moments of
mindfulness'
(a digital counter of
sorts),
I
decided that I
would try to
write a very
simple code to
simulate this
simple series
of events. For
my own
understanding,
(and with the
concern that
this knowledge
could be too
easily
forgotten,
without enough
practice),
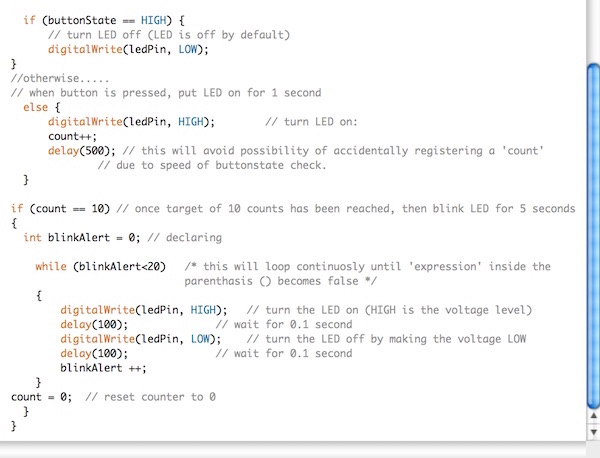
I tried to write
detailed
commentary, around
the code.


Download code
here

