Scott Zitek - Fab Academy 2014
Molding and casting
Week 9 Assignment
The assignment for this week is design a 3D mold, machine it, and cast parts from it. I decided to try to design a two part enclosed mold.
Designing the mold
I wanted to design a two part enclosed mold for a part that could not be made using a simple one sided "open-on-top" mold. I was hoping to design a mold that was self-contained and self-aligning.
- I started out by using SolidWorks to design a simple bracket for holding a cable or pipe in place.
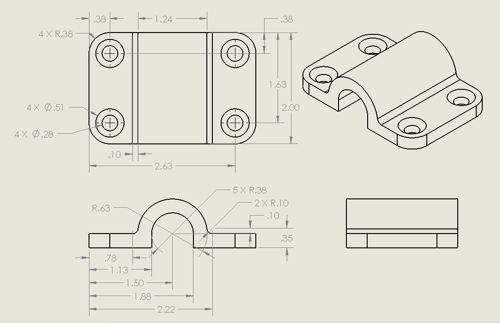
This is the part that I decided to make a mold for.

The part rendered in SolidWorks.
-
I watched some online tutorials on how to use the mold design tools that are built into Solidworks. They seemed to be intended for creating platens with draft angles for plastic injection molding machines. I decided just to design the molds "manually" using SolidWorks. I figured all I would need to do is subtract the part from a block to come up with the mold design. Turns out that I needed to make a mold for a mold. This quickly can become very confusing. I needed to design a machinable wax mold that would create a flexible urethane rubber mold that I could use to cast my desired part.
- With the desired part in mind, SolidWorks was used to design the machinable wax molds. This made it possible to visualize the wax molds in 3D. Solidworks was then able to use the void of the wax mold to derive what the urethane mold would look like. In the same way, SolidWorks allowed the two urethane molds to be assembled to see if the void between them would be the desired part.
/li>

SolidWorks made it possible to visualize and verify the mold design. This is an exploded view of the two flexible rubber molds and the part from different angles.

This is what the wax molds looked like in SolidWorks.
- For me, this design process involved a lot of trial and error. It was easy to get confused and I am sure that I did not do it the easiest way possible. I was glad that I chose a relatively simple part design. However, I also realized that my part design did create some challenges for making a mold. For example, my part design includes four counter sunk holes.
I found a lot of very useful information in the "Guerrilla guide to CNC machining, mold making, and resin casting" which can be found at http://lcamtuf.coredump.cx/gcnc/
Simulation using Vectric Aspire
- Once I felt the design for the machinable wax molds were correct, I exported them from SolidWorks in STL format.
- I imported the STL files into Vectric Aspire. Aspire was able to develop tool paths for roughing and finishing the STL mesh but it was very limited. I was not able to edit the mesh and I did not have a lot of options for CAM tools like I do for vector graphics.
- I used the cutting simulation built into Aspire to test my design. This helped me identify some issues related to cutting with round shaped tools. To minimize these effects you can use small diameter tools. However, small tools increase cutting time and are usually not long enough to cut at the depth of cuts that I need for my design.

Simulating the design in Vectric Aspire identified a couple of issues due to the limitations of cutting with round tools. The corner circled in the right picture turn out not to be an issue since it becomes an outside corner in the rubber mold.
- I went back to SolidWorks and made some changes to the design to hopefully eliminate these issues.
- From my experience, Aspire is pretty good at simulating the results of a cutting program. Based upon this, I was pretty disappointed in the simulated results of the 3D cutting mode for my mold design. The simulation predicted that is would take hours to cut and the finished pass made the part look worse than the roughing pass did. I believe to some extent this is due to the nature of my part design. If the entire design was a flowing constantly changing curvy 3D abstract shape, the Aspire 3D mode would be a good option. However, my part design is mostly flat surfaces with a few curved surfaces.

I did not like what Aspire thought the finished wax mold would look like.
-
I loaded the STL files into Fab Modules and it took a similar approach to cutting the 3D design.
Finding the necessary materials and tools
Now that I had narrowed down the design, I went to find the machinable wax and make sure that I had the tooling that I needed.
- We have lots of machinable wax. For some reason, none of the pieces were more than 1.5 inches thick. My design called for 2 inch thick machinable wax. I looked into gluing to thin pieces of wax together to make one thick piece but it sounded like it required a special adhesive and at least 24 hours to adhere. So I found a huge chuck of machinable wax and used a hand saw to cut off roughly the size pieces that I needed.

I had use a hand saw to cut a junk off this huge log of machinable wax and then had to cut the resulting piece in half.
- I then used double sided tape and hot glue to firmly attach them to a sheet of plywood. With a 1/2 flat endmill, I faced the top of the wax pieces until they were 2 inches thick with a smooth top.

Two pieces of machinable wax ready to cut on the Shopbot.
-
The 1/2 inch flat endmill worked so well for facing the top of the wax blocks off, that I decided to use it to cut the majority of my part design. So I used Aspire to do all the pocketing with basic vector graphics and used 3d cutting only for the curved cavity in the middle. I only ran into two problems. First was that the 1/2 inch flat endmill was not center cutting. I might have been able to get away with plunge cutting since it was only machinable wax but I decided to use ramp cuts. The other problem was that my outside profile was exactly 1/2 inch wide. I had to change the width of the slot to .54 inches before Aspire would cut it properly. Note: I don't think that the Fab Modules offer an option to ramp down for cuts instead of plunging straight down.

1/2 inch flat endmill with 2 inch cutting depth capability and 1/8 ball-nose mill. Notice the 1/2 inch endmill does not have cutters in the center.
I experimented with using Rotozip toolbits for machining the wax. These are very long inexpensive 1/8 inch diameter bits designed for a handheld router. They come in several varieties for a number of different applications like cutting drywall, ceramic tile, plastic, etc. The length of the toolbit and it's cutting depth are very useful. I found that the Rotozip Sabrecut ZBSC5 toolbits had a fairly flat end like a flat endmill. It cut the wax pretty good at first but I could not find a good feed and speed settings. Even with fairly shallow depths of cuts, you could see the tool bending. The tool didn't break but it was very flexible. After a little test cutting the Rotozip tool start melting the wax instead of creating clean loose chips. I experimented with different feeds and speeds but the wax melting continued to get worse.
Cutting the mold out of machinable wax
- Cutting the machinable wax on the Shopbot was pretty straight forward. I had to experiment a little with speeds and feeds, depth of cut, and step over, but machinable wax was very forgiving and fun to work with. You can really remove a lot of material in one pass if you want to. I used very conservative settings. For example:
Tool = 0.5" straight 2-flute flat endmill (not center cutting)
Pass depth = 0.1
Step over = 0.2 (40%)
Spindle speed = 8,000 RPM
Feedrate = 50 IPM
Plunge = 18 IPM
-
I used a 1/2 endmill to remove the majority of the material. This created a surprising amount of slippery blue wax shavings.

Shopbot using a 1/2 inch flat endmill to cut the wax to a depth of 1.5 inches.
-
I used a 1/4 inch flat end mill to rough out the curved cavity in the middle of the part.

Wax mold after rough cutting using a 1/4 inch flat endmill.
- Then I used a 1/8 inch ball-nose mill to finish cut the curved cavity in the middle of the part.

Wax mold after finishing cut with 1/8 inch ball-nose mill.
-
I had a few issues with the finished pass. I suspect some of the problem may be caused by loose pinions on the Shopbot x-axis. Our Shopbot seems fine during slower cuts but when reversing directions abruptly at high feed rates, I thought I saw the entire (y & z axis) carriage lift up.

A couple of aspects of the mold were not machined as designed.
Creating the urethane rubber mold
I filled my machinable wax mold with Smooth-on PMC-121/30 dry Urethane rubber to make the flexible mold.
-
I felt that Smooth-on PMC-121 urethane rubber was easy to use. It has a pot life of 30 minutes and cures overnight. I just followed the safety precautions and the directions that come with the product.
-
I put down old newspaper and a sheet of aluminum foil to make clean up easier. I also keep a roll of paper towels handy. Wear gloves, safety glasses, and only use in a well-ventilated area.

Everything ready to mix and pour the PMC 121 urethane rubber.
- Although you can calculate the amount of PMC 121/30 you will need to fill a mold, I found it easier just to fill my wax mold with water and then transfer the water to a cup. I determined that I needed about 12 ounces of liquid to fill my mold. So measure 7 ounces of part A and 7 ounces of part B into separate plastic cups.
- Remember to premix the material in the blue bottle (part B) before using it.
- Clean the tops of the containers with a clean paper towel before tightly sealing the lids.
- Close the tops of the bottles as soon as possible so the material does not absorb moisture from the air.
-
I then poured the thick clear material (part A) into the cup with the thin brown material (part B) trying not to create bubbles.

The PMC-121/30 material in the yellow bottle (part A) is very thick.
-
The thick clear material sank to the bottom of the cup.

This is not a black and tan beer. It is the PMC 121 after the clear part sank to the bottom. You have to mix it really well.
-
Being careful not to create bubbles, I mixed the two parts together very thoroughly and then pour the combination into a clean cup. My cups had lots of nooks and crannies and this helps make sure it is completely mixed. I mixed some more. I then tapped the cup on the table to try to encourage any bubbles to rise to the surface and pop. I used a wooden tongue depressor. The directions recommend using a non-porous mixing tool (e.g. plastic) to avoid inducing moisture into the mixture.
-
I then carefully poured the urethane mixture into my wax mold.

Carefully pouring the urethane rubber into the wax mold.
-
After waiting overnight, I removed the rubber mold from the wax mold. This was much harder than I expected. There wasn't anything to grab onto the rubber was "suction-cupped" to the wax mold.

The finished urethane rubber mold. Note that although the rubber contain many tiny bubbles, the surface was very smooth and reproduced fine details like the tool cutting marks.
- I put the rubber mold in our little convection oven at 150 degrees F for a couple of hours. Remeber, only use an oven that is reserved for this purpose because the oven can no longer be used to cook food.
Casting a part using Hydro-stone
Hydro-stone is a special type of Gypsum cement.
-
Hydro-stone is a special type of Gypsum cement. It is fairly easy to use. It has a pot life of 30 minutes and cures overnight. Be sure to follow the safety precautions and the directions that come with the product.

Everything ready to weigh, mix, and pour the Hydro-stone.
-
One of the things that makes Hydro-stone a little more challenging to use it that you must determine and weigh to get the proper mixture ratio. You need 100 parts Hydro-stone powder for 32 parts of room temperature water. For this example, I used 12.5 ounces of powder for 4.0 ounces of water. It does not look like you will have nearly enough water.

You use a lot less water than I would have expected.
-
I slowly sprinkled the hydro-stone powder into the water. As you do, it should sink into the water and not create any clouds of dust. Once all the powder is wet, let it sit for 1-2 minutes to soak.

Slowly add the Hydro-stone powder to the water.
-
Mix thoroughly being careful not to create bubbles. The product directions recommend an electric mixer, but I found that hand-mixing worked fine for the small quantities that I was using.

Mixed as directed, Hydro-stone is very thick.
-
When done mixing, tap the cup on the table to bring the bubbles to the top surface where they should pop.
-
To be on the safe side, I put a light misting of Stoner mold release spray on the mold. I carefully poured the Hydro-stone mixture into the urethane mold.

Once in the mold, you tap it to level the Hydro-stone out and to make the bubbles rise to the surface and pop. Notice how little Hydro-stone remained unused in the cup.

After waiting overnight, this is what the Hydro-stone part looked like when I removed it from the urethane rubber mold. It Hydro-stone part has a very good surface finish with only a couple of really small bubbles. The corners were amazingly sharp and the part appears very strong.
Status update:
My assignment was selected for review in class. It was pointed out that since we are usually working with small quantities, it is not necessary to follow all the directions exactly. There are "short-cuts" to make the process easier and faster. For example, reducing curing times for urethane rubber, silicone rubber, Hydrostone, etc.:
- Using the toaster oven in the fab lab at low temperature can greatly reduce wait times before demolding is possible. According to the directions that come with PMC 121 polyurethane rubber:
- Cure time before demolding is 16 hours. However, cure time can be reduced with mild heat.
- Post curing - After rubber has cured at room temperature, heating the rubber to 150 degrees F (65C) for 4 to 8 hours will increase physical properties and performance.
-
Instead of waiting 16 hours or overnight for the urethane rubber to cure enough so you can unmold it, after pouring put the urethane rubber and mold into the toaster oven at 150 degrees F for 1 hour. This temperature is low enough that wax molds will not melt. However, foam and plastic cups and containers probably will melt.
Mixing and measuring of Hydrostone:
- If you read the directions for a product like Hydrostone it describes exact ratios of water to Hydrostone powder and defines specific mixing techniques and speeds.
- You will find that with small quantities, Hydrostone is very easy to work with.
- It is not necessary to precisely weigh the water and Hydrostone powder. Just start with the estimated amount of water you want and slowly add Hydrostone powder until you get a pancake batter like consistency.
- Unlike some molding materials, you do not have to be super careful when mixing Hydrostone. For small quantities you do not need an electric mixer. You can mix it by hand using something like a wooden tongue depressor or popsicle stick. It is fairly easy to remove the air bubbles by tapping the mold on the table.
Project files
Back to index