

The discussion today focused on 3D scanning and 3Dprinting techniques and methods.
You can download all of the files for
this week's projects (including the milkscanner app) here.
UPDATE!!! I'm showing the result here to make it easy to see what I did. The grading for FarAcademy changed and I had to go back to meet the requirements of the homework. At first I scanned an object, and printed another object, but the new requirement is to print the object that you scanned. So I went back and printed the robot I scanned. Scroll to the bottom of this page to see the new stuff. You can download all of my files for this week here.
From the beginning of this week I decided I wanted to build an app for 3D scanning. I was intrigued by the concept of using GIF images as a data structure for volumetric data. What a simple and ubiquitous format! Immediately I wanted to build an app that would further simplify the milk scanning technique.(Putting an object in a vessel and taking snapshots as the vessel is slowly filled with milk.) As a backup, I decided to use the conventional 3D laser scanner in the lab as well.
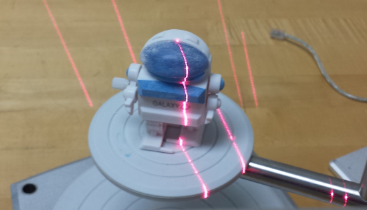
As you can see above, the laser scanner in the lab is pretty neat. To knock the shine off my little robot guy's face mask (the object I was scanning) I powdered it with make-up. ...Kinda strange sounding at first but it works very well and doesn't permanently affect the object. Here's a picture of the scan:
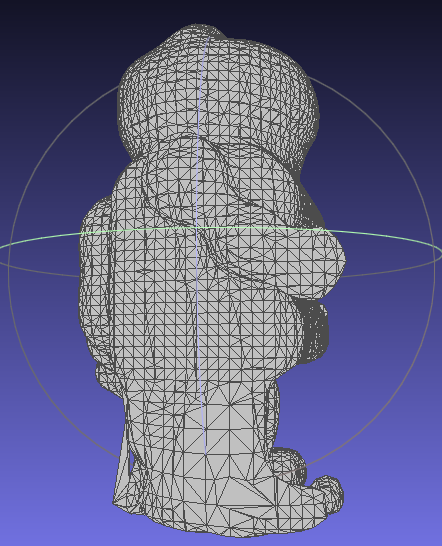
While messing about in MeshLab with the pointcloud data, I had lots
of trouble making a good mesh. While I followed some good
instructions online, I simply didn't have enough datapoints in certain
areas. The result was that the mesh grew like tumors in the areas
where I was missing data. This was a result of the sharp angles and
overhangs on the model I was scanning. While this technically worked,
I didn't like the result very much and felt it was too much work for
the end result.
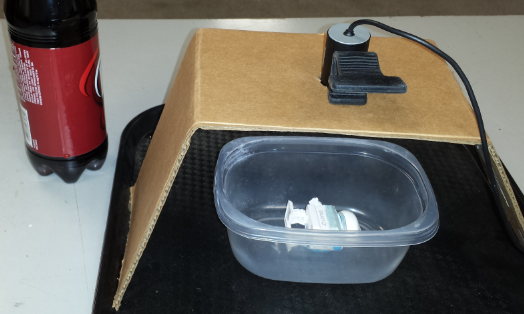
After hours of MeshLab fiddling, I decided to work on the milk scanning idea. I downloaded Processing and a few libraries. It only took me an hour or so to get used to the libraries and figure out what I needed to do. I ended up with a simple program. To Test it, I used a webcam. I put white reflective tape over the robot's darker parts to make a nice silhouette. Here's my setup:
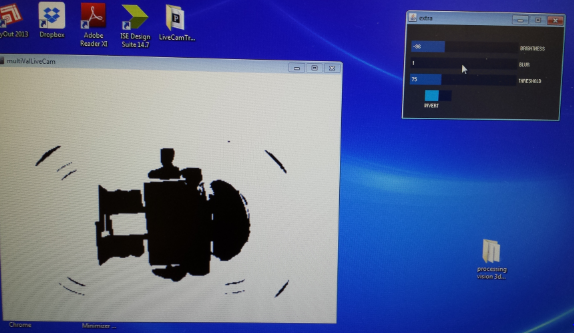
I used Dr. Pepper as the darkest liquid I could find. I don't recommend using soda. It is sticky, not very dark and the bubbles cause all kinds of problems. Sometimes the bubbles were visible and I had to pop them before taking a picture, and the first time I did it I found that my robot was very buoyant. I shook up the soda and released the bubbles and affixed the robot to the bottom of the container with clay for my second scans. Below is more or less clean shot from the Processing program I wrote. You can download the Processing.org program here.

After taking my milk scans, I cleaned them up in GIMP. I exported the results as a non-looping GIF, which is the only thing the fab modules recognized. The results, however, were not good. As a non-looping GIF, only one layer exported and resulted in no usable STL or PNG heightmap files.
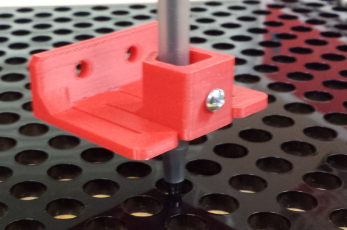
I did, however, print something. I have a ShapeOKO V1 CNC machine and have been wanting a nice solution to mounting a Pen for plotting and tests. I was just about to design something when I thought to use the google machine for inspiration. There are several good designs out there. Instead of reinventing the wheel, I chose one of these proven designs because of its ingenuity. This particular design mounts the pen in a plastic spring mechanism which prevents the Z axis from damaging the pen. I printed a couple and decided at the very least to test them before making my own modifications.
I printed on a Makerbot Replciator 2X, which is a very easy to use machine. I really like the cross-platform software and the fact that it even shows you exactly what the final print will look like, layer by layer. I chose this machine over the 3-headed 3D touch that our lab also has. On my first print, the bed must not have been very clean because the rightmost pen holder became spaghetti before the first layer could print. I had to start over (I not a 0.2mm thick neat bookmark form the first layer of the left-most one though) During the second print, one of the edges on the right most the pen holder curled upward a bit. It seems that the further tot he right you get on our machine, the worse it prints. That's good to note for the future.
Here's the final results of that print:

I still have hopes of printing the robot from my milk scan, but until I figure out the requirements of the fab modules, I will have to put that on the back burner.
UPDATE: I printed the model of the robot on the Makerbot2X that I had scanned using the laser scanner. Here are the results. Click the image to see a gallery you can scroll through.


I got a bit zealous removing the support structure and mangled
part of the left foot, though the mesh from my scan had a messed up
left leg. I did edit the mesh to remove the wind-up knob, but adding
data to the model proved to be MUCH more complicated than removing
points. I had quite a few problems with that issue.
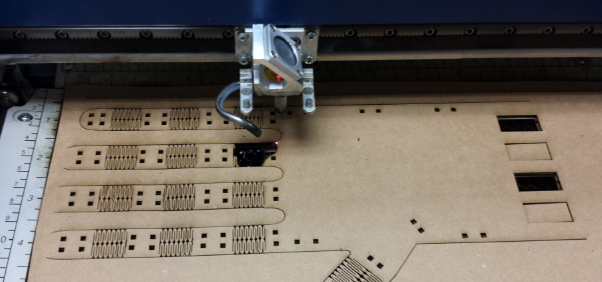
I laser cut a prototype of my final project, the bionic hand. I had a bit of a mishap... My living hinges were too close together and before I knew it, they were on fire! I was able to put it out with my fingers and it never flamed out, just had embers that crept across the skin of the cardboard I was using. I did, however, lose a finger on the hand. Here's a shot of what that looked like.
This
test confirmed a few things for me,