Casting and Molding
Lesson 7
This week's assignment is to design a 3D mold, machine it, and cast parts from it.
This week's assignment is to design a 3D mold, machine it, and cast parts from it.
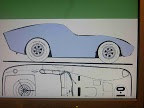
When I started off, I wanted to design a ball valve for this assignment, but I soon found out it's more complex than I thought. I decided to make a toy car and looked on the internet for a nice model to mold. I found one of the web of an AC Cobra Daytona and imported it into inkscape.
 |
linear_extrude(height = 300,file = "daytona1.dxf", center = true , convexity=10);
 |
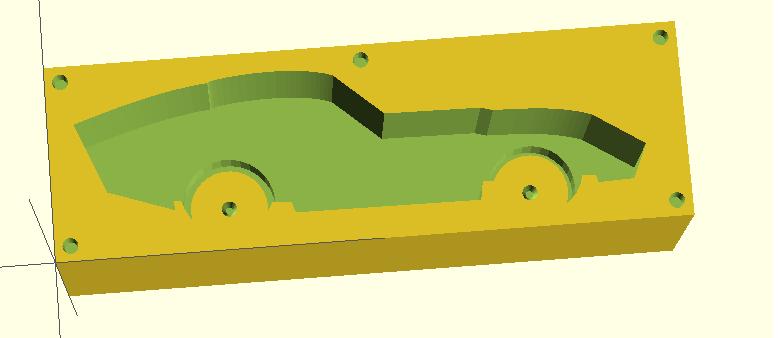
I made the basic shape of the car with the dxf file and added wheels and two tilted boxes to keep the wheels in place. I substracted the half of the car with a cube and from there i took the difference of the car shape with another cube. After this procedure, I ended up with the negative half of the car in a box. Then i added some supports where the two mold will be fixed together. You will find the code and an image of the openscad model below.
 |
module car(){
union(){
linear_extrude(height = 300,file = "daytona1.dxf",  center = true , convexity=10);

difference(){
translate([220,80,-160]) cylinder(h=320,r=60);
translate([220,80,-160]) cylinder(h=15,r=50);
translate([220,80,145]) cylinder(h=15,r=50);
}

difference(){
translate([610,72,-160]) cylinder(h=320,r=56);
translate([610,72,-160]) cylinder(h=14,r=49.4 );
translate([610,72,146]) cylinder(h=14,r=49.4 );
}


translate([220,80,-160]) cylinder(h=15,r1=5, r2=10);
translate([220,80,145]) cylinder(h=15,r1=10, r2=5);
translate([610,72,-160]) cylinder(h=14,r1=5, r2=10);
translate([610,72,146]) cylinder(h=14,r1=10, r2=5 );


rotate([0,0,-5]) translate([120,80,-120]) cube([200,100,240]);
rotate([0,0,-1]) translate([510,72,-120]) cube([175,75,240]);


}
}


/// top of car
difference(){
translate([0,0,-250]) cube([800,250,250]);


translate([400,230,-20]) cylinder(h=20,r1=8,r2=10);
translate([20,20,-20]) cylinder(h=20,r1=8,r2=10);
translate([780,20,-20]) cylinder(h=20,r1=8,r2=10);
translate([20,230,-20]) cylinder(h=20,r1=8,r2=10);
translate([780,230,-20]) cylinder(h=20,r1=8,r2=10);
car();
}
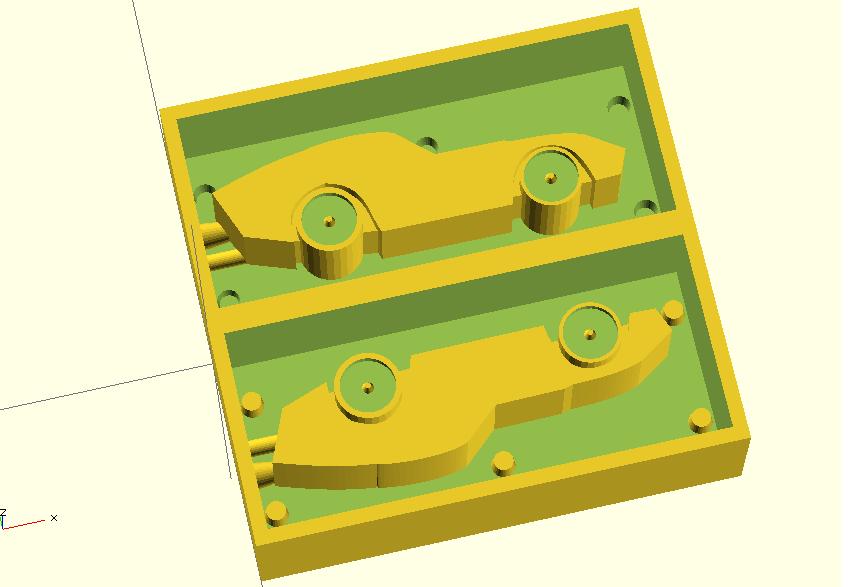
The next step was to take another difference from this model and a slightly bigger cube to end up with the mold of the mold. Then i had to mirror the resulting image to get the other side of the mold and change the pins into holes on this second mold. On the back of the car i added an air and pouring hole on both parts of the mold.
 |
Openscad code
module car(){
union(){
linear_extrude(height = 300,file = "daytona1.dxf",  center = true , convexity=10); // car shape


difference(){
color("red") translate([220,80,-160]) cylinder(h=320,r=58); //back wheel
translate([220,80,-160]) cylinder(h=15,r=48); // back wheel inside
translate([220,80,145]) cylinder(h=15,r=48);
}

difference(){
color("red") translate([610,72,-160]) cylinder(h=320,r=54); // front wheel
translate([610,72,-160]) cylinder(h=14,r=47.4 ); // front wheel
translate([610,72,146]) cylinder(h=14,r=47.4 );
}


translate([220,80,-160]) cylinder(h=15,r1=5, r2=10);
translate([220,80,145]) cylinder(h=15,r1=10, r2=5);
translate([610,72,-160]) cylinder(h=14,r1=5, r2=10);
translate([610,72,146]) cylinder(h=14,r1=10, r2=5 );


rotate([0,0,-5]) translate([120,80,-120]) cube([200,100,240]);
rotate([0,0,-1]) translate([510,72,-120]) cube([175,75,240]);

///translate([15,15,-15]) cylinder(h=30,r=10);


}
}


rotate([180,0,0]){
//mirror([ 0, 1, 0 ]) {}
translate([0,6,0]){
scale(0.125,0.125,0.125){
difference(){

translate([0,-50,-230]) cube([850,400,240]);
translate([25,25,-25]){
			difference(){
translate([0,-50,-250]) cube([800,350,250]);

translate([25,25,-30]) cylinder(h=60,r1=17,r2=25);
translate([775,25,-30]) cylinder(h=60,r1=17,r2=25);
translate([25,225,-30]) cylinder(h=60,r1=17,r2=25);
translate([775,225,-30]) cylinder(h=60,r1=17,r2=25);
translate([425,225,-30]) cylinder(h=60,r1=17,r2=25);
car();
translate([0,150,0]) rotate([0,90,0]) cylinder(h=70,r1=25, r2=15); // fluidhole
translate([0,100,0]) rotate([0,90,0]) cylinder(h=90,r=15);// airhole
				}
				}
}
}
}
///////////////////////////////////////

mirror([ 0, 1, 0 ]) {
translate([0,6,0]){
scale(0.125,0.125,0.125){
difference(){

translate([0,-50,-230]) cube([850,400,240]);
translate([25,25,-25]){
difference(){
			difference(){
translate([0,-50,-250]) cube([800,350,250]);


car();
translate([0,150,0]) rotate([0,90,0]) cylinder (h=90,r1=25, r2=15); // fluidhole
translate([0,100,0]) rotate([0,90,0]) cylinder(h=70,r1=15, r2=15);// airhole
				}//difference
				}// translate

color ("blue") translate([25,25,-30]) cylinder(h=50,r1=25,r2=17);
color ("blue")translate([775,25,-30]) cylinder(h=60,r1=25,r2=17);
color ("blue")translate([25,225,-30]) cylinder(h=60,r1=25,r2=17);
color ("blue")translate([775,225,-30]) cylinder(h=60,r1=25,r2=17);
color ("blue")translate([425,225,-30]) cylinder(h=60,r1=25,r2=17);

}

} // difference
} // scale
} // translate
} // mirror
} // flip and rotate entire model
The next step was to put download the stl generated from openscad to the shopbot. The material we used for cutting was machinable wax and we used a 3.125 inch mill to cut out the rough and fine parts of the model.
 |
 |
After 3 hours of milling the model was finished. The model took longer than i expected. The relatively high walls of the model took a long time to mill and as i needed two days to mill, there is a clear line where i restarted the machine on the casted model. I copied the x,y settings and restarting line, but still this gave a little deviation on the model.
 |
After finishing the mold above, i proceded to the next step. I needed to fill this model with OOMOO 25 to get the mold to cast the car. I filled the mold with water to determine how much OOMOO i would need. This appeared to be exactly right, but i did not take into account that a considerable amount of OOMOO will stick in the container, so it's be wise to make a little be more than you think you need.
 |
The two components needed to be mixed on a one to one ratio on volume basis and i mixed it until the OOMOO was smooth and evenly colored. Then i poured the mixture in the machinable wax mold and let it rest. The package said 75 minutes, but i needed at least 3 hours to get it sufficiently hard (and non sticky) to take it out.
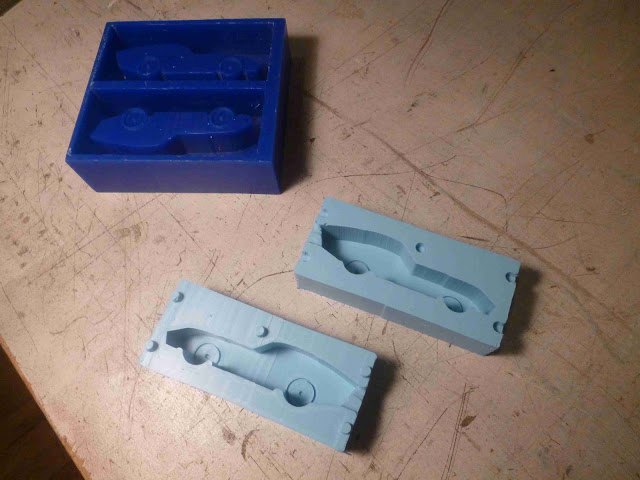 |
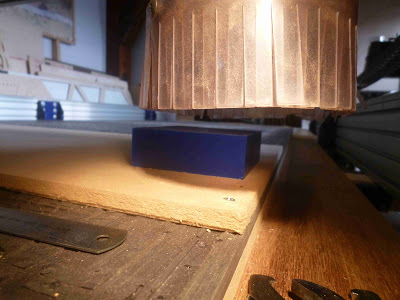
I took the mold out the machinable wax and went to the next step in the process. After taking all the safety precautions (mask, gloves, goggles) for working with hydro-stone i measured the exact amount of hydro-stone i needed relative to the amount water and mixed it with a mixer and drill until i had an even and smooth substance. Then i poured in the hydro-stone mixture in the OOMOO mold, which i had reinforced with some triplex. The back walls of the OOMOO molds were a little thin as i had been very tight with my OOMOO mixture. I put the mold into the oven at 65 celcius/150 fahrenheit and waited for 45 minutes.
 |
 |
The car cast was hard and dried and i suspected that i could have taken it out sooner. You can see a line on the side of the cast, where i stop the milling at the end of the day and continued the next day.
 |
 |