Printer Testing & Lab Equipment

During this week we tested the different 3D printers available in the lab to better understand their design rules, material behavior, and limitations. We worked with three machines covering two different printing technologies: FDM and MSLA (resin).
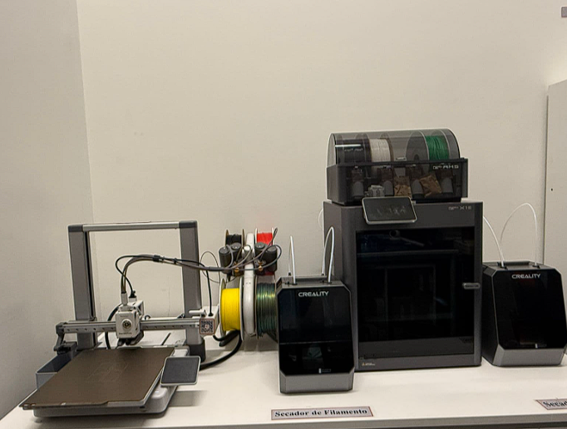
Lab 3D printing station
Lab 3D printing stationFull view of the printing area: open-frame printer (left), filament spool rack, Bambu Lab A1 + X1E (center), and two additional Creality units. Filament dryer visible at front.
FDM

Bambu Lab X1E

Multi-material · enclosed · professional

High-performance enclosed printer for functional parts and engineering-grade materials.

FDM

Bambu Lab A1

Open frame · beginner-friendly

Accessible and efficient for everyday prototyping with PLA and PETG.

FDM

Markforged Mark Two

Continuous fiber reinforcement

Professional printer combining thermoplastics with continuous fiber for structural parts.

MSLA

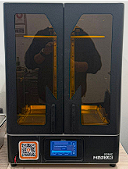
Phrozen Sonic Mega 8K

Resin · 8K monochrome LCD

Large-format resin printer for high-detail prints with smooth surfaces and sharp edges.

Fab Academy ULima — explore the full group assignment documentation on the official page:
fabacademy.org/2026/labs/ulima/ ↗
Technology 01

FDM — Fused Deposition Modeling

FDM builds parts by melting a thermoplastic filament and depositing it through a heated nozzle layer by layer. As each layer cools, it solidifies and bonds to the previous one, gradually forming the final object.

Bambu Studio

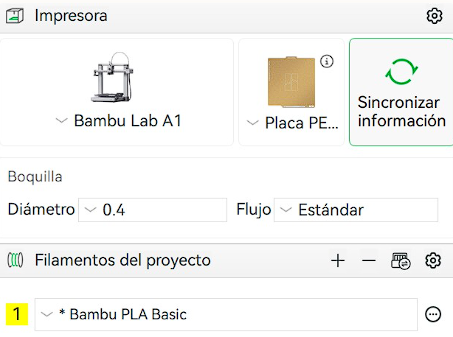
Bambu Studio is Bambu Lab's proprietary slicing software. Before sending anything to print, the most critical step is correctly defining the printer model, build plate type, and material — nozzle temperature and bed adhesion settings depend entirely on the filament loaded.

Bambu Studio printer configuration
Bambu Studio — printer & filament setupPrinter set to Bambu Lab A1 with PEI build plate, 0.4 mm nozzle, standard flow, and Bambu PLA Basic filament selected.
Bambu Studio layer height selection
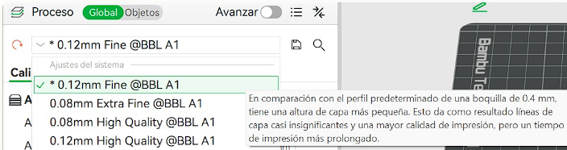
Bambu Studio — layer height selectionProfile set to 0.12 mm Fine @BBL A1. Tooltip explains finer layers produce smaller, less visible lines at the cost of longer print time.

Layer Height

Layer height directly affects surface quality, print time, and detail reproduction.

0.08 mm
Extra Fine

Maximum smoothness. Nearly invisible layer lines. Significantly longer print time.

0.12 mm
Fine

Smooth finish with good detail. Good balance for visual models.

0.20 mm
Standard

Default. Good balance between quality and speed. Suitable for most parts.

0.24 mm
Draft

Fast prints with less detail. Quick concept validation.

Support Structures

Supports are temporary structures beneath overhanging surfaces. The threshold angle determines when they are generated — 45° is the standard starting point.

Normal

Normal Supports

  • Solid grid-based structures
  • Strong and reliable
  • Harder to remove
  • Leaves rougher contact surfaces
  • Best for simple geometries
Tree

Tree Supports

  • Branching, minimal contact points
  • Much easier to remove
  • Less material used
  • Cleaner surface finish
  • Ideal for organic / complex shapes

FDM Test 01

Bambu Lab — X1E vs A1

Torture Test

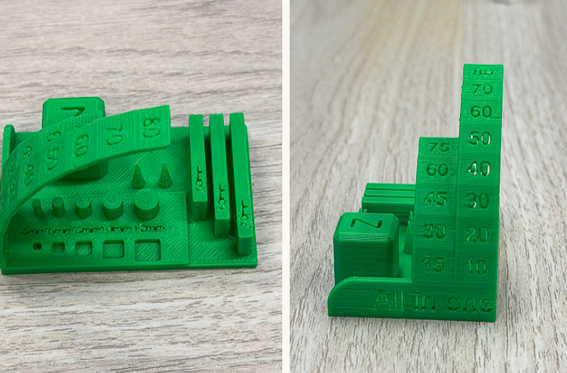
We used the "Torture Test All in One" by Gmino from MakerWorld, intentionally reducing its height to evaluate how the printer handles small, detailed geometries. The model concentrates multiple challenges in a single piece: overhang angles, thin columns, cylinders, triangular structures, engraved text, and dimensional accuracy checks.

Torture test printed result
Torture test — printed result (green PLA)Front and side views. Ramp overhang, step blocks, cylinders, pyramids, and engraved text all visible. Printed on Bambu Lab A1 with PLA.
Torture test overhang angles annotated
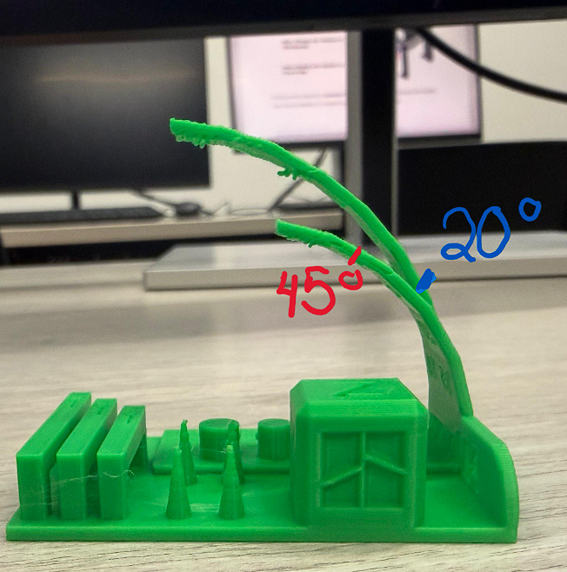
Overhang performance — 45° vs 20°Side view with angles annotated. The 45° overhang (red) printed cleanly without support. The 20° overhang (blue) failed — too steep without support, causing significant drooping.
Torture test close-up cylinders and text
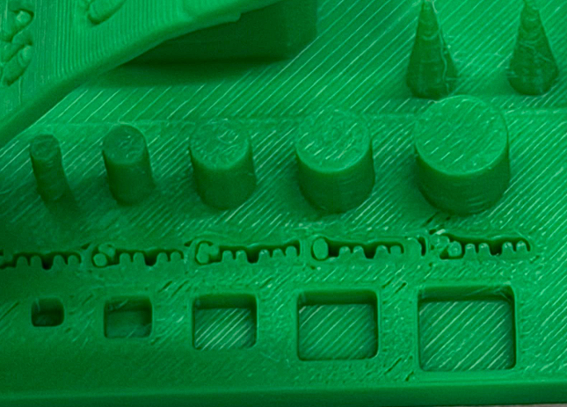
Close-up — cylinders & engraved textGraduated cylinders and rectangular cavities. Text at the bottom is legible at small scale. Cylinders show good circular definition without deformation.
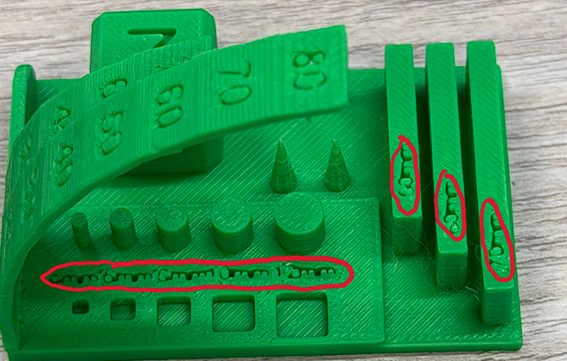
Torture test stringing annotated
Stringing defects highlightedRed circles mark stringing artifacts between the vertical fins and ramp section. These fine plastic threads appear between features during non-print travel moves.

Design Rules Tested

Overhang angle

45° is the standard threshold. Beyond that, supports are needed or quality degrades.

|

Thin columns

Very thin vertical features can fail or warp. Minimum wall thickness must be respected.

Cylinders

Circular cross-sections test dimensional accuracy and smooth curved surface reproduction.

Aa

Engraved text

Small text reveals resolution limits — characters must remain readable at small scales.

Dimensional accuracy

Reference dimensions on the model quantify shrinkage and tolerance.

Bridging

Horizontal spans without support test how well the printer handles bridging before sagging.

0.08 mm Layer Test — Golden Alpaca

To evaluate the effect of ultra-fine layer height on decorative prints, we used the "Mini Alpaca" model from MakerWorld with layer height set to 0.08 mm (Extra Fine). This setting is ideal for organic shapes where smooth curves and surface quality matter more than speed.

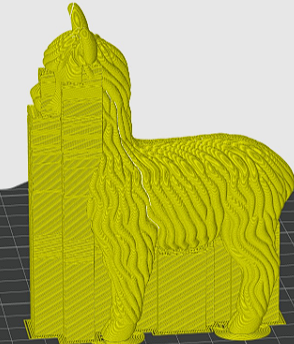
Alpaca in slicer without supports
Alpaca model in slicer — no supportsInitial placement in Bambu Studio. Yellow solid preview showing the alpaca geometry before support generation.
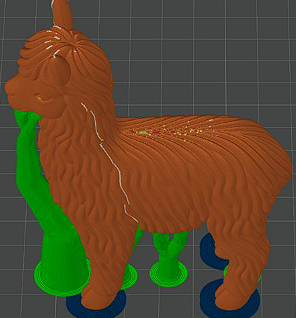
Alpaca with tree supports in slicer
Alpaca with tree supports generatedTree supports (green) automatically placed under the legs and belly. Blue = brim. Support points are minimal to protect surface quality on the organic curves.
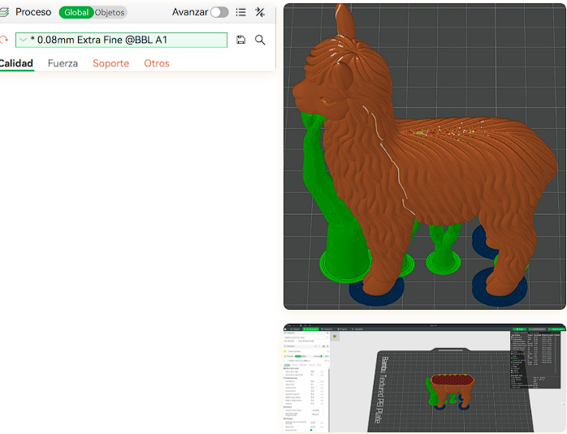
Bambu Studio 0.08mm Extra Fine settings
Bambu Studio — 0.08 mm Extra Fine profileProcess set to 0.08 mm Extra Fine @BBL A1. Right: live preview inside the printer chamber via Bambu Studio remote monitoring.
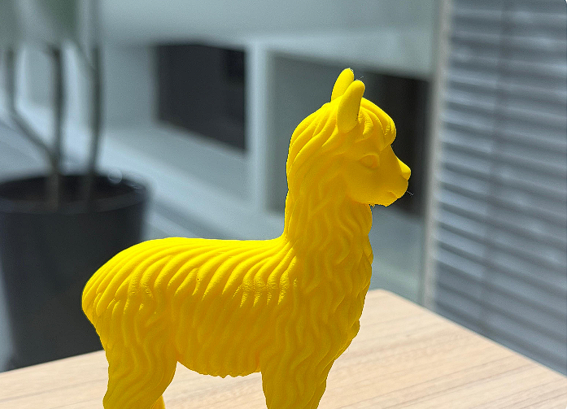
Final printed golden alpaca
Final result — golden alpaca (yellow PLA)Printed at 0.08 mm Extra Fine. Layer lines are nearly invisible. The wavy fur texture is faithfully reproduced with smooth transitions across the organic surface.

Smoother transitions

Surface transitions between curved sections appeared significantly more gradual and refined.

Better Z resolution

Vertical detail improved noticeably — the staircase effect was nearly eliminated.

Near-invisible layer lines

Layer lines became almost imperceptible without any post-processing or sanding.

Longer print time

Print time increases significantly. The result justifies it for decorative parts.

Machine Duel — X1E vs A1

AspectBambu Lab X1EBambu Lab A1
Best ForFunctional parts, mechanical systems, final componentsPrototypes, visual models, iterative testing
User ExperienceMore technical, better for experienced usersVery intuitive and beginner-friendly
Material CapabilityHandles advanced and engineering-grade materialsBest with common materials like PLA and PETG
Print StabilityVery stable — ideal for long and demanding printsStable for regular and medium-length prints
Detail & FinishExtremely clean surface and sharp detailsVery good finish for standard prints
Learning CurveRequires deeper understanding of settingsEasy to learn and operate quickly

Bottom line

The X1E is more powerful and industrial, ideal for demanding functional parts. The A1 is accessible and efficient for everyday use. Testing both gave a clear sense of how to choose the right machine for each goal.

FDM Test 02

Markforged Mark Two

FDM · continuous fiber reinforcement · Eiger
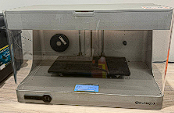
Markforged Mark Two printer
Markforged Mark Two — printerCompact enclosed professional desktop printer. Two print heads: one for thermoplastic base material (Onyx/Nylon), one for continuous fiber reinforcement.

The Mark Two produces strong, functional, structural parts by combining engineering-grade thermoplastics with continuous fiber reinforcement — enabling lightweight components with high stiffness for real-world use.

Fiber (top layer)

Continuous Fibers

Carbon Fiber
Fiberglass
Kevlar®
HSHT Fiberglass

Plastic (base)

Thermoplastics

Onyx
Nylon White

Workflow — Eiger Software

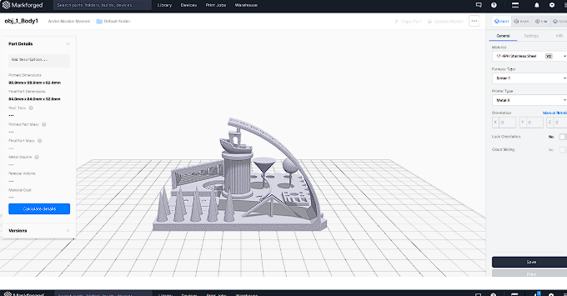
Eiger model on build plate
Eiger — model uploaded to build plateSTL imported and placed on the virtual Mark Two build volume. Right panel shows printer type and material configuration (Onyx + Kevlar).
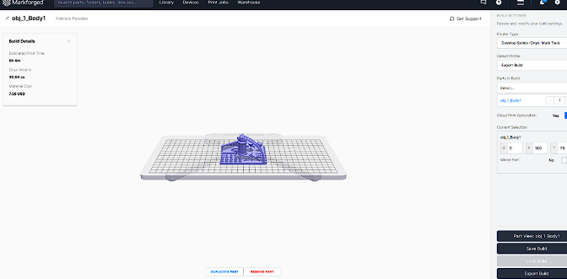
Eiger build details and top view
Eiger — build details & top viewEstimated print time: 8h 4m · Drive volume: 30.84 cc · Material cost: $7.15. Top-down sliced preview confirms part fits correctly on the plate.
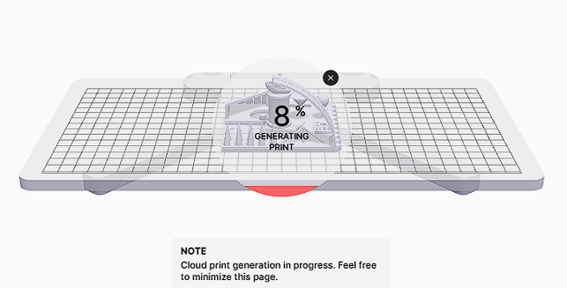
Eiger generating print 8%
Eiger — cloud print generation (8%)After clicking Send Build, Eiger generates the print file in the cloud. Progress tracked in real time. Note: "Feel free to minimize this page."
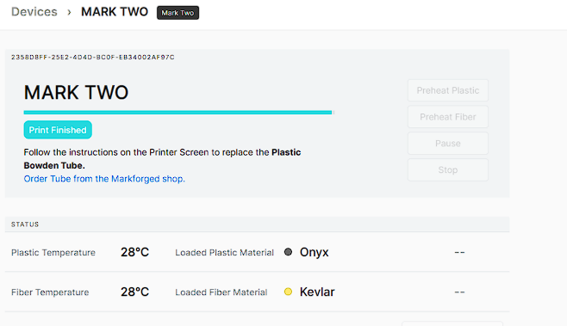
Eiger Mark Two Print Finished
Eiger — Print Finished statusMARK TWO device dashboard showing Print Finished. Loaded materials confirmed: Onyx (plastic) + Kevlar (fiber). Temperature at 28°C.
  • 01
    Upload STL

    Upload the file and verify scale and orientation on the virtual build plate.

  • 02
    Select printer and materials

    Choose the correct printer profile and confirm plastic and fiber materials available.

  • 03
    Review build details

    Check estimated print time and material usage to confirm feasibility.

  • 04
    Export and generate

    Eiger generates the print in the cloud, showing progress percentage.

  • 05
    Send to printer

    Job sent and monitored from the Devices section until Print Finished status.

FDM Design Rule Test Results

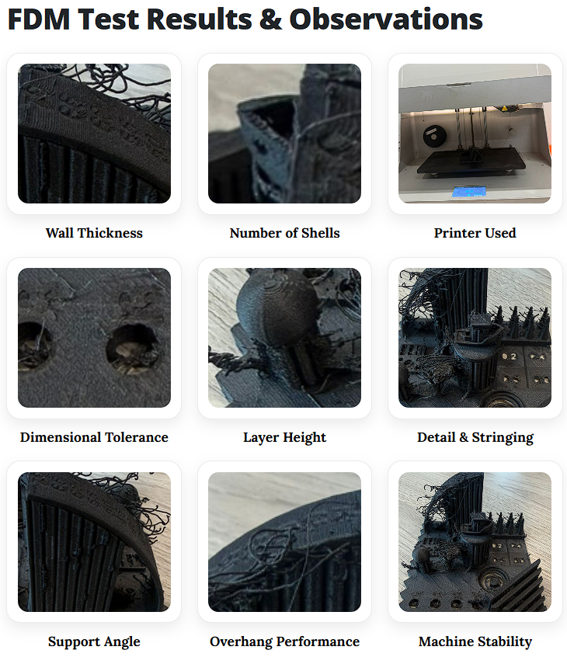
FDM Test Results collage
FDM Test Results & Observations — full collageSummary grid showing results for: Wall Thickness, Number of Shells, Printer Used, Dimensional Tolerance, Layer Height, Detail & Stringing, Support Angle, Overhang Performance, and Machine Stability.
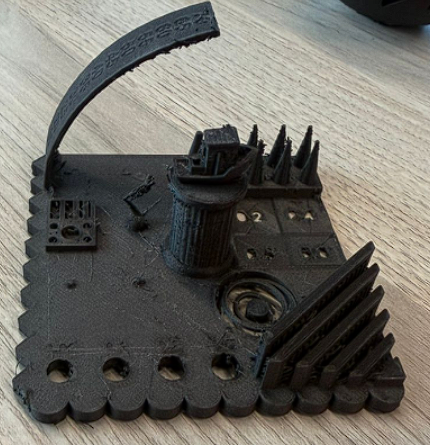
Markforged print result Onyx
Markforged physical result — Onyx + KevlarPrinted test object in black Onyx. Overhanging arc visible at top (with stringing), spike cluster, tolerance slots, and staircase ramp all present and measurable.

Wall thickness

One perimeter (~0.4 mm) reduced rigidity and increased dependence on infill.

Number of shells

Low shell count reduced structural resistance and wall stiffness significantly.

Dimensional tolerance

Tight clearances caused partial fusion in small moving regions — clearance must account for material expansion.

Layer height

Visible layer lines were present across curved surfaces and detail areas.

~

Stringing

Stringing appeared between vertical regions due to extrusion and retraction settings.

Overhang performance

Moderate overhangs printed correctly. Steep angles showed sagging and deformation.

Machine stability

The enclosed chamber improved thermal consistency and reduced warping across the build.

Summary: The Mark Two showed stable and reliable performance. The enclosed chamber improved layer adhesion and reduced warping. Dimensional features were generally accurate, although fine details, overhangs above 40°, and bridging required optimized settings.

Technology 02

MSLA — Phrozen Sonic Mega 8K

Resin · UV curing · 8K monochrome LCD
Phrozen Sonic Mega 8K printer
Phrozen Sonic Mega 8K — printerLarge-format MSLA resin printer with orange UV-blocking door panels. Touch screen control visible at bottom. Build plate retracts upward during printing.

MSLA solidifies liquid photopolymer resin using UV light and a monochrome LCD screen. Unlike FDM, MSLA cures entire resin layers simultaneously through an LCD masking system — providing faster printing speeds while maintaining high resolution and smooth surface quality.

Workflow — CHITUBOX

Chitubox slicer software
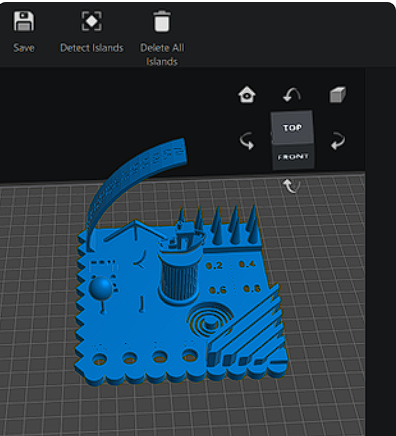
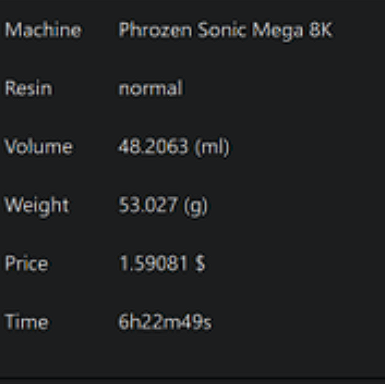
CHITUBOX — resin slicer interfaceMain interface showing the sliced model in blue on the build plate. Right panel shows volume (48.2 ml), weight (53.8 g), price ($1.59), and estimated time (6h 22m).
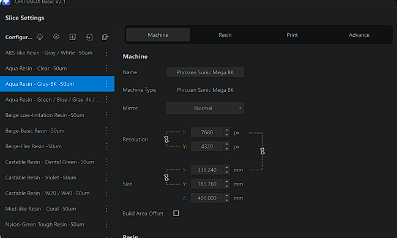
Chitubox machine settings Phrozen Sonic Mega 8K
CHITUBOX — Machine settings panelPrinter confirmed as Phrozen Sonic Mega 8K. Resolution: 7680×4320 px · Size: 338×190×400 mm. Resin selected: Aqua Resin – Gray-8K @ 50µm.
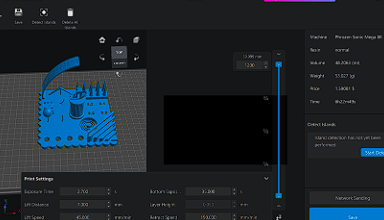
Chitubox sliced model with print settings
CHITUBOX — sliced model & print settingsBlue model preview on build plate. Bottom panel shows: Exposure 2.70 s · Bottom layers 31 · Lift Distance 7.300 mm · Lift Speed 45.0 mm/min · Retract Speed 150.0 mm/min · Layer Height 0.010 mm.
Chitubox TOP view model
CHITUBOX — TOP view of model on plateTop-down view of the test model placed on the Phrozen build platform. Features visible: tolerance cylinders, spikes, overhang arc, dimensional reference numbers (0.2 / 0.4 / 0.6 / 0.8), screw holes, and staircase ramp.
Chitubox print estimate summary
CHITUBOX — print estimate summaryMachine: Phrozen Sonic Mega 8K · Resin: normal · Volume: 48.2063 ml · Weight: 53.027 g · Price: $1.59 · Time: 6h 22m 49s.
  • 01
    Select printer profile

    Confirm the machine as Phrozen Sonic Mega 8K — resolution 7680×4320 px, build volume 338×190×400 mm.

  • 02
    Choose resin configuration

    Select Aqua Resin — Gray-8K (50µm) to ensure correct exposure values for that resin and layer height.

  • 03
    Import and place model

    Load the STL file, verify it is inside the printable area, and position to expose the main features.

  • 04
    Review print parameters

    Layer height: 0.050 mm · Exposure: 2.7 s · Bottom exposure: 35 s · Lift distance: 7 mm · Lift speed: 45 mm/min · Retract speed: 150 mm/min.

  • 05
    Detect islands (optional)

    Run island detection to identify areas that might print without support before committing to a long print.

  • 06
    Slice and review estimate

    Print time: 6h 22m 49s · resin volume: 48.2 ml · weight: 53 g · cost: $1.59. Confirm feasibility before sending to machine.

Resins

Resin Types Tested

  • 8K Gray (Aqua Gray 8K)
  • ABS-like Resin
  • Clear Resin
  • Tough Resin
Post-Processing

Required Steps

  • Washing in IPA to remove excess resin
  • UV curing for final mechanical strength
  • Careful support removal to protect fine features

MSLA Design Rule Test Results

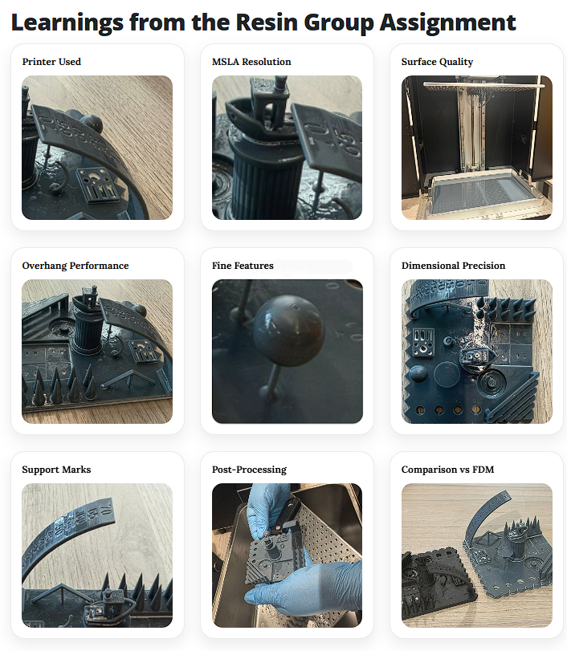
Learnings from the Resin Group Assignment collage
Learnings from the Resin Group Assignment — collage9-panel summary: Printer Used, MSLA Resolution, Surface Quality, Overhang Performance, Fine Features, Dimensional Precision, Support Marks, Post-Processing (gloved hand removing supports), and Comparison vs FDM.
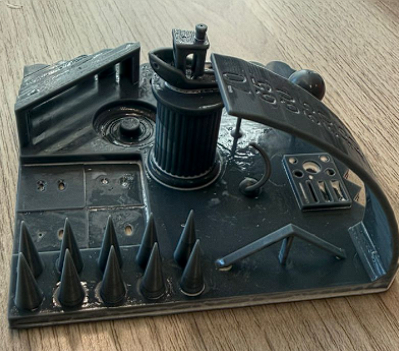
Phrozen resin physical result
Physical result — Phrozen Sonic Mega 8K (resin)Printed in dark gray resin. Conical spikes are sharp and defined, cylindrical column shows excellent surface smoothness, tolerance slots are clean, and the overhang arc printed without deformation. Support marks visible on base edges.

Resolution

Very fine detail reproduction. Clean text and engraving edges. Minimal visible layer lines at 50µm.

Surface quality

Smooth and uniform surfaces. Significantly less stair-stepping compared to FDM.

Overhang performance

Overhangs remained stable without supports in many cases. Clean arch and curved regions.

·

Fine features

Spikes printed sharply. Numbers remained readable. Excellent micro-detail clarity.

Dimensional precision

Sharp edges preserved. High geometric consistency, especially for small features.

Support marks

Supports required for many angles. Removal may leave small marks on fine or thin features.

Summary: The Phrozen Sonic demonstrated high precision and excellent surface quality. Post-processing steps (wash + cure) are mandatory to achieve full mechanical strength.

FDM vs MSLA — Technology Comparison

AspectFDM (Markforged / Bambu)MSLA (Phrozen Sonic 8K)
TechnologyMelts and extrudes thermoplastic filament layer by layerUV light cures liquid resin layer by layer through an LCD mask
Surface qualityVisible layer lines, staircase effect on curvesSmooth surfaces, near-invisible layer lines
Detail resolutionLimited by nozzle diameter and layer heightVery high — sharp edges, fine text, micro-detail
Dimensional accuracyGood for structural parts; shrinkage varies by materialVery good — especially for small and curved features
Overhang performanceNeeds supports above 45°; bridges up to ~60–80 mmMany overhangs print without support; still needs some
Material strengthStrong for large structural parts; fiber = very high strengthLower structural strength; good for rigid and clear parts
Post-processingRemove supports, optional sandingMandatory: wash (IPA) + UV cure; support removal
SafetyLow risk — enclosed preferred for ABS/ASAResin requires gloves, ventilation, UV protection
Cost per printLower — PLA filament is cheapHigher — resin costs more and requires consumables
Best forFunctional parts, large objects, structural componentsJewelry, dental, highly detailed visual models

Individual Reflections

What each team member learned from this week's assignment.

Nicolas

Testing both the X1E and the A1 side by side made the differences between machines much more concrete than any spec sheet could. The torture test was particularly valuable — it revealed the real limits of the printer in a controlled way, showing where support geometry, overhang angle, and wall thickness actually start to matter. The 0.08 mm layer height experiment was a good reminder that print settings should always match the purpose of the part: for decorative work, the extra time is worth it; for functional prototypes, 0.20 mm is almost always the better choice.

Micaela

Comparing FDM and MSLA technologies made it clear that "better" is always relative to what you are printing. The Phrozen's surface quality was impressive — fine details that would be completely lost in FDM printed cleanly. But the mandatory post-processing (wash + cure) and the safety precautions around liquid resin add real workflow complexity. Working in Eiger and CHITUBOX also showed how different slicers are designed around the technology they serve — each one asks you to think about the print in a different way.