Exploring silicone molding techniques and comparing resin casting materials
with 3D-printed and CNC-milled mold approaches
1. Chavín de Huántar Silicone Mold & Resin Casting: Creation and documentation of the workflow of a silicone mold using a master model found in our laboratory: a Chavín de Huántar "Cabeza Clava" — an iconic piece of ancient Peruvian art. We then performed casting tests with two different resin materials: SILIKAST EPOXY CRAFT A + B (crystal-clear epoxy for jewelry-grade finish) and Resina Silikast 70D (honey-amber polyurethane for structural strength). We compared the material properties, curing times, and final aesthetic qualities of both resins cast from the same silicone mold.
2. 3D-Printed Molds Experience: Documented the complete 3D-printed mold workflow using SLA resin printing to contribute to the comprehensive comparison of 3D-printed molds versus milled molds.
3. Technical Documentation — Resins & Silicones: Contributed to the laboratory documentation of all silicone and resin products used during the week.
1. Brain Figure Silicone Mold & Material Testing: FDM-printed a small brain figure mold, then created silicone molds using two different materials: Silicone Rubber (Silicone Rubber with catalyst) and F20 Plus (two-part RTV silicone). Documented handling characteristics, mixing ratios, flexibility, surface detail capture, curing times, and demolding ease.
2. Milling Mold Method Experience: Documented the complete CNC milling mold workflow to contribute to the comprehensive comparison of 3D-printed molds versus milled molds.
3. Technical Documentation — Resins & Silicones: Contributed to the laboratory documentation of all silicone and resin products used during the week.
Complete Material Comparison & Safety Guidelines
As part of our group contribution, we documented the properties of all silicones and resins used in the Fab Lab. Since these are Peruvian-origin products, formal international data sheets are not widely available — the information below is based on regional product specifications and manufacturer guidelines.
Comprehensive comparison table of all 4 silicone molding materials and 2 resin casting materials used in Week 13. Includes the two resins compared in the Chavín de Huántar casting tests.
| Property | SILICONE MOLD MATERIALS | RESIN CASTING MATERIALS | ||||
|---|---|---|---|---|---|---|
| RTV Type 6 | F20 Plus | Platinum 1510 | Epoxy A+B | Polyurethane 70D | ||
| Type / Curing | Condensation (Tin) | Condensation (Tin) | Platinum-Cured | Chemical Reaction (Epoxy) | Chemical Reaction (Polyurethane) | |
| Primary Use | MOLD | MOLD | MOLD | CAST | CAST | |
| Mixing Ratio | 2–2.5% catalyst | 2–3% catalyst | 1:1 by weight | 1:1 by volume | 1:1 by weight | |
| Pot Life | 15–25 min | 15–20 min | 15–20 min | 10–15 min | 2 min (FAST!) | |
| Cure Time | 2–6 hours | 4–12 hours | 4–6 hours | 10–24 hours | 5–10 min | |
| Hardness (Shore) | 20A (Flexible) | 20A (Flexible) | 10A (Very Flexible) | Hard/Brittle | 70D (Rigid) | |
| Visual Appearance | Opaque White | Opaque White | Semi-Translucent | Crystal Clear | Honey Amber | |
| Detail Capture | Excellent | Very Good | Excellent | Excellent | Excellent | |
| Food Safe | No | Yes | Yes | No | No | |
| Cost | Economical | Moderate | Premium | Moderate | Moderate | |
| Best Applications | Cost-effective molds, high detail | Food projects, precise detail | Extreme flex, high temp, jewelry | Jewelry, decorative, transparent display | Functional, structural, fast cycles | |
Nitrile Gloves
Essential for all handling. Silicones and resins are irritating to skin and can cause dermatitis. Always wear when mixing, pouring, or handling cured materials. Double-glove if handling for extended periods.
Safety Goggles
Protect eyes from splashes and aerosol particles. Especially critical when mixing resins and pouring into molds. Resin splashes can cause chemical burns. Mandatory for all resin work.
Lab Coat or Protective Apron
Protects clothing from stains and spills. Silicones and resins are nearly impossible to remove from fabric once cured. Use disposable aprons or dedicated work coats that can be cleaned.
Hair Tie / Head Cover
Keep hair back to prevent entanglement with machinery or mixing equipment. Hair in curing resin/silicone is difficult to remove. Hairnets or headcovers recommended for long-term exposure.
Precision Scale (0.1g accuracy)
Critical for catalyst ratios. Even 0.5g difference affects cure time and final hardness. Use digital scales with ±0.1g precision minimum. Calibrate before each use.
Measuring Cups (Graduated)
For volumetric measurements when using 1:1 ratios by volume. Mark at key volumes (50ml, 100ml) for quick reference. Use separate cups for silicones vs resins to avoid contamination.
Mixing Containers (Disposable)
Always use disposable cups for mixing. Never reuse containers that have cured silicone or resin residue — they interfere with new batches. Plastic cups work for silicones; use stronger containers for resins.
Stirring Rods / Sticks
Non-metallic preferred (wood or plastic). Stir slowly and deliberately to avoid trapping air bubbles. Vigorous stirring introduces bubbles that ruin molds. Scrape container sides thoroughly to incorporate all material.
Release Agent (Desmoldante) — CRITICAL ⚠️
ALWAYS apply before pouring silicone. Without release agent, the master model becomes permanently bonded to curing silicone. Results: trapped model, damaged mold, broken master. See Desmoldante section below for details.
Mold Box / Containment
Prevents overflow and contains spills during pouring. Use plastic containers, cardboard boxes, or dedicated mold frames. Ensure containment is at least 10mm taller than the tallest feature to accommodate silicone expansion.
Ventilation / Fume Hood
Critical: Work in well-ventilated area. Silicone and resin fumes (especially during curing) can be irritating to respiratory system. Use fume hoods or open-air work stations. Never work in enclosed spaces without ventilation.
Thermometer
Monitor ambient temperature throughout the process. Cold temperatures (<15°C) significantly slow curing times. Heat can accelerate cure (check material specs). Ideal range: 18–25°C for consistent results.
Timer / Clock
Track working time (pot life) and curing time with precision. Set alarms for critical time windows. Record times for each batch to identify patterns and optimize future projects.
Vacuum Degasser (Optional but Recommended)
Removes air bubbles trapped during mixing. Highly recommended for jewelry-grade molds and fine-detail work. Creates vacuum that pulls bubbles to surface before they become permanent. Expensive but transforms quality.
Heat Source (Optional)
Can accelerate platinum-cured silicone curing (check specs). Some polyurethanes benefit from gentle heat (not exceeding 40°C) during initial cure. Use heat lamps or warm water baths — never direct flame.
Waste Container
For safe disposal of unused material. Never pour down drains. Cured silicone/resin can clog pipes. Allow waste to cure in container, then dispose as solid waste per local regulations.
Chavín de Huántar Silicone Mold Creation & Dual Resin Casting
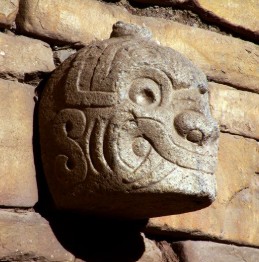
The Cabezas Clavas are stone sculptures belonging to the Chavín culture of Pre-Inca Peru. Originally embedded in the walls of the Chavín de Huántar temple, they represent human-feline transformations and are iconic symbols of ancient Peruvian lithic art. Having one as our master model was a meaningful cultural connection.
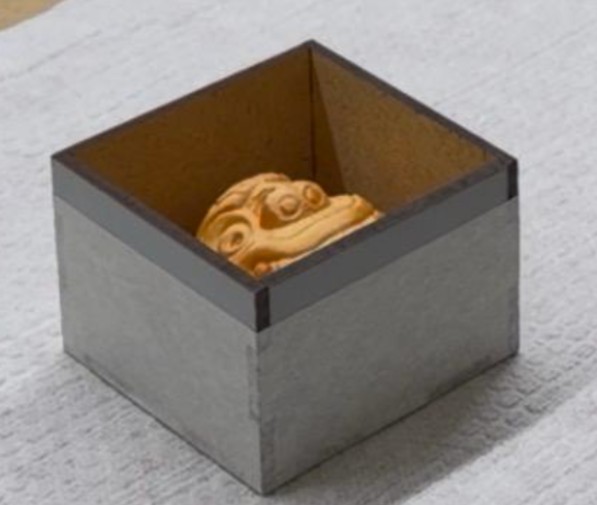
The piece was used as-is from the lab's collection, making this a pure mold-making exercise without a prior design or print stage. This presented an excellent opportunity to test silicone molding on a complex, detailed, and culturally significant artifact.
Chavín de Huántar temple in Peru — the original context for these sculptures
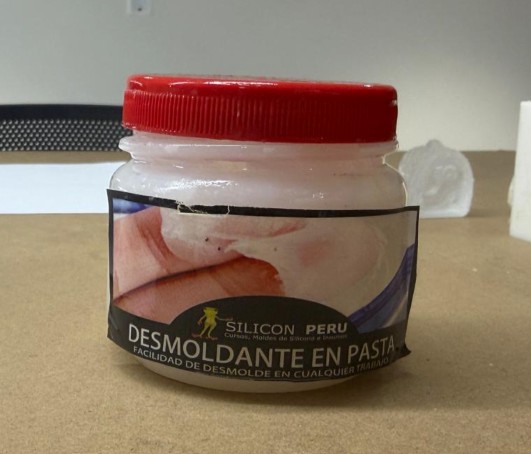
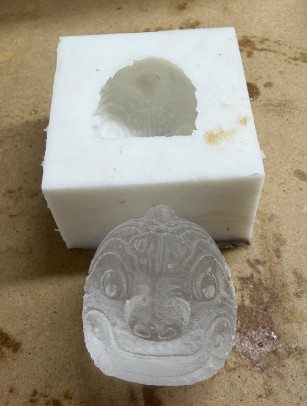
To replicate the Cabeza Clava, we used SILIKA CAUCHO SILICONA RTV TIPO 6 combined with its specific catalyst. This material was selected for its high fidelity in capturing textures and its ease of use for manual casting.
Measured mold capacity by filling with water to estimate the required silicone volume. Calculated the amount needed, intentionally adding surplus to ensure complete coverage of the master model.
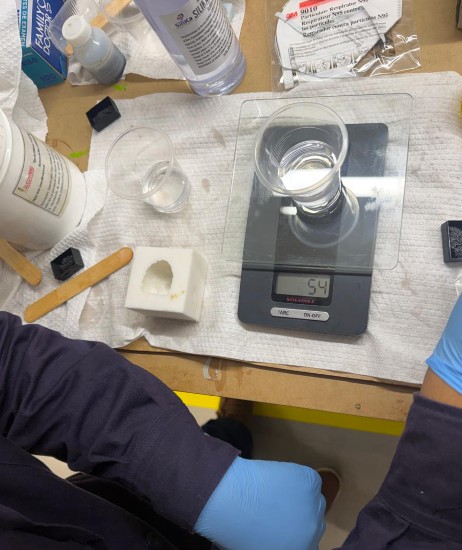
The RTV Type 6 requires precise mixing: 2% to 3% catalyst by weight. For every 100g of silicone base, we used a precision scale to add exactly 2–3g of catalyst. This precision is essential for proper curing and full mechanical resistance.
Precise weighing and catalyst mixing — the foundation of consistent results
Mixed both components slowly and thoroughly, scraping sides and bottom to ensure no unmixed base remained. Unmixed material prevents proper curing and creates weak spots in the mold.
Once mixed, had approximately 15–20 minutes to pour silicone before it began to thicken. Poured from the lowest point of the mold box, allowing the material to rise naturally around the piece to minimize air bubbles.
Tapped the mold against the table so trapped bubbles would rise to the surface. Left to cure at room temperature for 4–8 hours depending on ambient conditions.
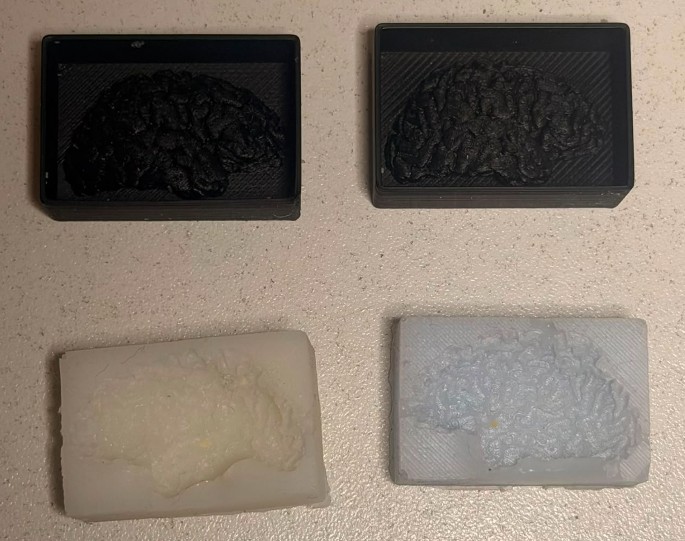
Once the silicone mold was complete, we performed casting tests with two different resin systems to compare their properties, aesthetics, and structural characteristics. The same silicone mold was used for both casts, providing a true apples-to-apples comparison.
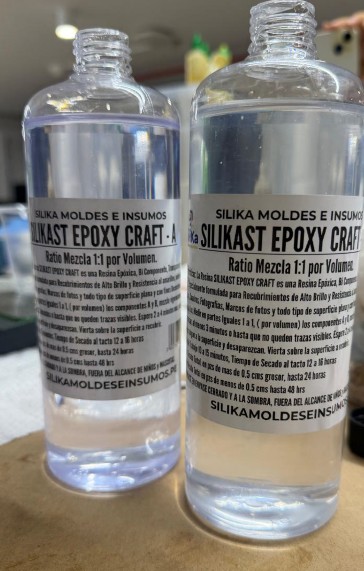
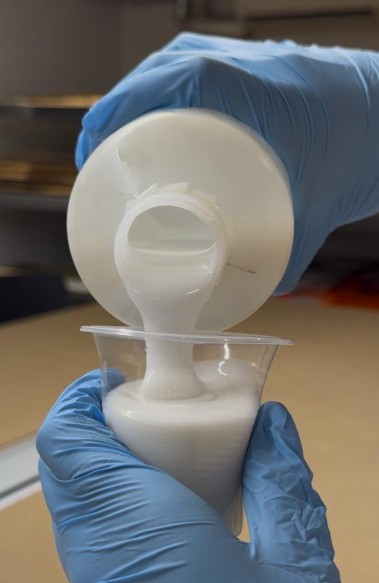
Mixed Part A and Part B at 1:1 ratio by volume. Poured into the silicone mold and let rest for 10 hours. The result was a beautiful, crystal-clear, glass-like piece that captured every detail of the original Cabeza Clava with exceptional optical clarity.
Pouring epoxy resin into the completed silicone mold
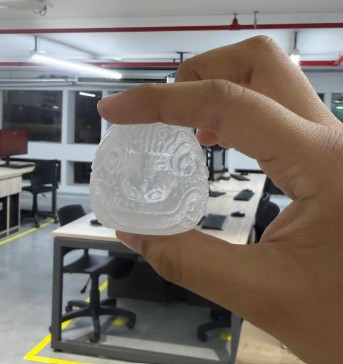
Epoxy cast: Crystal-clear finish captures every cortex fold and surface texture with optical transparency
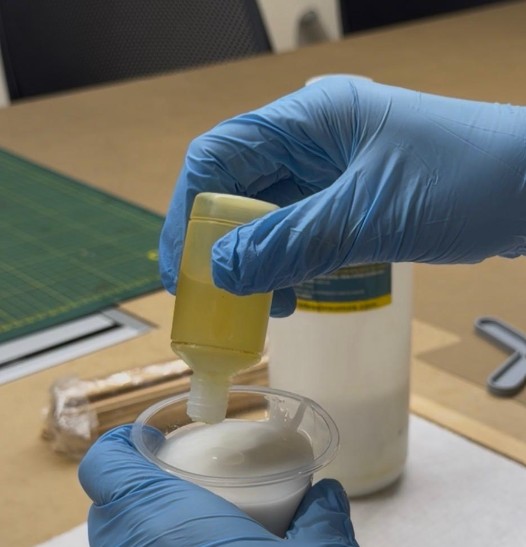
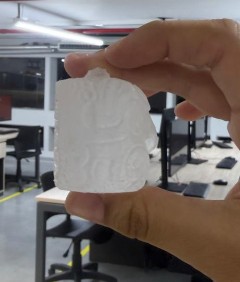
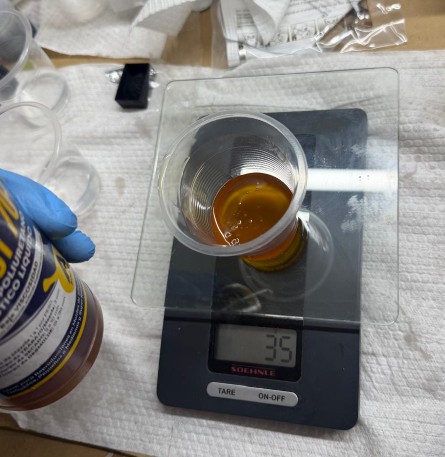
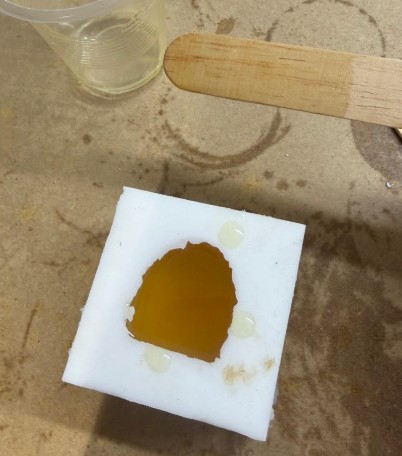
Mixed Part A and Part B at 1:1 ratio by weight. Poured into the same silicone mold. Cure time: 5 hours — notably faster than epoxy (10 hours). The result was a solid, vibrant amber-toned replica with excellent structural strength (70 Shore D hardness).
Polyurethane resin pour and curing process — note the distinctive honey-amber color
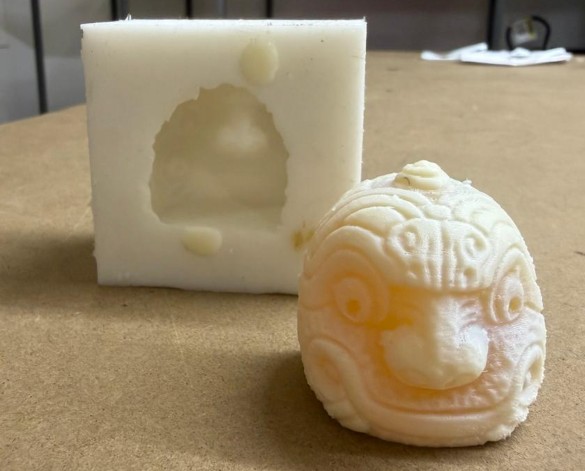
Polyurethane cast: Solid amber-toned replica with structural strength for functional applications
| Property | SILIKAST Epoxy A+B | Silikast 70D Polyurethane |
|---|---|---|
| Visual Finish | Crystal-clear, glass-like, transparent | Honey-amber color, opaque |
| Mix Ratio | 1:1 by volume | 1:1 by weight |
| Pot Life | 10–15 minutes | 2 minutes (very fast) |
| Cure Time | 10 hours (long) | 5 hours (fast) |
| Hardness | Hard but brittle | 70 Shore D (impact resistant) |
| Detail Capture | Excellent | Excellent |
| Best For | Jewelry, display, decorative, showcase pieces | Functional, structural, durability required |
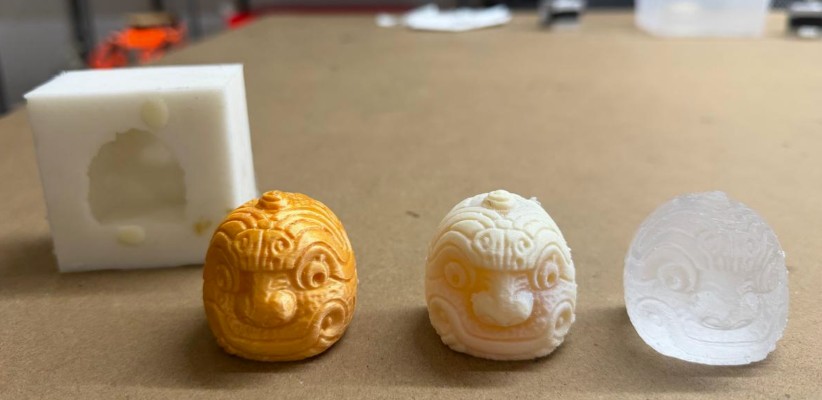
From left to right: SLA 3D-printed master model, Silikast 70D polyurethane cast, SILIKAST EPOXY CRAFT A+B epoxy cast. All produced from the same silicone mold.
Brain Figure FDM Mold & Silicone Material Comparison
For the individual molding and casting assignment, We designed and FDM-printed a small brain figure (cerebro) to use as a master model. The goal was to create two different silicone molds using different materials and compare their handling characteristics, flexibility, surface detail capture, curing times, and demolding ease.
We created two silicone molds of the same brain figure using different materials to conduct a direct comparison:
Material: SILIKA CAUCHO SILICONA RTV TIPO 6
Mixing Ratio: 78g silicone base + 2g catalyst (2.5% by weight)
Cure Time: 6 to 8 hours at room temperature
Visual Result: Opaque white silicone
Flexibility: Very flexible and easy to demold
The Silicone Rubber captured the brain cortex folds with good detail. The material's high elasticity makes demolding very easy — the brain figure pops out cleanly without stress.
Material: Silicona RTV F20-Plus
Mixing Ratio: 1:1 by weight (equal parts A + B, no catalyst)
Cure Time: 4 to 6 hours at room temperature
Visual Result: Opaque white silicone
Flexibility: Slightly firmer than Caucho, 20 Shore A
The F20 Plus produced slightly sharper detail on the smaller cortex folds compared to the Silicone Rubber. The two-part system (no catalyst to measure) is more convenient and the faster cure time (4–6 hrs vs 6–8 hrs) is advantageous for production workflows.
| Property | Silicone Rubber (RTV Type 6) | F20 Plus (RTV-2) |
|---|---|---|
| Mix Type | Base + catalyst (must weigh precisely) | Two-part A+B (1:1 by weight, no catalyst) |
| Ratio | 78g silicone + 2g catalyst | 1:1 by weight (A+B) |
| Food Safe | No | Yes |
| Flexibility | Very flexible (easy demolding) | Slightly firmer (20A, still flexible) |
| Surface Detail | Good (captures cortex texture) | Very good (sharper on fine folds) |
| Cure Time | 6 to 8 hours | 4 to 6 hours (faster) |
| Ease of Demolding | Very easy — high elasticity | Very easy — proper tear resistance |
| Best Use Case | Economical choice, maximum flexibility | When food safety or speed matters |
Both brain molds after demolding and curing. The rectangular cavities show the brain figure captured in both Silicone Rubber and F20 Plus materials, demonstrating the difference in visual opacity and detail sharpness.
3D-Printed (SLA) vs CNC-Milled Molds
This week provided hands-on experience with two distinct approaches to mold creation: additive manufacturing (SLA 3D printing) and subtractive manufacturing (CNC milling). Both methods successfully produce molds ready for silicone casting, each with unique advantages and trade-offs.
Advantages: Excellent detail resolution (0.05mm layers), ideal for organic complex shapes, easy design iteration, no tool wear concerns, jewelry-grade aesthetics.
Limitations: Single-use master model, post-processing required (support removal, curing, sanding), print time 12–24 hours, resin fragility.
Before: Raw SLA print with visible support marks and pitted surface
After: Filling pits with resin and sanding for smooth, mold-ready surface
Surface refinement is essential before silicone mold pouring. Both SLA and FDM prints require post-processing to achieve mold-ready quality.
Final SLA 3D-printed master model after surface refinement (filling pits, sanding). Ready for silicone mold casting with desmoldante applied.
FDM and SLA 3D-printed models have inherent surface porosity and micro-texture that silicone can grip into deeply. Without release agent, the bond is almost unbreakable. Post-processing (filing, sanding) makes the surface even grippier. Always apply desmoldante generously and wait for it to cure before pouring silicone. This is non-negotiable for 3D-printed masters.
Advantages: Superior surface finish (direct from machine), dimensional accuracy, reusable mold material, durable polycarbonate, multiple casting cycles.
Limitations: Slower total time (6–10 hours), limited by tool geometry, CAM setup complexity, tool replacement costs.
CNC-Milled mold workflow and finished mold demonstrating superior surface finish and precision.
| Criterion | SLA 3D-Printed | CNC-Milled |
|---|---|---|
| Detail Resolution | 0.05mm layers (excellent) | 0.10–0.20mm (very good) |
| Total Time | 12 hours print + 2–3 hours post-processing = 14–15 hours | 6–10 hours machining (direct, no post-processing) |
| Design Flexibility | Excellent — modify STL and reprint immediately | Good — requires CAM rework |
| Surface Quality | Good — requires post-processing to remove support marks | Excellent — direct from machine, no refinement needed |
| Mold Durability | Single-use (resin fragile) | Reusable for 10+ casting cycles |
| Release Agent (Desmoldante) | Essential — resin can stick to other materials if not applied | Recommended — polycarbonate is slightly more forgiving but desmoldante ensures clean release |
| Best Applications | Jewelry, one-off art pieces, intricate organic geometry | Functional parts, production runs, high-precision tolerances |
What is Desmoldante? A release agent applied to the master model surface before pouring silicone. It creates a barrier preventing the curing silicone from bonding to the model, ensuring clean separation after cure time.
Available Forms: Paste, spray, or liquid. Common types in Peru: Silicon Peru brand paste (shown), or spray formulations. Apply generously but evenly over the entire master model surface.
Cost: Economical — a small jar lasts for many molding sessions.
The silicone cures around the model with no barrier, creating chemical adhesion. The master becomes permanently bonded to the silicone mold. Extraction requires force that can damage both the mold and the master model.
FDM 3D-printed parts are especially vulnerable. Forced extraction can snap thin features, break delicate geometry, or tear away surface details. Cultural artifacts or irreplaceable masters can be destroyed.
Attempting to force out a trapped master can tear or rupture the freshly-cured silicone mold, ruining weeks of planning. Support marks and damage become permanent.
If the master model fractures during extraction, pieces may remain embedded in the silicone, contaminating the mold and making it unusable for clean casting.
Choose SLA 3D Printing when:
Choose CNC Milling when:
© Fablab Ulima 2025 | . Design: Tooplate