// Week 01
Project Management & Documentation
During Week 01 of Fab Academy, I focused on the foundations of project planning, project management, version control, documentation, and personal website development.
Week 01 Overview
During Week 01 of Fab Academy, I focused on project management and documentation. I built the foundation for organizing and publishing my work throughout the program.
Objectives
The objectives of this week's assignment were:
- To create and configure my GitLab repository.
- To connect GitLab to my local computer using Git.
- To generate and configure SSH key authentication.
- To develop my personal documentation website.
- To sketch and define my final project concept.
- To sign the Student Agreement.
Principles and Practices (part 1 of 2)
During Week 01, I planned and sketched my potential final project, AURA Robot. The sketches show my initial idea of the system architecture and the physical design of the device.
Final Project: AURA Robot
AURA is a portable desktop assistant designed to provide reminders, alarms, notifications, and indoor environmental information through a simple physical interface. It will combine sensors, a display, buttons, a speaker, and a rechargeable battery in one device.
Who Will Use AURA?
AURA is initially intended for elderly people, visually impaired users, students, and other users who need simple reminders, alarms, and environmental information without constantly checking a phone.
Project Planning
People need simple ways to receive important information. Elderly and visually impaired people may miss reminders, while students can be distracted by constantly checking their phones. Indoor conditions such as temperature and air quality can also affect comfort.
AURA Robot is designed as a desktop assistant that combines notifications, alarms, environmental monitoring, and a simple interface in one device.
Existing Solutions
Before defining my concept, I considered several existing types of devices that already provide some of these functions.
- Smart assistants: Provide voice commands, reminders, alarms, and information.
- Smart displays: Show time, weather, reminders, and other information.
- Environmental monitors: Measure temperature, humidity, and air quality.
- Digital alarm clocks: Provide time and alarms but have limited features.
Concept
My concept is to combine sensors, a display, speaker, and controls into one portable desktop assistant. AURA will monitor indoor conditions and provide alarms, reminders, and useful information through a simple interface, reducing the need to constantly check a phone.
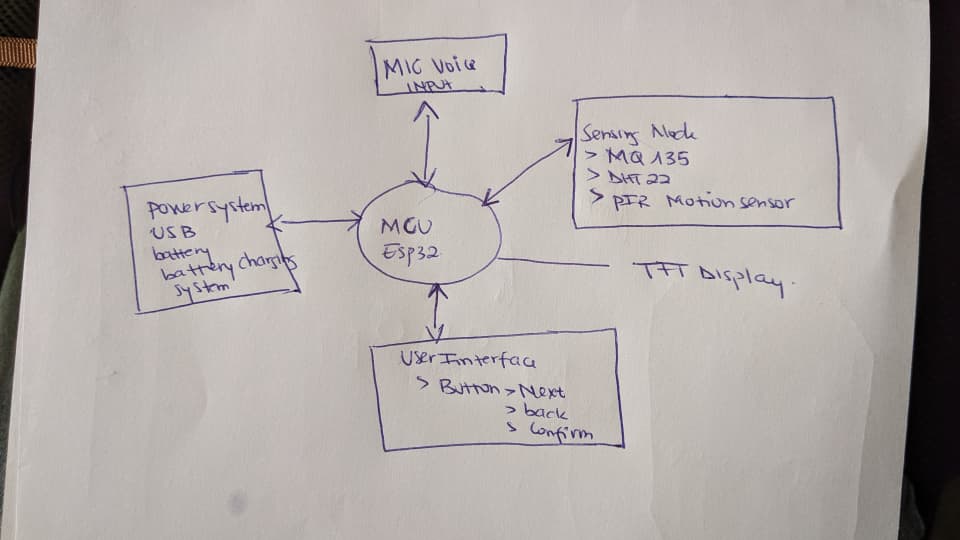
Initial System Architecture Sketch
I created this initial sketch to communicate my final project idea and show how the main electronic components could be connected. It helped me identify the main modules before starting detailed electronics design.
AURA System and Planned Features
AURA is built around an ESP32 and combines sensors, a display, buttons, audio, and a rechargeable battery to create a portable desktop assistant.
- ESP32: Main controller.
- TFT display: Shows information and notifications.
- MQ135: Measures air quality.
- DHT22: Measures temperature and humidity.
- PIR sensor: Detects movement.
- Microphone: For future voice interaction.
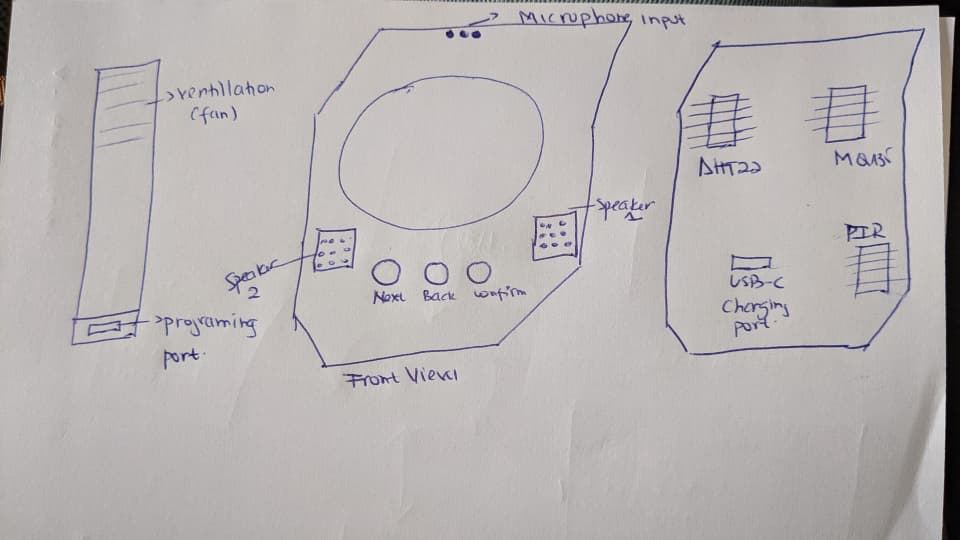
- Speaker: Provides alarms and notifications.
- Push buttons: Used for navigation and control.
- Rechargeable battery: Powers the device.
- USB-C: Used for charging.
- Ventilation: Allows air to reach the sensors.
Initial Mechanical Sketch
I created an initial sketch to plan the shape of AURA and the position of its main components.
Project Management (part 2 of 2)
For the Project Management part of Week 01, I completed the Student Agreement, worked through the Git workflow, created my personal documentation website, and published my work to the Fab Academy GitLab repository.
Week 01 Project Management Requirements
- Signed and committed the Student Agreement.
- Learned and documented the Git workflow.
- Created my personal Fab Academy documentation website.
- Documented my final project and initial sketches.
- Pushed my work to the Fab Academy GitLab repository.
Student Agreement
I read the Fab Academy Student Agreement, added my name as required, and committed the signed agreement to my repository.
Signed Student Agreement: View the signed Student Agreement
Work Through a Git Tutorial
1. GitLab
GitLab is an online platform used to store and manage code repositories. In my documentation, I used GitLab to host my website on Fab Academy GitLab Pages, upload all weekly progress of the assignments, and manage project versions.
2. Git
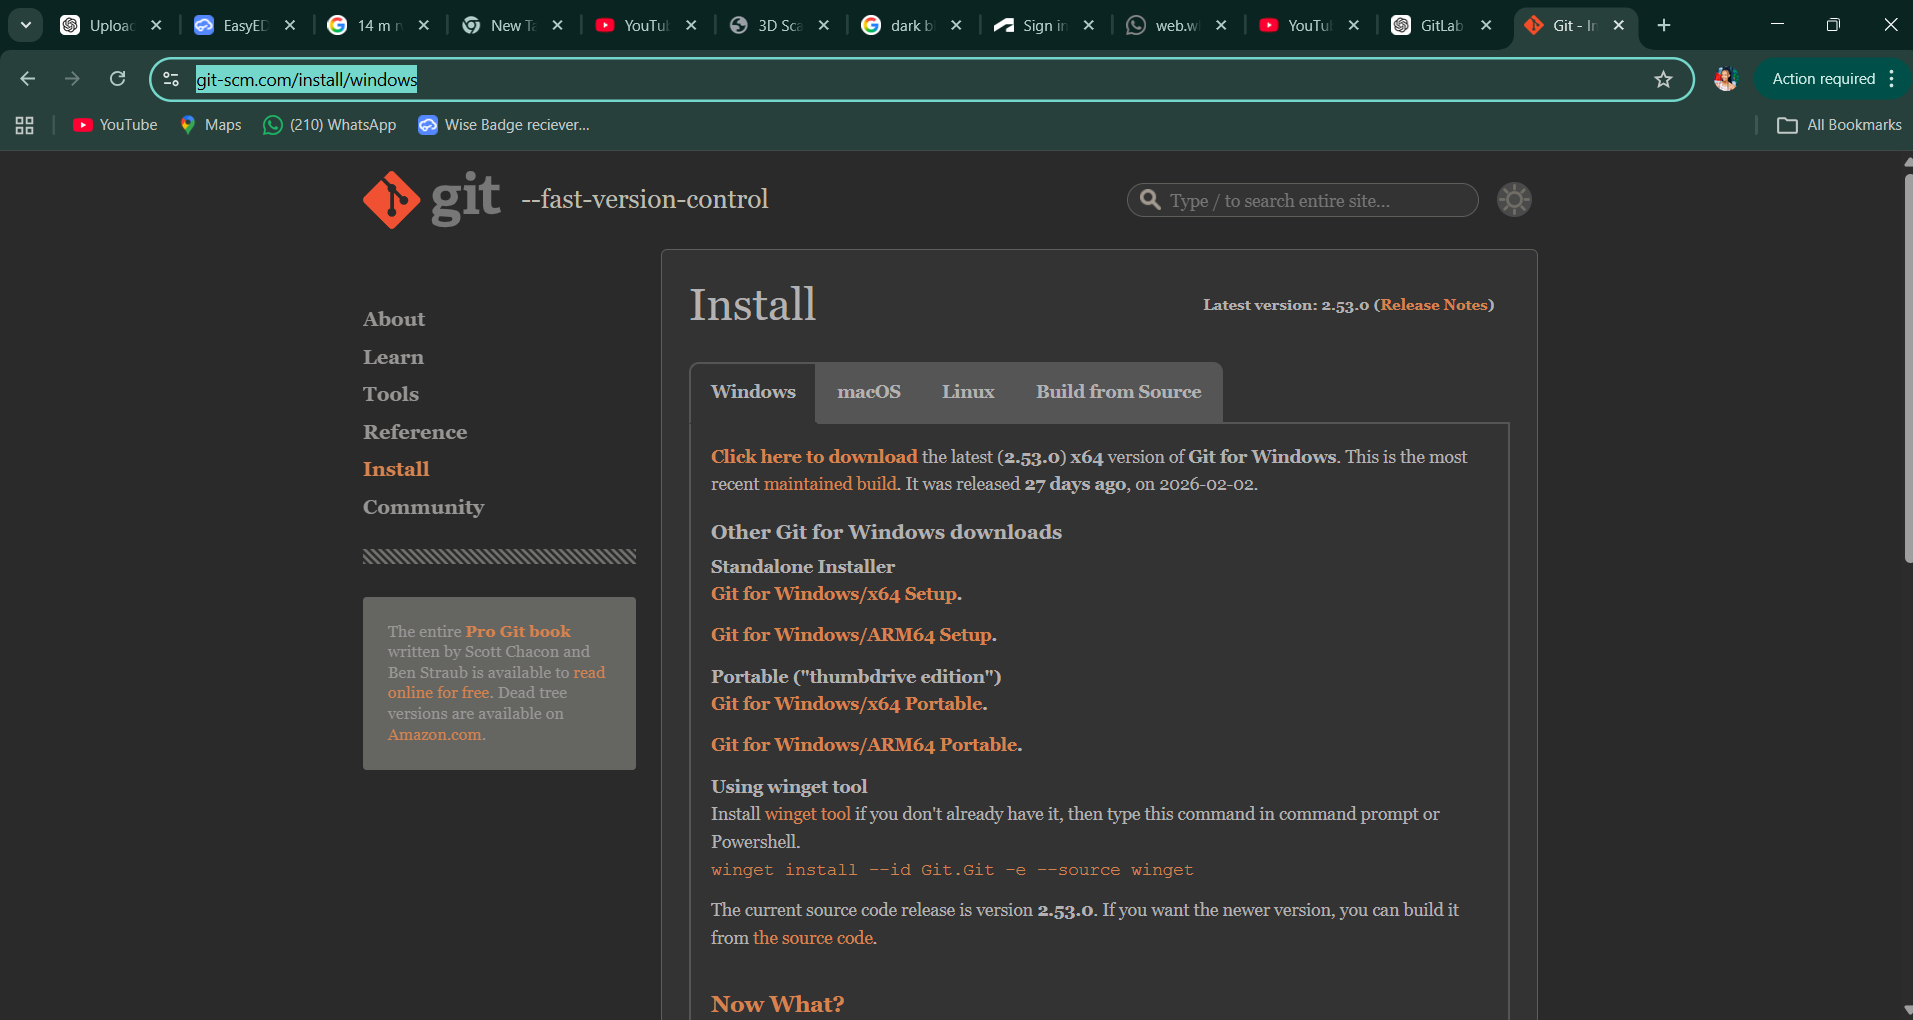
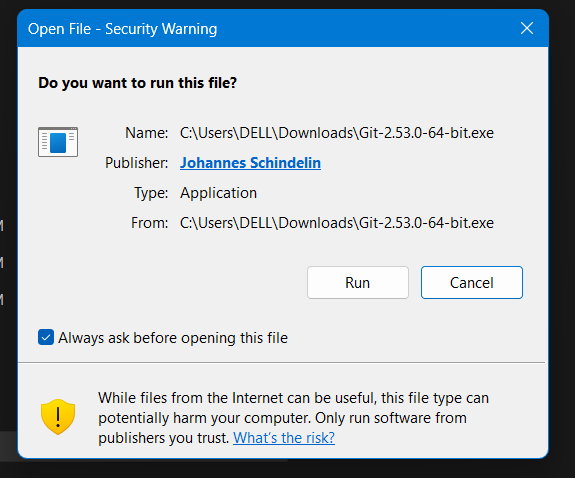
I chose Git because it allows me to track every change and recover previous versions if needed. To be able to use Git, I first downloaded and installed it on my computer.
Git Install: Download Git
Git Commands I Used
These are some of the Git commands I used while creating and updating my repository:
git init
git add .
git commit -m "Update Week 01"
git push
Explanation of Git Commands
- git init: Initializes a new local Git repository in the current project folder so Git can start tracking changes.
- git remote add origin repository_url: Connects the local repository to a remote repository on GitLab using the provided URL and names the connection "origin."
- git add .: Stages all files in the current directory, preparing them to be included in the next commit.
- git commit -m "Initial commit": Saves the staged files into the repository history with a descriptive message.
- git push -u origin master: Uploads committed changes to the remote repository on the "master" branch and sets it as the default upstream branch for future pushes.
GitLab Repository Setup and Documentation
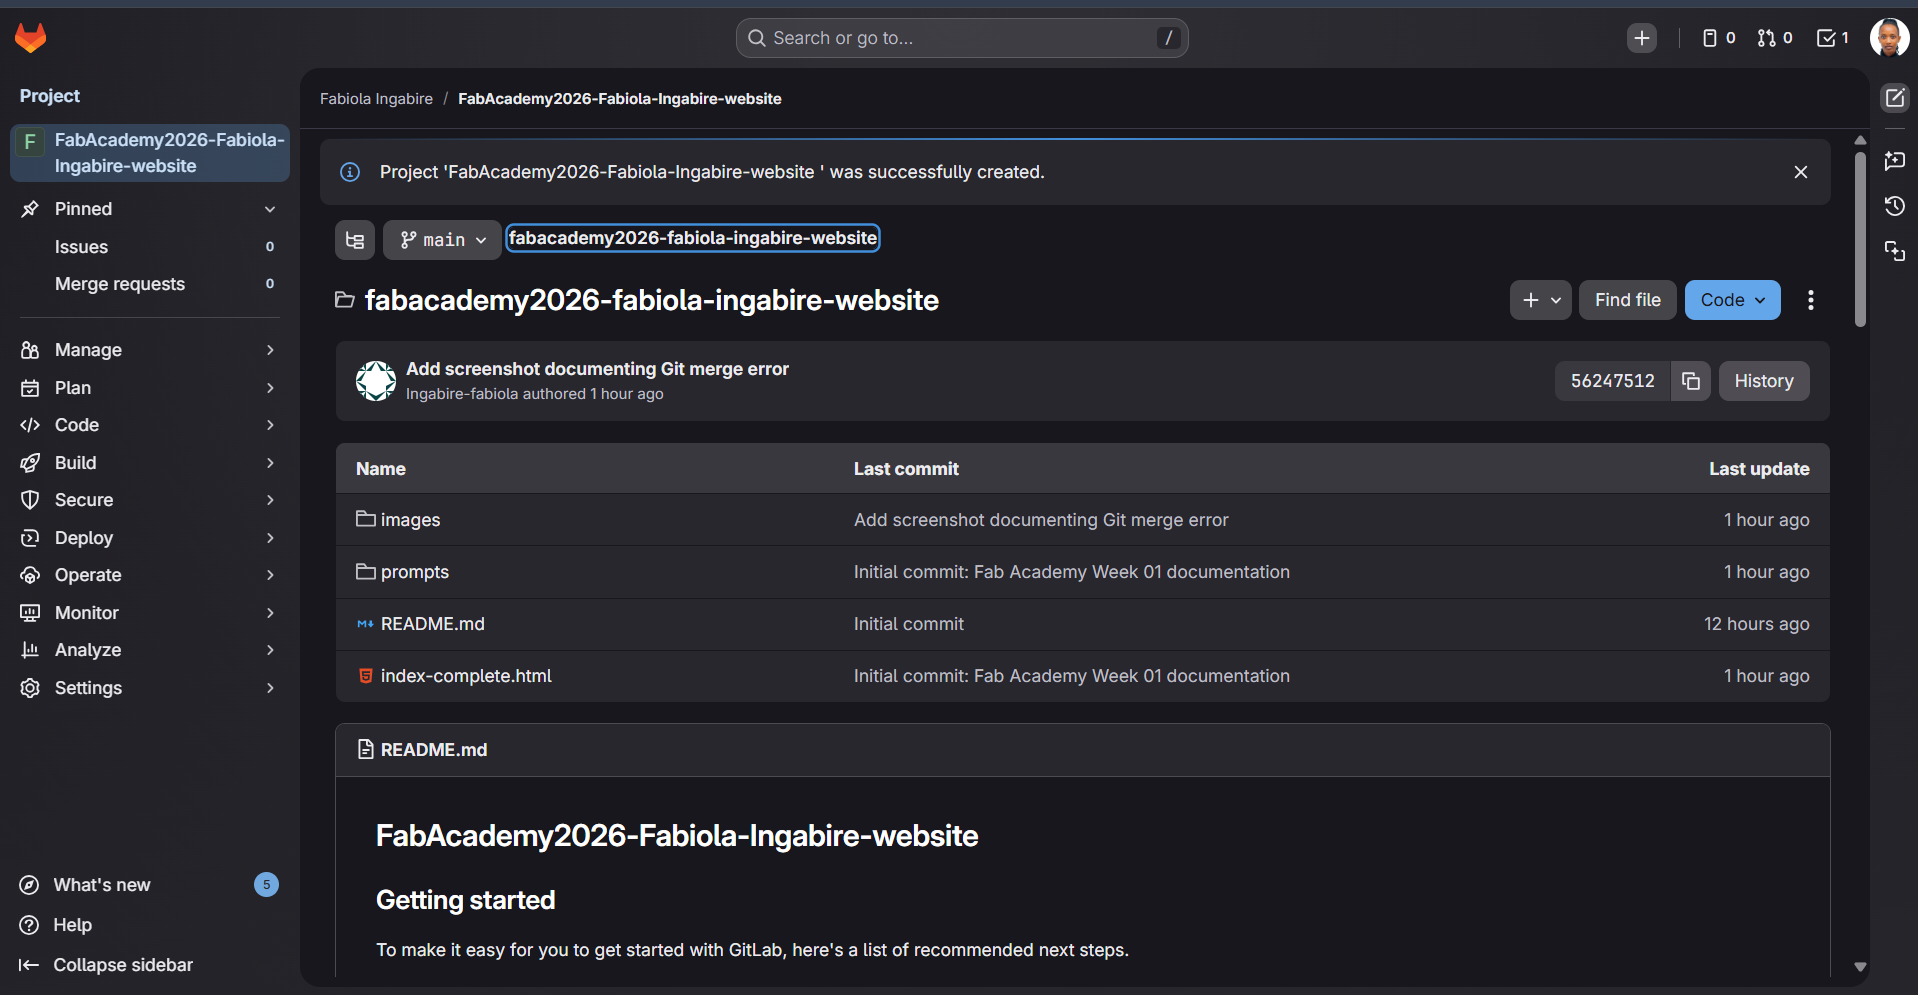
GitLab Repository
I created my Fab Academy repository on GitLab and cloned it to my computer using Git.
git clone git@gitlab.fabcloud.org:your-repository.git
cd FAB ACADEMY 2026\my_Documentation>
SSH Key Configuration
I configured an SSH key so my computer could communicate securely with GitLab.
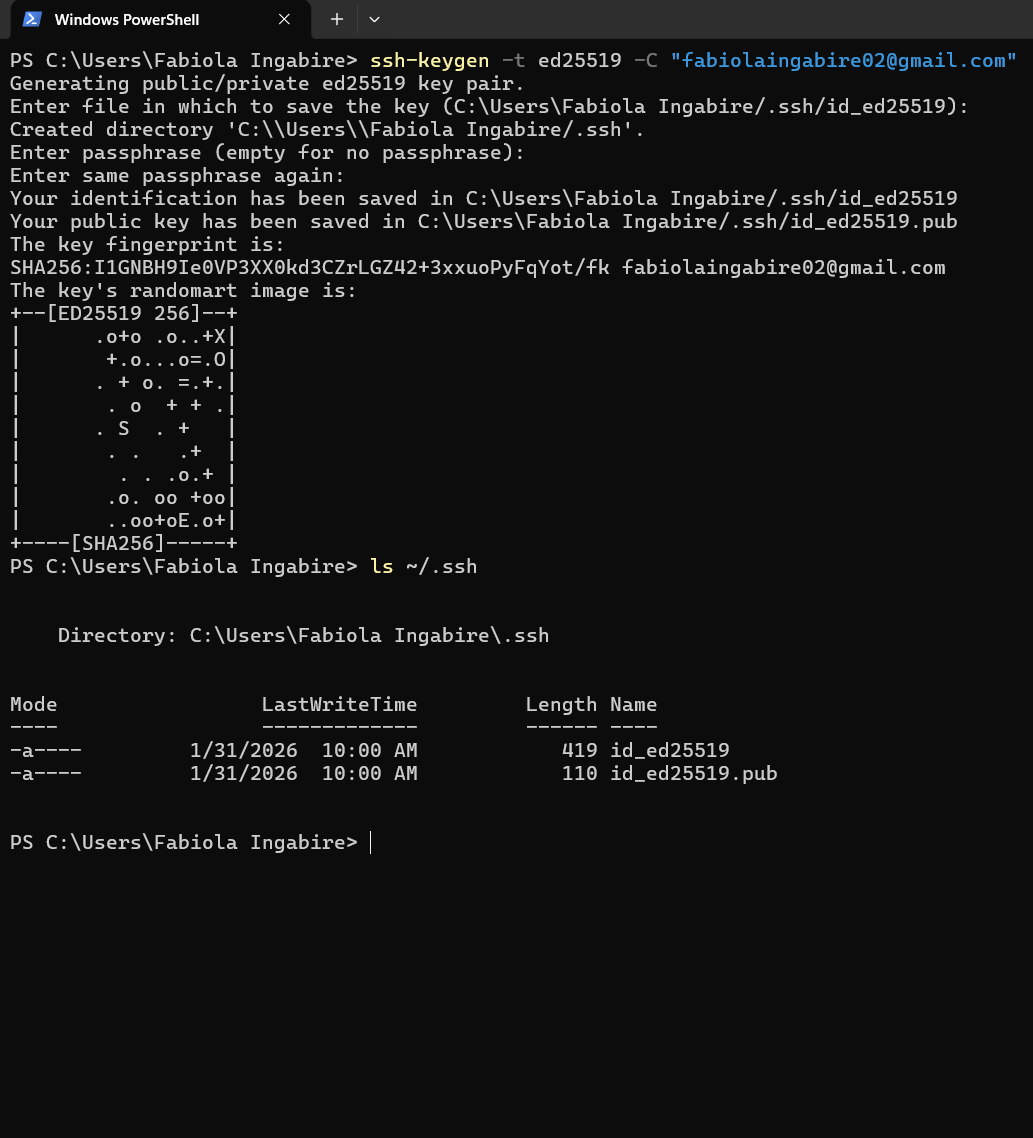
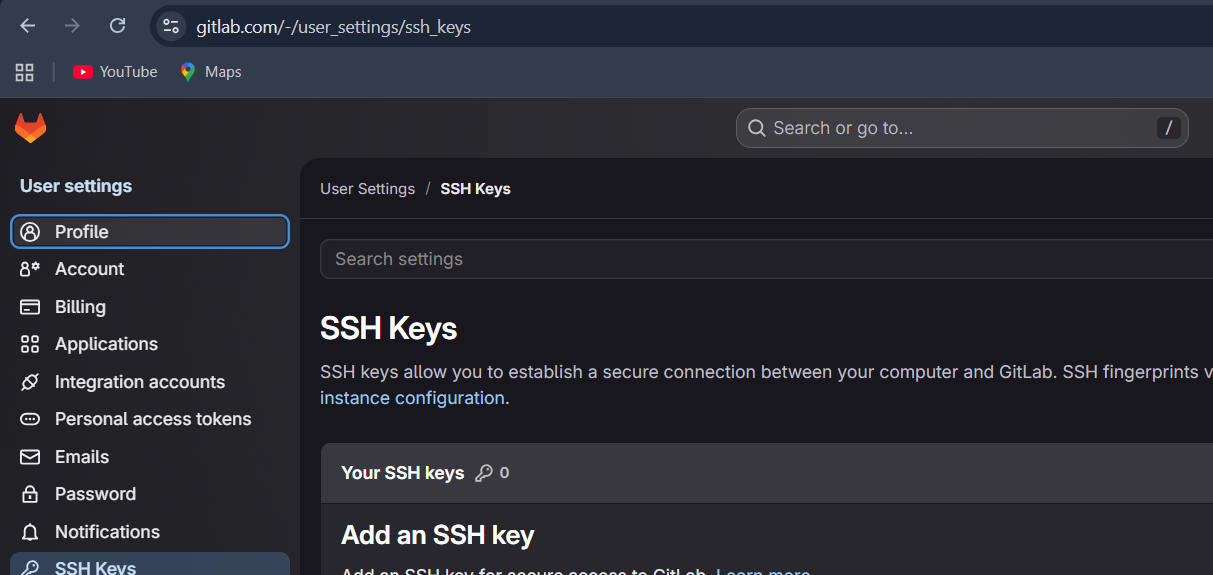
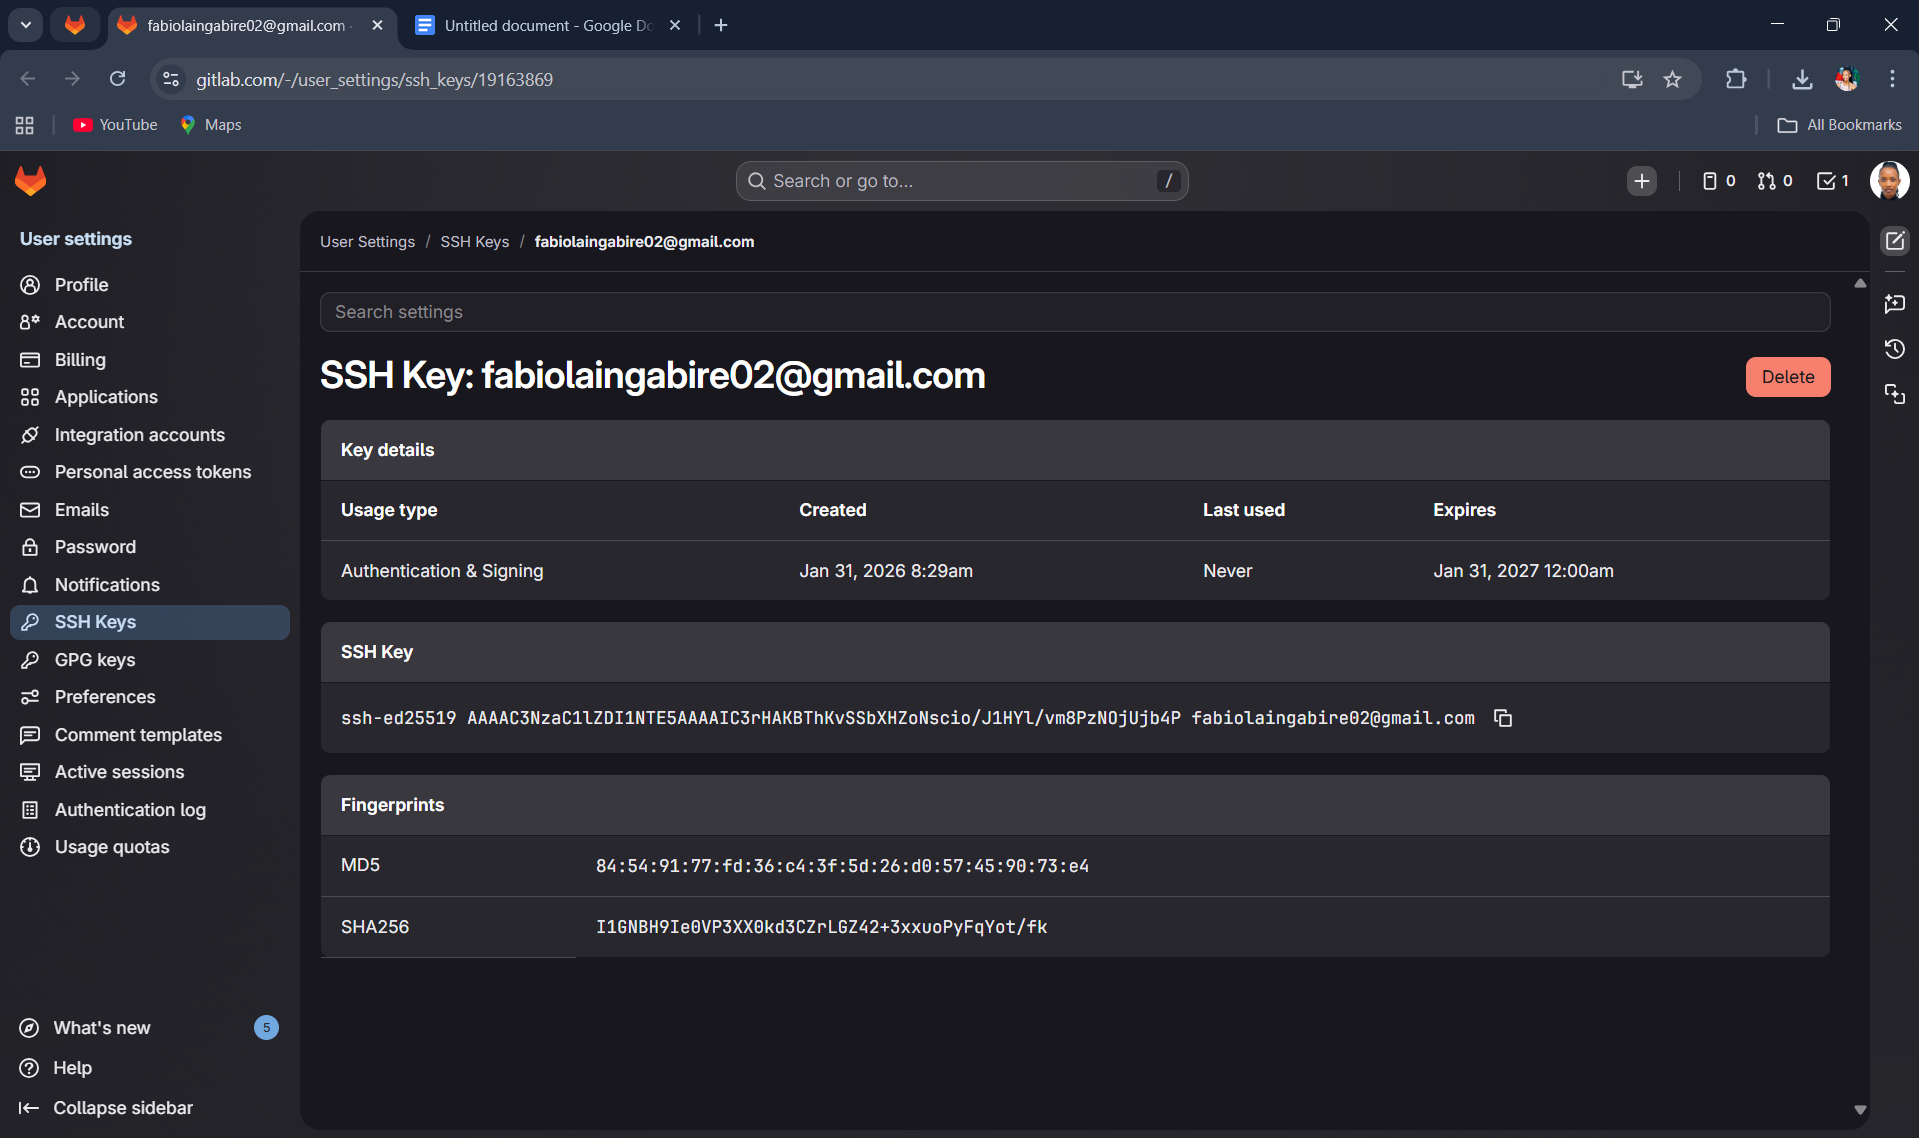
ssh-keygen -t ed25519 -C "your-email@example.com"
cat ~/.ssh/id_ed25519.pub
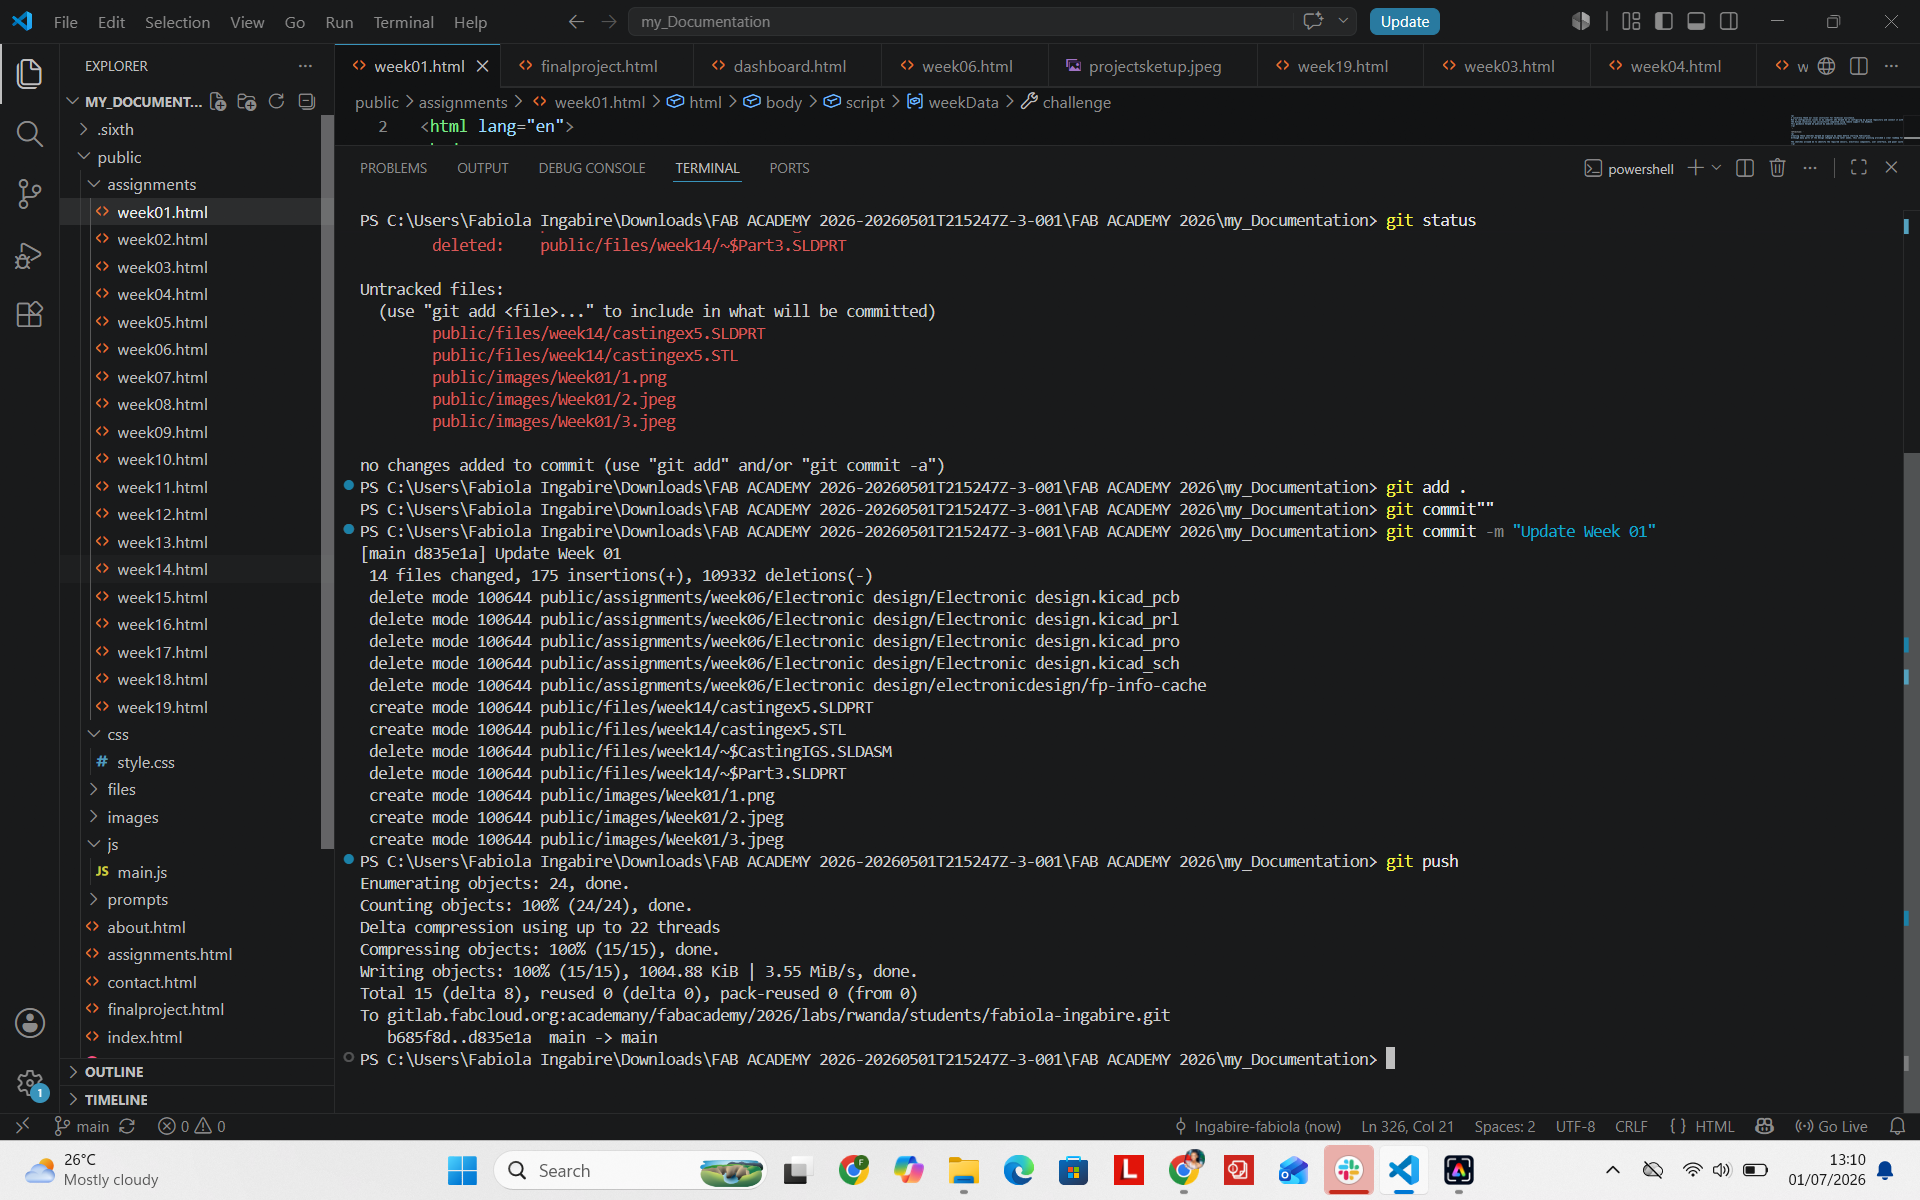
Adding, Committing and Pushing Files
After creating or modifying my website files, I added them
to the Git staging area before committing them. I used
git status to check which files had changed
and git add . to stage the updated files.
git status
git add .
git commit -m "Update Week 01"
git push
This workflow allowed me to save my changes in Git and then upload the updated files to my Fab Academy GitLab repository.
Build a Personal Website
I created my personal Fab Academy website in the class archive to document my work, introduce myself, and present my final project.
About Me
I created a dedicated About page on my website where I introduce myself, my background, my technical interests, and my experience.
Website Content
As part of developing my personal website, I created a section about myself and added information about my final project.
- Created a section about myself.
- Added my final project information.
Website Development
I used HTML, CSS and JavaScript to build my website. I also used ChatGPT and Claude.ai as assistants during the development process.
I first asked ChatGPT to help me create a detailed prompt for Claude.ai. I then used the prompt to generate the first version of my website.
My First AI Prompt
My first prompt to ChatGPT:
Help me generate a prompt that I can give an AI to build a professional
Fab Academy website with good structure, colors, alignment and responsive
design.
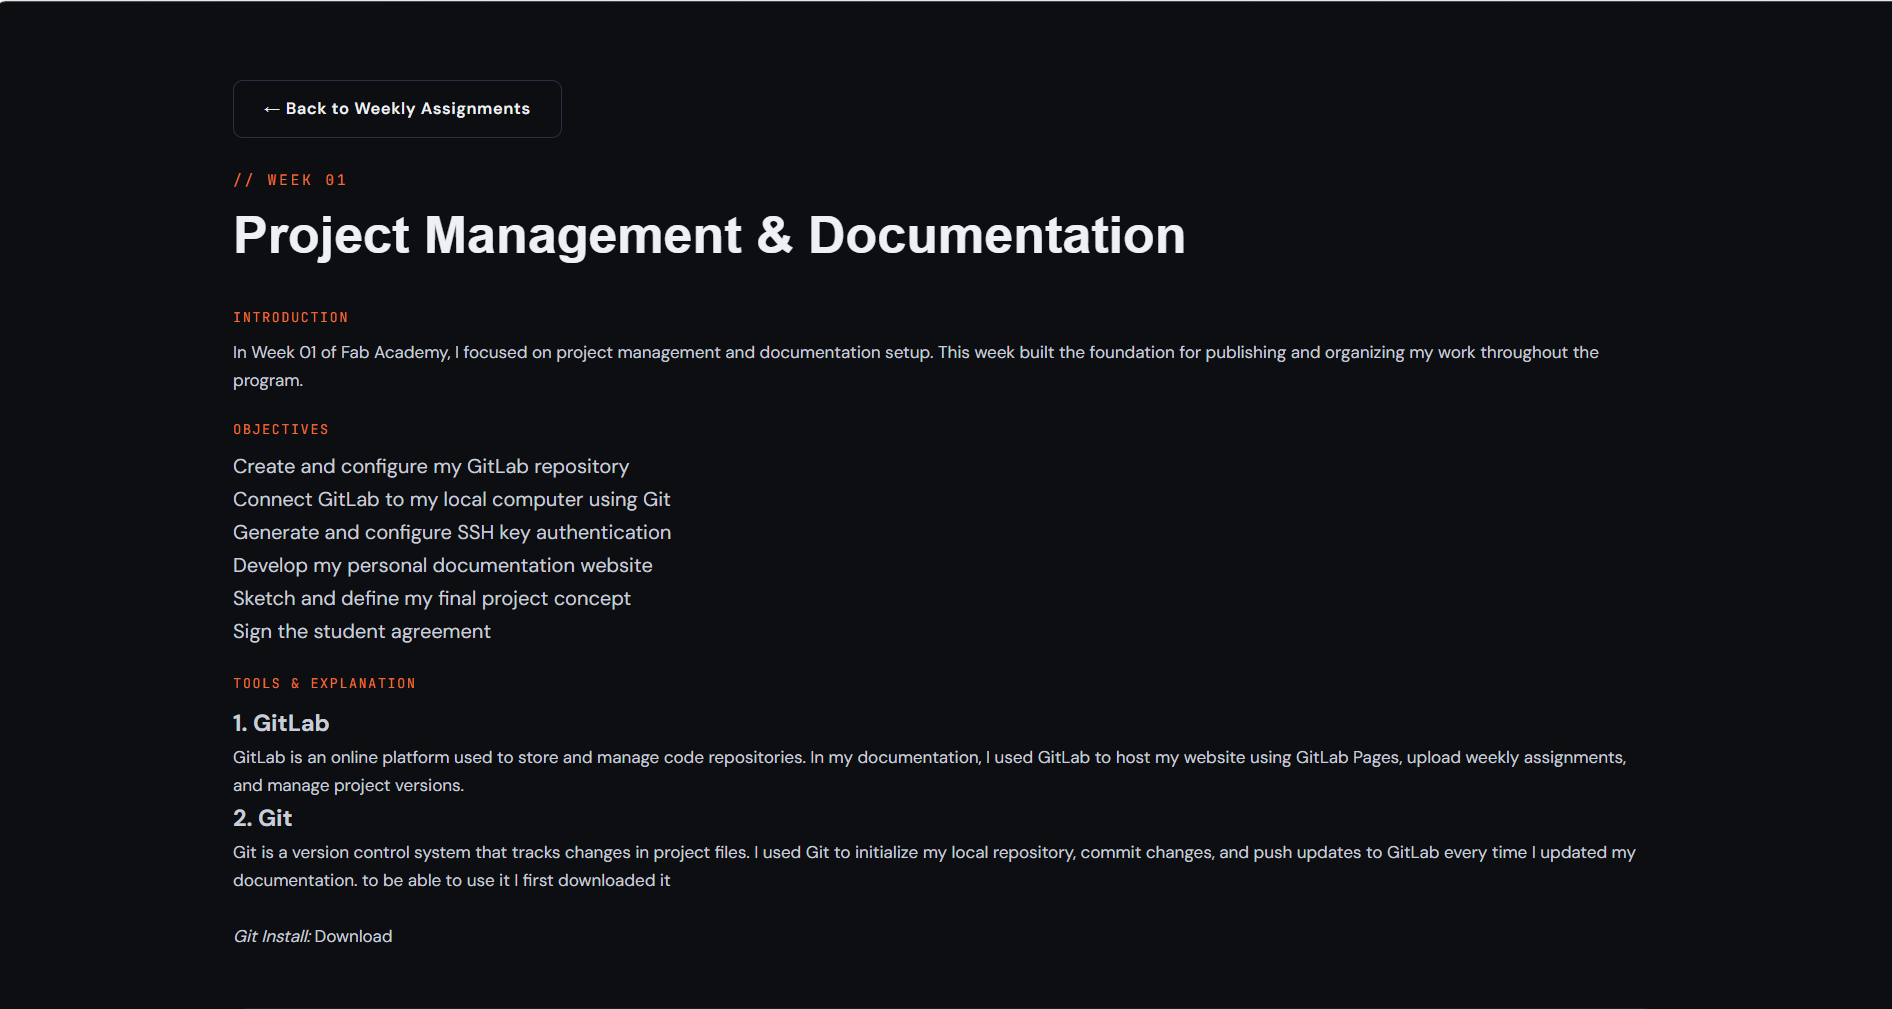
First AI Trial
I gave the generated prompt to Claude.ai. It created the first version of my website with the main pages, navigation, styling and weekly documentation structure.
View the prompt used for the First AI trial
I tested the website and then identified areas that needed improvement. The first version did not contain the three-column documentation layout. I decided to improve the website by adding a weekly sidebar, main documentation area and table of contents.
Website Improvements
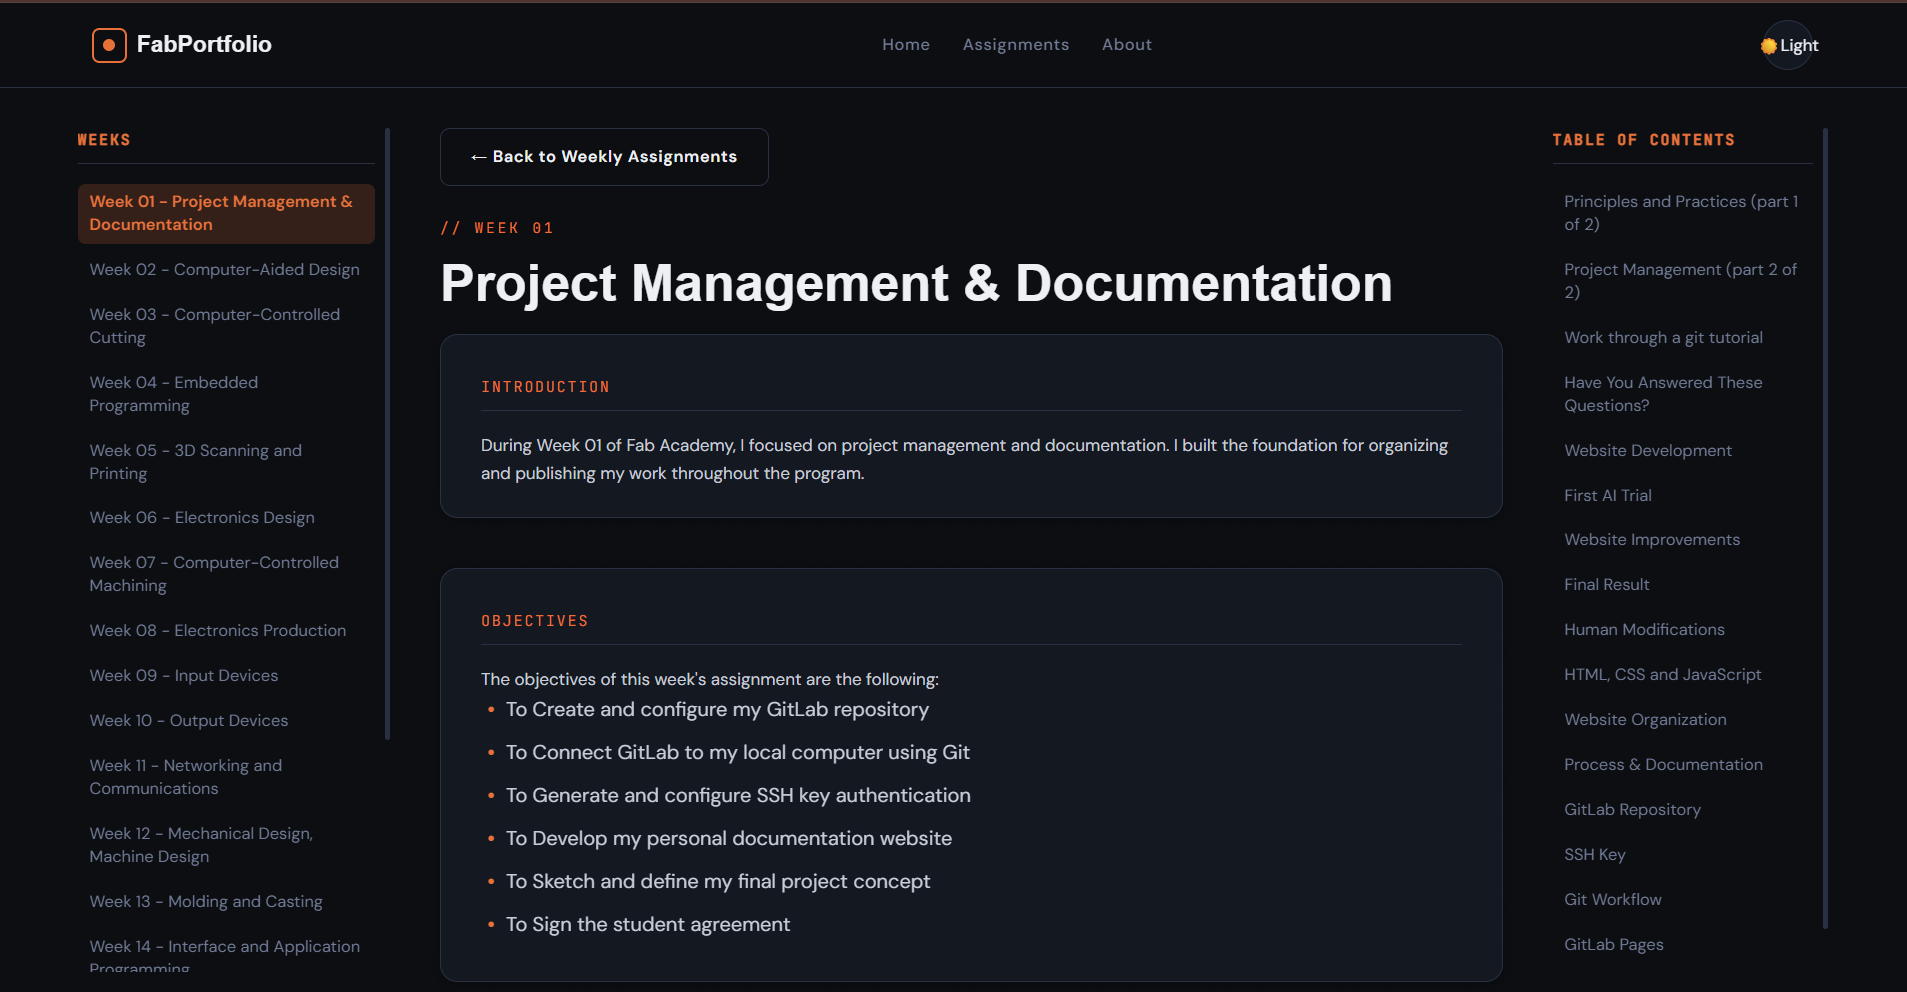
After reviewing the first version, I added a three-column documentation layout:
WEEK SIDEBAR | MAIN CONTENT | TABLE OF CONTENTS
I also added doc-layout.js to generate the
weekly sidebar, active week, table of contents and
previous/next navigation.
I changed the heading structure so that <h2>
is used for major sections and <h3> for
smaller subsections. The table of contents then displays
only the <h2> sections.
View the prompt used for the layout improvement
Final Result
After testing and making the changes, the three-column documentation layout worked correctly. I also checked navigation, scrolling and responsive behavior.
Human Modifications
AI-generated code was only a starting point. I reviewed the code, replaced images and content, changed the layout, fixed problems and added my own documentation.
The final website reflects my own work and understanding.
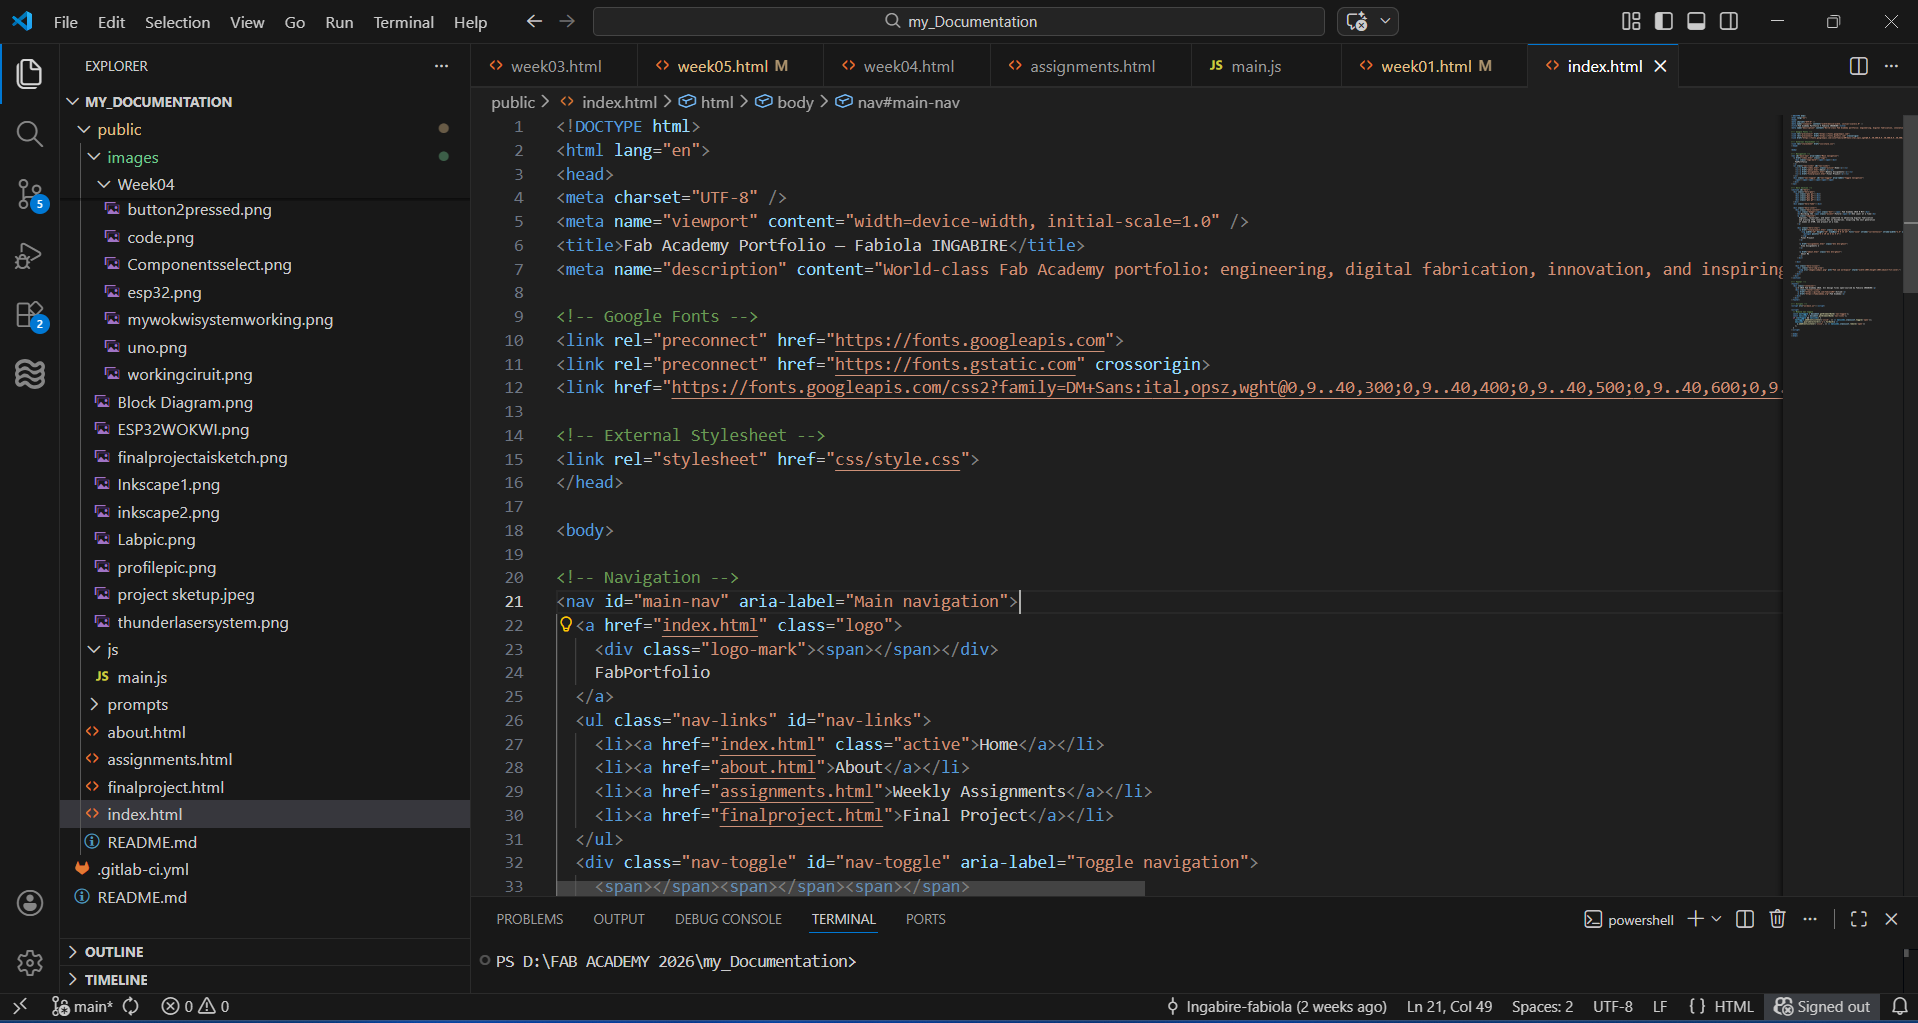
HTML, CSS and JavaScript
HTML: Website structure and content.
CSS: Layout, colors, typography and responsive design.
JavaScript: Navigation, theme switching and documentation layout.
Sample HTML Code
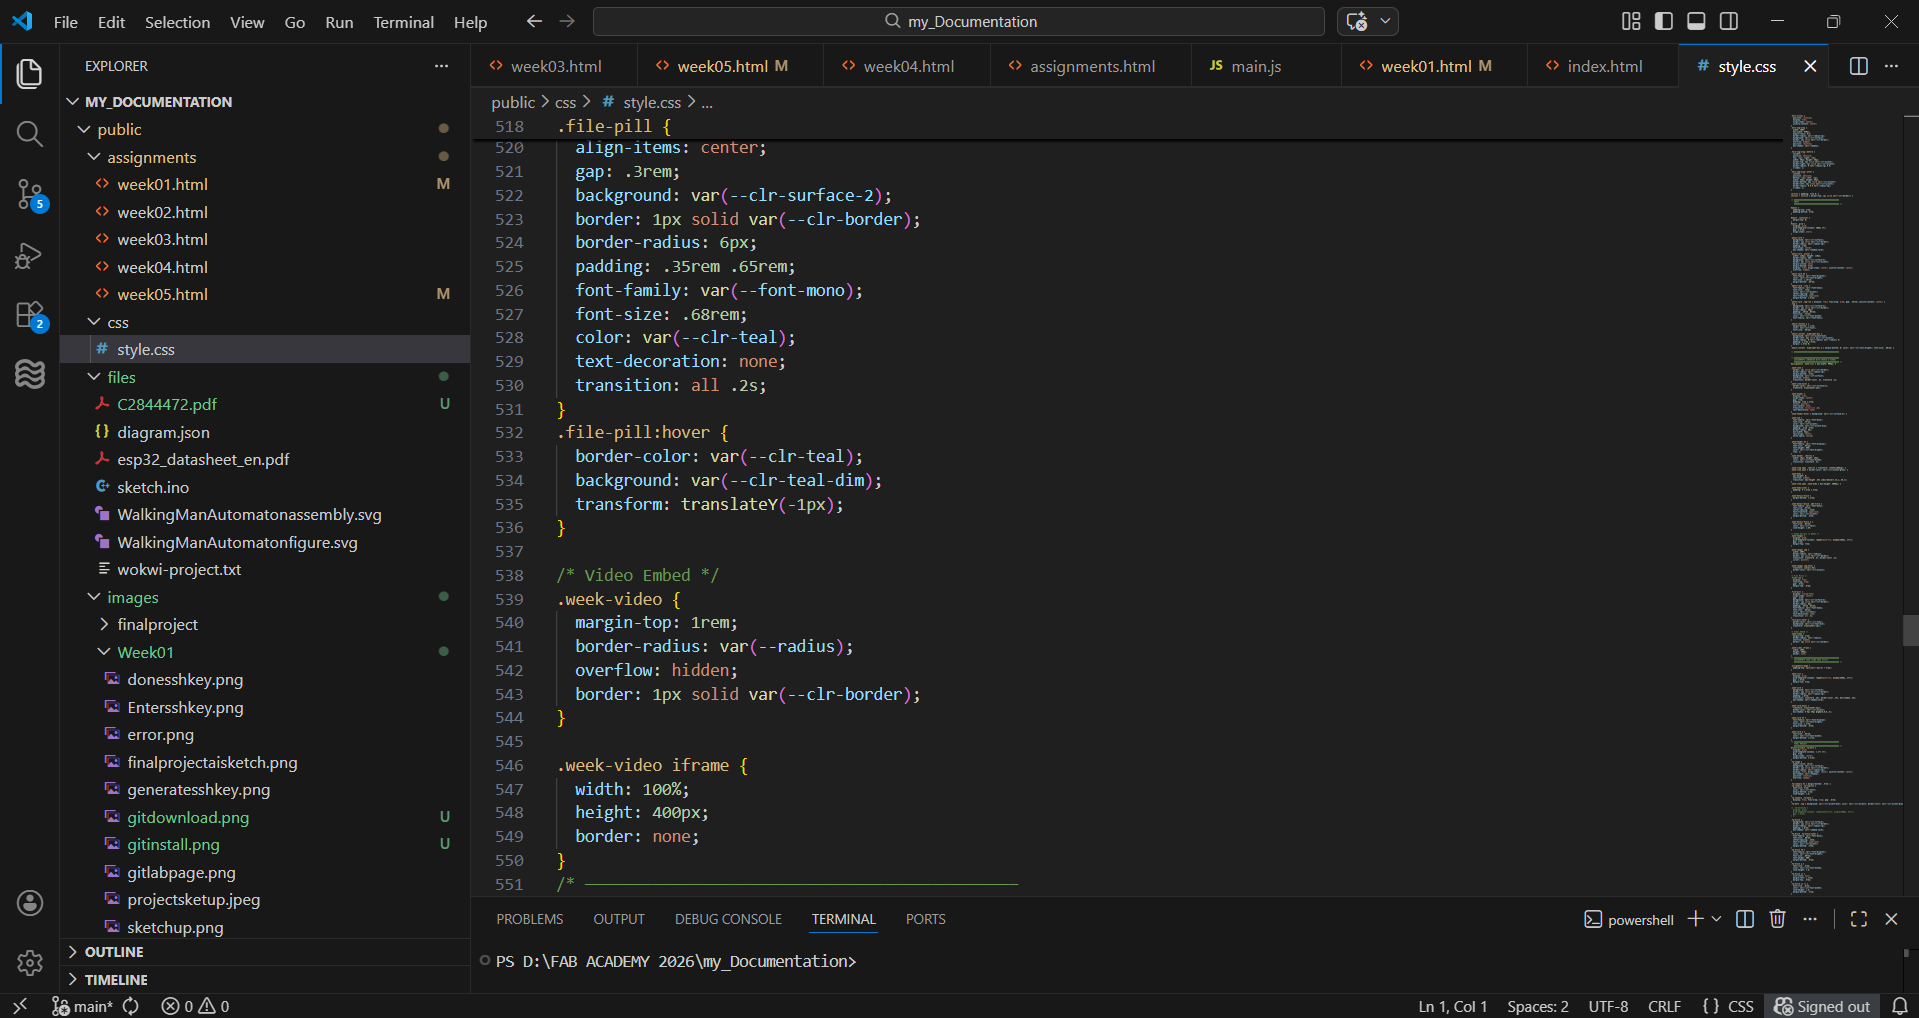
Sample CSS Code
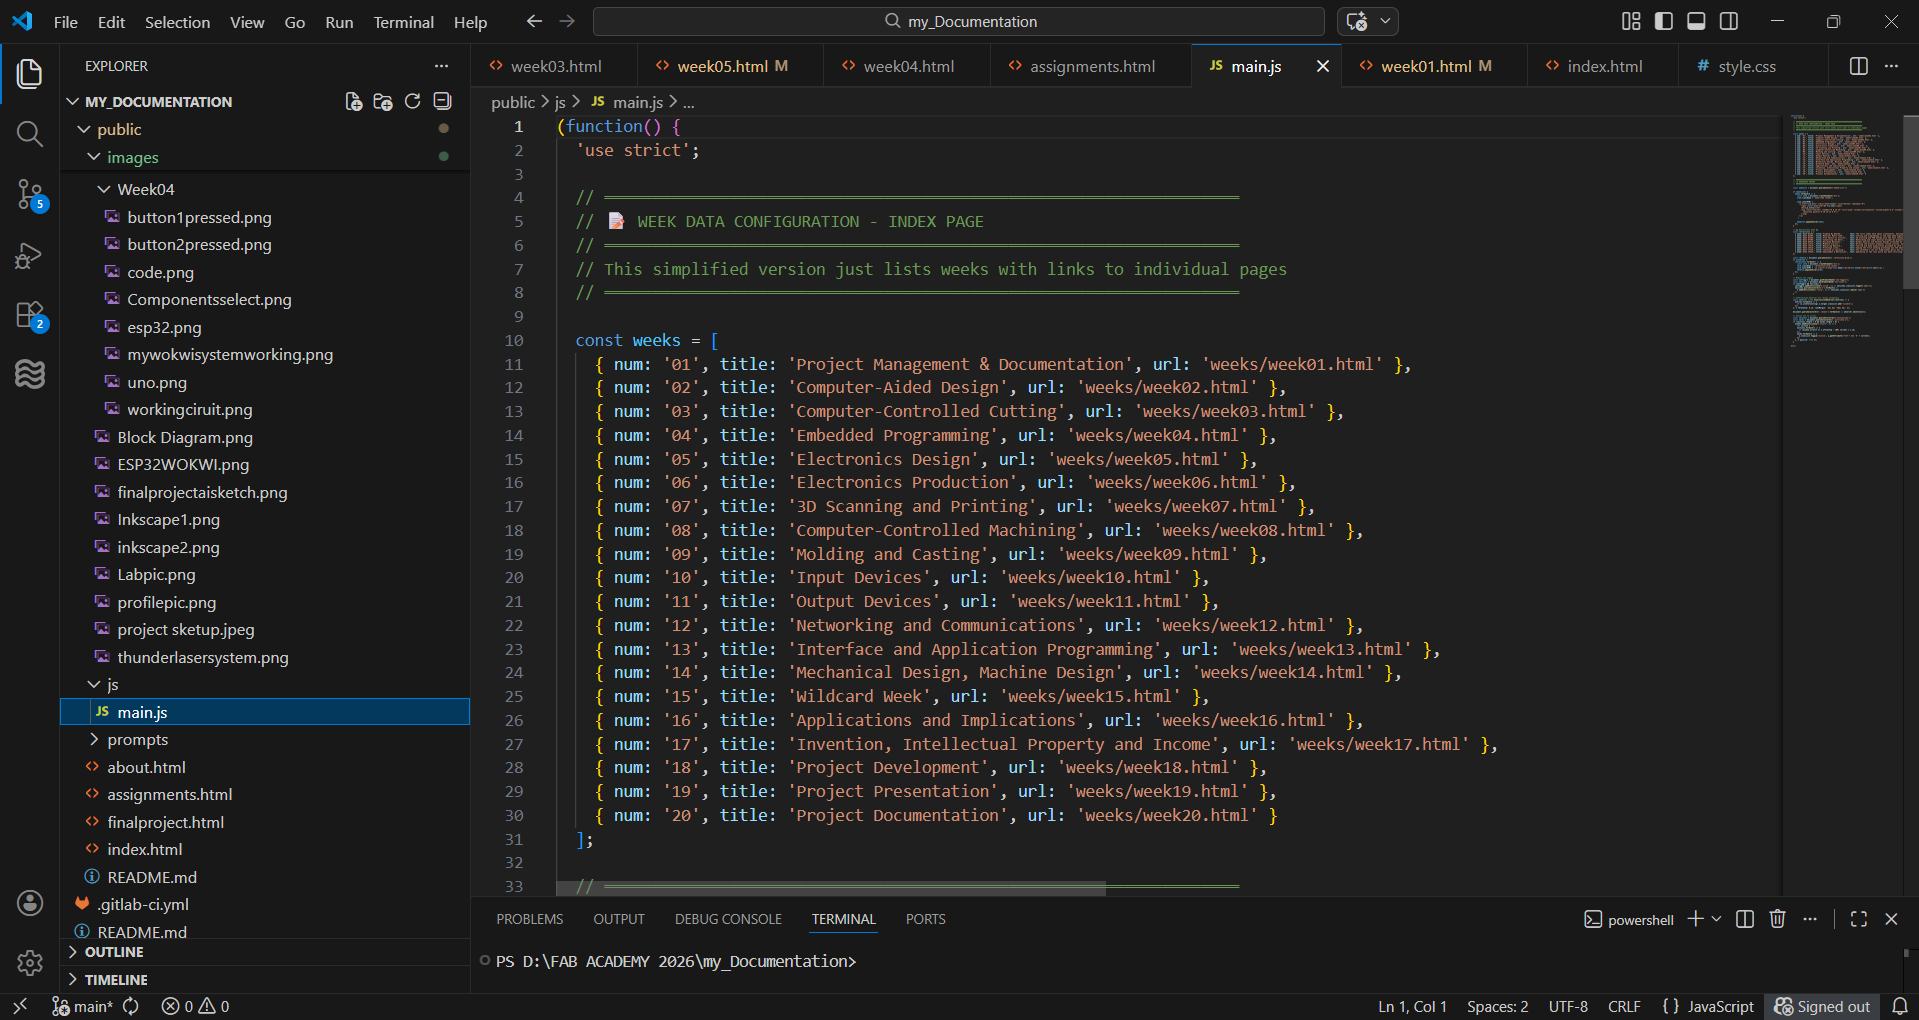
Sample JavaScript Code
Website Organization
I organized the website into folders to make it easier to maintain.
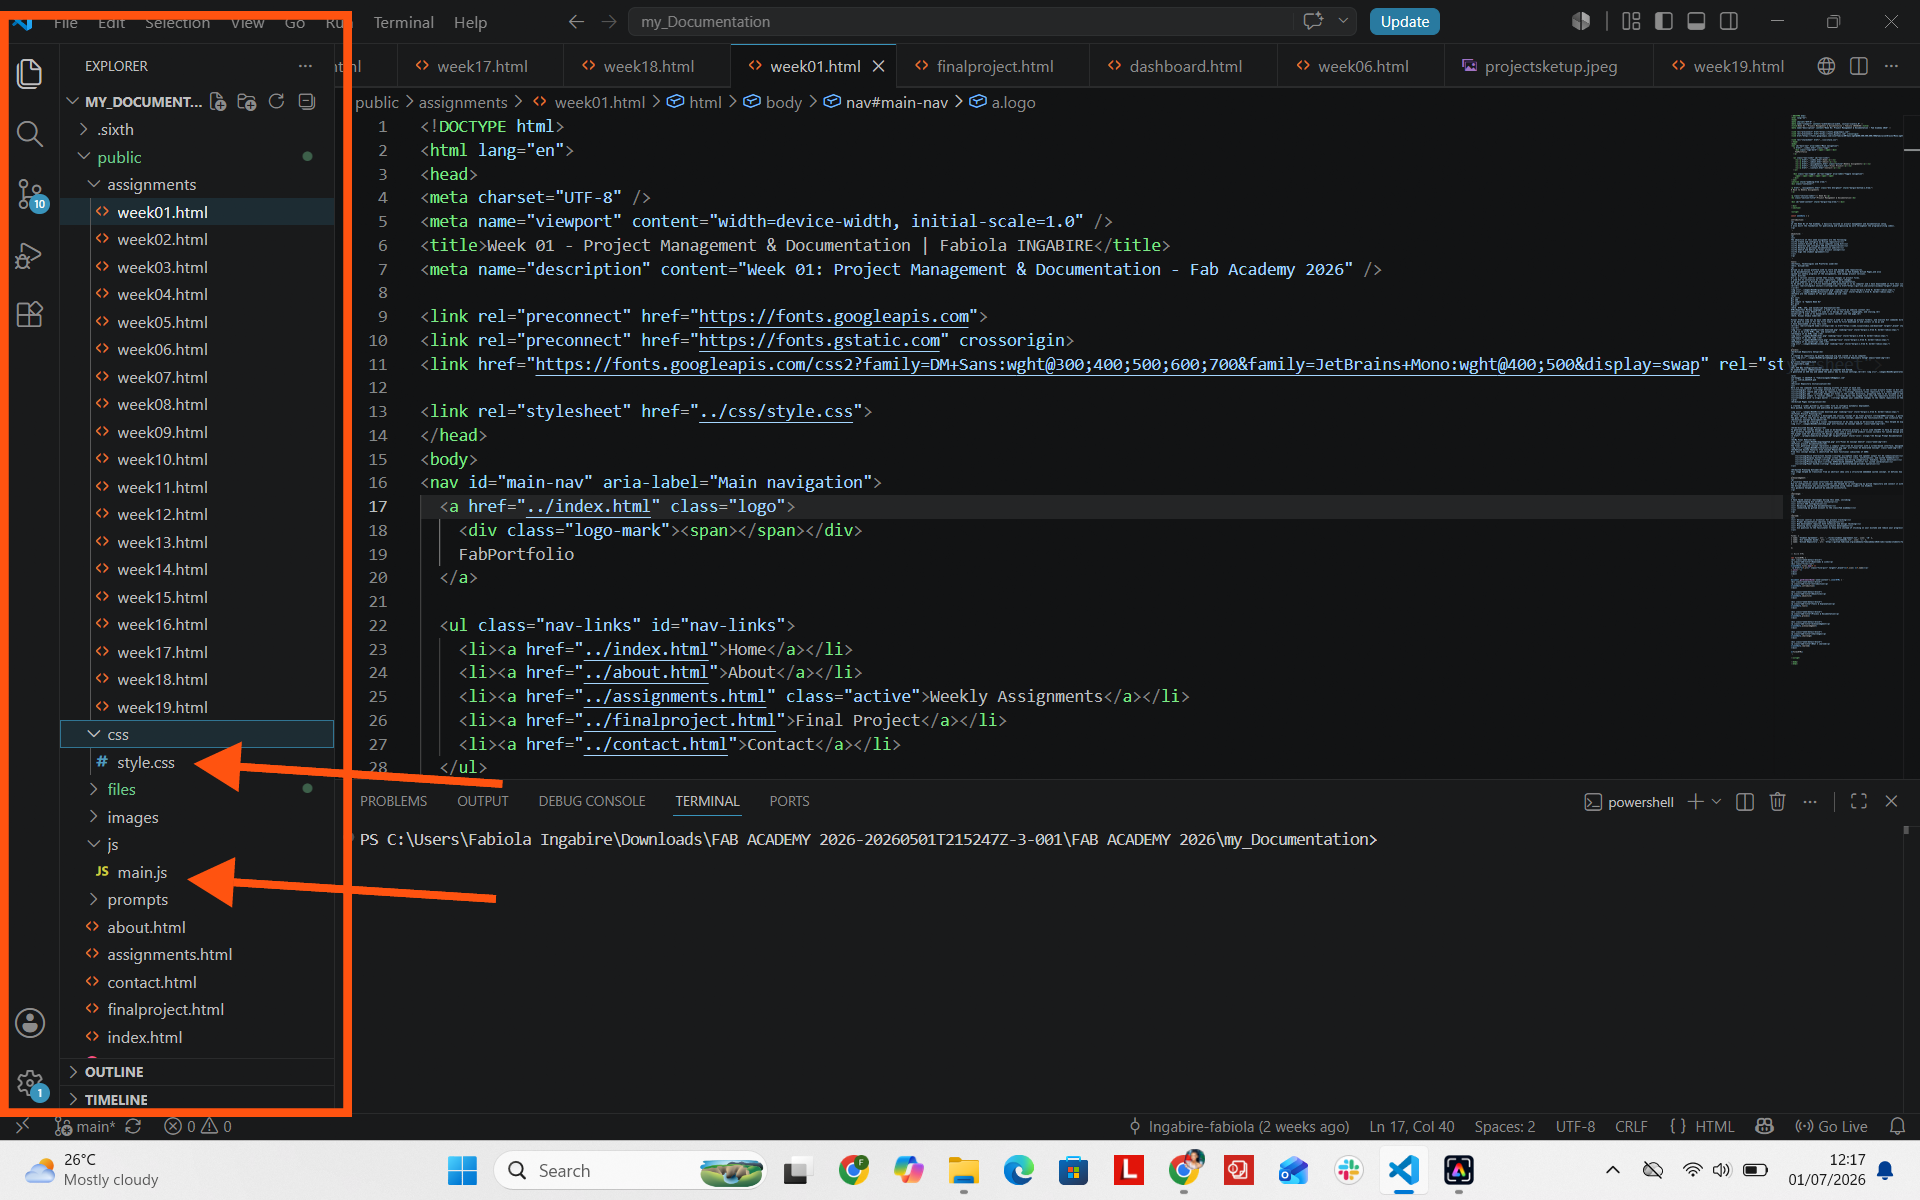
- assignments — weekly documentation.
- css — website styling.
- js — JavaScript files.
- images — documentation images.
- files — downloadable files.
- prompts — AI prompts used during development.
Website Publishing and GitLab Pages
GitLab Pages
GitLab Pages publishes my website after the GitLab pipeline successfully builds the project. I check the published page after each update.
Final Website
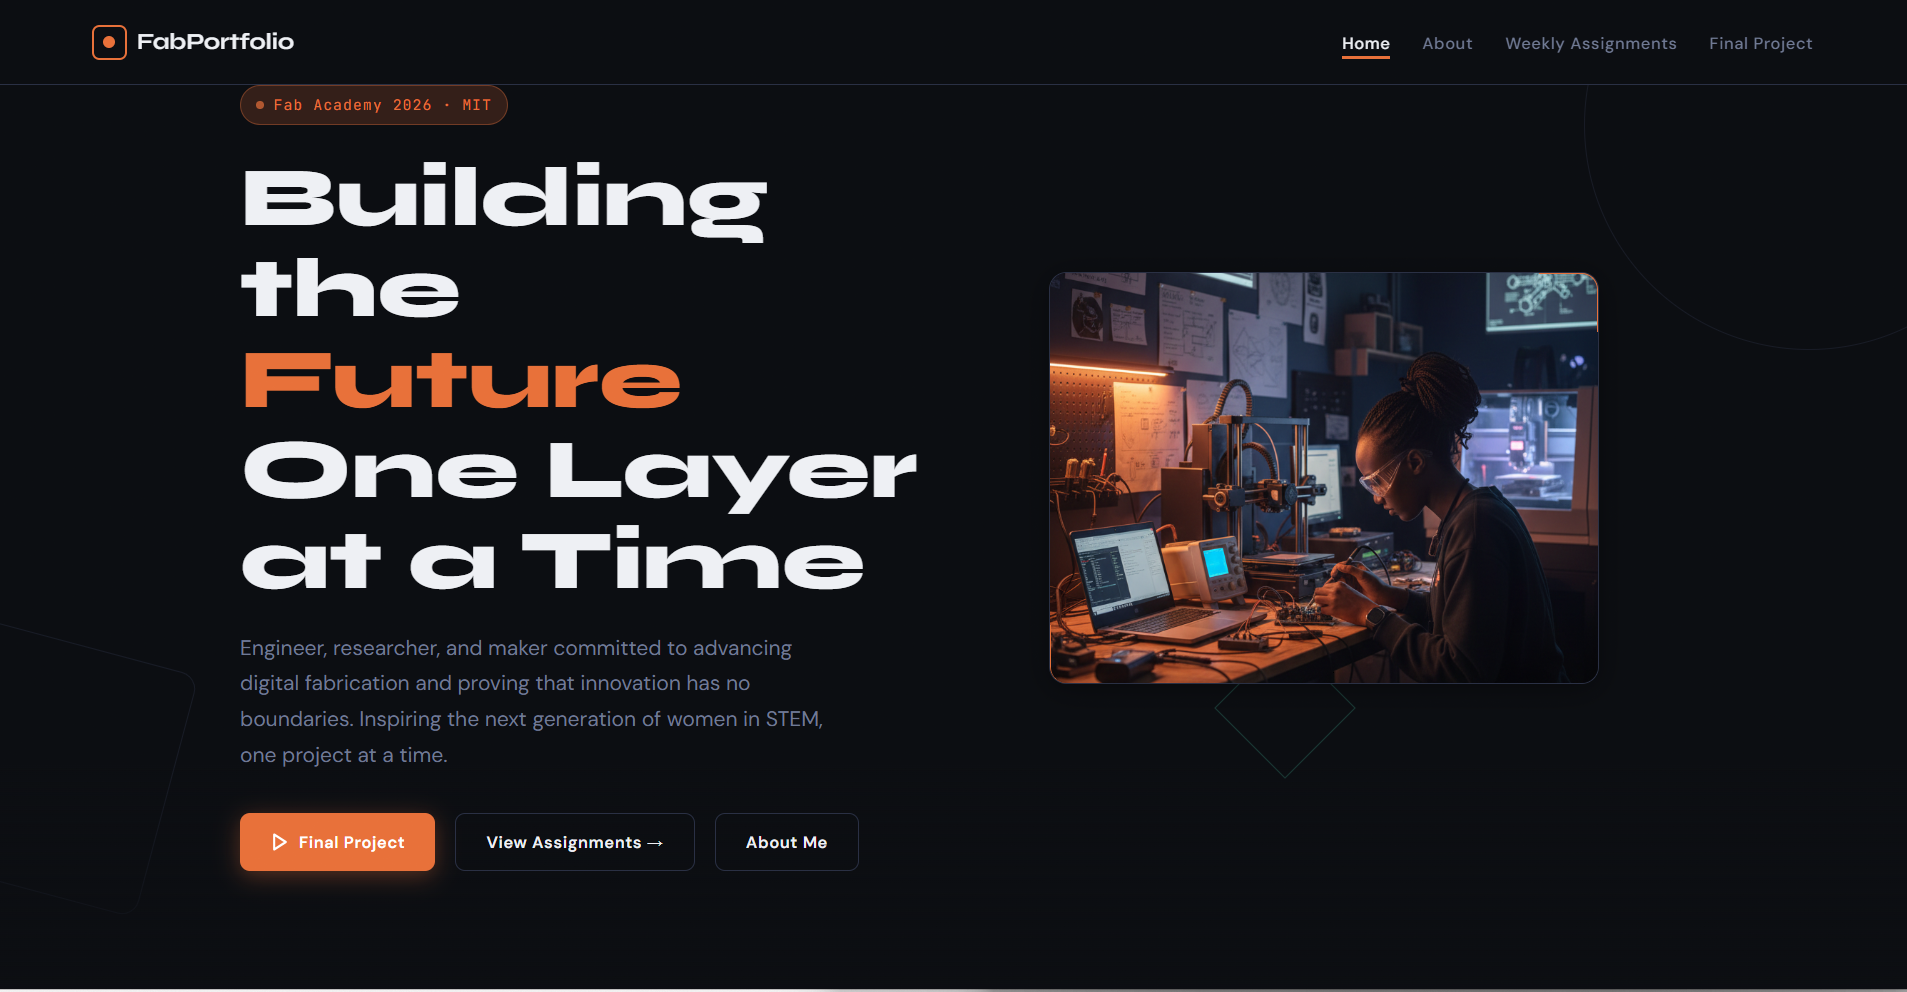
The final website documents my Fab Academy work, development process, final project and learning progress.
Week 01 Requirements Checklist
The following checklist summarizes the evidence completed during Week 01.
- Final project sketched: Initial system architecture and mechanical sketches are included in the Principles and Practices section above.
- Final project explained: AURA's purpose, planned functions, and target users are described above.
- Personal website created: This website was developed using HTML, CSS, and JavaScript.
- Website development documented: My development process, AI assistance, testing, modifications, and improvements are documented above.
- About section created: My personal information is available on the About page.
- Git repository documented: Git installation, repository setup, SSH configuration, adding files, committing, and pushing are documented.
- Work pushed to GitLab: My website and documentation are committed and pushed to my Fab Academy GitLab repository.
- Student Agreement: The signed Student Agreement is included in my repository.
Reflection
Creating these sketches helped me organize my ideas before starting fabrication. Although many parts of the design changed during later weeks, this initial planning provided a clear roadmap for the rest of the project.
The sketches allowed me to identify the required sensors, electronic components, user interface, and power system before beginning the detailed design work.
Challenges
I faced several challenges during this week, including:
- Understanding the Git workflow initially.
- Correct SSH configuration.
- Balancing coding and documentation.
- Connecting my GitLab account to the Fab Academy class.
What I Learned
- Version control is essential for project tracking.
- Proper documentation improves organization.
- Web development requires both technical and design thinking.
- Planning early simplifies final project development.
- Asking questions to the facilitator helps me learn more instead of sticking to mistakes and delaying progress.
Acknowledgment
I sincerely thank our local instructor for the technical guidance provided during Week 01. I experienced configuration issues while connecting my local Git repository to the Fab Academy GitLab repository. With support provided through AnyDesk, I successfully completed the setup and understood the required configuration process.
Week Summary
During Week 01, I successfully created my documentation website, configured Git and GitLab, signed the Student Agreement, and prepared the first proposal for my final project. These activities established the foundation that I used throughout the rest of Fab Academy.