Principles and Practices, Project Management
In the first week we worked on defining the final project and getting familiar with the documentation process.
Principles and Practices
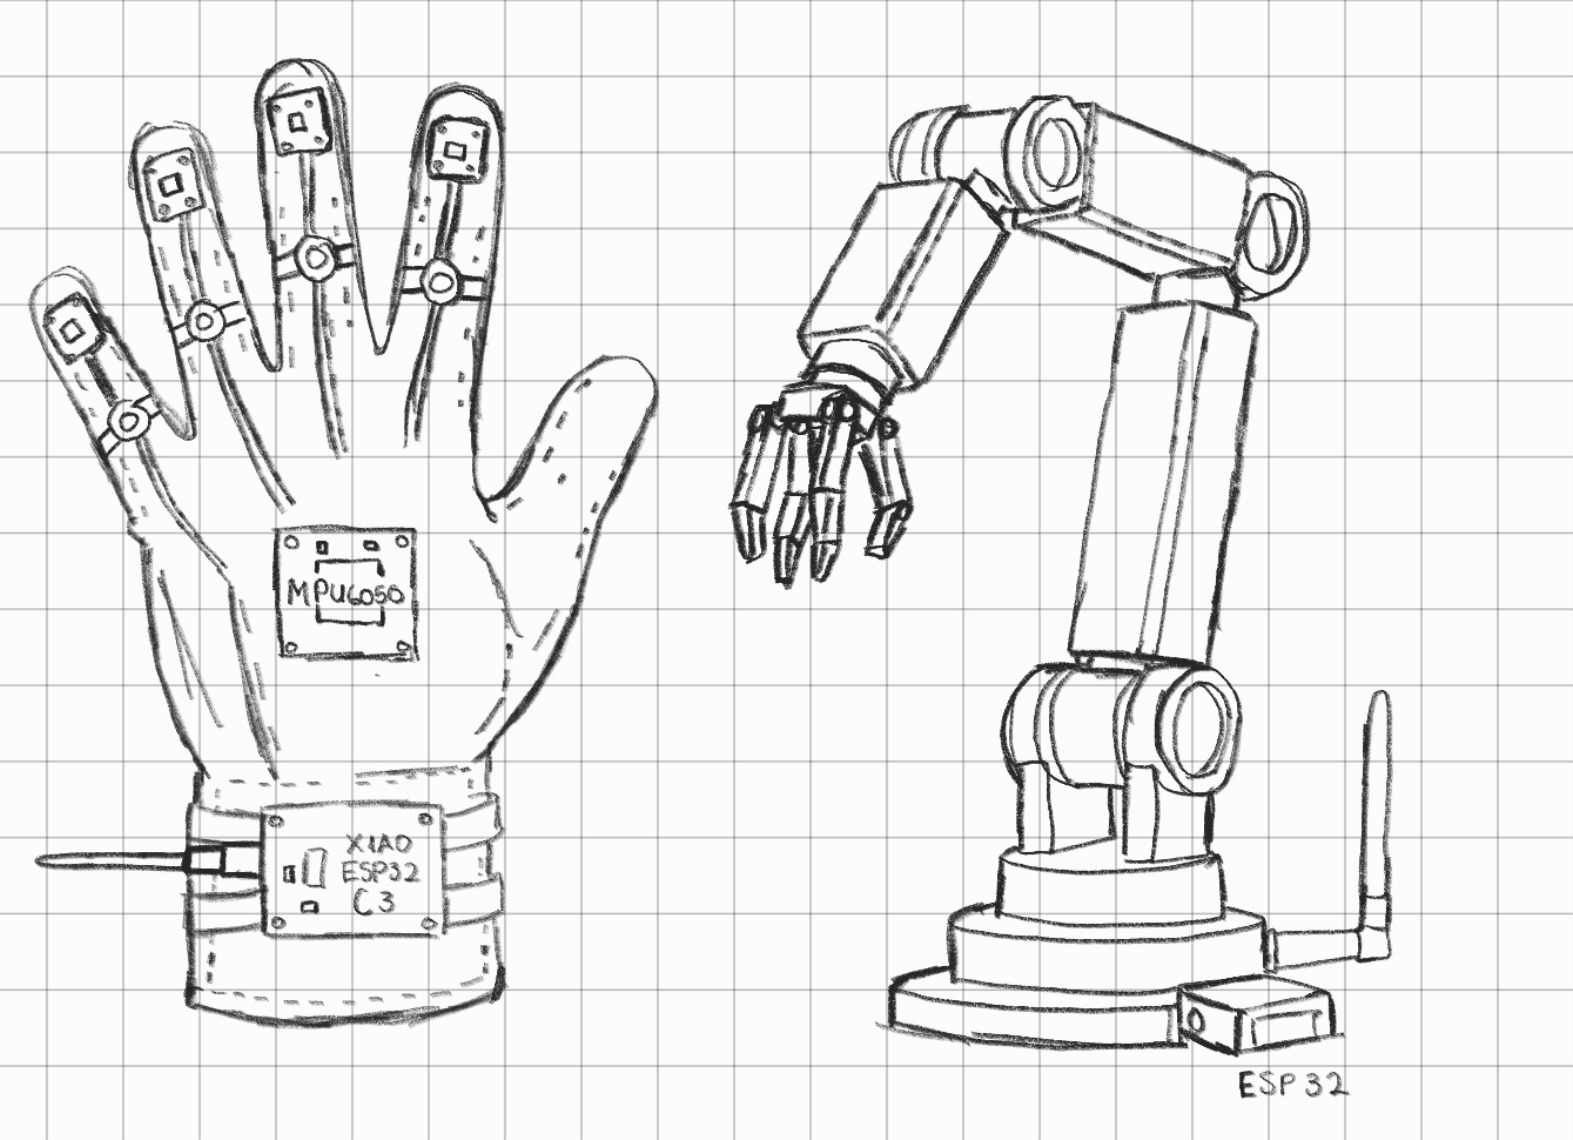
Weareable Wireless Robotic Arm Controller
The goal of this project is to develop a portable control interface capable of operating a robotic arm in near real-time. By integrating motion tracking and flexion detection, the system offers an intuitive, human-like control experience, bridging the gap between user intent and mechanical execution. Beyond simple movement, this technology aims to decentralize the machine operator, enabling complex tasks to be performed from a safe distance or in specialized environments.
The inspiration for this project came from an earlier prototype: a wired glove for controlling a mouse. While that initial version successfully demonstrated the basic concept of gesture-based input, it was limited by its physical connection. My goal for the Fab Academy is to build this concept into a fully wireless system with optimized signal processing. This transition from a simple wired tool to a sophisticated wearable controller represents a significant personal achievement.
Possible Design Considerations
- Mechanical Structure: The robotic claw will be manufactured using 3D printing in PLA or PETG for complex geometries, while the structural base and arm segments will be laser-cut from MDF or Acrylic to ensure fast prototyping.
- Actuators: Movement will be driven by high-torque Servos for precise angular control in the joints, or Stepper Motors if continuous rotation and higher holding torque are required.
- Wearable Base: The glove will be constructed from a semi-rigid fabric or a combination of 3D-printed flexible TPU "exoskeleton" parts to provide both comfort and stable mounting points for the electronics.
- Custom Sensors: To monitor finger movement, DIY Flex Sensors can be fabricated using Velostat, a pressure-sensitive conductive material, offering a cost-effective alternative to commercial sensors.
- Control System: Real-time processing will be handled by the XIAO ESP32-C3, using its small form factor and built-in Wi-Fi/Bluetooth capabilities for wireless data transmission.
Challenges and Technical Heurdles
- Near-Zero Latency: Achieving a real-time response between the user’s hand movements and the robot’s execution.
- Signal Processing: Implementing digital filters (such as a Complementary Filter) to smooth out MPU6050 sensor noise without introducing additional delay.
- Ergonomics: Positioning the XIAO ESP32-C3 and battery strategically to ensure the "Smart Glove" is comfortable and avoids straining the user's wrist.
- Mechanical Consistency: Creating a mounting system that keeps flex sensors aligned with the knuckles to provide stable resistance readings during repeated bending.
- Wireless connection: Achieve stable and long-distance connection between the smart glove and the robotic arm via Wi-Fi/Bluetooth integrated into the ESP32 module.
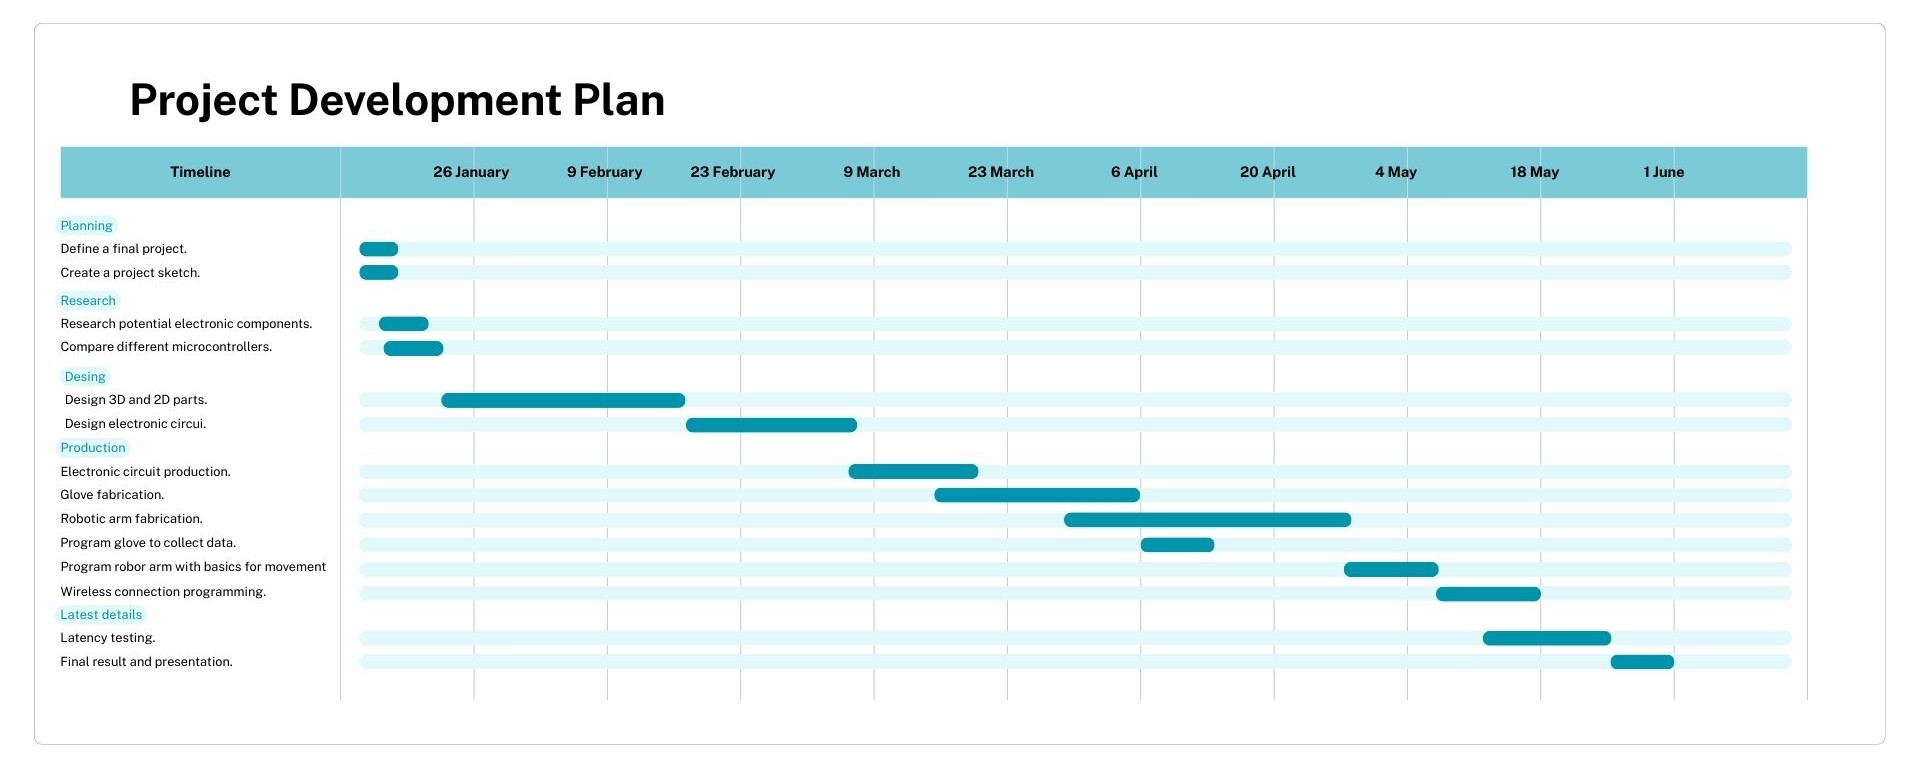
To manage the development of this project, I established a structured schedule based on the Fab Academy's weekly requirements, defining specific goals and delivery dates for each phase.
Project Management
Setup Guide: Cloning my GitLab Repository
To begin working on my website, I followed this initial workflow to link my local environment with the Fab Academy remote repository:
- Git Installation: First, I downloaded and installed Git on my computer to enable version control directly from the terminal. Git - Install
- Workspace Preparation: I created a dedicated folder on my device where all the website files and assets will be organized and stored.
-
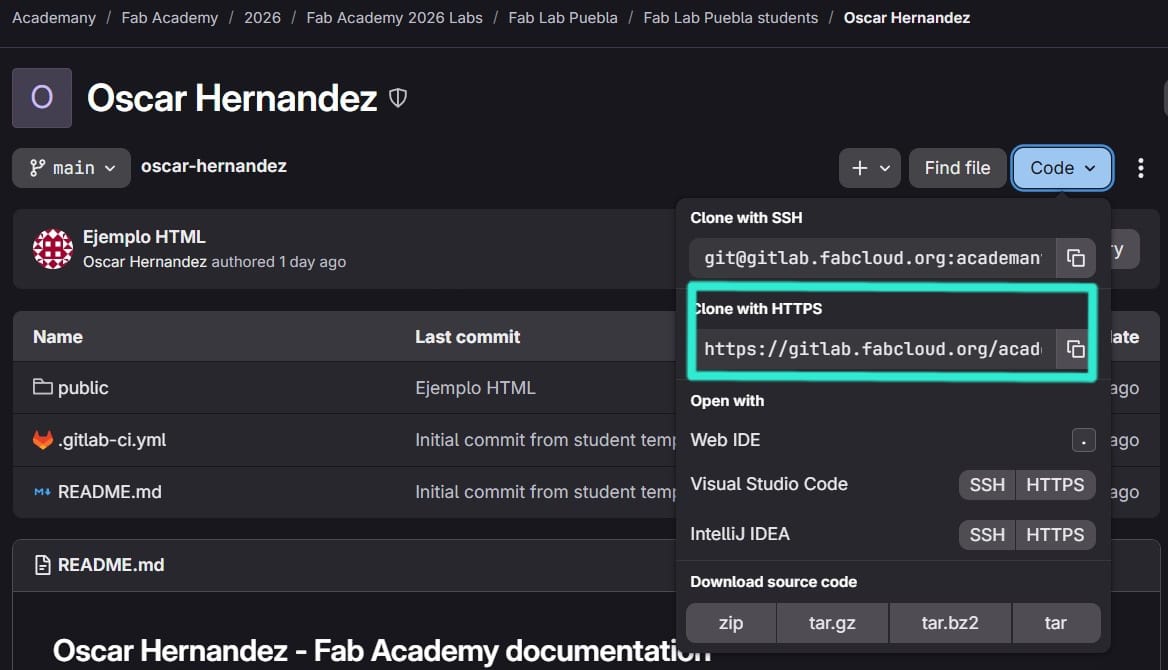
Linking with GitLab: On the Fab Academy GitLab page, I copied the project link under the "Clone with HTTPS" option. This link acts as the "cloud" address for my site.
I use the HTTPS cloning link because cloning the files only requires a GitLab username and password, which simplifies the process. If I use the SSH cloning link, it requires a key, making the process more laborious.
-
Cloning via VS Code: I opened my local folder in Visual Studio Code. Using the integrated terminal, I executed the cloning command:
git clone https://gitlab.fabcloud.org... -
Navigating to the Directory: Once Git finished downloading the repository copy, I used the
cd(change directory) command to enter my project folder:cd .\your-name\ -
Identity Configuration: Finally, I configured my Git identity to ensure all contributions are correctly attributed to my account. I used the following command in the terminal:
git config --global user.email "you@example.com"
It is now possible to modify the repository locally from your device. To do that we will use the following git commands in the Visual Studio Code terminal.
git status: Used to check the current state of my files.git add .: Adds all changes to the staging area.git commit -m "My Message": Records the changes with a descriptive note. Every time you make a commit, a commit will be generated in gitlab. It is advisable to make sure that this commit is completed correctly. This is represented with a little green check mark indicating that everything went well.If you ever do a
git pushand your page doesn't update, you should check the pipeline section. If you see a red circle with an X, it means there's an error in your HTML code or in the.gitlab-ci.ymlfile. Clicking on the failed status will tell you exactly which line the site build failed on.
git push: Uploads local changes to the GitLab server.git pull: Updates the local repository with changes from the server.git reset --soft HEAD~1: Undoes the last commit while preserving the work.
Every time a change is made to the project, the following sequence must be executed in the terminal to update the live site:
-
Stage:
git add .
Prepares all modified files to be included in the next commit. -
Commit:
git commit -m "Your message here"
Saves the changes locally with a descriptive note about what was done. -
Push:
git push
Uploads the local commits to the GitLab cloud, making the changes public.
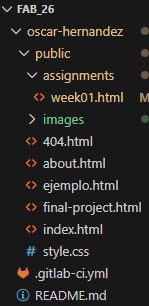
Core Project Files
-
index.html: The main entry point and structure of the website. As a markup language based on tags (
<>), it defines the content and hierarchy of the page. - style.css: The stylesheet used to define the visual appearance. It is a language primarily used to provide styles and aesthetics to the HTML structure.
-
.gitlab-ci.yml: A critical configuration file that automates the Continuous Integration and Deployment (CI/CD) process. It instructs GitLab on how to build and publish the website automatically every time a
git pushis executed. -
.git: Inside your-name folder, there's a hidden folder called .git. When you run commands in the VS Code terminal, you're directly interacting with this folder:
git add .tells the .git folder to prepare the files.git commitcreates a permanent "snapshot" of your code in the .git folder.git pushsends this data to the FabCloud server in the .git folder.
Rule of thumb: Never delete the .git folder or modify any files within it, as this could corrupt the page and cause problems when runninggit pushorgit pull.
Building a website involves using HTML, a markup language based on tags (<>) that defines the site's structure, and CSS, which is used to apply visual styles. To manage these files effectively, Git is utilized as a version control system.
We are now ready to start filling out the repository.
To build this documentation site, I used HTML5 for structure and CSS3 for styling. Below are the core elements and tools I implemented:
1. HTML Structure & Common Tags
Every page follows a semantic hierarchy to ensure clarity and accessibility:
- <head>: Contains metadata, the title, and links to external fonts or CSS files.
- <header> & <footer>: Used for the navigation menu at the top and the copyright/credits at the bottom.
- <body>: The main container for all visible content on the page.
- <div>: A generic container used to group elements for styling with CSS.
- <h1> to <h6>: Headings that define the content hierarchy (h1 being the main title).
- <p>: Defines paragraphs of text.
- <ul> & <ol>: Bullets and numbered lists.
2. Code Highlighting with Highlight.js
To display my code snippets (like Arduino or C++) in a clean and readable way, I integrated the Highlight.js library. This allows for syntax highlighting that makes the code look professional.
Implementation:
First, I linked the library in the <head> of my document:
    <link rel="stylesheet" href="https://cdnjs.cloudflare.com/ajax/libs/highlight.js/11.9.0/styles/default.min.css">
    <script src="https://cdnjs.cloudflare.com/ajax/libs/highlight.js/11.9.0/highlight.min.js"></script>
    <script>hljs.highlightAll();</script>
Then, I used the <pre> and <code> tags to wrap my code, specifying the language class:
    void setup() {
        pinMode(LED_BUILTIN, OUTPUT);
    }

    void loop() {
        digitalWrite(LED_BUILTIN, HIGH);
        delay(1000);
        digitalWrite(LED_BUILTIN, LOW);
        delay(1000);
    }
Collaboration with AI for Web Design
To achieve a professional and minimalist aesthetic for my repository, I collaborated with an AI thought partner (Gemini). This collaboration allowed me to focus on the technical content while the AI helped me framework the CSS3 structure and the visual hierarchy of the site.
The Design Process
I provided a highly descriptive "Master Prompt" to the AI, acting as a Product Manager. I defined the color palette (Cyan #18a7c4), the "Sticky Header" functionality, and the responsive grid system for my weekly assignments. The result is a custom-made layout that reflects my identity as a Mechatronics student.
Master Prompt Used:
"Act as an expert web developer in minimalist and technical design. Help me create the HTML5 and CSS3 code for my Fab Academy documentation site. The goal is a clean, modern site:
- Aesthetic: Minimalist with white space, using Cyan (#18a7c4) for accents and buttons.
- Header: Persistent (sticky) with links to Home, About, Assignments, and Final Project.
- Sections: A Hero section with a technical sketch, an About Me grid, and a Card-based layout for weekly assignments.
- Responsiveness: Full mobile support and smooth scrolling for internal anchors."
Note: After the AI generated the base code, I manually refined the semantic HTML structure, and integrated the documentation workflow.