Assignment requirements
Individual assignment
- Prepare a summary slide and a one minute video showing its conception, construction, and operation
- Your project should incorporate 2D and 3D design, additive and subtractive fabrication processes, electronics design and production, embedded microcontroller interfacing and programming, system integration and packaging
- You should make rather than buy the parts of your project
- Present your final project.
Progress status
Present project advances
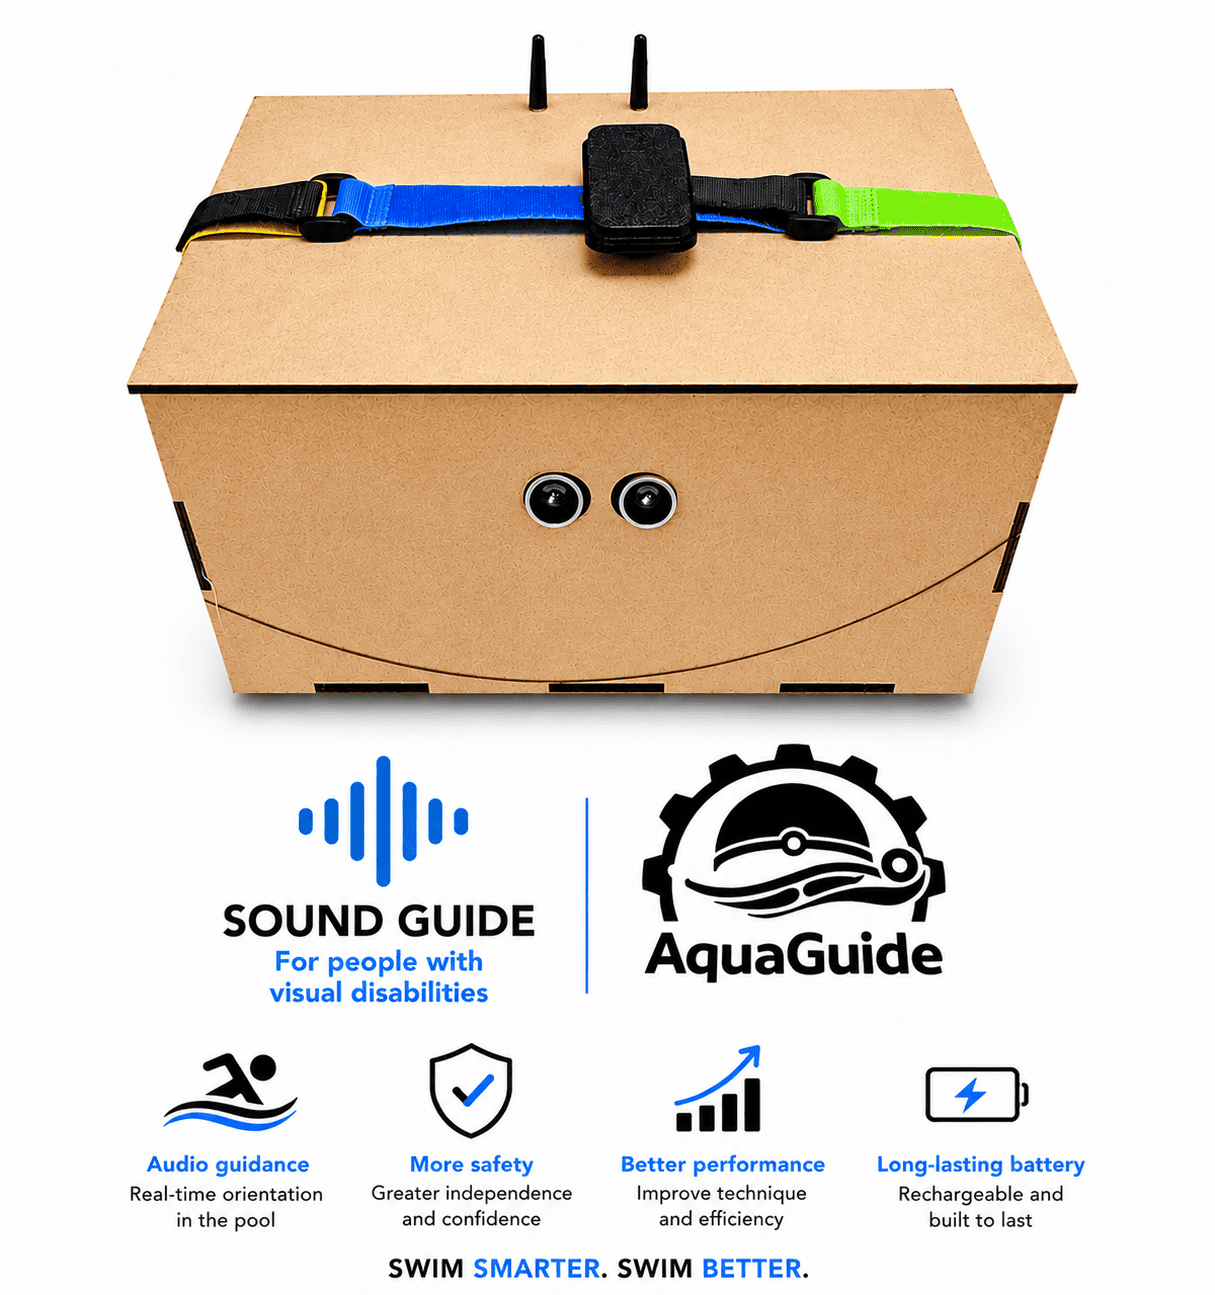
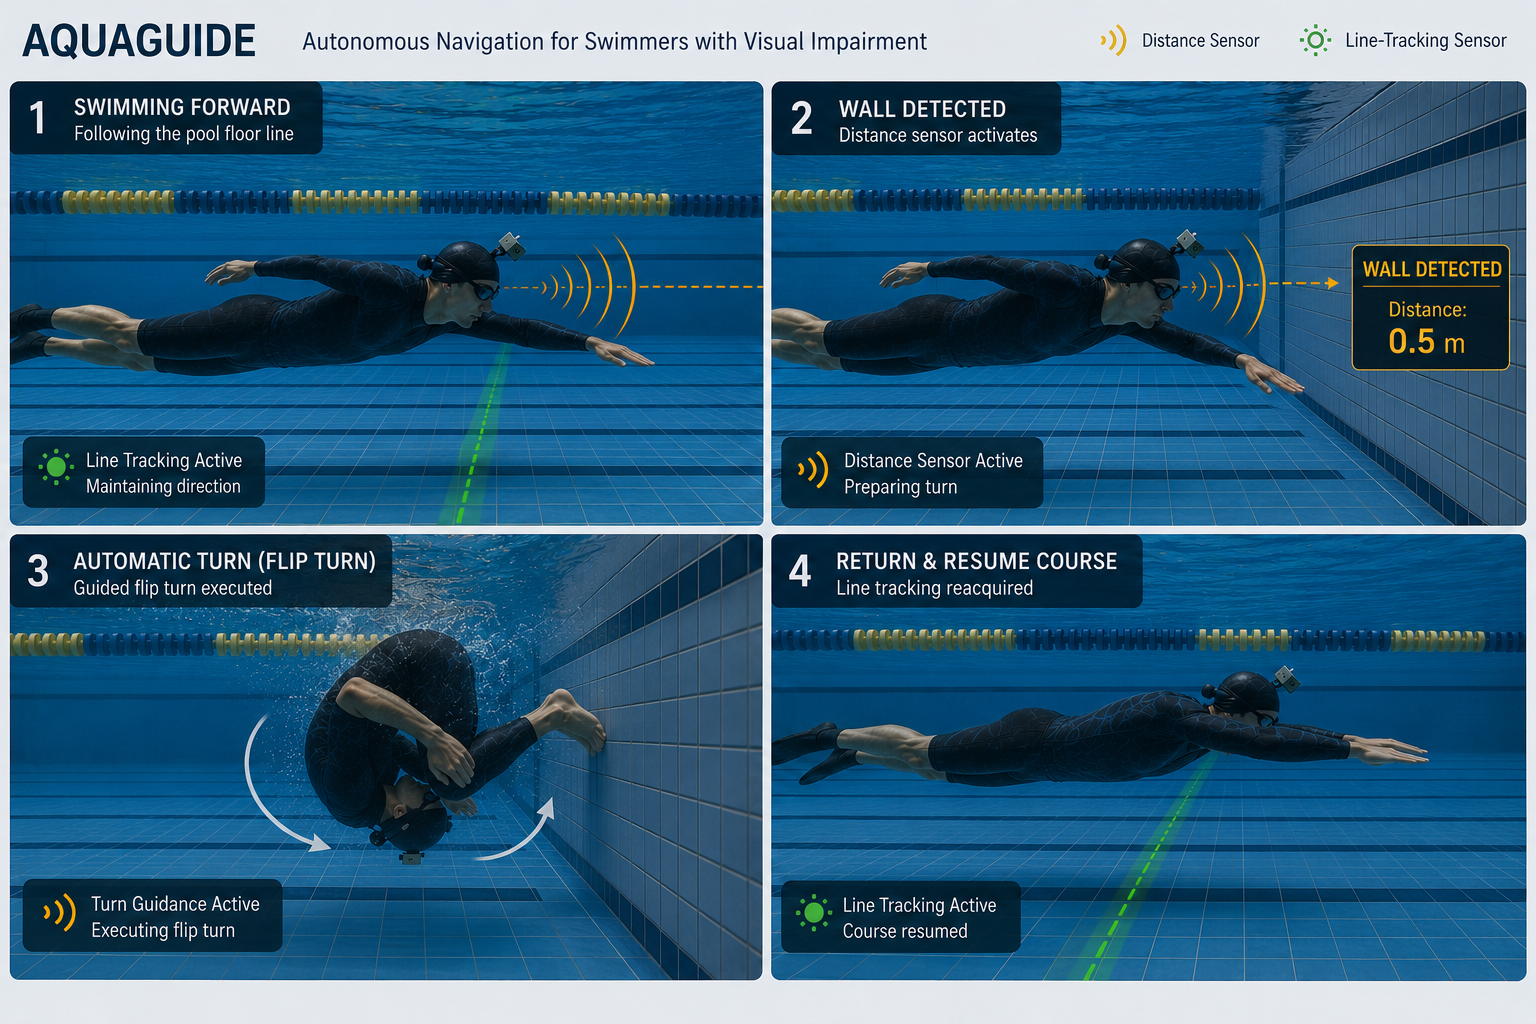
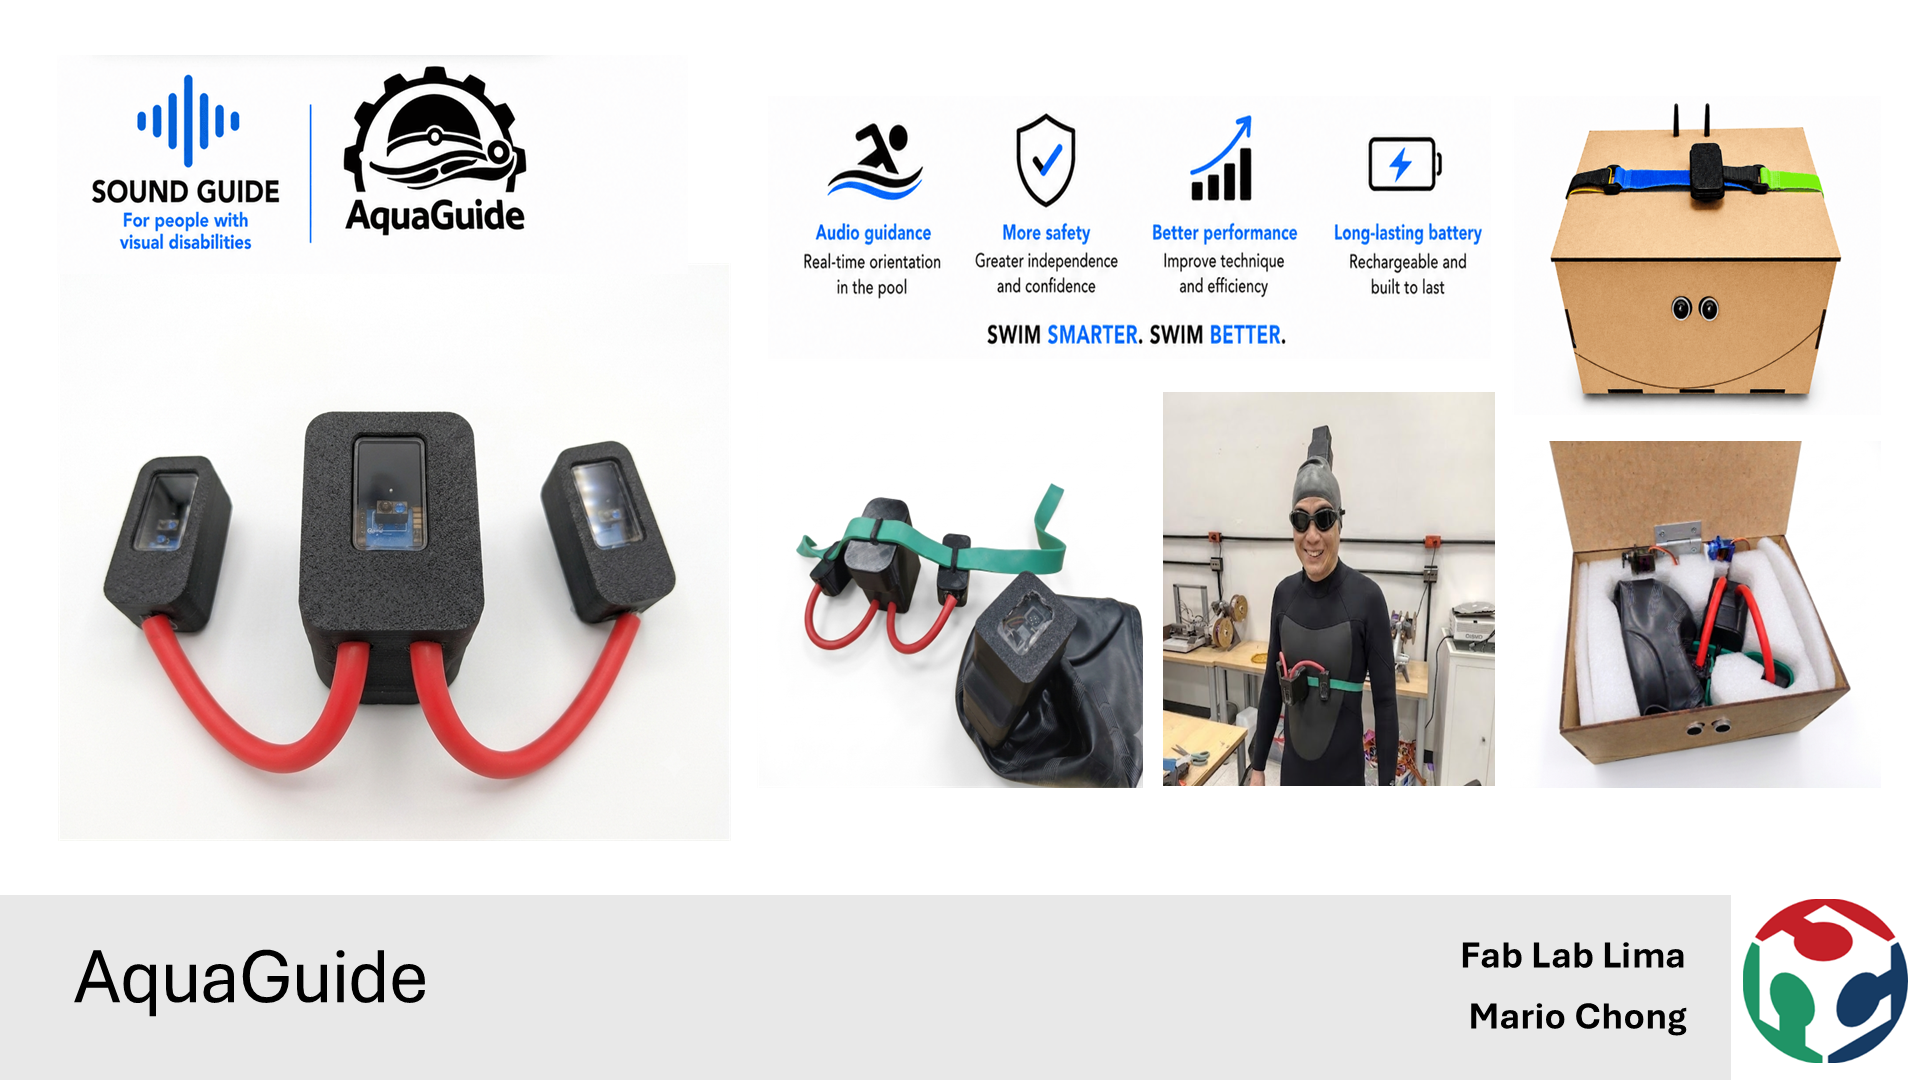
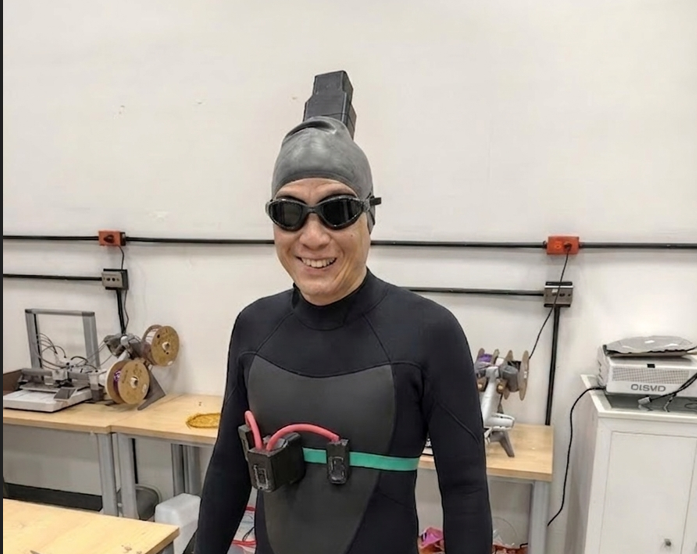
AquaGuide - Audio navigation system for swimmers
Benefits
🔊 Audio Guidance - Real-time directional feedback in the pool
🛡️ Enhanced Safety - Greater confidence and independence while swimming
📈 Improved Performance - Supports technique development and lane orientation
🔋 Long-Lasting Battery - Rechargeable and designed for extended training sessions
Product strengths
🏊🏻Swim with confidence
🛟Guiding every stroke
🤽🏼♀️Accessible swimming through sound
🍥Empowering independence in the water
🥽Hear the direction
💯 Focus on the swim
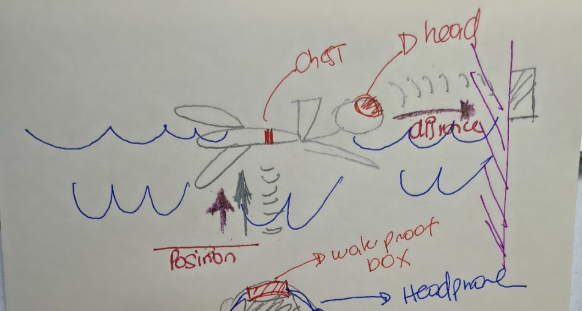
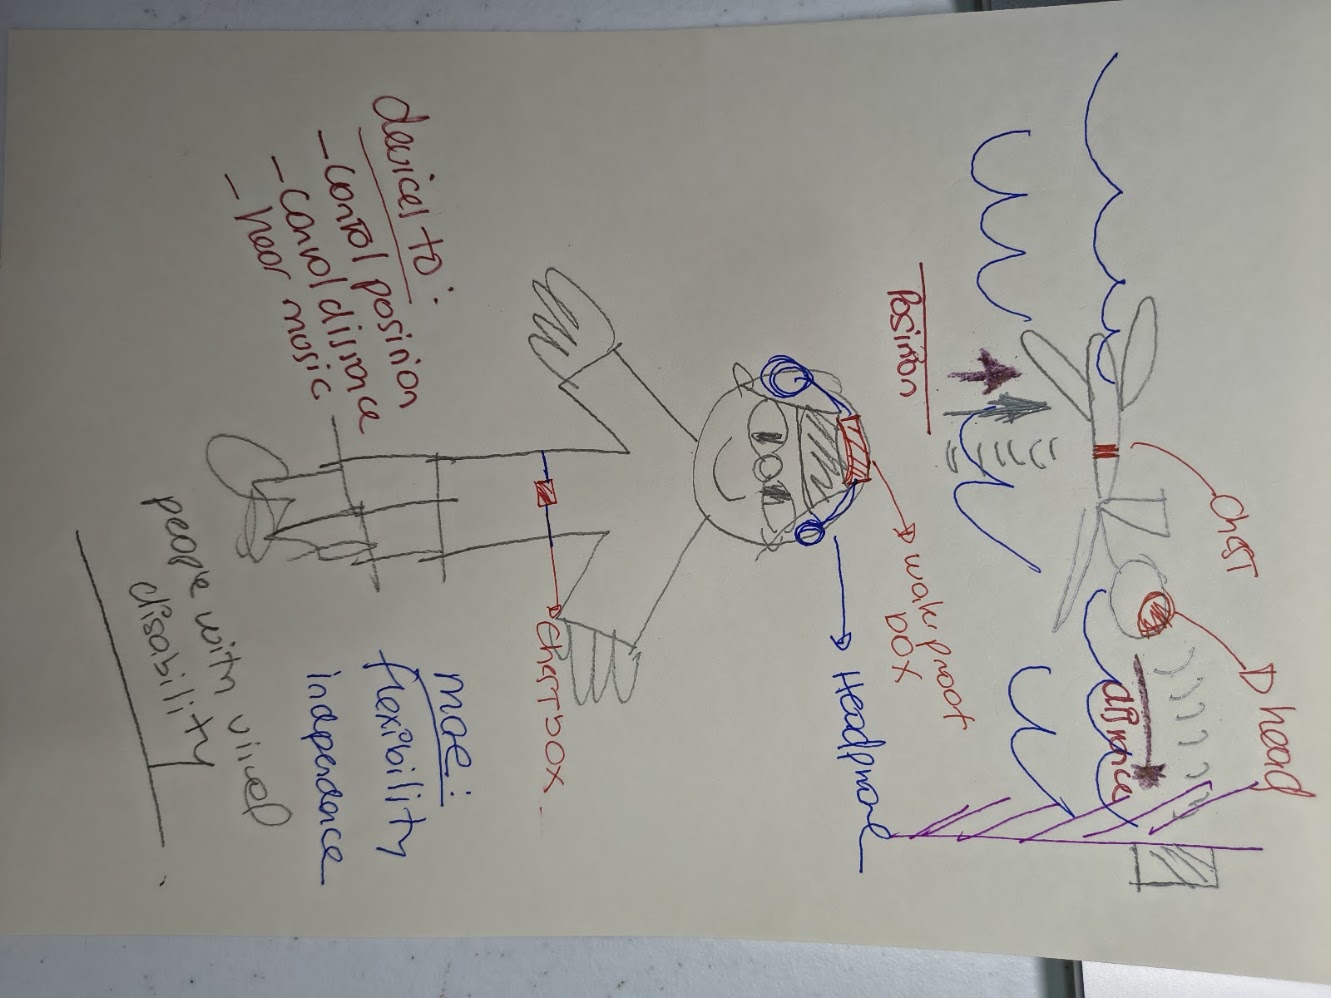
The concept

Final slide
Final slide - Week 20. A slide that summarize the project, the concept, the user and the problem. The idea is to have a clear and simple slide.
Final video
Final video - Week 20. A video that summarize the project, a clear and simple in a one minute video.
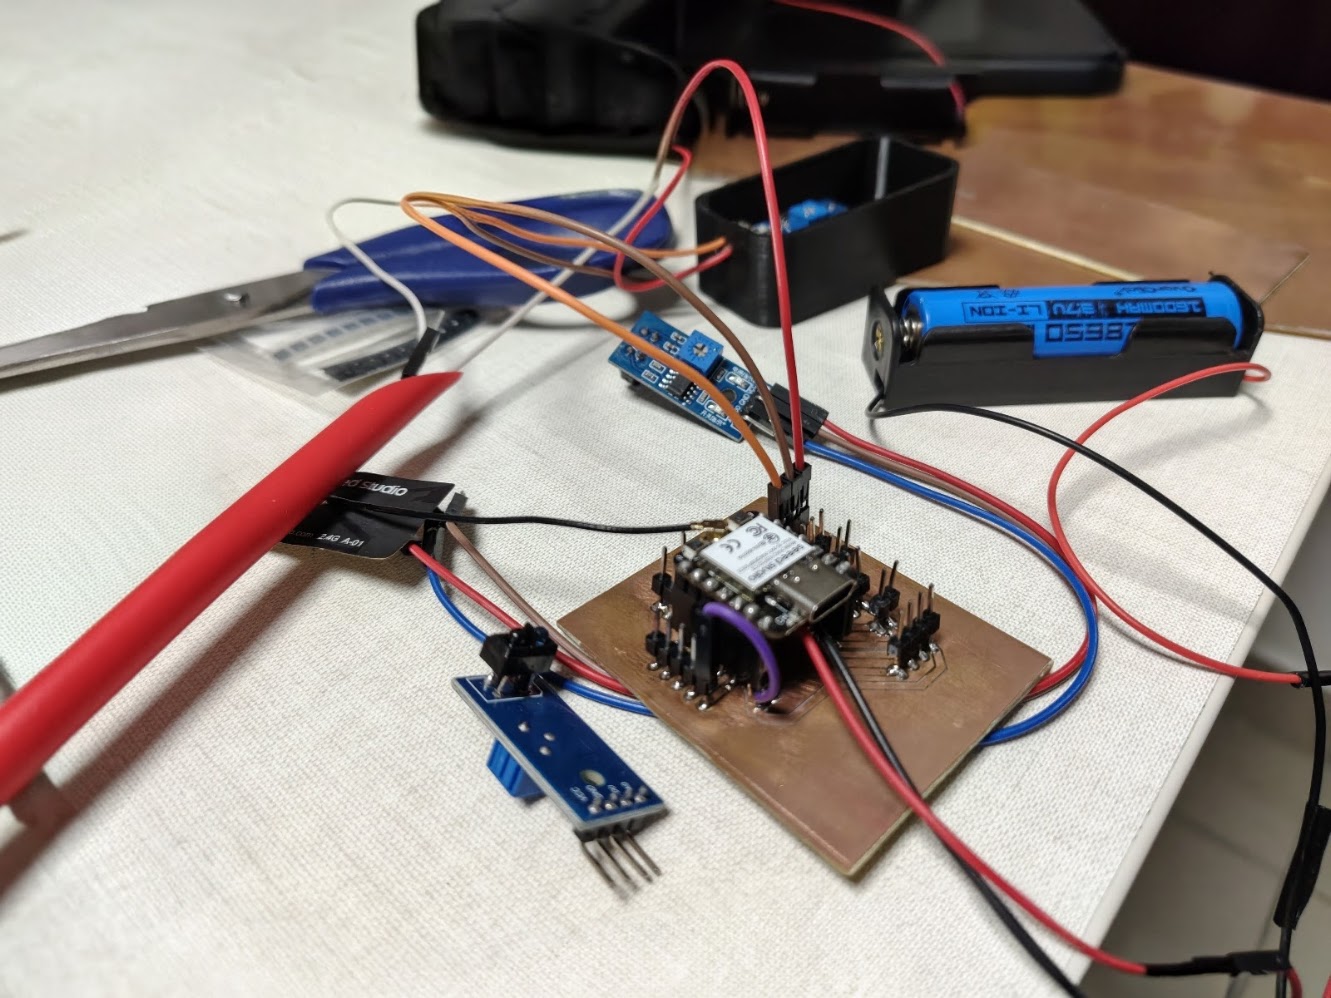
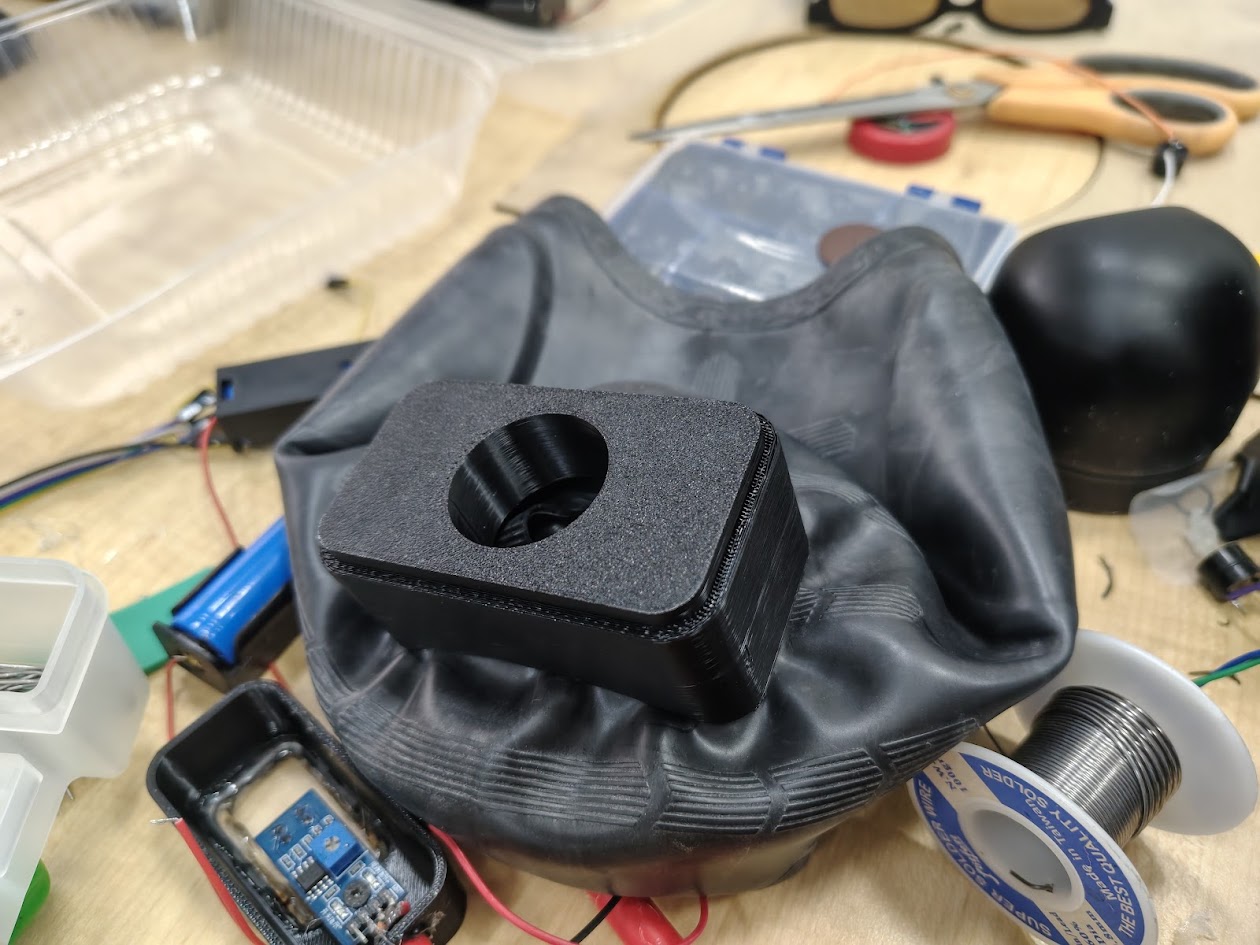
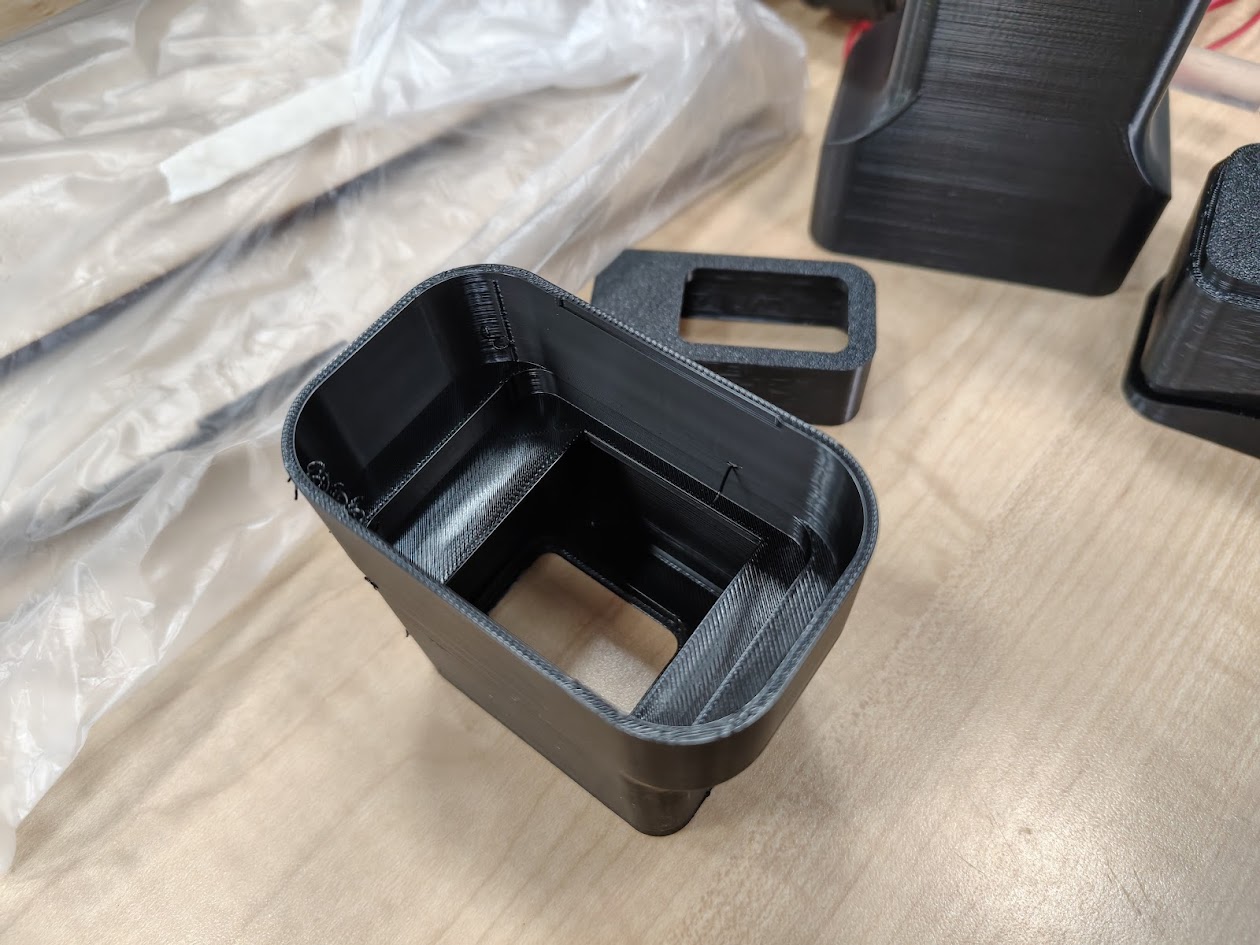
1) Head part assembly
Problems
- Battery space constraints
- How to integrate one in the swimming cap
- Material selection for the head part
Solutions
- We used a standard battery in this phase
- We integrated in a regular swimming cap for better functionality
- We selected PET for the head part to ensure durability and comfort
                        #include

                        const int sharpPin = A0;

                        const int buzzerIzq = D2;
                        const int buzzerDer = D3;

                        #define SERVICE_UUID        "12345678-1234-1234-1234-123456789abc"
                        #define CHARACTERISTIC_UUID "abcd1234-5678-1234-5678-abcdef123456"

                        // Reemplaza por la MAC del servidor
                        static NimBLEAddress serverAddress(
                            std::string("AA:BB:CC:DD:EE:FF"),
                            BLE_ADDR_PUBLIC
                        );

                        NimBLEClient* pClient = nullptr;

                        void notifyCallback(
                            NimBLERemoteCharacteristic* pRemoteCharacteristic,
                            uint8_t* pData,
                            size_t length,
                            bool isNotify)
                        {
                            Serial.print("Recibido: ");

                            for(size_t i = 0; i < length; i++) {
                                Serial.print((char)pData[i]);
                            }

                            Serial.println();

                            String dato = "";

                            for(int i = 0; i < length; i++) {
                                dato += (char)pData[i];
                            }

                          if (dato=="Izq"){
                          digitalWrite(buzzerIzq, HIGH);
                          delay(500);
                          digitalWrite(buzzerIzq, LOW);
                          }

                          if (dato=="Der"){
                            digitalWrite(buzzerDer, HIGH);
                          delay(500);
                          digitalWrite(buzzerDer, LOW);
                          }
                        }

                        void setup() {
                            Serial.begin(115200);

                            pinMode(buzzerIzq, OUTPUT);
                            pinMode(buzzerDer, OUTPUT);

                            NimBLEDevice::init("");

                            pClient = NimBLEDevice::createClient();

                            Serial.println("Conectando...");

                            if(!pClient->connect(serverAddress)) {
                                Serial.println("Error de conexion");
                                return;
                            }

                            Serial.println("Conectado");

                            NimBLERemoteService* pService =
                                pClient->getService(SERVICE_UUID);

                            if(!pService) {
                                Serial.println("Servicio no encontrado");
                                return;
                            }

                            NimBLERemoteCharacteristic* pCharacteristic =
                                pService->getCharacteristic(CHARACTERISTIC_UUID);

                            if(!pCharacteristic) {
                                Serial.println("Caracteristica no encontrada");
                                return;
                            }

                            if(pCharacteristic->canNotify()) {
                                pCharacteristic->subscribe(true, notifyCallback);
                                Serial.println("Suscrito");
                            }

                        }

                        void loop() {
                              int adc = analogRead(sharpPin);

                          float voltaje = adc * (3.3 / 4095.0);

                          float distancia = 27.86 * pow(voltaje, -1.15);

                          Serial.print("ADC: ");
                          Serial.print(adc);

                          Serial.print("  Voltaje: ");
                          Serial.print(voltaje);

                          Serial.print(" V  Distancia aprox: ");
                          Serial.print(distancia);
                          Serial.println(" cm");

                          if (distancia<50){
                          digitalWrite(buzzerIzq, HIGH);
                          digitalWrite(buzzerDer, HIGH);
                          delay(1000);
                          digitalWrite(buzzerIzq, LOW);
                          digitalWrite(buzzerDer, LOW);
                          }
                          else{
                          delay(1000);
                          }
                        }
Video demonstration - 3D Printing using PET
3D printing with PET
This material is more affordable, lightweight, and resistant for aquatic environments. The video demonstrates the 3D printing process and the final product.
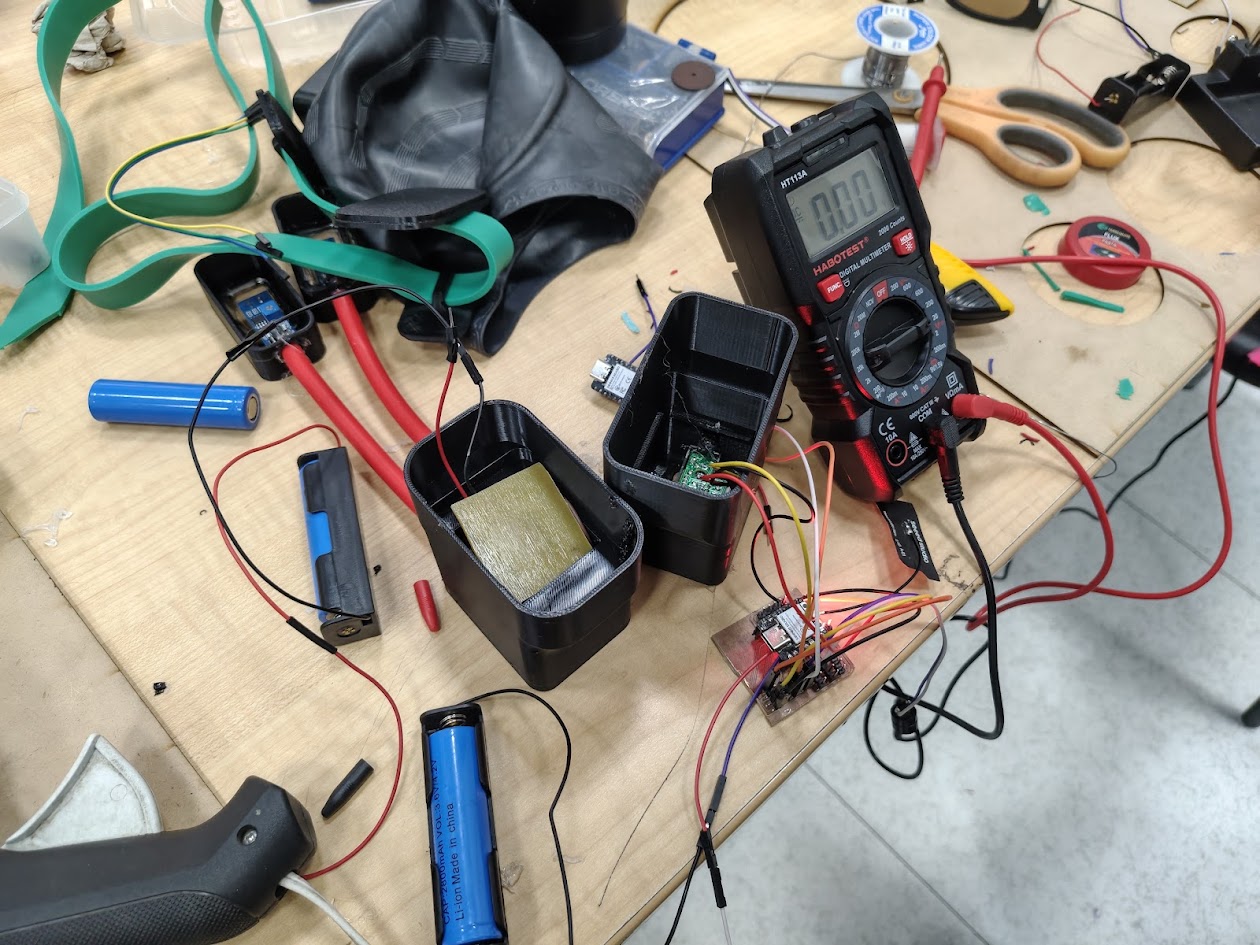
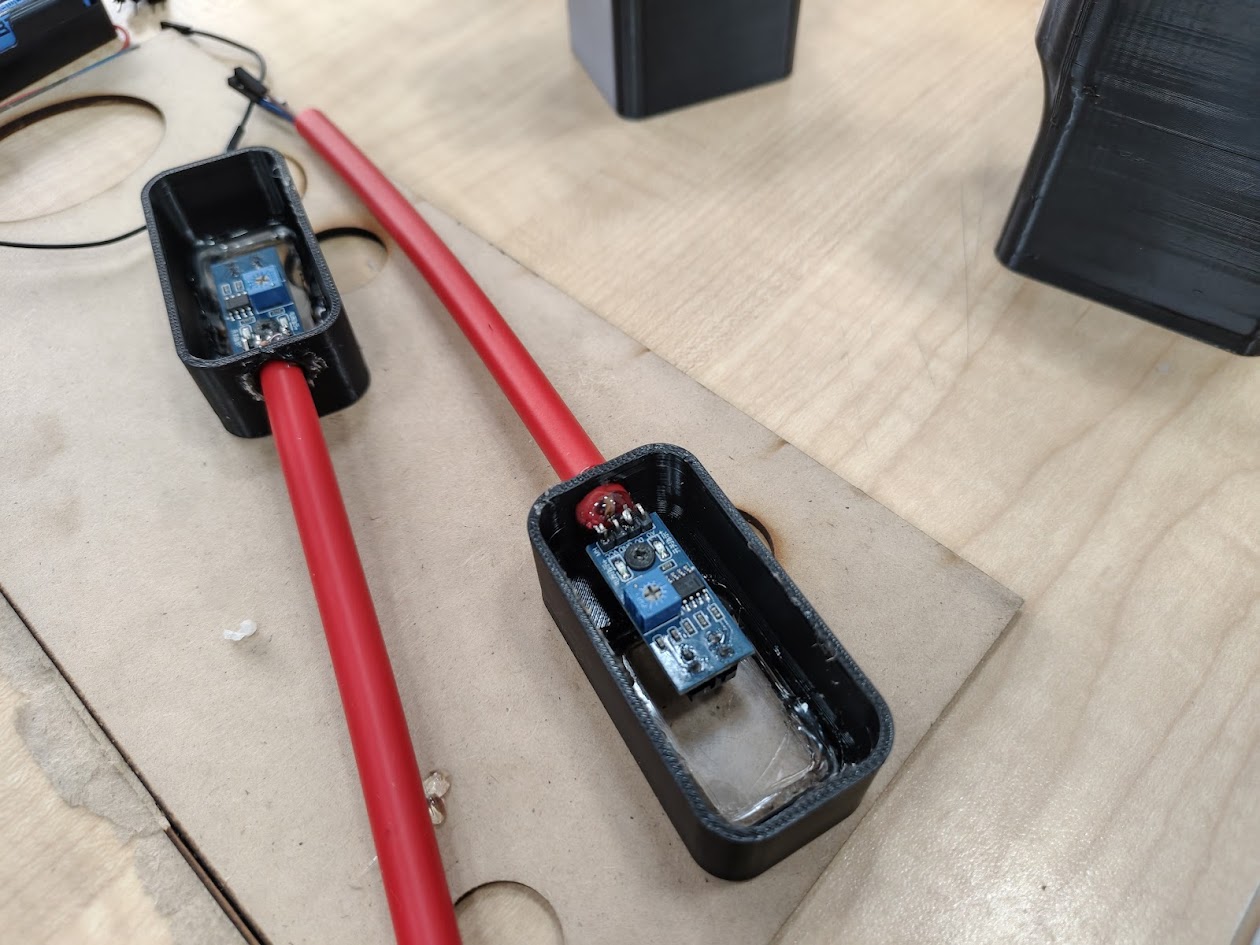
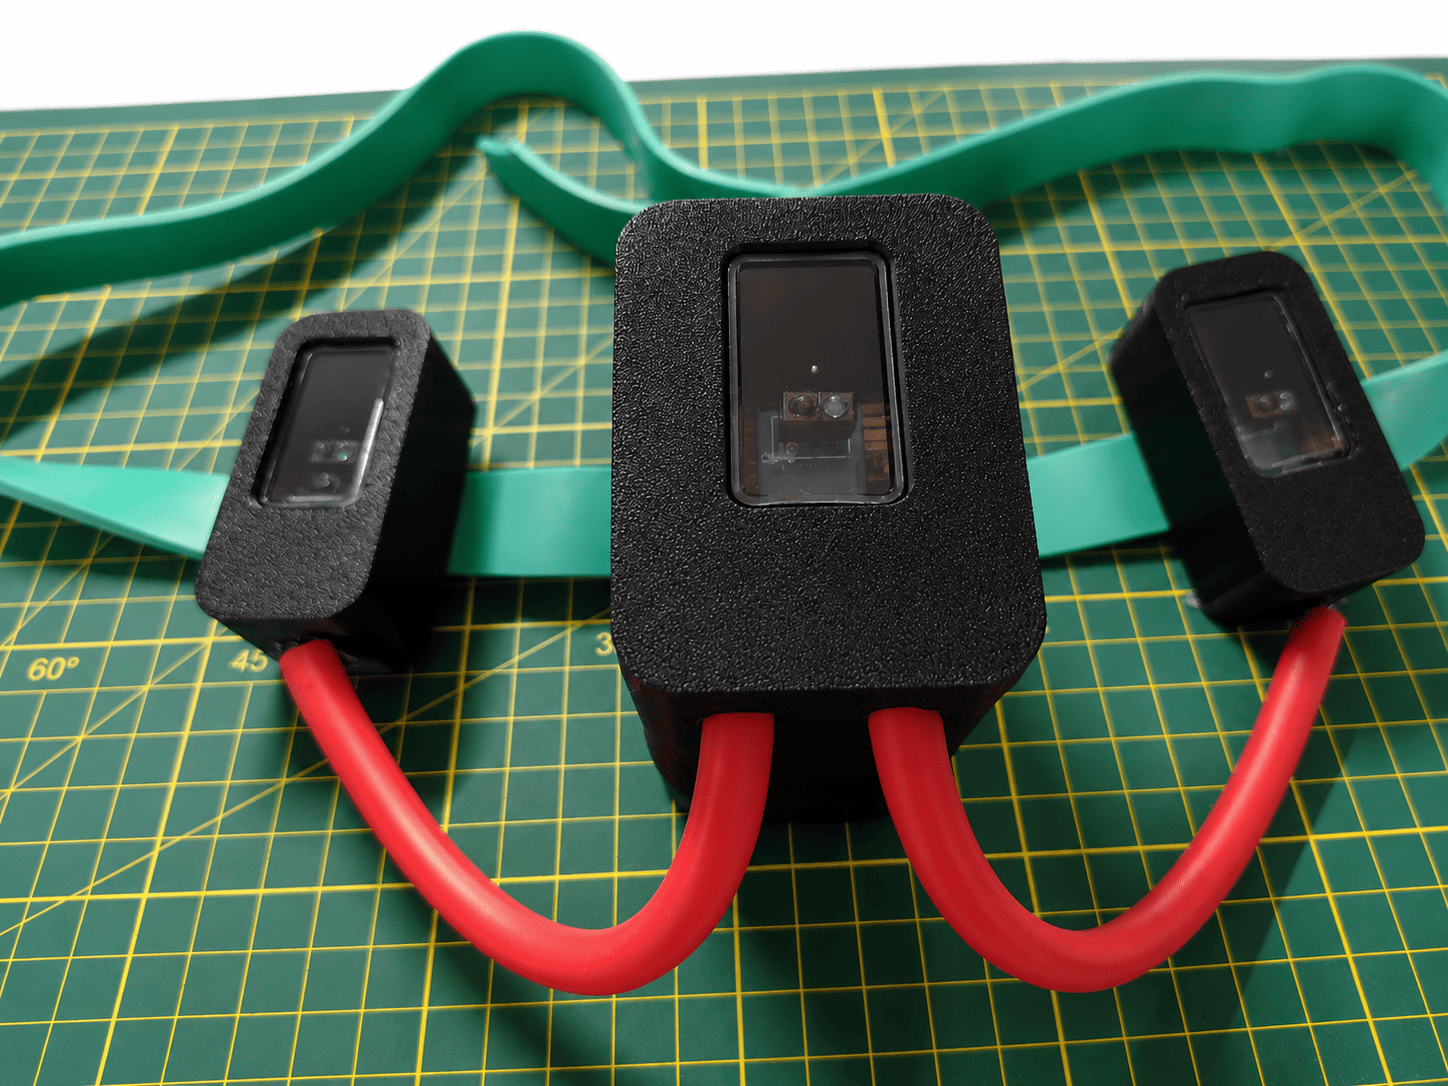
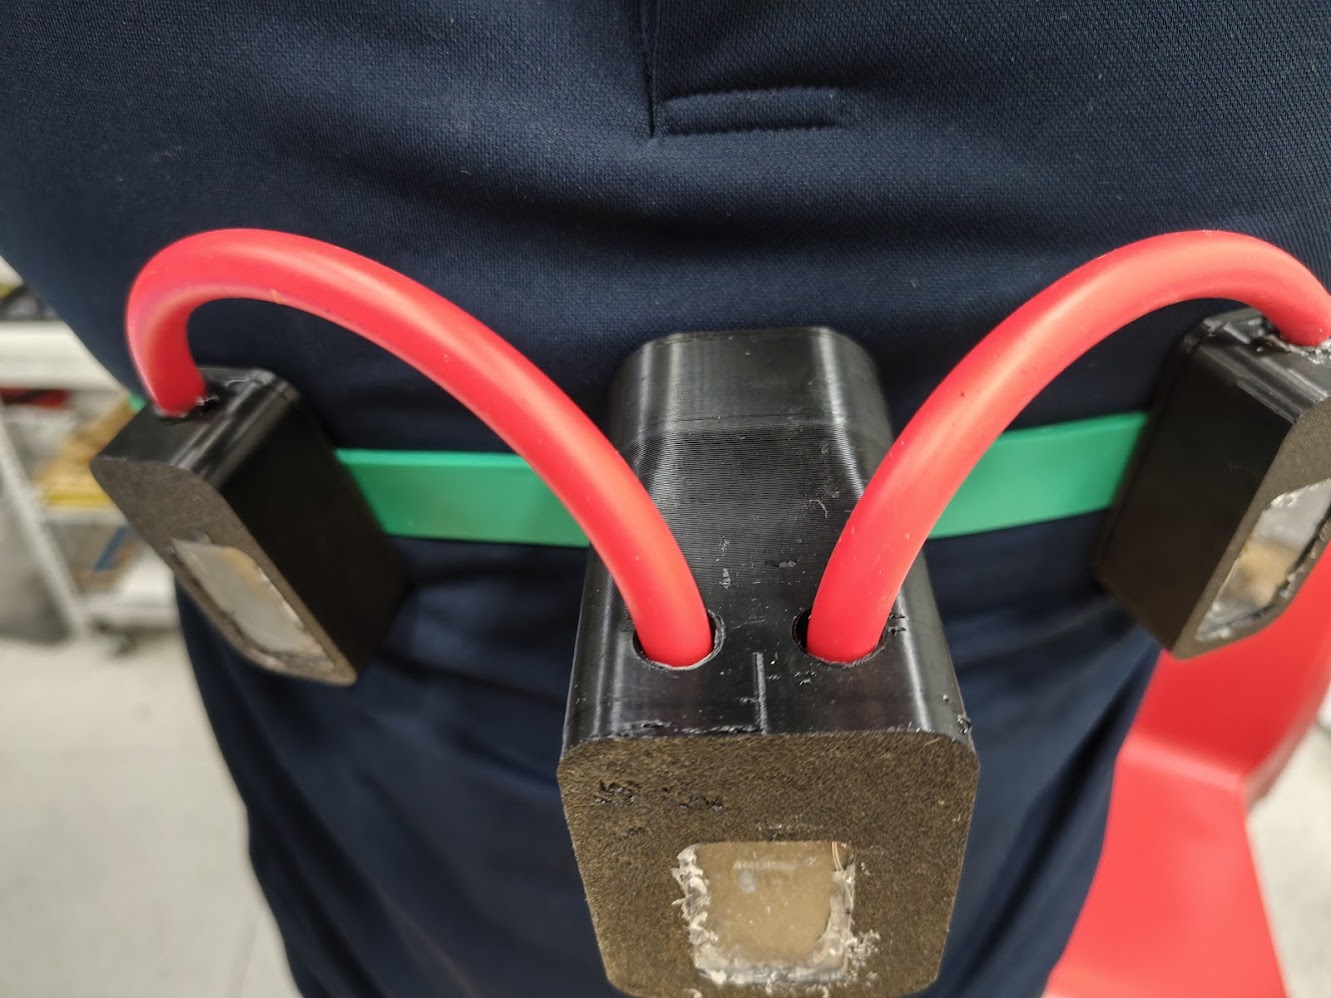
2) Body part assembly
Problems
- Battery space constraints
- How to integrate in the swimmmer body
- Material selection for the head part
Solutions
- We used a standard battery in this phase
- We used a band and 03 designed cases
- We selected PET for the head part to ensure durability and comfort
                        #include

                        const int sensorIzq = D4;
                        const int sensorCentro = D5;
                        const int sensorDer = D6;

                        NimBLECharacteristic* pCharacteristic;
                        bool deviceConnected = false;

                        #define SERVICE_UUID        "12345678-1234-1234-1234-123456789abc"
                        #define CHARACTERISTIC_UUID "abcd1234-5678-1234-5678-abcdef123456"

                        class ServerCallbacks : public NimBLEServerCallbacks {
                          void onConnect(NimBLEServer* pServer) {
                            deviceConnected = true;
                            Serial.println("Cliente conectado");
                          }

                          void onDisconnect(NimBLEServer* pServer) {
                            deviceConnected = false;
                            Serial.println("Cliente desconectado");
                            NimBLEDevice::startAdvertising(); // reanuda advertising
                          }
                        };

                        void setup() {
                          Serial.begin(115200);

                          pinMode(sensorIzq, INPUT);
                          pinMode(sensorCentro, INPUT);
                          pinMode(sensorDer, INPUT);

                          NimBLEDevice::init("XIAO_Server");

                          NimBLEServer* pServer = NimBLEDevice::createServer();
                          pServer->setCallbacks(new ServerCallbacks());

                          NimBLEService* pService = pServer->createService(SERVICE_UUID);

                          pCharacteristic = pService->createCharacteristic(
                                              CHARACTERISTIC_UUID,
                                              NIMBLE_PROPERTY::NOTIFY
                                            );

                          pService->start();

                          NimBLEAdvertising* pAdvertising = NimBLEDevice::getAdvertising();
                          pAdvertising->addServiceUUID(SERVICE_UUID);
                          pAdvertising->start();

                          Serial.println("Esperando cliente...");
                        }

                        void loop() {
                          if (deviceConnected) {
                            std::string mensaje = "Hola desde XIAO (NimBLE)";
                            pCharacteristic->setValue(mensaje);
                            pCharacteristic->notify();

                            Serial.println("Enviado: " + String(mensaje.c_str()));
                            delay(1000);
                          }

                          int izq = digitalRead(sensorIzq);
                          int centro = digitalRead(sensorCentro);
                          int der = digitalRead(sensorDer);

                          Serial.print("Izq: ");
                          Serial.print(izq);

                          Serial.print("  Centro: ");
                          Serial.print(centro);

                          Serial.print("  Der: ");
                          Serial.println(der);

                          if (izq==HIGH){
                          char buffer[10];
                          sprintf(buffer, "%d", "Izq");

                          pCharacteristic->setValue(buffer);
                          pCharacteristic->notify();
                          }

                          if (centro==HIGH){
                          char buffer[10];
                          sprintf(buffer, "%d", "Centro");

                          pCharacteristic->setValue(buffer);
                          pCharacteristic->notify();
                          }

                          if (der==HIGH){
                          char buffer[10];
                          sprintf(buffer, "%d", "Der");

                          pCharacteristic->setValue(buffer);
                          pCharacteristic->notify();
                          }

                          delay(100);

                        }
Video demonstration
Testing sensors
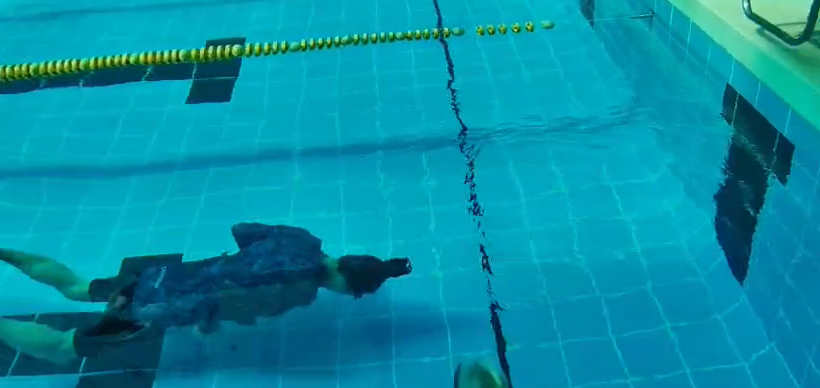
Testing the sensor functionality for line tracking and waterproofing. I used a transparent box to simulate the aquatic environment and ensure that the sensors work effectively while being protected from water.
Testing sensors in the wall
Considering a wall centerline, if I move left or right, a buzzer sounds, and an LED lights up. If I put my hand in front of the sharp, both buzzers sound and both LEDs activate, simulating being near the wall.
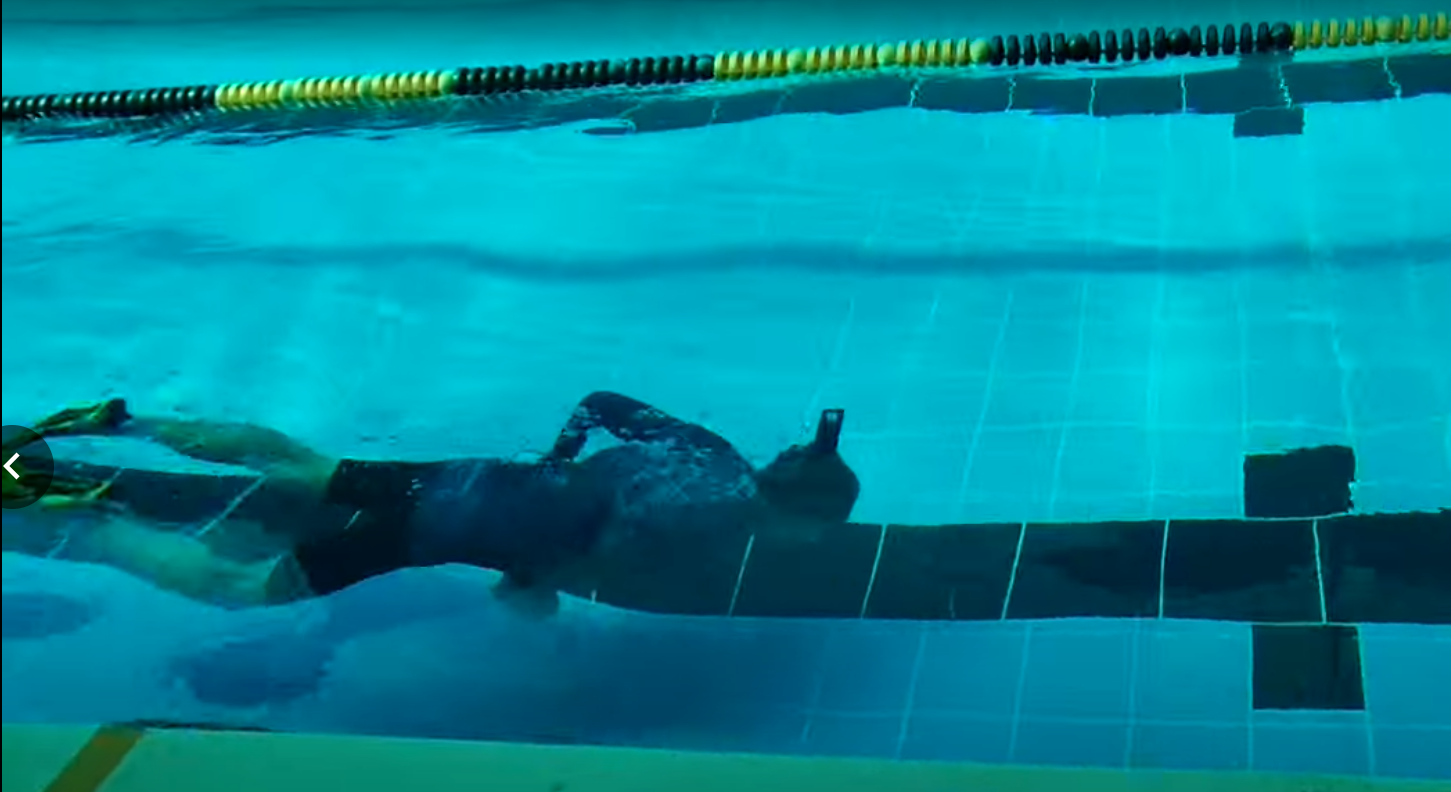
Testing sensors in the pool
Considering the wall centerline, if I move left or right, a buzzer sounds, and an LED lights up. If I put the head device in front the black line, both buzzers sound and both LEDs activate, simulating the pool lines
Testing sensor inside the pool
When I move left or right relative to the lane centerline, a buzzer sounds, and an LED activates. Outside, an assistant holds the head device and shows the LED on/off status.
Testing the whole system inside the sensor inside the pool
I swam around the pool while testing the sensor functionality, and when I neared the wall, both buzzers sounded.
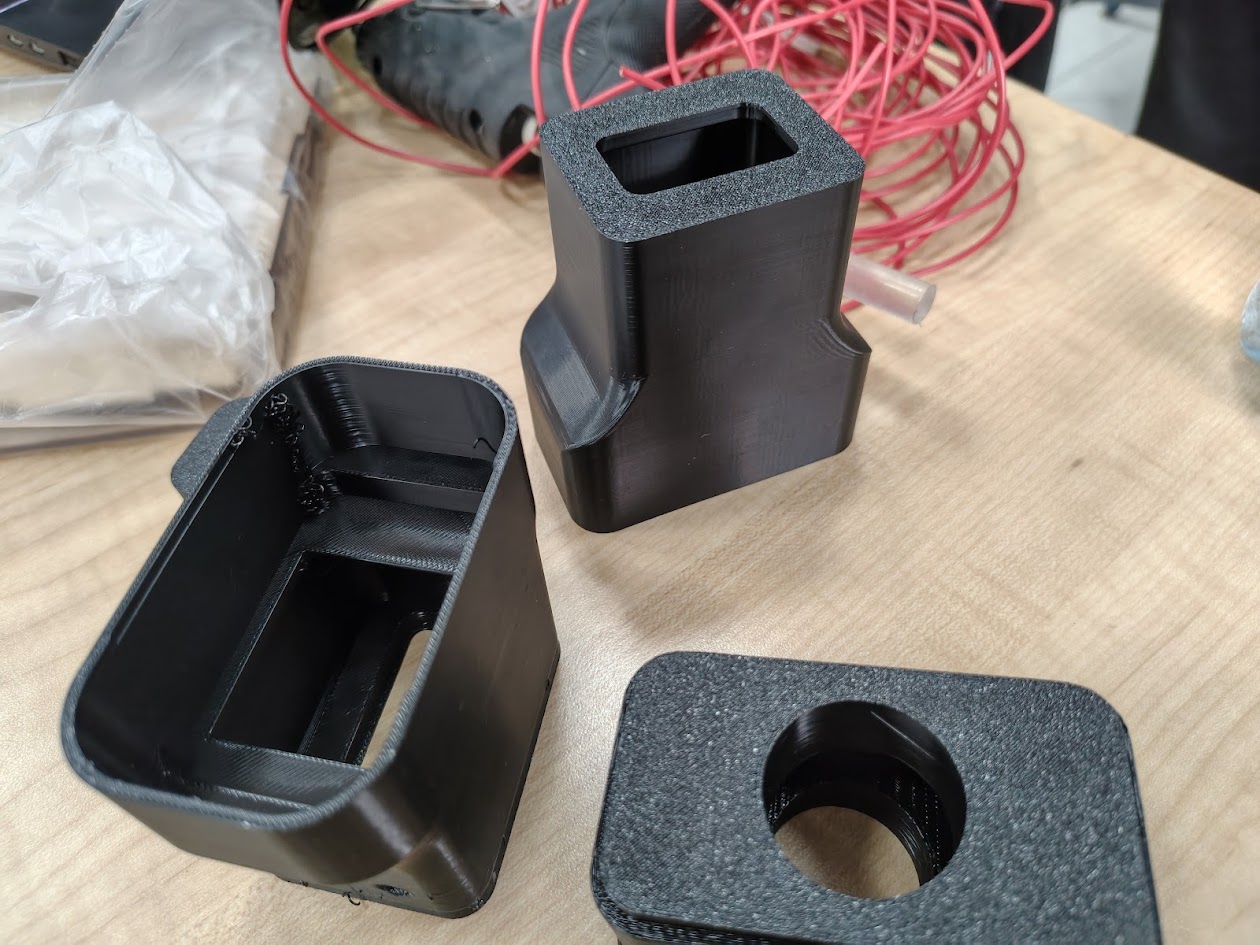
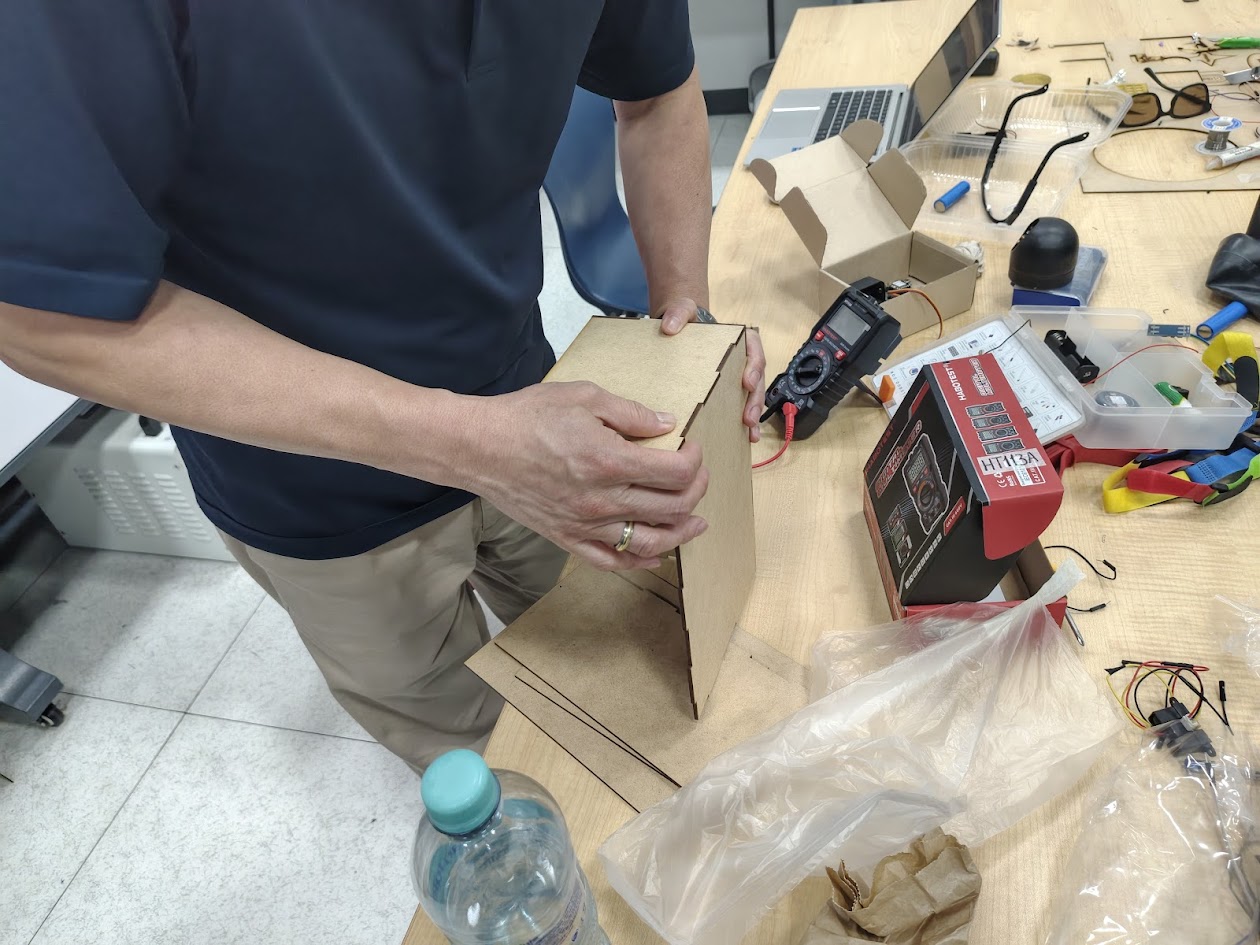
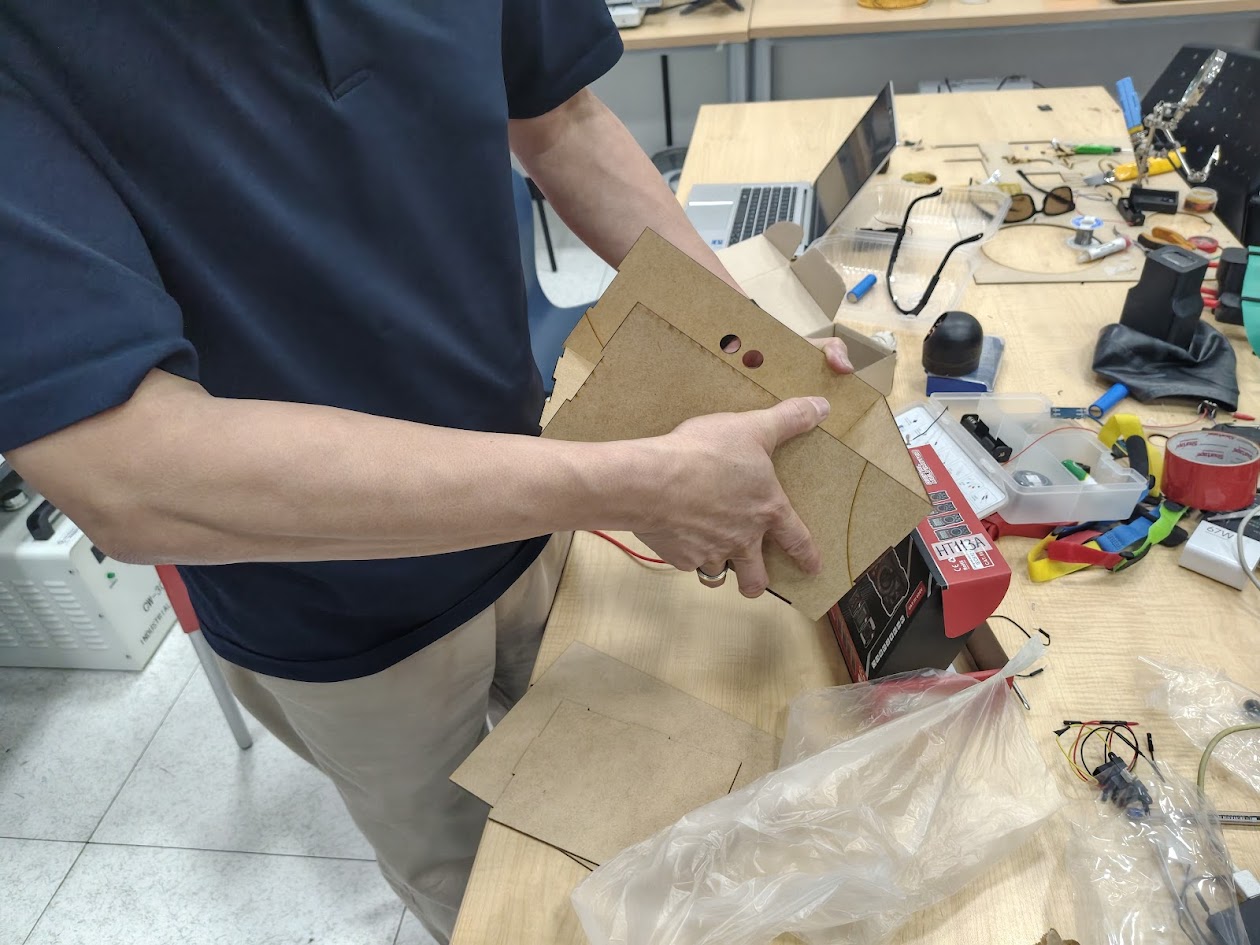
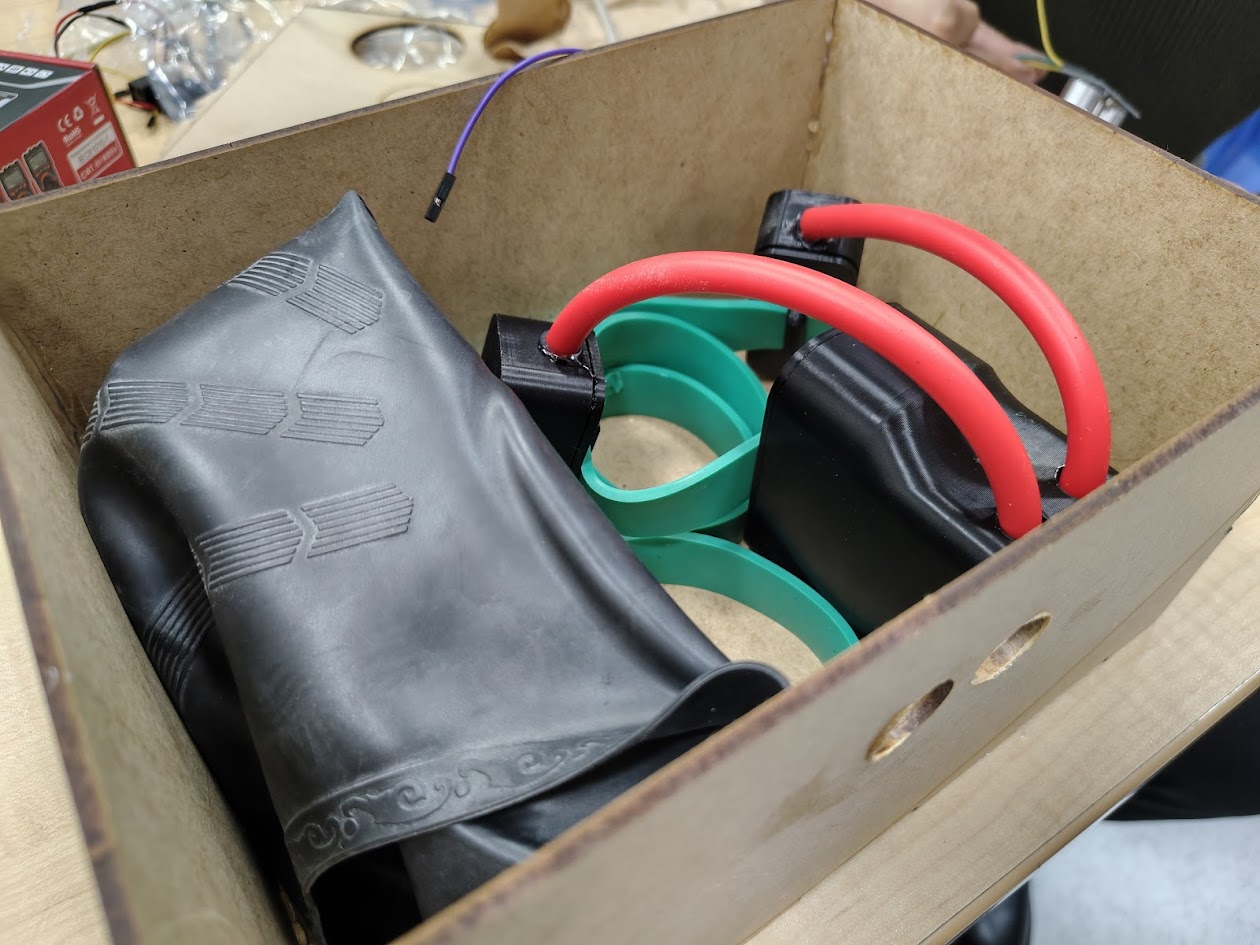
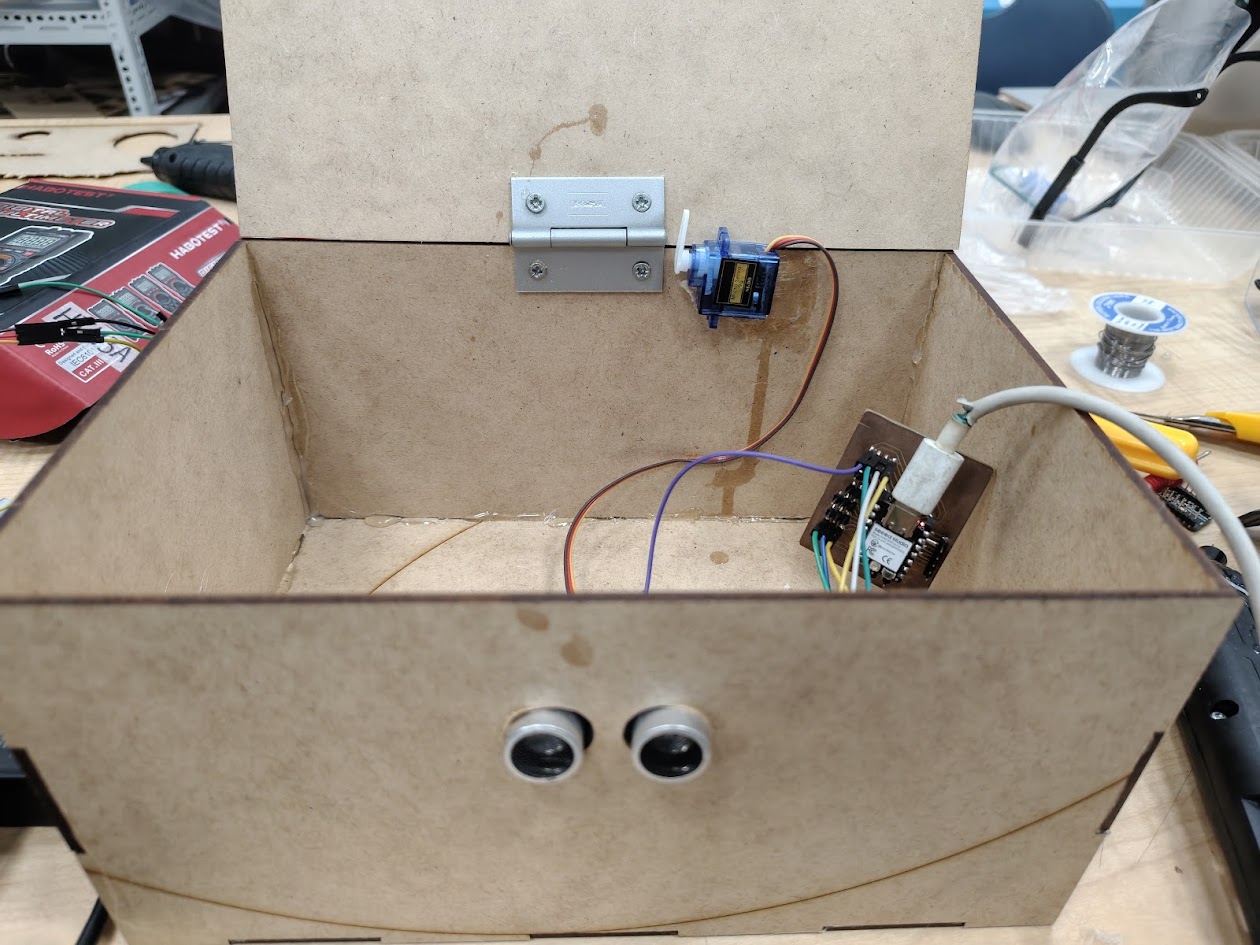
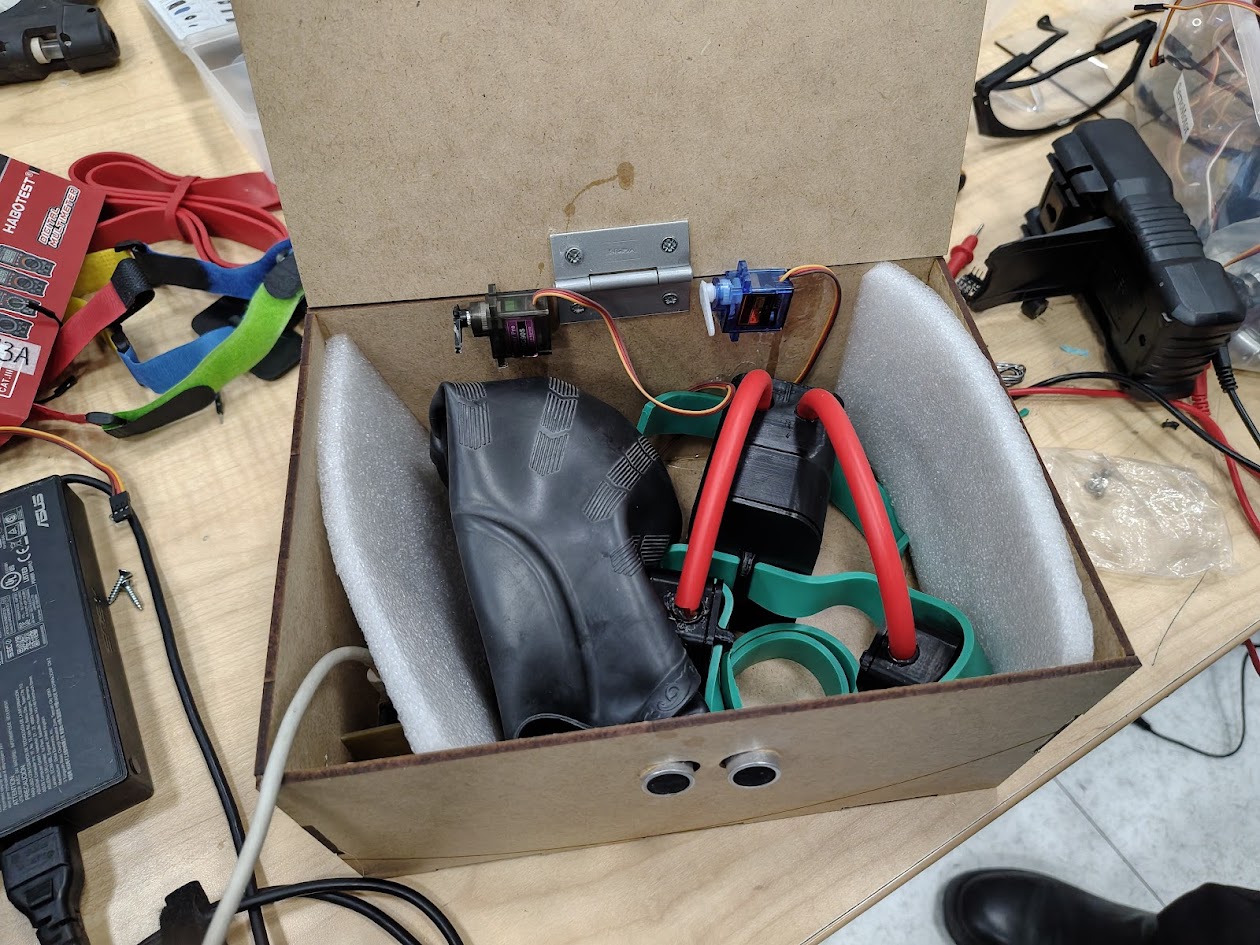
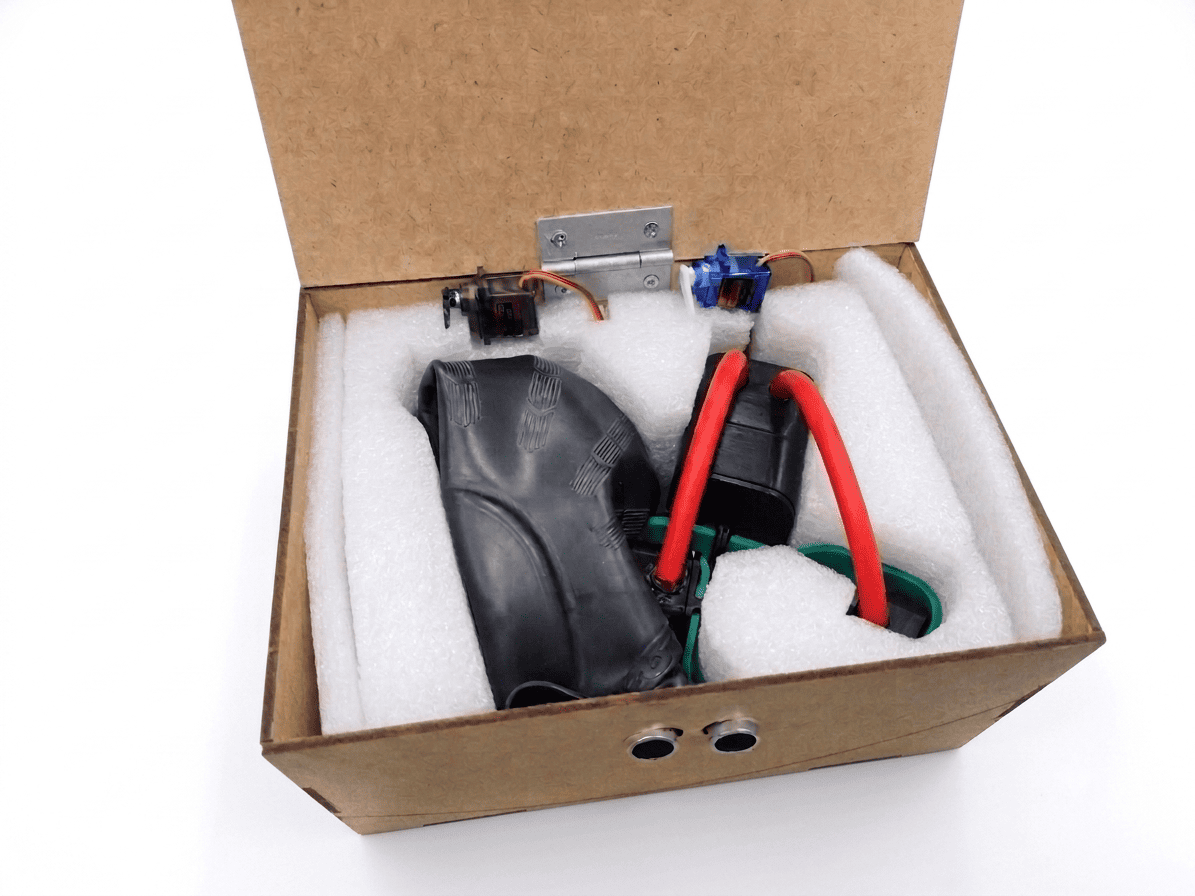
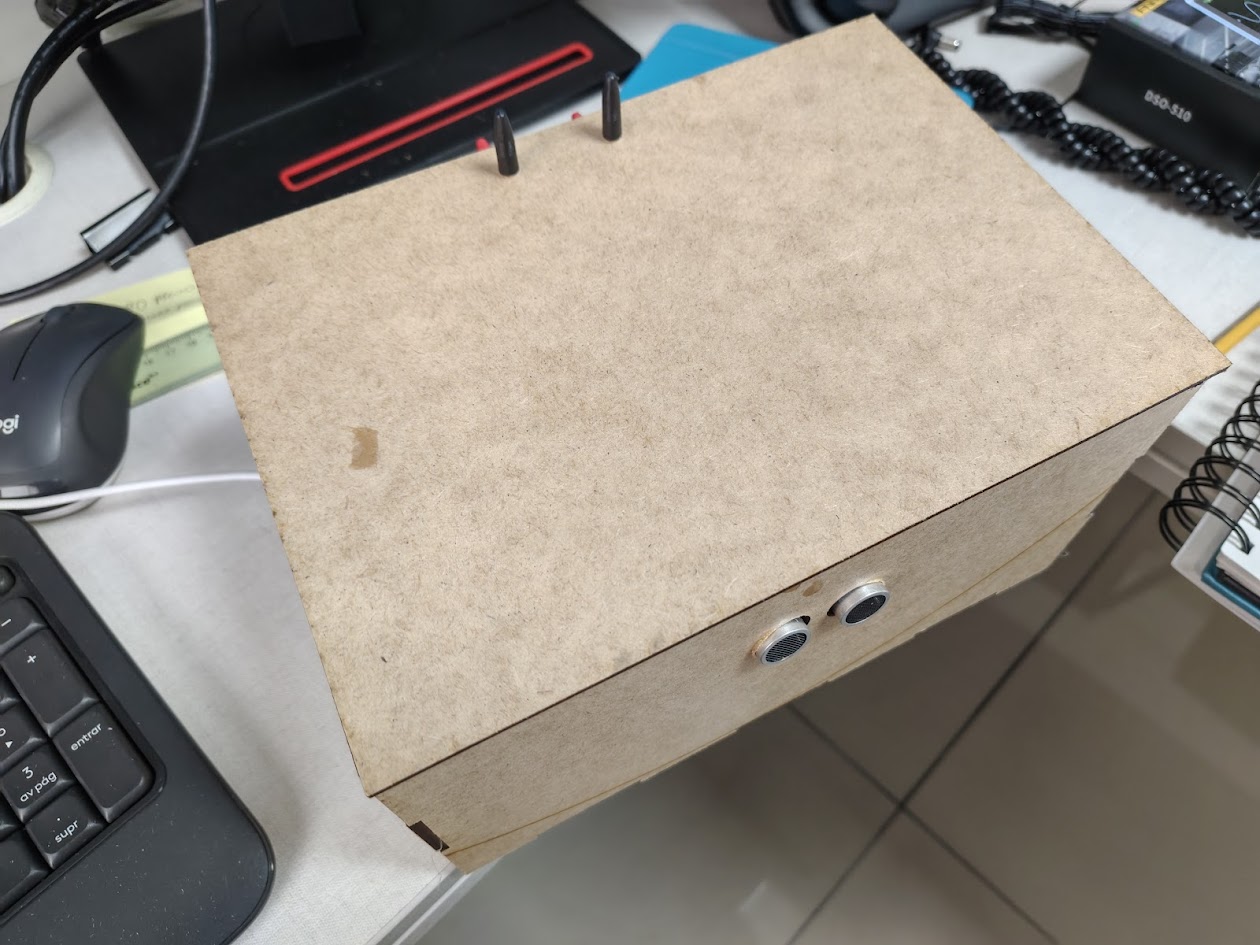
3) Packaging design
Problems
- Consolidate the packaging design
- One micro servo MG90S cannot open the box, we need to find an alternative
- Battery life is limited
Solutions
- Cut with laser the 3 mm MDF
- Use two micro servos for better functionality
- Find another battery for next versions
A system with sensor integration for person with visual disabilities.
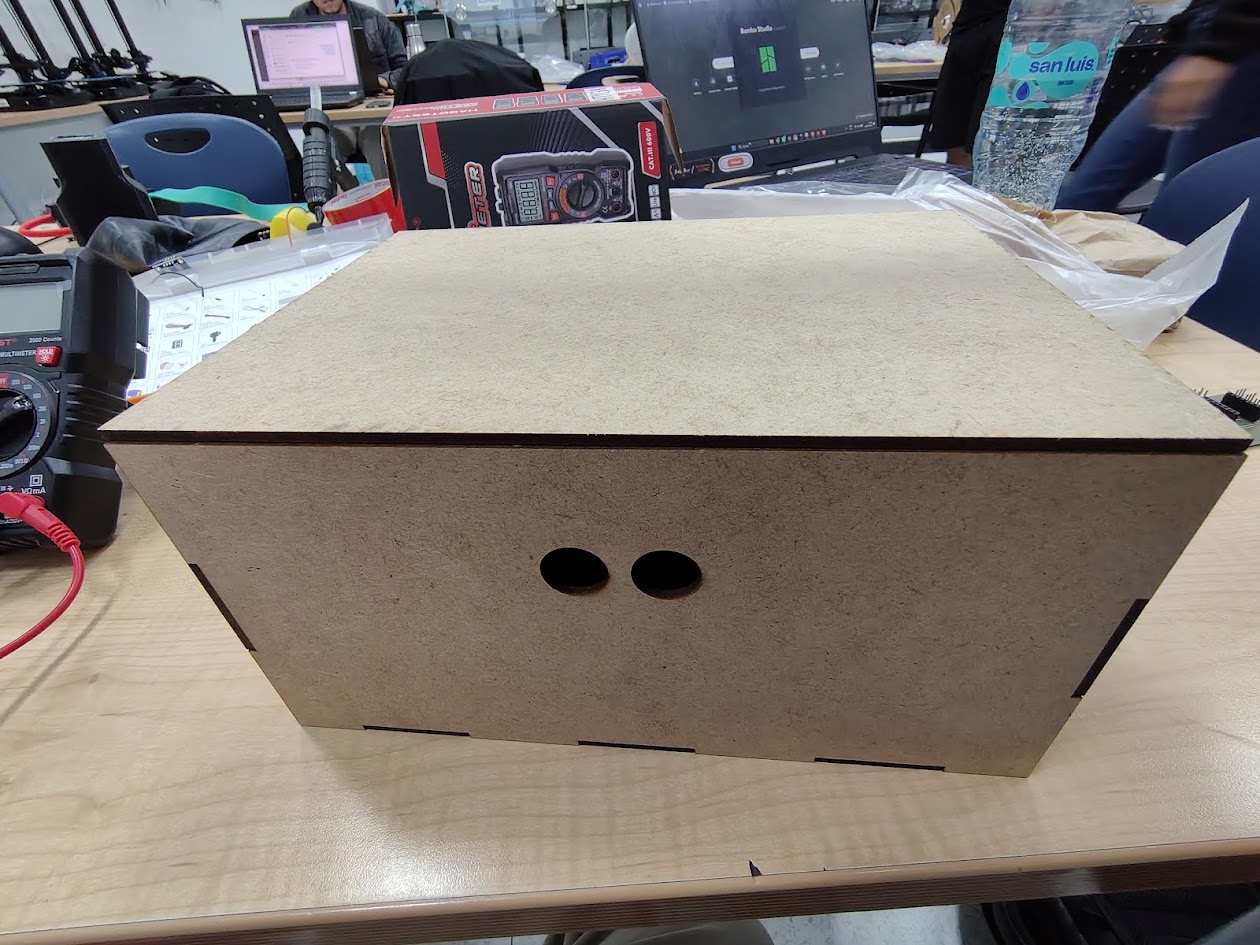
The box is designed to be an intuitive user interface. It incorporates a microcontroller for sensor integration and ensuring that swimmers with visual disabilities can navigate the pool safely and effectively.
                        //Programming two microservos and HC-SRO4 distance sensor for the box opening system
                      // Board: Seeed Studio XIAO ESP32C3
                      // PCB: Designed PCB

                        #define TRIG_PIN D0
                        #define ECHO_PIN D1
                        #include

                        Servo servo;
                        Servo servo2;

                        #define SERVO_PIN D6
                        #define SERVO_PIN2 D5

                        void setup() {
                          Serial.begin(115200);

                          pinMode(TRIG_PIN, OUTPUT);
                          pinMode(ECHO_PIN, INPUT);

                          digitalWrite(TRIG_PIN, LOW);

                          servo.setPeriodHertz(50);      // Frecuencia estándar de servos
                          servo2.setPeriodHertz(50);      // Frecuencia estándar de servos
                          servo.attach(SERVO_PIN, 500, 2400);
                          servo2.attach(SERVO_PIN2, 500, 2400);

                          servo.write(80);               // Posición inicial
                          servo2.write(80);               // Posición inicial
                          delay(1000);
                          int i=0;
                        }

                        void loop() {
                          long duration;
                          float distance;

                          // Pulso de disparo
                          digitalWrite(TRIG_PIN, LOW);
                          delayMicroseconds(2);

                          digitalWrite(TRIG_PIN, HIGH);
                          delayMicroseconds(10);

                          digitalWrite(TRIG_PIN, LOW);

                          // Leer eco
                          duration = pulseIn(ECHO_PIN, HIGH); //obtenemos el ancho del pulso

                          if (duration == 0) {
                            Serial.println("Fuera de rango");
                          } else {
                            distance = duration * 0.0343 / 2.0;

                            Serial.print("Distancia: ");
                            Serial.print(distance);
                            Serial.println(" cm");
                          }

                          delay(50);

                        if (distance<10){
                            servo.write(180);
                            servo2.write(180);
                            delay(10000);
                            servo.write(80);
                            servo2.write(80);
                          }
                        }
1) Cap device
2) Body device
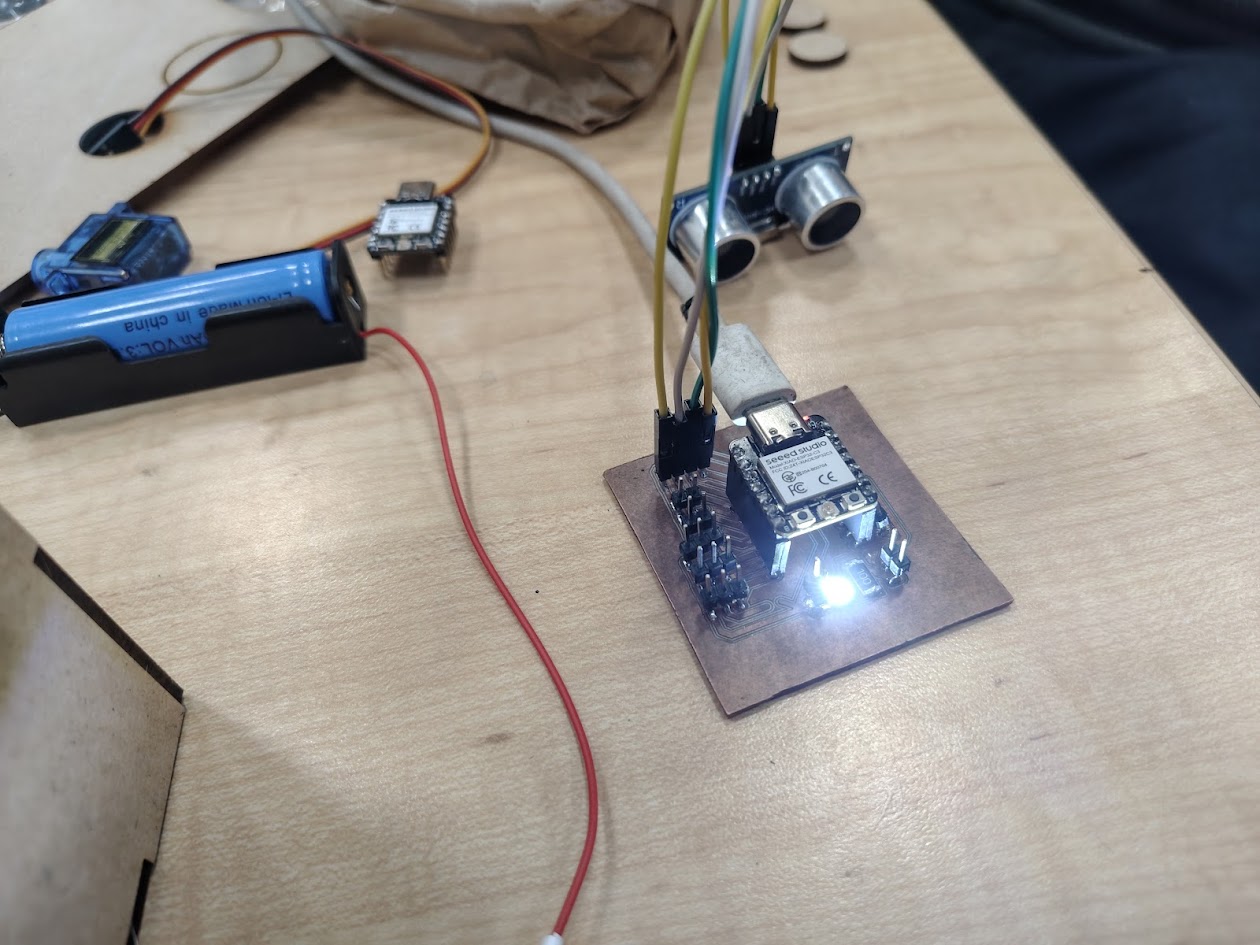
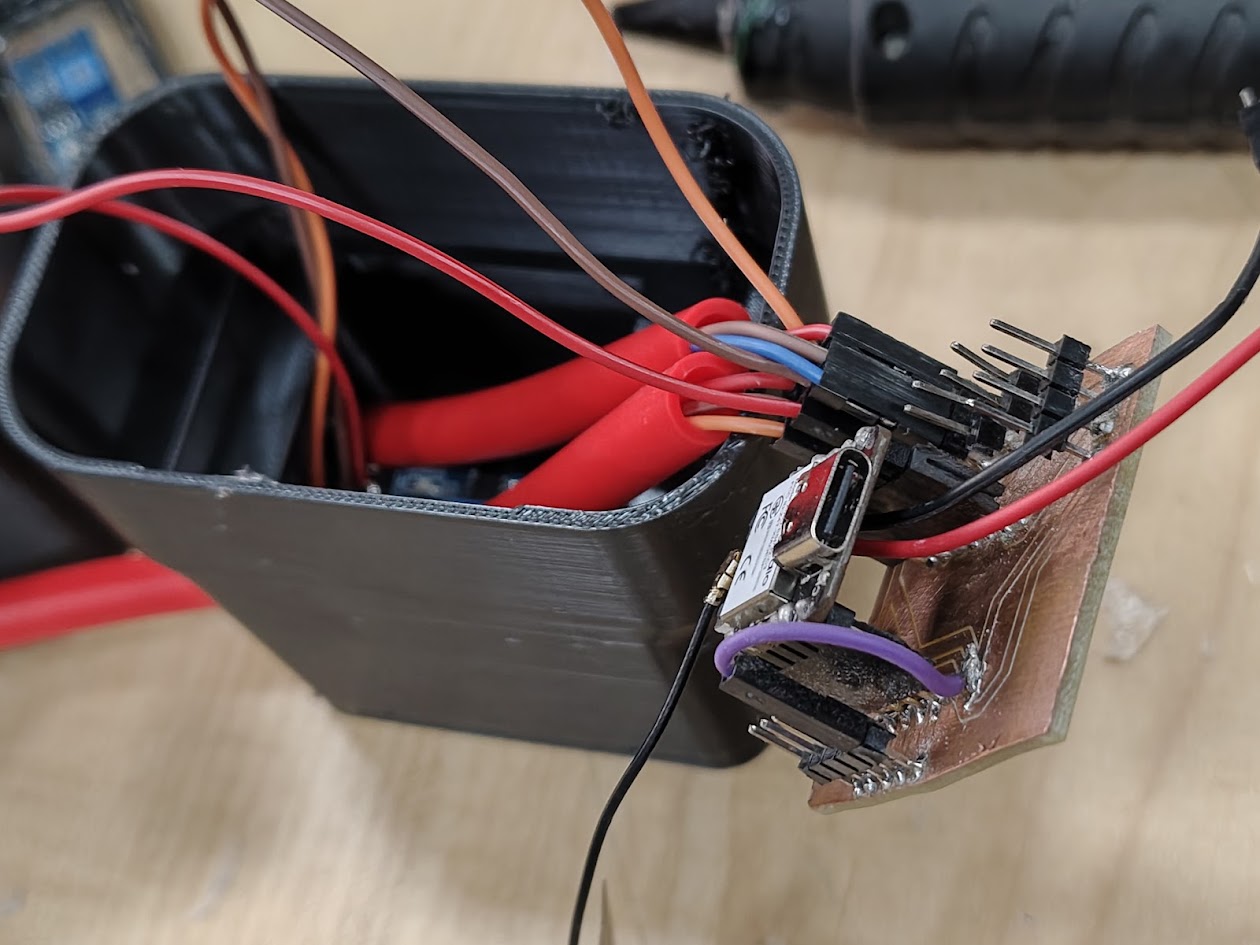
1) Designed PCB with Xiao ESP32 C3
2) 02 microservo motors
3) HC-SR04 distance sensor
4) Programming with Arduino IDE and C++ for sensor integration and box opening system
- Can not open the door
- Can open the door
Video demonstration
Designed packaging
I designed the packaging for the final product, ensuring it was both functional (for people with visual disabilities). When I put my hand near the HC-SR04 distance sensor, the box opened, with two servos moved 90°. Then, if the HC-SR04 does not detect an object for 10 seconds, the box will close automatically. /p>
| Materials & Components | Where did they come from | Cost (S/.) |
|---|---|---|
| Sharp GP2Y0A02YK0F | Naylampmechatronics | $ 30.00 |
| TCRT5000 Single Channel Line Tracking Sensor Module x3 | Hifisac | $ 15.00 |
| XIAO ESP32 C3 Seeed Studio Mini WiFi BLE x2u | MTLAB | $ 30.00 |
| LED SMD Blanco 1210 (3528) x10u | Stacktronics | $ 1.00 |
| Resistors SMD 5% 1W 2512 - 10 Ohms x10u | Stacktronics | $ 1.00 |
| Rechargeable battery 18650 3.7V 2200mAh x2u | Sai Sac | $ 8.00 |
| Others (box, PET, others) | 10% | $ 8.50 |
| TOTAL | $ 93.50 | |
3) Final results - Project development
- What will it do?
- Who has done what beforehand?
- What sources will you use?
- What will you design? Explained
- What materials and components will be used?
- Where will they come from?
- How much will they cost?
- What parts and systems will be made?
- What processes will be used?
- What questions need to be answered?
- How will it be evaluated?
- Uploaded summary slide (placeholder)
- Uploaded video clip (placeholder)
- Check they are linked in the final presentation schedule