Assignment Requirements
Learning outcomes
- Demonstrate workflows used in the chosen process.
- Select and apply suitable processes (and materials) to do your assignment..
Have you answered these questions?
- Documented the workflow(s) and process(es) you used.✅
- Explained how your process is not covered in other assignments.✅.
- Described problems encountered (if any) and how you fixed them.✅.
- Included original design files and source codeIncluded original design files and source code.✅.
- Included ‘hero shot’ of the result.✅.
Weekly planning
During this week, the planning focused on the integration of all the project subsystems into a single functional prototype. The work included organizing the mechanical structure, electronics, embedded programming, interaction system, power supply, and the final physical enclosure.
The integration process also involved testing the communication between hardware and software, improving component distribution, and verifying that all systems worked together correctly. In addition, the knowledge acquired throughout the course was applied by combining programming, electronics, 3D design, digital fabrication, and interface development to achieve a more stable, interactive, and organized final result.

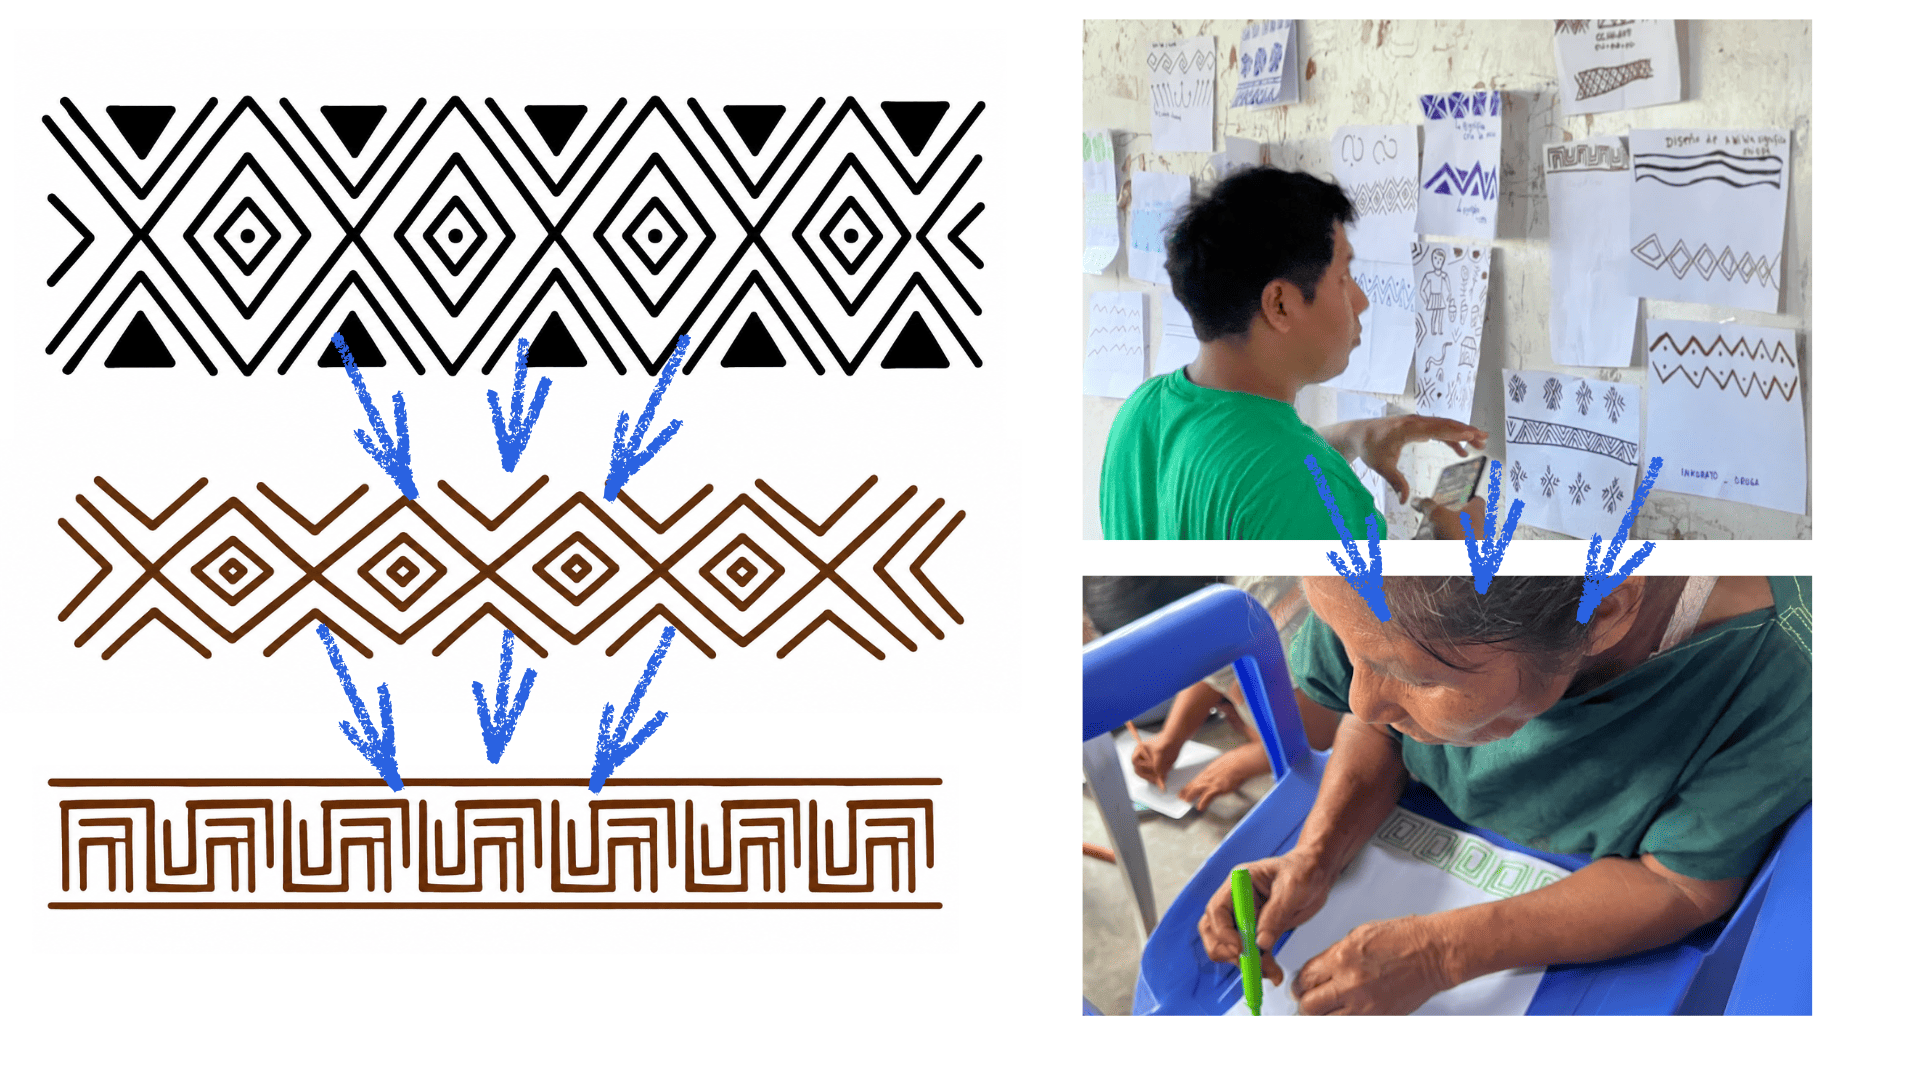
During this wildcard week, I will share part of my research and community work developed in the BIO area at Fab Lab Koajika. My individual assignment focuses on embroidery inspired by Asháninka culture, especially the traditional patterns, incense symbols, and visual language that represent nature and everything surrounding it.
As part of this process, I conducted a workshop in the native community of Santavancori, located in the district of Río Tambo, province of Satipo, Junín region, Peru. Through processes of symbio-creation and co-creation, we explored the meaning behind Asháninka patterns and symbols, which are deeply connected to the forest, the land, the sky, the mountains, water, and fire.
For the Asháninka people, the forest is not only a landscape but part of their identity and way of life. Much of their language comes from the sounds of the forest, and many of their traditional clothes and ornaments are represented through these symbolic icons and patterns.
Through this project, I seek to connect ancestral knowledge with technology by comparing and combining traditional techniques with contemporary creative processes. At the same time, I continue exploring research in the BIO area, integrating biomaterials, natural pigments, local resources, and cultural identity into new forms of artistic and technological expression.
Individual Assignment
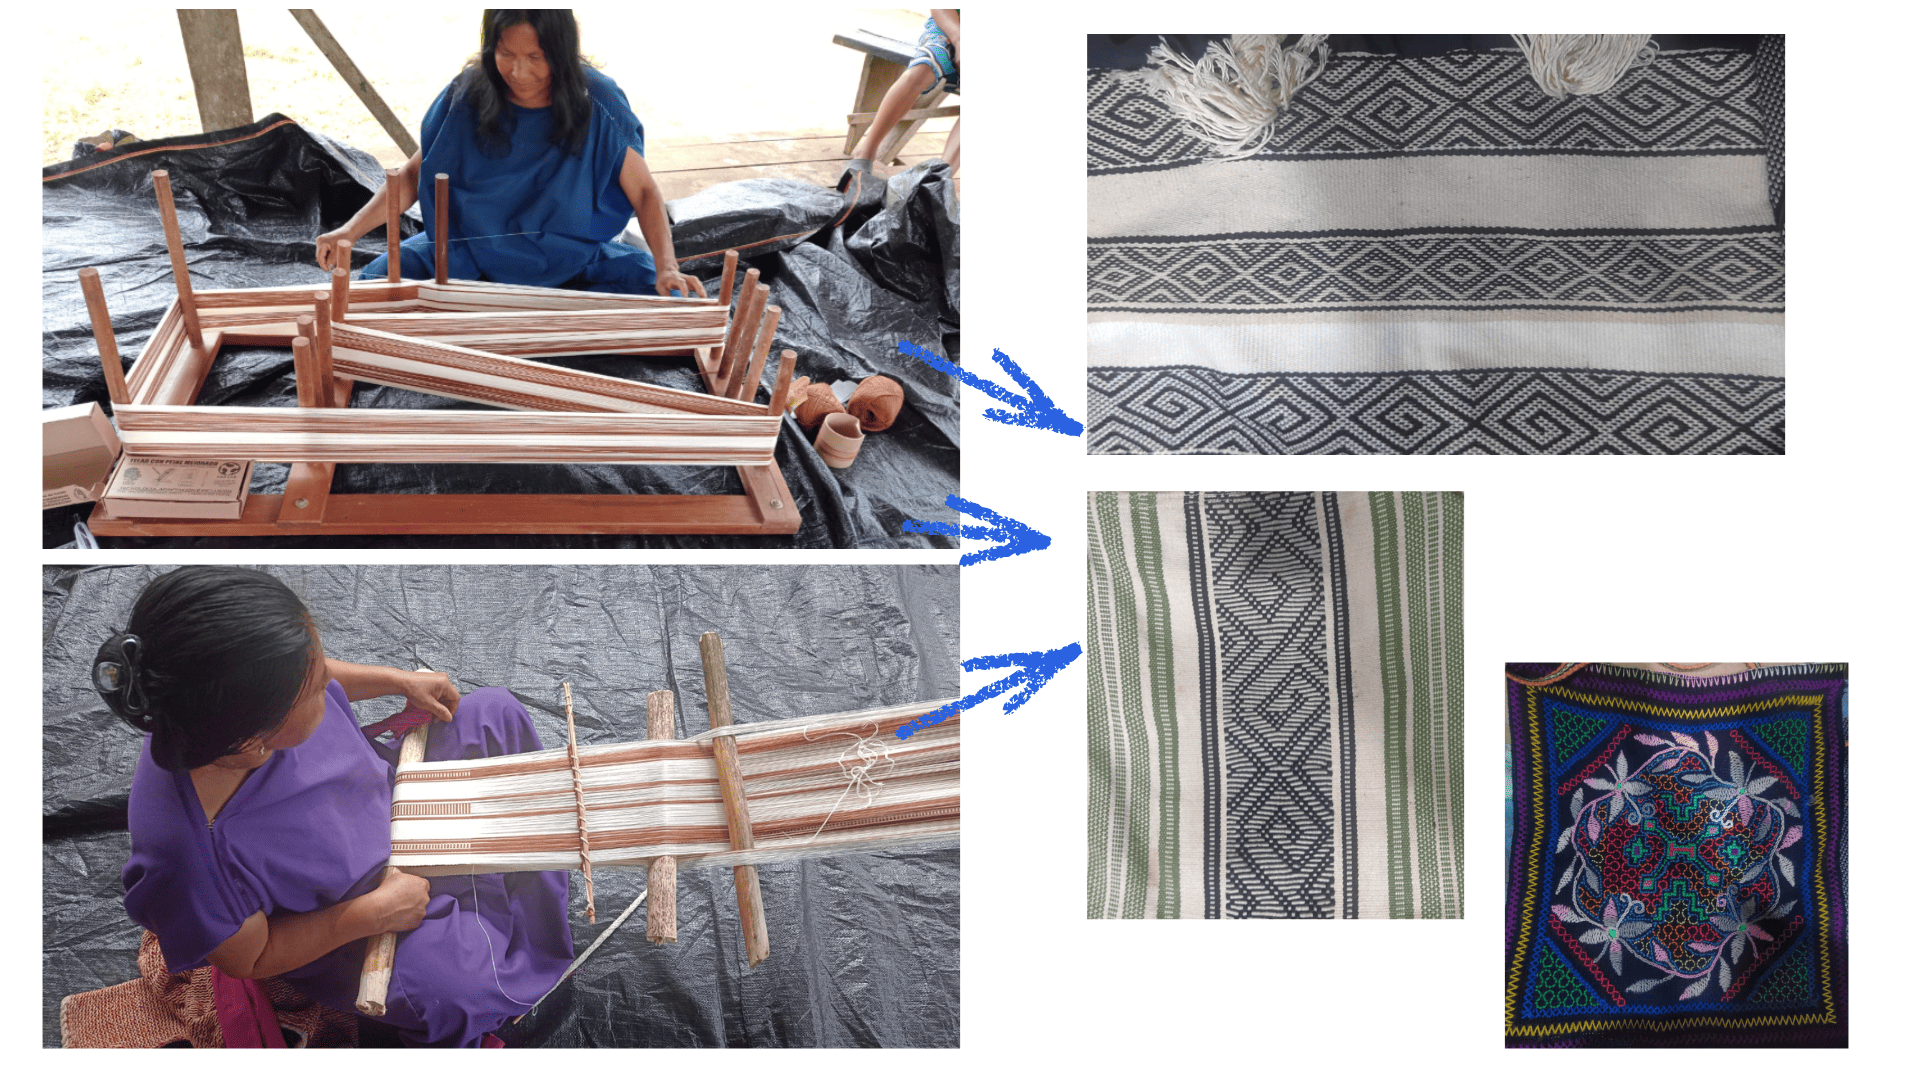
The Asháninka cotton weaving and embroidery techniques are ancestral practices passed down through generations. Using traditional handloom methods, the Asháninka people transform natural cotton into textiles that carry cultural identity, symbolic patterns, and ancestral knowledge.
These millenary techniques are created through careful manual weaving processes, where each thread and symbol represents a connection with nature, the forest, spirituality, and community life. The patterns inspired by the earth, rivers, mountains, sky, and living beings become part of their clothing, ornaments, and daily expressions.
Through this work, I seek to learn from and reinterpret these traditional weaving techniques by combining them with embroidery, biomaterials, and creative technologies, creating a dialogue between ancestral knowledge and contemporary innovation.
During my stay in the jungle, I was able to develop embroidery tests using bio-materials thanks to the support and shared knowledge of Ashaninka artisan sisters. Since there are very few places or workshops specialized in embroidery in this area, this process became an important opportunity to explore my interest in experimenting with bio-materials and analyzing their resistance and finishing through embroidery.
Although Fab Lab Satipo does not currently have a digital embroidery machine, I was able to continue the process by using the manual loom developed by Walter Gonzales, which allowed the creation of bio-threads and supported the continuation of the textile experimentation through local and artisanal techniques.
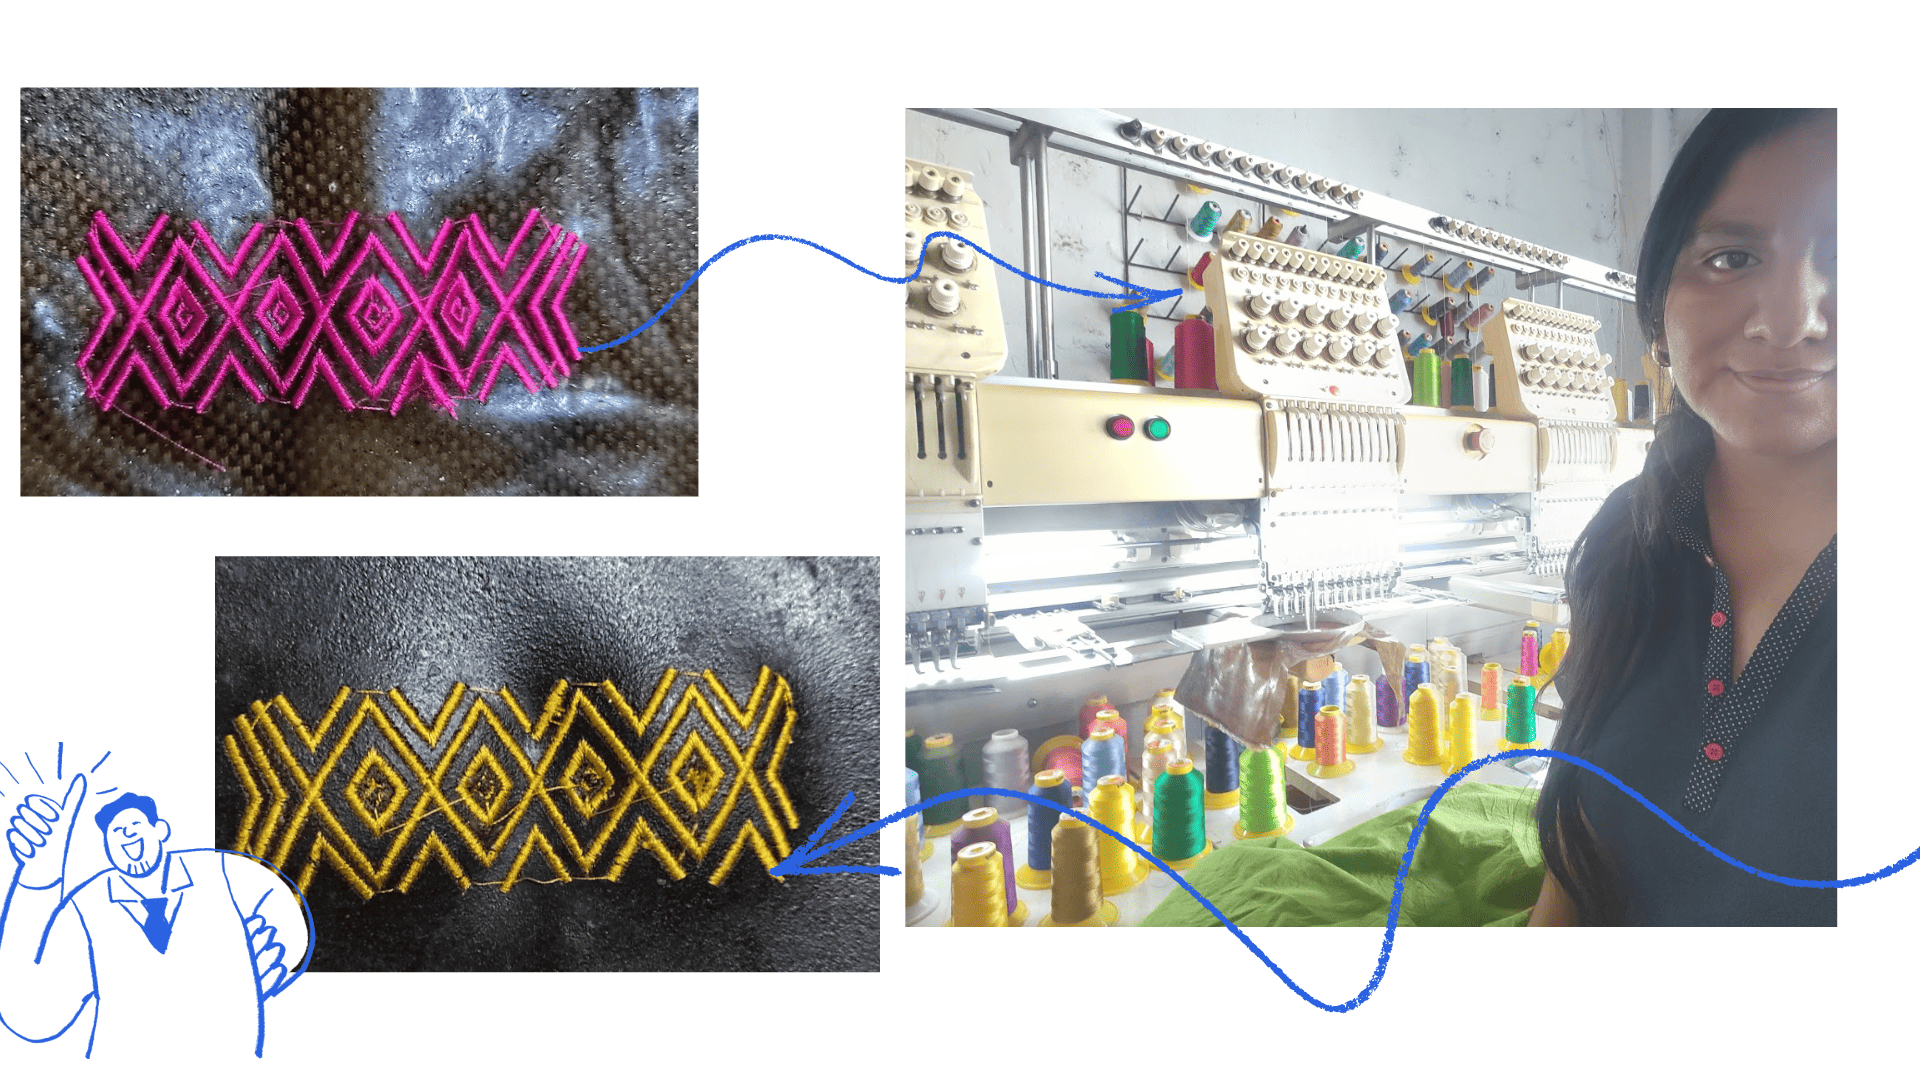
Additionally, I found a medium-sized embroidery workshop dedicated to T-shirt manufacturing and embroidery production, which had four embroidery stations, as shown in the attached image. The people working there were surprised to see the use of this bio-leather material, as well as the loom dyed with native plants such as matico, since it combines local craft techniques with biological materials and experimental textile fabrication processes.
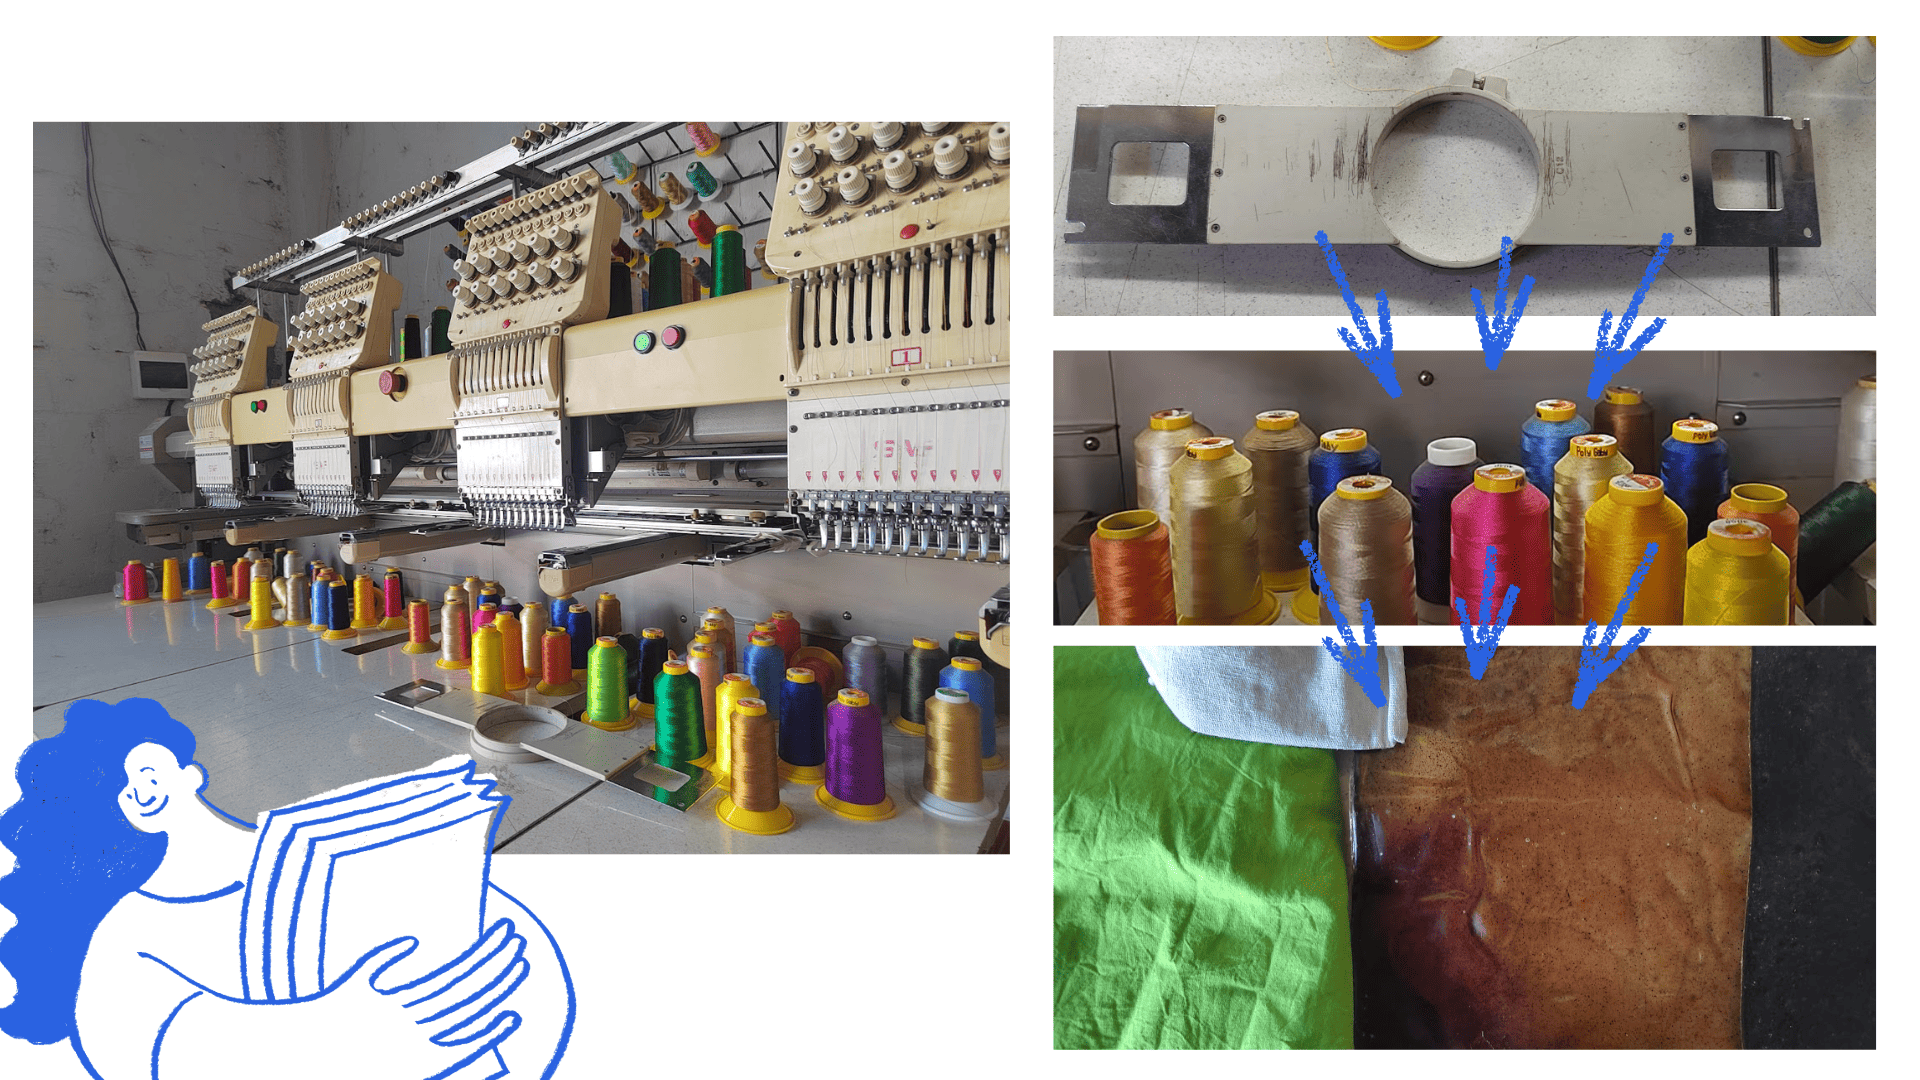
SWF SunStar Industrial Embroidery Machine
The SWF SunStar industrial embroidery machine used in this process features a high-precision computerized system designed for continuous textile work and industrial production. The machine operates through a synchronized multi-head embroidery system, allowing repetitive embroidery processes with high accuracy and speed.
The embroidered design contains approximately 3485 stitches and operates at a speed of 800 RPM, maintaining stability and clean detail definition during the embroidery process. The system also uses X/Y scaling at 100%, helping preserve the original proportions of the design during production.
Main Technical Features
- Computerized industrial embroidery control system.
- Automatic needle control and color change system.
- Synchronized multi-head embroidery system.
- Compatibility with DST embroidery files.
- Adjustable speed depending on material type.
- Stitch density and direction adjustment.
- Digital control display for process monitoring.
- Internal memory for design storage.
- Thread tension control system for precise stitching.
- High-durability industrial motors.
- Resistant metal structure for long production hours.
Materials Used with the Machine
- Cotton fabrics.
- Canvas and thick textiles.
- Leather and bio-leather.
- Caps and textile accessories.
- Backpacks, bags, and handcrafted pieces.
Recommended Materials for Bio-Leather Embroidery
- #14 and #16 industrial needles.
- High-resistance shiny polyester embroidery thread.
- Thick stabilizers to avoid material deformation.
- Embroidery hoops to maintain uniform tension.
Accessories and Complementary Components
- Industrial thread spool holders.
- Metal bobbins and bobbin holders.
- Embroidery hoops of different sizes.
- Supports for thick materials.
- Industrial control pedal.
- Mechanical lubrication system.
- Calibration and maintenance tools.
- Digital embroidery software for DST file conversion.
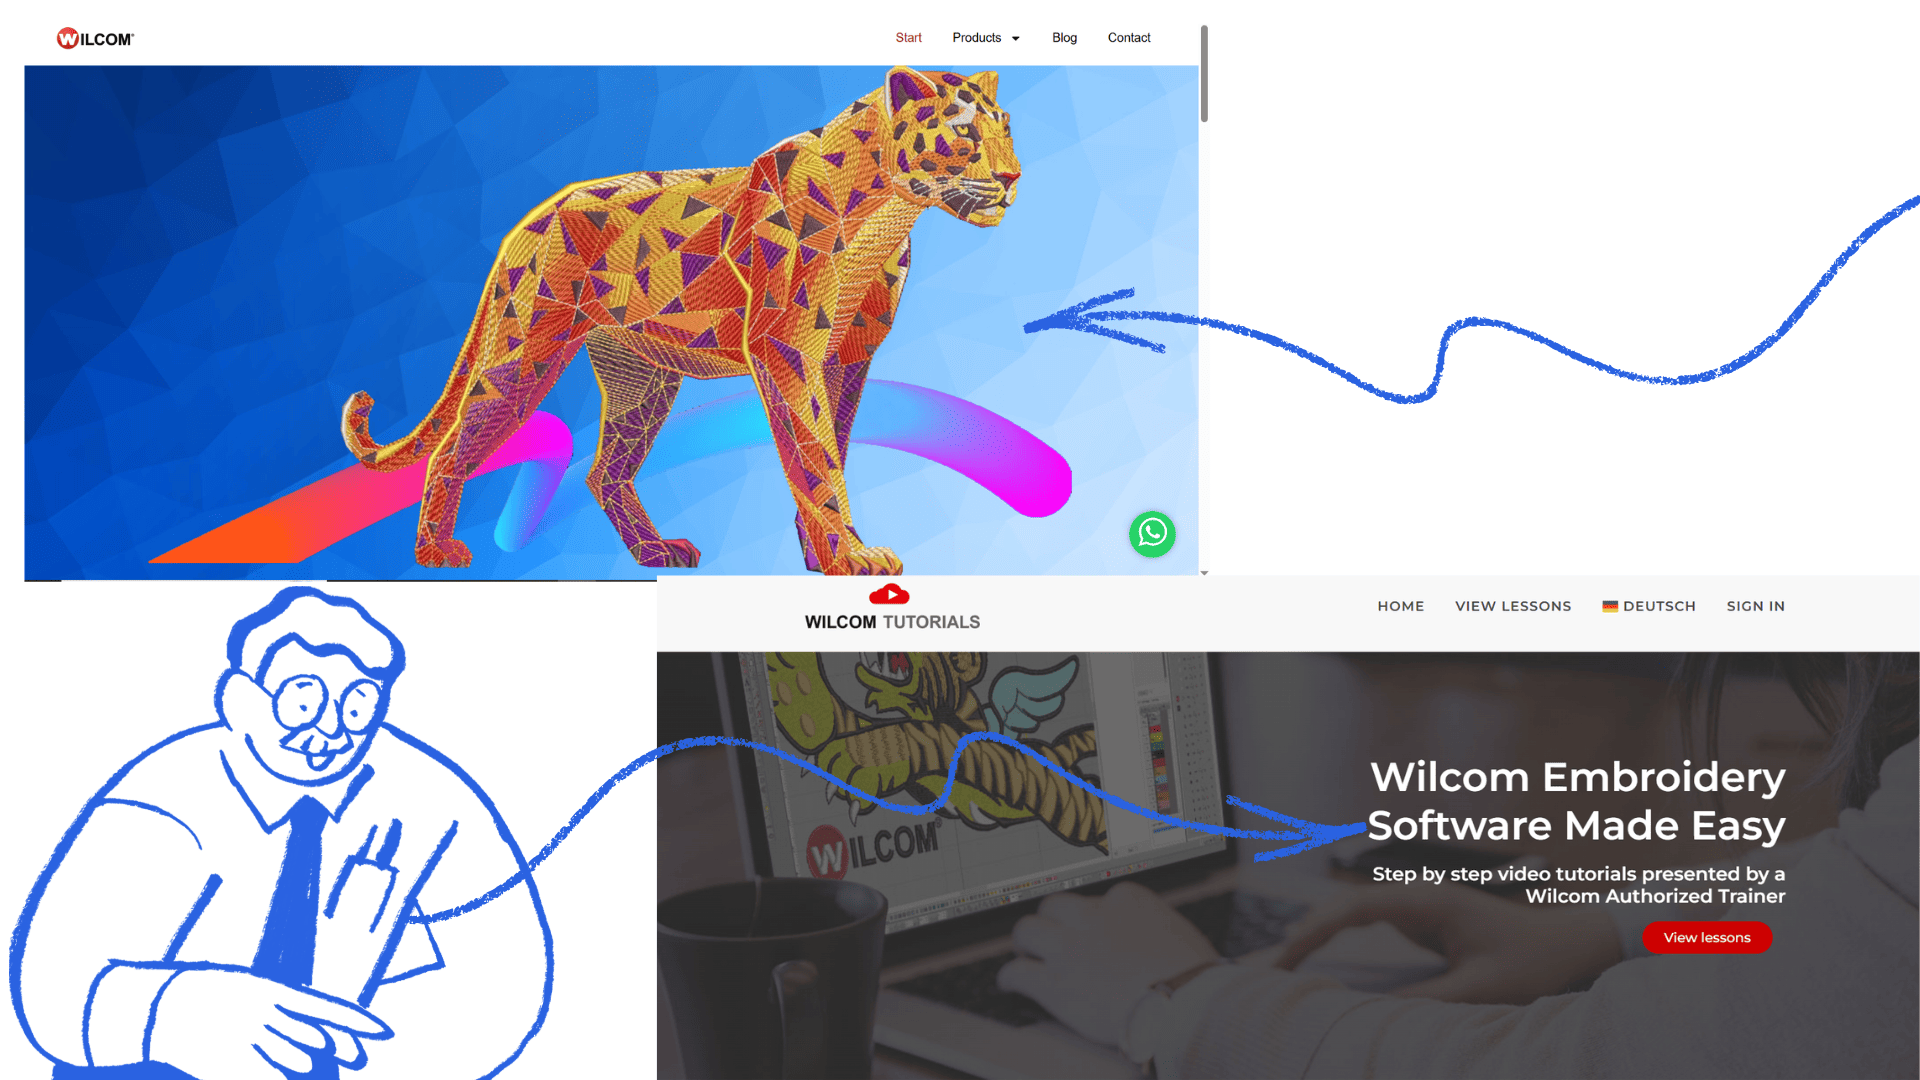
Wilcom Embroidery Software
Wilcom is a professional embroidery digitizing and design software used to create, edit, and convert embroidery designs into machine-readable files compatible with industrial embroidery machines such as the SWF SunStar. The software allows images, illustrations, and graphic patterns to be transformed into stitch sequences that can be automatically embroidered by the machine.
Wilcom provides advanced tools for controlling stitch density, thread direction, fill types, edge compensation, color sequence, and embroidery settings. It also supports industrial embroidery formats such as DST, widely used in textile production and computerized embroidery systems.
In this process, Wilcom was used to prepare embroidery designs inspired by Amazonian geometry and cultural patterns, adapting them for industrial embroidery production.
The software can be downloaded from the official Wilcom tutorial and training platform:
www.wilcomtutorials.com
Although Wilcom is paid software, the platform offers a free trial period that allows users to explore its tools, embroidery workflow, and digitizing features before purchasing the full version. :contentReference[oaicite:0]{index=0}
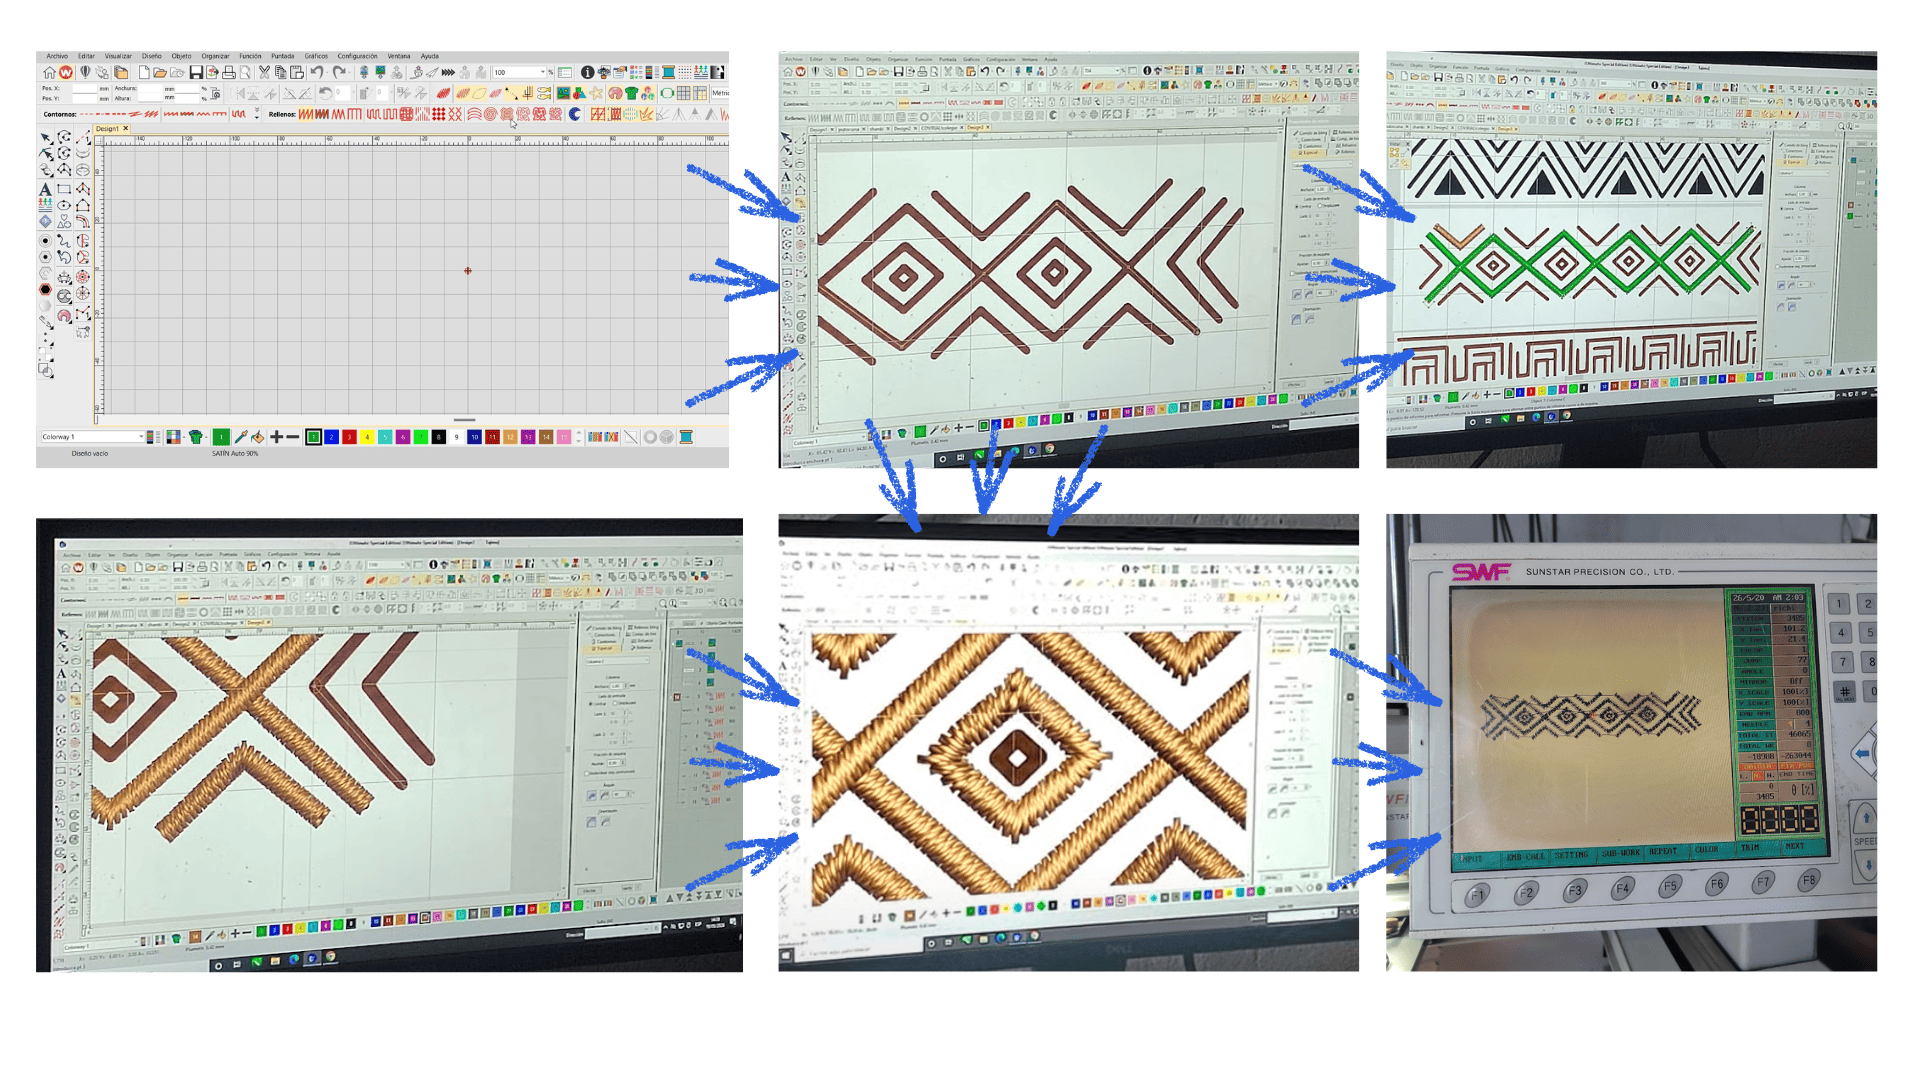
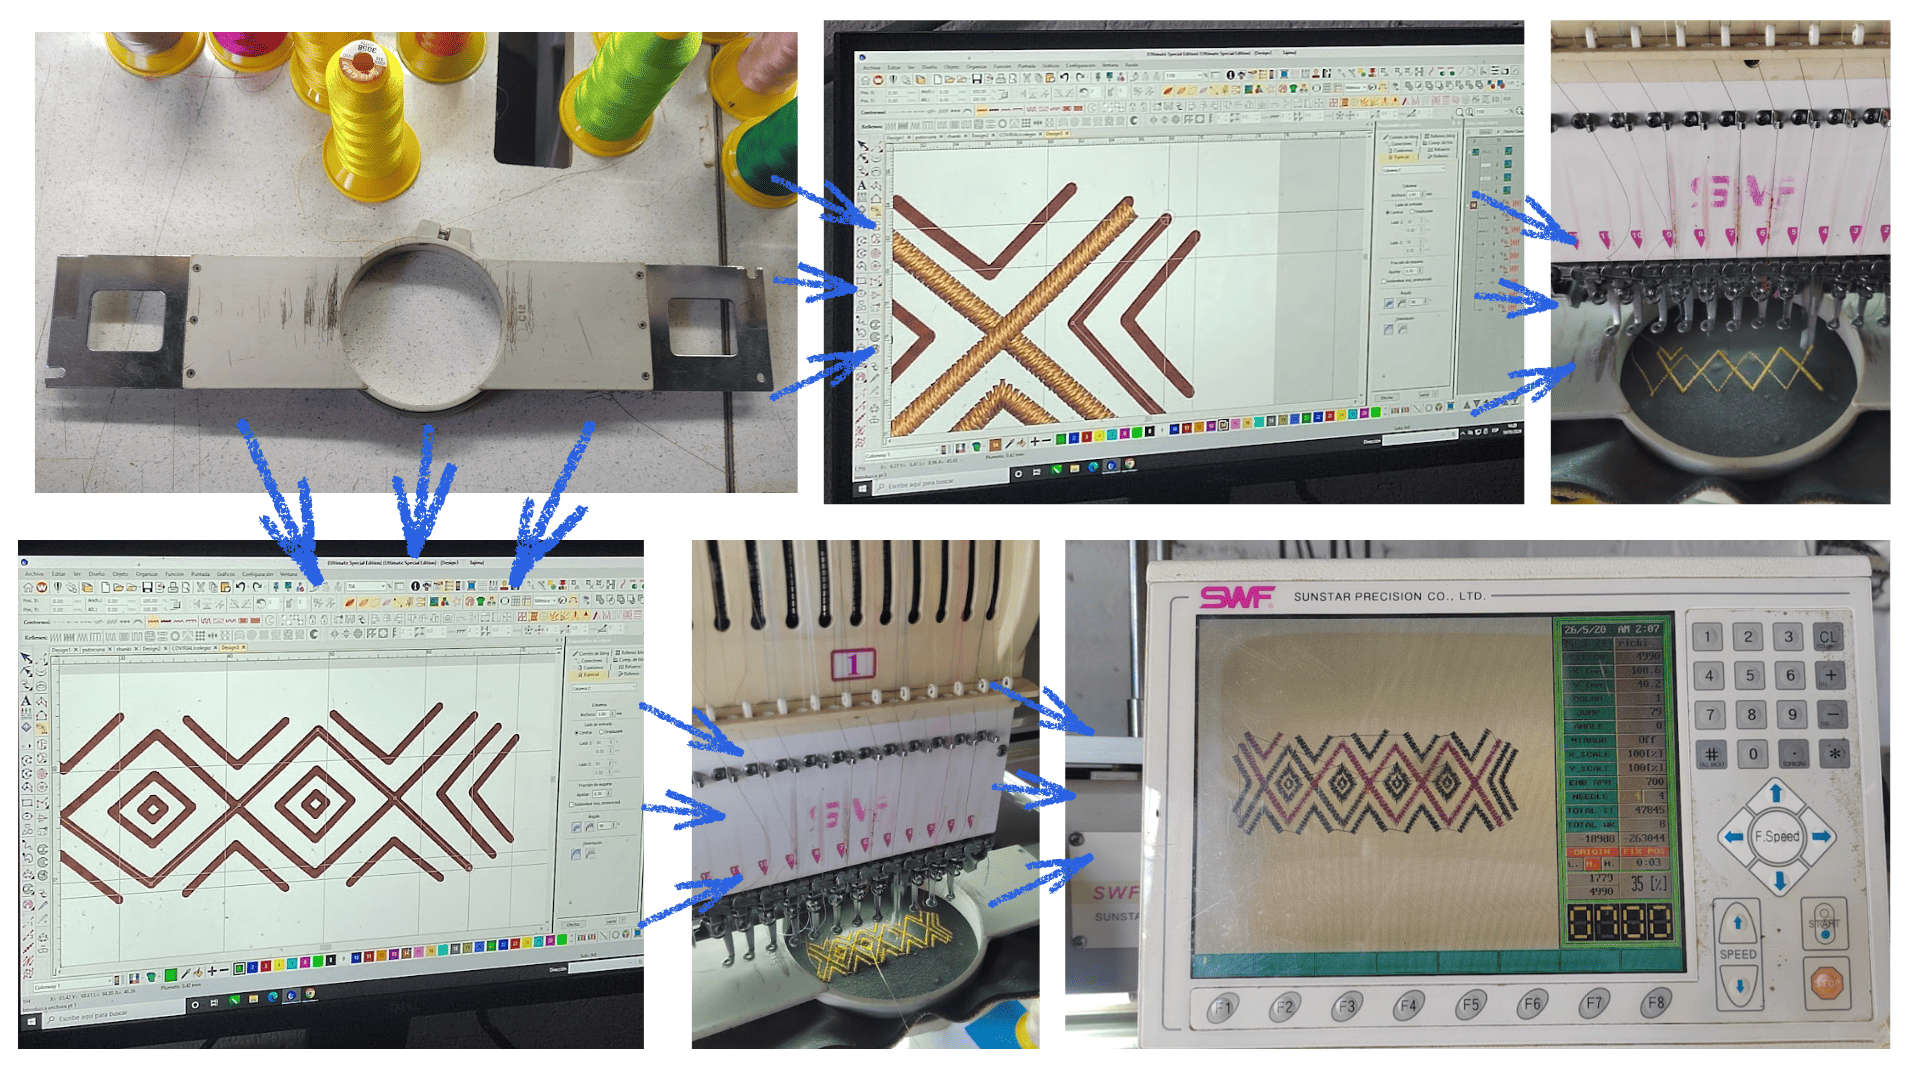
Workflow Process in Wilcom
1. Image Import
The process begins by importing an image or graphic reference into the software. This image can be a drawing, symbol, pattern, or illustration that will be used as the base for the embroidery design.
2. Size and Scale Adjustment
After importing the image, the design size is adjusted according to the final embroidery dimensions. The workspace and proportions are also configured during this step.
3. Vector Redrawing Process
Once the image is placed, the design is manually redrawn using Wilcom vector tools. This process helps create cleaner lines and properly define the areas that will later be converted into embroidery stitches.
4. Outline and Shape Definition
The main outlines of the design are created and separated according to the stitch type required, such as fill stitch, satin stitch, or running stitch.
5. Stitch Configuration
Technical embroidery parameters are configured during this stage, including:
- Stitch density.
- Thread direction.
- Fill type.
- Edge compensation.
- Stitch length.
- Embroidery sequence.
These adjustments are important to avoid material deformation and achieve better embroidery finishes on textiles, leather, and bio-leather materials.
6. Color Assignment
Thread colors are assigned to each section of the design while organizing the embroidery sequence for a more efficient production workflow.
7. Digital Embroidery Simulation
Wilcom allows a digital simulation preview of the final embroidery result, showing how the stitches will behave before sending the file to the embroidery machine.
8. File Conversion and Export
The final design is converted and exported into DST format, compatible with the SWF SunStar embroidery machine and other industrial embroidery systems.
9. Transfer to the Embroidery Machine
The DST embroidery file is transferred to the machine through USB memory or direct connection, allowing the automated embroidery production process to begin.
 Download and install the Wilcom program
Bio-Materials
This bio-material experimentation process explores the use of organic waste, local resources, and natural pigments to create sustainable materials for textile, artistic, and technological applications.
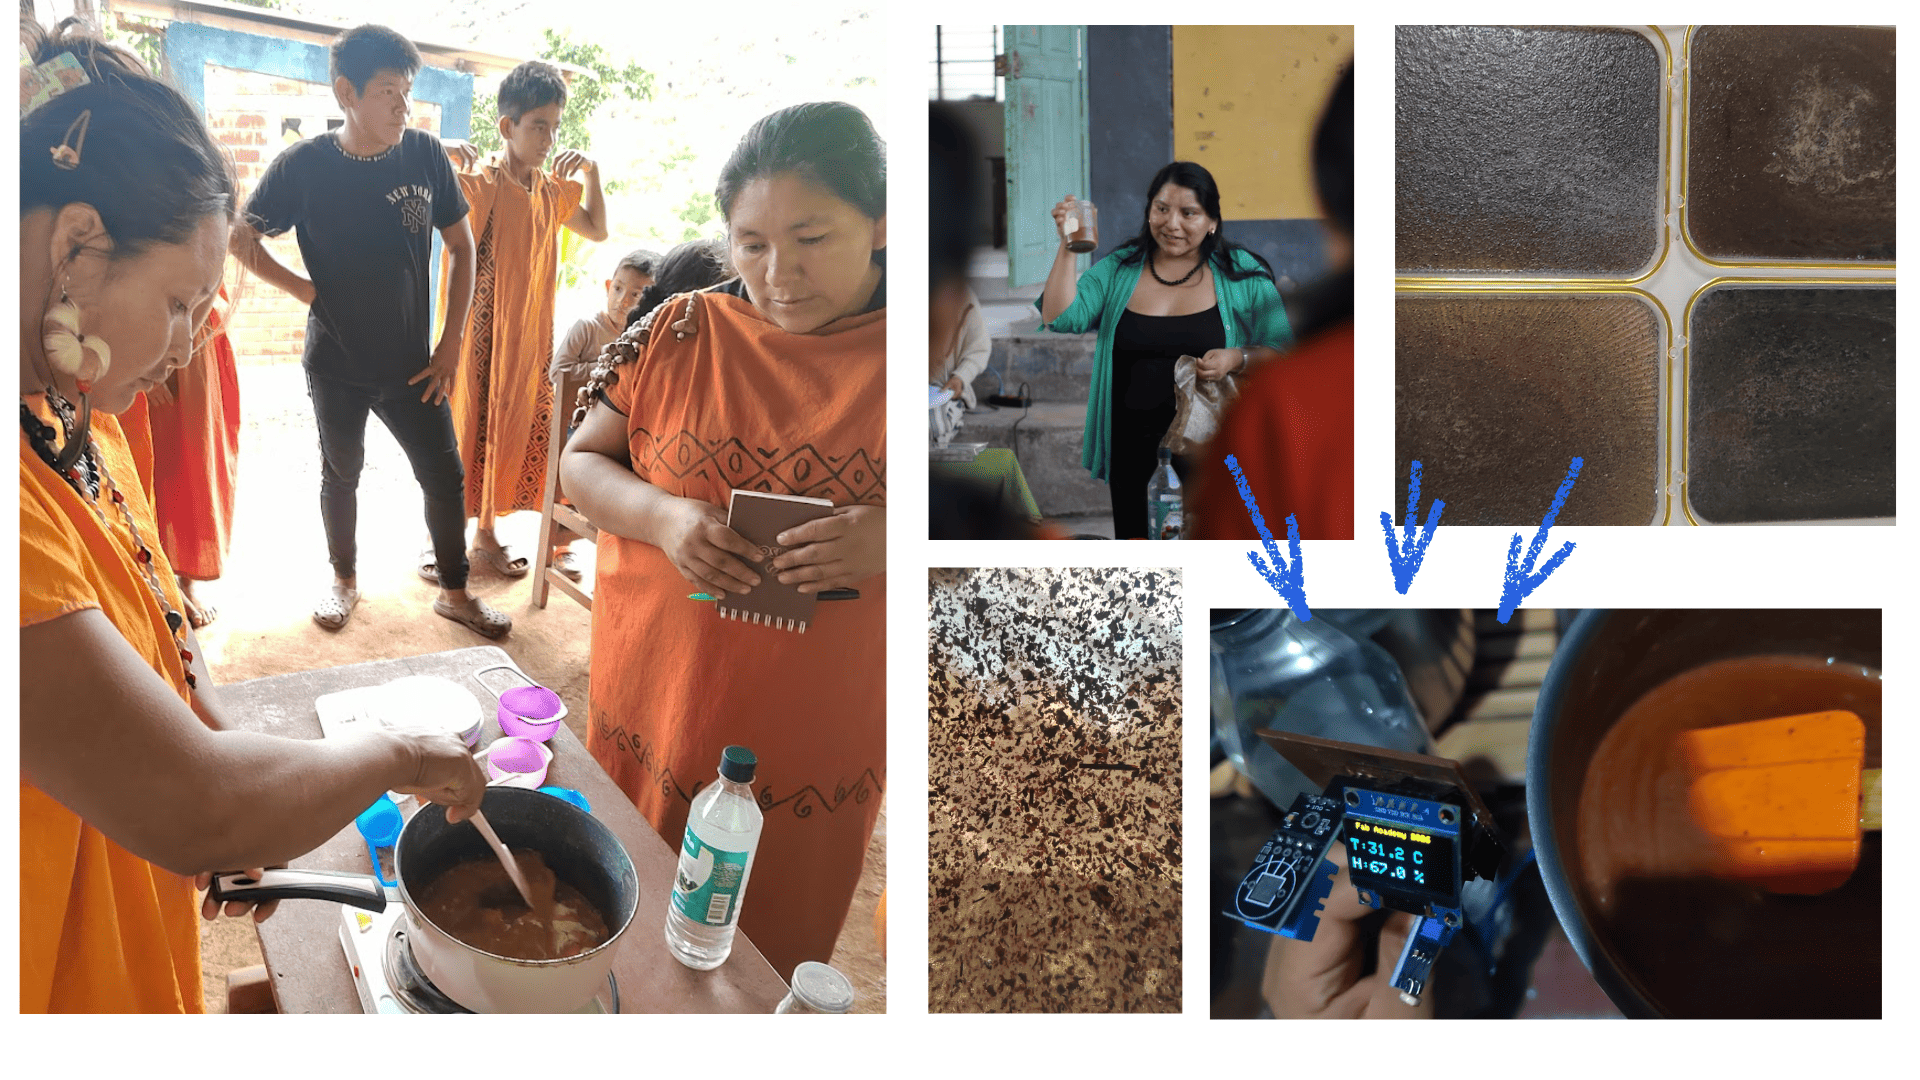
1. Material Collection
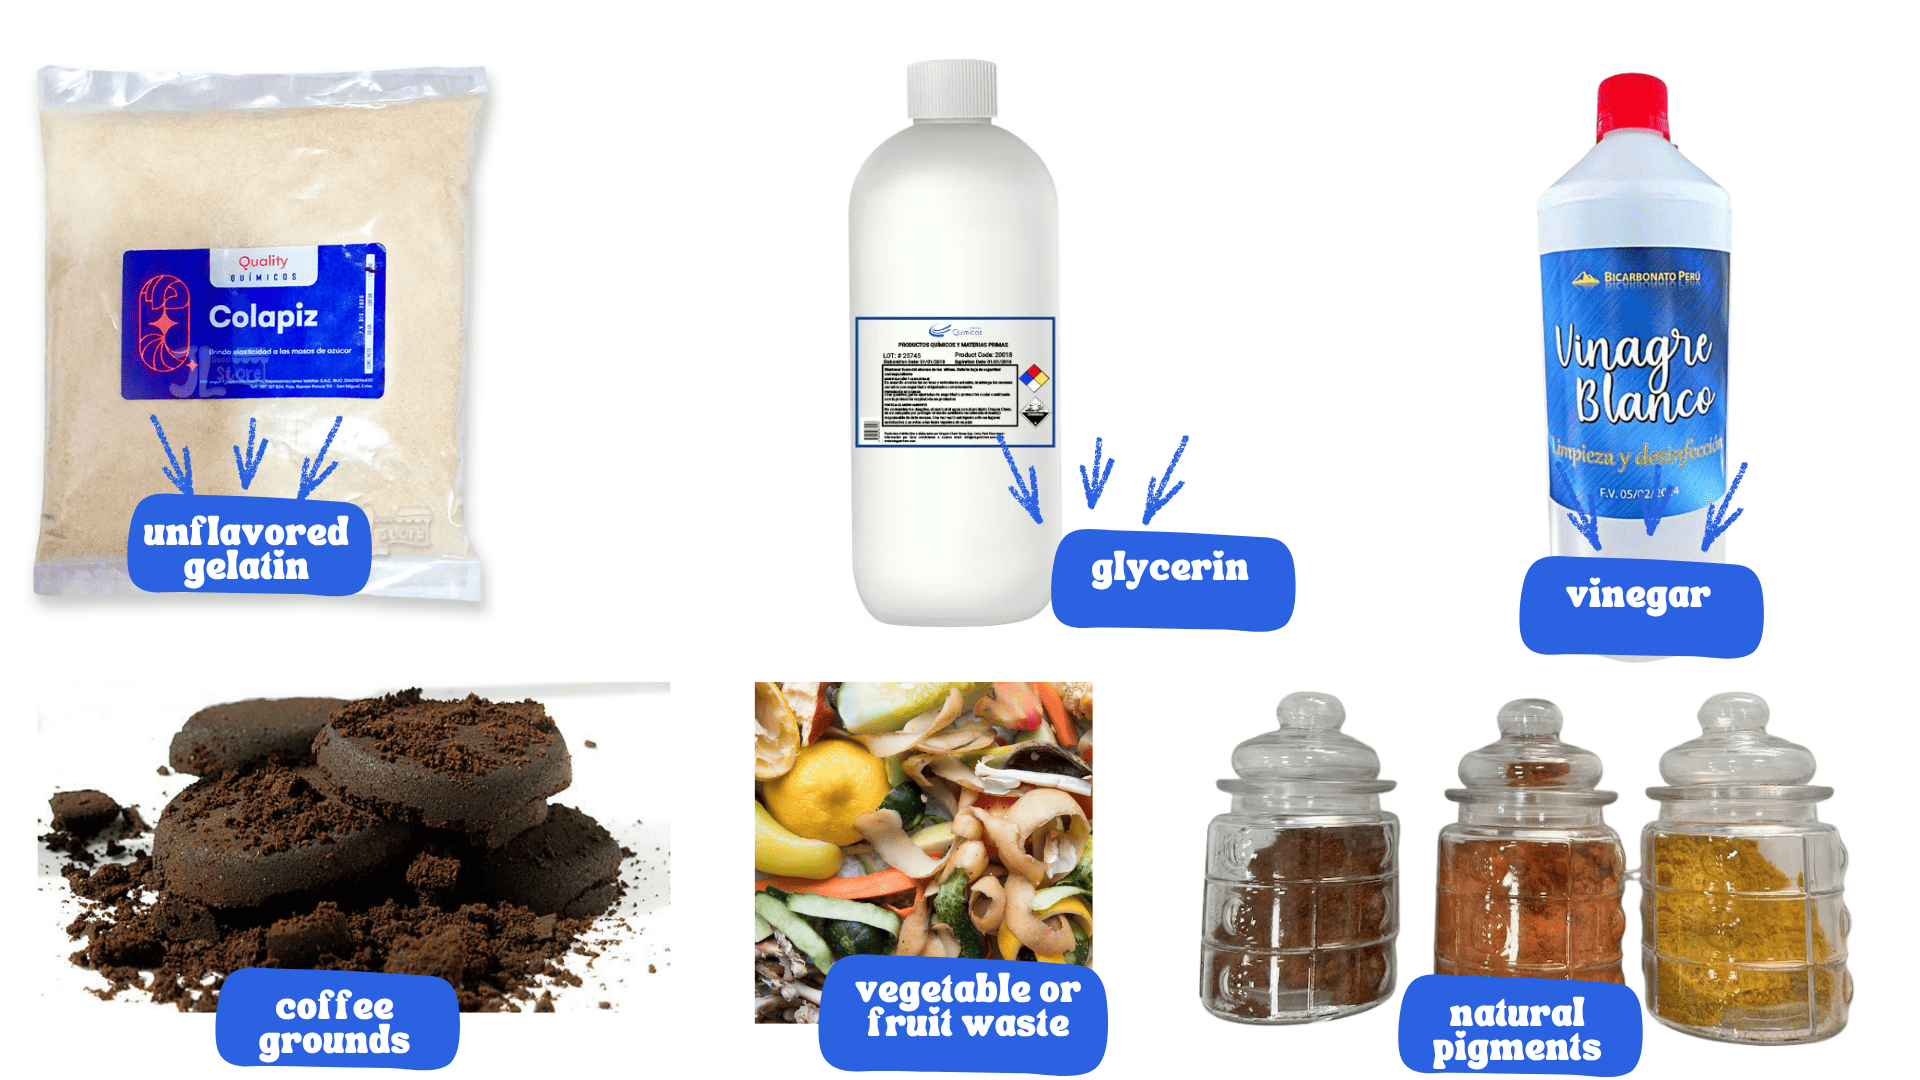
Used coffee grounds are collected together with natural fibers, leaves, seeds, bark, and natural pigments that will be used during the experimentation process.
2. Materials and Ingredients Used
The following materials are used for the bio-material preparation:
- Coffee grounds.
- Glycerin.
- Colorless gelatin or collagen glue.
- Vinegar.
- Natural pigments.
- Water.
Each component contributes flexibility, resistance, texture, and preservation properties to the final bio-material.
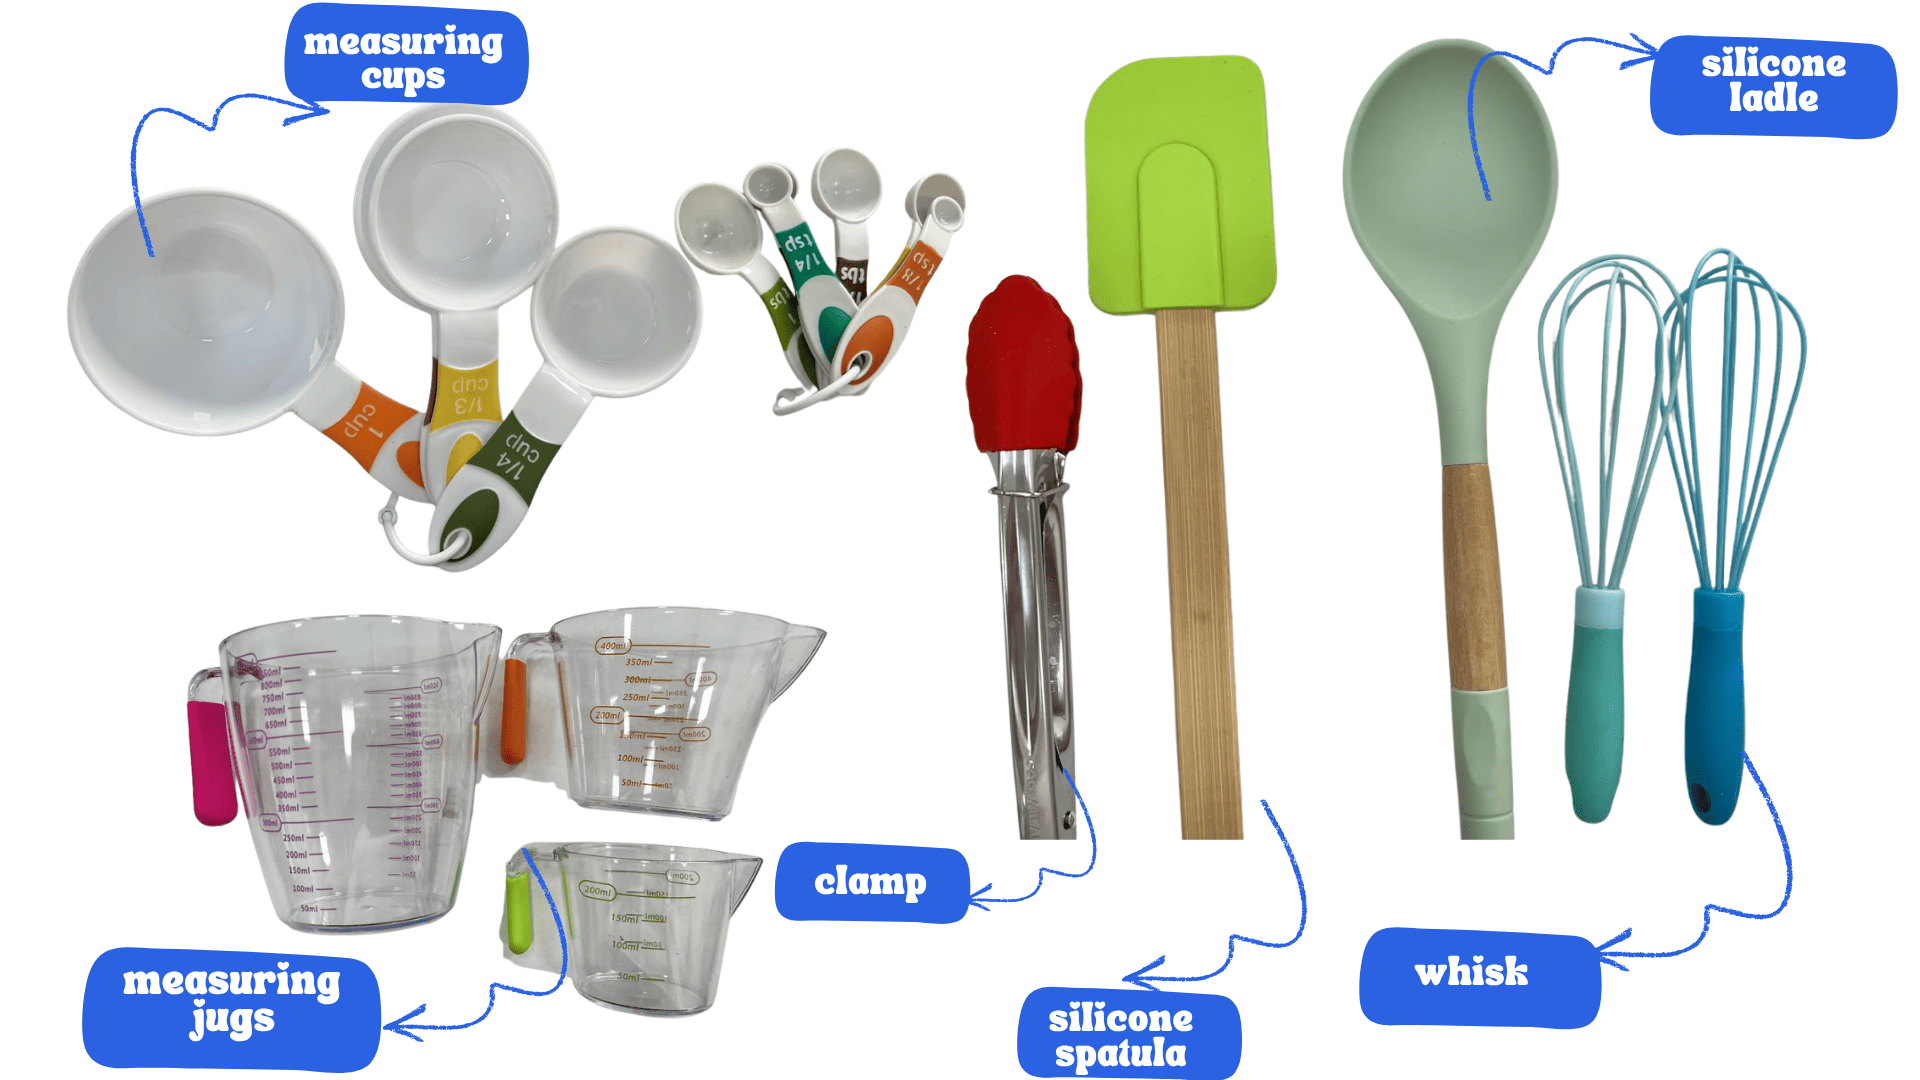
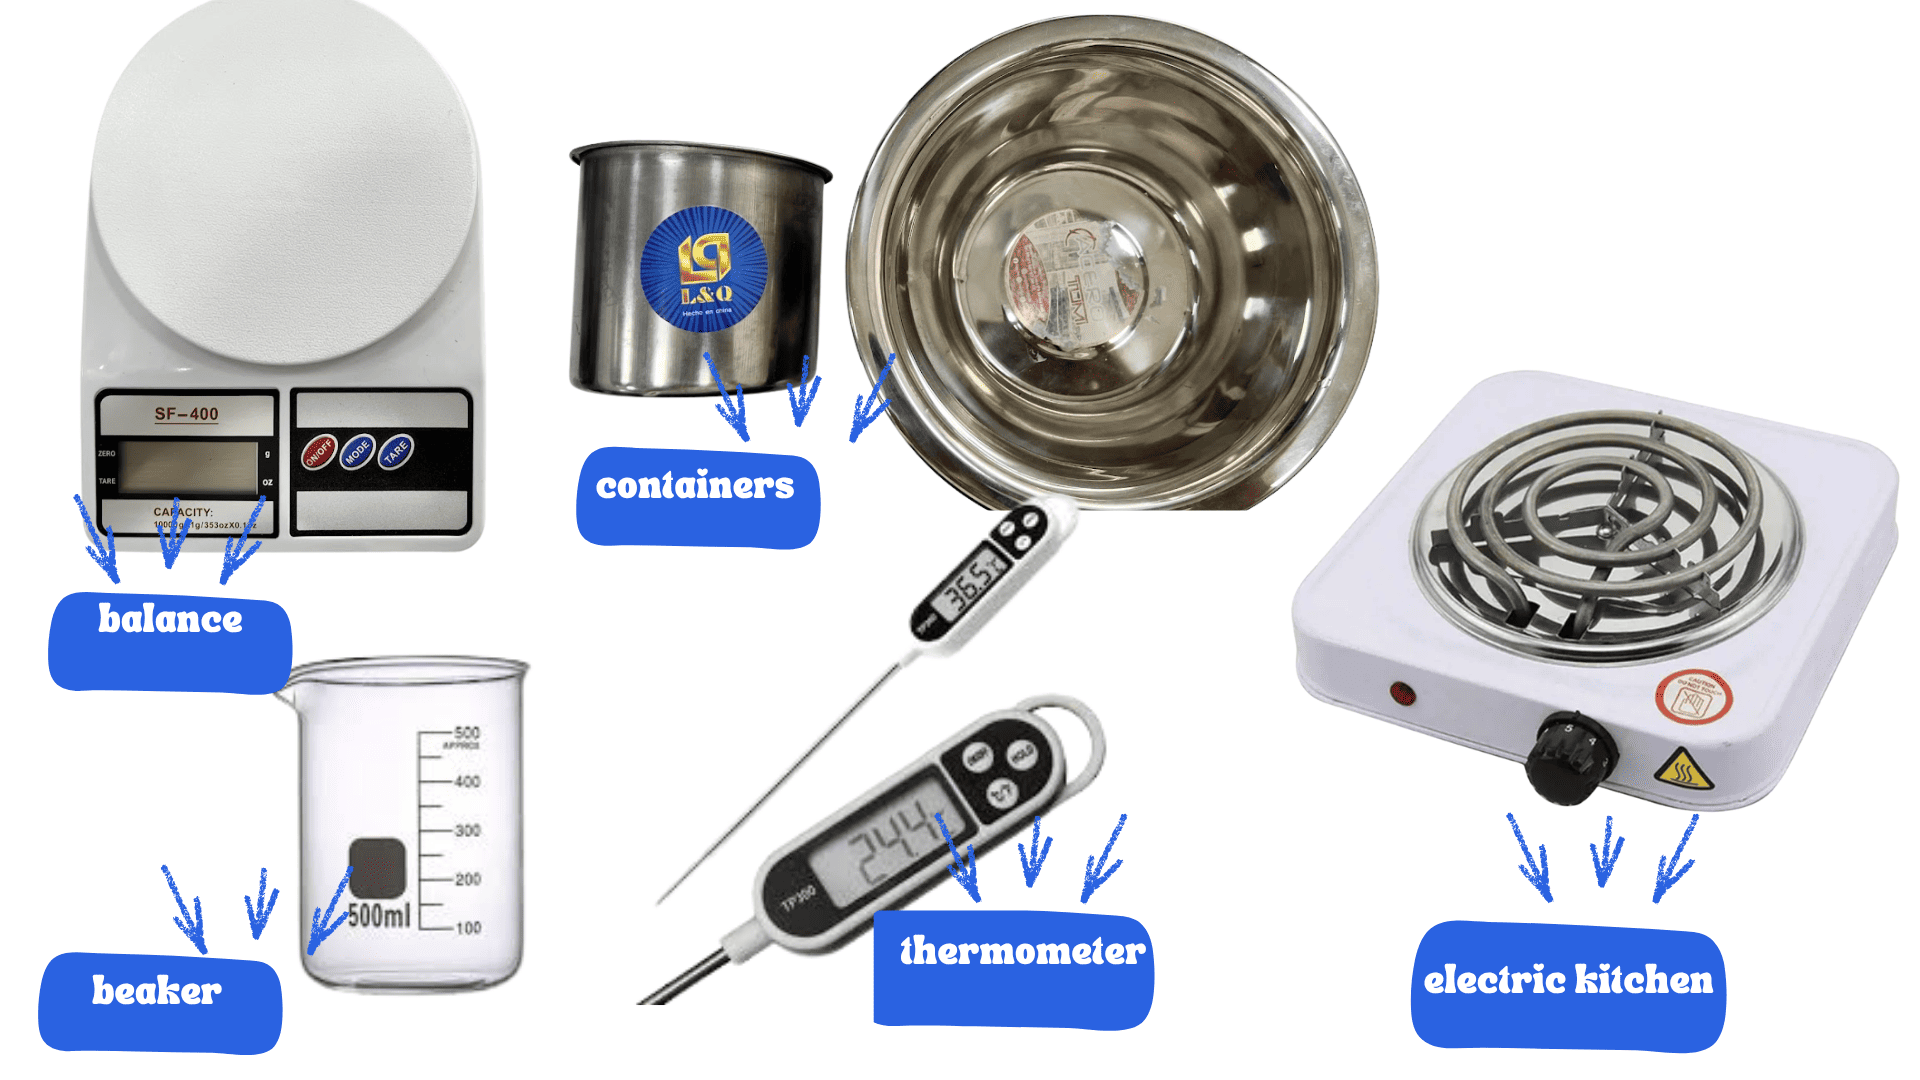
3. Tools and Equipment
Different tools and utensils are also used during the preparation process:
- Measuring cups and jars.
- Electric stove.
- Metal cooking pot.
- Spoons and mixing spatulas.
- Thermometer for temperature control.
- Molds and flat drying surfaces.
- Frames and support structures.
These tools help measure quantities, control temperature, and maintain a homogeneous mixture during the experimentation process.
4. Drying the Coffee Grounds
The coffee grounds are completely dried under sunlight or in a ventilated area to remove moisture and prevent decomposition or mold formation.
5. Material Filtering
Once dry, the coffee grounds are filtered to obtain a finer and more uniform texture that can be easily combined with other organic components.
6. Natural Pigment Preparation
Natural pigments are extracted from plants, leaves, seeds, soil, and bark. These materials are crushed, boiled, or processed to obtain natural colorants.
7. Base Mixture Preparation
In a container, the coffee grounds are mixed with hot water, glycerin, vinegar, and colorless gelatin or collagen glue. The mixture is heated and stirred continuously until a homogeneous texture is achieved.
8. Pigment Incorporation
Natural pigments are added to create different organic colors, textures, and finishes.
9. Mixing and Homogenization
All components are manually mixed until a uniform and moldable texture is obtained.
10. Bio-Material Molding
The mixture is spread onto molds, frames, or flat surfaces according to the desired thickness and shape.
11. Drying Process
The bio-material is naturally dried under sunlight or in ventilated spaces for several hours or days depending on thickness and humidity conditions.
12. Demolding and Final Finishing
Once dry, the bio-material is carefully removed from the mold and manual finishing processes such as cutting, sanding, or texturing are applied.
13. Experimental Applications
The final bio-material can be used for experimental bio-leather, textile design, embroidery, handcrafted packaging, decorative surfaces, and explorations between nature, craftsmanship, and technology.
Environmental Monitoring and Technological Exploration
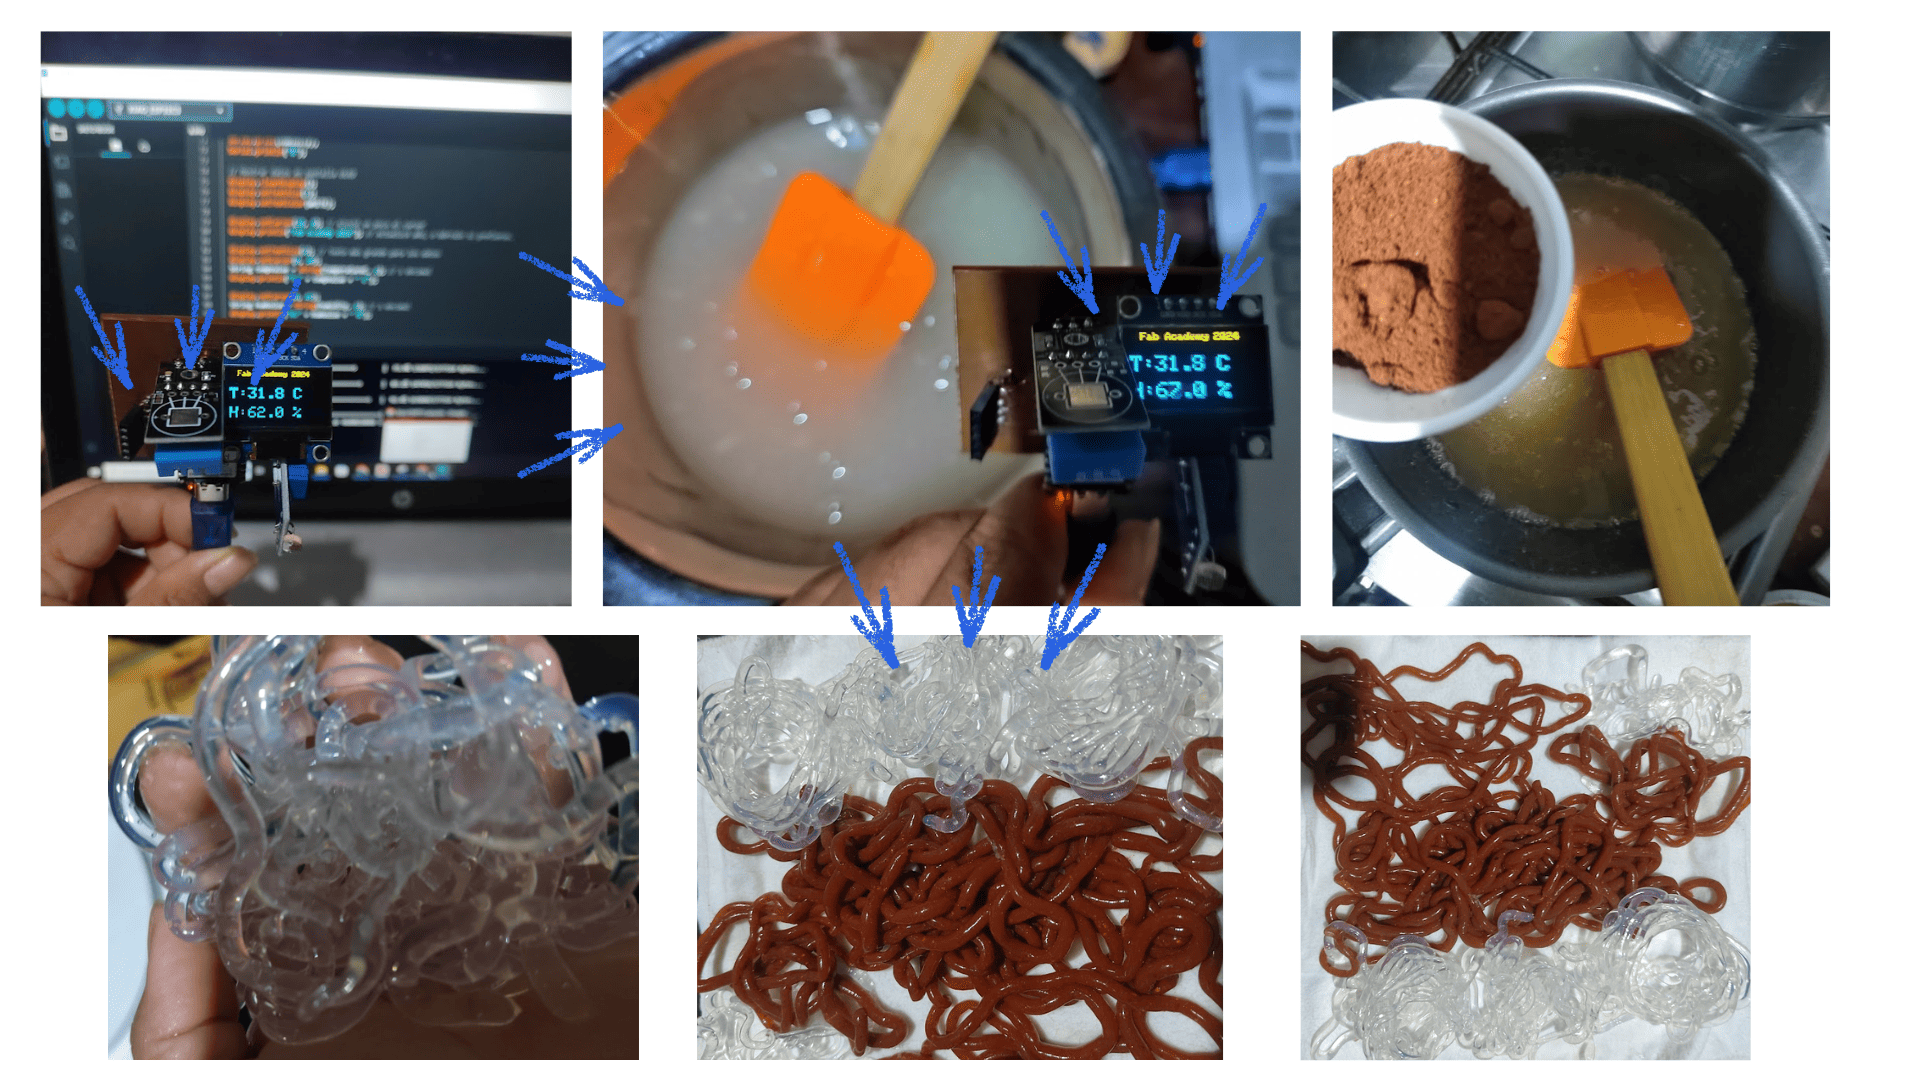
In addition to bio-material development, humidity and temperature sensor boards were also used to analyze how environmental conditions affect the material behavior. This process helped explore how humidity, temperature, and environmental changes directly influence the texture, flexibility, resistance, and drying time of bio-materials.
Each territory presents different climatic conditions, making environmental monitoring an important part of bio-material experimentation and research. Through sensors and monitoring systems, real-time environmental data can be collected to better understand material behavior in different contexts.
Part of this research was also supported through our bio-material web platform developed within the REGEN project. The platform allows users to document processes, create new recipes, and explore different combinations of organic and natural materials.
Platform Link:
Biomaterials REGEN Platform
This platform works as a collaborative and experimental space where new recipes can be documented, tested, and improved while continuing to explore the possibilities between bio-materials, technology, nature, and sustainable design.
 tools for developing biomaterials
 tools for developing biomaterials
 inputs for developing biomaterials
 website for developing biomaterials
 Development of bio-materials in native communities, biomaterials of natural pigments and coffee and cocoa grounds, as well as the use of the PCB of the final project during the development of the bio-material
 Products developed from biomaterials include wallets with reed handles, card holders made from coffee grounds, coin purses made from natural fibers, and an organizer basket made from coffee biomaterial.
One of the most innovative aspects of the organizer basket is that it doesn't use buttons or traditional fastening systems, as its structure is held together solely by a strap system, allowing for functional and sustainable assembly.
Products developed from biomaterials include wallets with reed handles, card holders made from coffee grounds, coin purses made from natural fibers, and an organizer basket made from coffee biomaterial.
One of the most innovative aspects of the organizer basket is that it doesn't use buttons or traditional fastening systems, as its structure is held together solely by a strap system, allowing for functional and sustainable assembly.
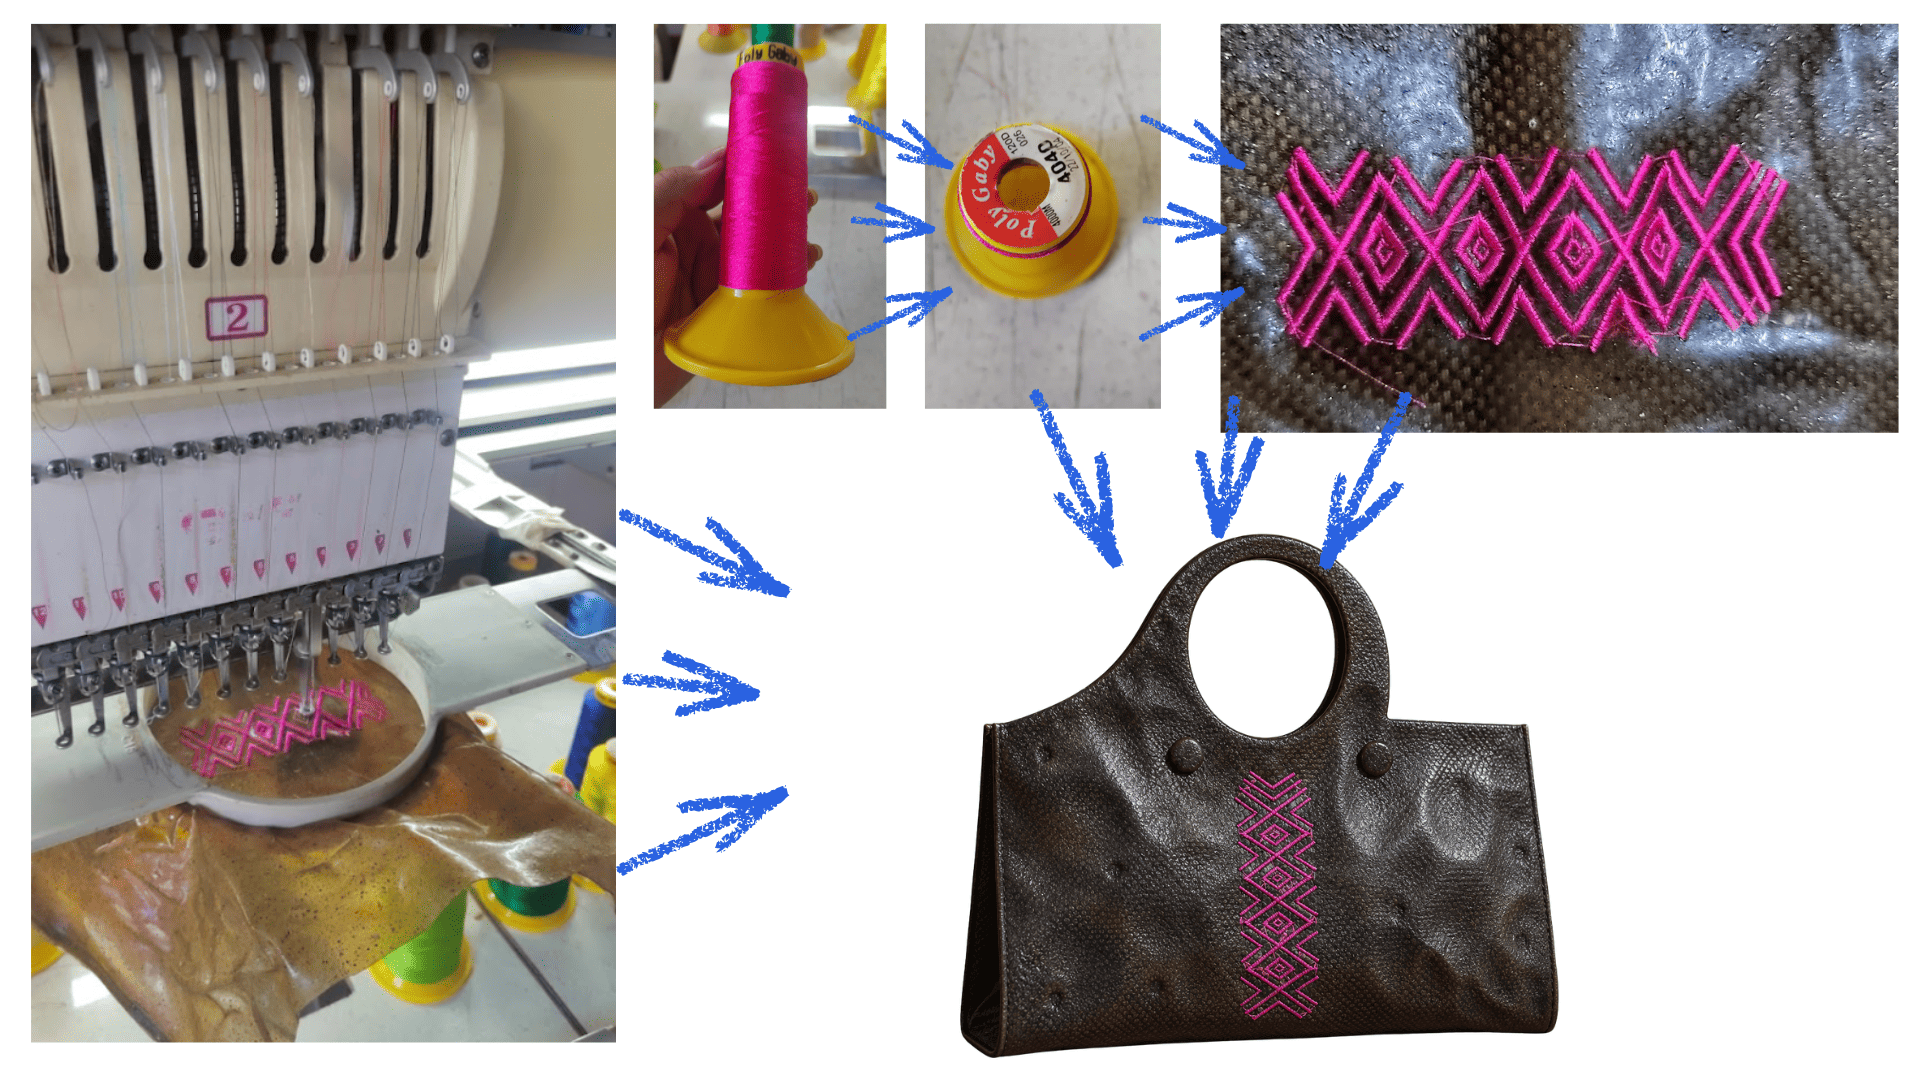
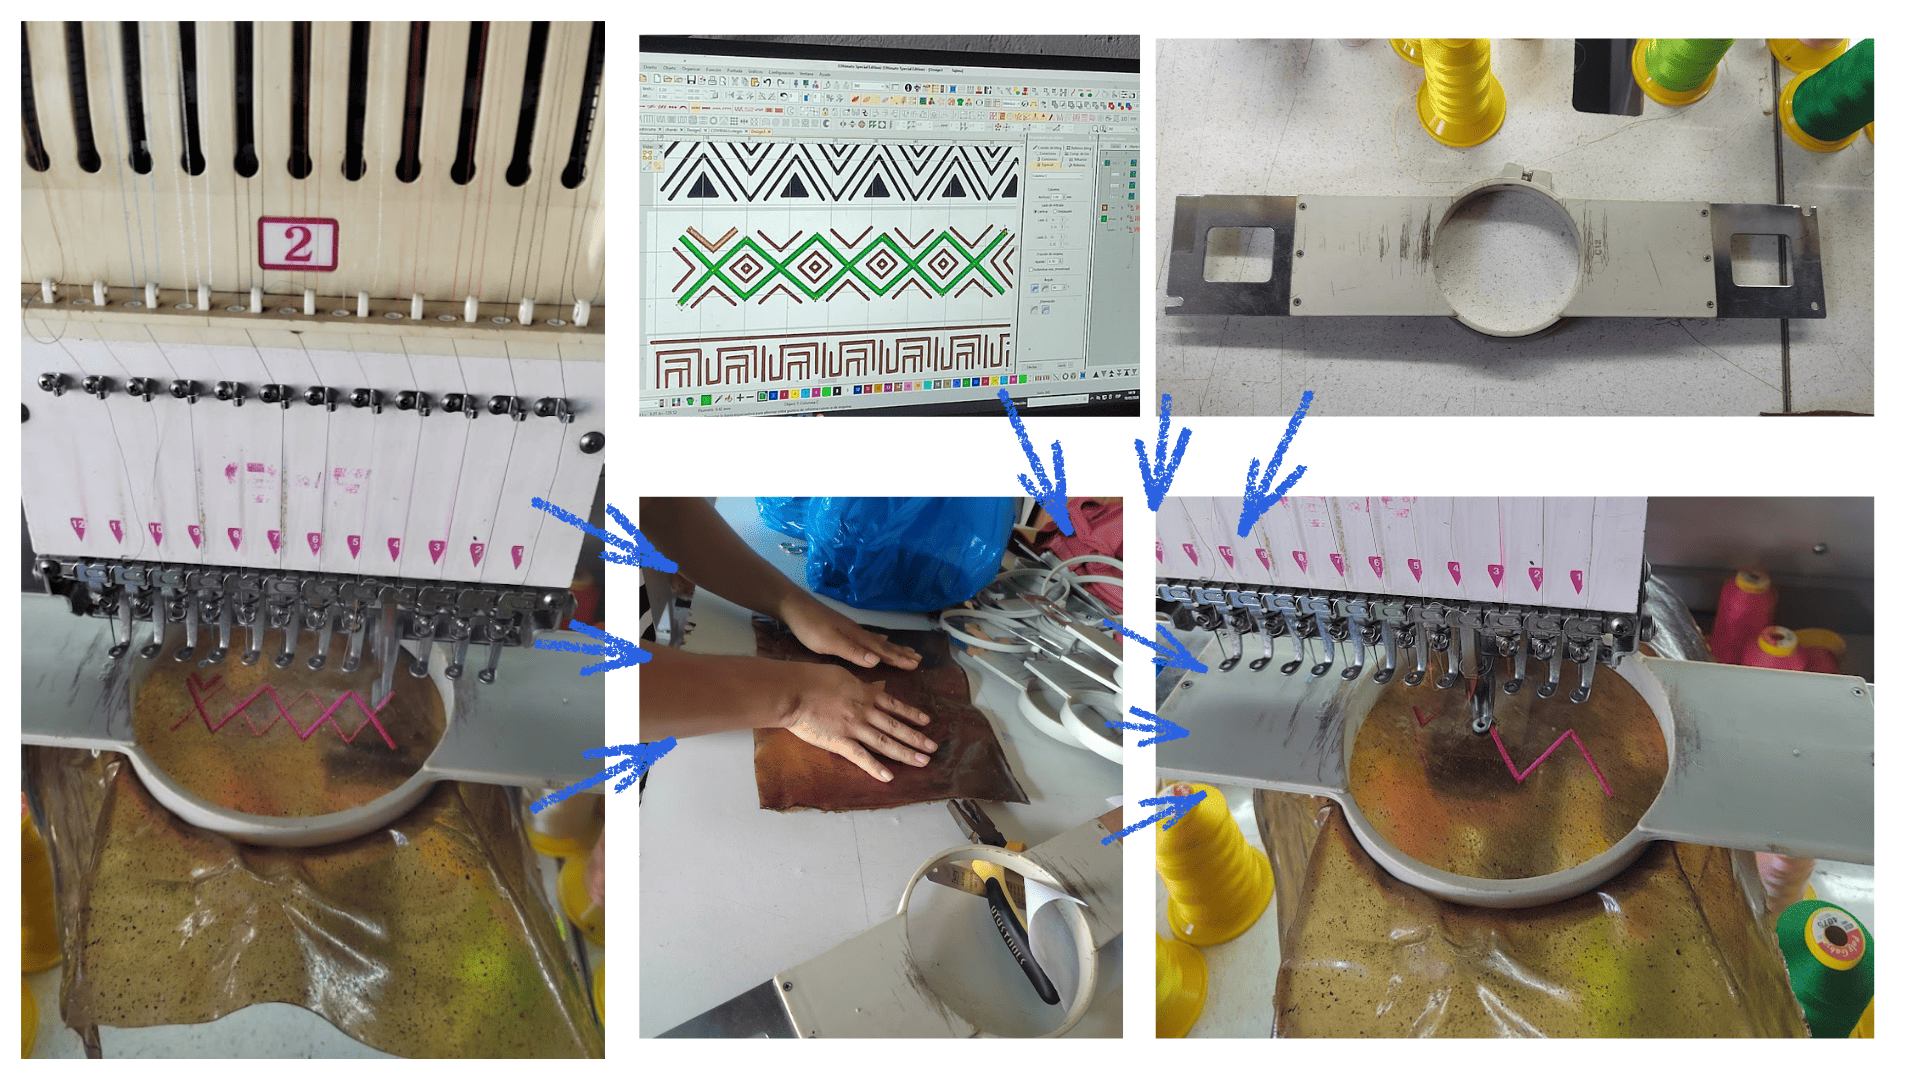
Embroidery on Coffee and Cacao Bio-Leather
The development of this bio-material, created from coffee grounds and cacao, allowed the exploration of new possibilities between sustainability, craftsmanship, and technology. This natural bio-leather was worked using industrial embroidery techniques, integrating co-creation processes with Asháninka culture while combining ancestral knowledge with contemporary digital tools.
Through patterns, symbols, and visual elements inspired by the Asháninka worldview, the project sought to represent the connection between nature, the forest, and the surrounding environment. The experimentation demonstrated that this bio-material has suitable properties for embroidery processes, achieving visual and structural results similar to those obtained on conventional textiles.
The process begins by placing the design into the embroidery software, where measurements and proportions are adjusted according to the size of the bio-material. Afterwards, the embroidery tracing process is created digitally by defining lines, stitch density, and embroidery sequences. Once the digital configuration is completed, the file is transferred to the industrial embroidery machine to begin the embroidery process on the experimental bio-leather.
The final results demonstrate that the bio-material can properly support embroidery stitches while maintaining texture, resistance, and pattern definition. This experimentation highlights the potential of natural bio-materials as an alternative for textile, artistic, and technological applications.
Step-by-Step Embroidery Process on Bio-Material
1. Bio-Material Preparation
The natural bio-leather made from coffee grounds and cacao is selected and cut according to the required embroidery dimensions.
2. Design Creation
Patterns inspired by Asháninka culture are created using symbols and geometries related to nature and ancestral knowledge.
3. Software Import
The design is imported into the embroidery software, where measurements, scaling, and proportions are adjusted.
4. Digital Tracing
Inside the software, the design is redrawn and traced to convert the artwork into digital embroidery stitches.
5. Stitch Configuration
Parameters such as stitch density, thread direction, embroidery speed, and stitch type are configured according to the behavior of the bio-material.
6. File Conversion
The embroidery design is exported into a format compatible with the industrial embroidery machine.
7. Machine Preparation
The bio-material is carefully placed into embroidery hoops to maintain uniform tension during the embroidery process.
8. Embroidery Process
The industrial embroidery machine automatically stitches the design onto the bio-material using industrial threads and needles.
9. Result Evaluation
Finally, the results are evaluated by analyzing texture, resistance, stitch quality, and the overall behavior of the bio-material during the industrial embroidery process.
 The development of the cocoa biomaterial allowed for the transformation of natural waste into a flexible, leather-like material, exploring new possibilities at the intersection of sustainability, design, and technology. Subsequently, the material was used in industrial embroidery processes, where the design was digitized and the stitches configured according to the biomaterial's properties.
Tests demonstrated that the cocoa biomaterial possesses good strength and flexibility for textile applications and experimental embroidery.
The development of the cocoa biomaterial allowed for the transformation of natural waste into a flexible, leather-like material, exploring new possibilities at the intersection of sustainability, design, and technology. Subsequently, the material was used in industrial embroidery processes, where the design was digitized and the stitches configured according to the biomaterial's properties.
Tests demonstrated that the cocoa biomaterial possesses good strength and flexibility for textile applications and experimental embroidery.
 The embroidery was done using a previously designed prototype wallet as a reference, allowing the application of the biomaterial and experimenting with the integration of the embroidery onto the final piece.
 The development of the coffee grounds biomaterial made it possible to transform organic waste into a flexible and sustainable material for textile design. Subsequently, industrial embroidery tests were conducted on the biomaterial, exploring its strength, texture, and behavior during the embroidery process.
 The embroidery was done using a previously designed toiletry bag prototype as a reference, allowing the application of the biomaterial and experimentation with the integration of the embroidery onto the final piece.
Video (local)
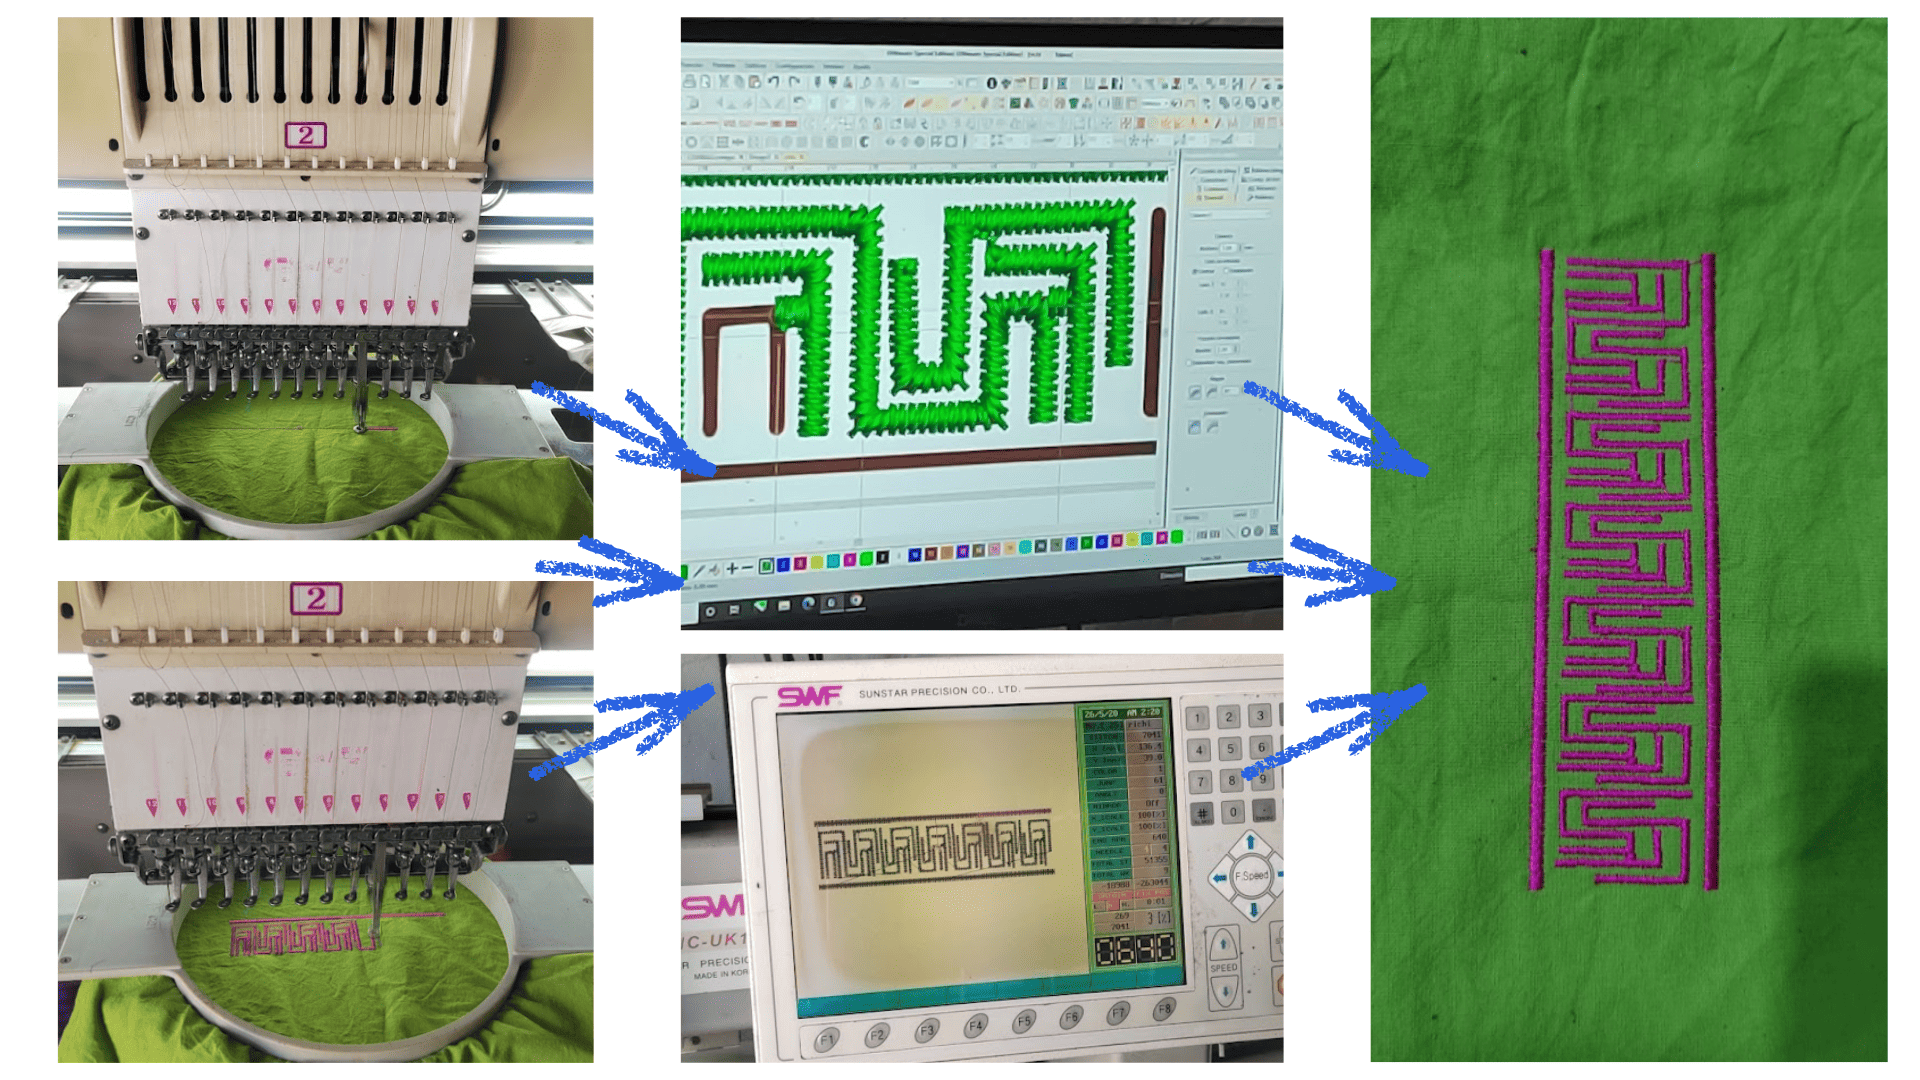
Embroidery on Fabric Dyed with Natural Plant
This embroidery experimentation was developed on a very particular fabric traditionally used for native clothing within Asháninka communities. The fabric was naturally dyed using matico, a native medicinal plant from the region that provides organic pigmentation, cultural identity, and connection to ancestral knowledge.
This process allowed the exploration of embroidery techniques on traditional textiles while observing how the material behaves during industrial embroidery. At the same time, the research explored the relationship between ancestral weaving techniques, Asháninka iconography, and contemporary digital fabrication tools.
Through the use of symbols and geometric patterns inspired by Asháninka culture, the embroidery represents the connection with nature, territory, the forest, and ancestral knowledge. This experimentation demonstrates how traditional textile practices can coexist and interact with technological processes such as digital embroidery.
Step-by-Step Embroidery Process
1. Fabric Selection
A traditional fabric used for native clothing is selected for the embroidery experimentation.
2. Natural Dyeing Process
The fabric is naturally dyed using matico, a native plant from the region that provides natural pigmentation and cultural meaning to the textile.
3. Design Creation
Patterns and iconography inspired by Asháninka culture are created using symbols connected to nature and community identity.
4. Importing the Design into Wilcom
The design is imported into the Wilcom embroidery software to begin the digital preparation process.
5. Size and Scale Adjustment
The embroidery dimensions and proportions are adjusted according to the fabric size and working area.
6. Digital Redrawing and Stitch Creation
The design is digitally redrawn using vector and embroidery tools to convert the artwork into embroidery stitches.
7. Stitch Configuration
Parameters such as:
- Stitch density.
- Thread direction.
- Stitch type.
- Embroidery sequence.
- Working speed.
are adjusted according to the behavior of the natural fabric.
8. File Conversion
The design is exported into DST format compatible with the industrial embroidery machine.
9. Fabric Placement
The naturally dyed fabric is carefully placed into embroidery hoops to maintain uniform tension during the embroidery process.
10. Machine Setup
Industrial threads, needles, and embroidery settings are prepared before starting the process.
11. Embroidery Process
The industrial embroidery machine automatically embroiders the Asháninka-inspired patterns onto the naturally dyed fabric.
12. Final Evaluation
Finally, the results are observed and analyzed by evaluating the interaction between embroidery, natural dyeing, ancestral textile techniques, and Asháninka cultural iconography.
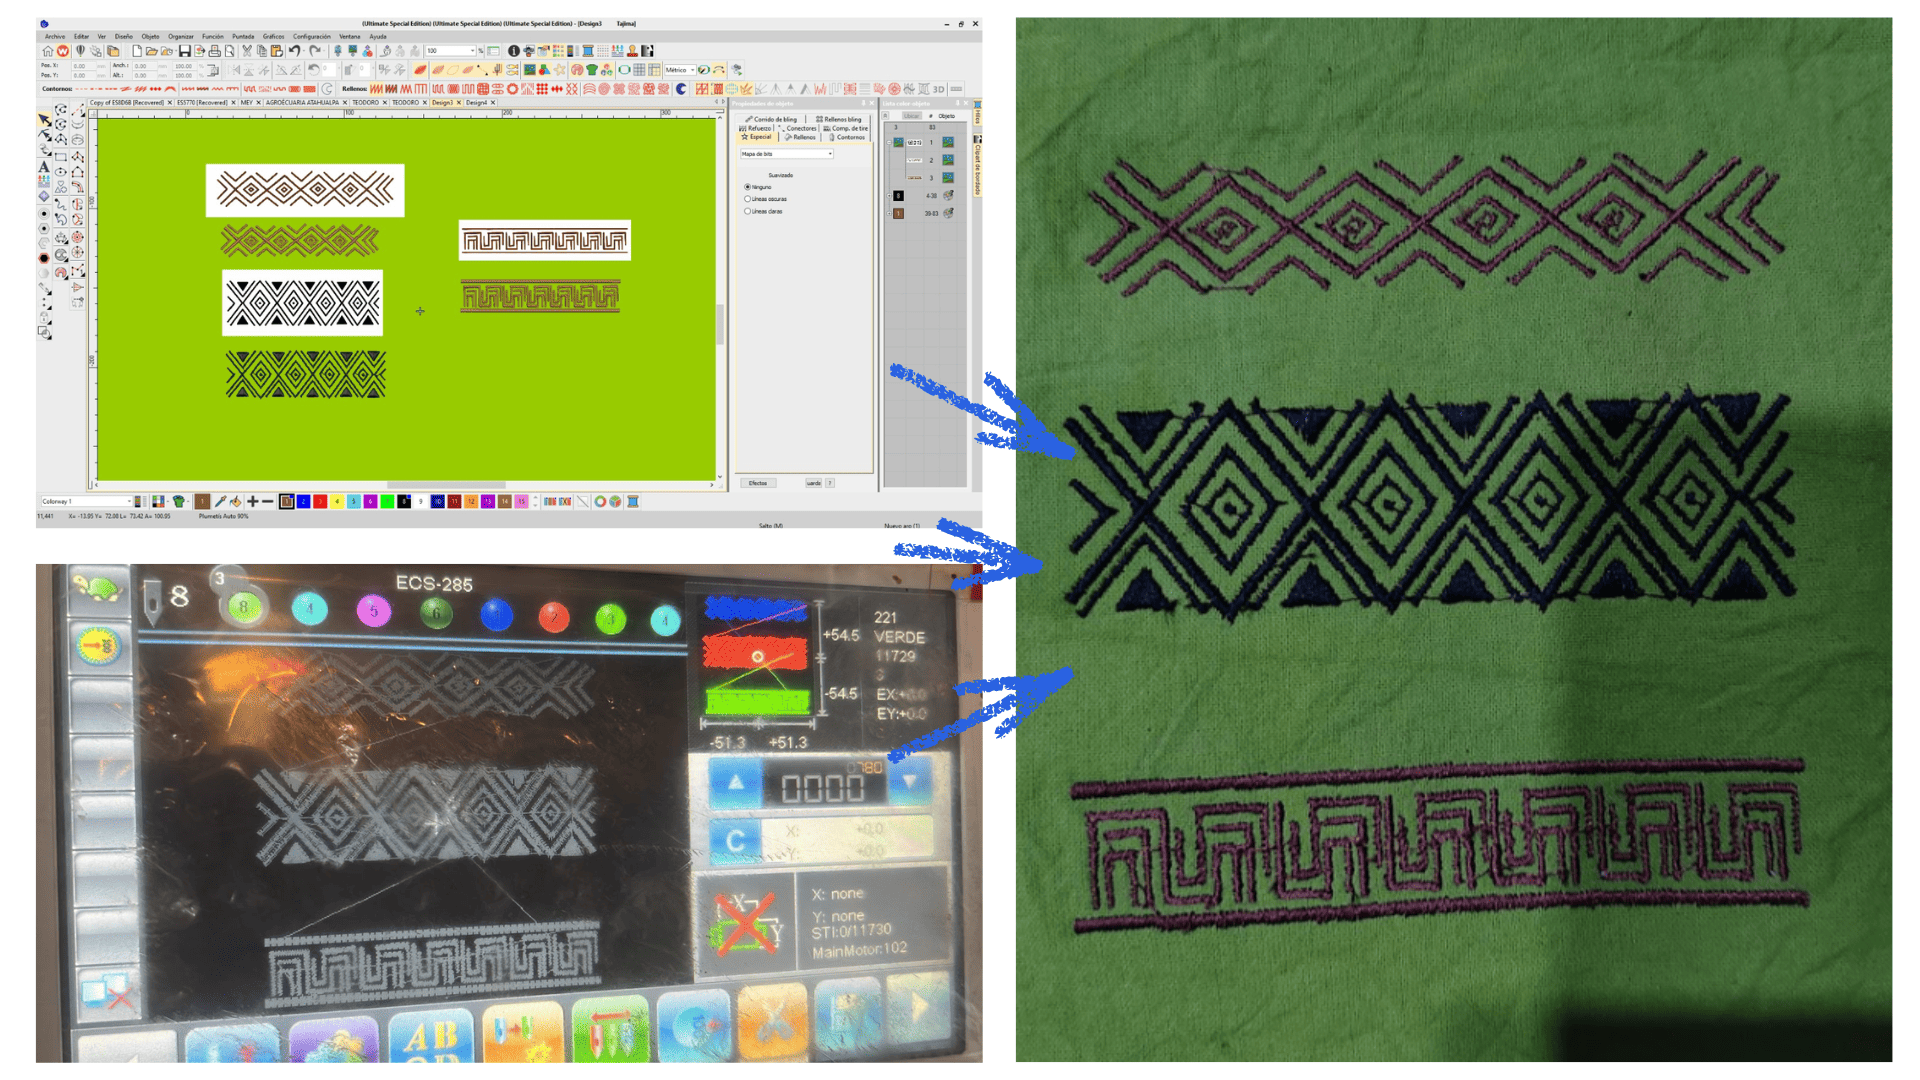 The embroidery on the fabric dyed with matico allowed us to explore the integration between natural pigmentation, ancestral textile techniques and industrial embroidery technology, carrying out the process from the digitization of the design to the execution on the embroidery machine.
Video (local)
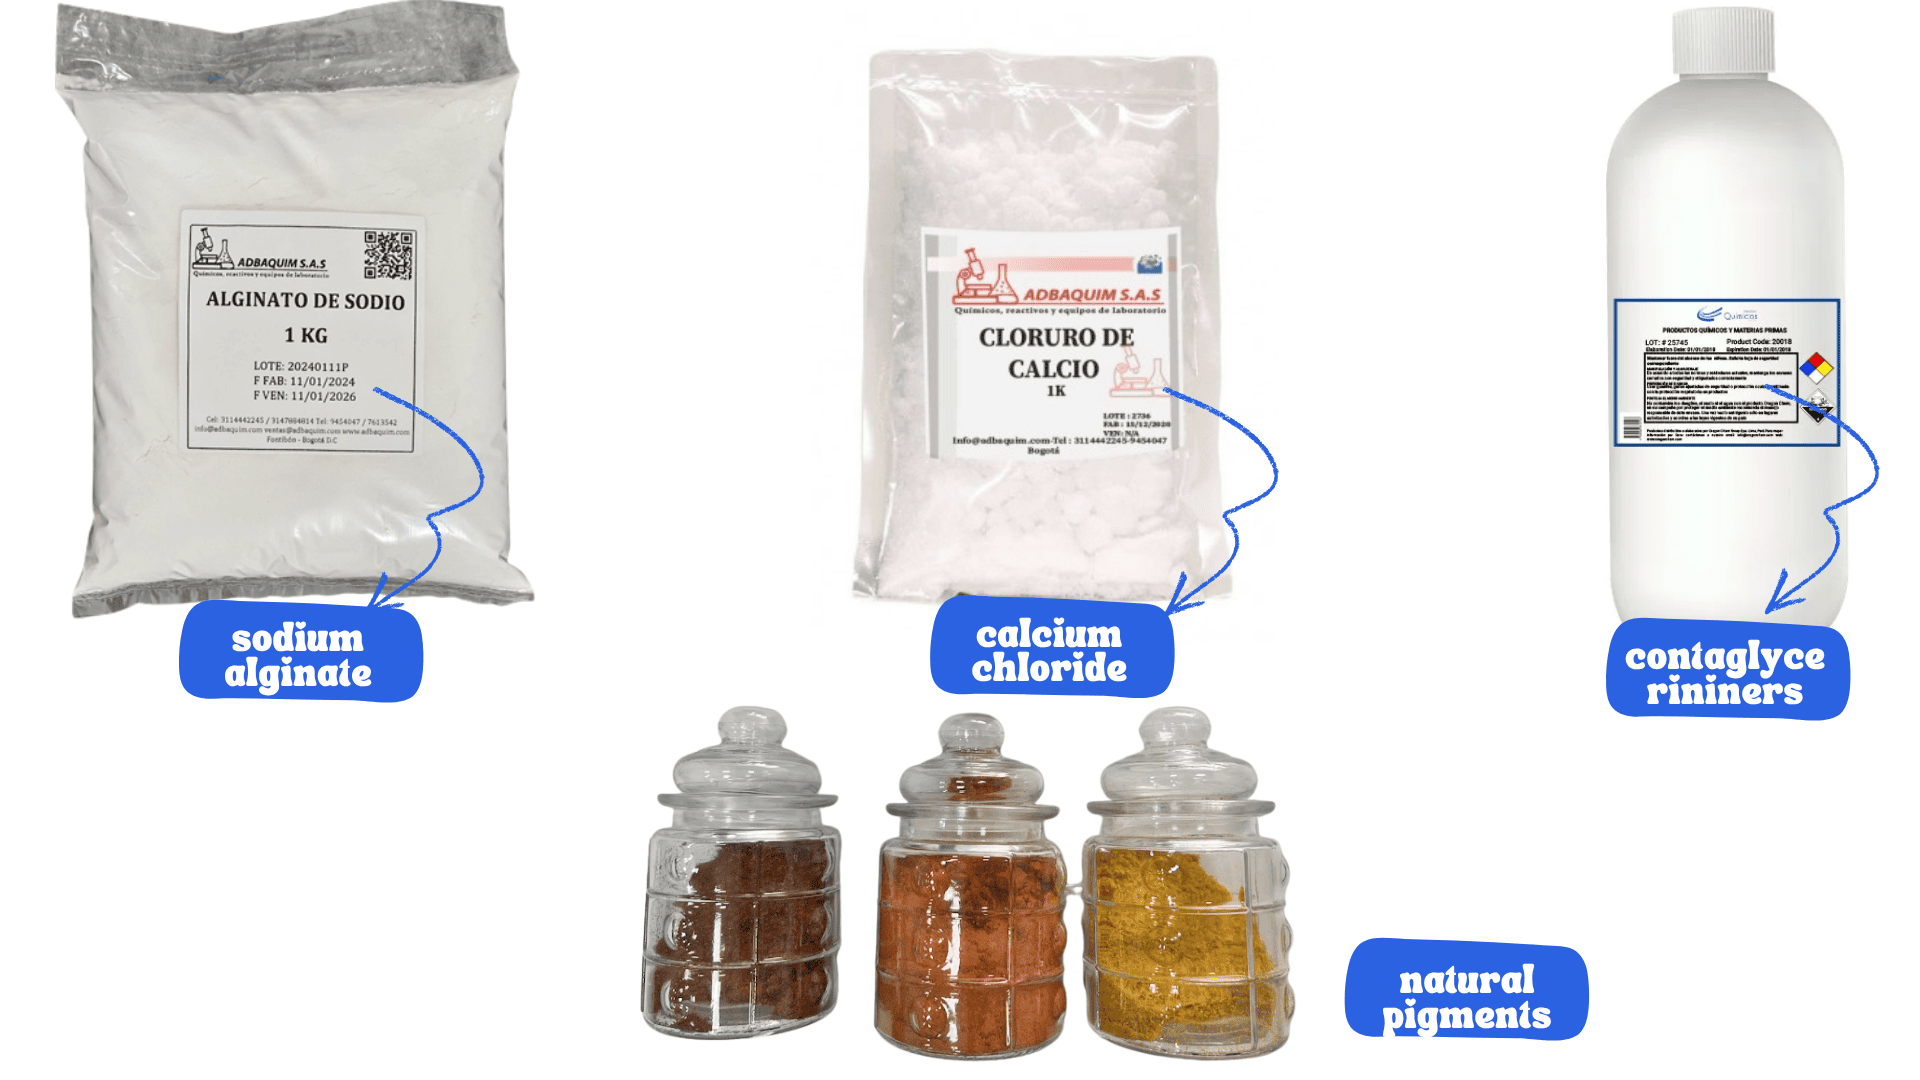
Bio-threads
Bio-threads are experimental biomaterials developed from natural and biodegradable components. In this process, sodium alginate, sodium chloride, glycerin, and natural pigments were used to create flexible fibers for textile, artisanal, and technological explorations.
In addition to the development of the bio-thread, a PCB board with humidity and temperature sensors was also used to monitor environmental conditions during the fabrication process. This allowed the analysis of how factors such as temperature and humidity directly influence the texture, flexibility, drying process, and resistance of the bio-thread.
Environmental monitoring helped to better understand the material behavior in real time and explore how different territories and climates can affect the final biomaterial results.
After obtaining the bio-thread, experimentation continued through braiding and weaving processes using handcrafted textile techniques. For this exploration, the loom developed by Walter Gonzales was studied in order to investigate how bio-threads can be integrated into woven textile structures and contemporary fabrication processes.
This experimentation allowed the exploration of how biomaterials can be integrated into weaving and loom techniques, creating new possibilities between textile design, biomaterials, technology, and contemporary craftsmanship.
Step-by-Step Bio-Thread Process
1. Material Preparation
All materials and supplies are organized before beginning the experimental process.
2. Materials and Ingredients Used
- Sodium alginate.
- Sodium chloride.
- Glycerin.
- Natural pigments.
- Water.
Each component contributes specific properties such as flexibility, resistance, texture, and color.
3. Tools and Equipment
- Digital scale.
- Measuring cups and jars.
- Spatulas and mixing utensils.
- Blender.
- Syringe for extrusion.
- Containers and bowls.
- Drying surfaces.
- PCB board with humidity and temperature sensors.
4. Ingredient Measurement
All ingredients are carefully measured according to the experimental recipe.
5. Alginate Mixture Preparation
Sodium alginate is mixed with water and blended until a homogeneous solution is obtained.
6. Addition of Glycerin and Pigments
Glycerin is incorporated to improve flexibility, while natural pigments are added to create organic colors and finishes.
7. Preparation of the Sodium Chloride Solution
In a separate container, the sodium chloride solution is prepared to solidify the bio-thread.
8. Syringe Loading
The alginate mixture is carefully placed into a syringe to begin the extrusion process.
9. Bio-Thread Extrusion
The mixture is slowly extruded into the sodium chloride solution, forming bio-threads through an immediate solidification process.
10. Environmental Monitoring
During the process, humidity and temperature data are collected through the PCB board to analyze the behavior of the biomaterial.
11. Bio-Thread Drying
The bio-threads are carefully removed and left to dry naturally on flat surfaces or supports.
12. Braiding and Textile Exploration
Once dry, the bio-threads are used in braiding and experimental weaving tests using textile techniques and loom explorations.
13. Final Evaluation
Finally, properties such as flexibility, resistance, texture, and possible applications in textile design, biomaterials, and contemporary craft processes are evaluated.
 inputs for developing bio-threads
 El desarrollo de los bio-hilos permitió explorar nuevos biomateriales flexibles, complementando el proceso con el uso de una PCB para medir la temperatura y humedad del entorno y analizar cómo estas condiciones afectan el comportamiento del material.
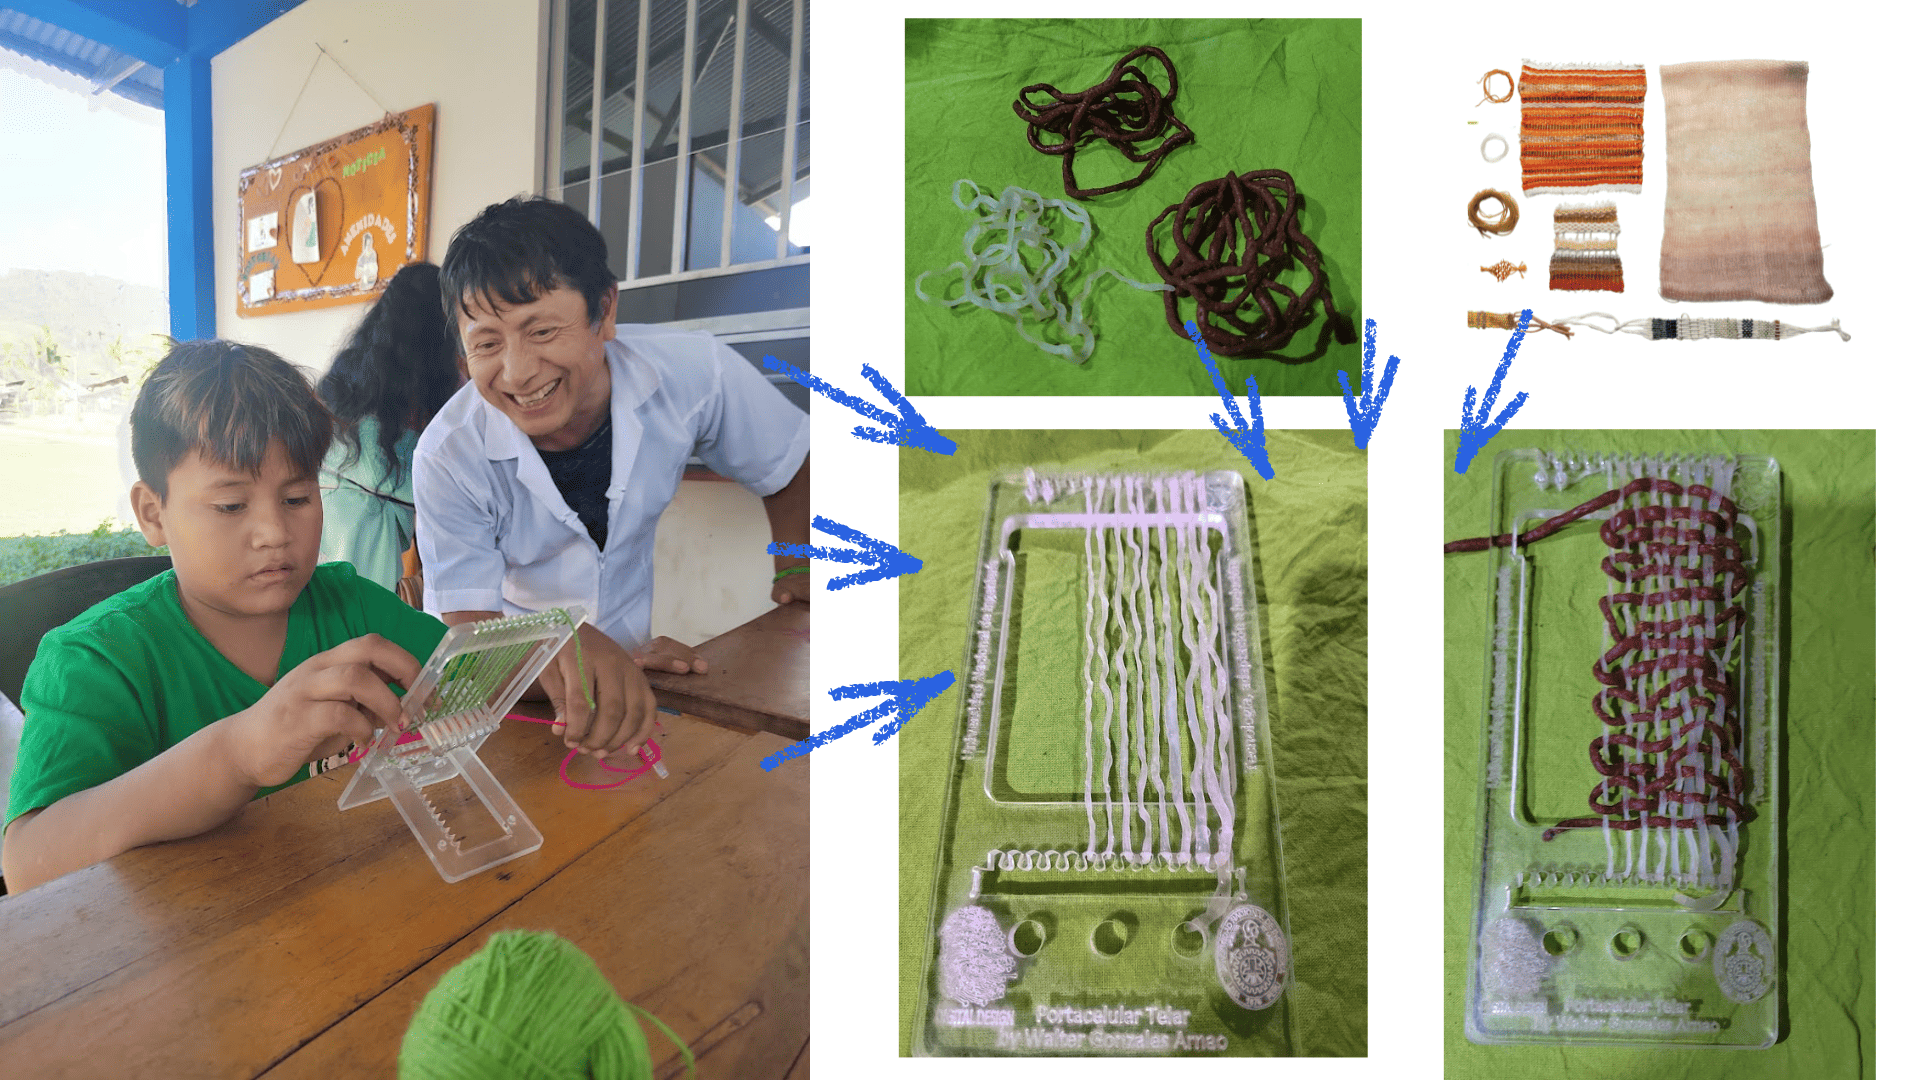 With the prototype loom developed by Walter, the use of transparent and naturally pigmented bio-yarns was explored, allowing observation of how the material interacts with the structure of the fabric and generating new possibilities between technology, biomaterials and ancestral weaving techniques.
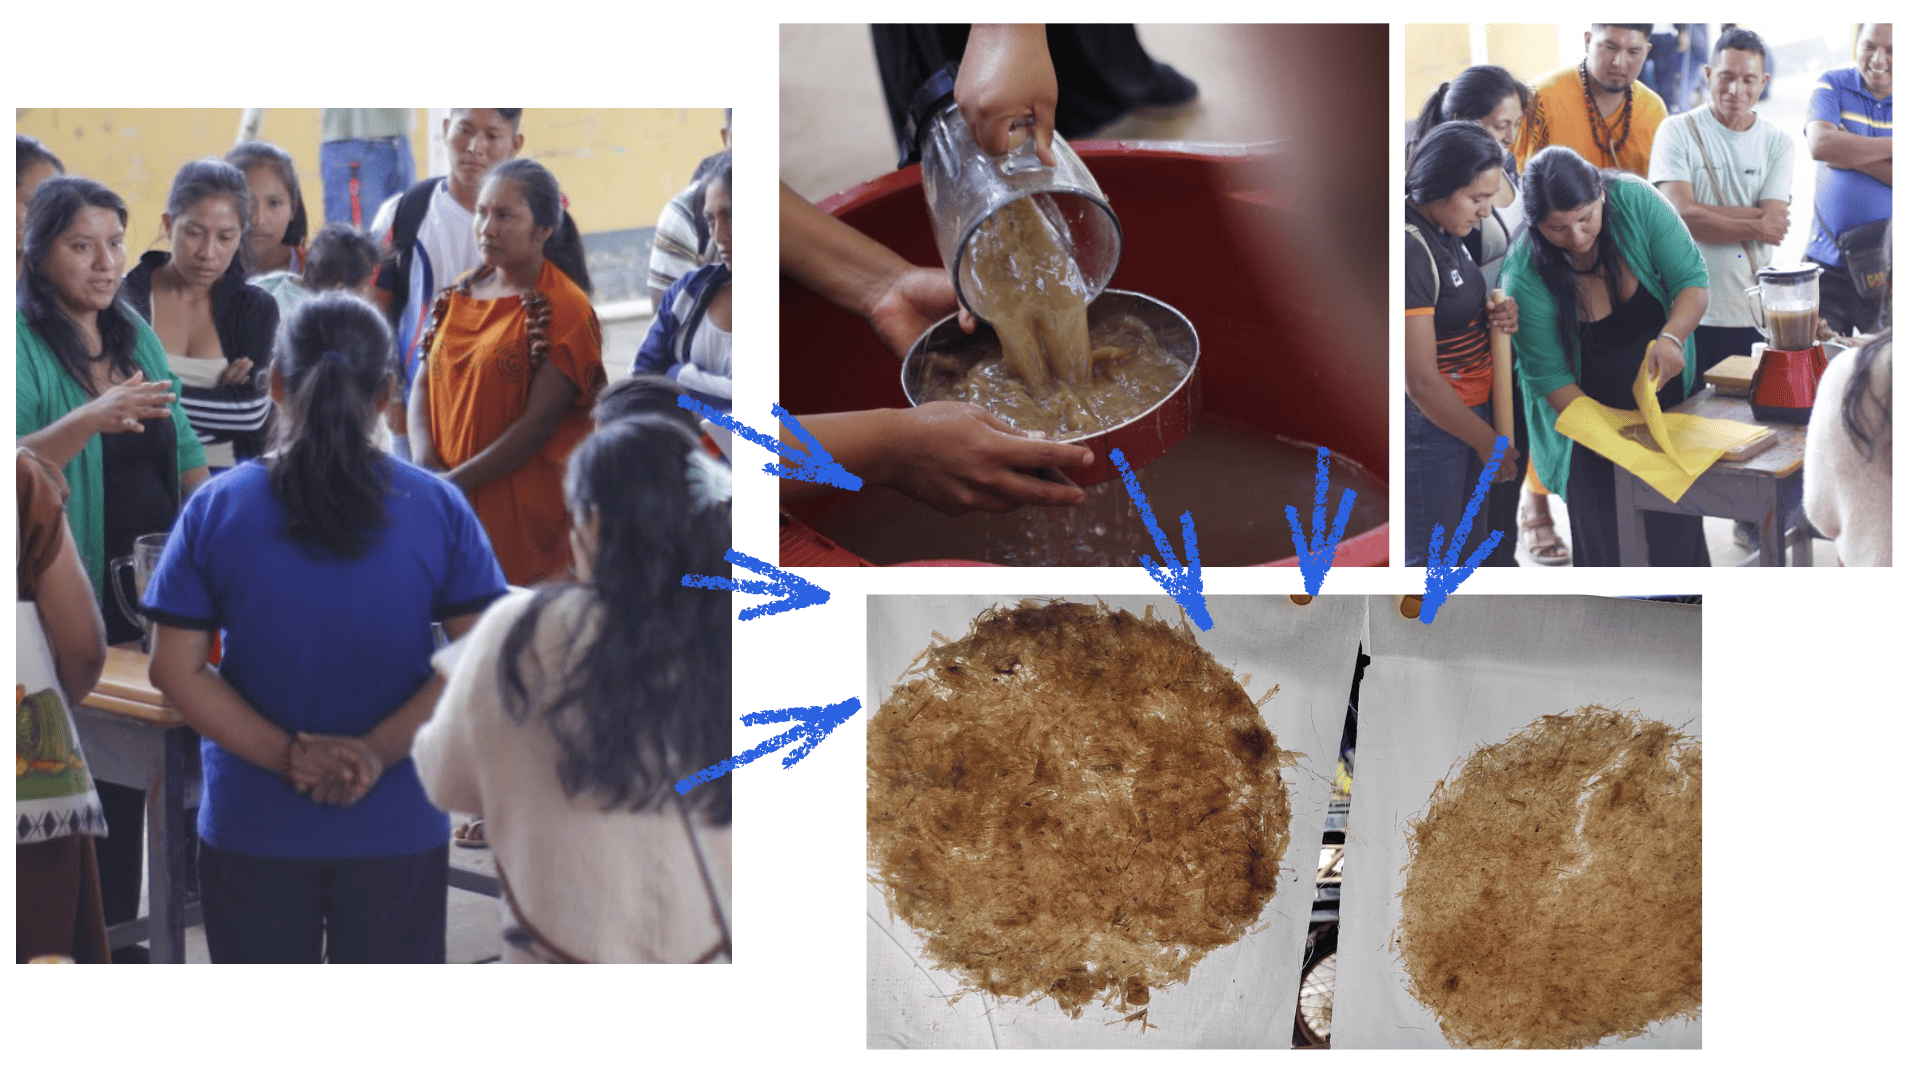
Bio-Paper
1. Material Collection
Natural fibers are collected from:
- Banana trunk bark.
- Pineapple fibers.
- Coconut fibers.
These materials can be obtained from agricultural waste or local plants.
2. Fiber Cleaning
The fibers are carefully washed to remove dirt, organic residues, and impurities.
3. Material Cutting
The plant fibers are cut into small pieces to facilitate the cooking and processing stages.
4. Tools and Equipment
- Metal cooking pots.
- Electric stove or cooking burner.
- Blender.
- Containers and buckets.
- Paper frames and molds.
- Drying meshes or fabrics.
- Scissors and knives.
- Measuring cups.
5. Fiber Cooking Process
The natural fibers are boiled for several hours to soften the material and separate the fibers.
6. Blending and Pulp Preparation
Once cooked, the fibers are blended with water until a homogeneous pulp is obtained.
7. Natural Pigment Preparation
Natural pigments extracted from plants, seeds, leaves, or natural soils can optionally be prepared to add color to the bio-paper.
8. Pulp Mixing
The fiber pulp is manually mixed in large containers, incorporating water and natural pigments according to the desired finish.
9. Sheet Formation
The mixture is poured onto mesh frames or molds, distributing the fibers evenly to form the bio-paper sheet.
10. Water Removal
The surface is carefully pressed to remove excess water and compact the fibers.
11. Drying Process
The bio-paper sheets are naturally dried under sunlight or in ventilated spaces until all moisture is removed.
12. Frame Removal
Once dry, the bio-paper is carefully removed from the frame or drying surface.
13. Finishing and Experimentation
Finally, the bio-paper can be used for drawing, embroidery, engraving, handcrafted packaging, experimental design, and artistic or technological explorations.
This process was also developed together with native communities, seeking to revalue natural resources and organic waste available within the territory. One of the main materials explored was banana trunk bark, since after harvesting, this material is often considered waste and usually discarded.
Through the development of bio-paper, it was demonstrated that these natural fibers have great potential for creating new sustainable materials. From these fibers, it is possible to develop decorative artworks, handcrafted plates, experimental surfaces, biodegradable packaging, and many other applications related to design, craftsmanship, and art.
This exploration aims to create new opportunities for local communities by promoting circular economy practices, the use of local resources, and the connection between nature, ancestral knowledge, and sustainable technology.
 bio-paper development process with natural fibers
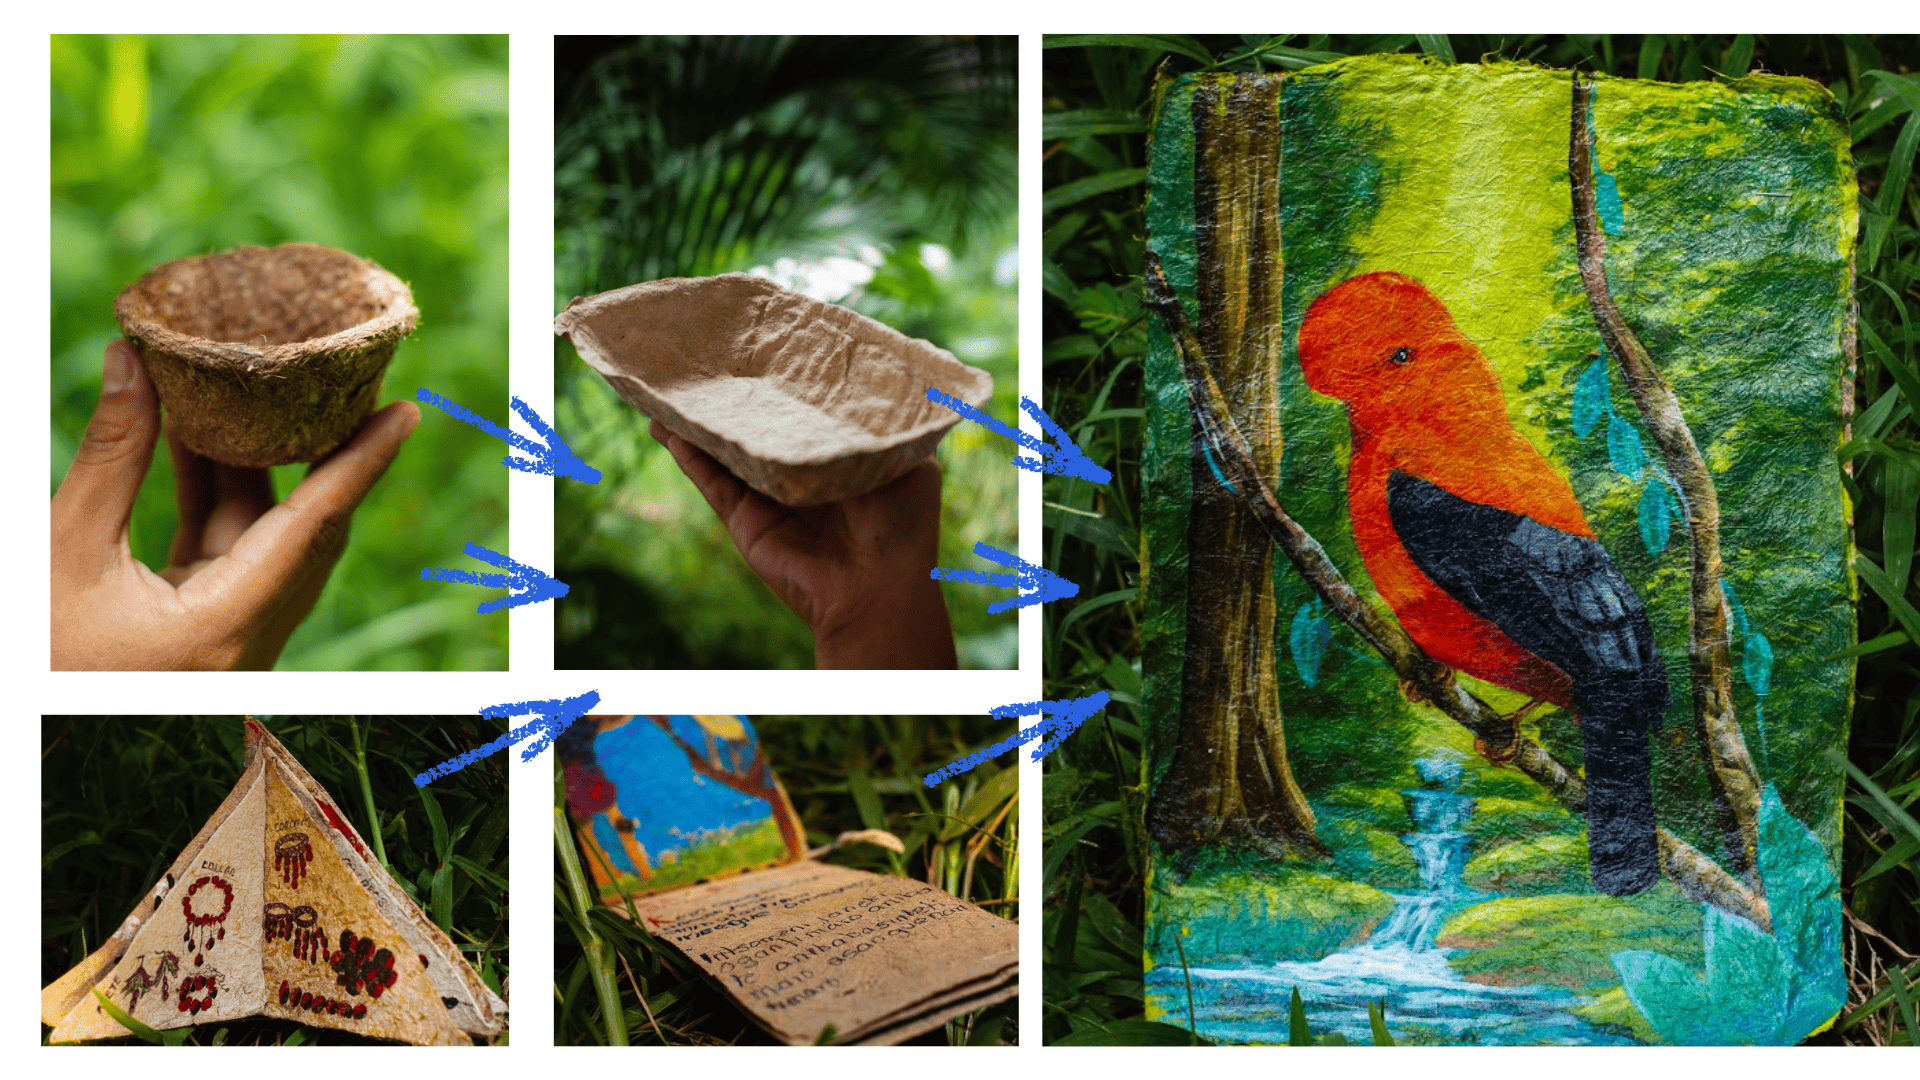 Bio-paper products such as using plates, notebooks and paper from a canvas for painting
Difficulties and Learning Experience
One of the main challenges during this experimentation process was working with industrial embroidery on biomaterials and naturally dyed fabrics for the first time. Although the results were visually successful, the process involved several technical difficulties and continuous adjustments during production.
In this case, it was necessary to access an external workspace where the embroidery machine could be rented, since the laboratory did not have this type of industrial equipment available. This required additional coordination, material preparation, and testing outside the regular laboratory environment.
Despite these challenges, the experience became an important learning opportunity. It allowed the exploration of new fabrication processes, the interaction between ancestral textile knowledge and digital technologies, and the possibility of applying embroidery techniques to bio-materials and experimental textiles.
Reflections
One of the most valuable aspects of this process was the possibility of co-creating and connecting ancestral wisdom with contemporary technology. Through experimentation with biomaterials, embroidery, natural dyes, and Asháninka iconography, it became possible to explore how traditional knowledge can coexist with digital fabrication and industrial processes.
This experience demonstrated that technology does not need to replace ancestral practices, but instead can function as a tool to preserve, reinterpret, and amplify cultural identity through new forms of creation.
The fusion between nature, craftsmanship, community knowledge, and technological experimentation opened new perspectives for sustainable design and collaborative innovation. It also allowed the understanding that materials, symbols, and techniques coming from indigenous cultures carry stories, relationships with the territory, and deep connections with the forest and the environment.
Co-creation became an important bridge between tradition and innovation, showing that it is possible to create contemporary processes while respecting and valuing ancestral knowledge.