
Assignment Requirements
Group assignment
- Review the safety data sheets for each of your molding and casting materials.
- Make and compare test casts with each of them.
- Compare printing vs milling molds.
Individual assignment
- Design a mold around the process you'll be using, produce it with a smooth surface finish that does not show the production process toolpath, and use it to cast parts.
Progress Status
This is for reporting progress (not for visitors to click).
Group page link + notes added.
Missing final photos and conclusions.
Upload .zip with source files.
Assignment Requirements
Learning outcomes
- Design appropriate objects within the limitations of your process.
- Demonstrate workflows used in mold design, construction and casting.
Have you answered these questions?
- Linked to the group assignment page and reflected on your individual page what you have learned.✅
- Reviewed the safety data sheets for each of your molding and casting materials, then made and compared test casts with each of them.✅.
- Documented how you designed and created your 3D mold, including machine settings.✅.
- Ensured your mold has smooth surface finish, that does not show the production process (by postprocessing if necessary).✅.
- Shown how you safely made your mold and cast the parts.✅.
- Described problems and how you fixed them.✅.
- Included your design files and ‘hero shot’ of the mold and the final object.✅.
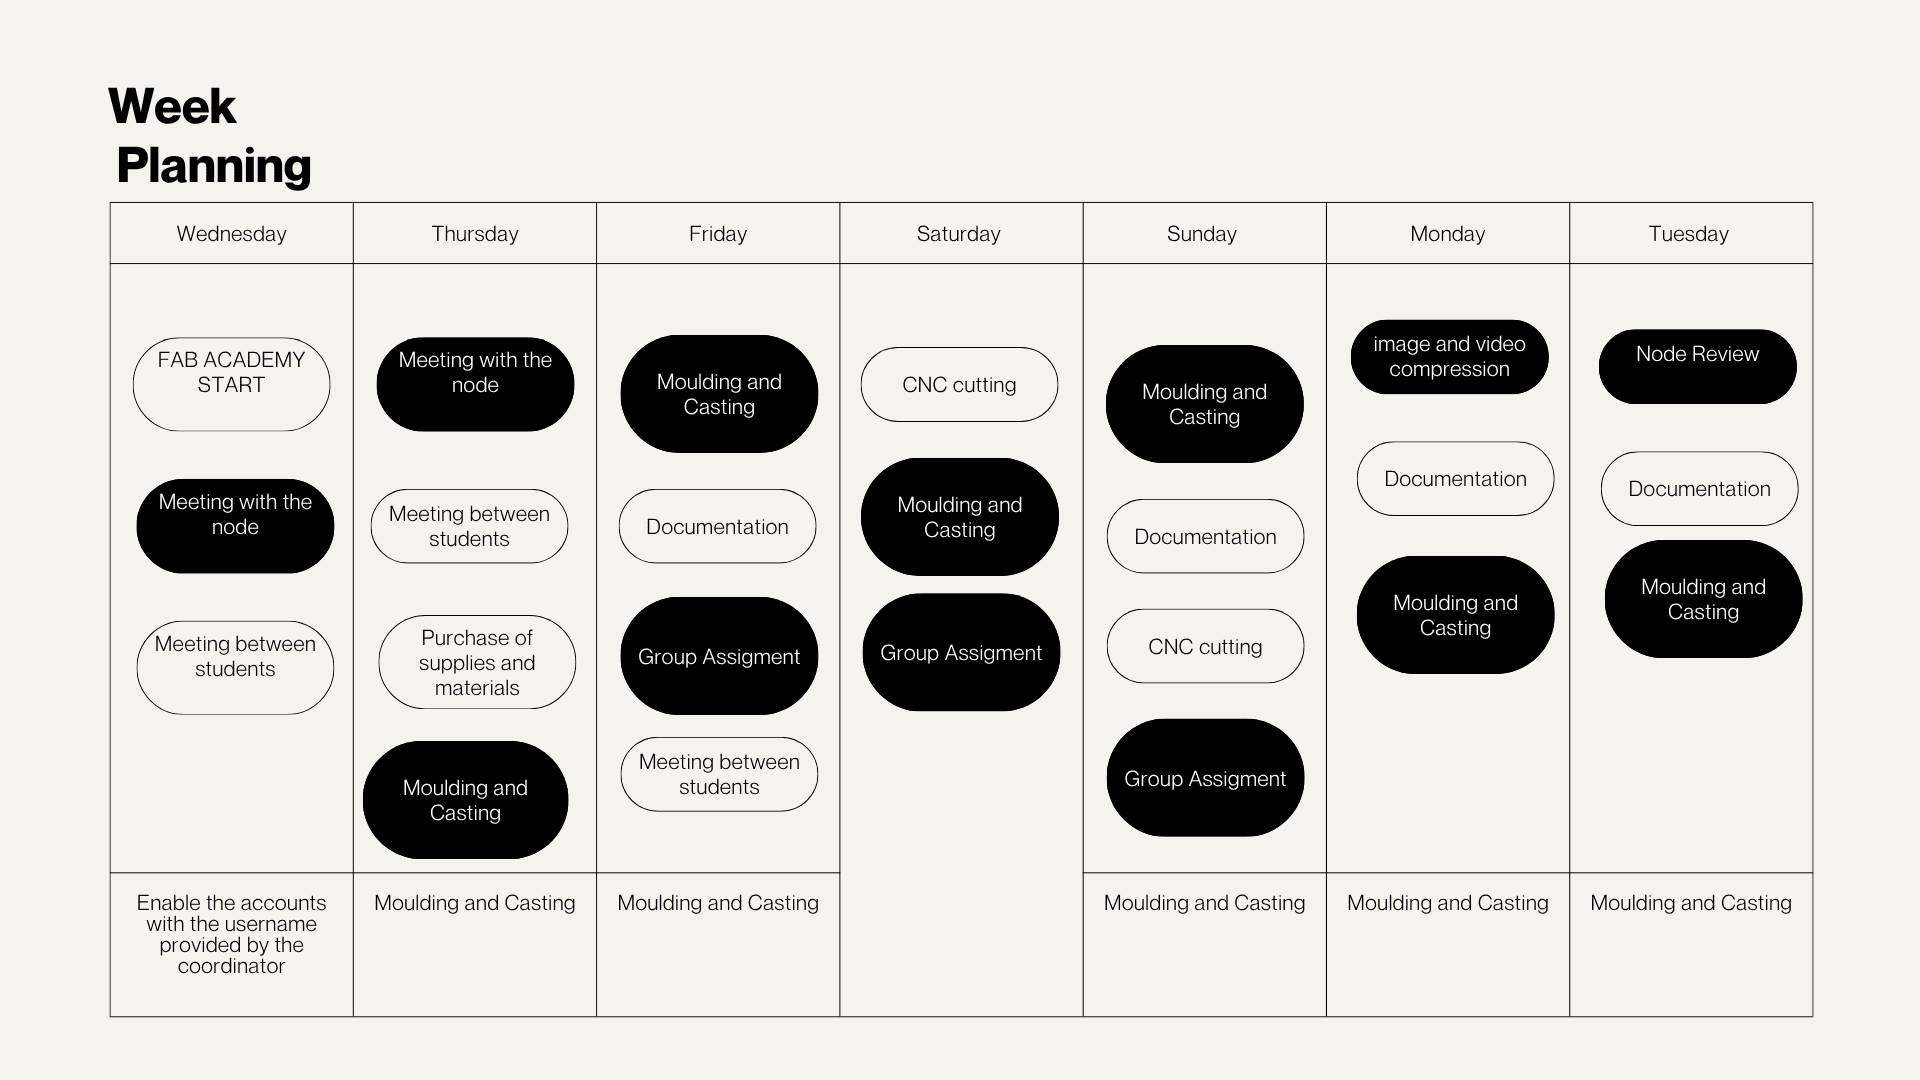
Weekly planning
During the week, we carried out various activities that presented significant challenges but were also very rewarding, especially due to the opportunity to share and learn as a team. We met virtually with our colleagues at the node and participated in lab meetings, which allowed us to organize ourselves and conduct open workshops in different spaces. In these sessions, we reviewed and worked with input devices, understanding their operation and their importance in capturing data from the environment for subsequent processing in electronic systems.
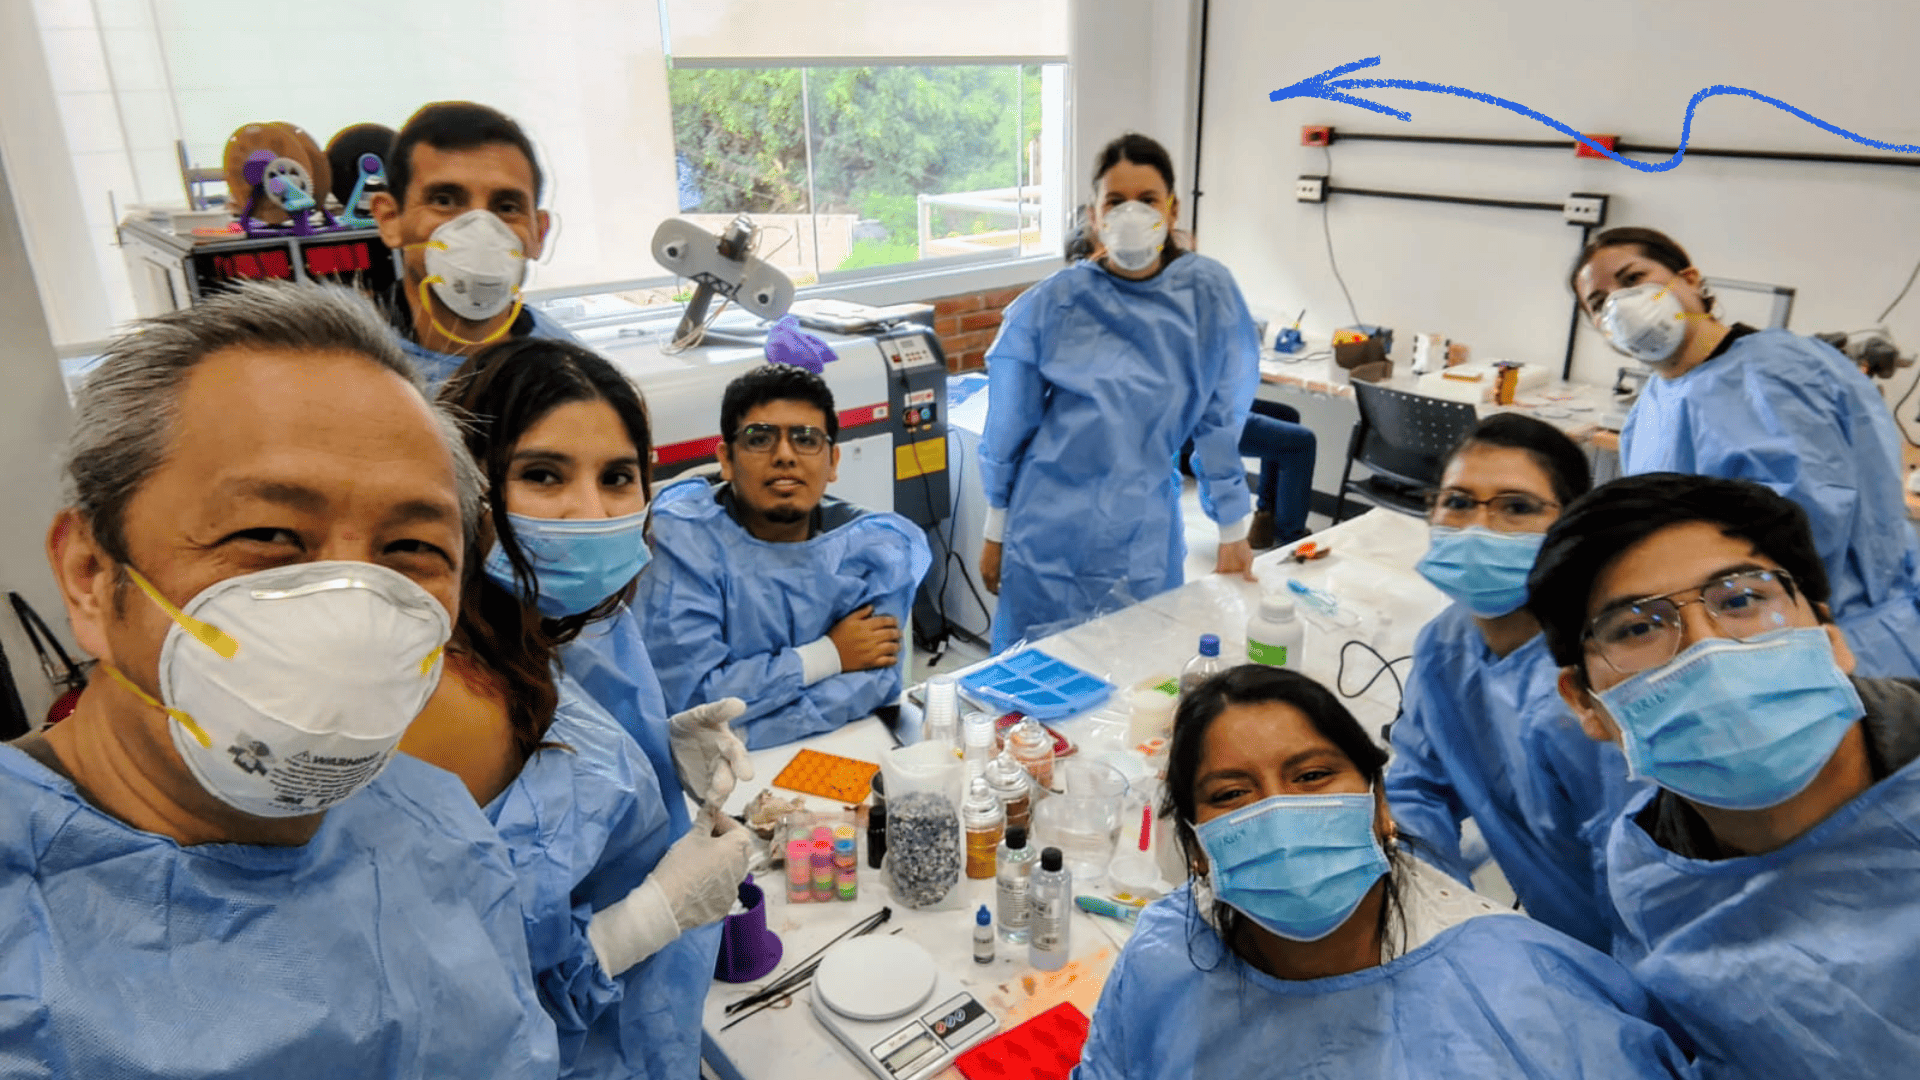
During this week's group project, we conducted a series of experiments in molding and casting processes,
exploring various materials and manufacturing techniques. The objective was to understand the behavior
of different materials, as well as their applications in design and production.
We worked with a wide variety of materials, including: natural resin, bio-silicone, plaster, white cement,
two-component resin (A+B), silicone for molds, soy wax, glycerin for soap making, modeling clay, and chocolate base.
Each of these materials allowed us to analyze specific properties such as curing times, level of detail,
texture, strength, and surface finish.
Furthermore, the molds used in the processes were developed using digital manufacturing technologies,
including 3D printing and CNC machining. This allowed us to obtain precise geometries and adapt the designs
according to the requirements of each material.
Through this experience, we were able to compare industrial, natural, and biomaterials, evaluating their
advantages, limitations, and potential applications. This approach made it possible to integrate knowledge
of design, manufacturing, and sustainability, strengthening a more experimental and critical vision in
the use of materials.
Throughout this week, the exploration of molding and casting processes allowed me to
understand the relationship between materials, techniques, and outcomes from a hands-on
and experimental perspective. Working with a wide range of materials—such as plaster,
eco-resin, bio-silicone, two-component resin, soy wax, soap base, and chocolate—helped me
recognize that each material behaves differently depending on its composition, processing
conditions, and interaction with molds.
One of the most valuable learnings was understanding that success in these processes does
not depend solely on following a recipe or technical data sheet, but also on controlling
variables such as temperature, proportions, timing, and mixing techniques. Small variations
in these parameters can significantly affect the final result, especially in terms of
surface quality, structural integrity, and detail reproduction.
Additionally, comparing digital fabrication methods such as 3D printing and CNC machining
allowed me to better evaluate how mold-making technologies influence the final outcome.
I learned that while 3D printing enables more complex geometries, CNC machining offers
superior surface finishes with less post-processing, highlighting the importance of
selecting the appropriate method based on design requirements.
From a sustainability perspective, experimenting with biomaterials—particularly bio-silicone
and natural pigments—was especially meaningful. It allowed me to connect fabrication processes
with environmental awareness and regenerative design principles. I realized the potential of
integrating locally sourced materials and natural resources into design workflows, promoting
more responsible and context-driven practices.
Finally, this experience reinforced the importance of experimentation, iteration, and
problem-solving. Challenges encountered during the process, such as material overheating
or mixing inconsistencies, became learning opportunities that improved my understanding
of material behavior. Overall, this week strengthened my ability to critically evaluate
materials and processes, and to approach design and fabrication with a more informed,
sustainable, and experimental mindset.
In the individual component of this assignment, I integrated knowledge from previous weeks
with new experimentation in biomaterials and molding processes. A key aspect of my work was
the incorporation of biomaterials and natural pigments inspired by native communities,
exploring their potential within a sustainable and context-driven design approach.
Additionally, I utilized molds developed through CNC machining, combining digital fabrication
techniques with manual processes. This allowed me to better understand how different fabrication
methods influence the final outcome of the pieces.
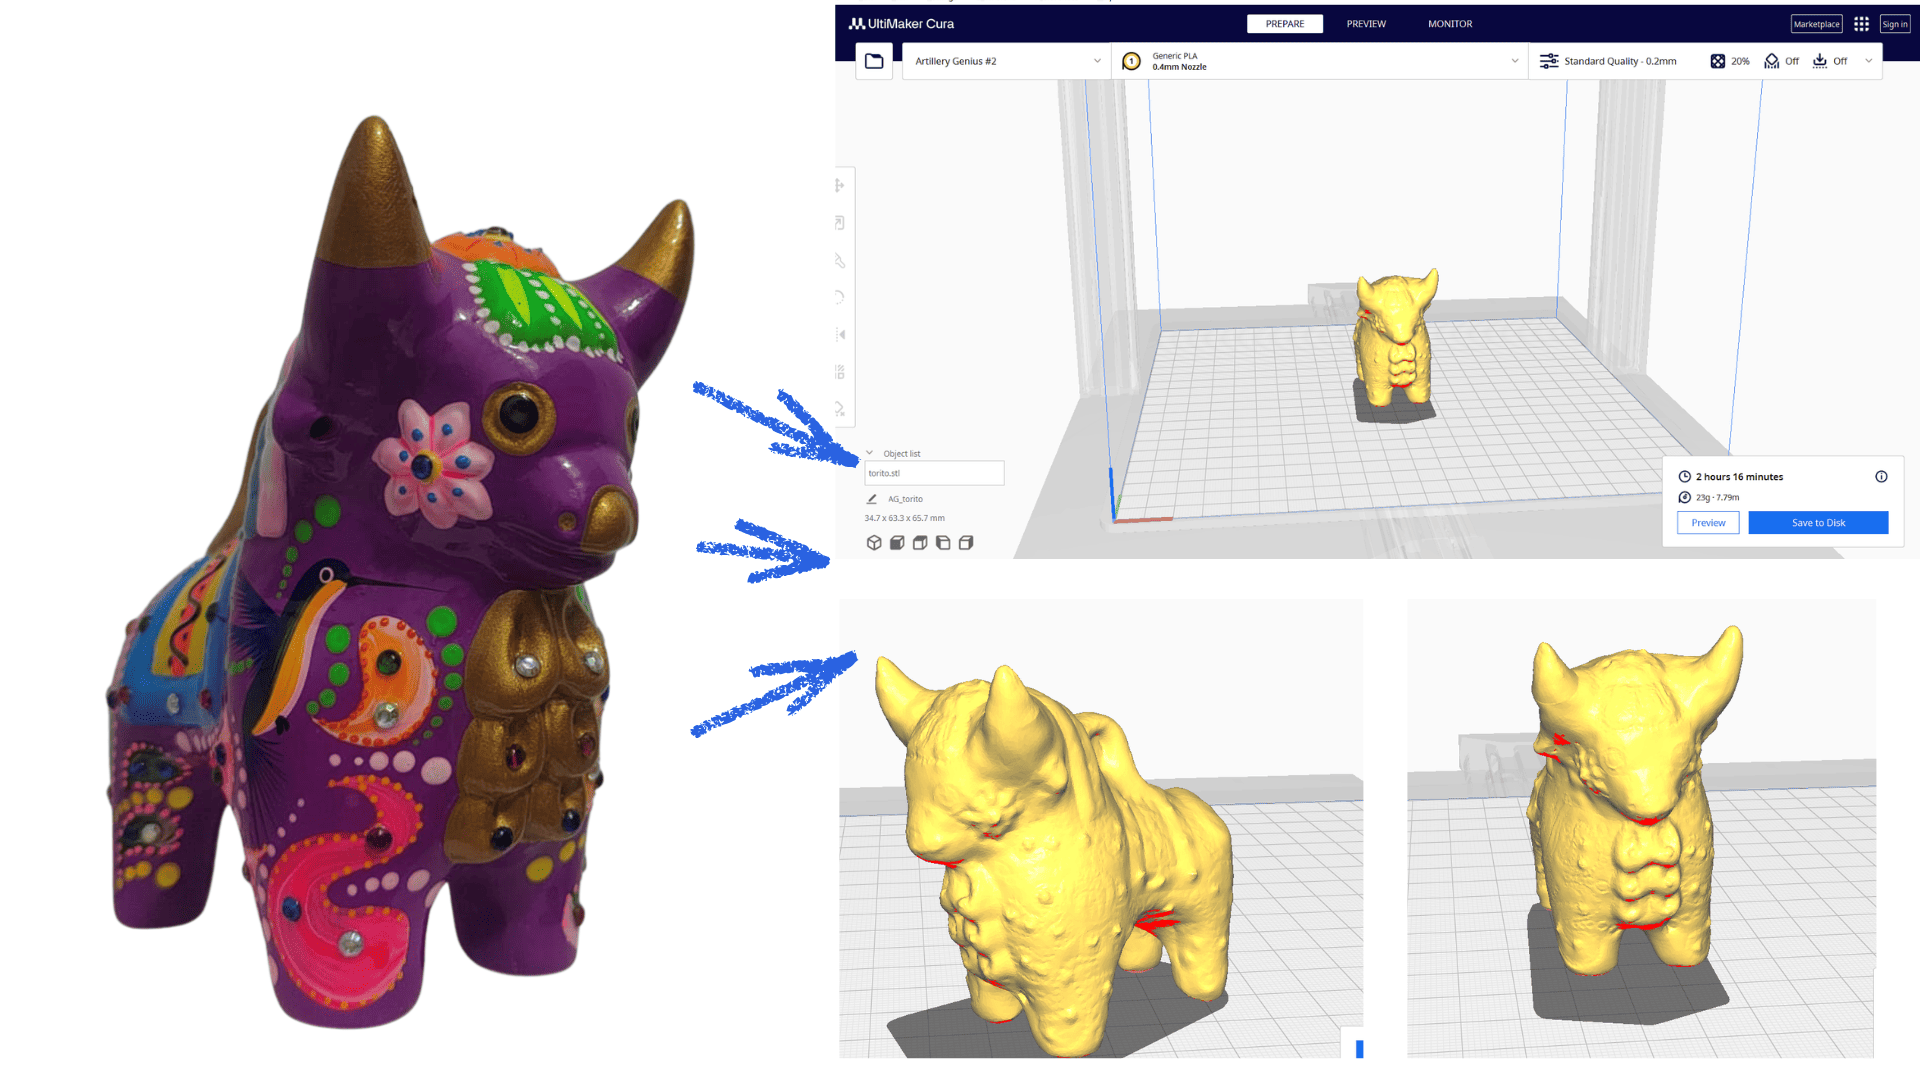
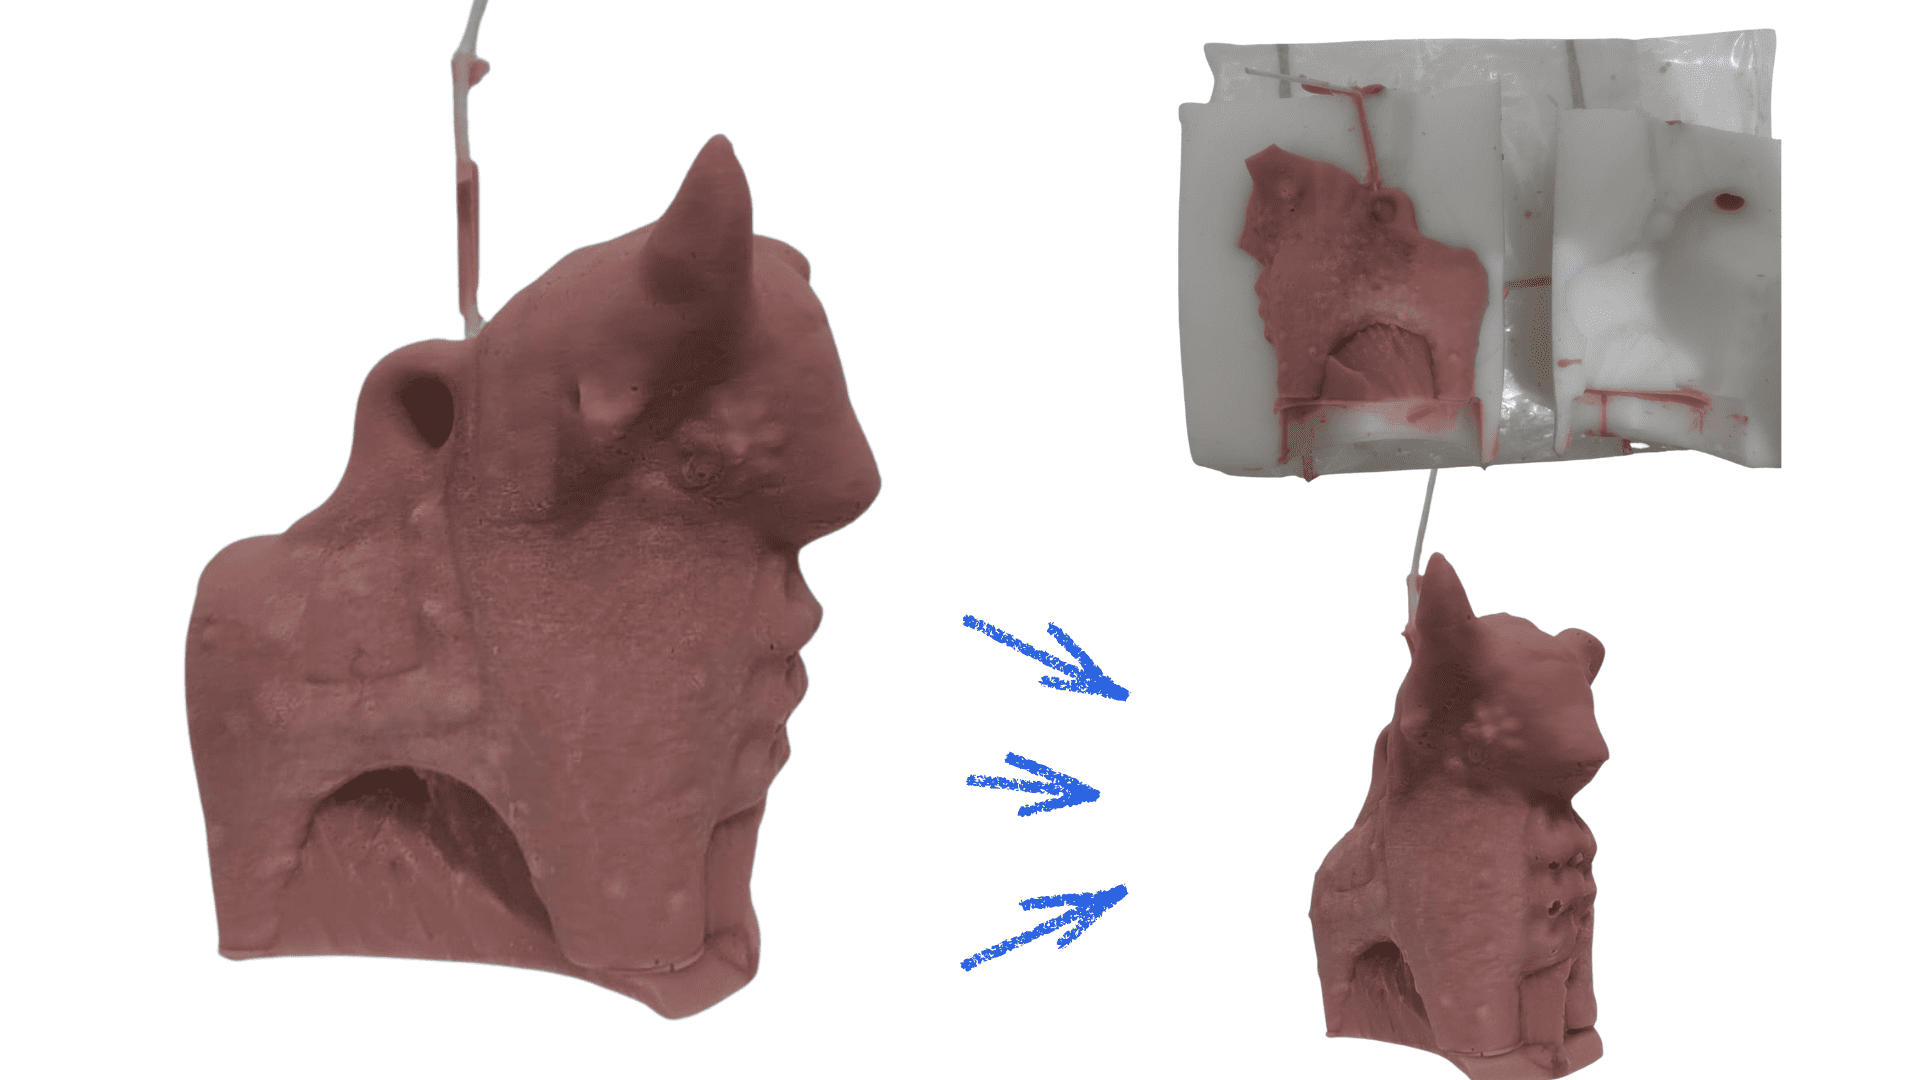
I also applied knowledge acquired in previous weeks, particularly in 3D scanning and digital
modeling. As part of this process, I scanned a traditional Torito de Pucará using a
mobile scanning application. The resulting digital model was then processed in
Ultimaker Cura to prepare it for 3D printing.
Once printed, the object was used as a base model to create a silicone mold. This workflow
enabled the transition from a digital representation to a physical mold, which could then
be used in subsequent casting processes with different materials.
Overall, this experience allowed me to connect digital fabrication tools, traditional cultural
references, and biomaterial experimentation into a cohesive workflow, reinforcing a more
integrated and multidisciplinary approach to design and production.
In this stage of my individual work, I applied a complete workflow that integrates
digital fabrication and material experimentation. The process began with the 3D scanning
of an object, followed by digital preparation and 3D printing, which enabled the creation
of a master model for mold fabrication.
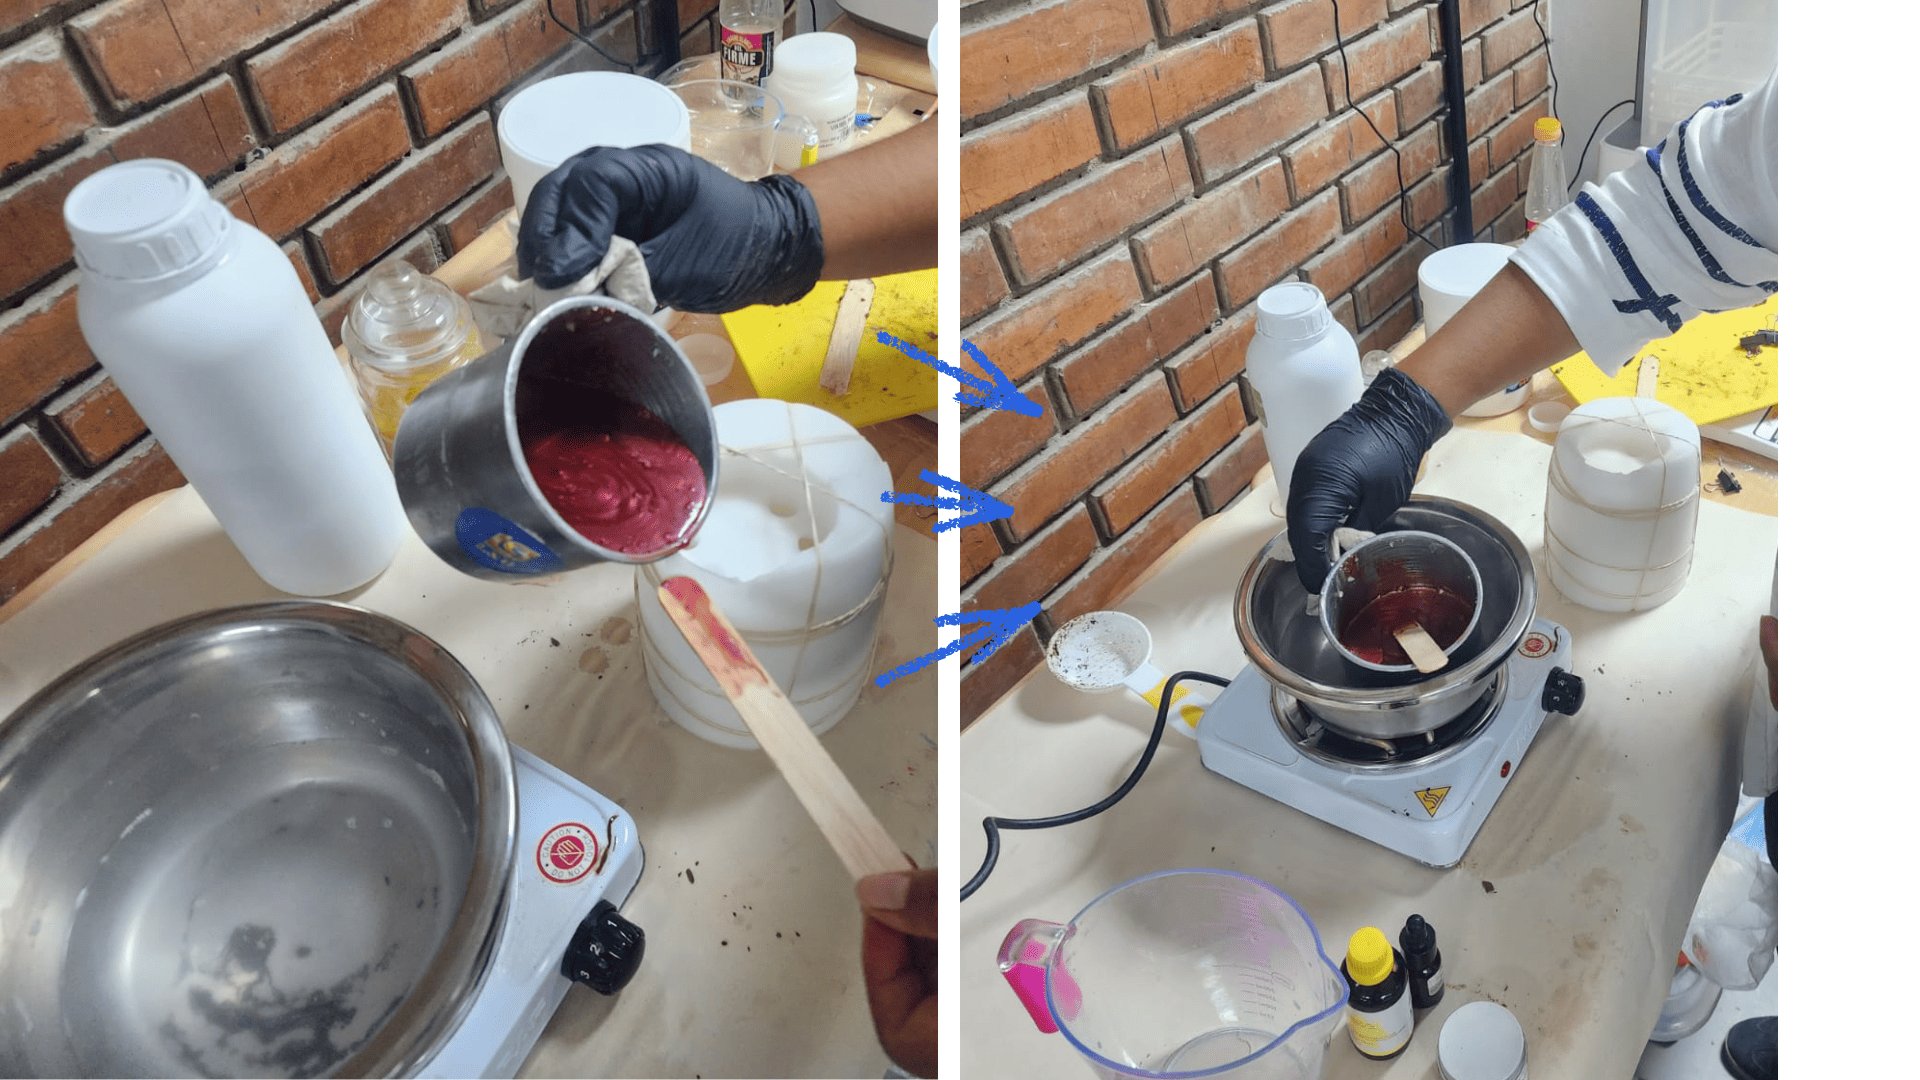
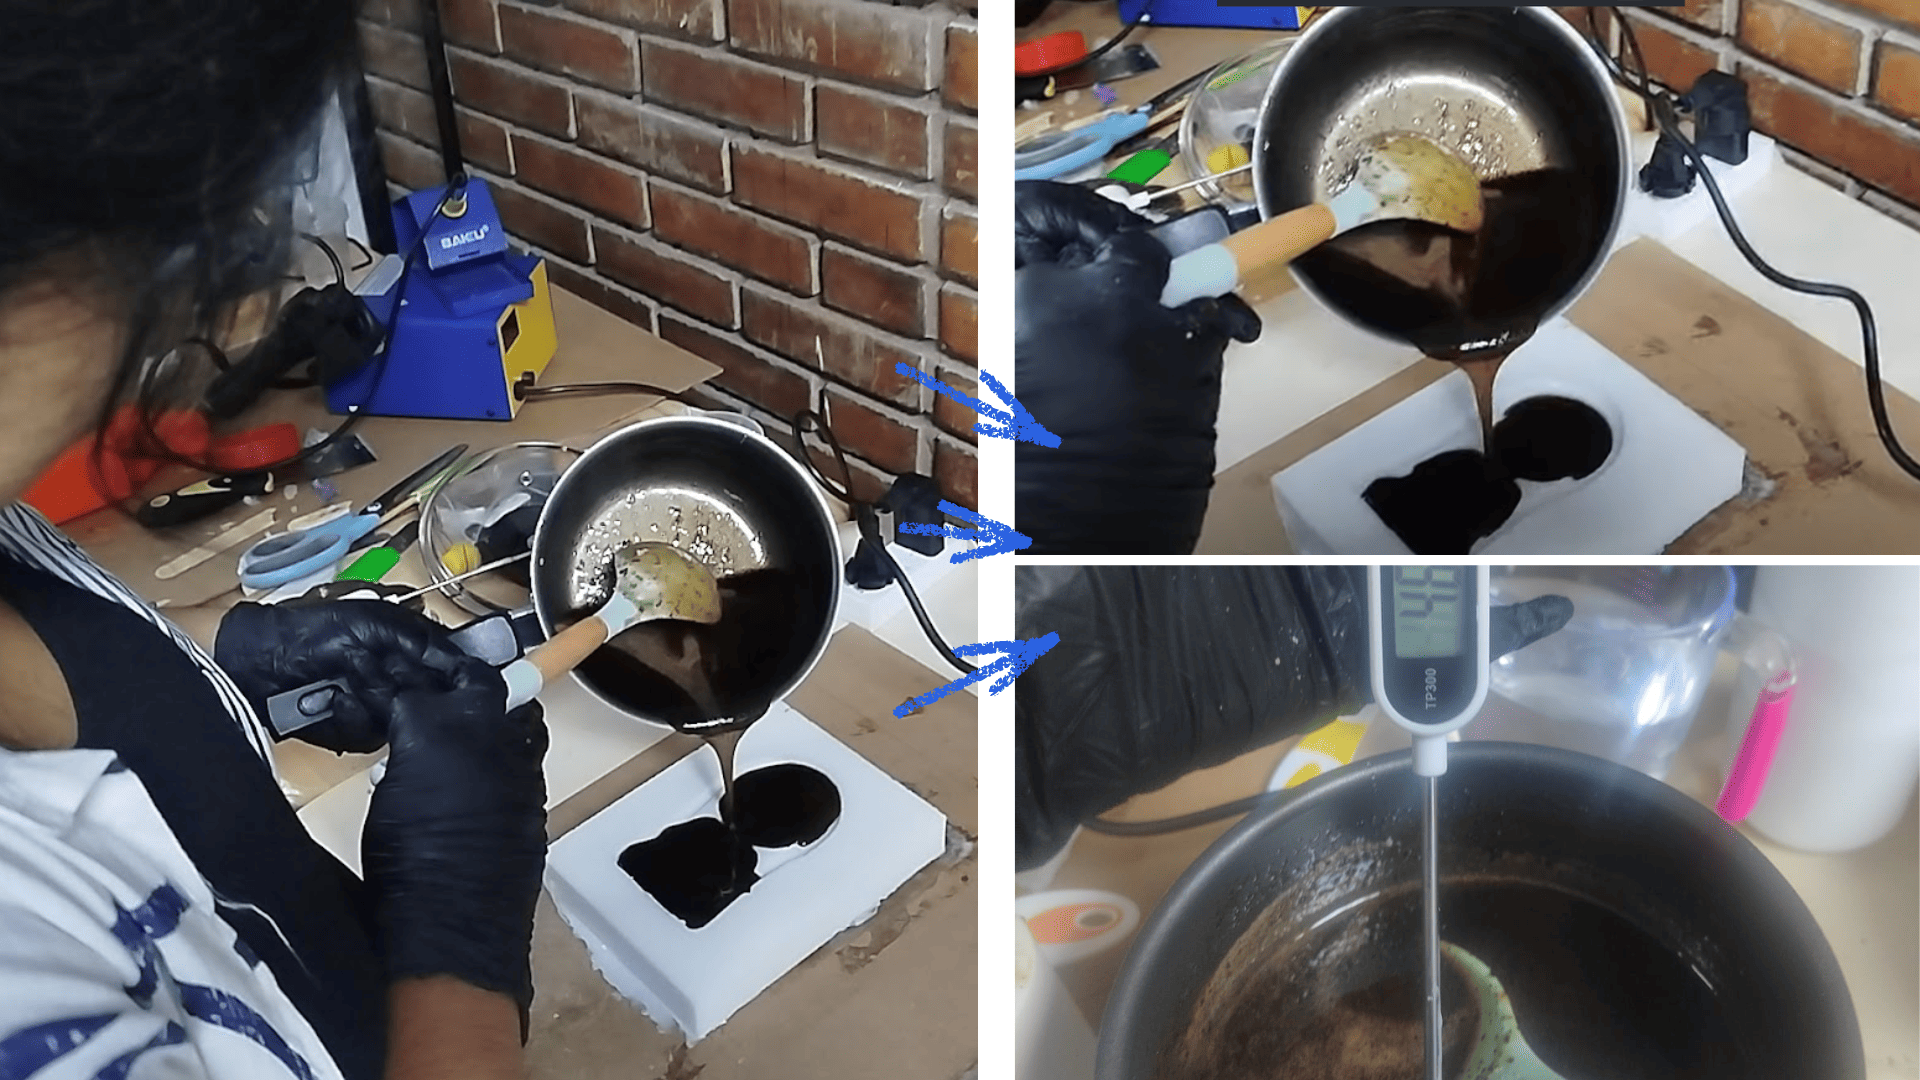
Using the printed model, a silicone mold was produced by mixing silicone
with its corresponding catalyst. The mixture was poured over the model inside a container,
allowing it to cure and form a flexible negative mold capable of capturing fine details.
After obtaining the silicone mold, it was used to produce a candle using soy wax,
incorporating a citrus fruit extract and natural oils to enhance the sensory properties of the final piece.
The silicone mold demonstrated excellent flexibility and detail reproduction, allowing for
an accurate transfer of the original geometry. The soy wax performed well during casting,
achieving a smooth finish and effectively retaining the added aroma.
The integration of digital fabrication tools with traditional casting techniques enabled a
complete workflow from digital model to final product, reinforcing the relationship between
design, materials, and fabrication processes.
This experience highlights the versatility of silicone molds and soy wax as accessible materials
for prototyping and product development. It also demonstrates how combining digital tools with
natural materials can lead to innovative and sustainable design outcomes.
As part of my individual work, I developed an experimental biomaterial using
coffee grounds (coffee waste) as the main component. The objective
was to explore the potential of organic waste as a sustainable material for molding
and fabrication processes, while also evaluating its physical behavior under controlled conditions.
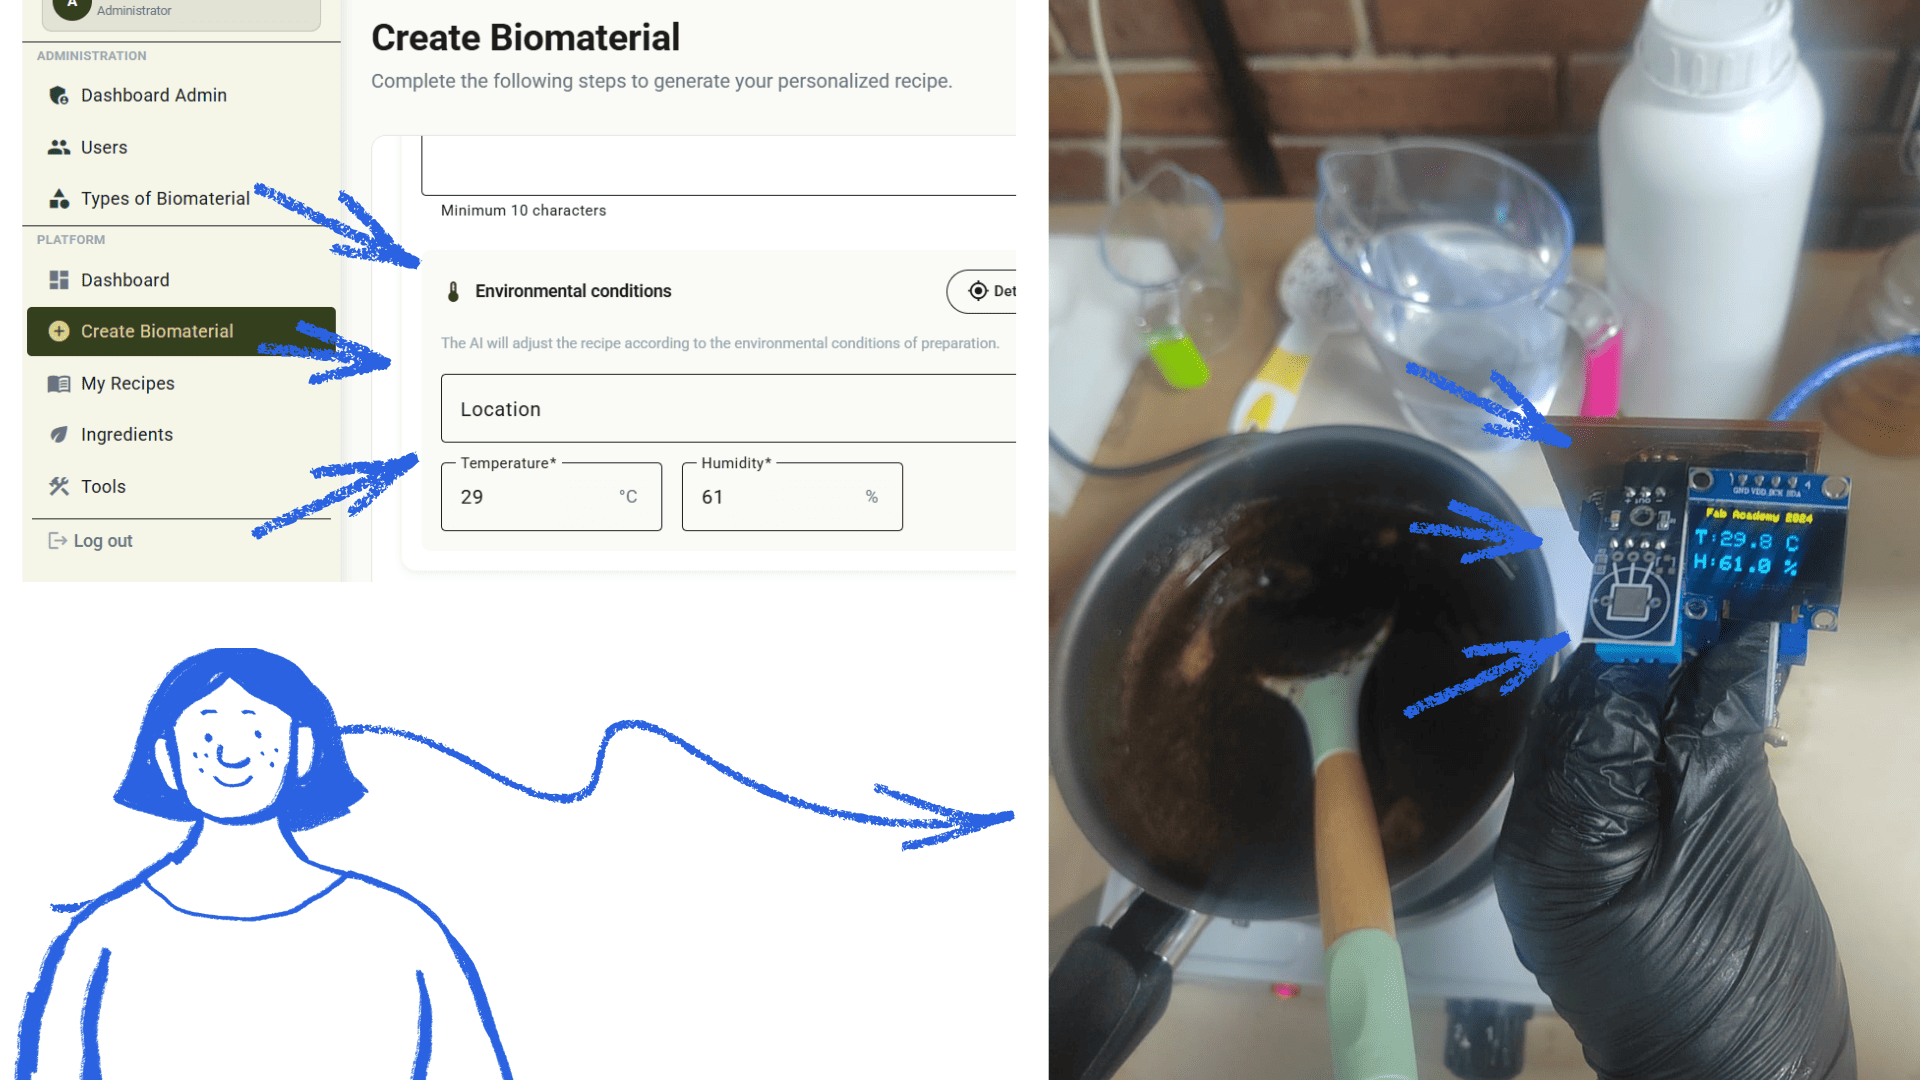
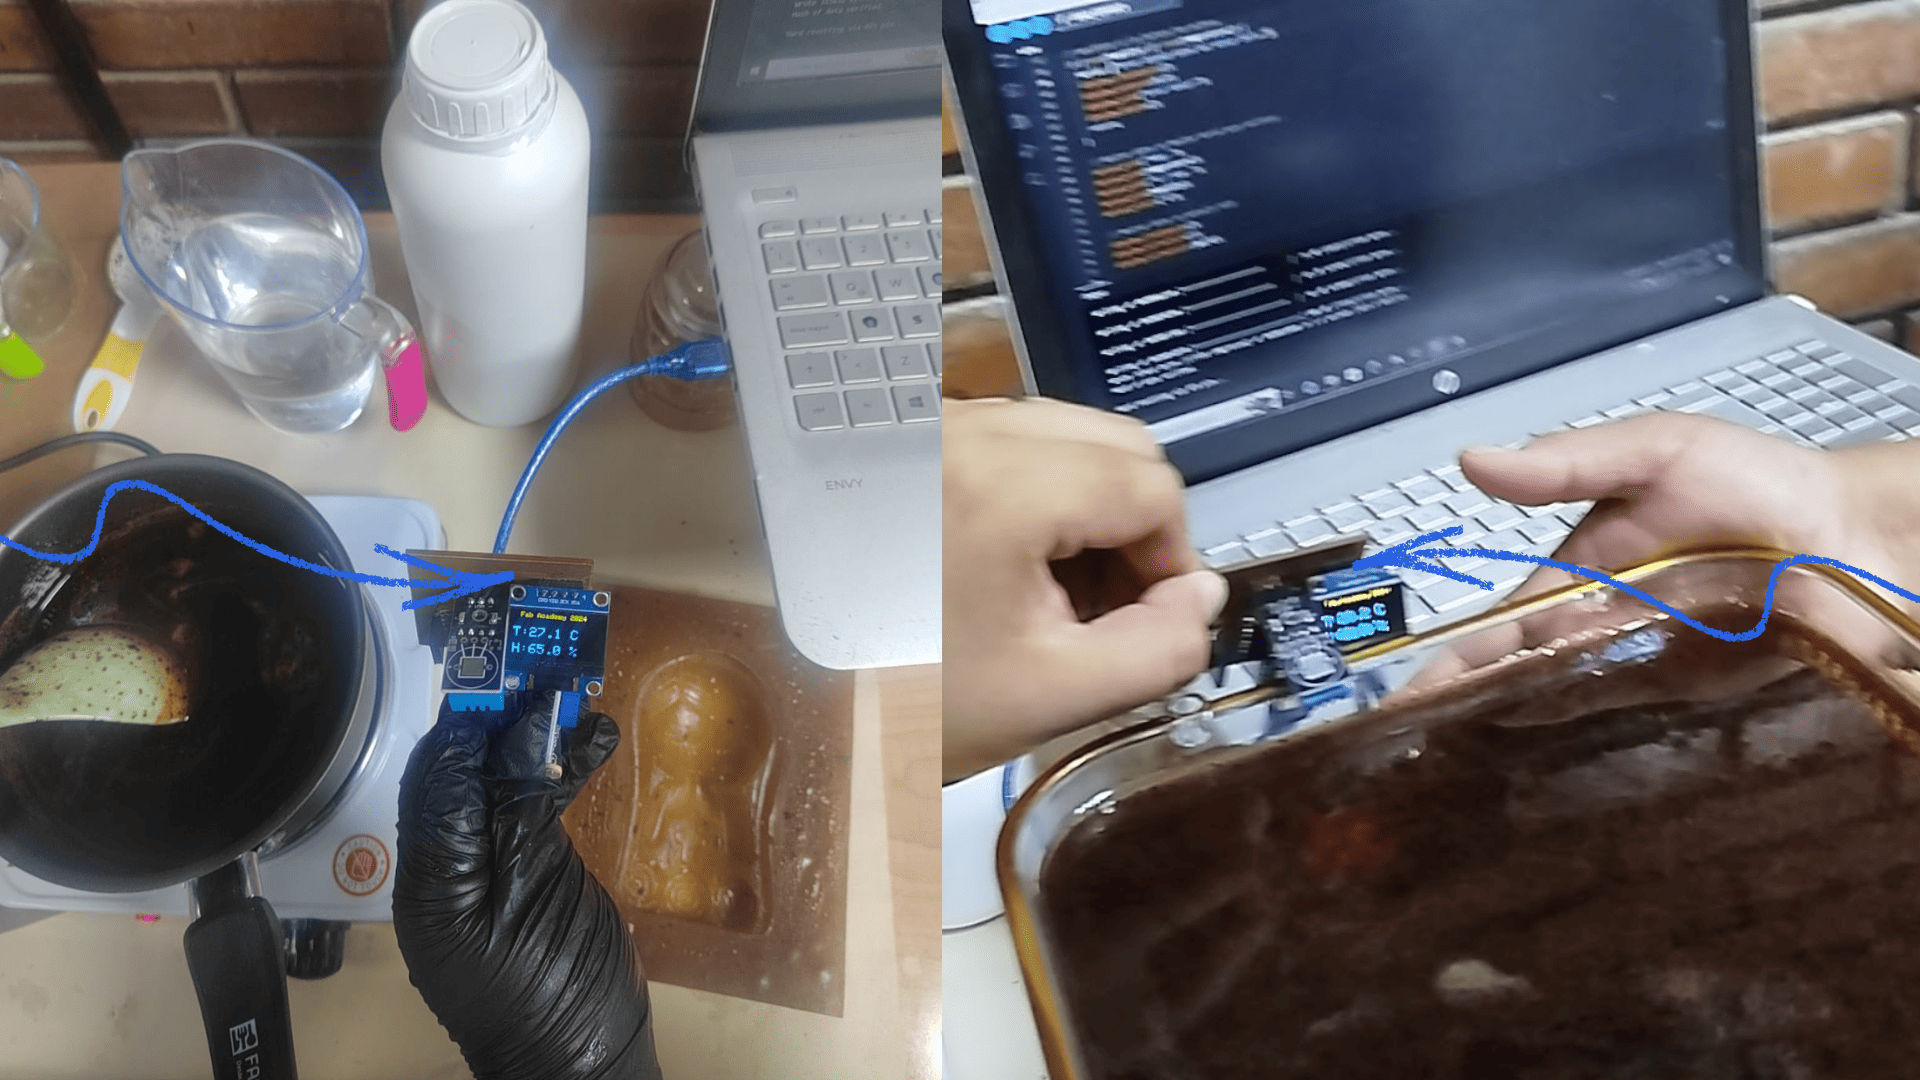
This experiment was complemented by the use of an electronic system developed in previous weeks,
consisting of a temperature and humidity sensor connected to a microcontroller. This setup allowed
real-time monitoring of environmental conditions during the drying and curing process of the biomaterial.
The coffee-based biomaterial is formed by combining organic particles with a binding agent,
creating a composite structure. The binder acts as a matrix that holds the coffee particles together
during drying. As water evaporates, the material transitions from a malleable mixture to a rigid or
semi-rigid structure, depending on the formulation.
To better understand the behavior of the biomaterial during the drying phase, a temperature
and humidity sensor was used. The sensor was connected to a custom electronic board, allowing
the collection of environmental data in real time.
Monitoring these variables helped identify how temperature and humidity influence drying time,
material shrinkage, and final consistency. This integration of digital tools with biomaterial
experimentation provided a more analytical and data-driven approach.
The coffee-based biomaterial showed good cohesion when properly mixed with the binder. However,
drying conditions significantly affected the final result. High humidity slowed down the curing
process, while controlled environments improved consistency and structural integrity.
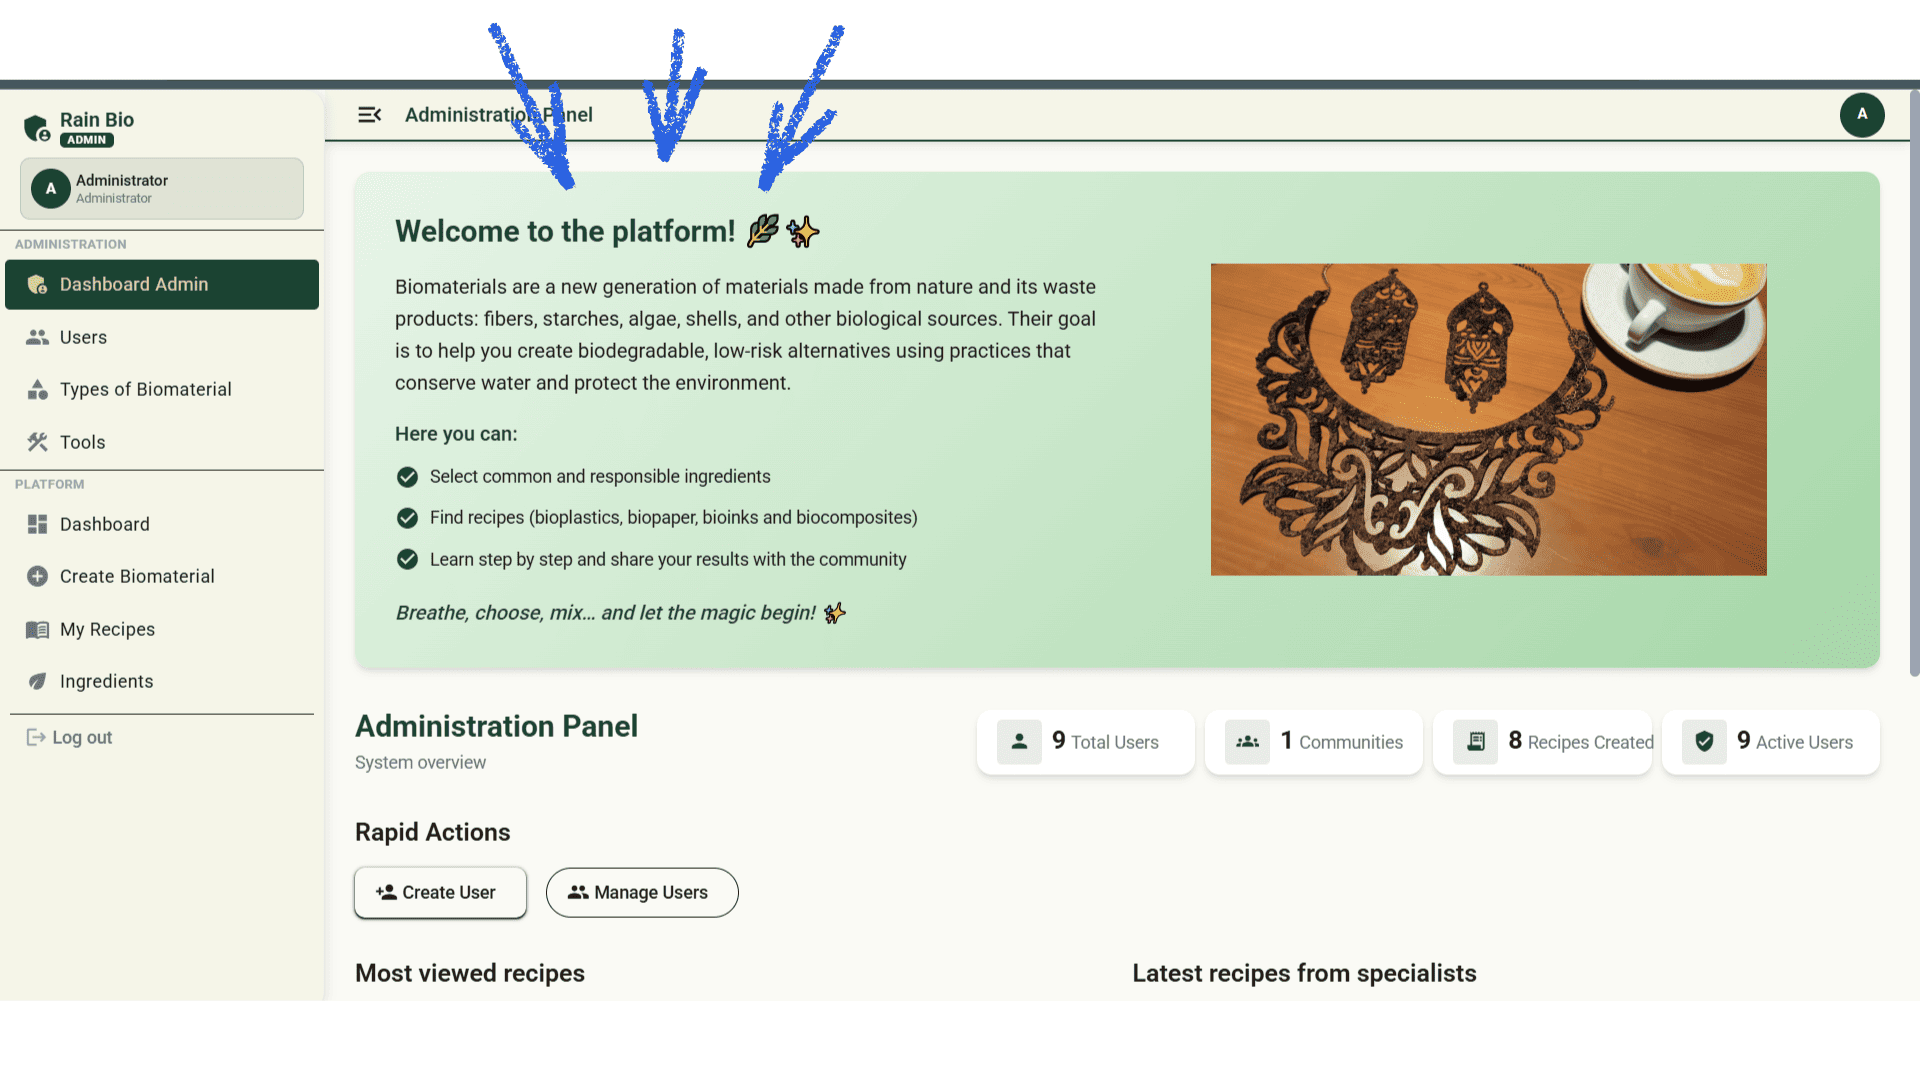
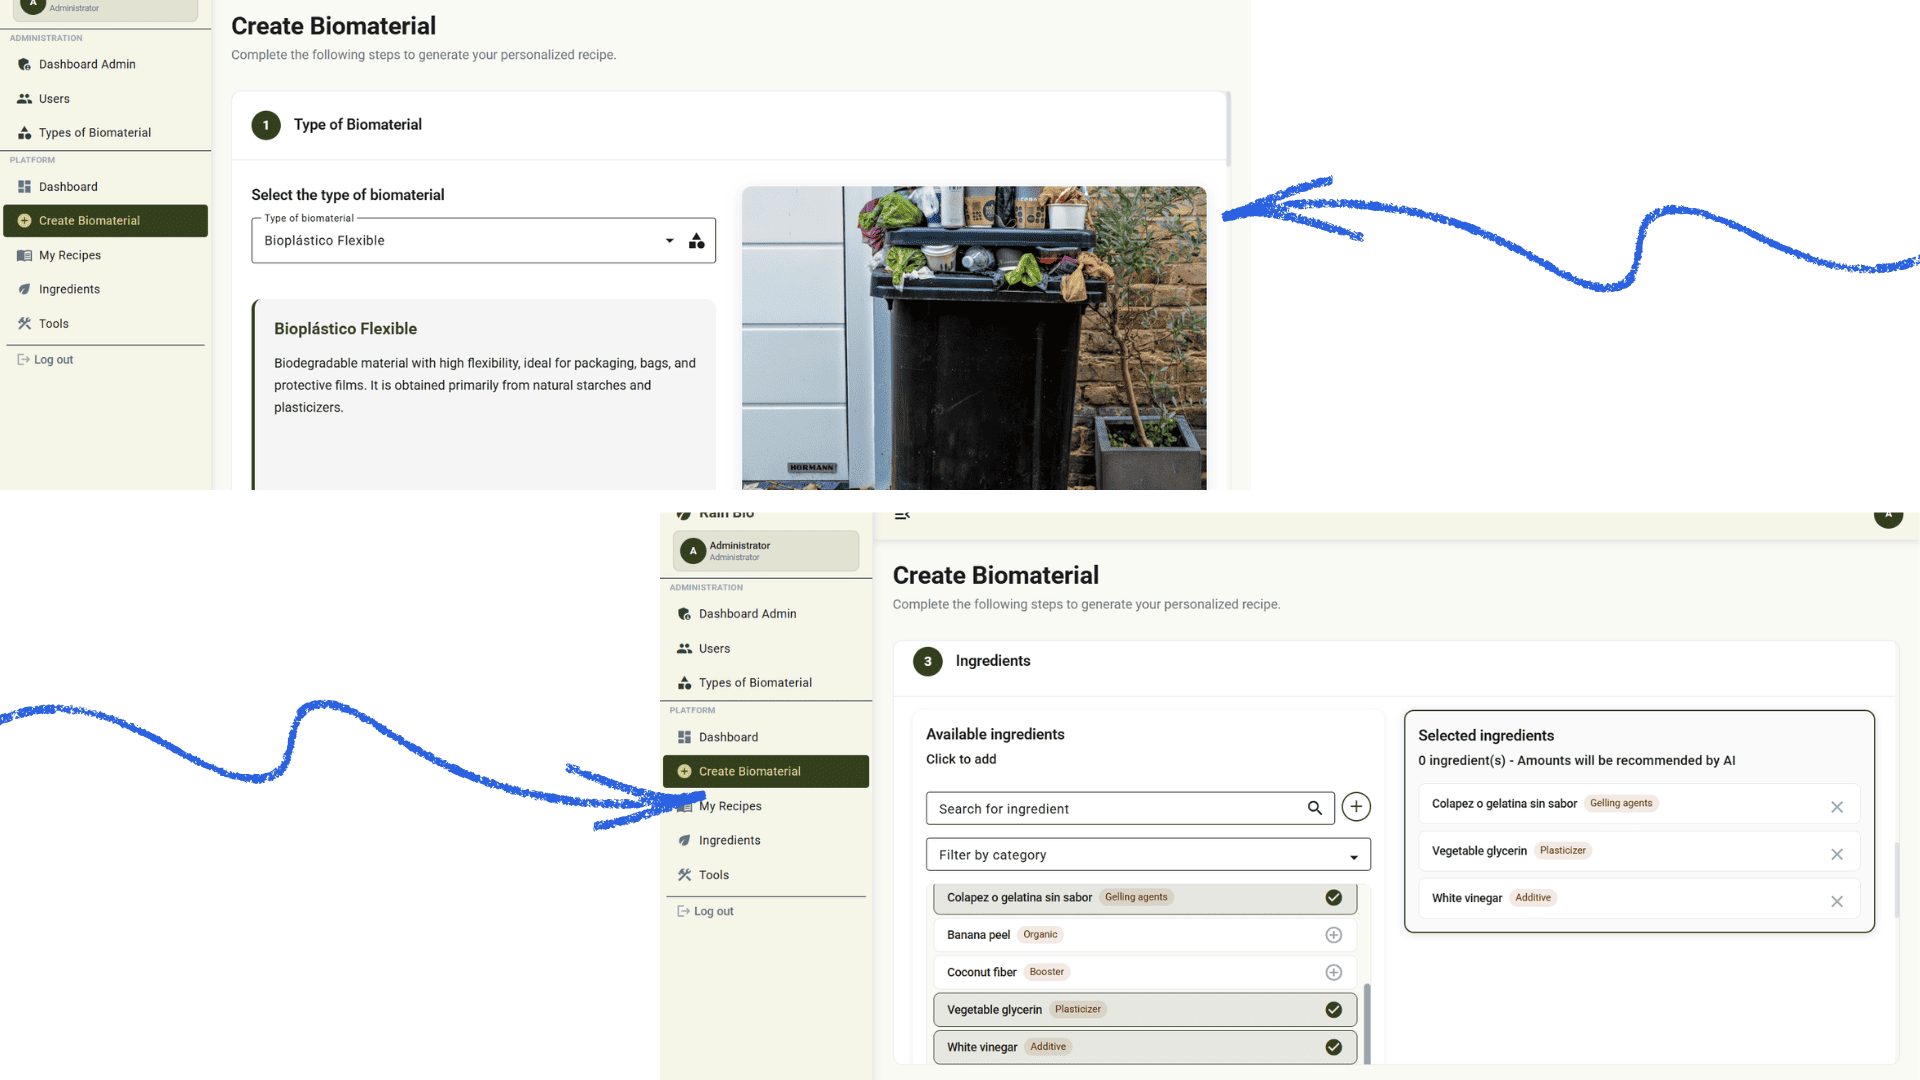
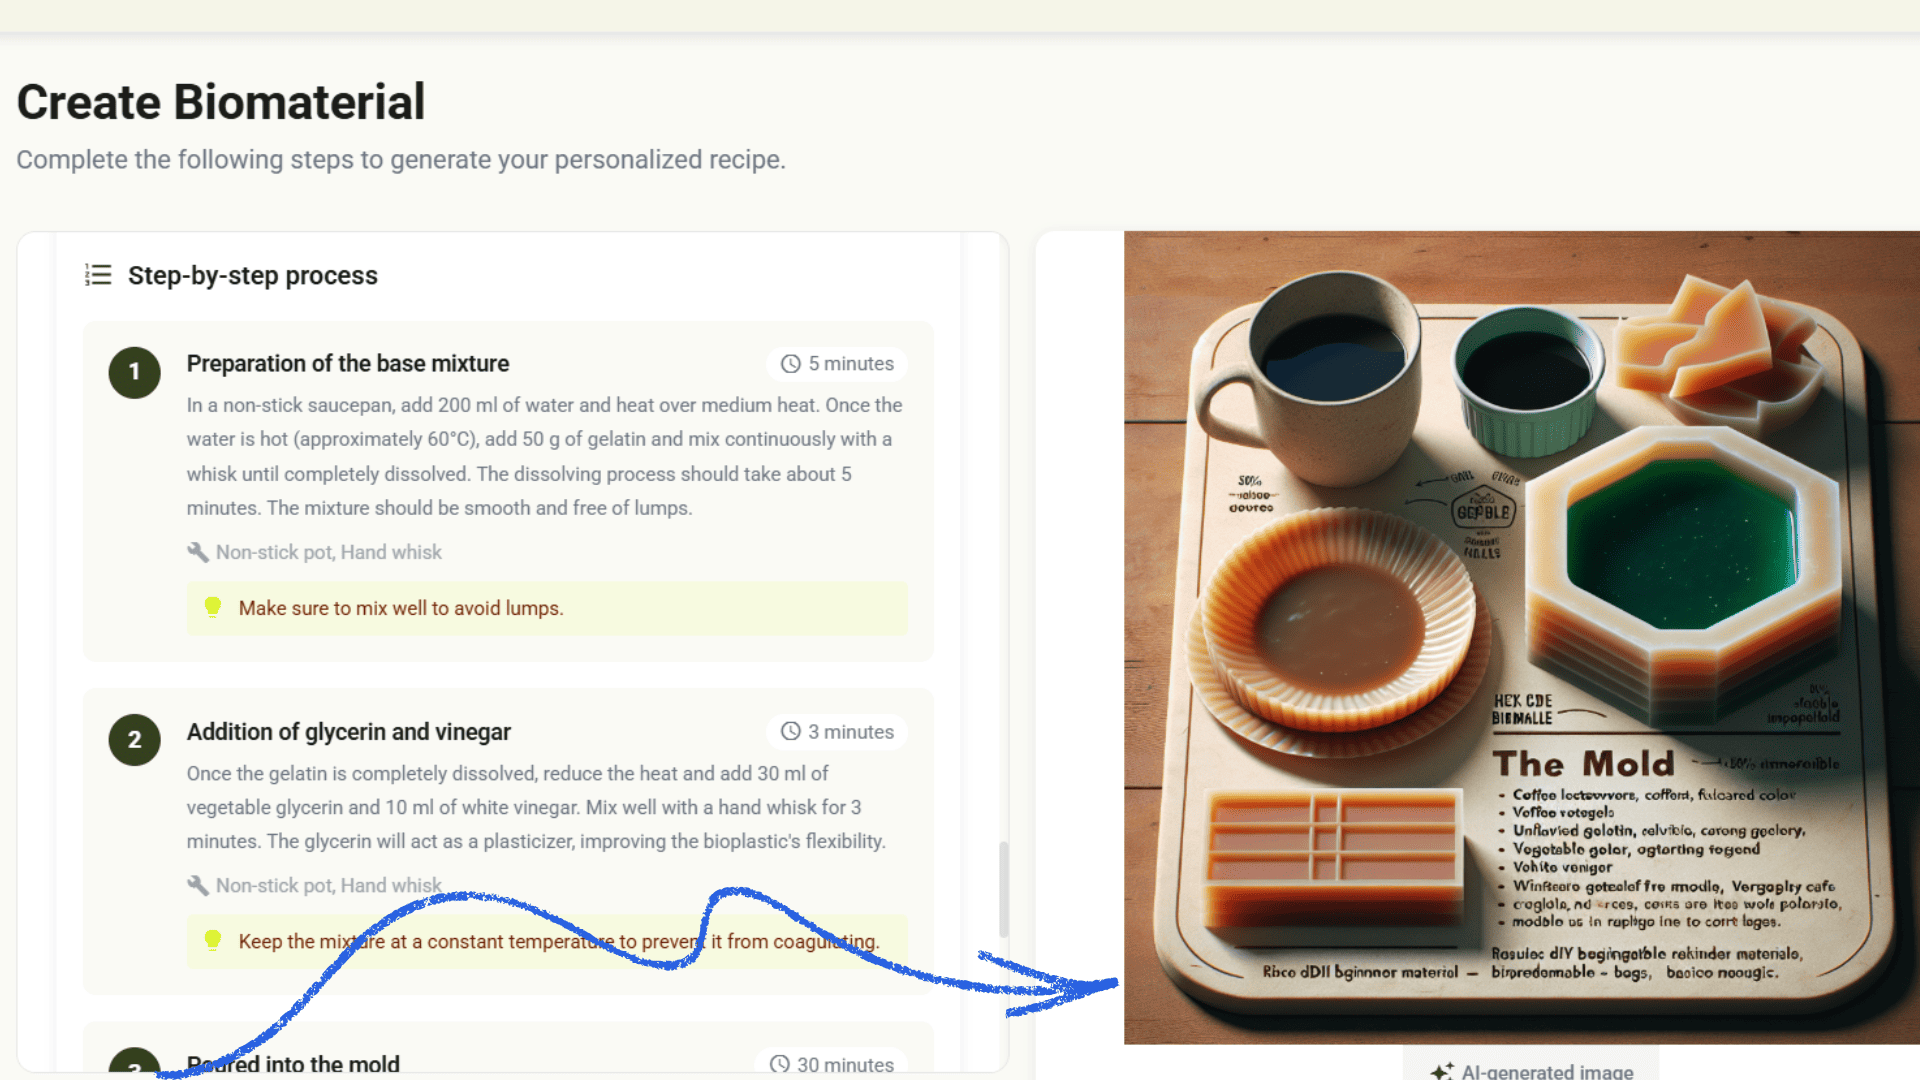
The entire process, including formulation, environmental data, and results, was documented using
the Regen Bio platform. This digital tool supports the structured development and sharing of
biomaterial recipes and experimental data.
This experiment demonstrated the potential of organic waste such as coffee grounds as a viable
material for sustainable design. Additionally, integrating electronic sensors allowed for a deeper
understanding of environmental influence on material behavior, bridging digital fabrication,
biomaterials, and data-driven experimentation.
Throughout this week, I developed a deeper understanding of molding and casting processes
by combining digital fabrication tools with hands-on material experimentation. Working with
different materials such as bio-silicone, eco-resin, plaster, soy wax, soap, chocolate, and
coffee-based biomaterials allowed me to explore how each one behaves under different conditions
and how their properties influence the final outcome.
One of the most valuable aspects of this experience was integrating knowledge from previous weeks.
The use of 3D scanning, modeling, and printing enabled me to transform a physical object into a
digital file and then back into a physical mold through silicone casting. This workflow helped me
understand the full cycle from digital design to material production.
Additionally, incorporating biomaterials and natural pigments inspired by native communities
gave a new dimension to my work. It allowed me to reflect on the importance of sustainability
and the potential of using local resources in design processes. I realized that materials are
not only technical elements but also cultural and environmental expressions.
The use of my electronic board with temperature and humidity sensors added a data-driven layer
to the experimentation. Monitoring environmental conditions helped me better understand how
variables such as heat and moisture affect the behavior and curing of biomaterials.
I also learned that mistakes are part of the process. Issues such as overheating, incorrect
proportions, or material inconsistencies became opportunities to improve my understanding
and refine my techniques. This reinforced the importance of patience, observation, and iteration.
Overall, this week strengthened my ability to connect design, technology, and sustainability.
It encouraged me to think more critically about material choices and to approach fabrication
as an experimental and learning-driven process. This experience has motivated me to continue
exploring biomaterials and integrating them into future projects.
Gruop Work- Group work- Molding and casting
Personal Reflection
Individual Task
Silicone Mold and Soy Wax Candle Casting
Silicone Mold Fabrication
Soy Wax Candle Casting Process
Observations
Conclusion

Biomaterial Experiment: Coffee Waste Composite
Materials Used
Material Composition and Mechanism
Fabrication Process
Sensor Integration and Monitoring
Observations
Platform Documentation
Reflection

Reflection
Downloads