Creality · HALOT-MAGE PRO 8K
Resin 3D printing (MSLA) — Operation & Safety
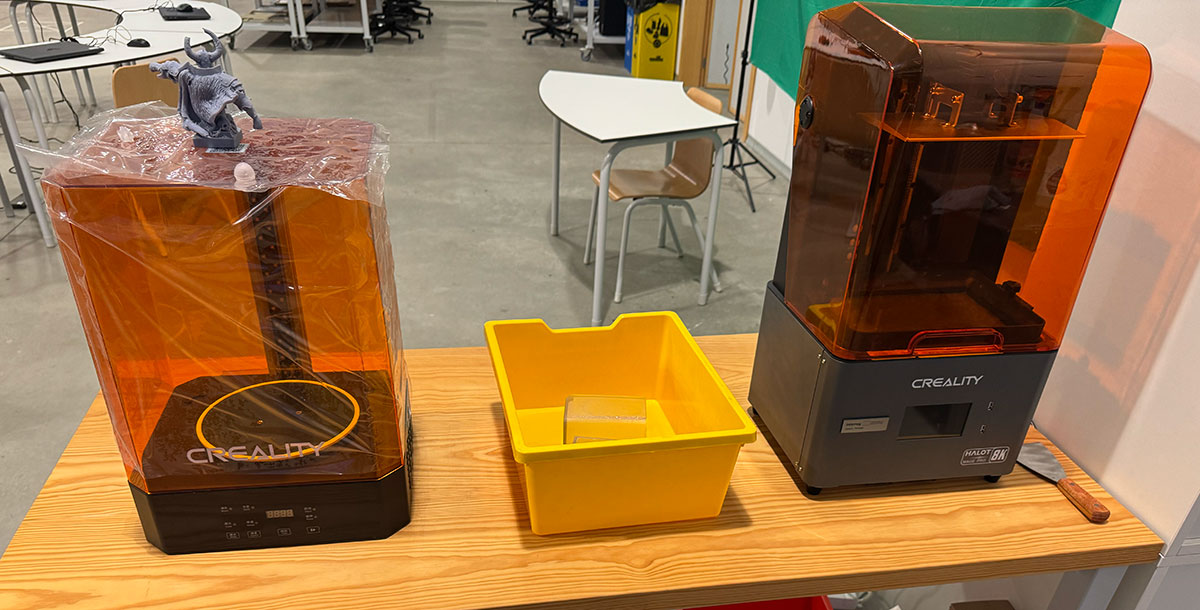
Companion equipment: UW-03 Washing/Curing Machine
Overview
The Creality HALOT-MAGE PRO 8K is an MSLA resin printer focused on high detail and smooth surfaces. Compared to FDM, the big advantages are fine features and clean finishes — but the tradeoff is a stricter workflow: chemical handling, washing, curing, and cleanliness.
HALOT-MAGE PRO 8K — Machine specifications
| Parameter | Value |
|---|---|
| Technology | MSLA (LCD resin printing) |
| Build volume | 228 × 128 × 230 mm |
| LCD screen | 10.3" monochrome |
| LCD resolution | 8K (7680 × 4320) |
| XY pixel size | 29.7 μm |
| Typical layer height | 0.02–0.05 mm (depends on resin and detail needs) |
| Slicer | HALOT BOX (and other compatible resin slicers) |
Resins & profiles
Resin compatibility is mainly about choosing the right resin type and matching it with a correct exposure profile.
- Standard (general purpose)
- ABS-like / Tough (better impact resistance)
- High-detail (miniatures, fine text)
- Flexible (rubber-like parts)
- Water-washable (easier cleanup, still requires safe handling)
- Engineering resins (high-temp / rigid / specialty)
What I always verify when changing resin
- Normal exposure time per layer (resin-dependent).
- Bottom layers + bottom exposure (first layer adhesion without overcooking).
- Lift distance and lift speeds (too aggressive = failures; too gentle = slow).
- Room temperature and resin viscosity (cold resin behaves differently).
Printer operation
Power on and pre-check
Before printing, I make sure the workflow is “ready end-to-end”, including wash & cure. That way I’m not improvising with wet resin parts in my hands.
- Power on and confirm the touchscreen starts normally.
- Check the vat: clean, properly installed, no cured debris.
- Check the build plate: tight, clean, no previous resin chunks.
- Confirm ventilation and PPE are ready (gloves, eye protection).
- Prepare the UW-03 area: solvent/water, basket, curing platform.
Typical resin print flow
- Prepare model in slicer (orientation, hollowing if needed, supports).
- Slice and preview layers (islands, suction risks, support coverage).
- Start the print and do an early sanity check.
- After print: drip → remove → wash → dry → support removal → final cure.
- Cleanup: filter resin if needed, clean tools, leave the station spotless.
HALOT BOX workflow
My workflow is: Import → Orient → Support → Slice → Preview → Export. The critical step is always checking islands and support contact points.
1) Import and orient
I import the STL and tilt the model to reduce peel forces. I avoid large flat areas parallel to the plate when possible.
2) Supports
I generate supports, then reinforce areas that start “in the air”. I also place contact points on non-critical surfaces.
- Heavy supports for first contact / heavy load areas
- Medium supports for structure
- Light supports for details (careful: too light = failures)
- Always run an island check before exporting
3) Slice and preview
I scrub through the layer preview looking for: isolated pixels, sudden big cross-sections (suction risk), and unsupported features.
4) Export and print
I export the file and start the job from the printer. If it’s a long print, I still check early progress to catch failures fast.
Resin handling (fill, drain, and cleanup)
My goals are simple: no spills, no skin contact, and no contamination spreading around the lab.
Filling the vat
- Put on nitrile gloves (and eye protection if scraping/handling liquids).
- Mix resin gently and pour slowly into the vat (avoid bubbles).
- Do not overfill.
- Close the cover before starting the print.
Draining resin after a print
- Let resin drip from the build plate back into the vat.
- If I need to empty the vat, I pour resin back through a filter.
- I inspect for cured debris before printing again.
UW-03 Washing/Curing Machine
The UW-03 is the companion machine I use for washing and UV curing resin prints. It helps keep the workflow cleaner and more consistent than manual washing.
What I use it for
- Wash mode: agitated cleaning to remove uncured resin.
- Cure mode: UV curing to fully harden the print after washing/drying.
UW-03 wash workflow
- I place the part in the basket (or mount the build plate if the station supports it in my setup).
- I fill the container with the chosen cleaning liquid (IPA or the resin’s recommended cleaner).
- I run a wash cycle and avoid over-washing fragile parts.
- I remove the part and let it dry completely (especially cavities and holes).
UW-03 cure workflow
- Only when the part is clean and dry, I move it to cure mode.
- I cure in short cycles and rotate the part if needed for even exposure.
- I stop once the surface is dry and fully hardened (no tackiness).
Post-processing flow (remove → wash → cure)
Post-processing is mandatory in resin printing. My standard sequence is: drip → remove → wash (UW-03) → dry → remove supports → final cure (UW-03).
1) Remove the print
- Let it drip above the vat for a moment.
- Move the build plate to the cleaning area (I avoid walking around with dripping resin).
- Use a scraper carefully and slowly (no sudden force).
2) Wash (UW-03)
- Run a wash cycle appropriate for the resin and part complexity.
- If needed, do a second short rinse cycle (details/cavities).
- Dry completely (air + time; compressed air helps for crevices).
3) Supports + final cure (UW-03)
- Remove supports when the part is clean (less mess, better finish).
- Run final UV cure in controlled cycles.
- Inspect: no tacky surfaces, no uncured resin trapped inside.
Design rules for resin printing
- Orientation: tilt parts to reduce large cross-sections (less peel force).
- Hollowing: saves resin, but only if you add drain holes and wash properly.
- Supports: put contact points on non-critical faces when possible.
- Fine details: resin is excellent, but supports can damage micro-features.
- Clearances: moving parts still need real gaps (test and document your lab’s typical clearance).
Basic maintenance
- Filter resin after failures or suspicious prints.
- Inspect the vat film regularly (scratches, clouding, punctures).
- Keep the build plate clean and properly tightened.
- Clean spills immediately and dispose waste according to lab rules.
- Keep UW-03 containers clean and closed to reduce fumes and contamination.
Safety rules
Resin printing involves chemicals, odors/VOCs, and UV exposure. Safe operation is mainly PPE, ventilation, and keeping a clean “dirty zone” for resin tasks.
PPE
- Nitrile gloves (avoid bare skin contact).
- Eye protection during scraping and liquid handling.
- Mask/respirator if your lab policy requires it.
- Dedicated resin tools + protected surface (liners, paper).
Ventilation
- Prefer local extraction or well-ventilated rooms.
- Keep resin containers closed when not in use.
- Avoid running resin printers in poorly ventilated spaces.
UV curing (UW-03)
- Keep curing stations closed during operation.
- Do not look into UV light sources.
- Cure waste (supports, paper towels) if required by lab policy before disposal.