Triathlon training: see about page to understand this.
On holidays from 1st to 17th May.
FABACADEMY
Recitation
FabLab
Global Open Time
Assignment
Triathlon training
Work
In the mobile version, you have to tap each day to display the data.
On holidays from 1st to 17th May.
Starting Point
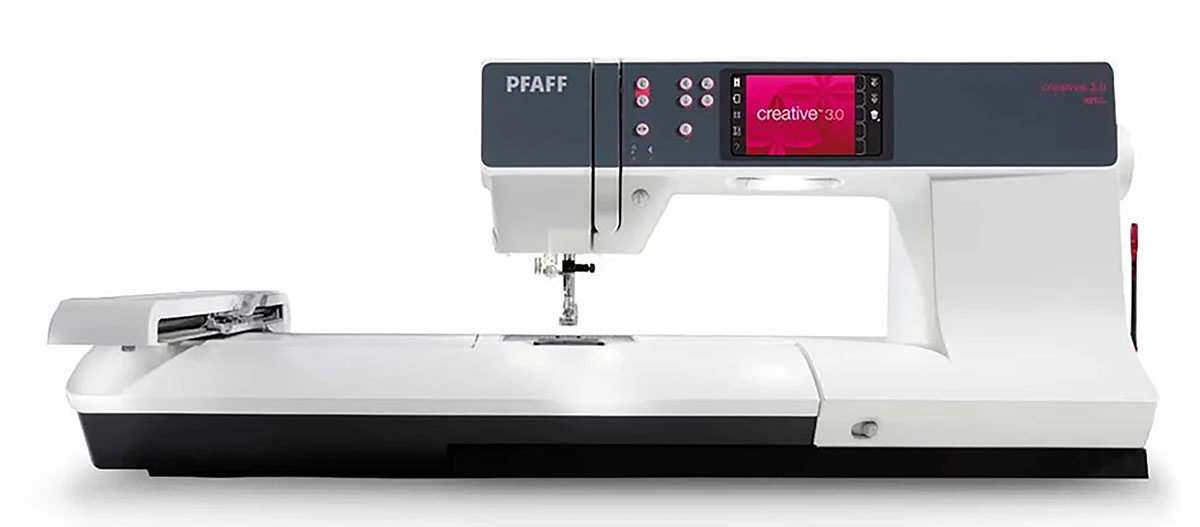
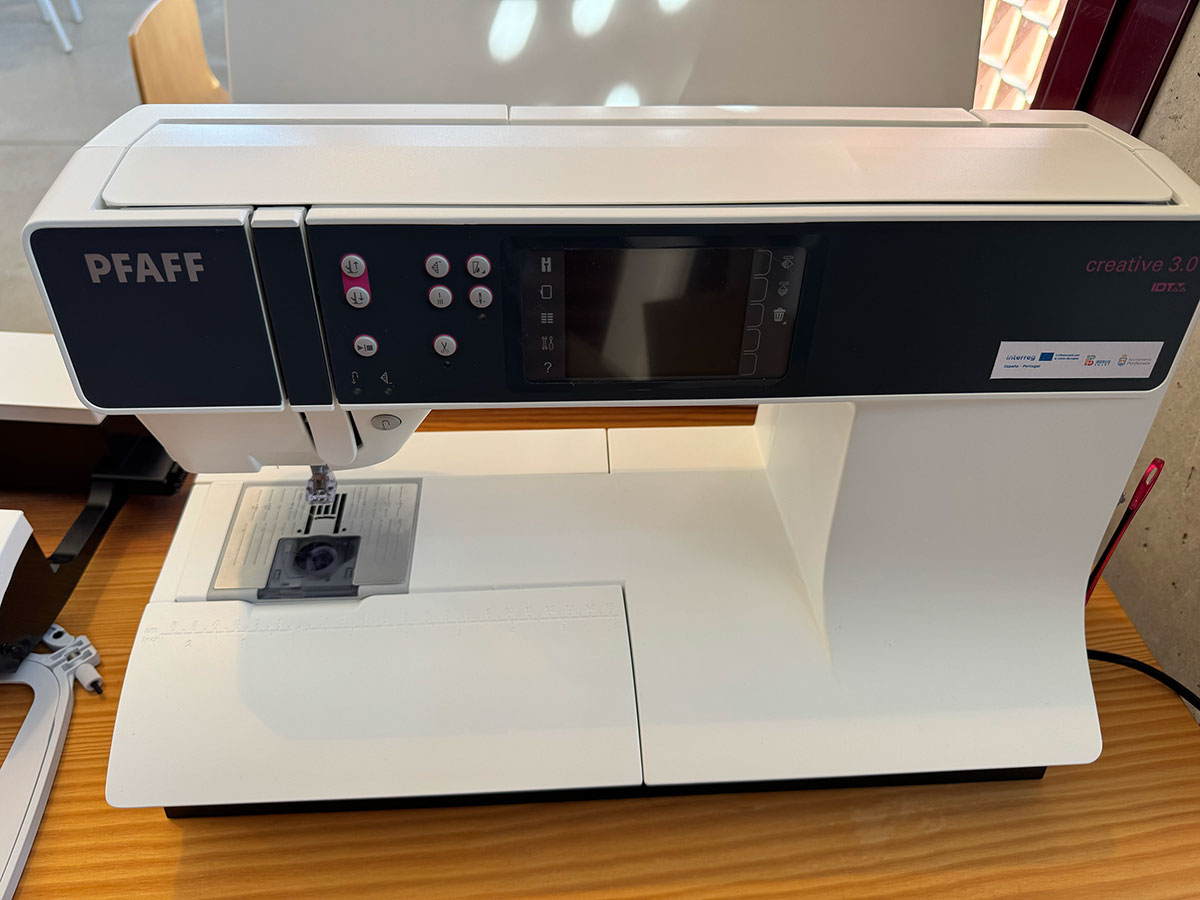
This week I decided to explore and test one of the latest additions to the FabLab: the Pfaff Creative™ 3.0 embroidery machine.
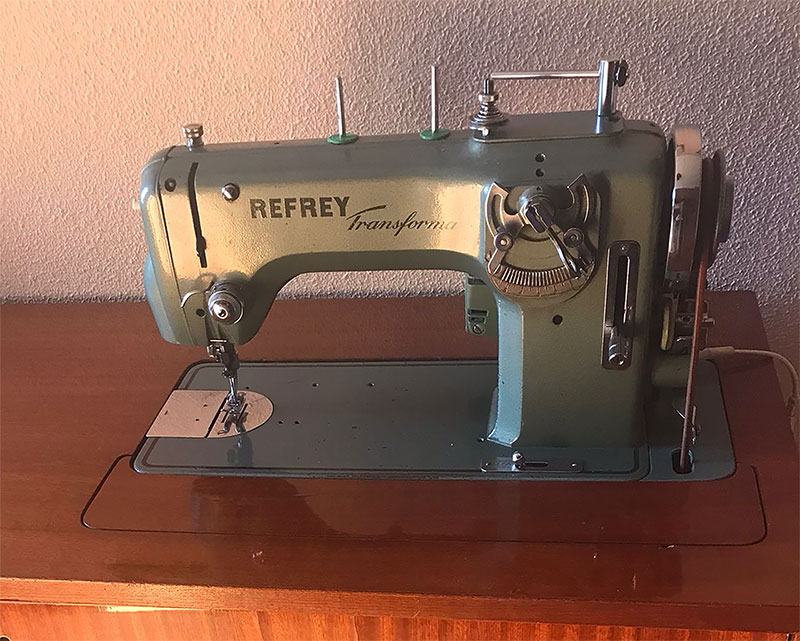
Sewing machines are not something new to me. My mother has worked as a seamstress for most of her life, so I grew up watching her sew at home using different kinds of machines, both manual and electric. In fact, many of the clothes I wore as a child were made by her. It is a skill she learned when she was young and, in one way or another, she has never really stopped practicing.
However, she has never worked with machine embroidery, and of course much less with computer-assisted embroidery systems.
That is why this week also has a more personal meaning for me. Besides learning how to use a new FabLab tool, I am excited about the idea of later showing it to her and sharing together something connected to a craft that has always been present in my home.
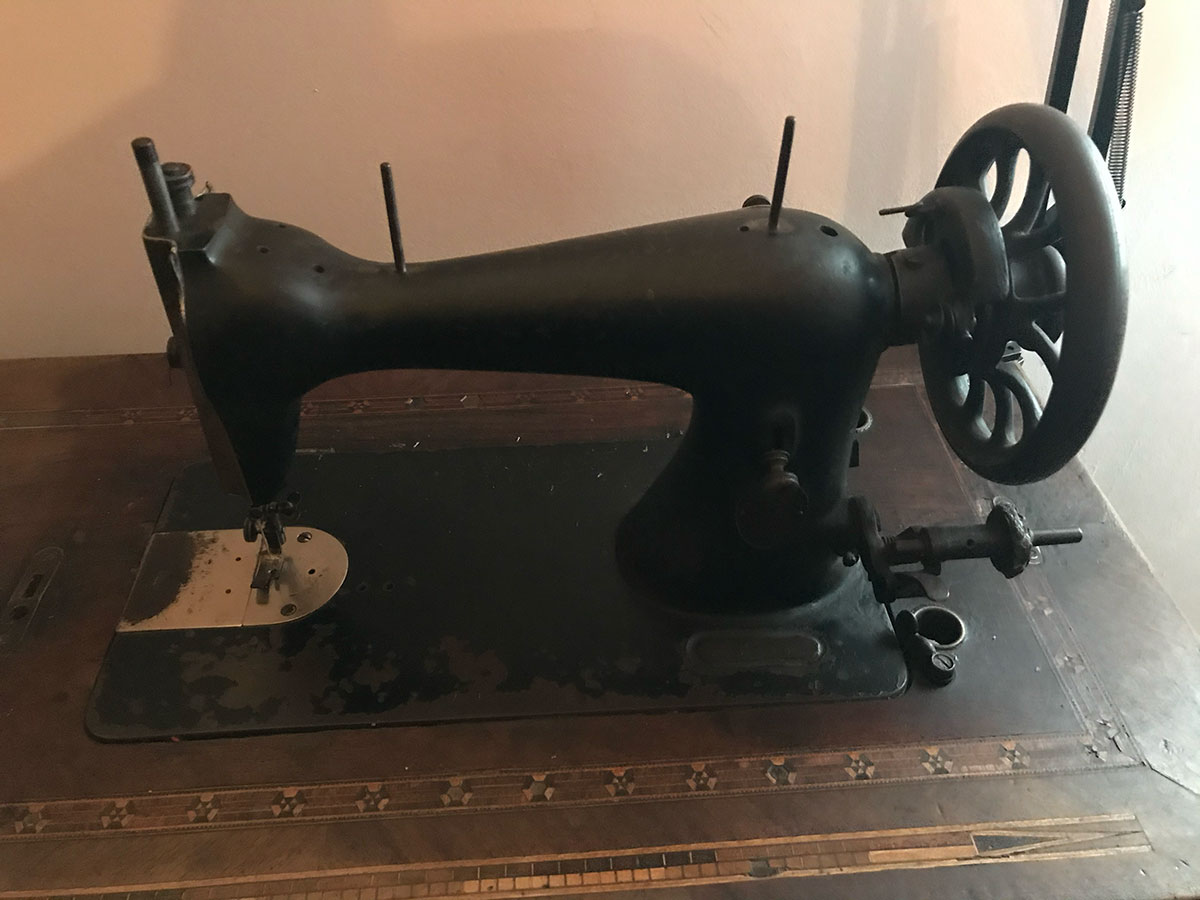
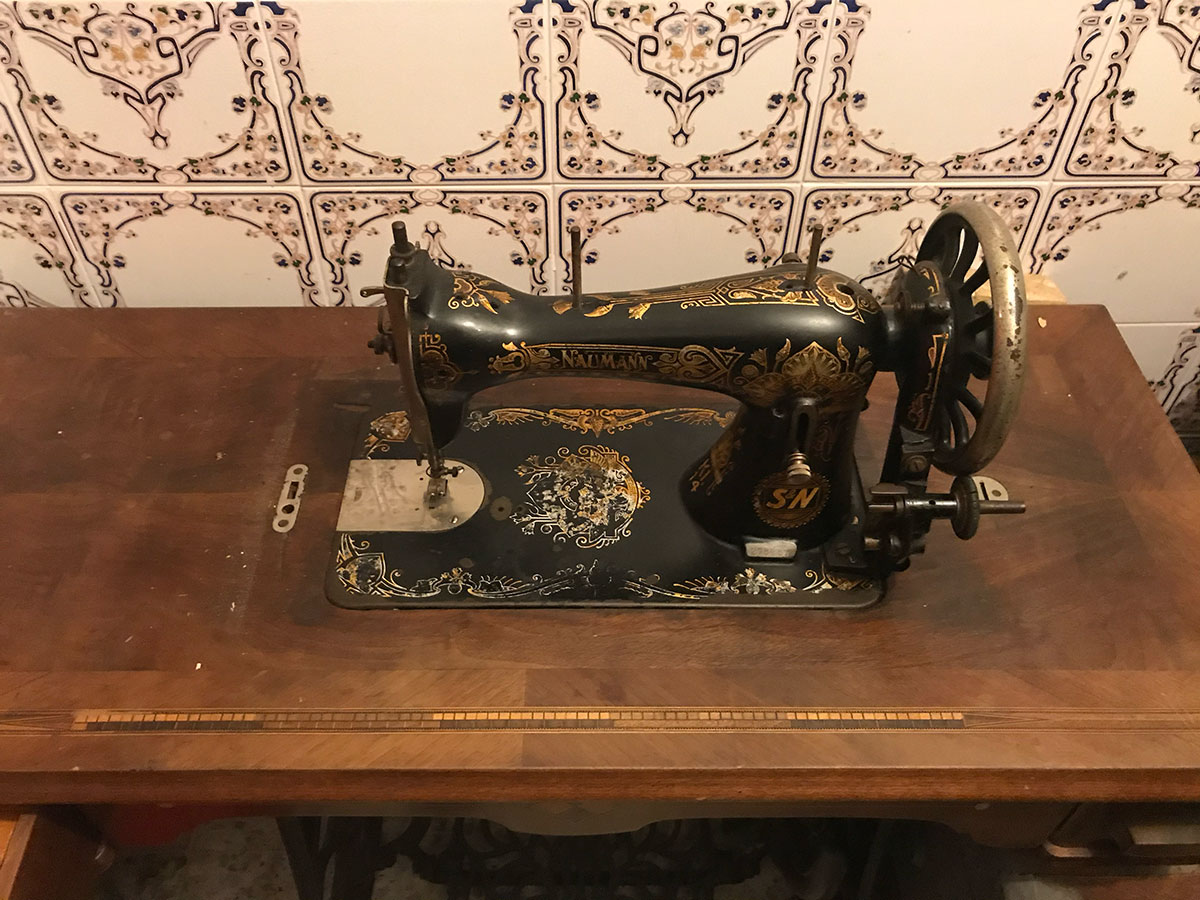
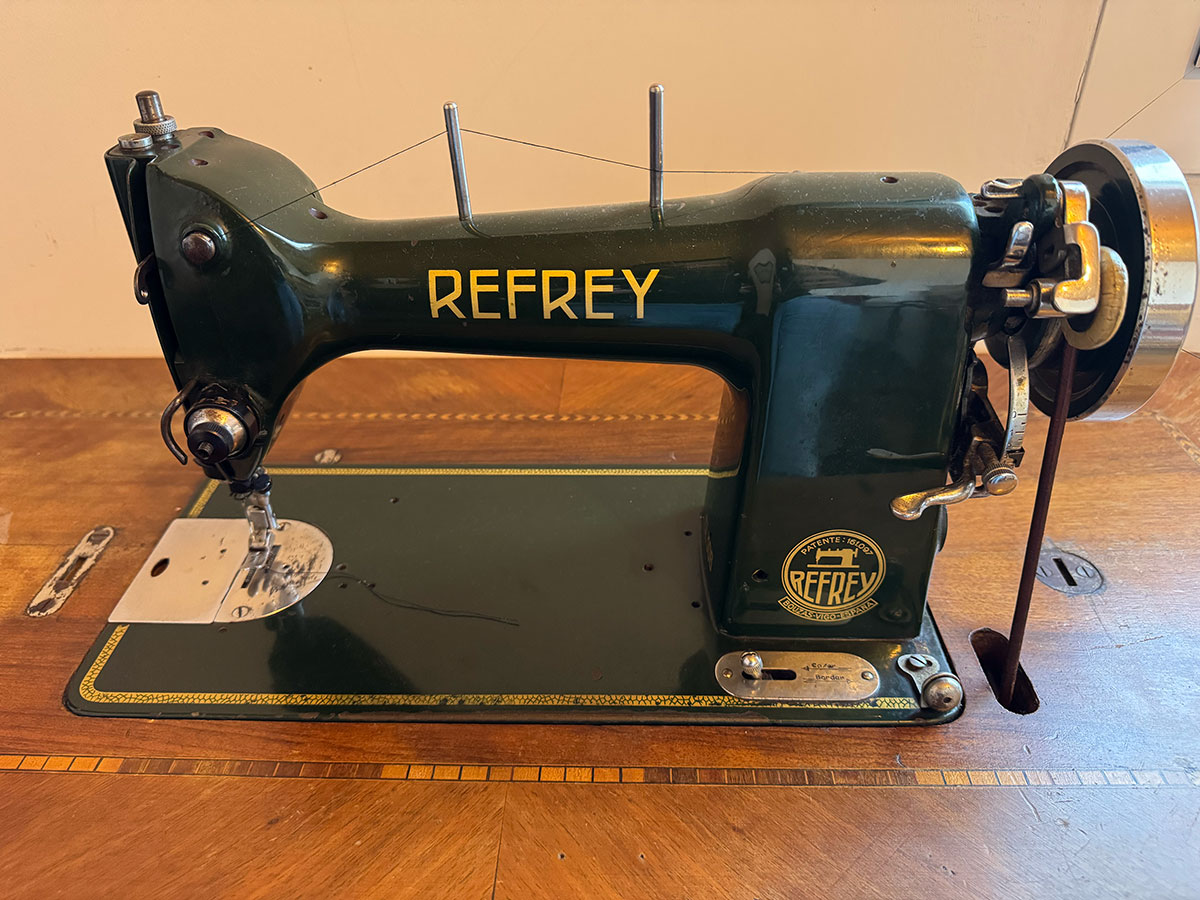
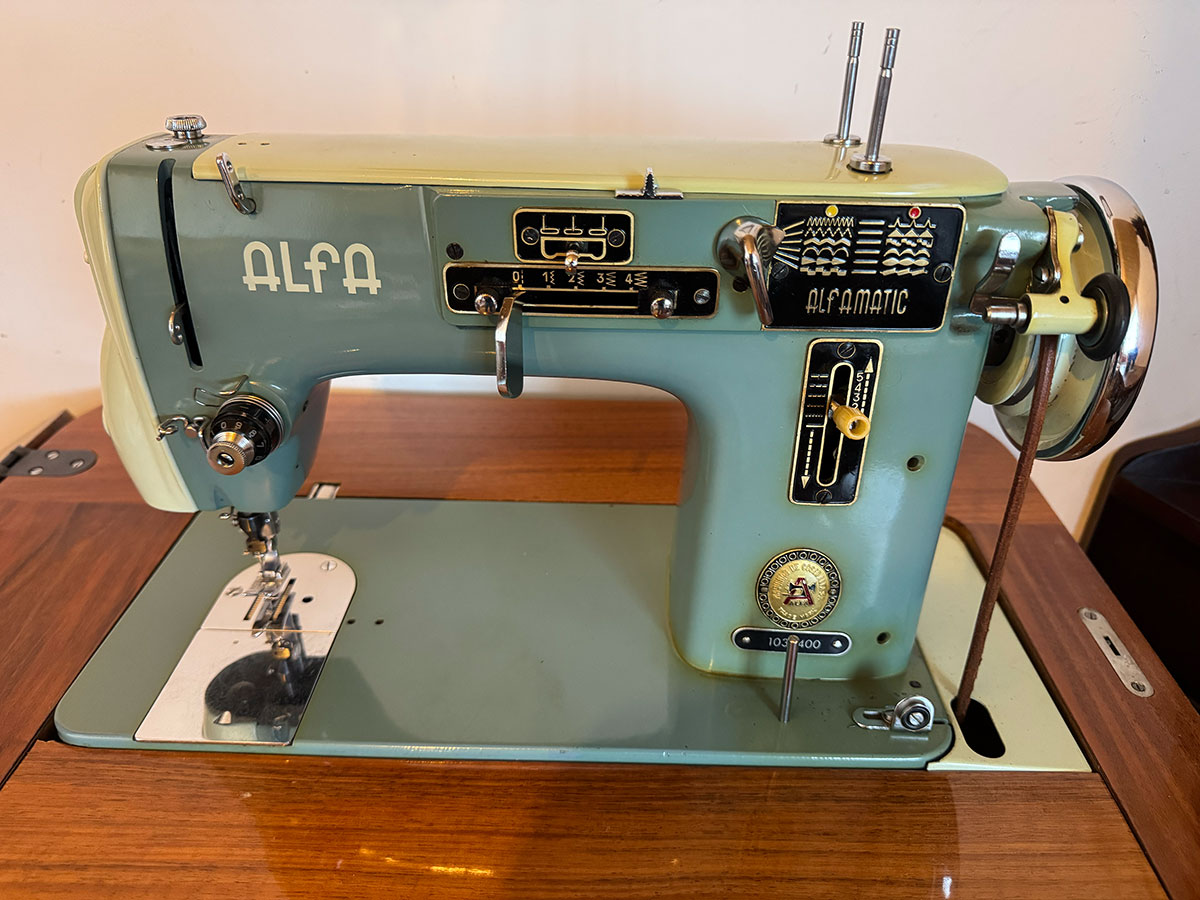
Some of my mom's machines
Frister & Rossmann (size: 0 Kb -click to enlarge-).Naumann (size: 0 Kb -click to enlarge-).Refrey (size: 0 Kb -click to enlarge-).Alfa (size: 0 Kb -click to enlarge-).Refrey (size: 0 Kb -click to enlarge-).
Individual assignment
Design and produce something with a digital process (incorporating computer aided design and manufacturing) not covered in another assignment, documenting the requirements that your assignment meets, and including everything necessary to reproduce it
Pfaff Creative™ 3.0 Sewing and Embroidery Machine
To develop this week’s assignment, I used the Pfaff Creative™ 3.0 sewing and embroidery machine available at the Fab Lab. It is a very complete machine that combines both digital sewing and computer-assisted embroidery, allowing users to work manually or import embroidery designs directly from a USB device.
One of the things I found most interesting is how it blends a traditional textile workflow with modern digital fabrication tools. Through its touch screen interface, integrated editing options, and compatibility with multiple embroidery file formats, the machine offers a very flexible and intuitive environment for experimenting with textile design.
Beyond the technical features, it also feels like a good example of how Fab Academy connects different worlds together: in this case, combining craftsmanship, electronics, software, and digital fabrication into a single tool.
Pfaff Creative™ 3.0 Sewing and Embroidery Machine (size: 0 Kb -click to enlarge-).Pfaff Creative™ 3.0 Sewing and Embroidery Machine (size: 0 Kb -click to enlarge-).
Main specifications
Feature
Specification / Description
Model
Pfaff Creative™ 3.0
Machine type
Computerized sewing and embroidery machine
Screen
3.5” color touch screen
Working modes
Sewing mode / Embroidery mode
Built-in stitches
254 stitches
Maximum stitch width
9 mm
Maximum stitch length
6 mm
Sewing fonts
4 built-in fonts
Embroidery fonts
2 built-in fonts
Sewing space
250 mm from needle to tower
Maximum sewing speed
1,050 stitches/min
Maximum embroidery area
260 x 200 mm
Built-in embroidery designs
157 designs
Feed system
Original IDT™ System
Needle threader
Built-in
Thread cutter
Automatic thread snips
Speed control
Digital
Start/Stop button
Yes
Needle Up/Down
Yes
Automatic presser foot lift
Yes
Automatic feed dog drop
Automatic
Bobbin thread sensor
Yes
Thread tension
Automatic
Precise stitch positioning
Basic
Stitch sequencing
Yes
Auto-cut embroidery jump stitches
Yes
Connectivity
USB port
Supported embroidery formats
.DST, .PES, .EXP, .JEF, .VP3, .VIP, .PEC, .PCS, among others
File management
Create folders, copy, paste, move, rename and delete files
Mirror function
Horizontal and vertical mirroring
Compatible software
QuickFont for TrueType and OpenType fonts
Built-in help
On-screen Quick Help system
Internal memory
Yes
Storage compatibility
Internal memory and external USB device
Firmware update
Via USB
Main uses
Digital sewing, embroidery, lettering and basic design editing
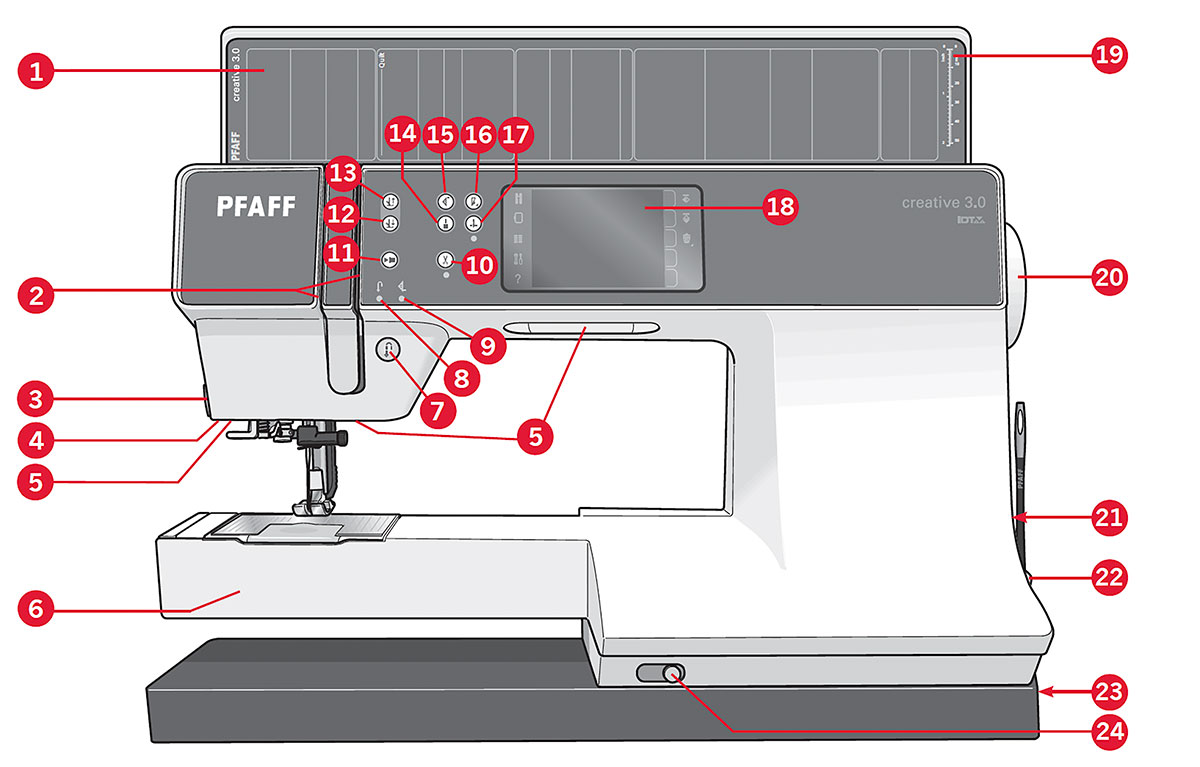
Machine overview
1. Front side
Lid with stitch categories
Threading slots
Thread cutter
Sensormatic buttonhole foot socket
LED lights
Free arm
Reverse
Reverse indicator
Action indicator
Thread snips
Start/stop
Presser foot down and pivot toggle
Presser foot up and extra lift toggle
Immediate tie-off
Stitch restart
Speed control
Needle up/down
PFAFF® creative™ Color Touch Screen
Button ruler
Handwheel
Built-in USB port
Stylus holder
Main switch, power cord and foot control connectors
Slide for lowering the feed dogs
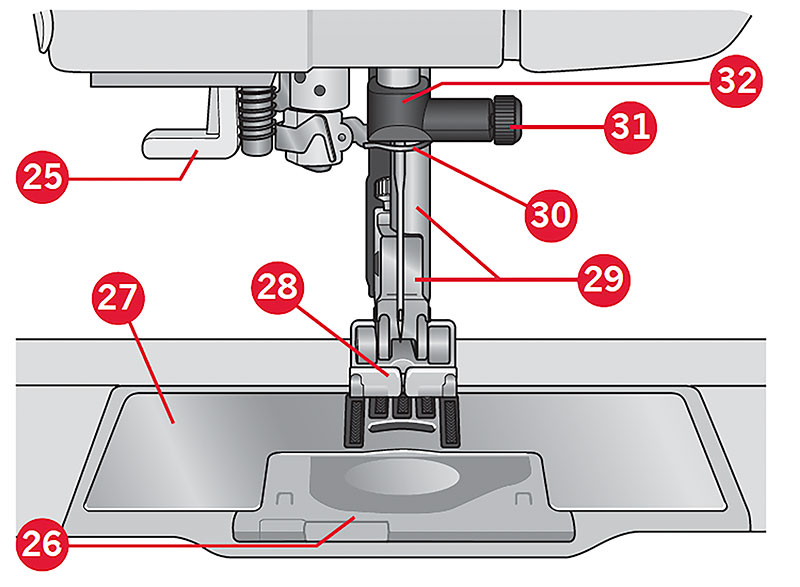
2. Needle area
Built-in needle threader
Bobbin cover
Needle plate
Presser foot
Presser foot bar and presser foot holder
Needle thread guide
Needle screw
Needle bar
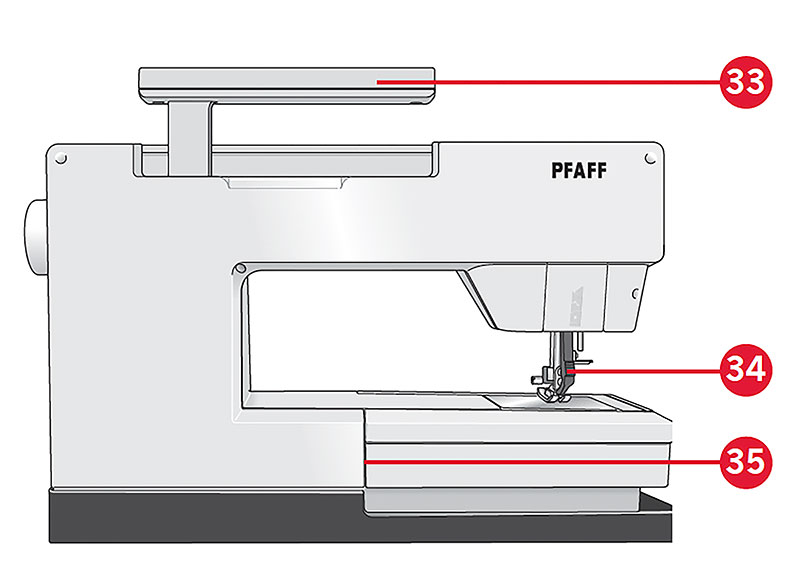
3. Rear side
Handle
IDT™ system
Embroidery unit connection socket
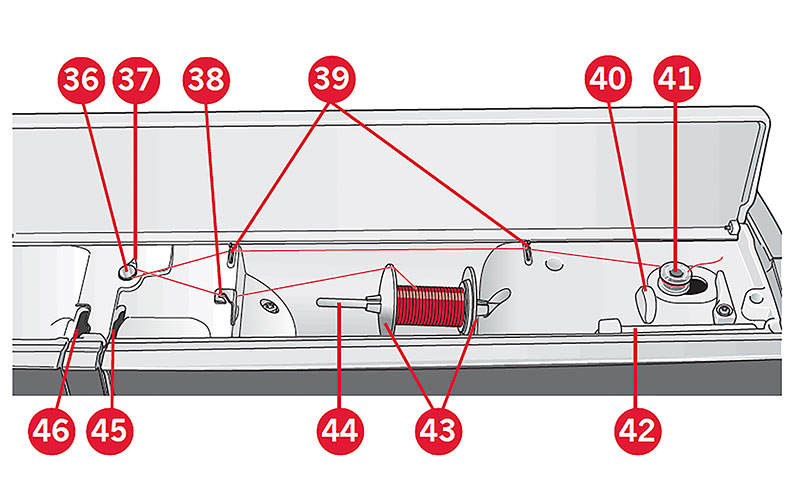
4. Top parts
Pre-tension disk for threading and bobbin winding
Bobbin winder thread guide
Thread guide
Bobbin winder thread guides
Bobbin winder thread cutter
Bobbin winder spindle
Auxiliary spool pin
Spool caps
Spool pin
Thread tension disk
Take-up lever
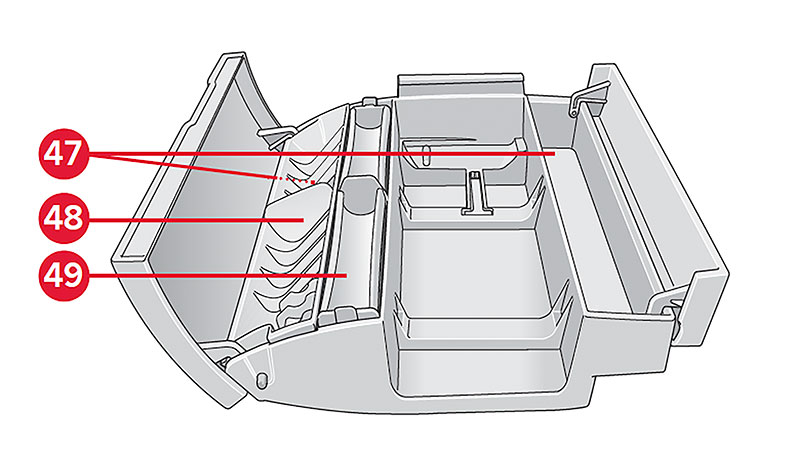
5. Accessory tray
Space for accessories
Removable tray for presser feet
Removable bobbin holder
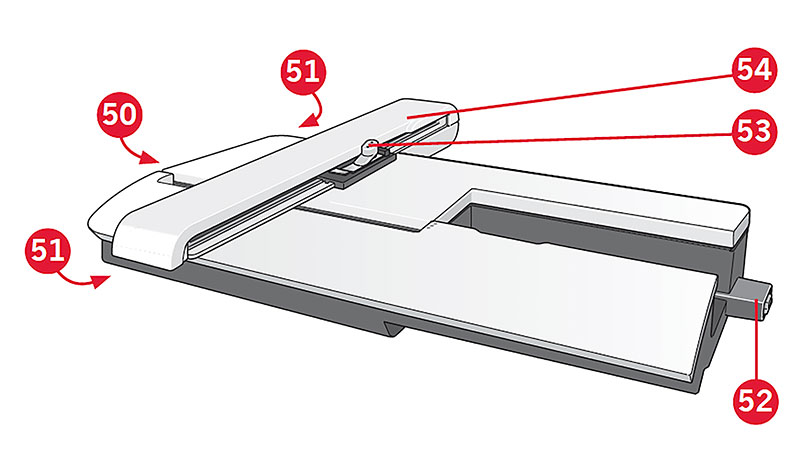
6. Embroidery unit
Embroidery unit release button
Level adjusting feet
Embroidery unit socket
Embroidery hoop connection assembly
Embroidery arm
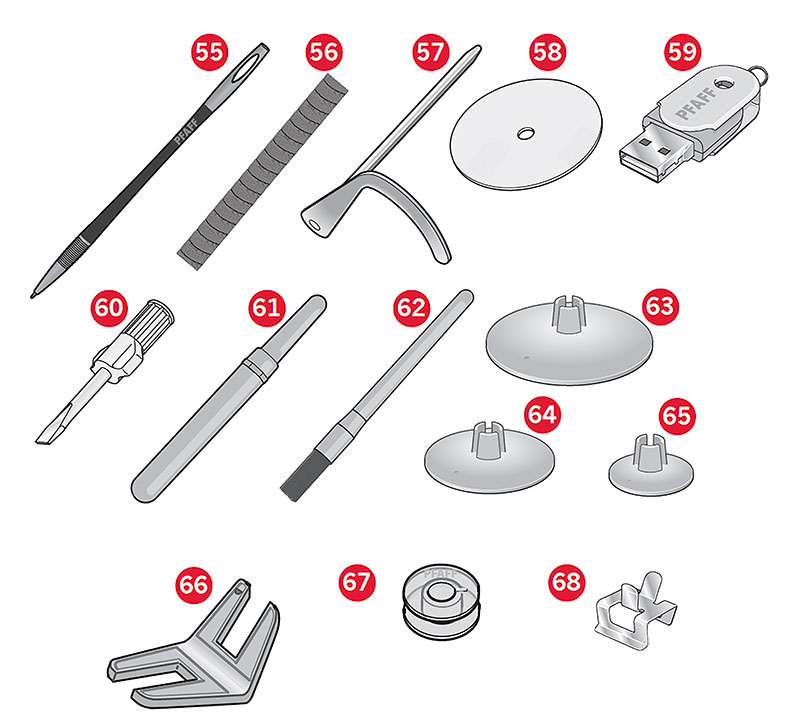
7. Accessories
Stylus
Thread net (1)
Edge guide
Felt pad (1)
USB embroidery stick
Screwdriver
Seam ripper
Brush
Spool cap, large (2)
Spool cap, medium
Spool cap, small
Multi-purpose tool
Bobbins (10)
Hoop clips
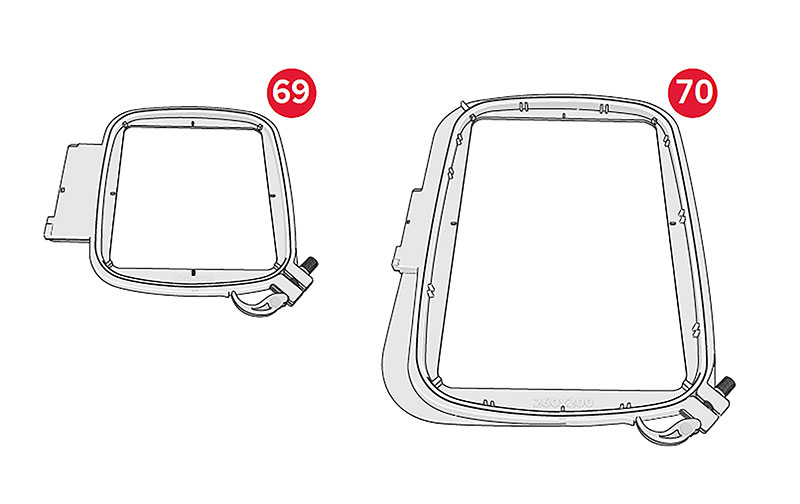
8. Included hoops
creative™ 120 Square hoop (120x120)
creative™ Elite hoop (260x200)
Utility stitches
The machine includes a wide variety of built-in stitches designed for different textile applications, ranging from basic seams and reinforced stitches to decorative, stretch, overlock, and buttonhole stitches. The following table shows some of the main available stitches, together with their identification number, name, and a short description of their recommended use.
Stitch
Stitch number
Name
Description
1.1.1
Straight stitch
For seaming and topstitching. Select from 37 different needle positions.
1.1.2
Stretch triple straight stitch
Reinforced seam. Topstitching.
1.1.3
Straight stitch reverse
Sew continuous reverse with strong tie-off.
1.1.4
Basting stitch
Single stitch used for basting. Lower the feed dogs. Touch foot control to sew one stitch. Move fabric manually to desired position and touch foot control again to sew another stitch.
Elastic stitch for decorative hems or topstitching.
1.1.9
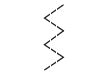
Three-step zigzag stitch
Sewing elastic, darning, patching and decorative sewing.
1.1.10
Elastic stitch
Sewing elastic, darning, patching.
1.1.11
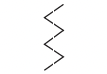
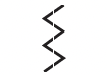
Triple stretch stitch
Sewing elastic, darning, patching and decorative sewing.
1.1.12
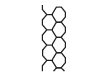
Honeycomb stitch
Decorative stitch for stretch fabrics and hems. Also used with elastic thread in the bobbin.
1.1.13
Bridging stitch
Joining fabrics and quilt batting, decorative stitch for quilting, hemstitching.
1.1.14
Foundation elastic stitch
Joining stitch for terry cloth, leather, bulky fabrics where overlapping the seams.
1.1.15
Crosshem stitch
Elastic decorative hem for stretch fabrics.
1.1.16
Blindhem stitch
Sewing blindhems on woven fabrics.
1.1.17
Elastic blindhem stitch
Sewing blindhems on stretch fabrics.
1.1.18
Stretch tricot stitch
Sewing seams on stretch fabrics.
1.2.1
Closed overlock
Seam and overcast stretch fabrics in one step.
1.2.2
Closed overlock
Seam and overcast in one step.
1.2.3
Closed overlock
Seam and overcast in one step with reinforced edge.
1.2.4
Elastic overcast
Seam and overcast stretch fabrics in one step.
1.2.5
Standard overcast
Seam and overcast stretch fabrics in one step with reinforced edge.
1.2.6
Overlock
Seam and overcast stretch fabrics in one step.
1.2.7
Closed overlock
Seam and overcast in one step, patch, hem.
1.2.8
Stretch knit overlock
Seam and overcast stretch fabrics in one step.
1.2.9
Reinforced overlock
Seam and overcast stretch fabrics in one step and reinforce.
1.2.10
Finished edge overlock
Seam and overcast stretch fabrics in one step with reinforced edge.
1.2.11
Mock cover hem
Create the look of a serger cover hem for stretch fabrics.
1.2.12
Open overlock blindhem
Create decorative overlock blindhem for woven fabrics.
1.2.13
Closed overlock blindhem
Create decorative overlock blindhem for stretch fabrics.
1.3.1
Linen buttonhole
Buttonhole for blouses, shirts and linen.
1.3.2
Standard buttonhole
Basic buttonhole for blouses, shirts and jackets. Also for home décor.
1.3.3
Rounded buttonhole with pointed tack
Buttonhole for garments.
1.3.4
Rounded buttonhole with lengthwise tack
Buttonhole for garments.
1.3.5
Eyelet buttonhole with pointed tack
Tailors buttonhole or decorative buttonhole.
1.3.6
Eyelet buttonhole with lengthwise tack
Tailors buttonhole for jackets and trousers.
1.3.7
Rounded buttonhole
Buttonhole for light garments or jackets.
1.3.8
Stretch buttonhole
Buttonhole for stretch fabrics.
1.3.9
Cross stitch buttonhole
Decorative buttonhole.
1.3.10
Decorative eyelet buttonhole
Decorative buttonhole for jackets.
1.3.11
Heirloom round buttonhole with pointed tack
Decorative heirloom buttonhole.
1.3.12
Bound buttonhole
Foundation stitch for bound buttonhole.
1.3.13
Button sewing
Sew on buttons or tacking. Lower the feed dogs.
1.4.1
Decorative eyelet
Decorative eyelet for heirloom sewing.
1.4.2
Programmable darning stitch
Darning holes or damaged fabric.
1.4.3
Programmable reinforced darning stitch
Reinforced darning holes or damaged fabric.
1.4.4
Bartack
Automatically reinforce seams and pockets.
1.4.5
Denim bartack
Automatically reinforce seams and pockets decoratively.
1.4.6
Decorative bartack
Automatically reinforce seams and pockets decoratively.
1.4.7
Cross bartack
Automatically reinforce seams and pockets.
Machine preparation
Spool spins
The machine has two spool pins, a main spool pin and an auxiliary spool pin. The spool pins are designed for all types of thread. The main spool pin is adjustable and can be used both in a horizontal position (the thread reels off the spool) and a vertical position (the thread spool rotates).
Use the horizontal position for normal threads and the vertical position for large spools or specialty threads.
Spool spin
Horizontal position
Horizontal position
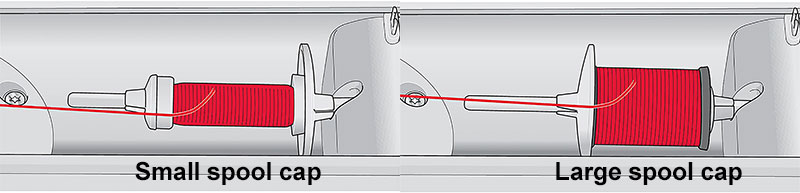
Place a spool cap and the thread spool on the spool pin. Make sure that the thread reels off the spool counter clock-wise and slide on a second spool cap.
Note: Not all thread spools are manufactured in the same way. If you experience problems with the thread, turn it in the opposite way or use the vertical position.
Use a spool cap slightly larger than the thread spool. For narrow thread spools, use a smaller spool cap in front of the spool. For large thread spools, use a larger spool cap in front of the spool.
The flat side of the spool cap should be pressed firmly against the spool. There should be no space between the spool cap and the thread spool.
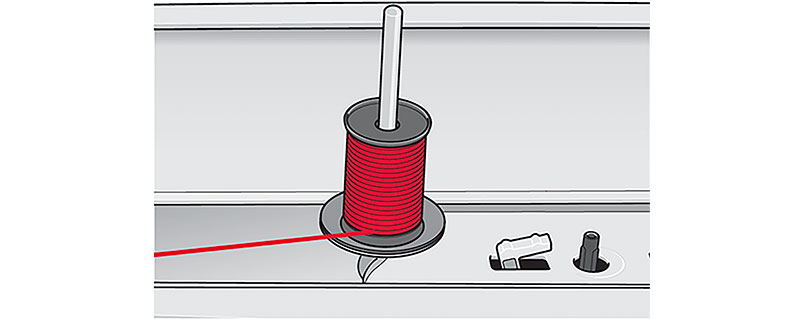
Main spool pin in vertical position
Vertical position
Raise the spool pin to the vertical position. Slide on the large spool cap and place a felt pad under the thread spool. This is to prevent the thread from reeling off too fast.
Do not place a spool cap on top of the spool pin as that would prevent the spool from rotating.
Note: When the spool pin is used in the vertical position, the thread tension might need to be adjusted manually.
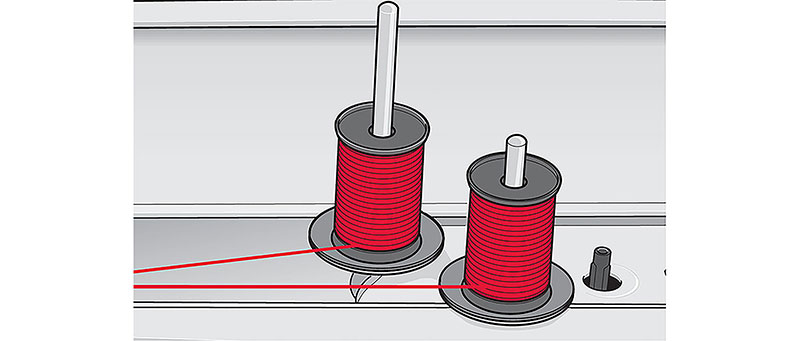
Auxiliary spool pin and main spool pin in vertical position.
Auxiliary spool spin
The auxiliary spool pin is used when winding a bobbin thread from a second spool of thread or for a second spool when sewing with a twin needle.
Raise the auxiliary spool pin. Slide on a large spool cap and place a felt pad under the thread spool.
Threading the machine
Make sure that the presser foot is raised and the needle is in the up position.
Threading
Threading the machine
Threading the machine
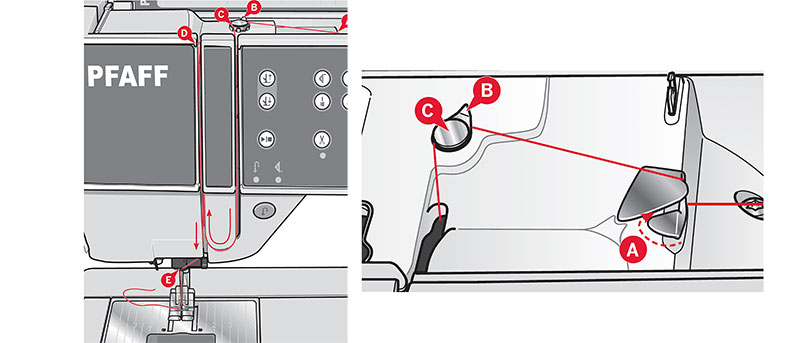
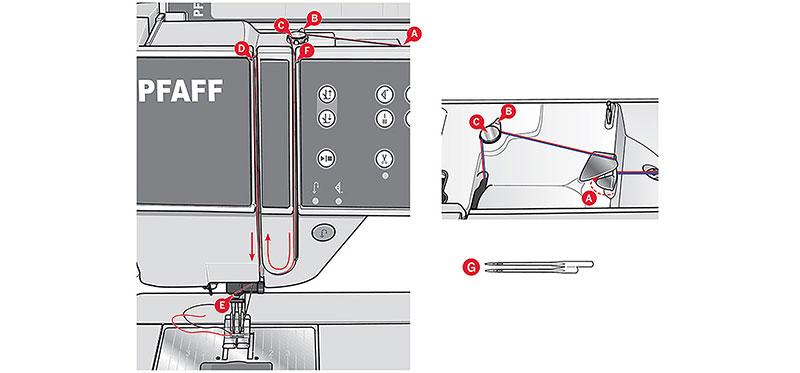
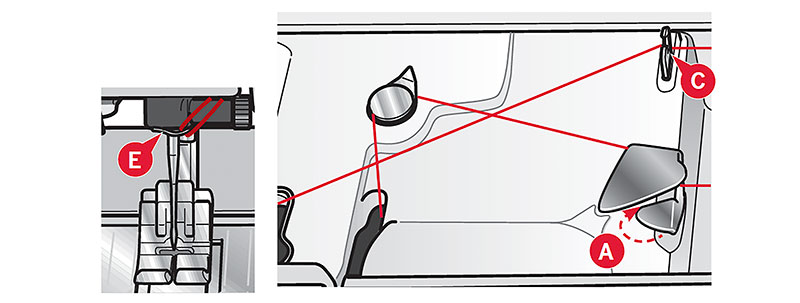
1. Place the thread on the spool and fit a spool cap of the right size.
Note: Hold thread with both hands to prevent it from slacking while threading. This ensures that the thread will be positioned properly in the threading path.
2. Pull the thread into the thread guide by pulling it from the front to the back (A). Make sure the thread clicks into place. Then pull the thread underneath the bobbin winder thread guide (B) on the pre-tension disc (C).
3. Thread down through the right-hand threading slot and then upwards through the left-hand threading slot.
4. Bring the thread from the right into the take-up lever (D) and down in the left-hand threading slot to the needle thread guide (E).
5. Thread the needle.
Needle threader
Needle threader
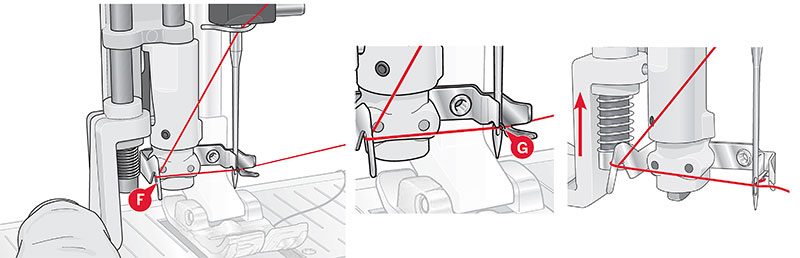
The needle threader allows you to thread the needle automatically. The needle must be in the up position to use the built-in needle threader.
1. Lower the presser foot.
2. Use the handle to pull the needle threader all the way down. The threader hook (G) swivels through the needle eye.
3. Place the thread from the back over the hook (F) and under the thread hook (G).
4. Let the needle threader gently swing back. The hook pulls the thread through the needle eye and forms a loop behind the needle. Pull the thread loop out behind the needle.
Note: The needle threader is designed to be used for size 70-120 needles. You cannot use the needle threader for size 60 needle or smaller, the wing needle, twin needle or triple needle. There are also some optional accessories that require manual threading of the needle. The bobbin cover can be used as a magnifying glass.
Threading for twin needle.
Threading for twin needle
Replace the sewing needle with a twin needle. Make sure that the presser foot is raised and the needle is in the up position.
1. Place the thread on the spool pin and fit a spool cap of the right size. Raise the auxiliary spool pin. Slide on a large spool cap and a felt pad. Place the second thread on the spool pin.
Note: Hold threads with both hands to prevent them from slacking while threading. This ensures that the threads will be positioned properly in the threading path.
2. Pull the threads into the thread guide by pulling them from the front to the back (A). Make sure the threads click into place. Then pull the threads underneath the bobbin winder thread guide (B) on the pre-tension disc (C).
3. Thread down through the right-hand threading slot and then upwards through the left-hand threading slot. Make sure that you pass one thread to the left and one thread to the right sides of the tension disk (F).
4. Bring the threads from the right into the take-up lever (D) and down in the left-hand threading slot. Make sure that one thread is inside the needle thread guide (E) and the other one outside. Make sure that the threads do not become twisted together.
5. Thread the needles.
Note: Activate twin needle and select the correct twin needle width in the Settings menu. This will limit the width of all stitches for that needle size to prevent damage to presser foot and needle.
Note: The weight and irregular surface of specialty threads such as metallic increases the amount of friction on the thread. By reducing the tension, the risk of needle breakage is prevented.
Note: Do not use asymmetrical twin needles (G), since it may damage your sewing machine.
Thread sensor.
Thread sensor
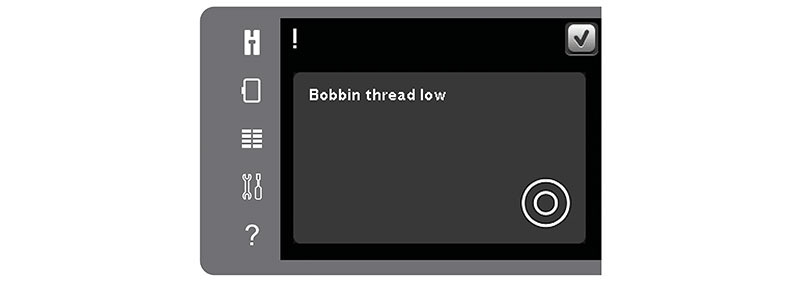
If the upper thread breaks or bobbin thread runs out, the machine stops and a pop-up appears on the screen.
If upper thread breaks: Re-thread the machine and touch OK on the pop-up. If bobbin thread runs out: replace with a wound bobbin and continue sewing.
Note: When the bobbin thread is almost empty, the bobbin thread low pop-up appears on the screen. You can continue sewing without closing the pop-up before the bobbin thread runs out completly.
Bobbin
Bobbin winding
Winding from horizontal position
Winding from horizontal position
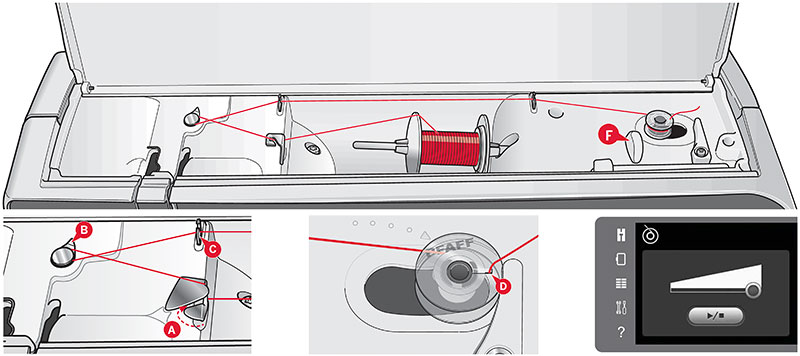
1. Place an empty bobbin on the bobbin winder spindle, with the logo facing up. Use only the original PFAFF® bobbins approved for this model.
2. Place the thread spool on the spool pin in horizontal position. Slide a spool cap tightly against the spool.
3. Place the thread into the thread guide (A) from front to back. Pull the thread counter-clockwise above the bobbin winder thread guide (B) and then through the bobbin thread guides (C) at the rear.
Note: Make sure the thread is pulled securely inside the pre-tension device for correct thread tension.
4. Thread through the slot in the bobbin (D) from the inside to the outside.
5. Push the bobbin winder spindle to the right to wind. A pop-up appears on the screen to inform you that bobbin winding is active. To adjust winding speed, use the slider in the pop-up. Start bobbin winding by pressing the foot control or touch the start/stop.
When the bobbin is full, it will stop winding. Release the foot control or touch start/stop to stop the bobbin winder motor from running. Move the bobbin winder spindle to the left and the pop-up will close. Remove the bobbin and cut the thread using the bobbin thread cutter (F).
Winding while threaded
Winding while threaded
Make sure that the presser foot and the needle are in the up position. To prevent the needle from bending, pull the thread out of the needle.
Bring the thread up from the needle thread guide (E), upward through the left-hand threading slot and through the bobbin thread guides (C). Then follow step 4 and 5 above.
Inserting the bobbin.
Inserting the bobbin
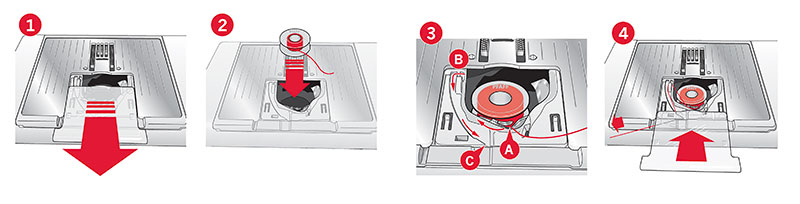
1. Remove the bobbin cover by sliding it towards you.
2. Place the bobbin in the bobbin case with the logotype facing up and the thread unreeling from the left of the bobbin. The bobbin will then
rotate counter-clockwise when you pull out the thread.
3. Place your finger on the bobbin to keep it from turning as you pull the thread firmly to the right and then to the left into the tension spring (A) until it “clicks” into place.
4. Continue threading around (B) and to the right of the thread cutter (C). Replace the cover. Pull the thread to the left to cut.
IDT™ system (Integrated Dual Feed)
For sewing any fabric precisely the PFAFF® creative™ 3.0 sewing and embroidery machine provides the ideal solution: the integrated dual feed, IDT™ system. As on industrial machines, the IDT™ system feeds the fabric from the top and bottom at the same time. The material is fed precisely, eliminating puckering on seams in light weight fabrics such as silk and rayon. The dual feed action of the IDT™ system prevents layers from shifting while sewing, keeping quilt layers aligned and ensuring a more perfect match when sewing plaid or striped fabrics.
IDT™ system (Integrated Dual Feed) (size: 0 Kb -click to enlarge-).
Changing the presser foot and needle
Remove presser foot (size: 0 Kb -click to enlarge-).Attach presser foot (size: 0 Kb -click to enlarge-).Changing the needle (size: 0 Kb -click to enlarge-).
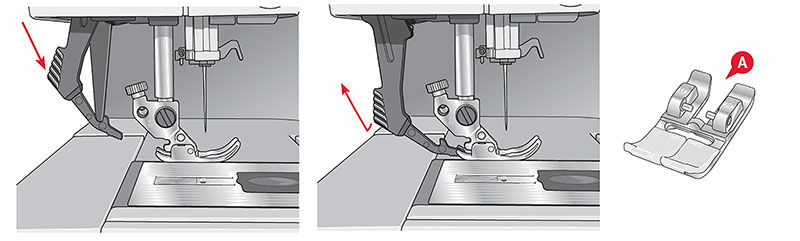
Remove presser
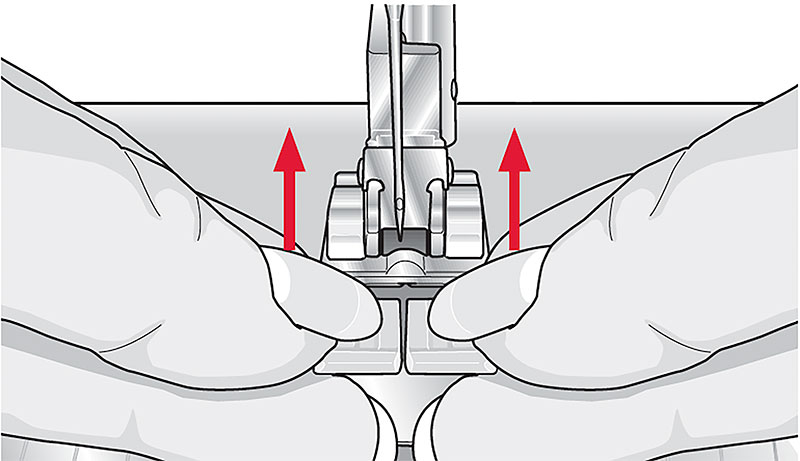
Press the presser foot downwards until it disengages from the presser foot holder.
Attach presser foot
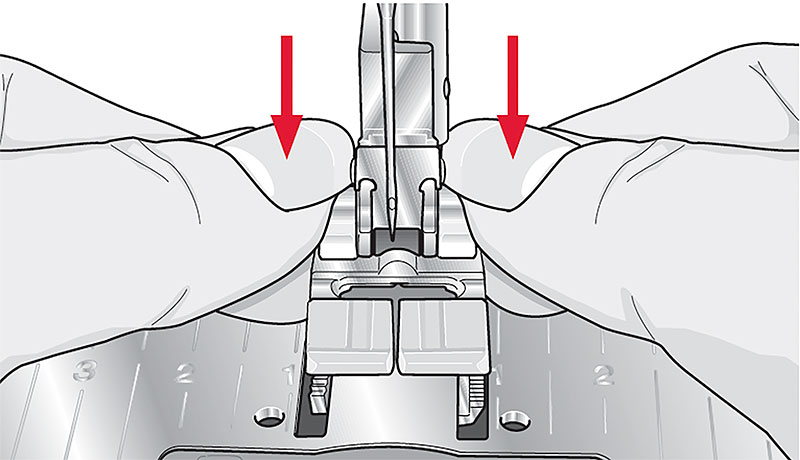
Line up the pins on the foot with the gap underneath the presser foot holder. Press upwards until the foot snaps into place.
You can also use the presser foot up/down buttons to raise or lower the presser foot holder. Place the presser foot under the presser foot holder, so that the pins of the foot snap onto the presser foot holder when lowered.
Changing the needle
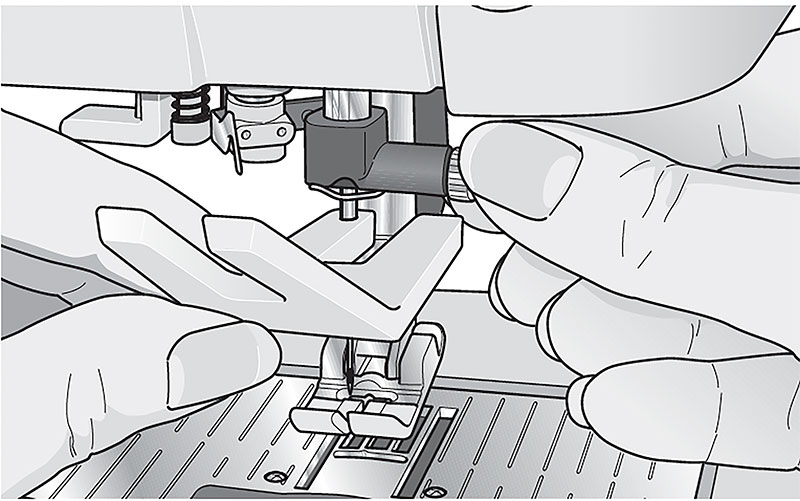
1. Use the hole in the multi-purpose tool to hold the needle.
2. Loosen the needle screw.
3. Remove the needle.
4. Insert the new needle, using the multi-purpose tool. Push the new needle upwards with the flat side away from you until it will go no further.
5. Tighten the needle screw as tight as it will go.
Needles
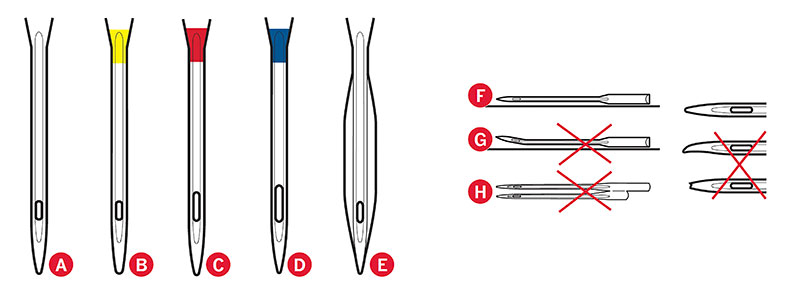
The sewing machine needle plays an important role in successful sewing. Use only quality needles. We recommend needles of system 130/705H. The needle package included with your machine contains needles of the most frequently used sizes.
Needles (size: 0 Kb -click to enlarge-).
Universal needle (A)
Universal needles have a slightly rounded point and come in a variety of sizes. For general sewing in a variety of fabric types and weights.
Stretch needle (B)
Stretch needles have a special scarf to eliminate skipped stitches when there is a flex in the fabric. For knits, swimwear, fleece, synthetic suedes and leathers.
Embroidery needle (C)
Embroidery needles have a special scarf, a slightly rounded point and a slightly larger eye to avoid damage to thread and materials. Use with metallic and other specialty threads for embroidery and decorative sewing.
Denim needle (D)
Denim needles have a sharp point to penetrate tightly woven fabrics without deflecting the needle. For canvas, denim, microfibers.
Wing needle (E)
The Wing needle has wide wings on the side of the needle to poke holes in the fabric when sewing entredeux and other hemstitches on natural fiber fabrics.
Note: Change the needle often. Always use a straight needle with a sharp point (F). A damaged needle (G) can cause skipped stitches, breakage or snapping of thread. A damaged needle can also damage the needle plate. Do not use asymmetrical twin needles (H), since it may damage your sewing machine.
Threads and Stabilizers
THREADS
There are many threads on the market today developed for different purposes.
All purpose sewing thread
All purpose sewing thread is made of synthetic, cotton or cotton covered polyester. This type of thread is used for sewing garments and projects.
Embroidery thread
Embroidery thread is made of various fibers: rayon, polyester, acrylic or metallic. These threads create a smooth glossy appearance for embroidery and other decorative stitching.
When embroidering, use embroidery bobbin thread because it is a fine weight and will not build up under embroidery.
Note: When using a metallic or a flat film thread for embroidering, you may need to use a needle with a larger eye and lower the embroidery speed. Thread the sewing machine with the spool in the vertical position.
Transparent thread
Transparent thread, also called monofilament thread, is single clear synthetic thread. It is used for quilting and other decorative sewing. Thread the sewing machine with the spool in the vertical position. When winding a bobbin, wind at slow speed and wind the bobbin half full.
Note: Some fabrics have excess dye which can cause discoloration on other fabrics or on your sewing machine. This discoloration may be very difficult or impossible to remove.
Fleece and denim fabric, especially red and blue, often contain excess dye.
If you suspect that your fabric/ready-to-wear garment contains a lot of excess dye, always pre-wash it before sewing/embroidering to prevent discoloration of your machine.
STABILIZERS
Tear-away stabilizers
Tear-away stabilizers are used with stable woven fabrics. Place underneath fabric for decorative stitching or hoop with the fabric when embroidering. Tear away excess stabilizer after stitching.
Iron-on tear-away
Iron-on tear-away is a totally stable stabilizer that has a slick side that will iron on to fabric. It is recommended for knits and all unstable fabrics. Fuse it to the wrong side of the fabric before decorative stitching or hooping. Tear away excess stabilizer after stitching.
Cut-away stabilizer
Cut-away stabilizer does not tear so the excess has to be cut away. It is recommended for knits and all unstable fabrics, especially for hoop embroidery.
Water soluble stabilizer
Water soluble stabilizer is placed on top of the fabric when embellishing/embroidering napped and looped fabrics such as terry cloth. When embroidering cutwork, use it underneath the fabric. Place your work in water to dissolve the excess stabilizer. It is available in different thicknesses.
Disintegrating stabilizer
Disintegrating stabilizer is a stable, loosely woven fabric that is used for techniques such as cutwork and to crochet off the fabric edge. The stabilizer disappears with heat.
Sticky stabilizer
Sticky stabilizer is used for hoop embroidery when the fabric is too delicate or too small to be hooped. Hoop the sticky stabilizer with the paper side up. Remove the paper and stick the fabric onto the sticky surface. Tear away sticky stabilizer after stitching.
Preparing the graphics and files
To start working with the embroidery machine, the first thing I needed was to properly prepare the digital designs that would later be converted into real stitches. For this purpose, I decided to use Ink/Stitch ↗️, a free and open-source extension specifically designed to create embroidery files from vector graphics.
One of the things I find most interesting about Ink/Stitch is that it works directly inside Inkscape ↗️, allowing the use of a very flexible and well-known vector design environment. Starting from shapes, text, or vector drawings, the software automatically generates the stitch paths and embroidery instructions that the machine later interprets.
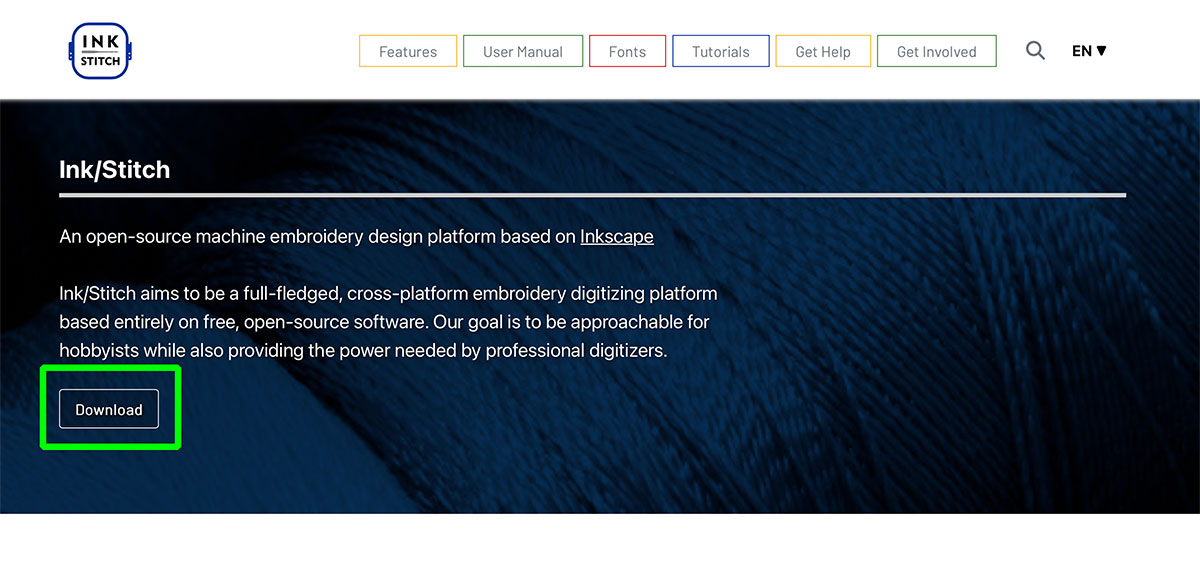
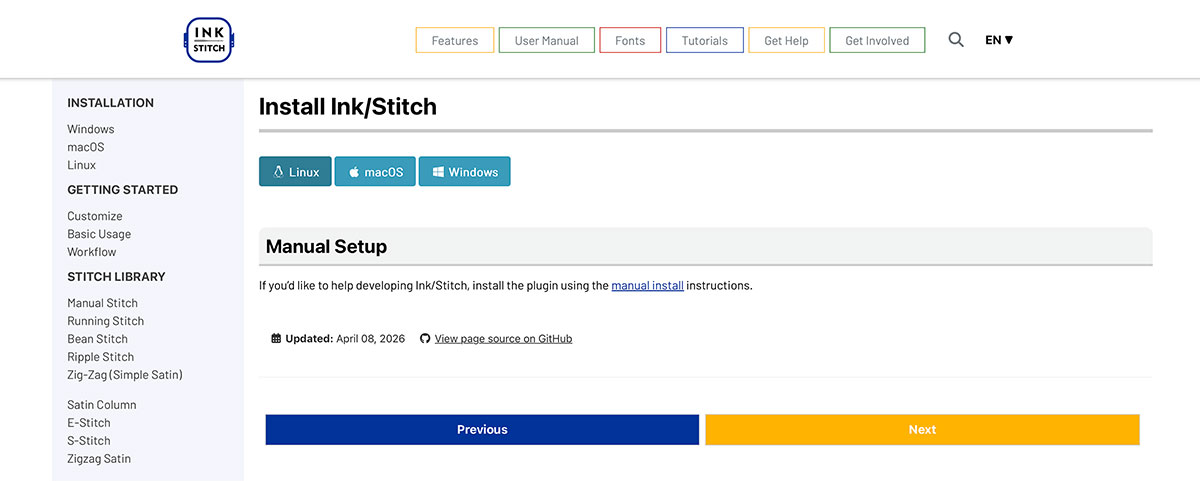
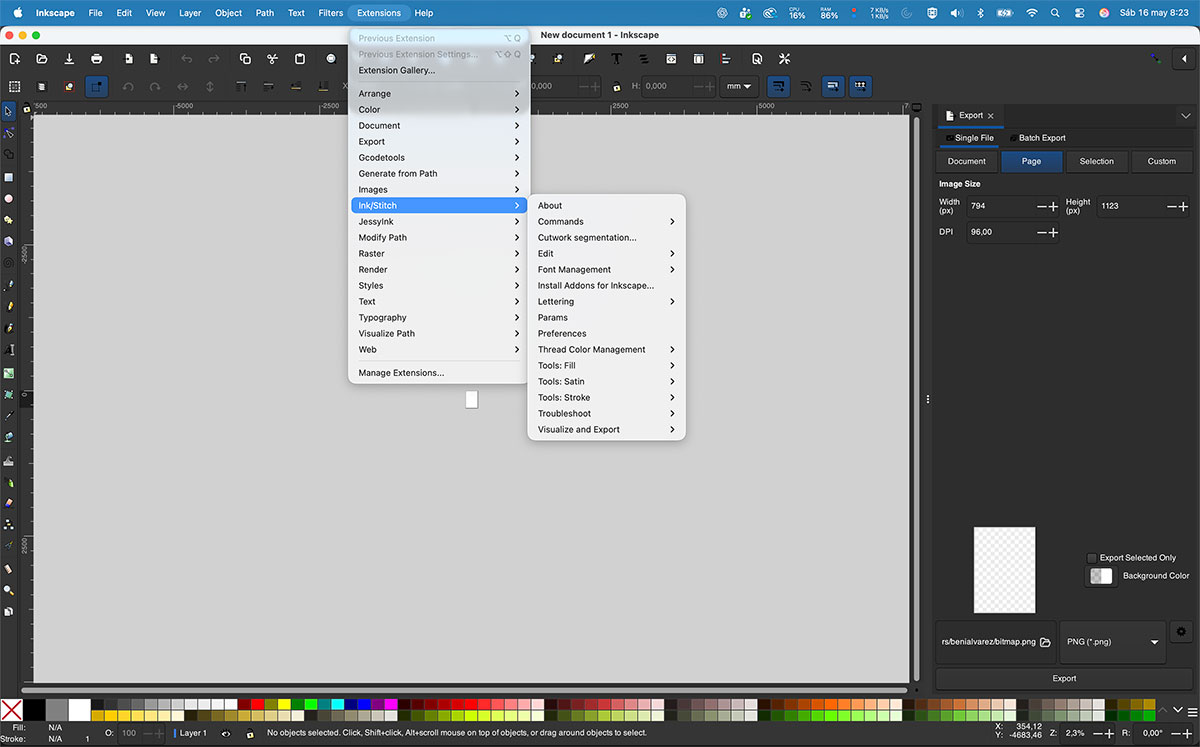
The installation process is quite straightforward. First, it is necessary to have Inkscape installed (in my case, I already had it installed), since Ink/Stitch works as an extension inside this software. After that, the only thing required is downloading the installer from the official Ink/Stitch website and running the installation process.
Ink/Stitch download (size: 0 Kb -click to enlarge-).Ink/Stitch download (size: 0 Kb -click to enlarge-).Ink/Stitch instaled as Inkscape extension (size: 0 Kb -click to enlarge-).
Once everything is installed, it becomes possible to start preparing embroidery designs directly from Inkscape, configuring parameters such as stitch type, density, direction, and stitching sequence before exporting the final machine-compatible embroidery file.
Patch design in Inkscape
Once the Ink/Stitch extension was installed, I opened Inkscape and started preparing the first embroidery test design for the machine.
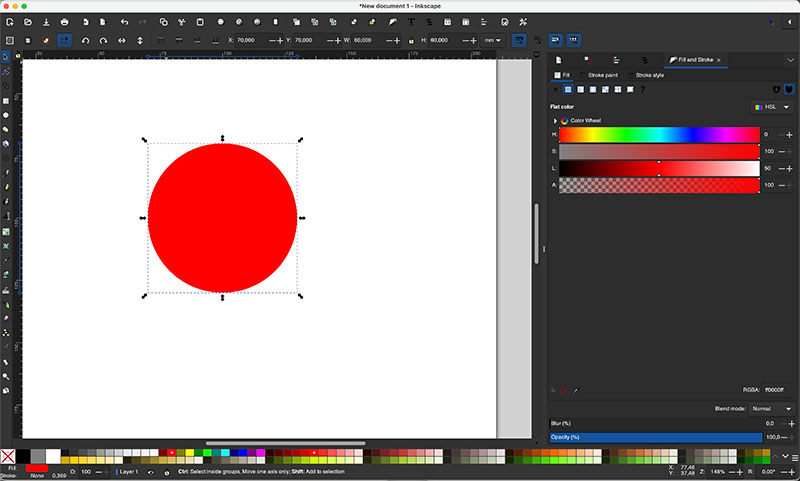
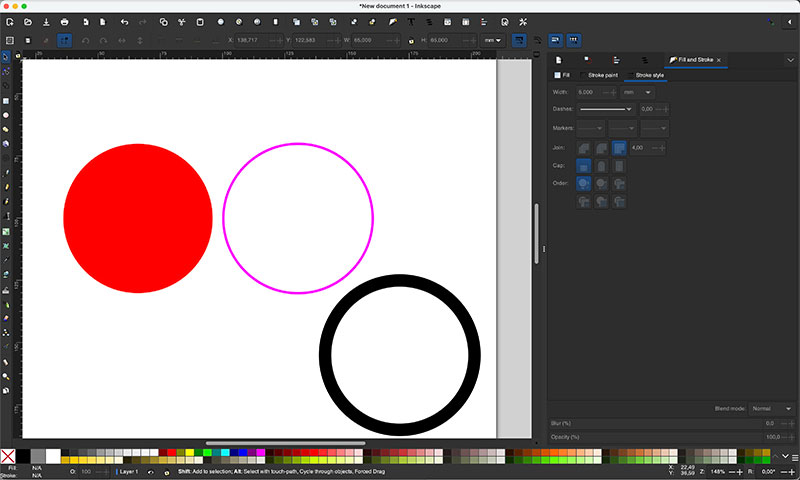
In this case, I decided to create a small circular patch of approximately 60 mm in diameter. The goal was not only to make a decorative design, but also to use it as a first experiment to better understand how different embroidery strategies and stitch types behave.
The design is composed of several independent circles:
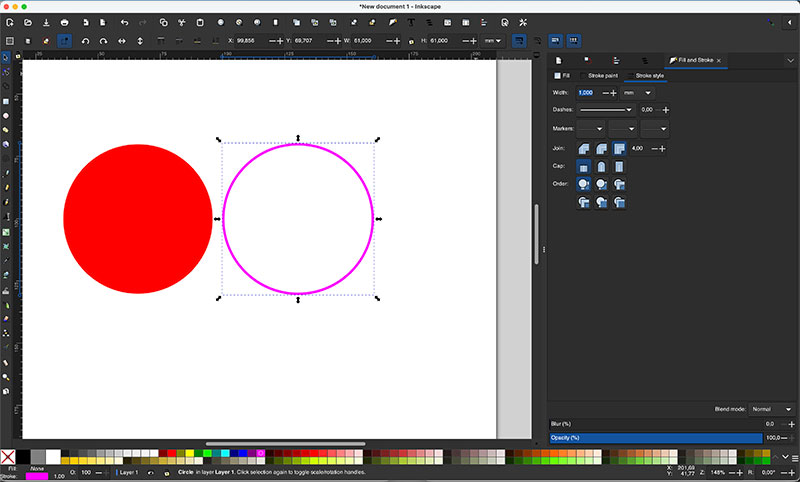
An outer circle without fill, configured with a “Satin Stitch” path and a thickness of 1 mm.With this stitch line, the fabric will first be secured to the embroidery hoop before the rest of the design starts stitching.This initial fixation helps keep the fabric stable during the embroidery process, reducing unwanted movement, wrinkles, or misalignment while the machine is working.
An inner circle with fill and no stroke, which would later use the “Fill Stitch (Tatami)” strategy.
And a second outer circle, also without fill, using “Satin Stitch” as well, but this time with a much larger thickness of 5 mm, allowing an easy visual comparison between both stitch widths.
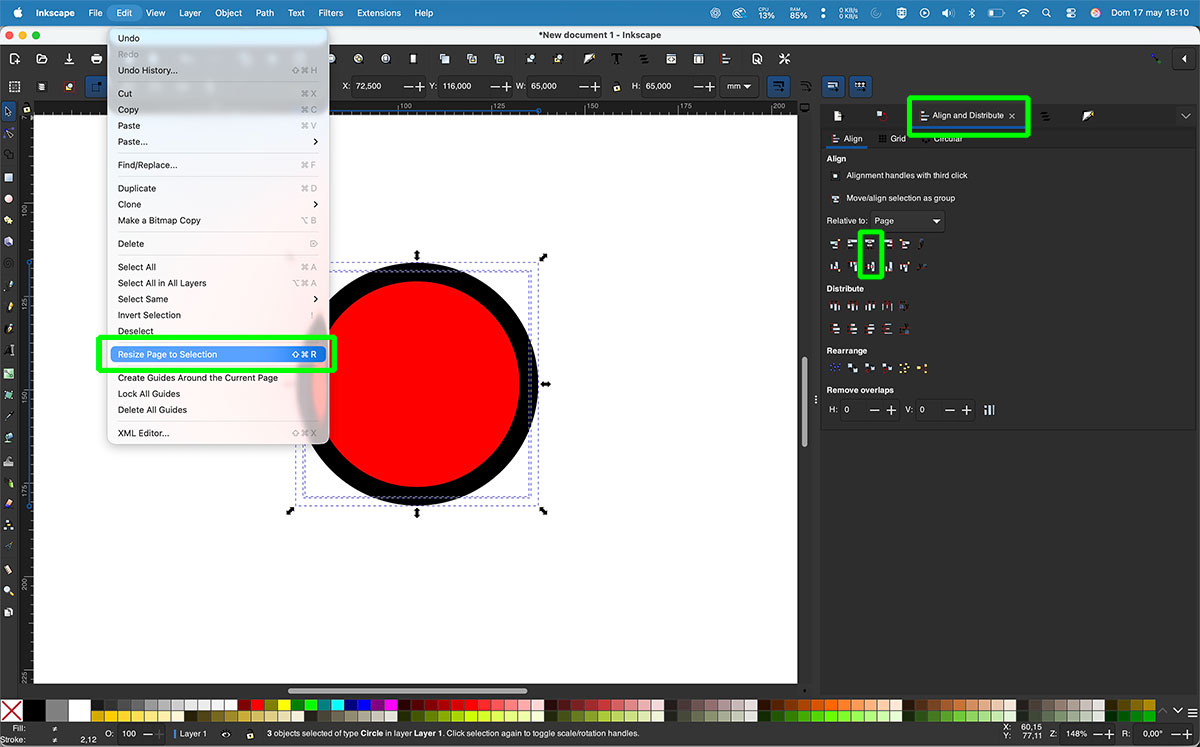
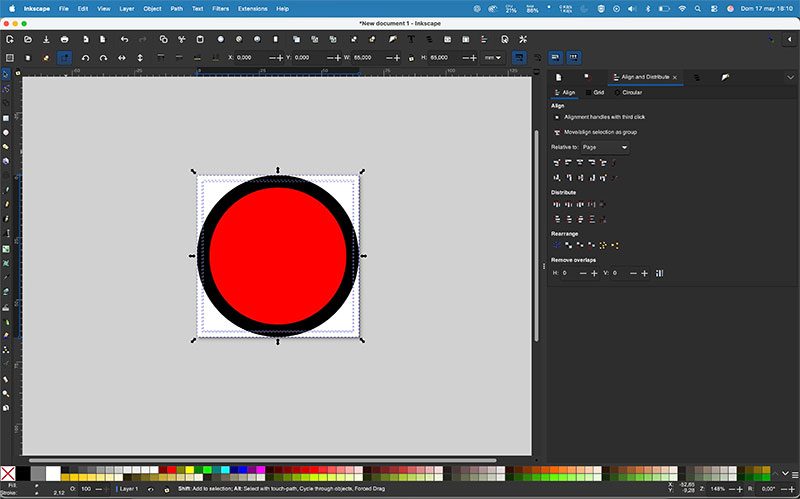
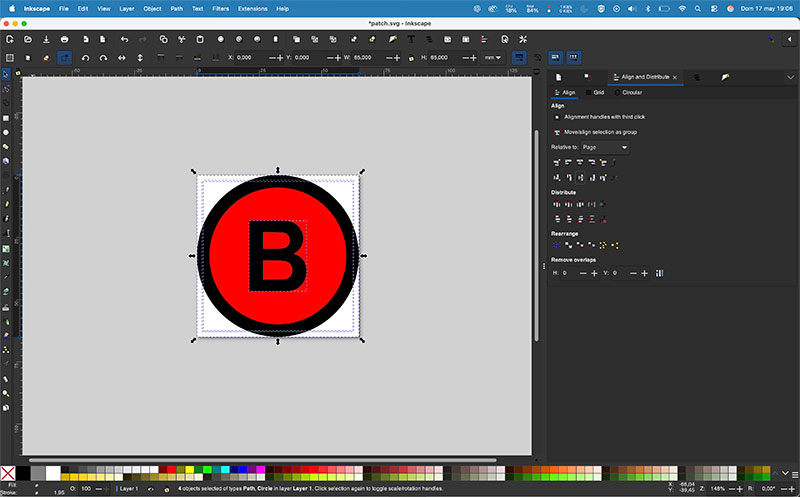
Once all the geometries were created, I selected the three elements and aligned them both vertically and horizontally to keep the design perfectly centered. Finally, I adjusted the page size to the selected content, leaving the file ready before starting to configure the embroidery parameters.
Circle (size: 0 Kb -click to enlarge-).Outer circle 1mm (size: 0 Kb -click to enlarge-).Outer circle 5mm (size: 0 Kb -click to enlarge-).Align and resize page (size: 0 Kb -click to enlarge-).Result (size: 0 Kb -click to enlarge-).
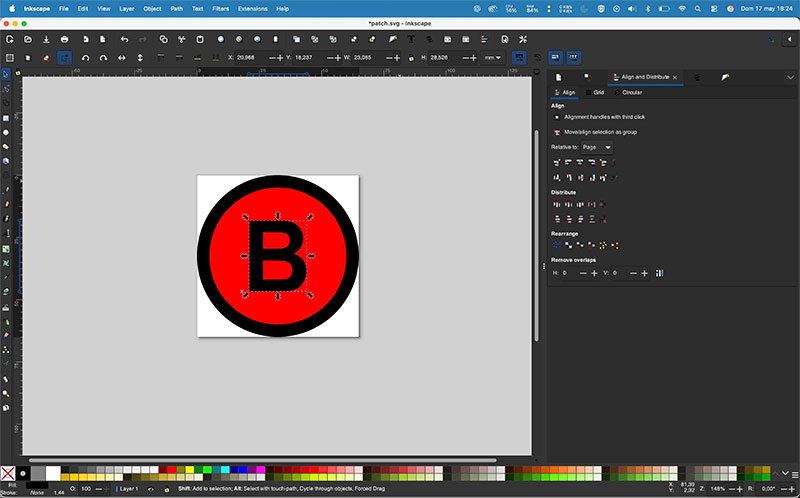
After that, I added a letter to the design — in this case, my initial — to include a more personalized element and to test how text behaves when converted into embroidery stitches.
Once the letter was placed, I adjusted its size visually until it fit well inside the circular composition. Then, I aligned it with the rest of the design to keep everything centered and balanced.
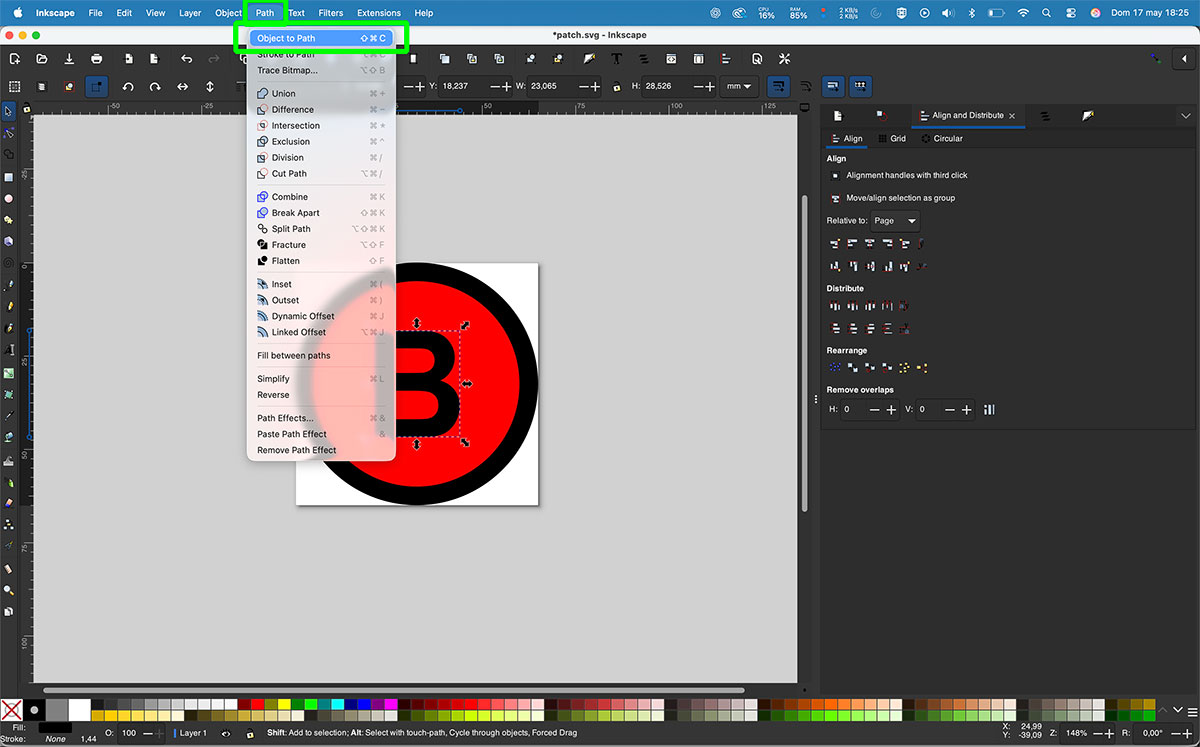
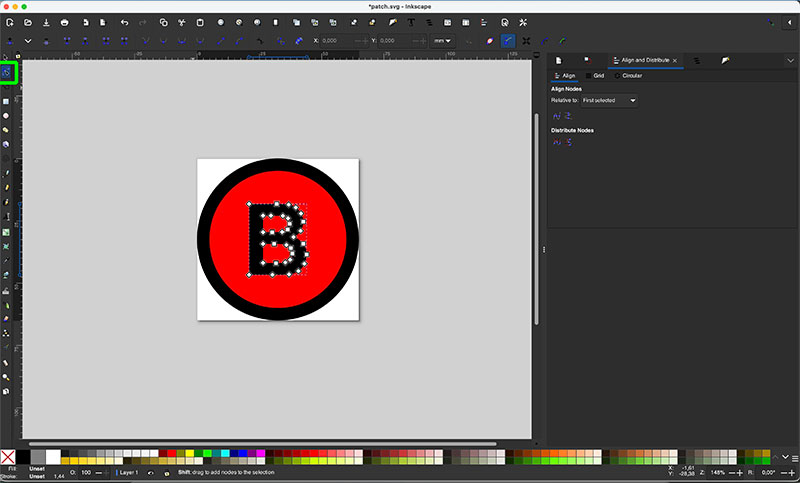
Finally, before applying any embroidery strategy, it was necessary to convert the text object into paths. This step is important because Ink/Stitch works with vector trajectories, allowing the software to correctly generate the stitch patterns that will later be interpreted by the embroidery machine.
Letter (size: 0 Kb -click to enlarge-).Object to path (size: 0 Kb -click to enlarge-).View nodes with node tool (size: 0 Kb -click to enlarge-).
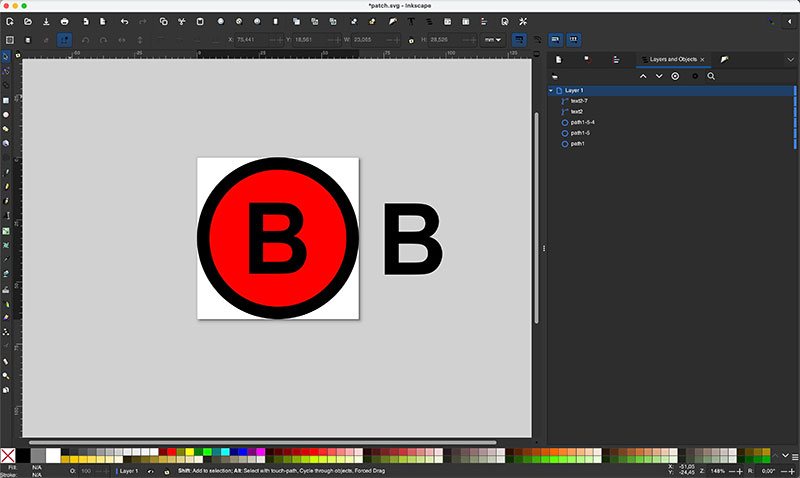
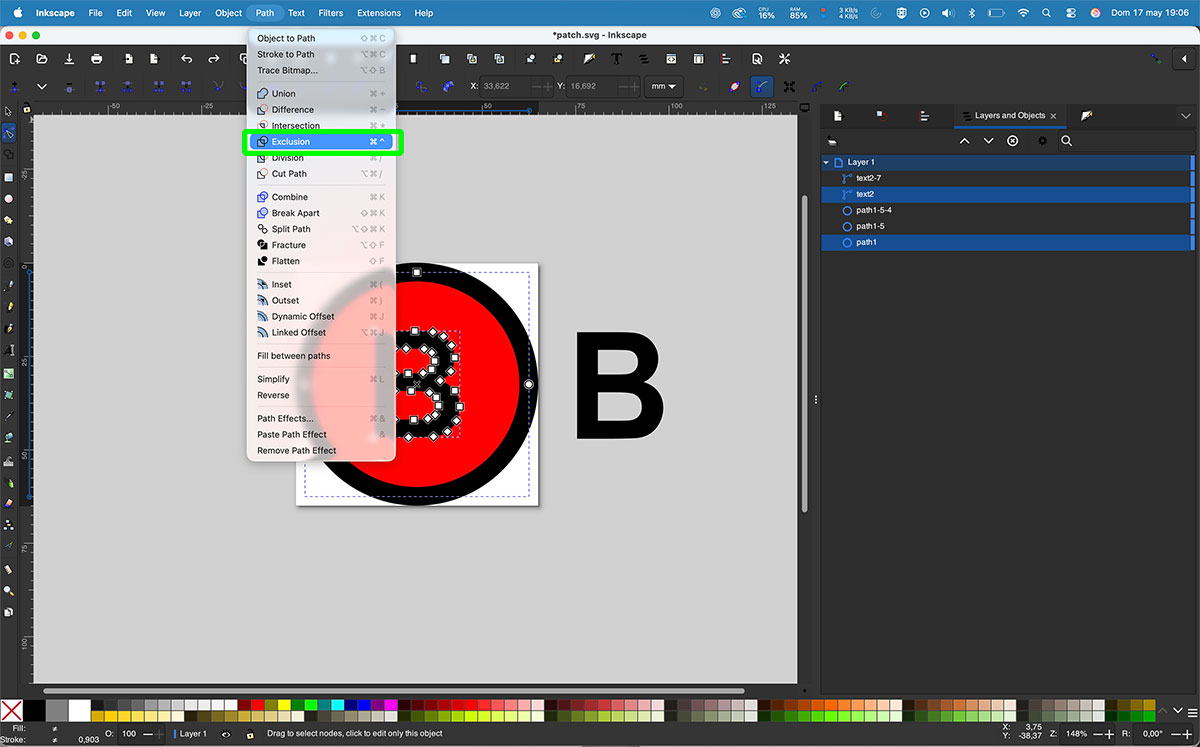
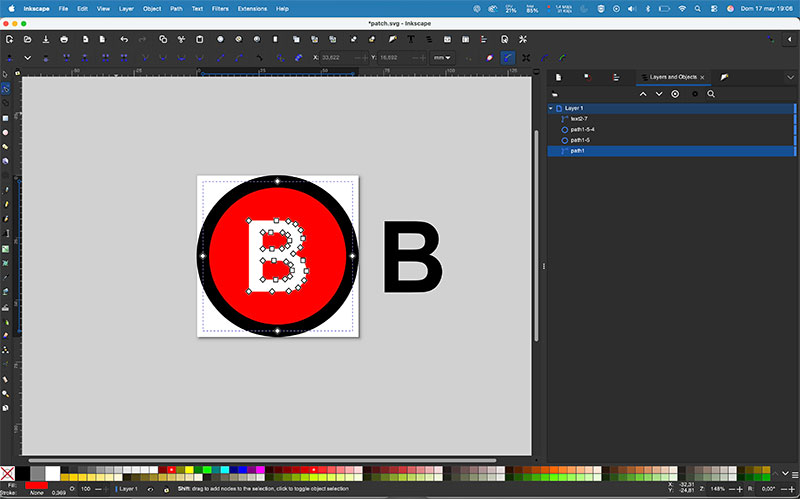
Next, I duplicated the letter and temporarily moved the copy away from the main design. Then, I selected both the filled circle and the original letter placed on top of it, and applied a boolean subtraction operation.
This operation removes the shape of the letter from the filled area of the circle, creating an empty space where the letter will later be embroidered separately. After that, all the elements were aligned again to keep the composition properly centered.
This step is important because it prevents the machine from embroidering the letter on top of an already embroidered fill area. Instead, the letter will be stitched directly onto the fabric itself, resulting in a cleaner finish and avoiding unnecessary overlapping layers of embroidery.
Duplicate letter (size: 0 Kb -click to enlarge-).Path exclusion (size: 0 Kb -click to enlarge-).Path exclusion result (size: 0 Kb -click to enlarge-).Path exclusion result Result (size: 0 Kb -click to enlarge-).
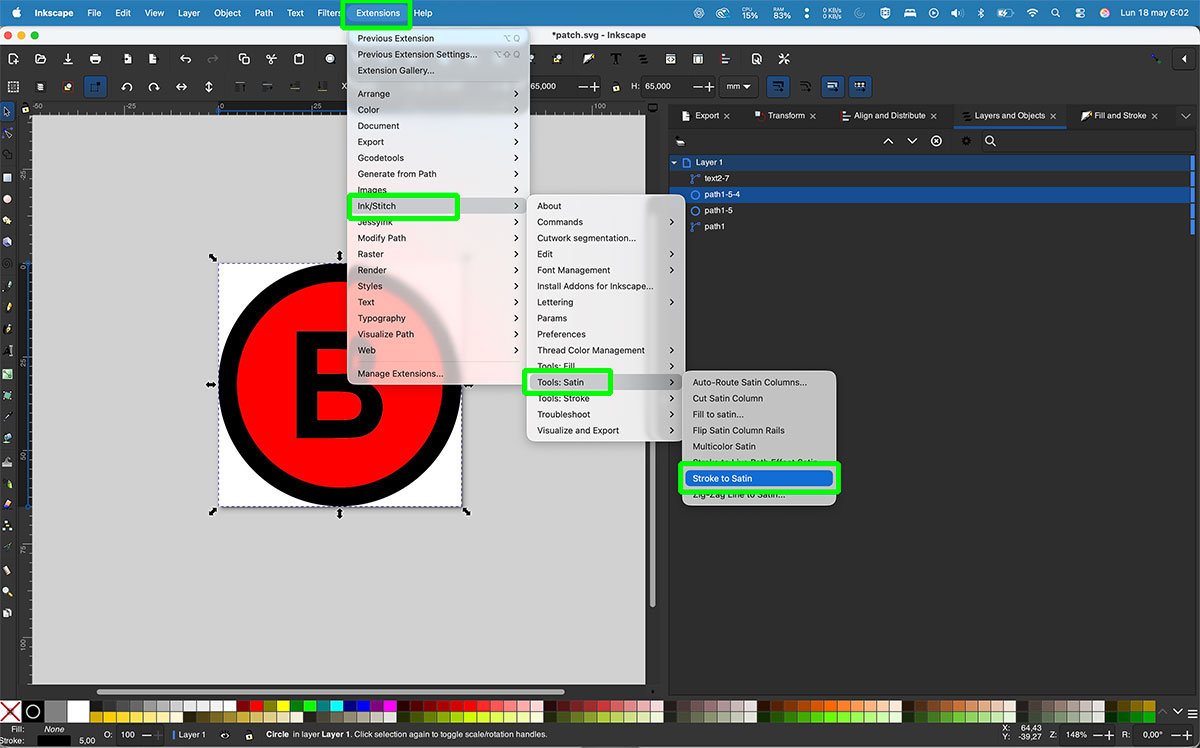
After that, I selected the layer/object containing the 5 mm outer contour, which would become the external border of the patch. Inside the Ink/Stitch extension, I used the “Stroke to Satin” function.
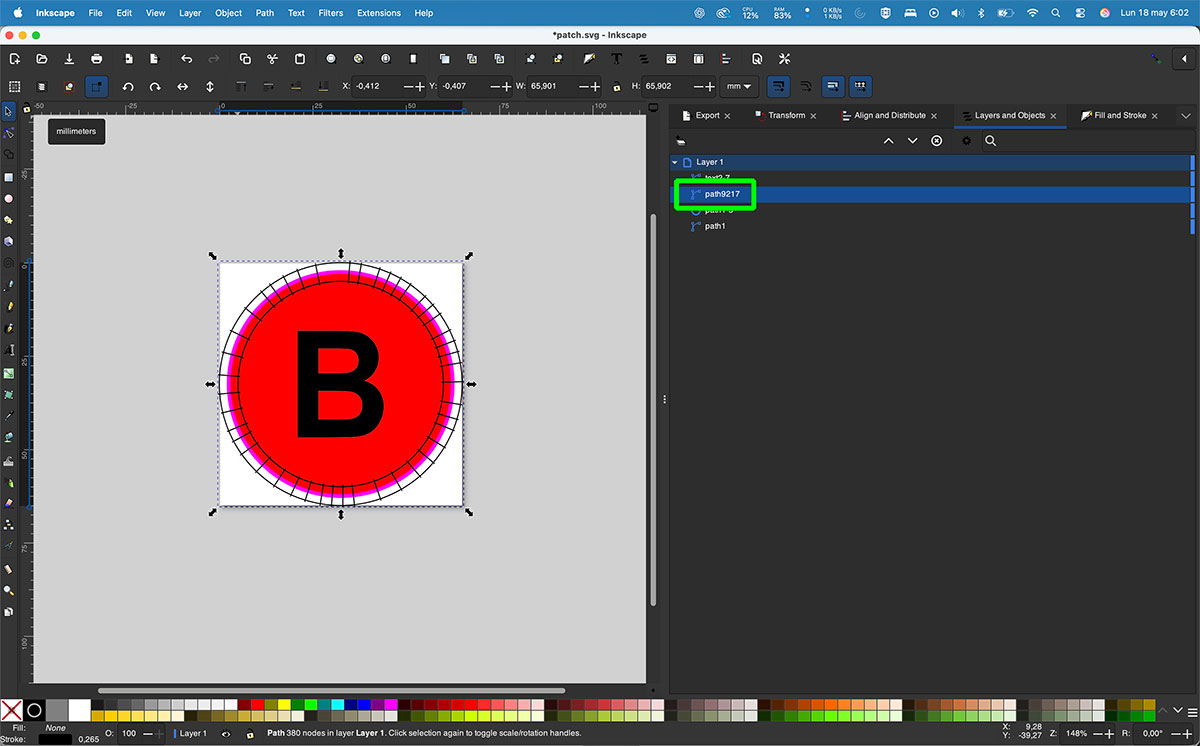
At this point, the object stopped behaving like a simple vector circle and was converted into an actual embroidery path ready to generate satin stitches.
This process is especially useful for creating clean and dense borders, since satin stitches work very well for outlines and patch edges, producing a much more professional and visually solid result.
Stroke to satin (size: 0 Kb -click to enlarge-).Embroidery path (size: 0 Kb -click to enlarge-).
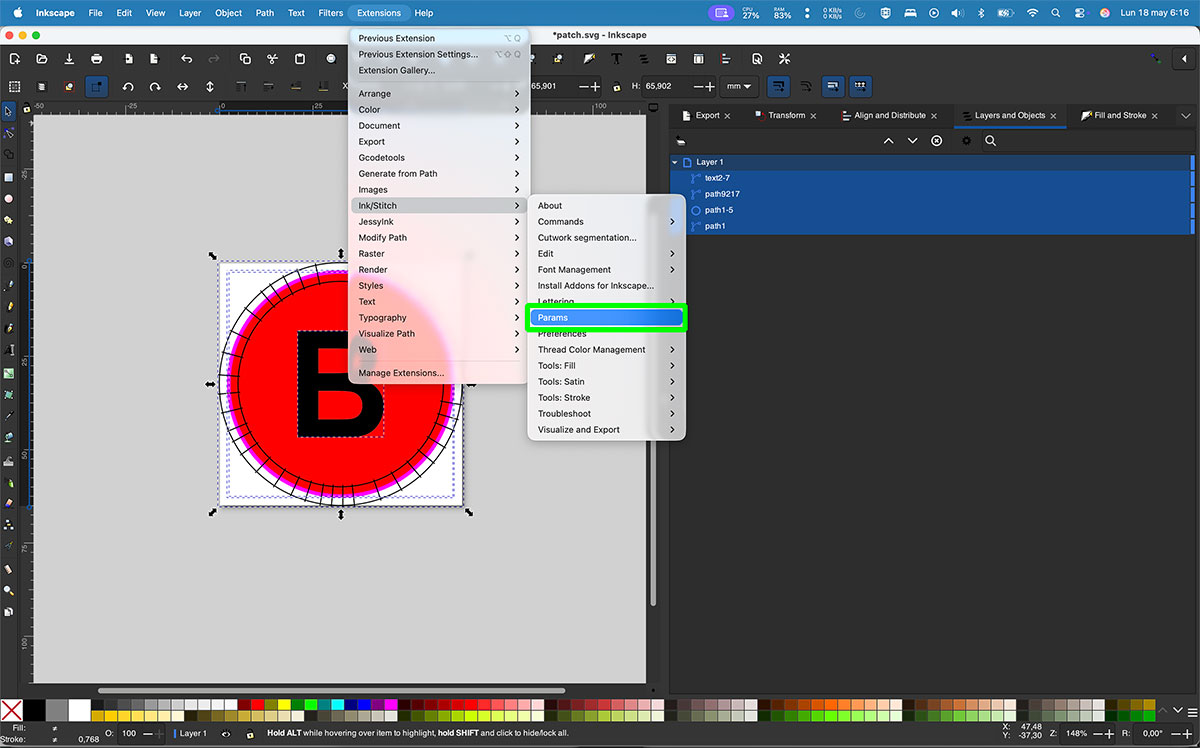
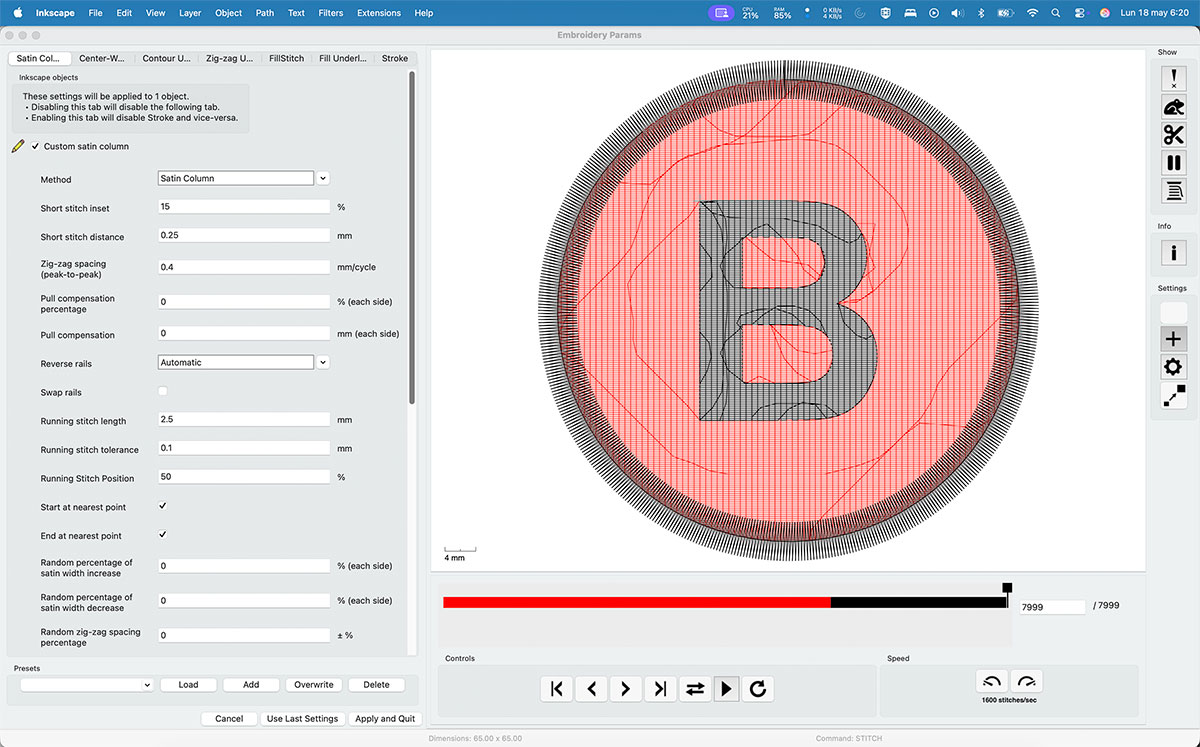
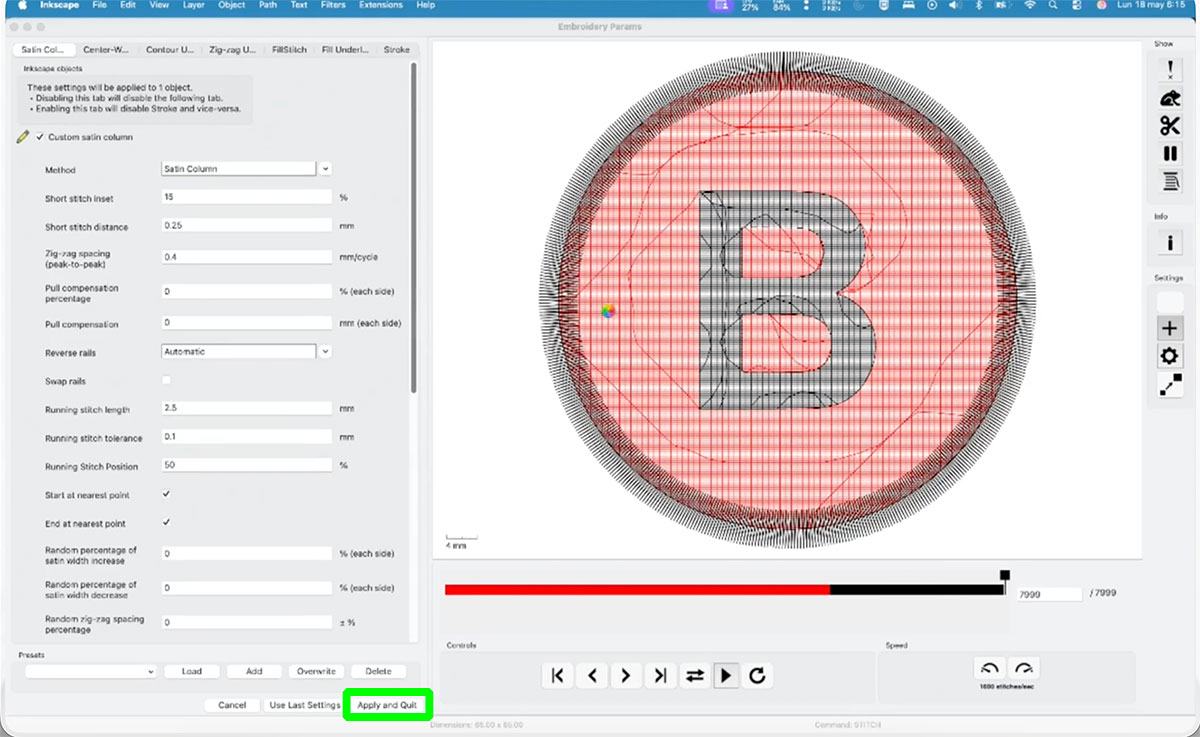
Once all the elements were prepared, I selected the entire design and opened the “Params” panel inside Ink/Stitch.
This section allows viewing a simulation of how the embroidery will be generated and gives access to the different configuration options for each object and stitch type.
From there, it is possible to adjust parameters such as stitch density, direction, compensation, underlay, stitch length, and sewing order, helping to optimize both the visual result and the machine behavior before exporting the final embroidery file.
Ink/Stitch Params (size: 0 Kb -click to enlarge-).Ink/Stitch Params (size: 0 Kb -click to enlarge-).Ink/Stitch Apply and quit (size: 0 Kb -click to enlarge-).
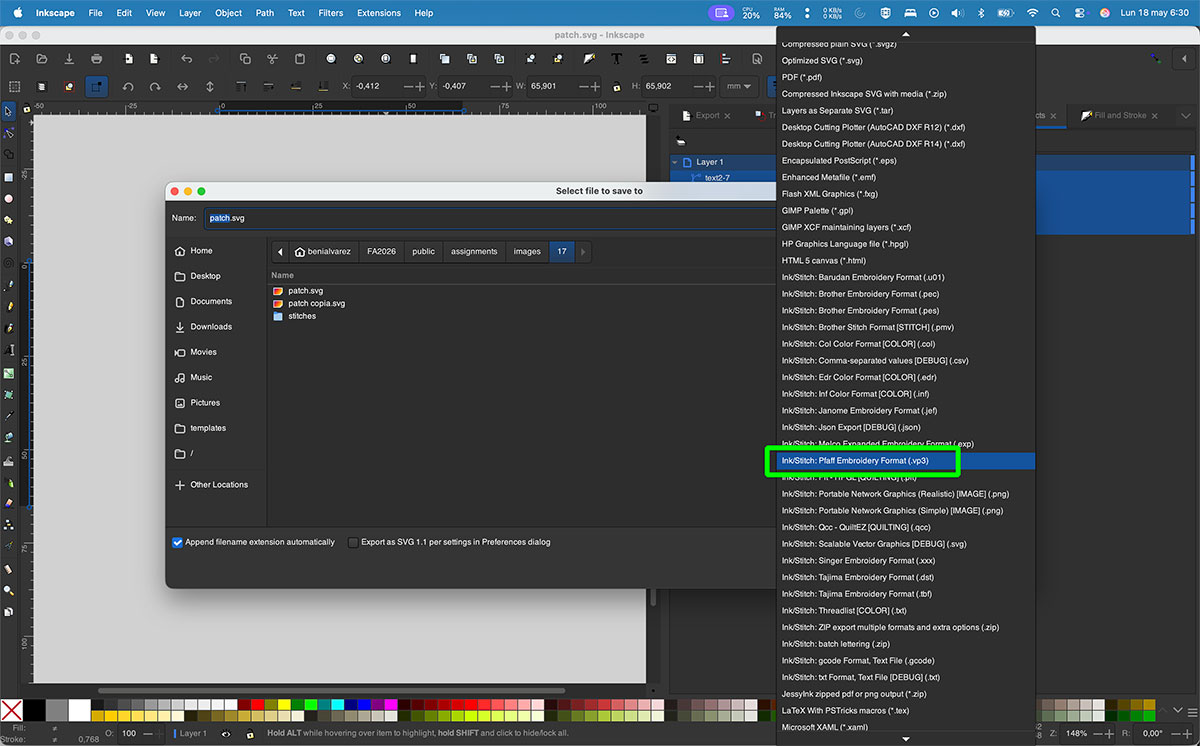
Once all the embroidery parameters and adjustments were configured, I saved the design both as a standard .svg file and as machine embroidery formats generated directly from Ink/Stitch.
For the Pfaff machine, I exported the design using the “Ink/Stitch: Pfaff Embroidery format (*.vp3)” option, which is the native embroidery format supported by the machine.
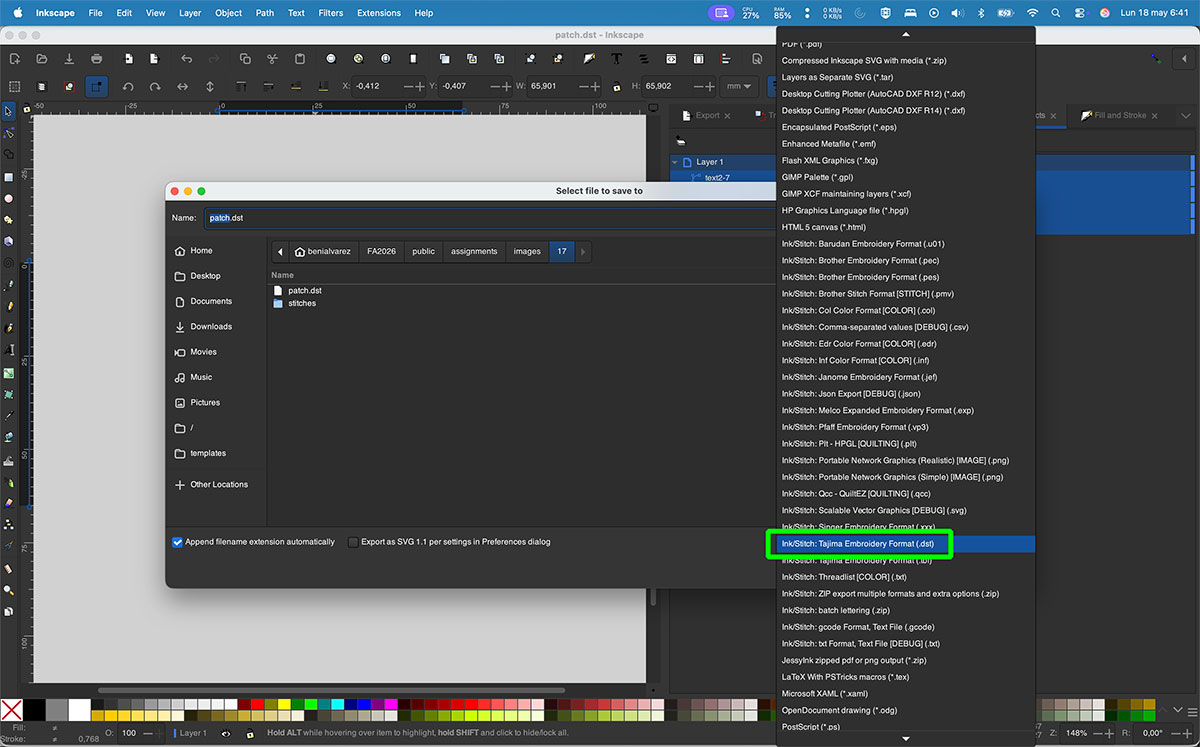
I also exported the file as “Ink/Stitch: Tajima Embroidery format (*.dst)”, since it is one of the most widely used embroidery exchange formats and allows the design to be compatible with many other embroidery machines and software environments.
Ink/Stitch: Pfaff Embroidery format (*.vp3) (size: 0 Kb -click to enlarge-).Ink/Stitch: Tajima Embroidery format (*.dst) (size: 0 Kb -click to enlarge-).
Embroidery my design
Once the embroidery file was ready, the next step was preparing the physical materials before starting to use the machine.
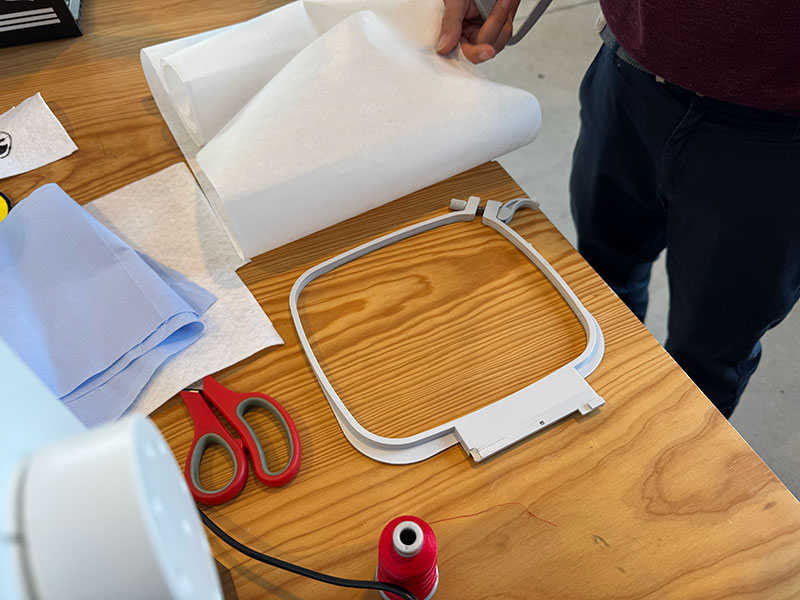
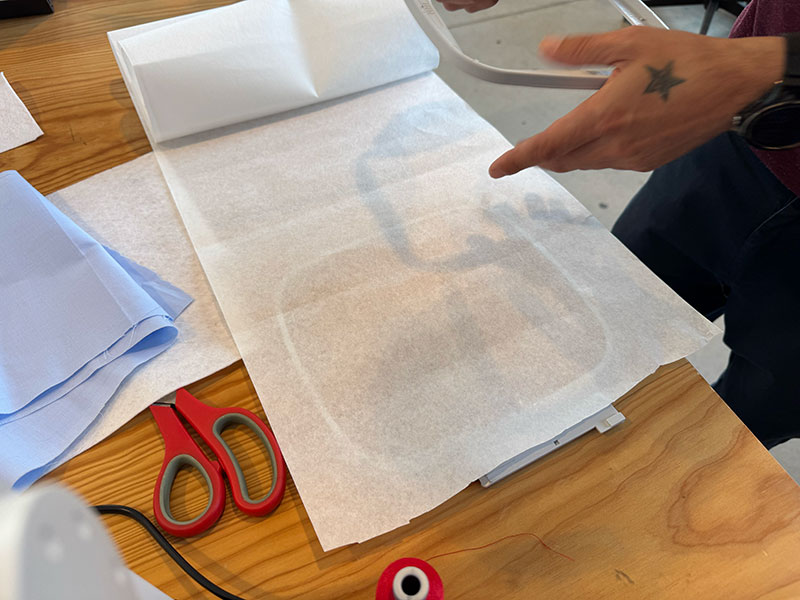
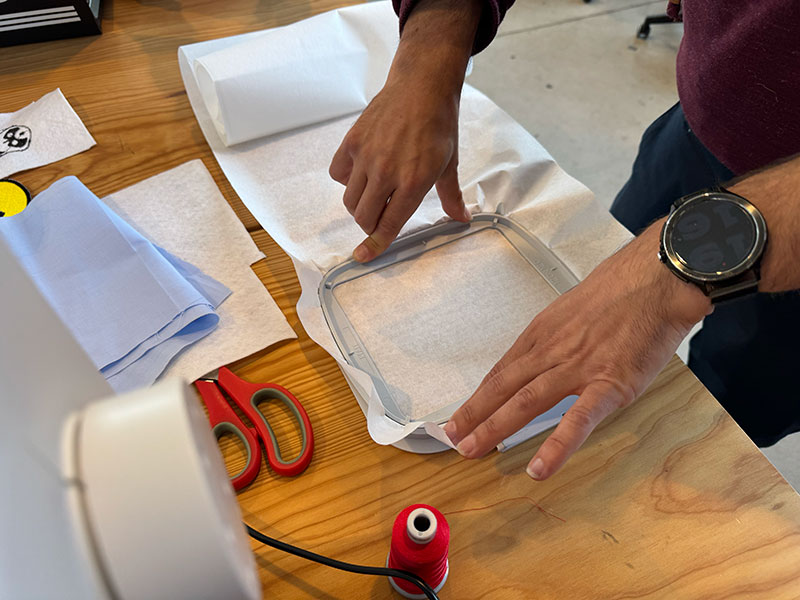
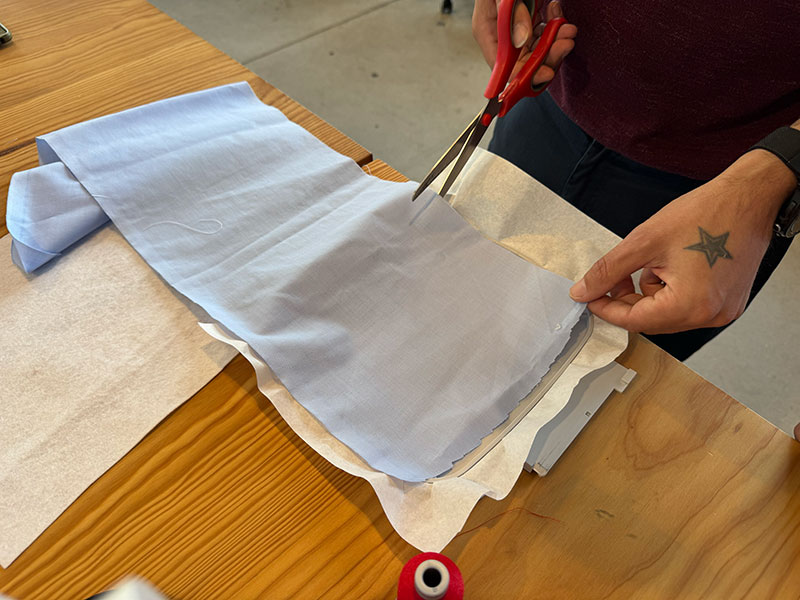
First, I placed the stabilizer backing onto the embroidery hoop and tightened it properly so the material stayed firm and wrinkle-free. After adjusting the hoop tension, I trimmed the excess material to make the setup easier to handle during the embroidery process.
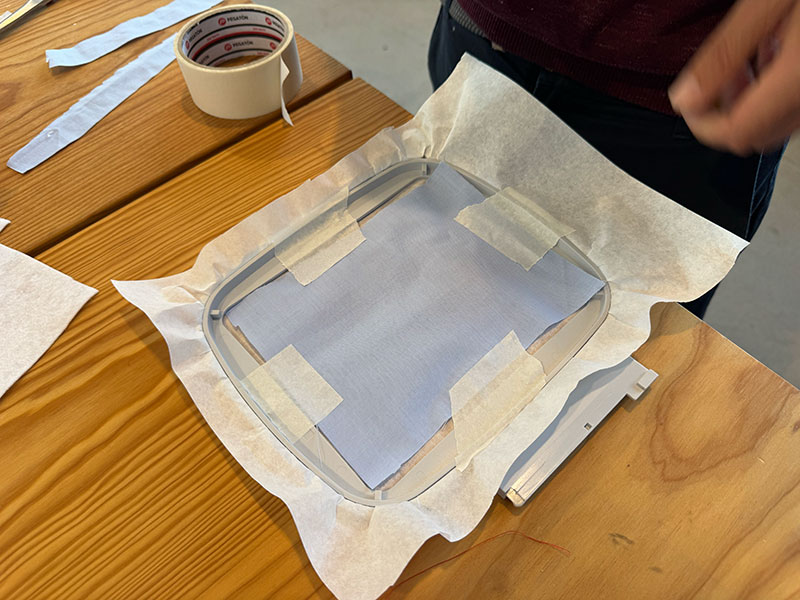
Next, I cut the final fabric slightly smaller than the hoop size. Instead of hooping the fabric directly, I positioned it on top of the already mounted stabilizer and fixed it in place using adhesive tape.
This method helps keep the fabric stable during embroidery while avoiding excessive marks or deformation caused by the pressure of the hoop.
Embroidery hoop, Stabilizer backing and Fabric setup (size: 0 Kb -click to enlarge-).Embroidery hoop, Stabilizer backing and Fabric setup (size: 0 Kb -click to enlarge-).Embroidery hoop, Stabilizer backing and Fabric setup (size: 0 Kb -click to enlarge-).Embroidery hoop, Stabilizer backing and Fabric setup (size: 0 Kb -click to enlarge-).Embroidery hoop, Stabilizer backing and Fabric setup (size: 0 Kb -click to enlarge-).
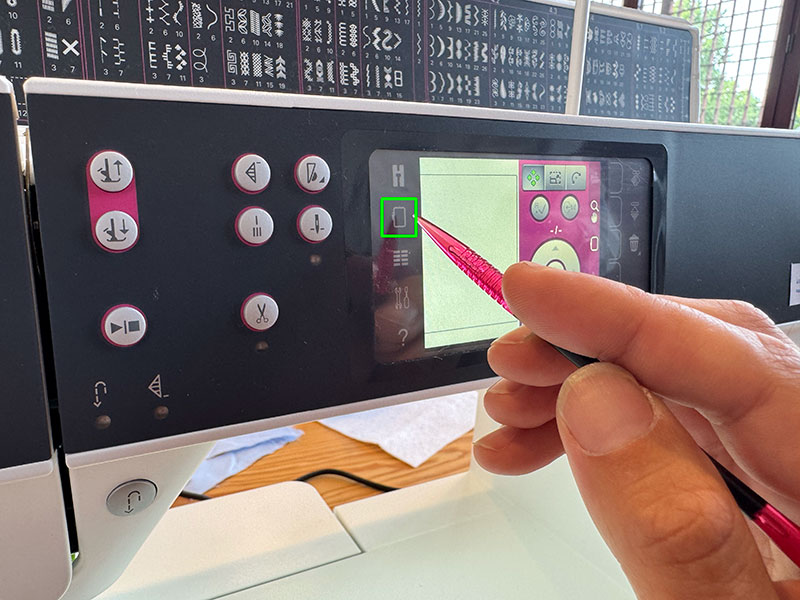
Once the hoop, stabilizer, and fabric were ready, I turned on the machine and switched to embroidery mode.
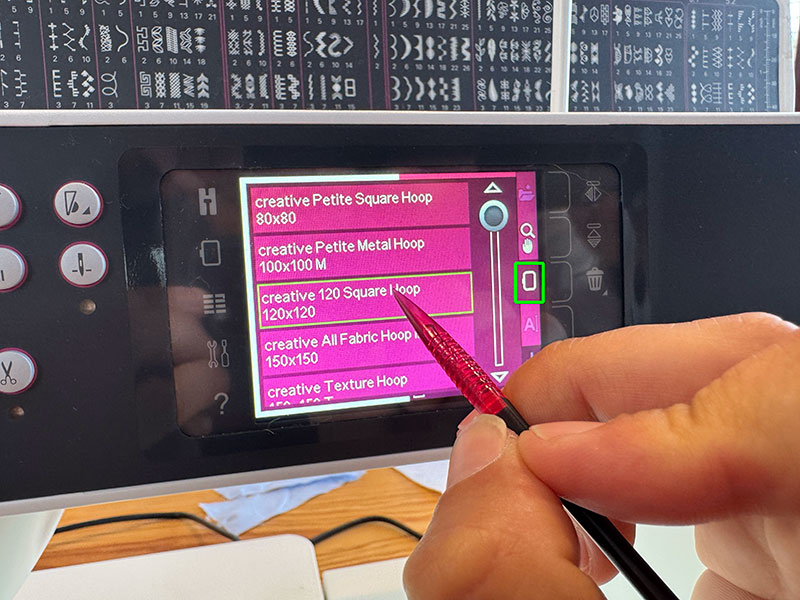
The first step was selecting the embroidery hoop that would be used for the project. In this case, I selected the “creative™ 120 Square Hoop 120x120”, which was the most suitable size for the dimensions of the test patch.
Choosing the correct hoop is important because the machine uses these dimensions as a reference to position and limit the available embroidery area.
Selecting the embroidery hoop (size: 0 Kb -click to enlarge-).Selecting the embroidery hoop (size: 0 Kb -click to enlarge-).
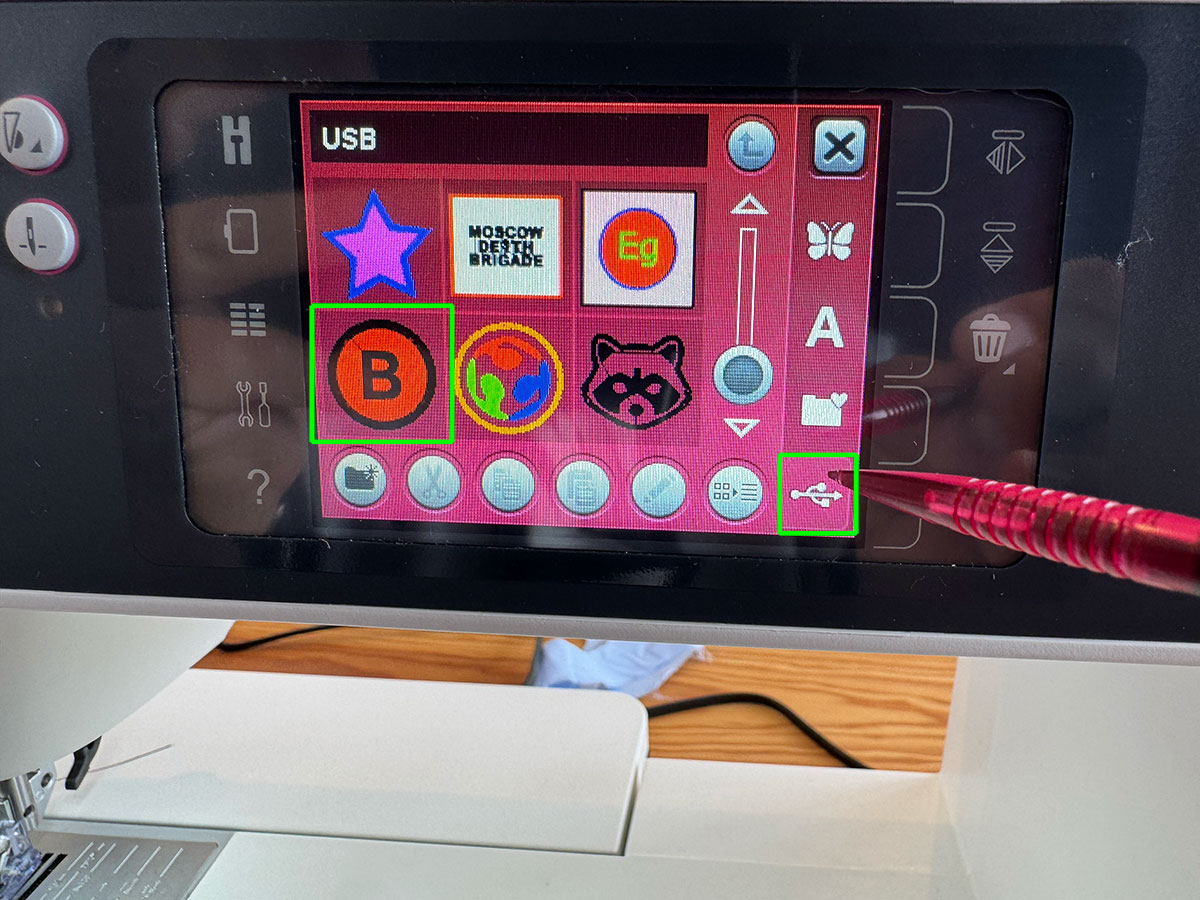
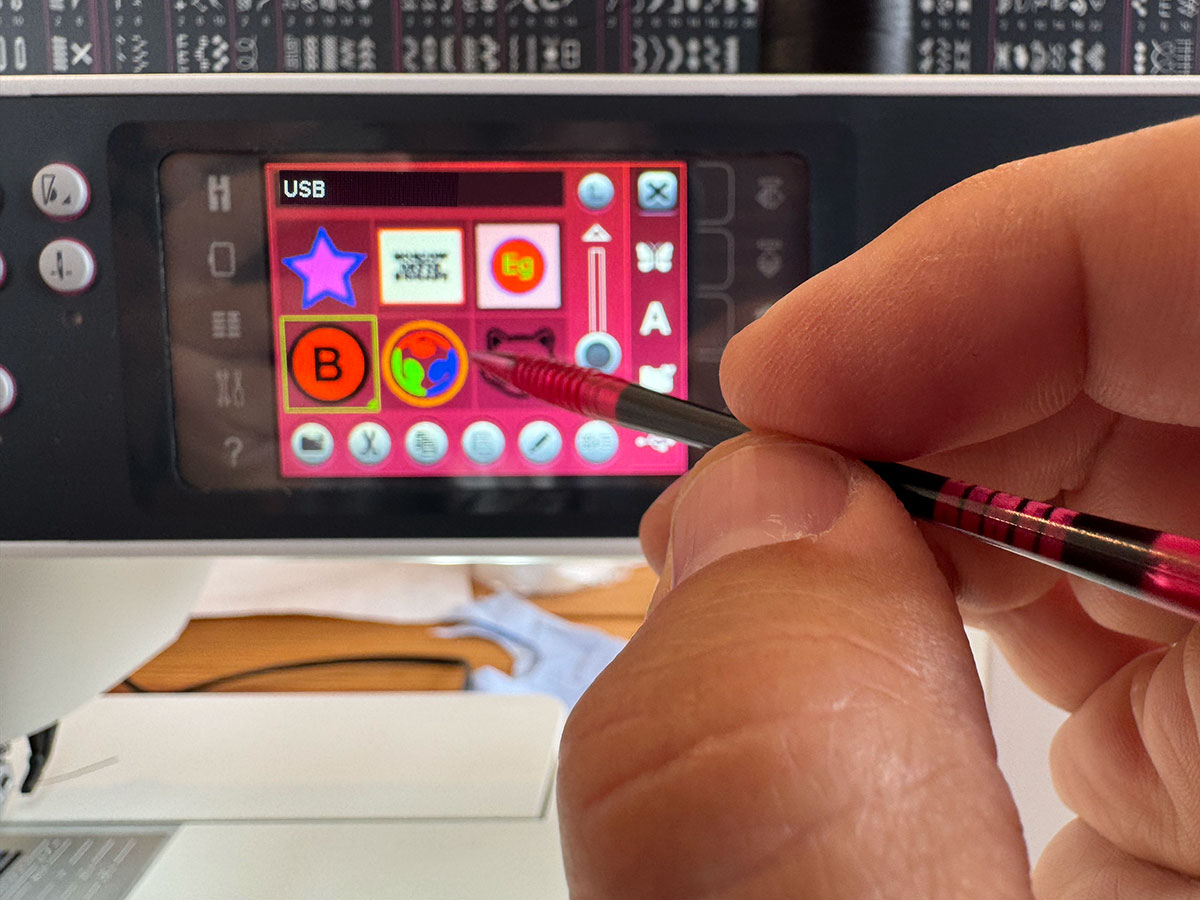
After selecting the hoop, I opened the USB options menu and searched for the .vp3 embroidery file previously generated with Ink/Stitch. The machine displays the available embroidery files directly in the file browser, and to load the design it is necessary to press and hold the selected file on the touch screen.
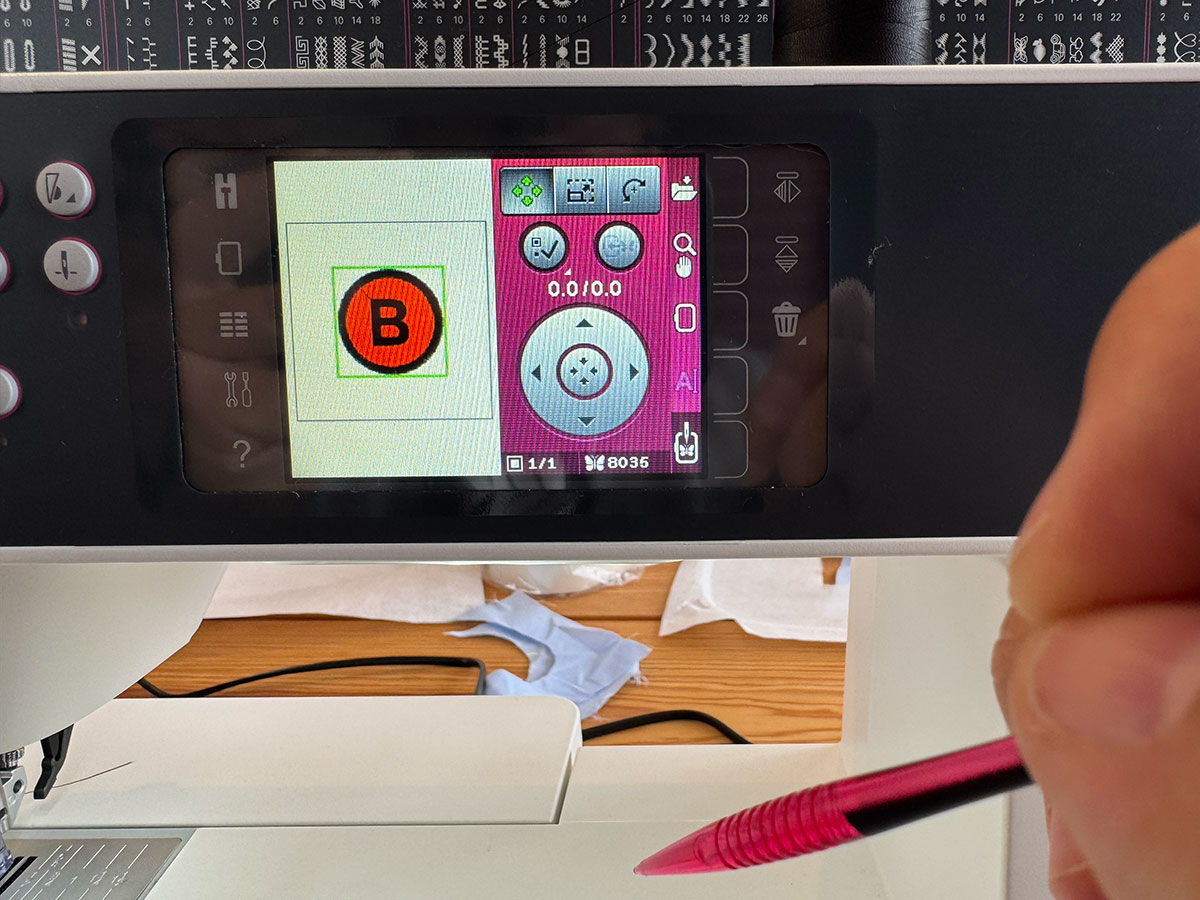
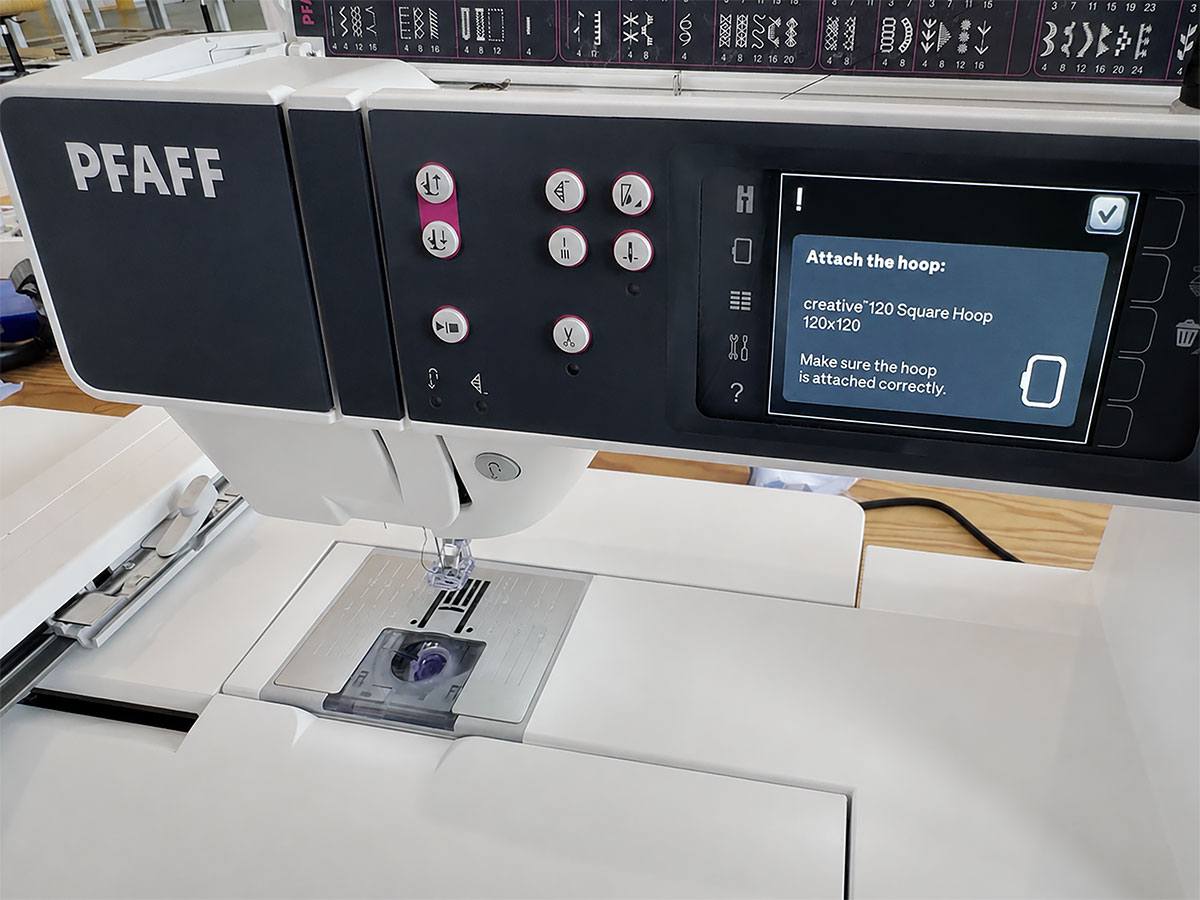
Once the design was loaded correctly, the machine prompted me to prepare and insert the hoop before starting the stitching process.
Selecting design (size: 0 Kb -click to enlarge-).Design selected (size: 0 Kb -click to enlarge-).Design loaded (size: 0 Kb -click to enlarge-).Insert the hoop message (size: 0 Kb -click to enlarge-).
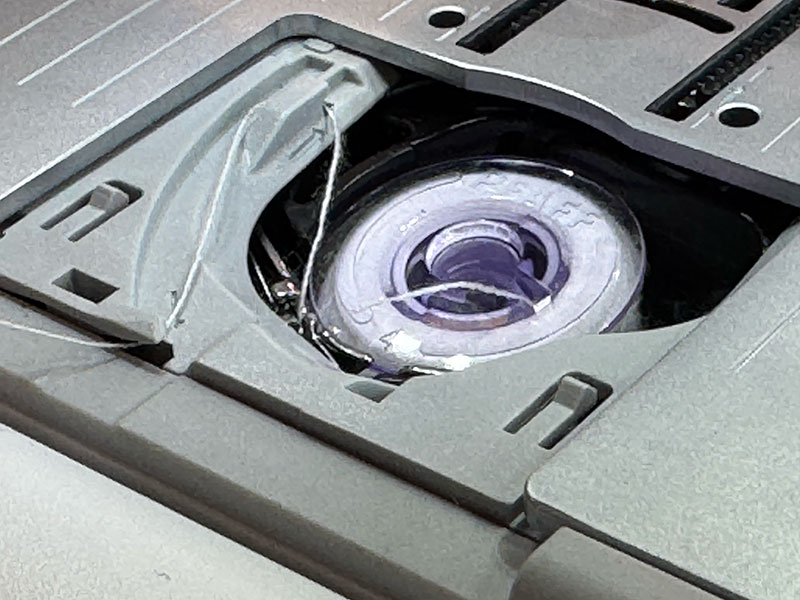
After threading the machine, I manually stitched a couple of test stitches to verify that everything was working correctly and that the upper thread was properly catching the bobbin thread.
This small check is important before starting the full embroidery process, since it helps detect possible threading or tension issues early and avoids ruining the fabric or the design.
Once I verified that both the upper thread and the bobbin thread were working correctly, I pressed the PLAY button to start the automatic embroidery process.
During the stitching operation, the machine manages the different embroidery paths automatically and prompts for a thread color change whenever a section configured with a different color has been completed.
The machine is also capable of detecting when the bobbin thread is running low. In that case, a warning message appears on the screen, allowing the embroidery process to be temporarily paused so the bobbin can be replaced before continuing the design without losing its position.
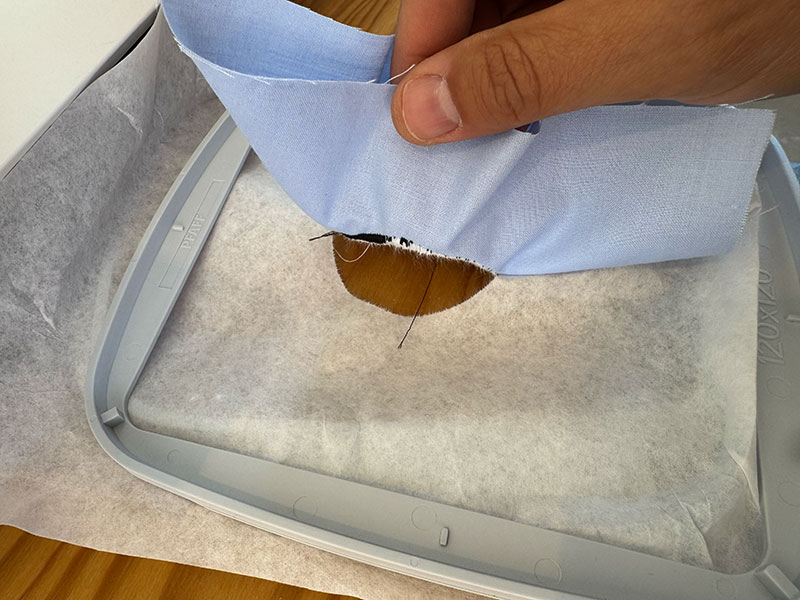
Once all the embroidery paths were completed, I removed the embroidery hoop from the machine and carefully separated the different fabric layers.
After that, I gently pulled the fabric to break and remove the excess tear-away stabilizer surrounding the embroidered area.
Finally, I trimmed the remaining excess fabric around the embroidered piece until obtaining the final patch shape.
Pulled the fabric to break and remove the excess (size: 0 Kb -click to enlarge-).Embroidery patch result (size: 0 Kb -click to enlarge-).
Practical example: final embroidery
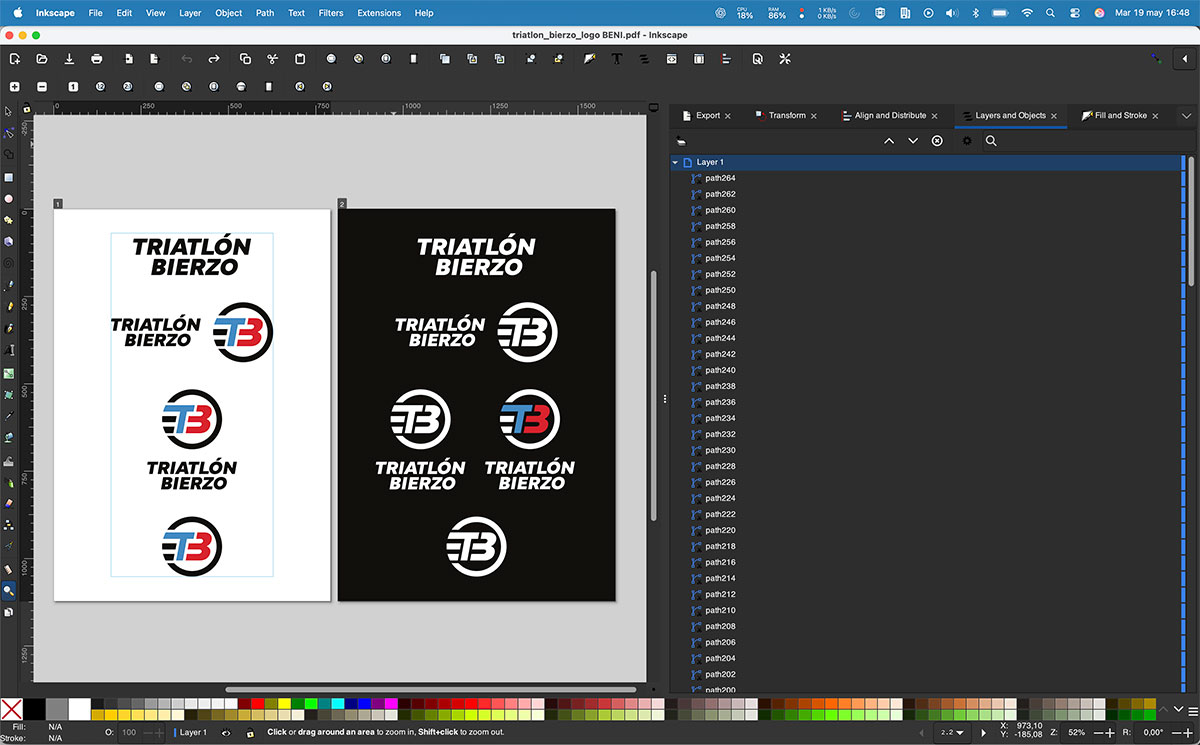
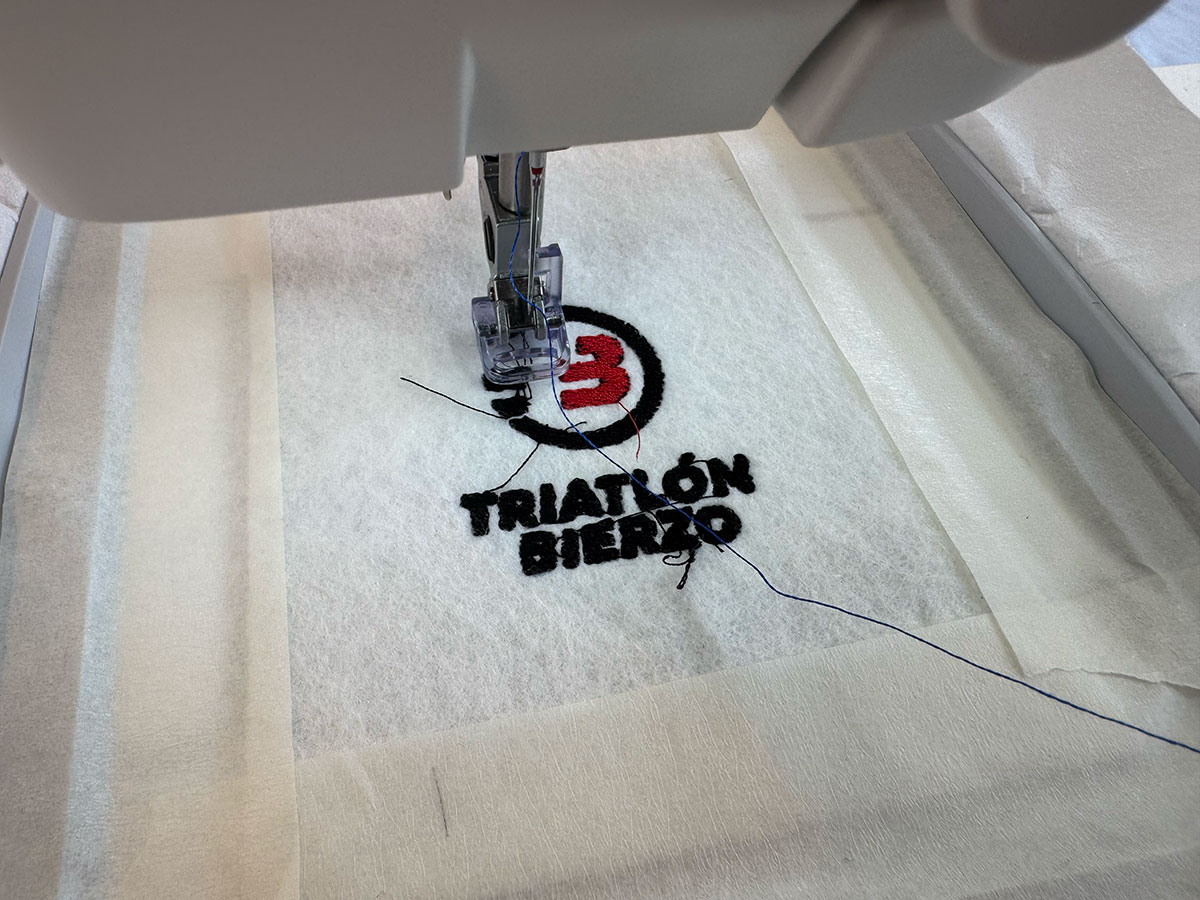
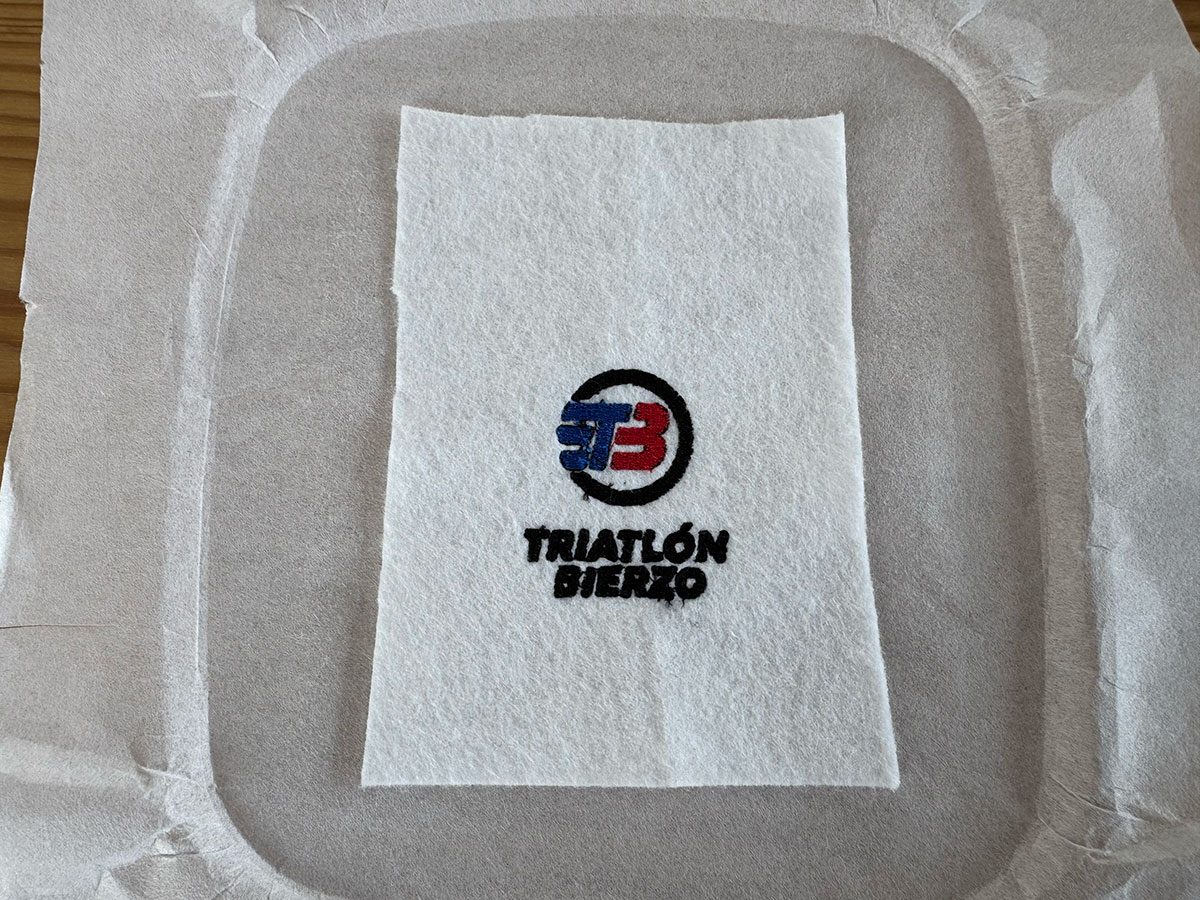
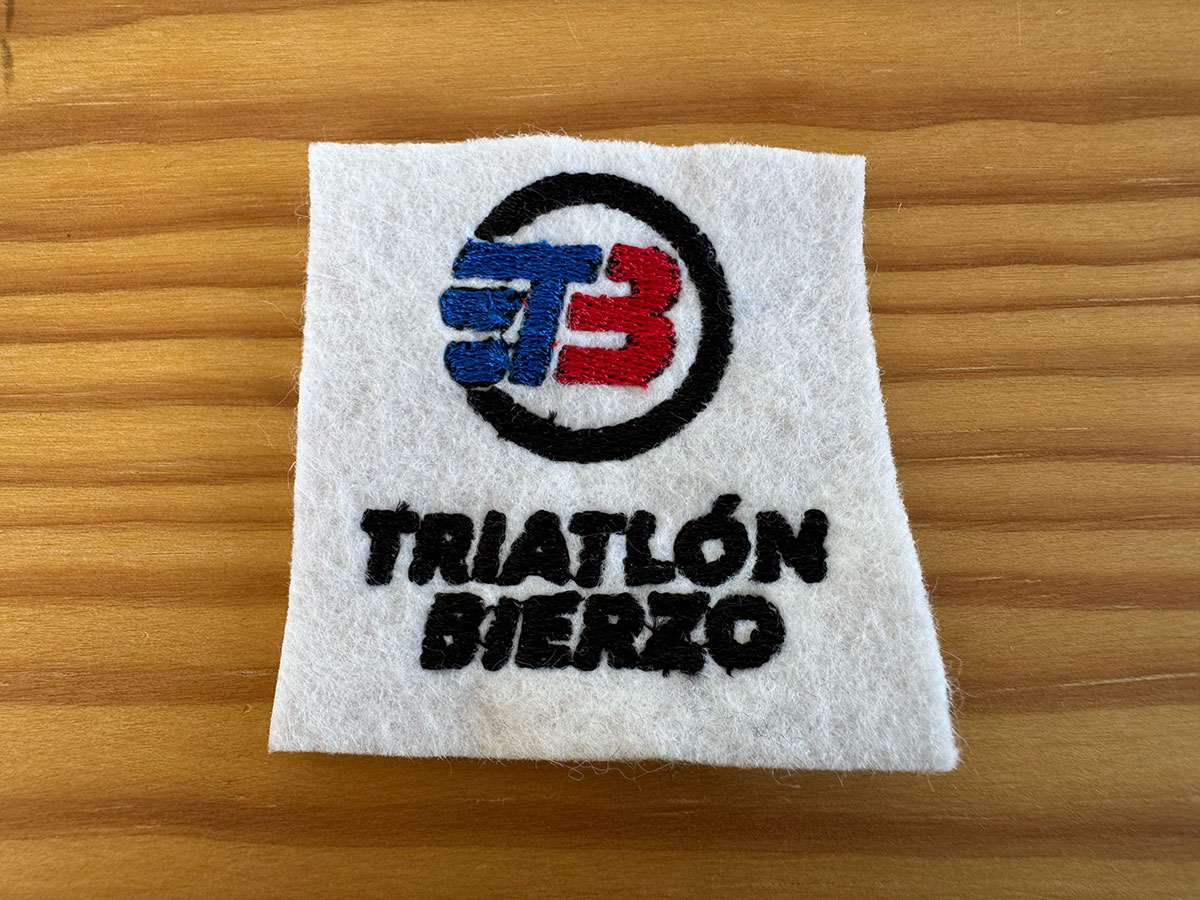
Once the first tests were completed and I had a better understanding of the full workflow, I wanted to create a more realistic and practical example using the logo of the triathlon club I belong to. The idea was to visualize how an embroidered version could look on one of our casual team garments.
Starting from the original logo design and following exactly the same workflow explained previously — preparing the graphics in Inkscape, configuring the embroidery strategies with Ink/Stitch, exporting the embroidery file, and finally stitching it with the Pfaff machine — I embroidered the design onto fabric.
Besides serving as a practical exercise, this test also helped me evaluate how more complex elements such as text, fills, and borders behave in a real embroidery design intended for clothing applications.
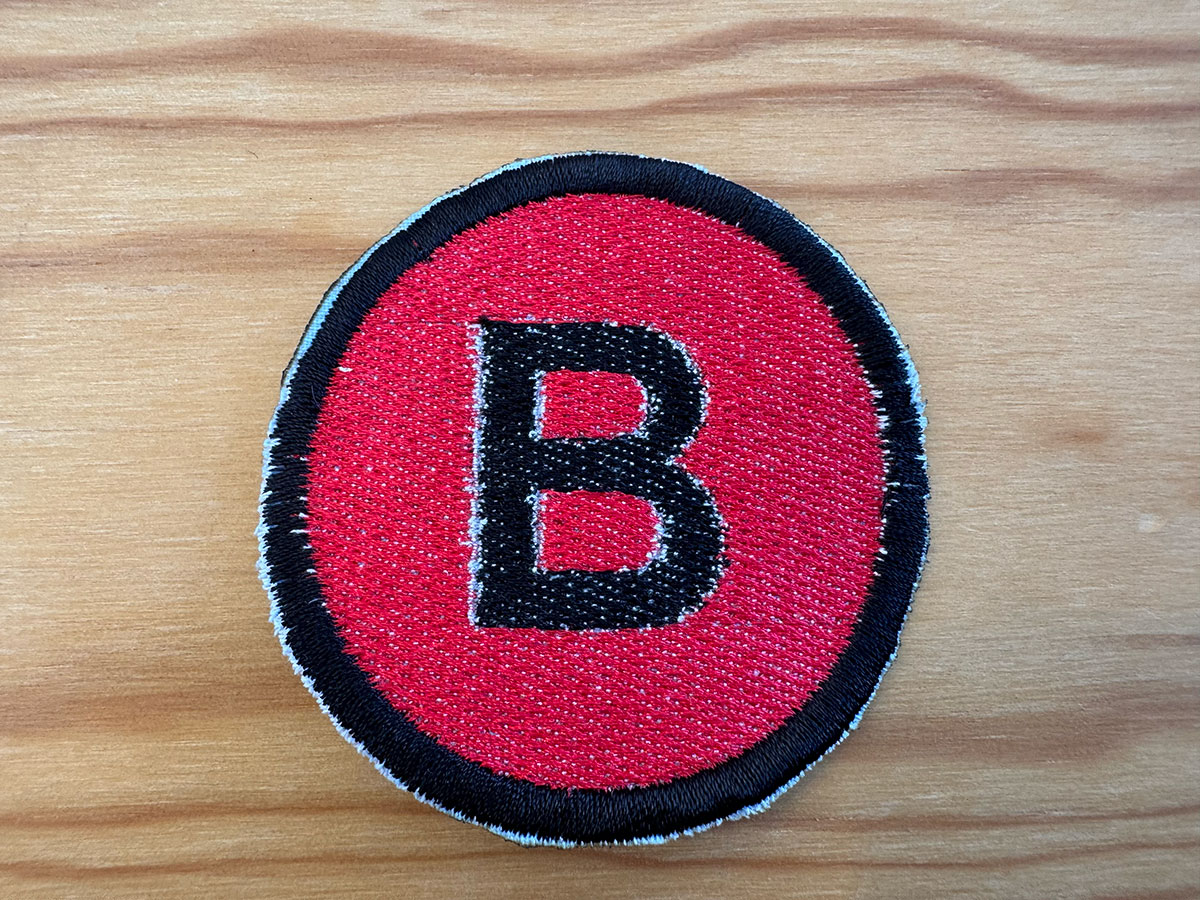
This was the final result.
Vector Logo (size: 0 Kb -click to enlarge-).Embroidering patch (size: 0 Kb -click to enlarge-).Embroidery result (size: 0 Kb -click to enlarge-).Embroidery result (size: 0 Kb -click to enlarge-).
Glossary of terms — Wildcard Week / Digital Embroidery
Term (spanish term)
Description
Embroidery machine (máquina de bordado)
Digitally controlled embroidery machine capable of interpreting stitch files and reproducing designs onto fabric.
Embroidery hoop (bastidor)
Frame used to keep the fabric and stabilizer tight during the embroidery process.
Fabric (tela)
The textile material onto which the embroidery is stitched.
Stabilizer / Stabilizer backing (entretela)
Support material placed underneath or above the fabric to provide stability during embroidery.
Ink/Stitch
Open-source Inkscape extension used to convert vector graphics into embroidery files.
Inkscape
Vector design software used to create graphics before converting them into embroidery designs.
Vector graphics (gráficos vectoriales)
Designs created using mathematical lines and curves that can be scaled without losing quality.
Path (trayectoria)
Vector line or shape used to generate embroidery stitches.
Stroke to Satin
Ink/Stitch function that converts a vector stroke into a satin stitch embroidery path.
Satin Stitch (puntada satinada)
Dense and continuous stitch type mainly used for borders and lettering.
Fill Stitch / Tatami (puntada de relleno)
Fill stitch used to cover larger areas with repeated stitch patterns.
Stitch density (densidad de puntada)
Amount of stitches per area. It affects the final appearance and rigidity of the embroidery.
Underlay
Hidden base stitches used to stabilize the fabric before the main embroidery stitches.
Embroidery sequence (secuencia de bordado)
The order in which the machine executes the different parts of the embroidery.
Thread tension (tensión del hilo)
Tension applied to the thread during stitching. It directly affects stitch quality.
Bobbin / Bobbin thread (canilla / hilo de canilla)
Lower thread spool used together with the upper thread to create stitches.
Needle threader (enhebrador de aguja)
Automatic mechanism used to help thread the needle.
Embroidery file (archivo de bordado)
Specialized file containing stitch paths and machine instructions for embroidery machines.
.VP3
Native embroidery file format used by Pfaff embroidery machines.
.DST
Universal embroidery exchange format compatible with many embroidery machines.
Thread color change (cambio de color de hilo)
Automatic machine request to change the embroidery thread color during stitching.
Tear-away stabilizer (entretela rompible)
Type of stabilizer that can be manually torn away after embroidery.
Cut-away stabilizer (entretela recortable)
Stabilizer that must be cut away after the embroidery process.
Water soluble stabilizer (entretela soluble al agua)
Water-soluble stabilizer used mainly for delicate or textured fabrics.
IDT™ System
Pfaff integrated dual feed system that moves the fabric evenly from both top and bottom.
Object to path (objeto a trayectoria)
Inkscape function used to convert text or objects into editable vector paths.
Embroidery simulation (simulación de bordado)
Software preview used to visualize how the embroidery will be stitched before fabrication.
Individual assignment:
Documented the workflow(s) and process(es) you used.
Explained how your process is not covered in other assignments.
Described problems encountered (if any) and how you fixed them.
Included original design files and source code.
Included ‘hero shot’ of the result.
Done
Final reflection
This week ended up being much more enjoyable than I initially expected. At first, I thought I was simply going to learn how to use another FabLab machine, but in the end it became a very different and much more personal experience.
I really enjoyed discovering how a vector design can be transformed into thread and fabric, combining digital tools with a very traditional and hands-on process. While working with the embroidery machine, I constantly found myself remembering all the times I watched my mother sewing when I was a child, so this assignment also had a special emotional connection for me.
From a technical point of view, I learned how to use tools like Ink/Stitch and better understood concepts related to embroidery such as stitch strategies, stabilizers, needles, and thread types.
I think that is exactly what makes this week different from many other Fab Academy assignments. While we have already worked with 3D printing, CNC machining, laser cutting, and electronics, digital embroidery introduces a completely different workflow where digital design, automation, and traditional textile techniques all come together.
Overall, I really enjoyed discovering a less common form of digital fabrication inside a FabLab environment, but one that still fits perfectly within the idea of combining technology and physical making.
Credits
I would like to thank the instructor Nuria ↗️ and the FabLab Ponferrada Manager Javier ↗️ for their guidance and support throughout this assignment.
All texts were written in Spanish and translated into English using Google Translate and ChatGPT.