Project Development#
This section documents the development journey of my final project, the Smart Tool Cabinet with RFID tracking.
Presentation Video#
Planned what will happen when? (timeline)#
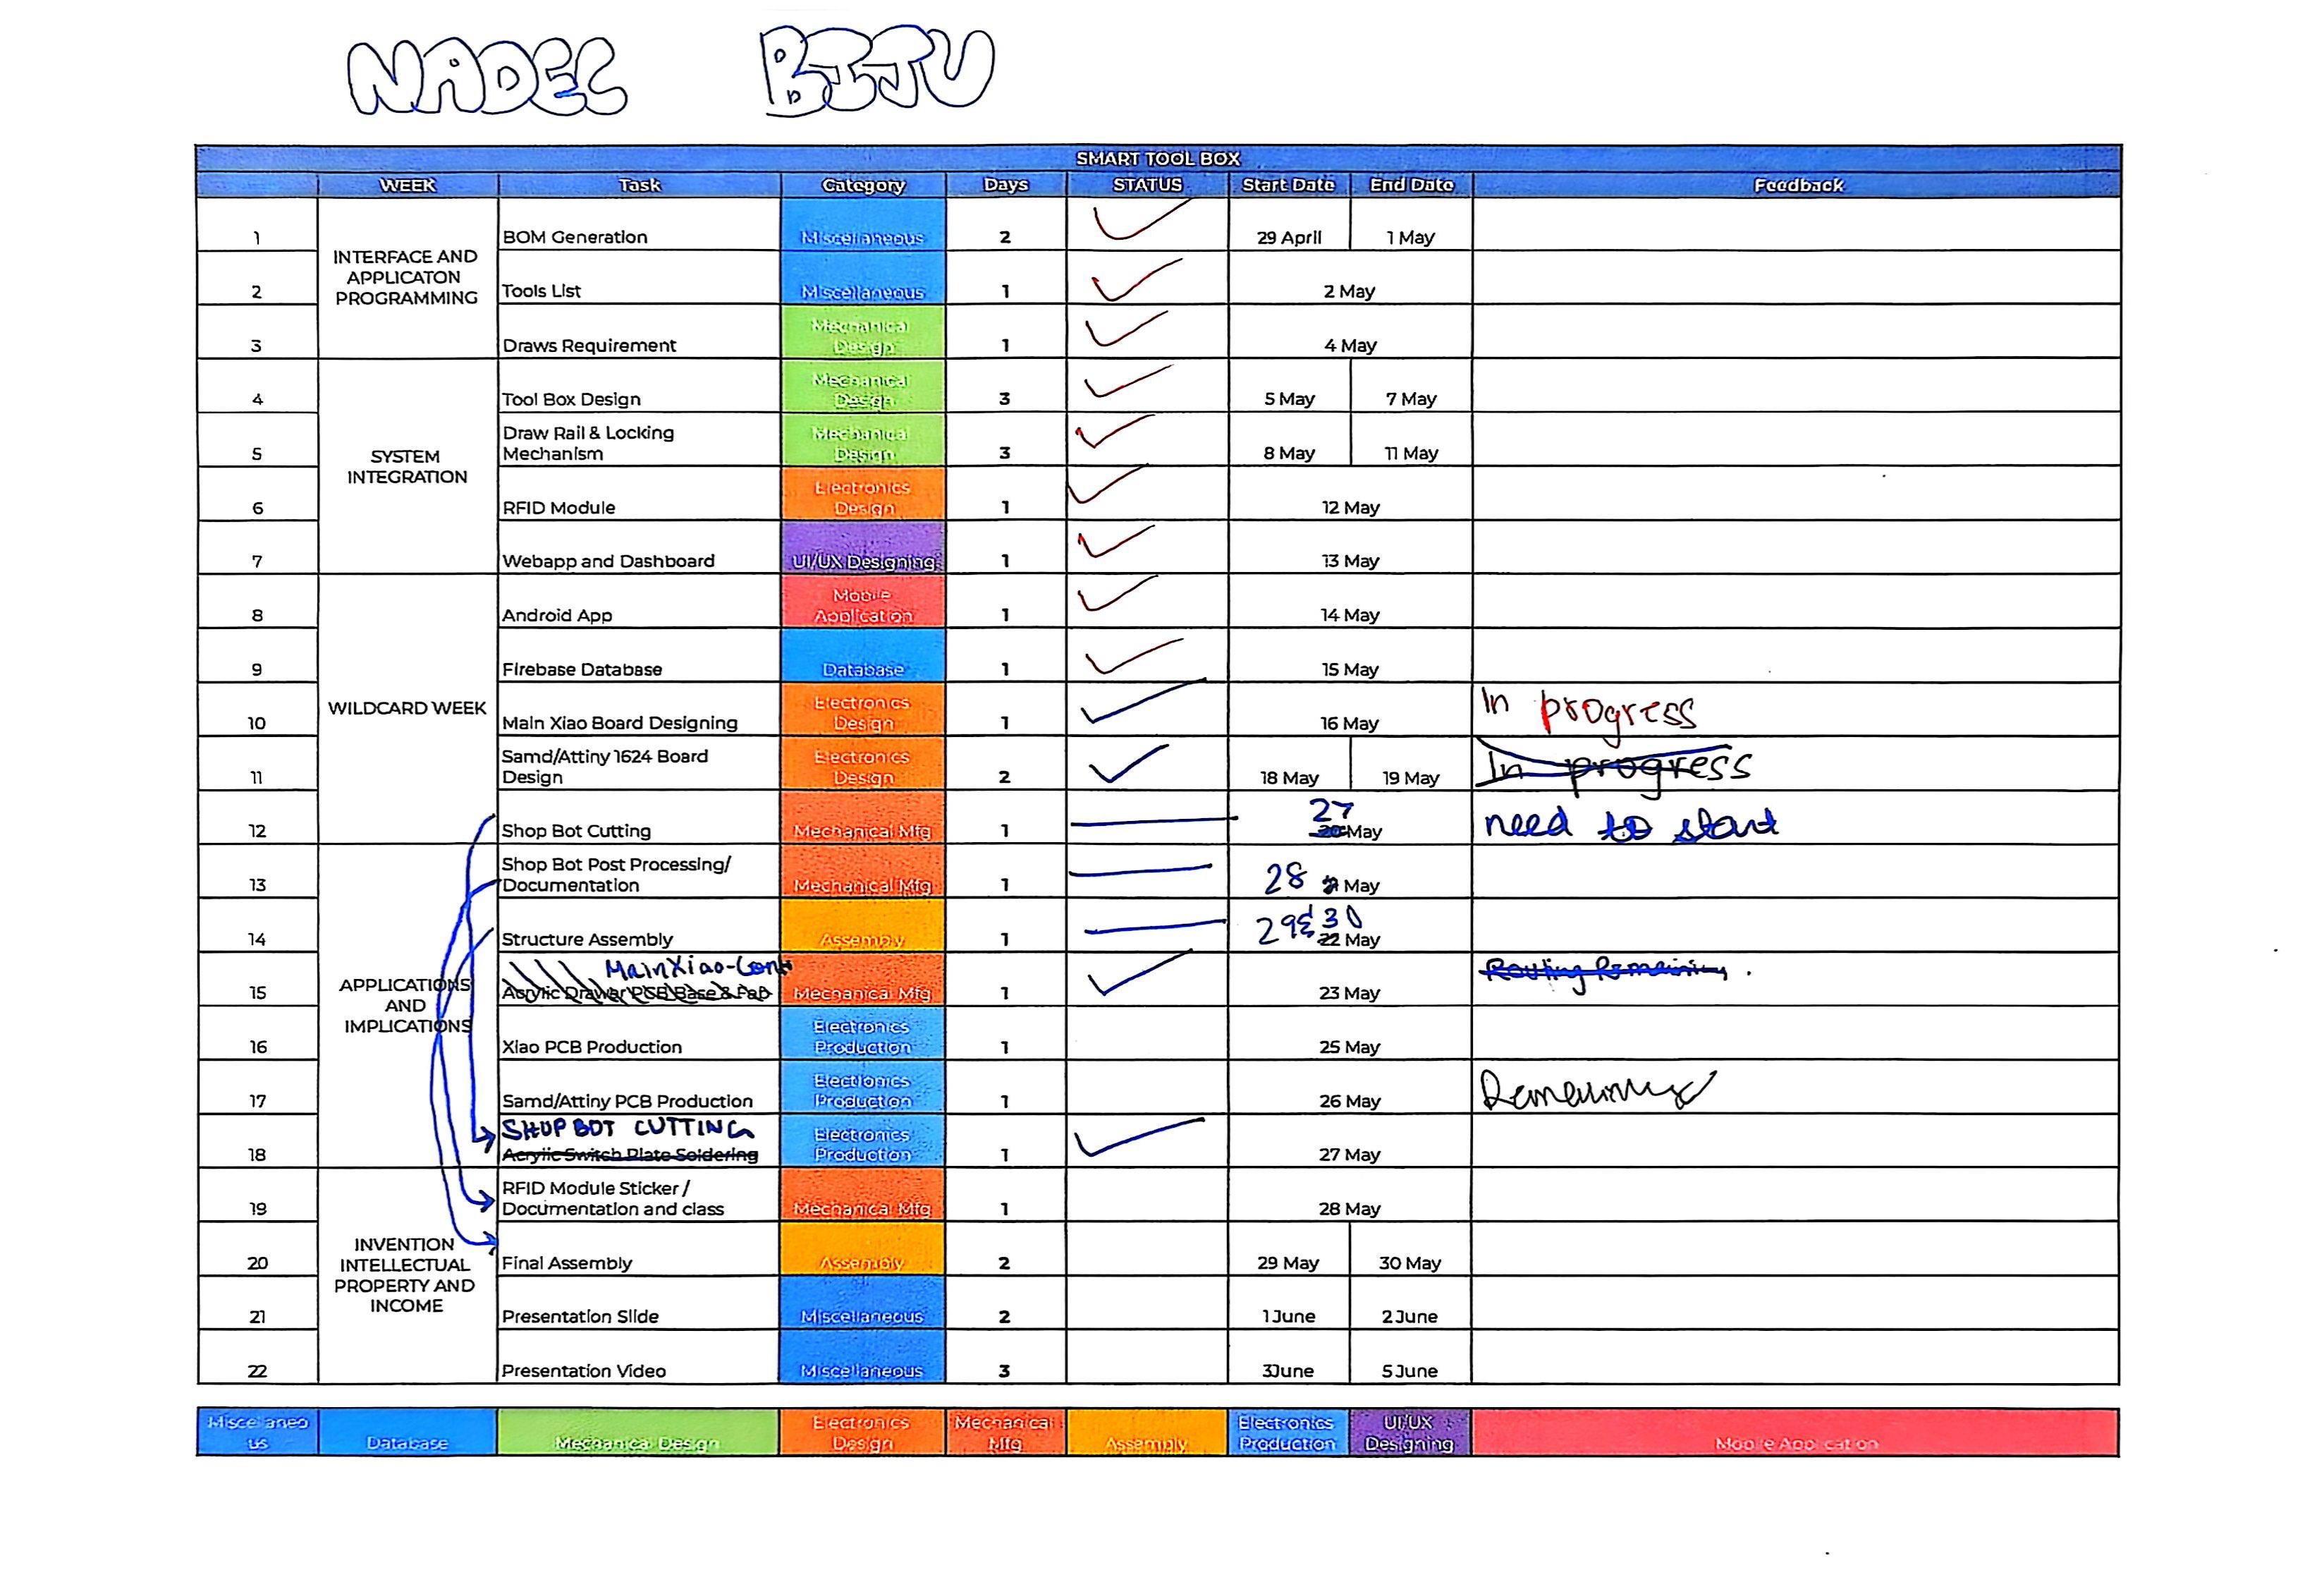
This is the plan I made at the start. It lists every task week by week with start and end dates. This is the schedule I’m following:
Overview#
The project development process includes the conceptualization, design iterations, prototyping, and implementation phases of building a smart tool tracking system for collaborative maker spaces.
DISCLAIMER: There are a lot of things that I have done in the last few weeks of my Fab Academy journey, and I have added almost all of them to the best of my ability. As a result, the sheer length of this page is quite long. Hence, I’ve added all the sections as collapsible sections, so it will be easier for everyone to navigate through the page and read only the sections they are interested in.
So, I say let’s get started, shall we? :)
Sections#
Mechanical Design of the Tool Cabinet
Thought Process#
My idea was to make a tool drawer similar to the ones used in traditional mechanics workshops, but it should have a classy look, like something that wouldn’t be out of place or an eyesore if kept in one’s living room. Hence, I decided I want it to look kind of like those kitchen cabinets used in modern kitchens. So I decided to go with a structure made fully out of wood.
Material Selection#
The material to be selected was a bit tricky. There were lots of things I had to take into consideration.
- Cheap
- Easy to work with
- Durable
- Aesthetically pleasing
This was a tall order for me, as I couldn’t find any material that satisfied all the above criteria, so I decided to go with the trusty old plywood. It was cheap, easy to work with, and durable. The only thing it lacked was the aesthetic appeal. Hence, I decided to go with a post-processing technique of staining the wood to give it a more classy look.
P.S: I couldn’t get to stain the wood, mainly due to the budget of the project, and time estimation got greatly out of hand. Hence, I had to skip this step and go with the natural look of the plywood.
Not my greatest work, but it still looks good enough for me.
Designing the Cabinet#
Well, this is the designing section of the project, and so far I haven’t covered much regarding the design of the cabinet, so let’s get to it.
CAD Software Selection#
I know this isn’t something that should be a huge deal; people usually stick to something they are quite familiar with.
That’s where you are wrong, my friend. Up until joining Fab Academy, my main go-to software was SolidWorks, and I was a huge Fusion 360 hater (still am, don’t get me wrong, I just don’t like it). There is something about Fusion that gets on my nerve. How can a software be so laggy and buggy? It’s a CAD software, for crying out loud, that is marketed to run on very low-end machines, and struggles on a machine where SolidWorks runs without any hiccup, but I digress.
I had to use Fusion 360 for this project, as it was the only software widely used in my lab (not just widely, tbh I think it’s the only CAD software used in my lab), and I had to use it for this project.
So Fusion 360 it is.
How Many Drawers Should the Cabinet Have?#
This was a question that me and a lot of people had heated discussions about, I would say. LOL. My local instructors, my peers, and the folks at the regional review, Rico and Miriam (HUGE SHOUT OUT TO RICO AND MIRIAM, GREAT FOLKS), all were asking me to make the cabinet with one drawer and let the rest just be placeholders, no more than two drawers.
I was pretty confident that I could get it done in time, and hence I decided to go with three drawers. But it was kept conditional that I should make one drawer fully functional, and the other two should only be worked on after the first one is fully functional and working.
Designing the Cabinet#
So I started with the dimensions. How big I wanted them to be, mainly length, width, and height. So I decided to go with the following dimensions for the cabinet and the drawers.
Length: 2.5ft Width: 2.5ft Height: 1.5ft + 50mm
SORRY GUYS, we live in a crazy world. How can dimensions be so non-uniform? Can’t we all just switch to the metric system and be done with it?
Like, seriously, I don’t get it. I mean, I know the US is a big country and all, but come on. It’s 2026 and we are still using the imperial system. I mean, seriously.
The funny thing is that I live in India and we use the metric system here for the most part, but some things like plywood length and width are mentioned in feet and inches.
But when it comes to thickness, hell no, we have to use metric for that. I mean, seriously, how hard is it to just use one system for everything? I mean, seriously.
Haven’t we as humans learned anything from the past, where we had rockets blow up due to unit conversion errors? I mean, seriously, how hard is it to just use one system for everything? I mean, seriously. (Enough ranting for now, let’s get back to the project.)
Then I sat for a solid 45 minutes creating the formulas for the dimensions of the drawers and the cabinet in relation to each other and the overall dimension of the cabinet. So everything can be scaled by the parametric formulas I created.
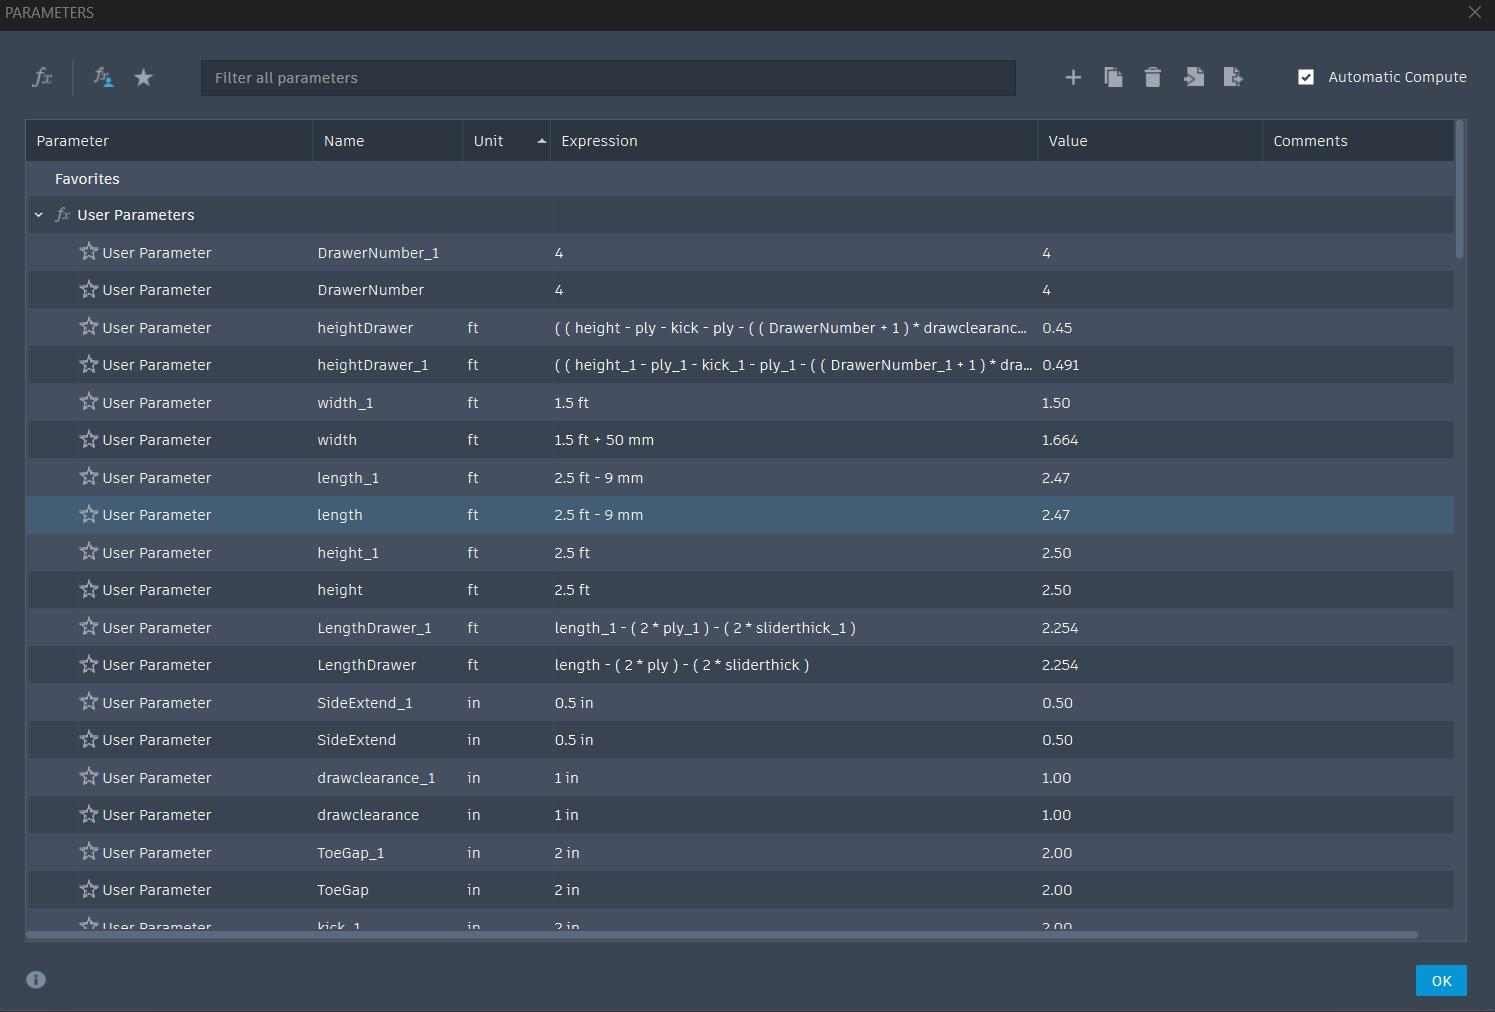
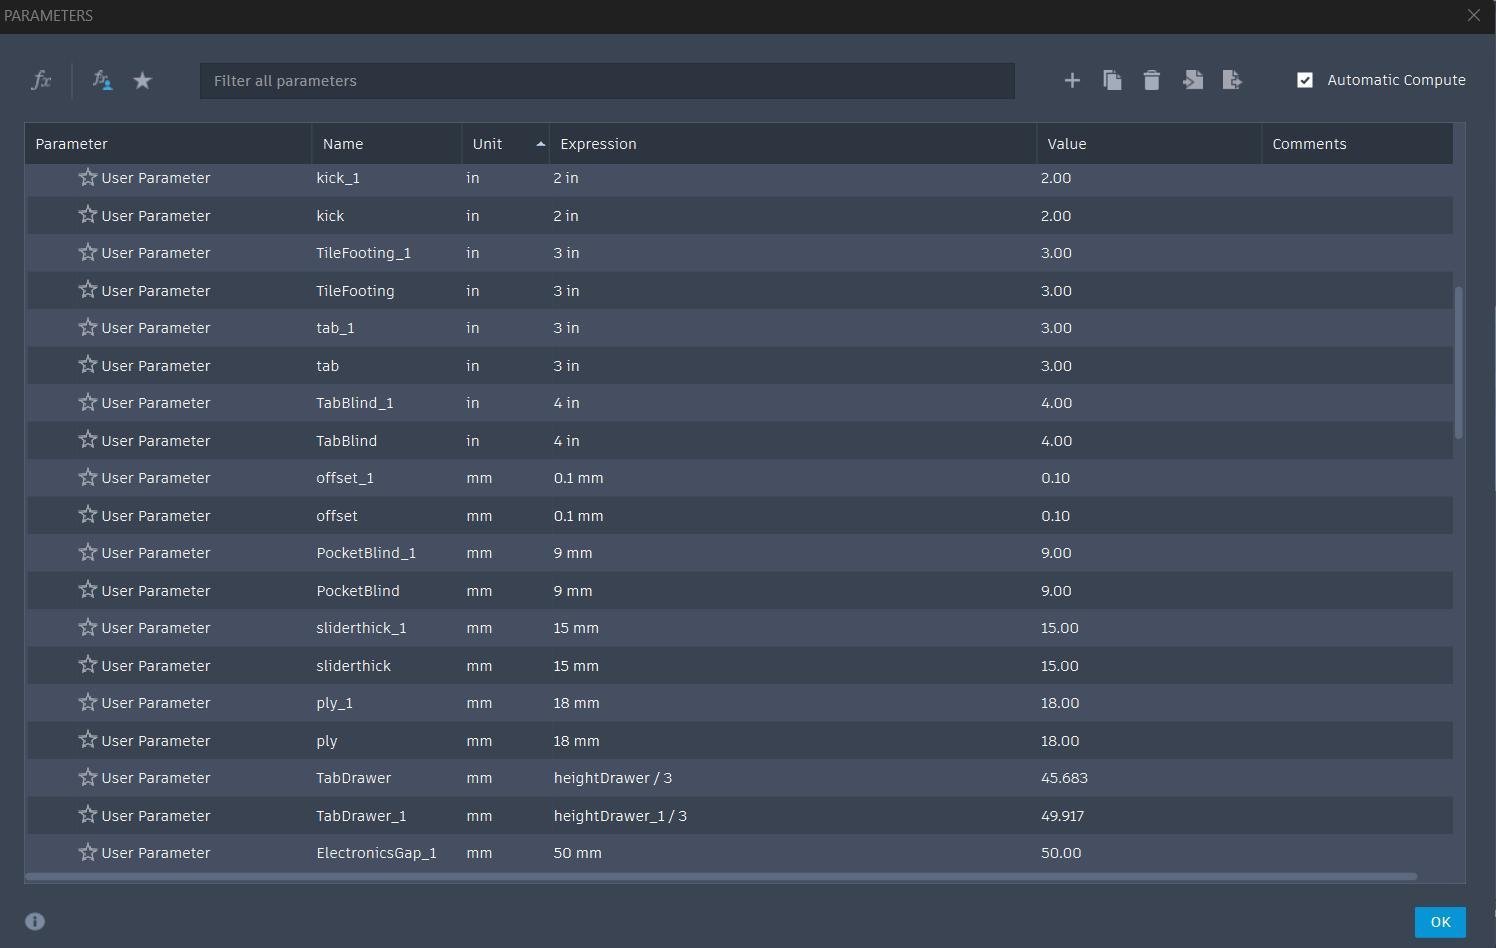
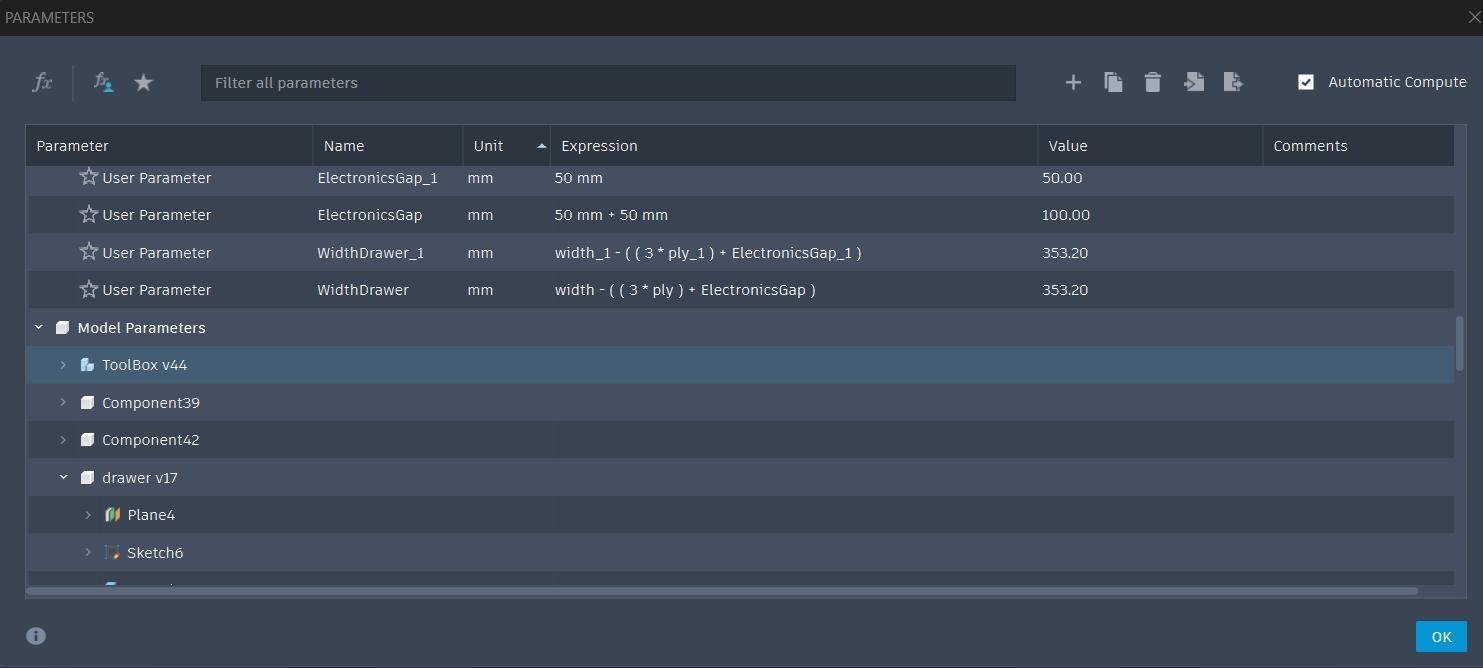
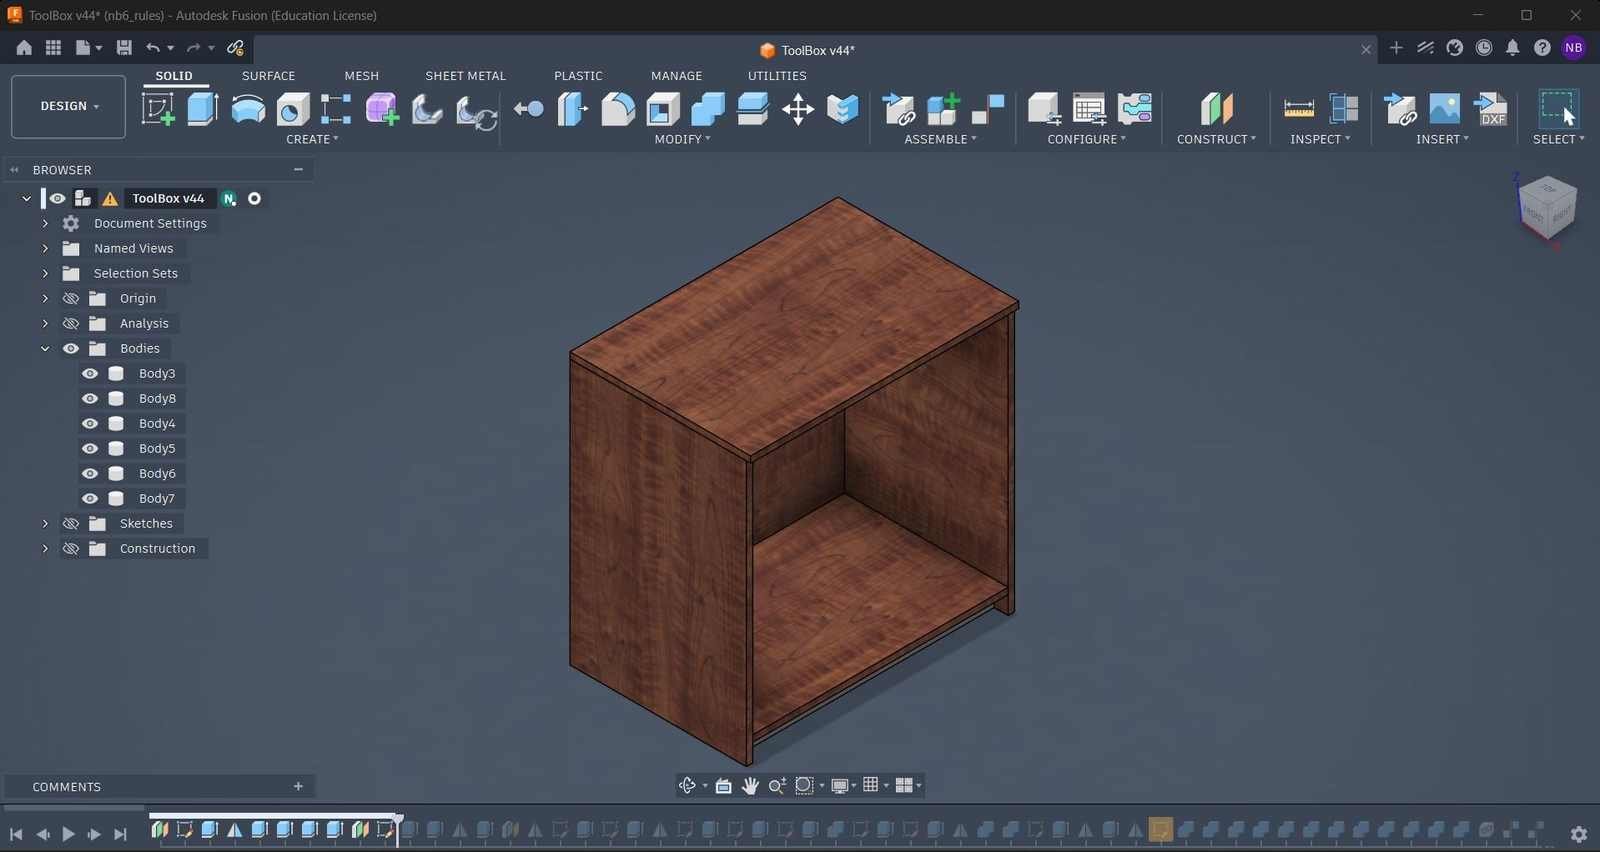
After which I went forward with just the exterior of the cabinet and created the 3D model.
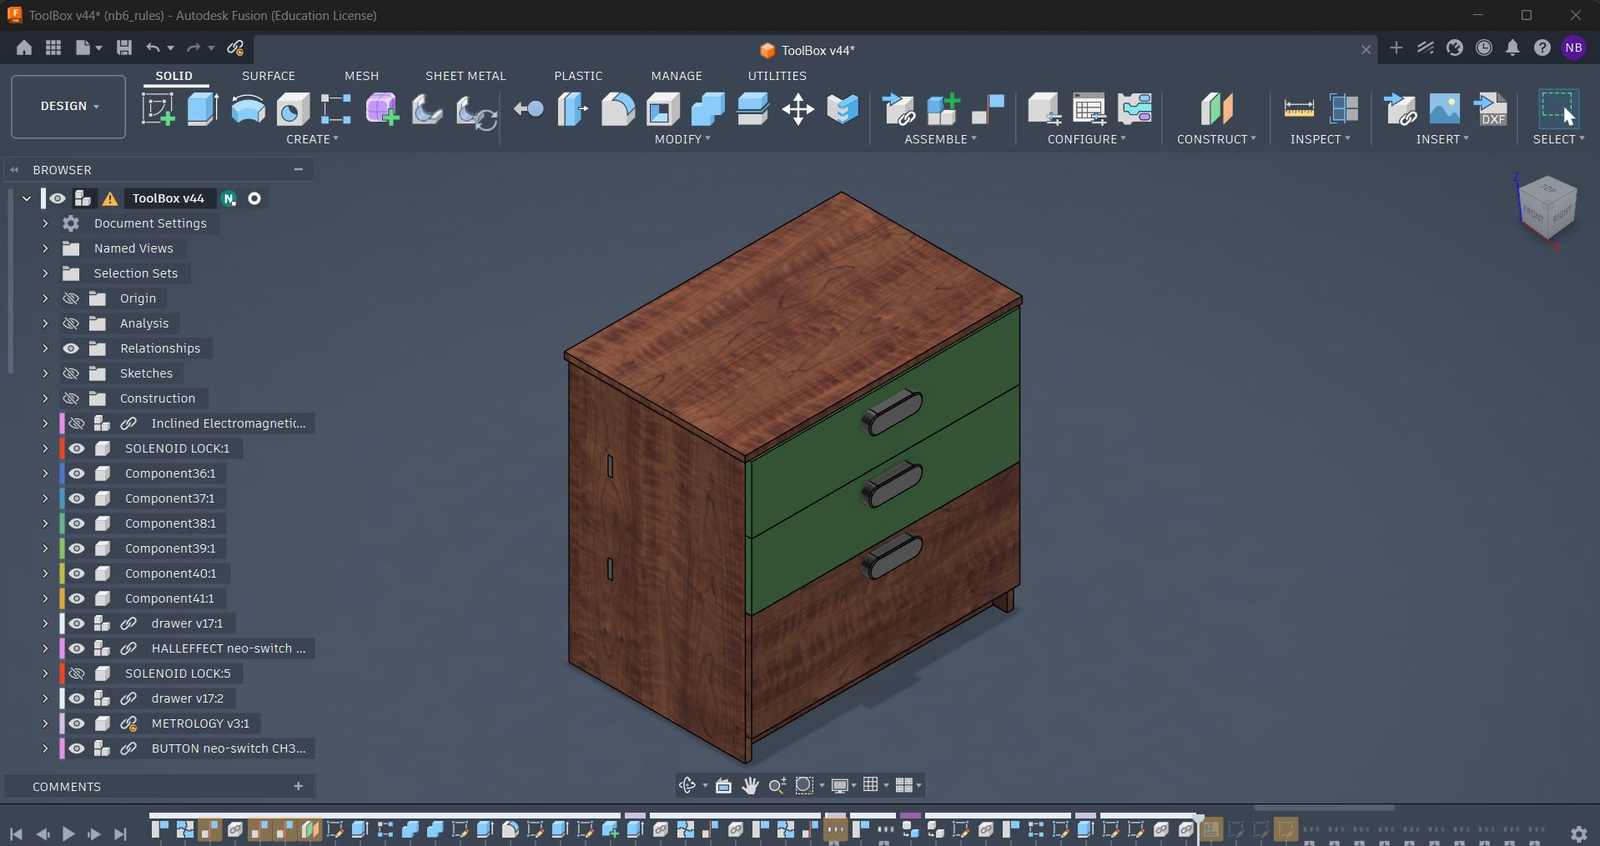
Then I went forward with the drawers and created the 3D model for them as well.
Do you want to see the CAD montage of the cabinet and the drawers? Sure you do. Here it is.
For more details on the CAD designing, you can check out my week-2 documentation .
Well, with that initial design done, let’s move forward with the next thing I did.
PCB Design Part - 1: XIAO Main Board
Objective#
The main things I wanted to achieve with this board are as follows:
- The WiFi connection to the internet so I can push data to my Firebase Firestore database.
- The ability to read the RFID tags.
- The ability to control the solenoid locks.
- The ability to control the Neopixel LED strips for the lighting of the drawers (I’m a kid in an adult’s body, and RGB LIGHTS INCREASE FRAME RATE, DON’T TRY TO CORRECT ME ON THAT, IF YOU DON’T WANT A HAMMER THROWN AT YOUR HEAD).
- The ability to talk with the n number of nodes I’ll be adding for the n number of tools I’ll be adding to the cabinet.
Since I had a somewhat clear idea of what I wanted to do, I went ahead with the board, but since I’m dealing with a fairly big project (in terms of physical size), I’ll be splitting it into a set of boards. The first one is the main board that will control the whole cabinet, and the other ones will be the nodes attached to each tool.
Designing the XIAO Main Board#
Now we move to the trusty old KiCad.
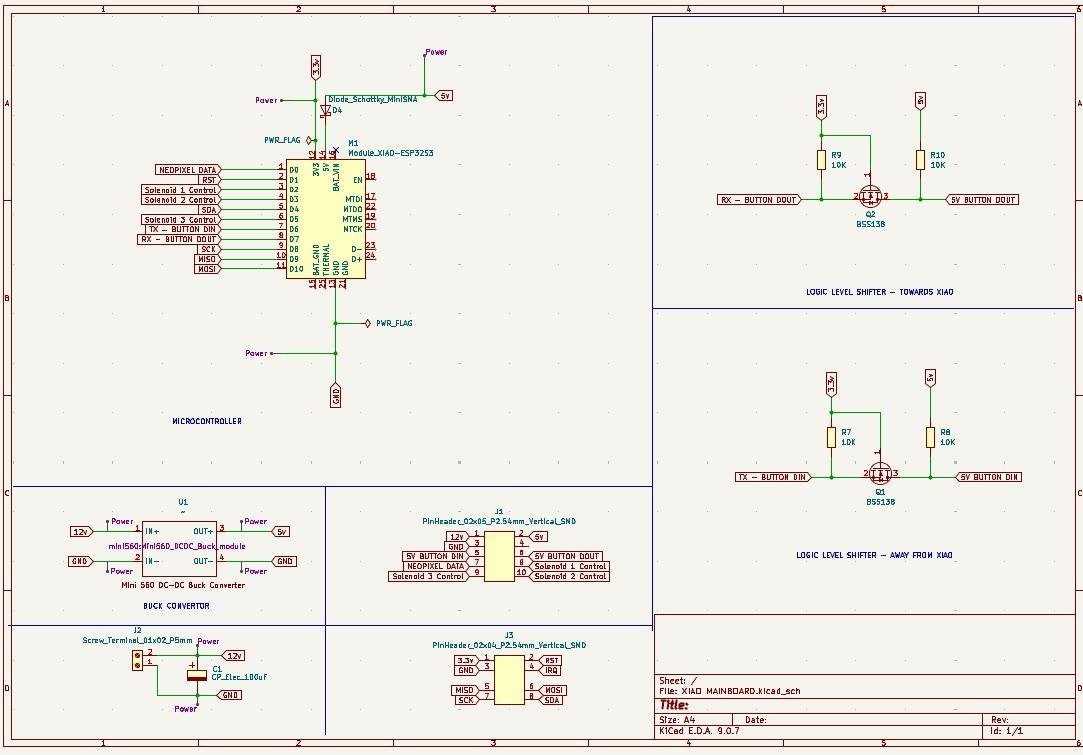
So I started out by building the schematic for the board with all the components I’ll be needing for this board.
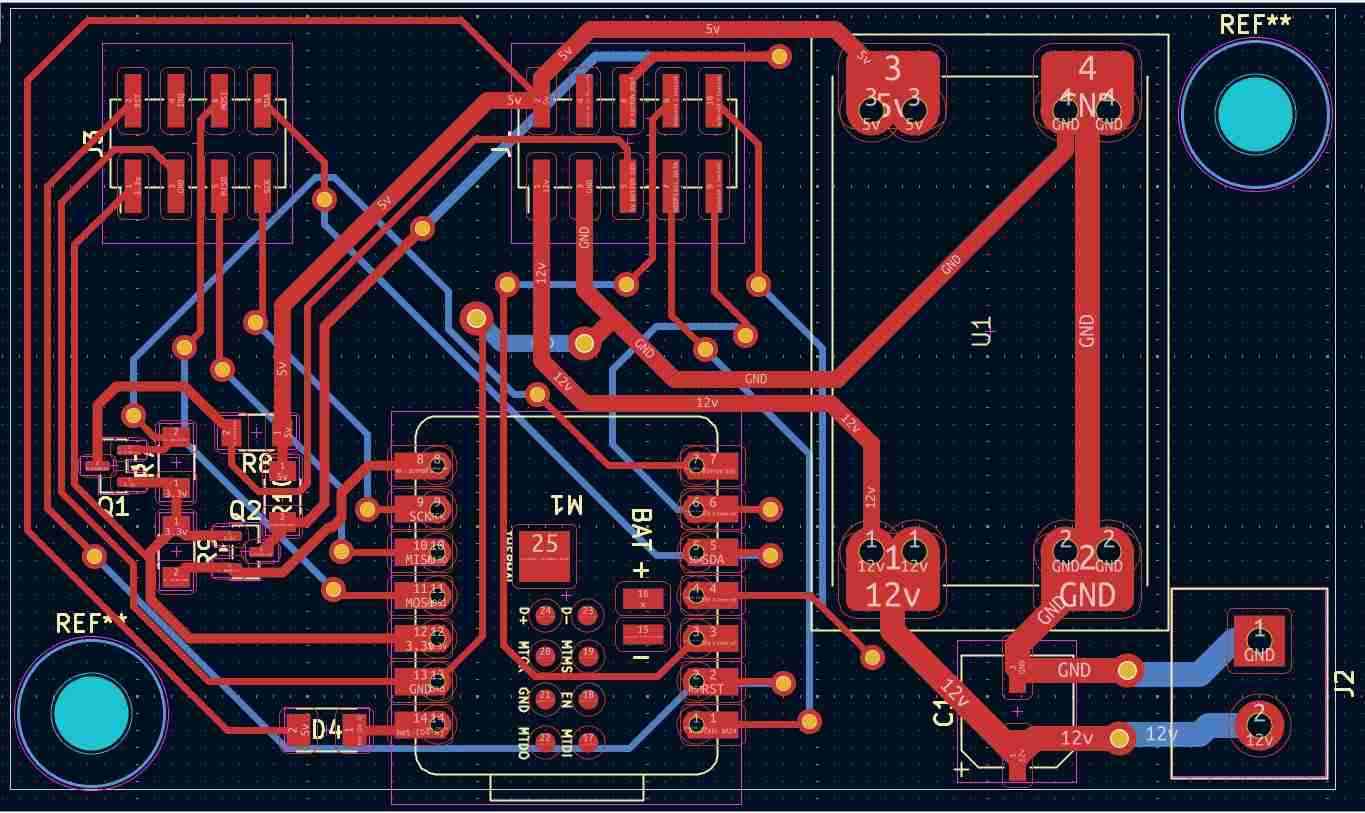
Then the PCB was routed.
You can check out the 3D model below.
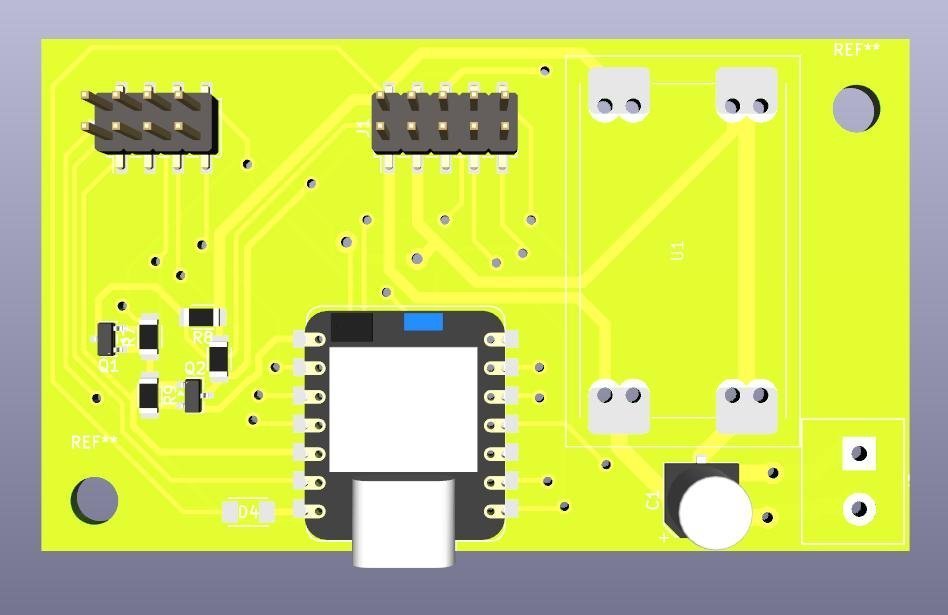
I hadn’t bothered about the missing 3D model of the DC buck converter and a diode, as in my project there was plenty of spacing available, so I didn’t have to worry about the extra 5mm of thickness that I won’t be accounting for when I eventually import this into my Fusion 360 3D model of the cabinet and the drawers.
For more details on the PCB designing, you can check out my week-6 documentation .
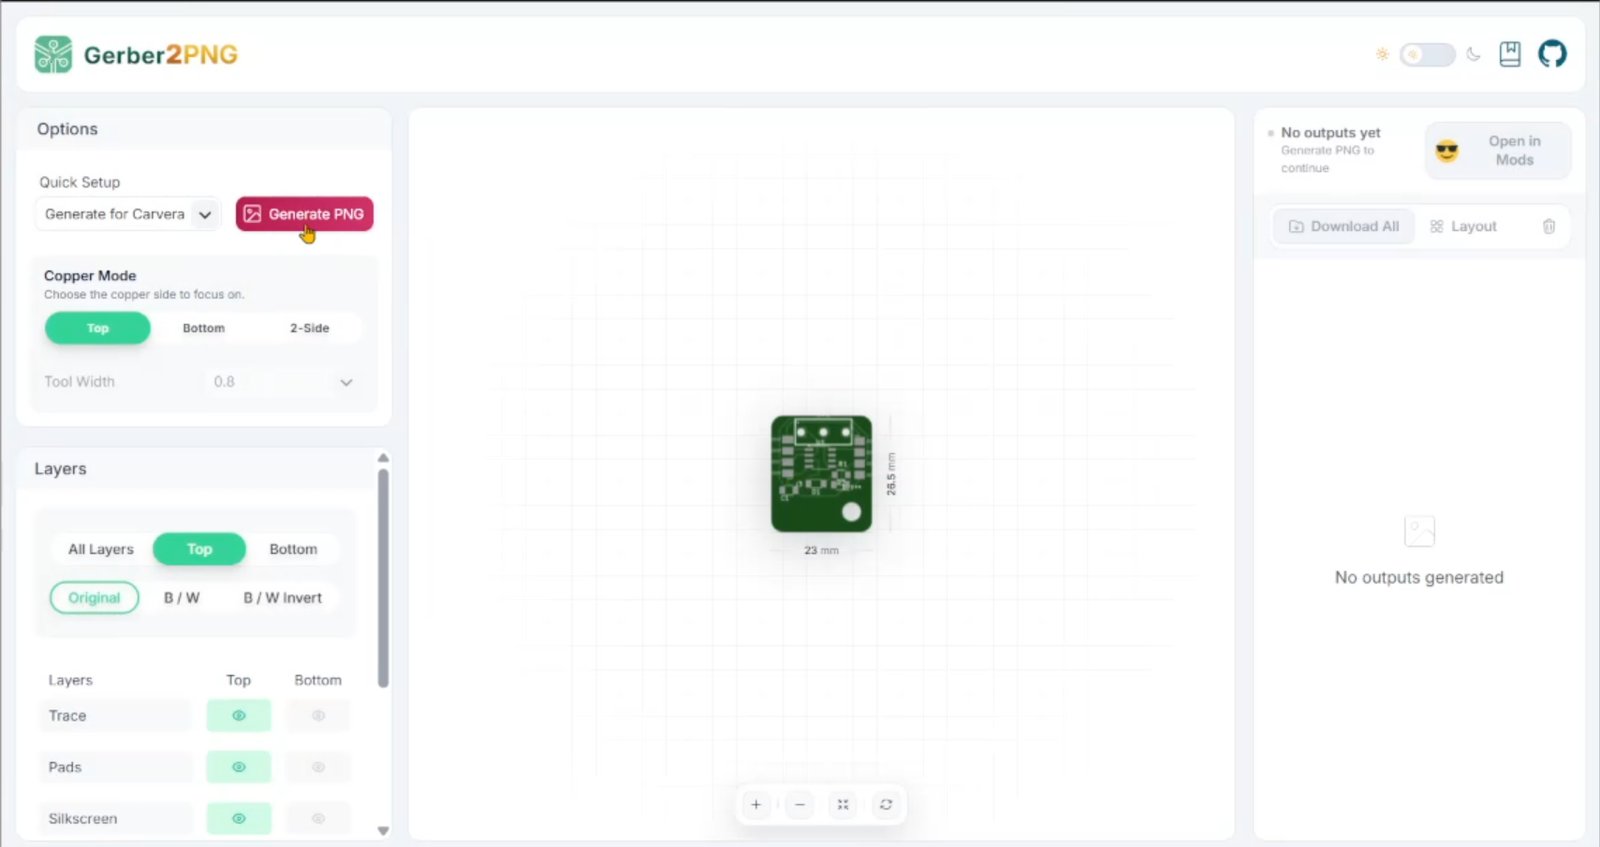
Then it was all about exporting it to the Gerber-to-PNG tool from my very own super cool lab (or SuperFabLab, as they officially call it), and then milling the PCB on the Carvera CNC machine.
https://gerber2png.fablabkerala.in/
More detail on that in the next section of this page.
Carvera Documentation
Steps#
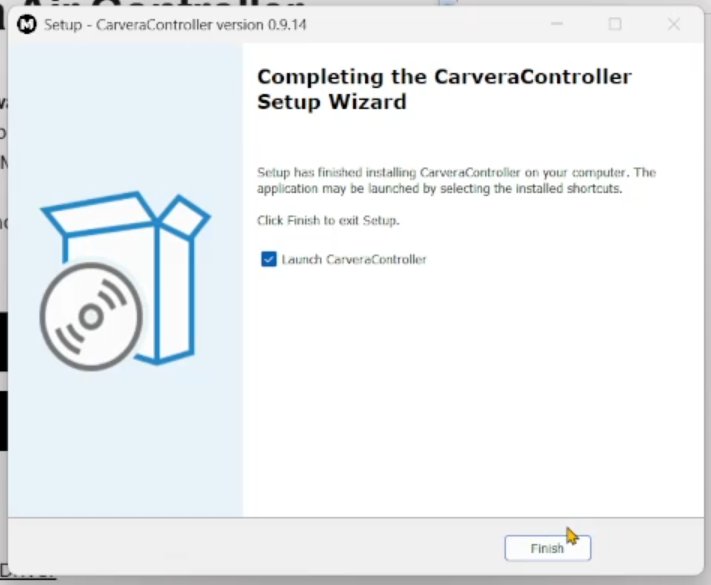
Downloading the Carvera Controller Software from the official website and installing it on my laptop. https://global.makera.com/pages/software?srsltid=AfmBOori47Mr6iiwDX-9Y0koYWJygdZLgS6OkXF9NHD8bUTk8dPo13OR
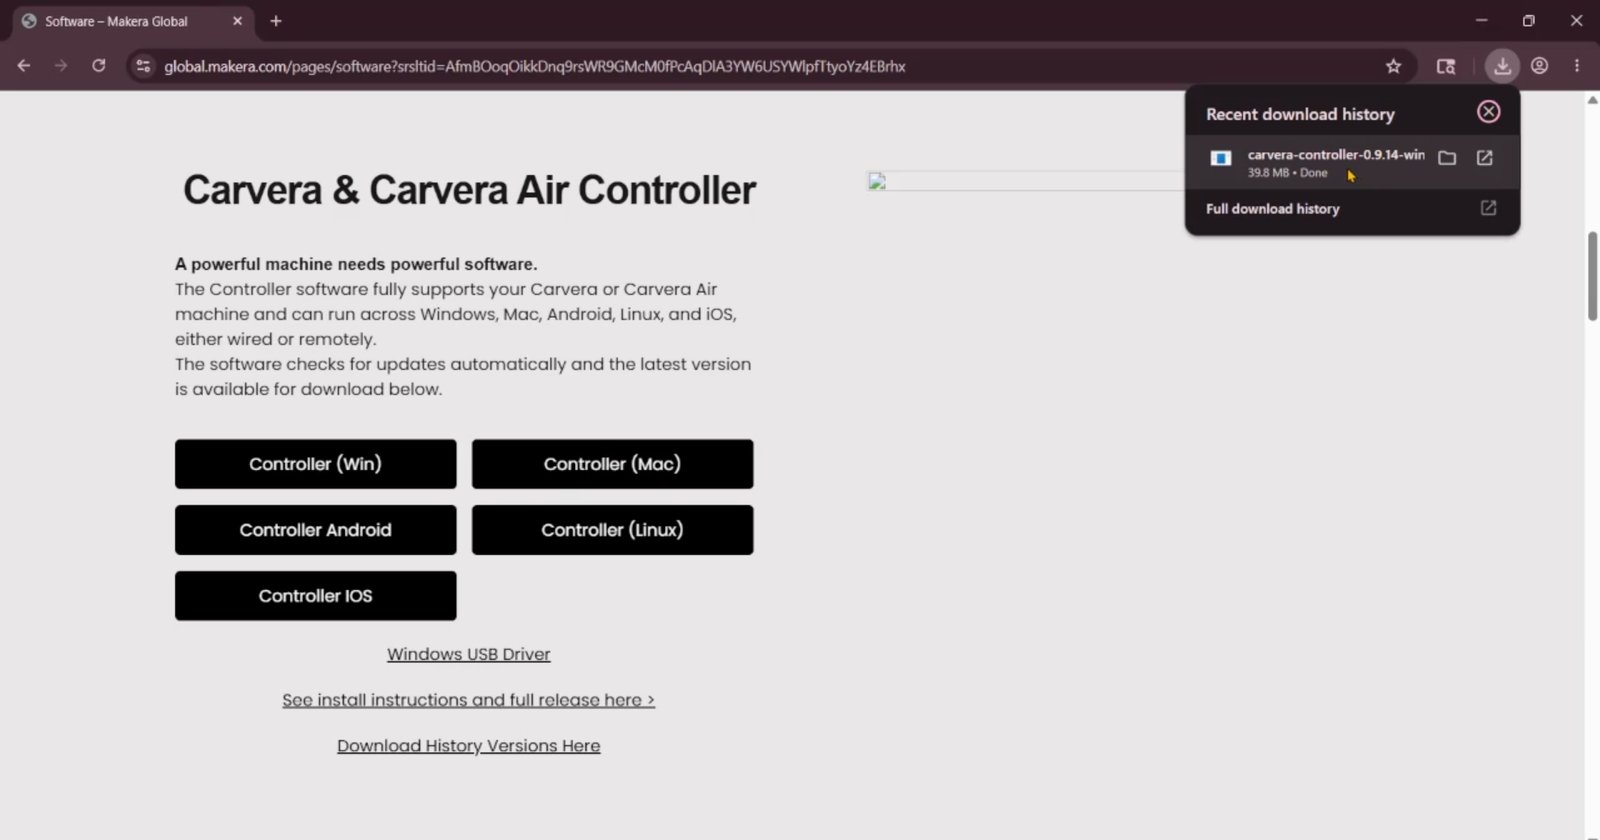
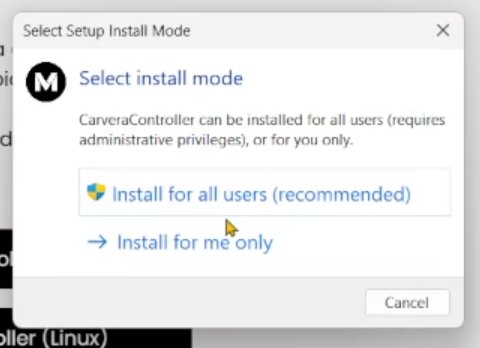
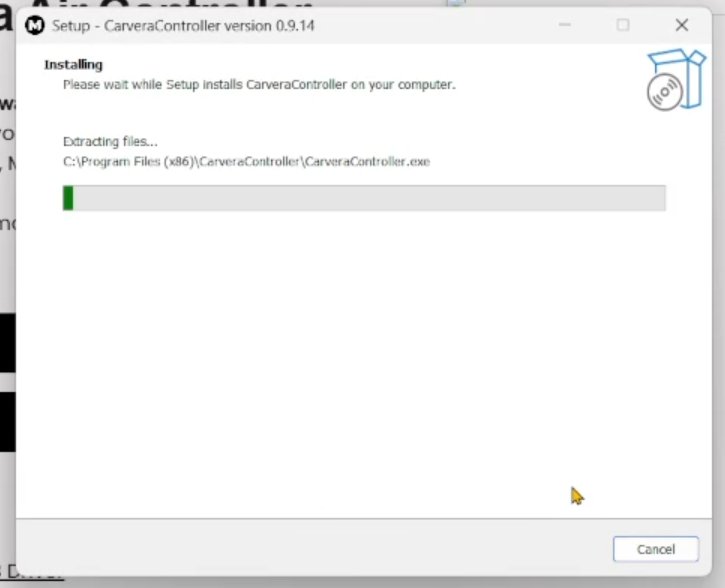
Exporting the file from Gerber to PNG.
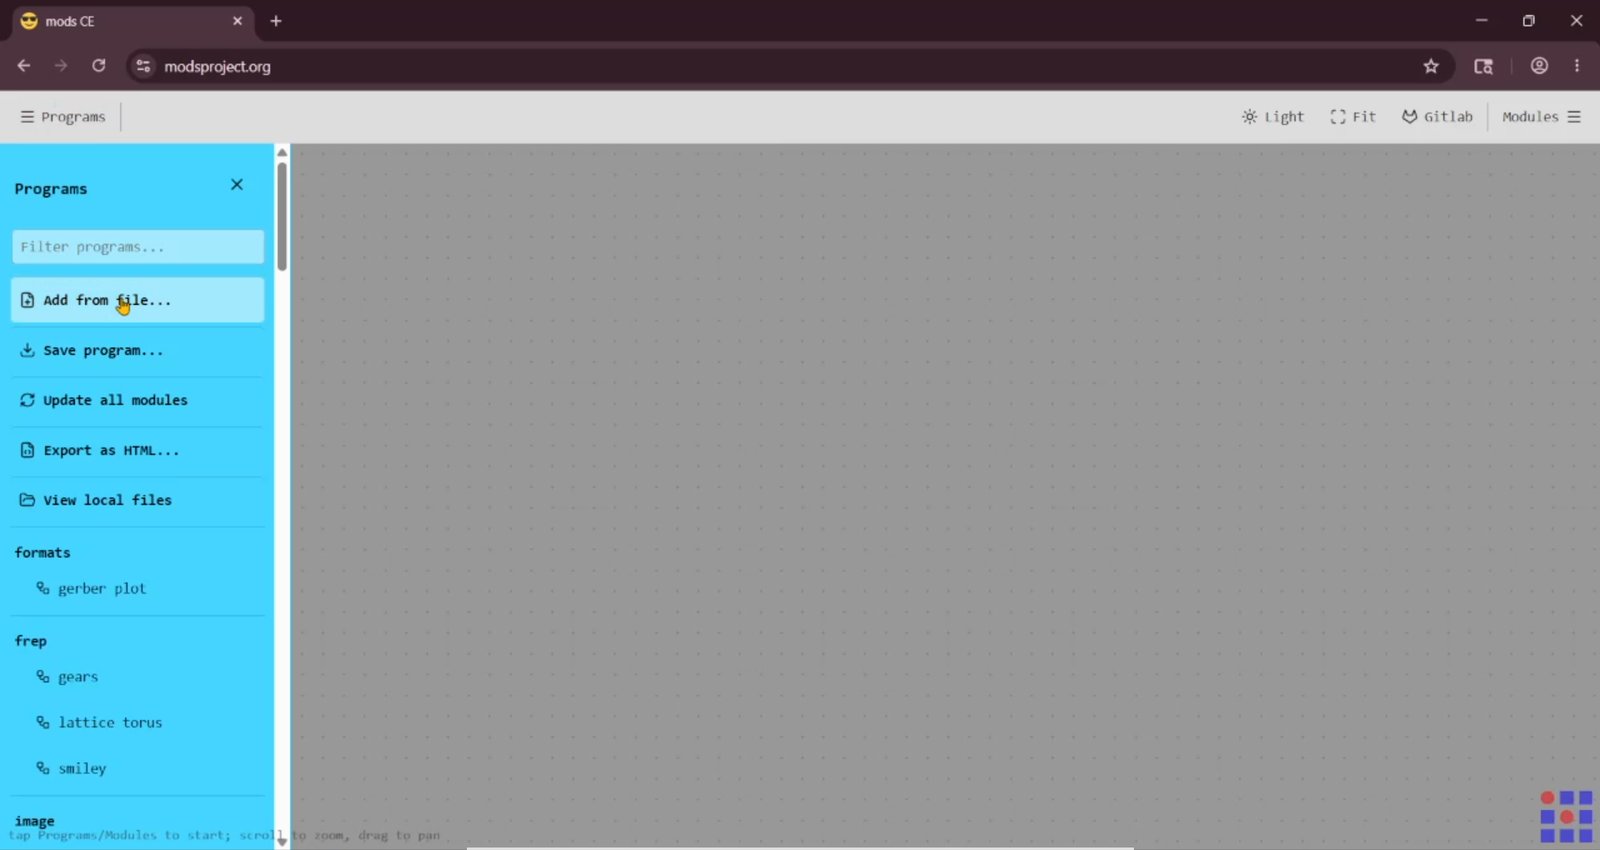
Opening MODS (https://modsproject.org/ ) and importing the program file. CarveraMODSv4.3.json
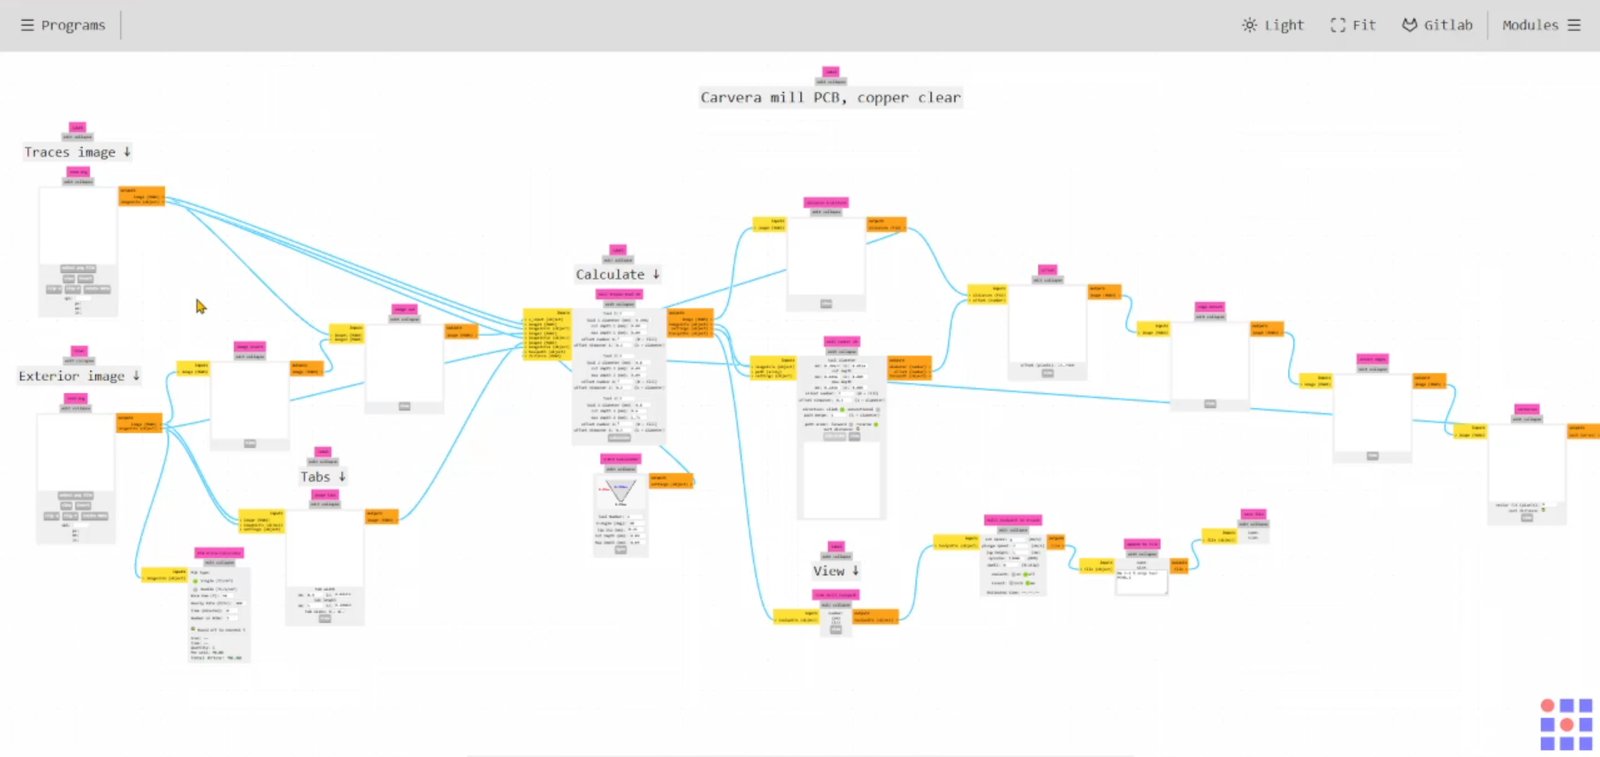
Import the PNG file into MODS and set the parameters for milling.
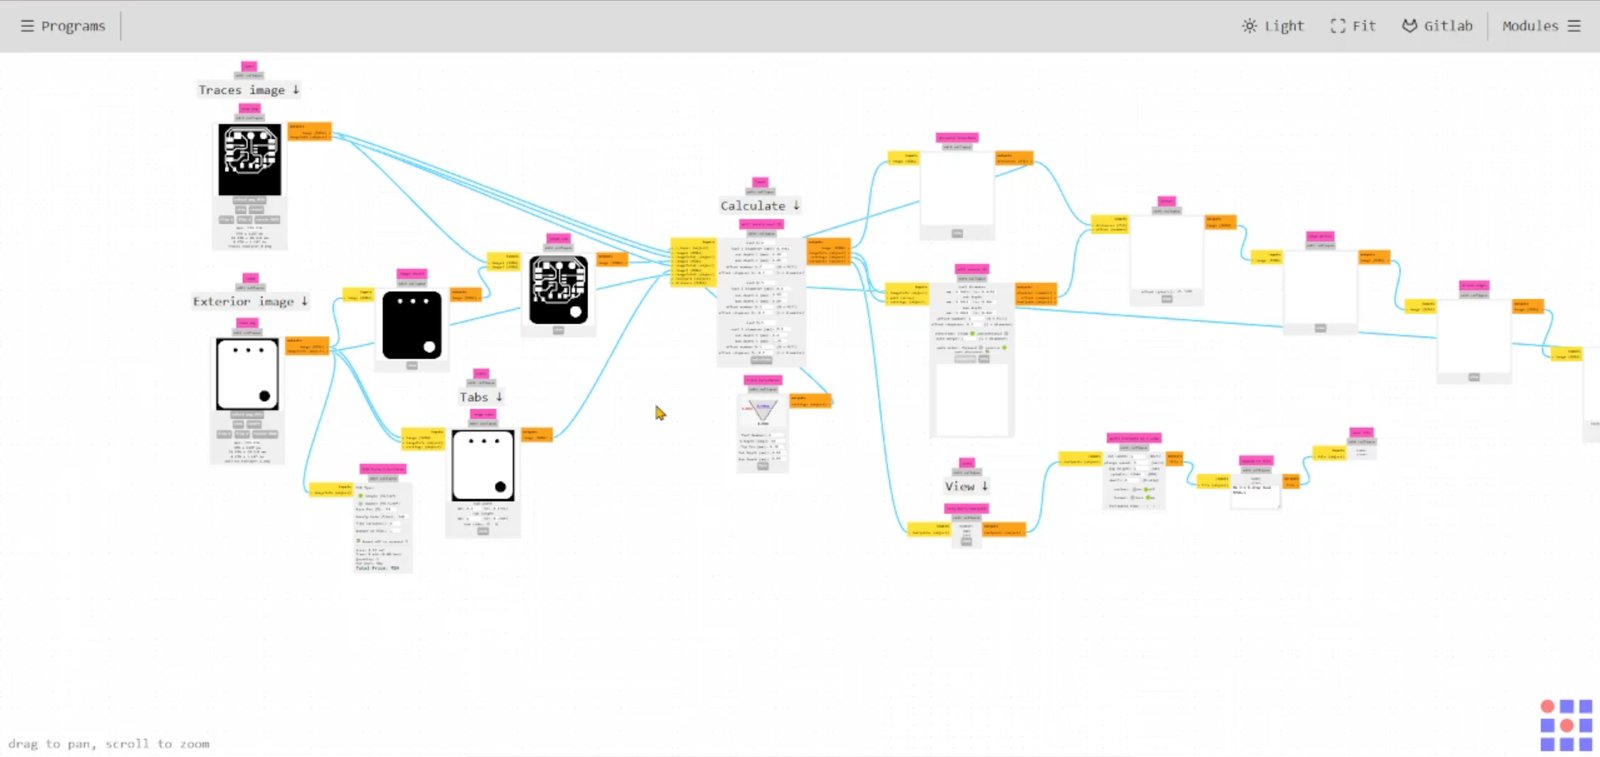
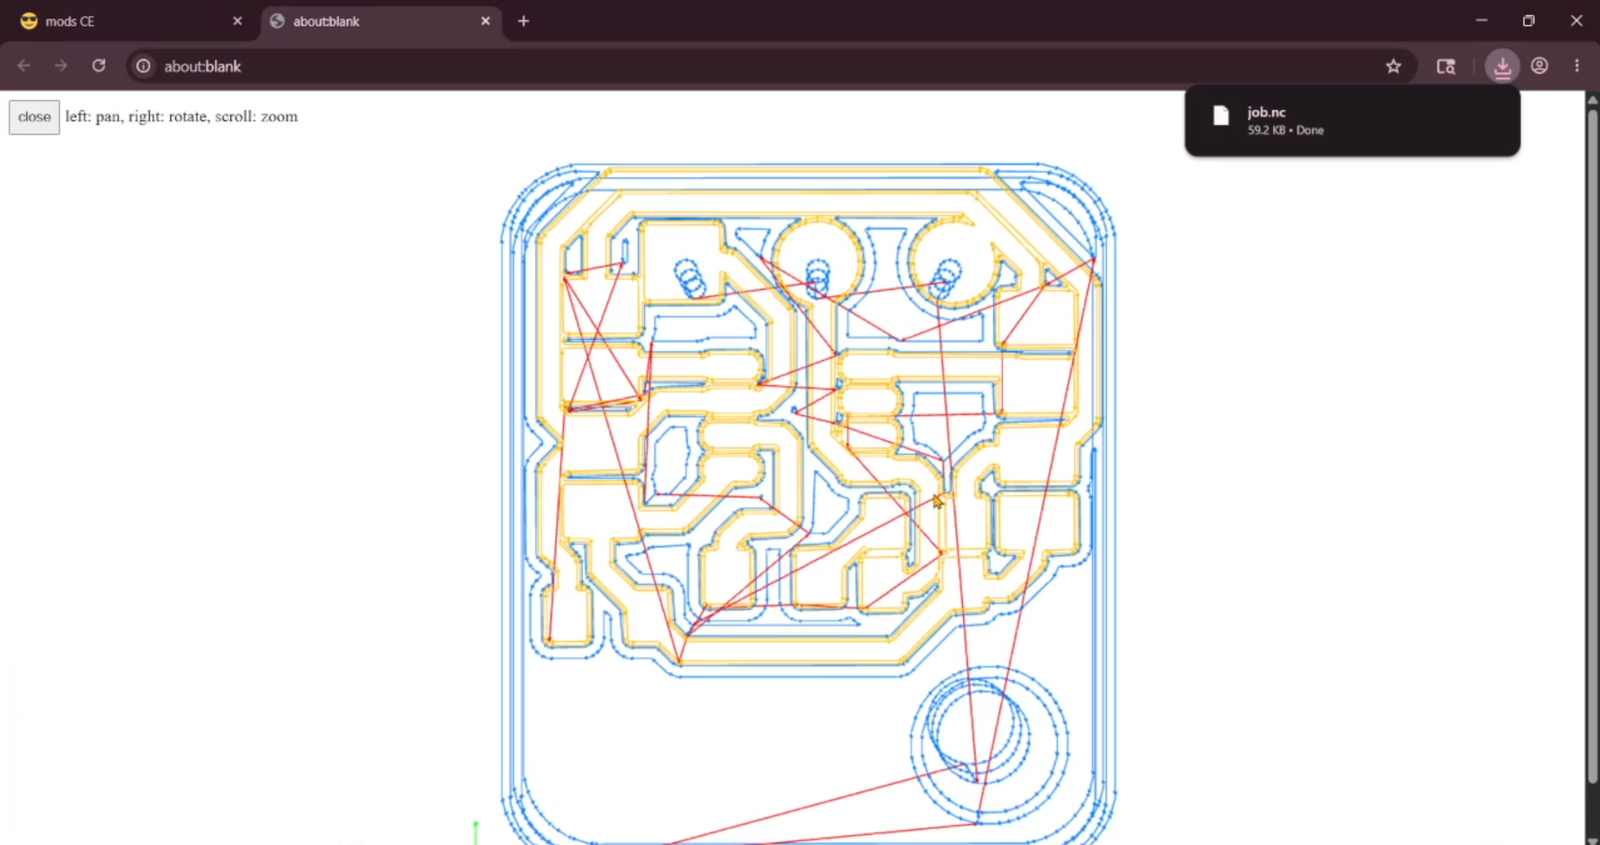
Crosscheck the generated toolpath and make sure all the traces can be milled.
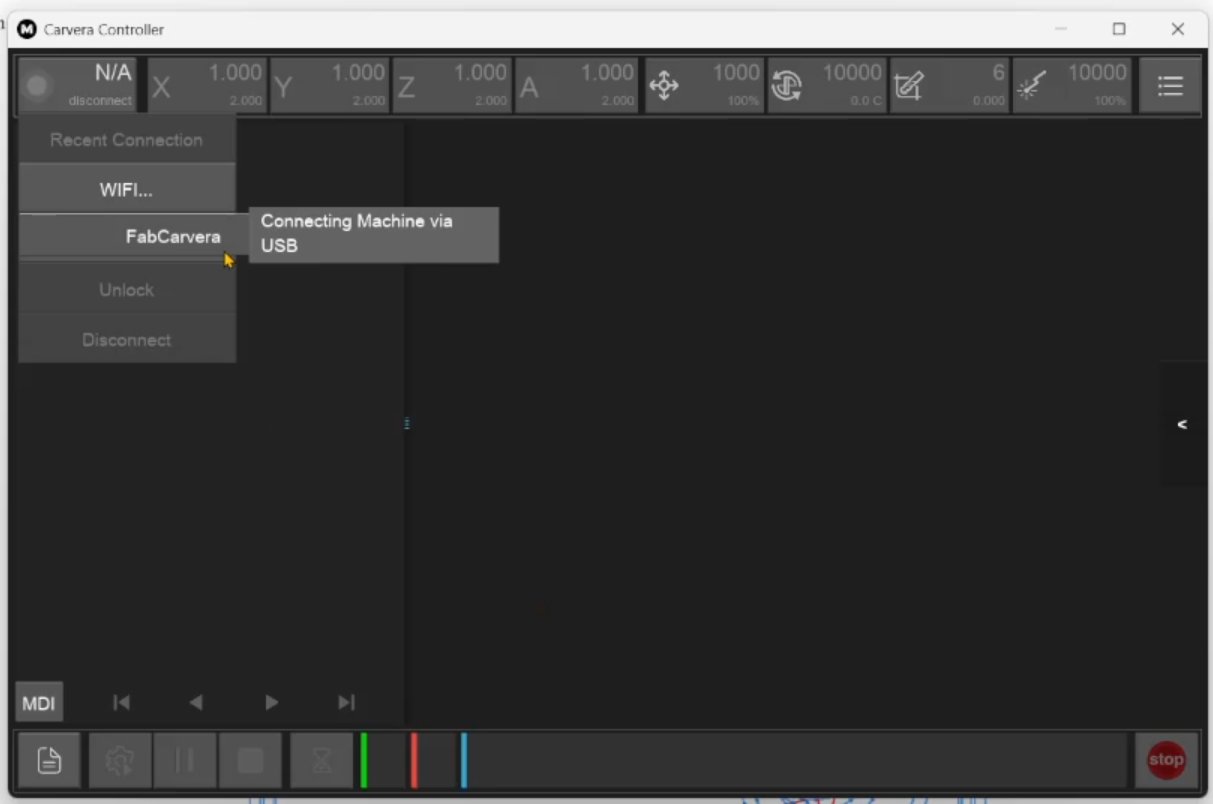
Open the Carvera Controller Software and connect to the Carvera CNC machine.
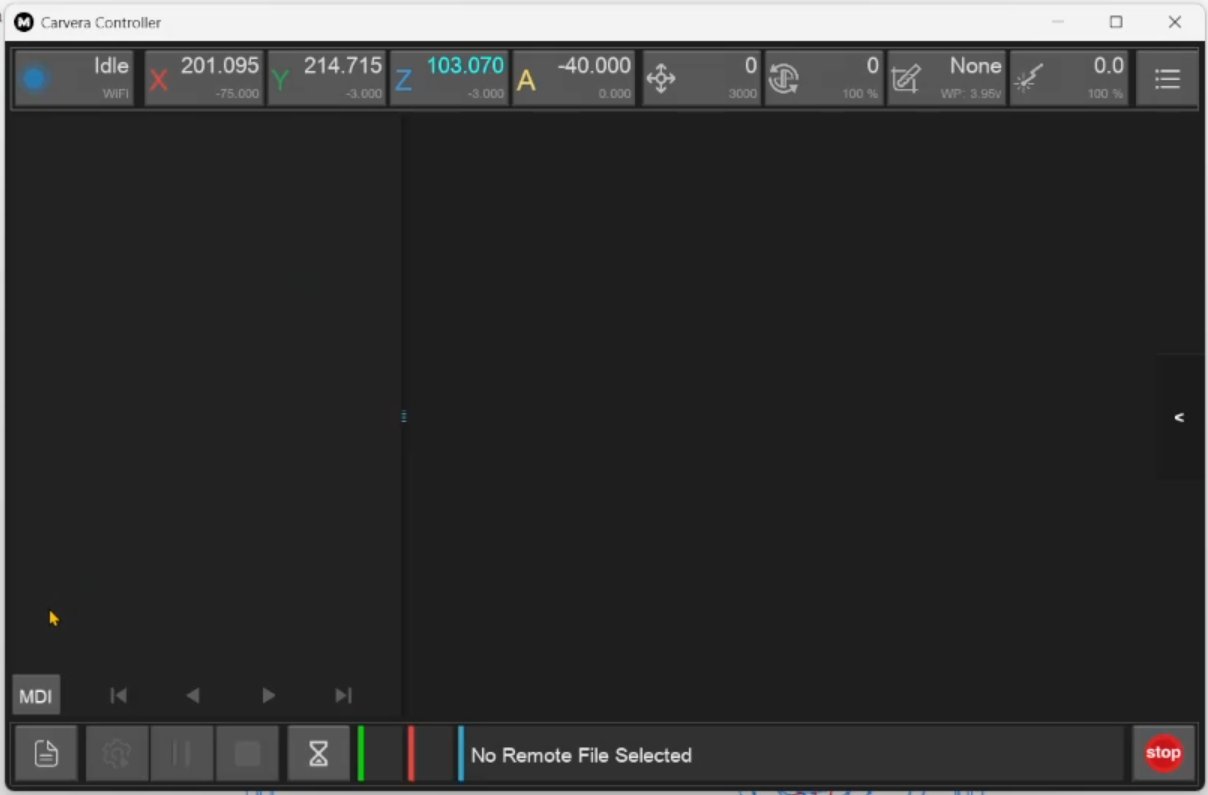
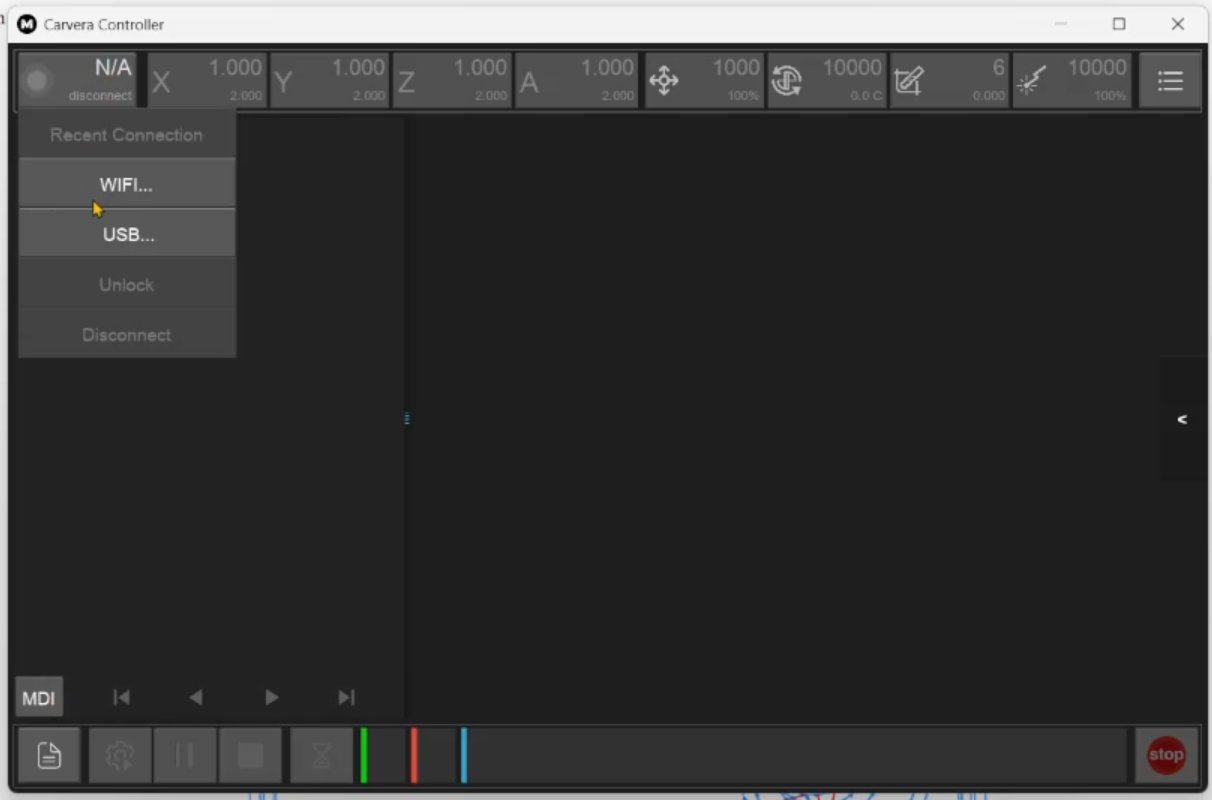
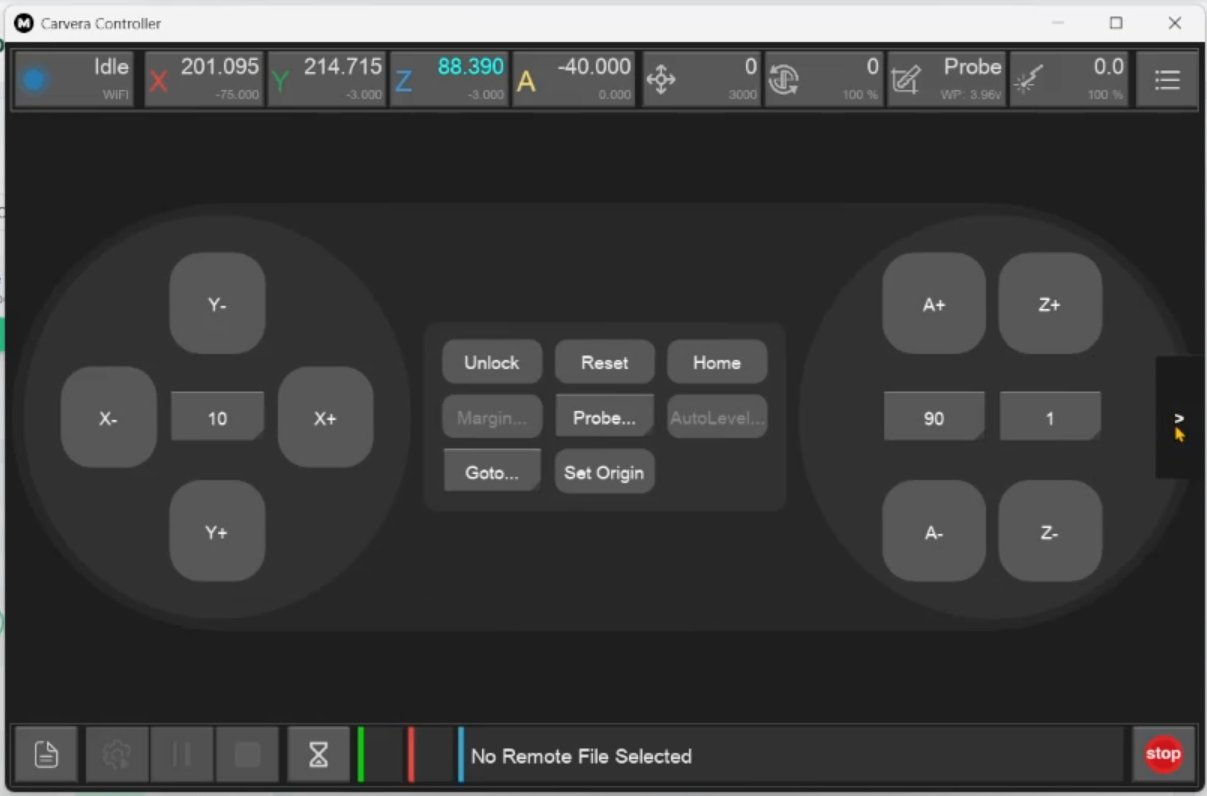
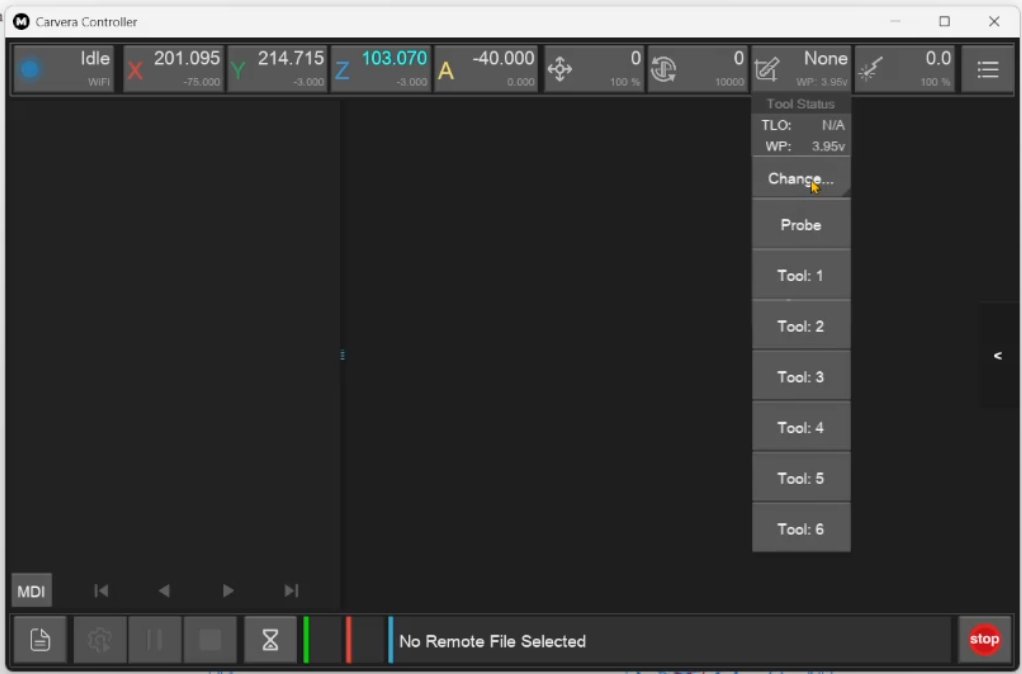
Change the tool to the probe.
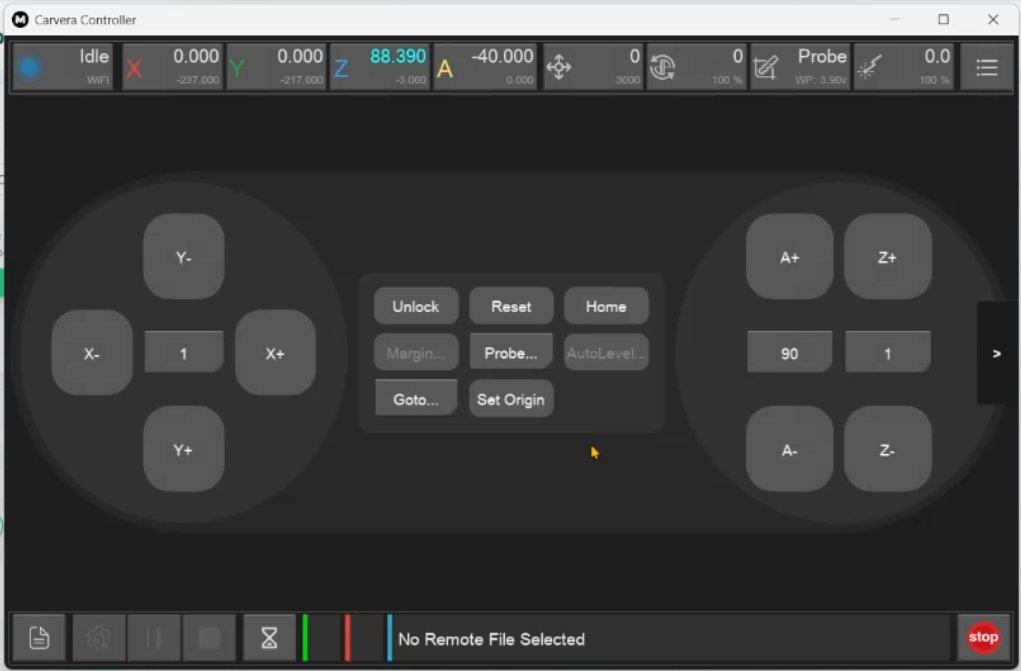
Bring the tool head to the required origin and set up the origin for the milling process.
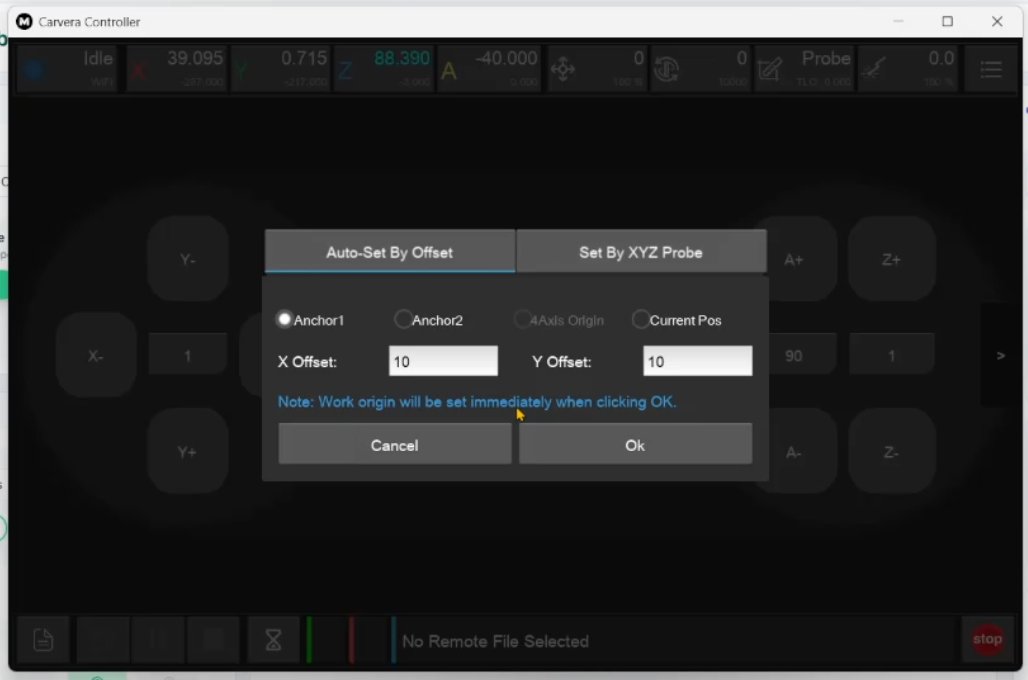
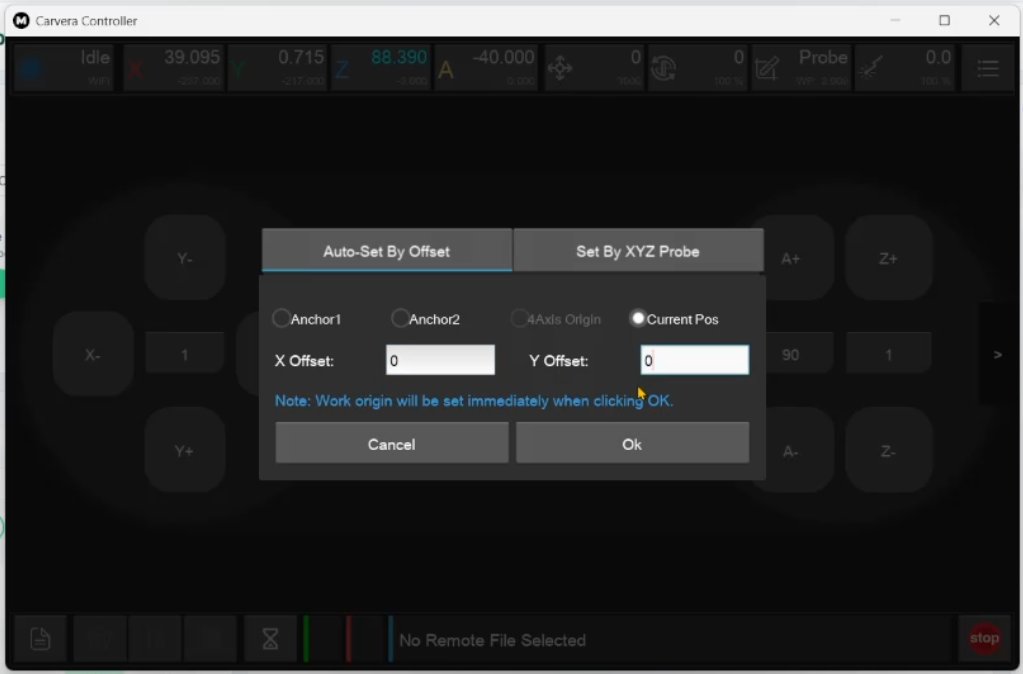
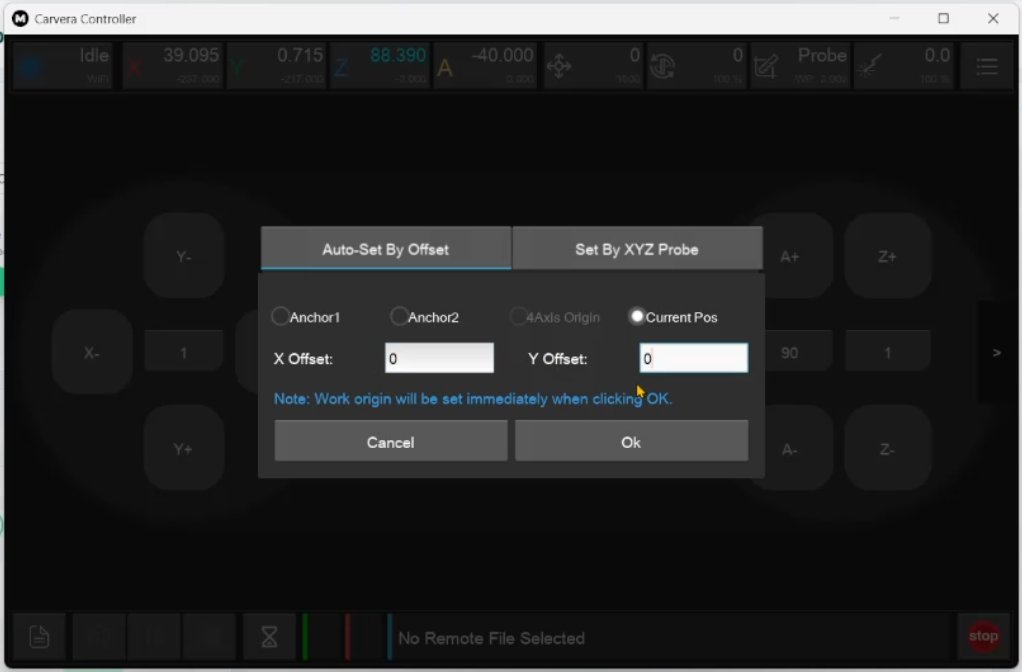
Load the file generated from MODS and start the milling process.
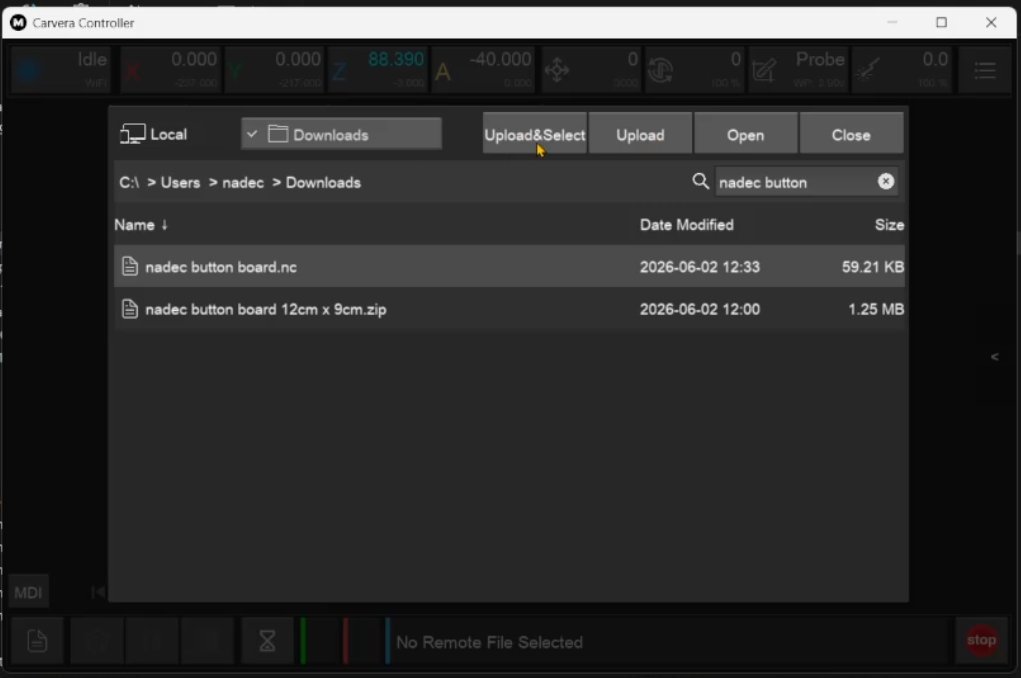
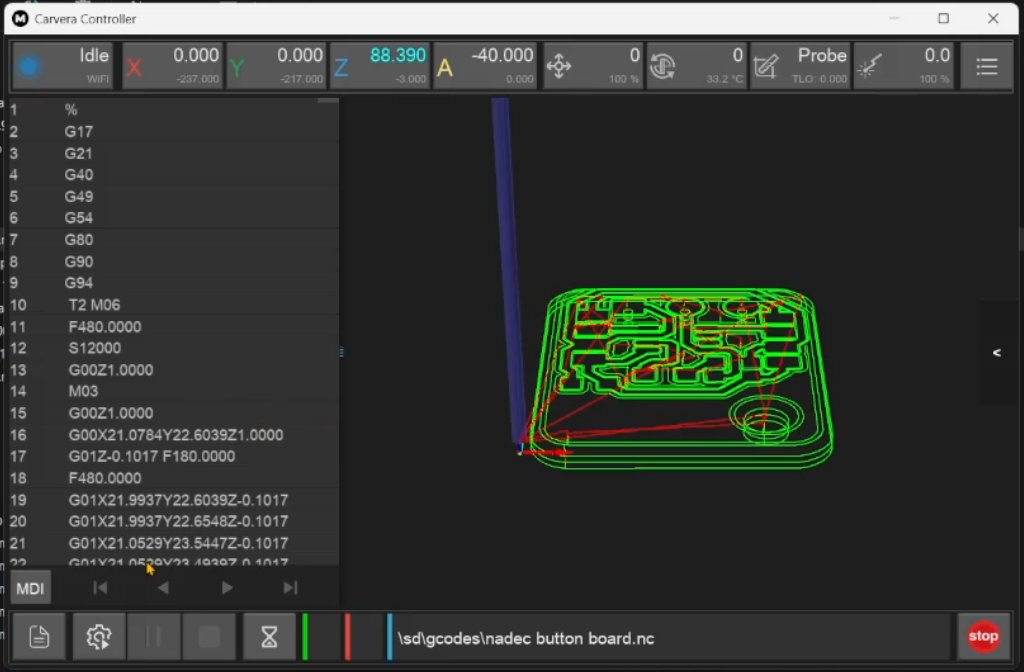
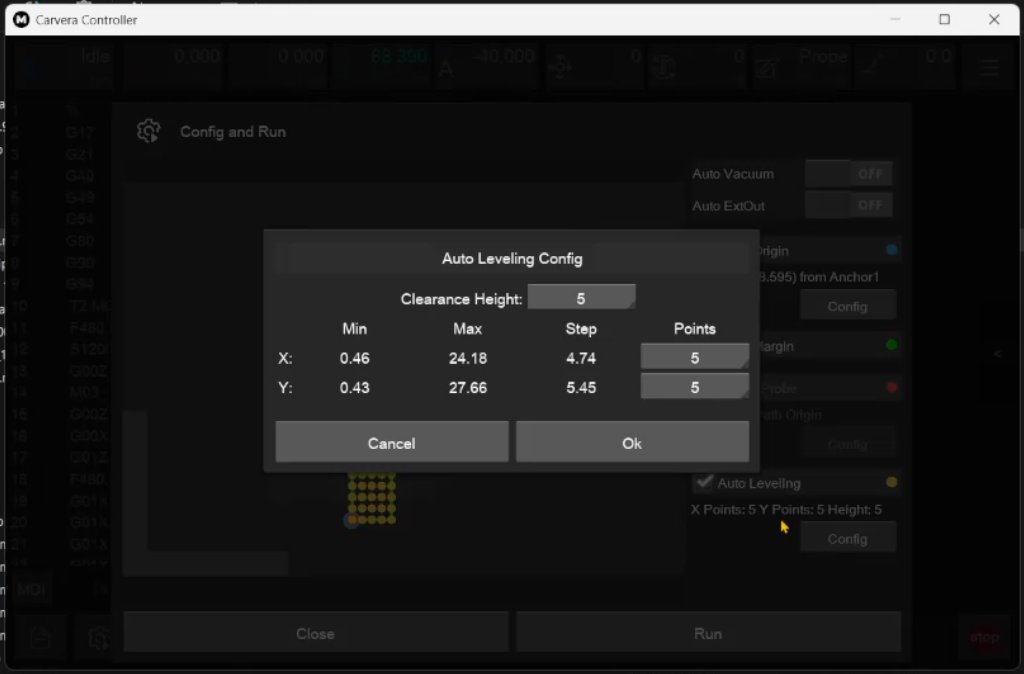
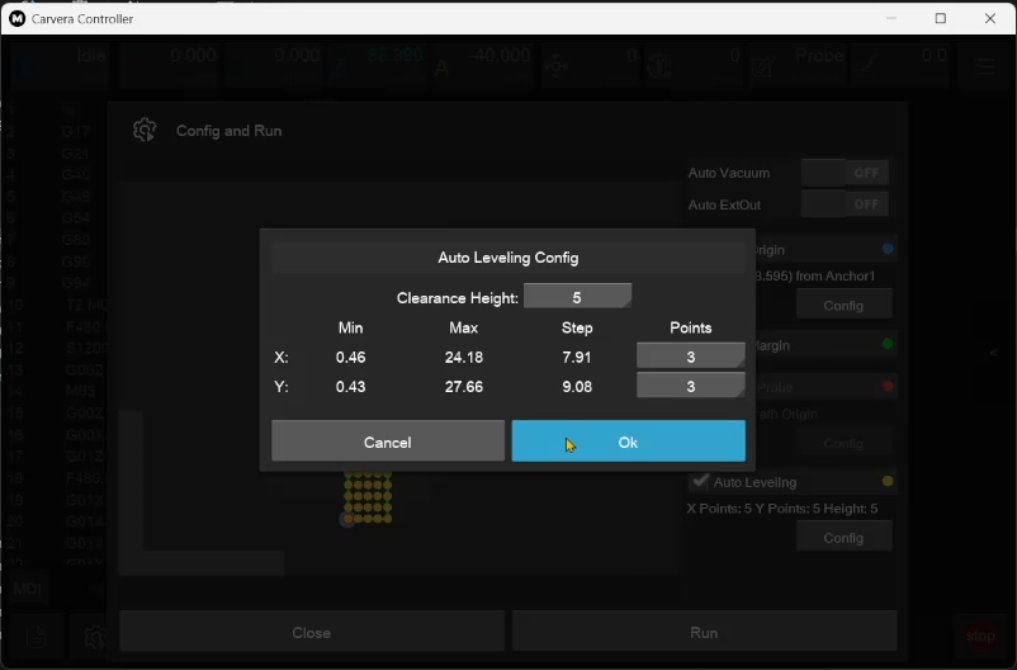
Set the auto-leveling configuration when prompted.
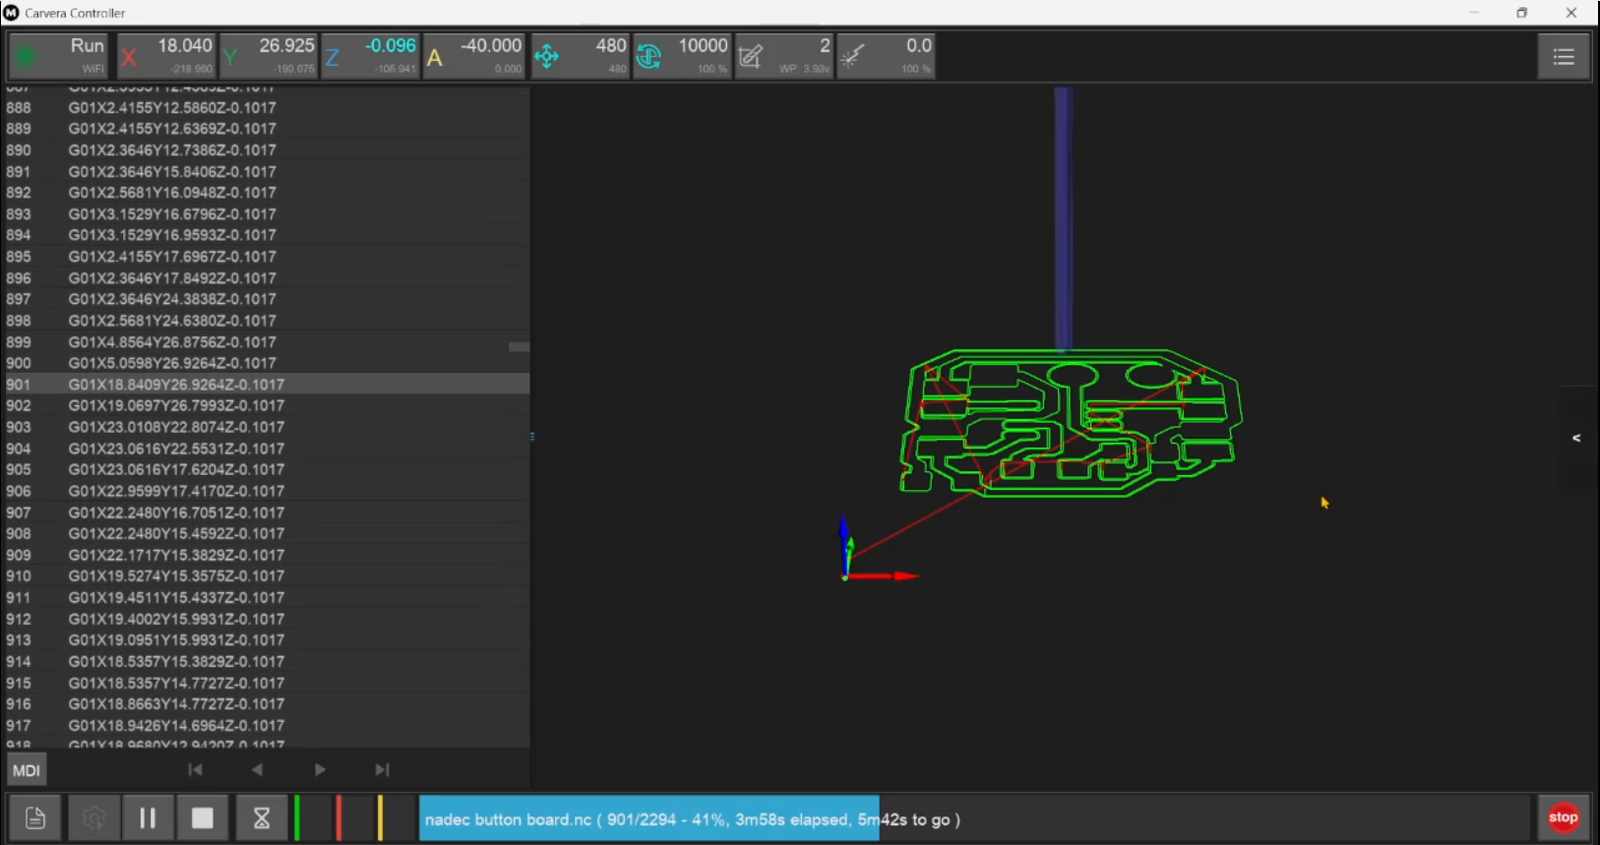
Milling would start, and the machine would automatically change tools as per the toolpath generated from MODS.
Let’s move on to PCB no. 2.
PCB Design Part - 2: XIAO Sister Board
Objective#
This board was meant to be a long one. It was meant to be long so that it can be divided into four sections for ease of cable management.
The board is meant to receive a ribbon cable from the XIAO main board and split the controls for each of the three drawers, sending three individual ribbon cables to each of the drawers, hence the length (for cable management). This board also has a few MOSFETs for switching the high-amperage current the solenoid would be drawing.
Designing the XIAO Sister Board#
Just like part 1, same steps, different board. One important thing to note: this was a single-side board.
Schematic Design#
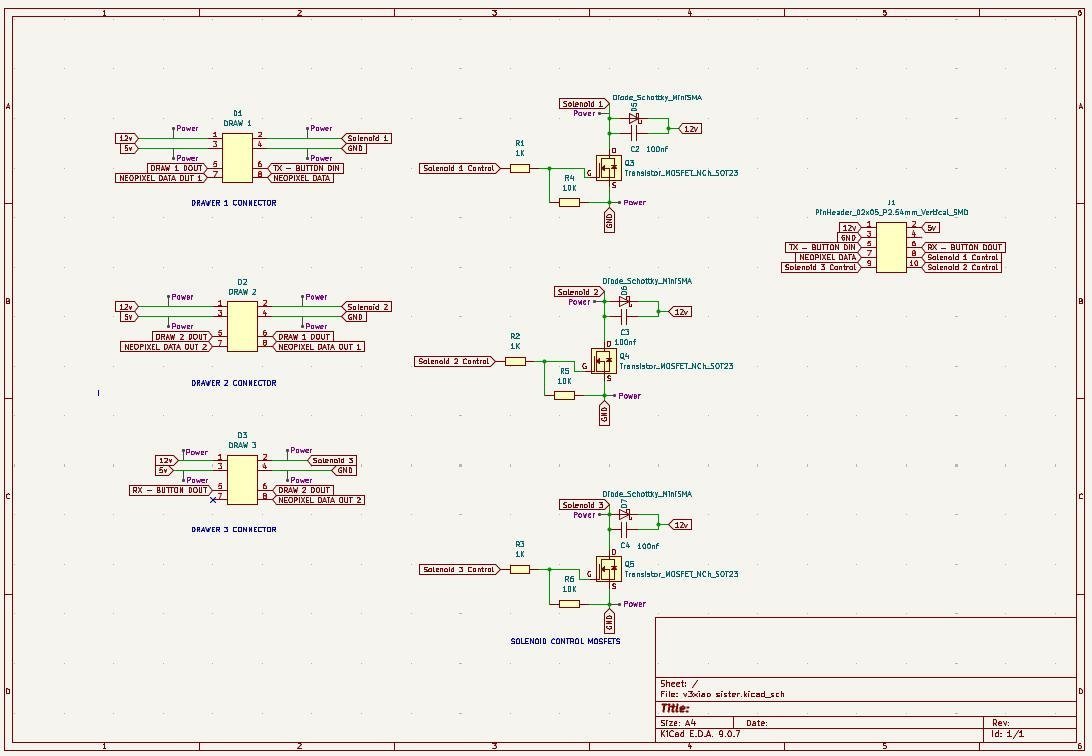
PCB Design#
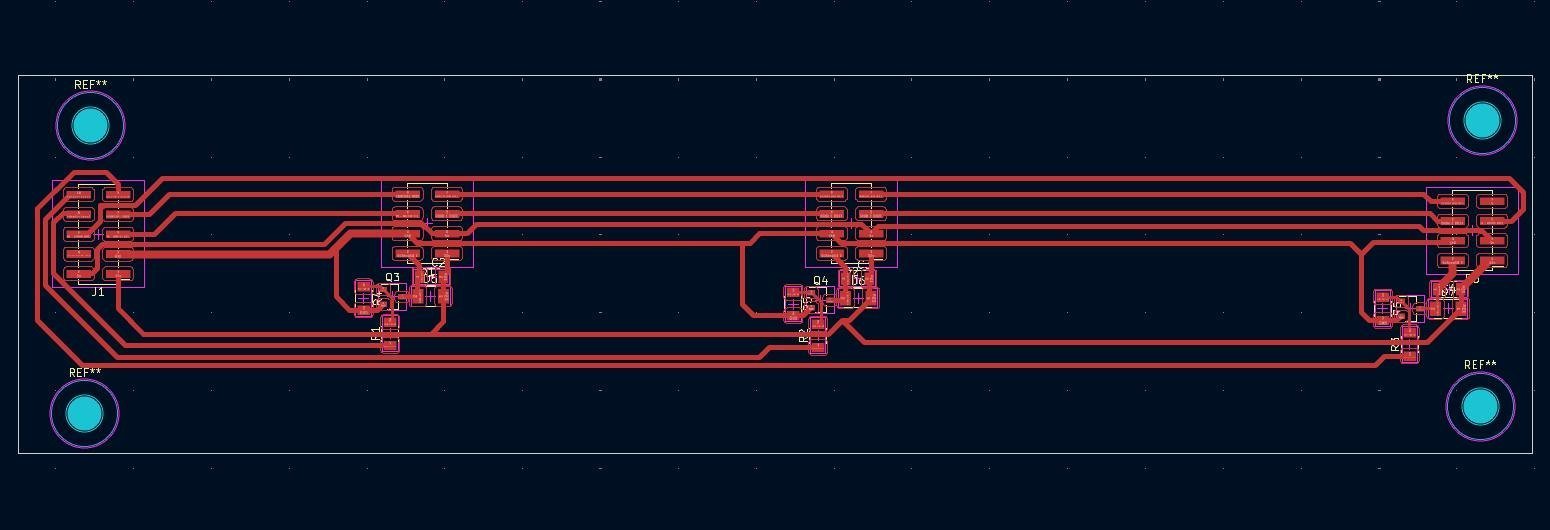
3D Model#
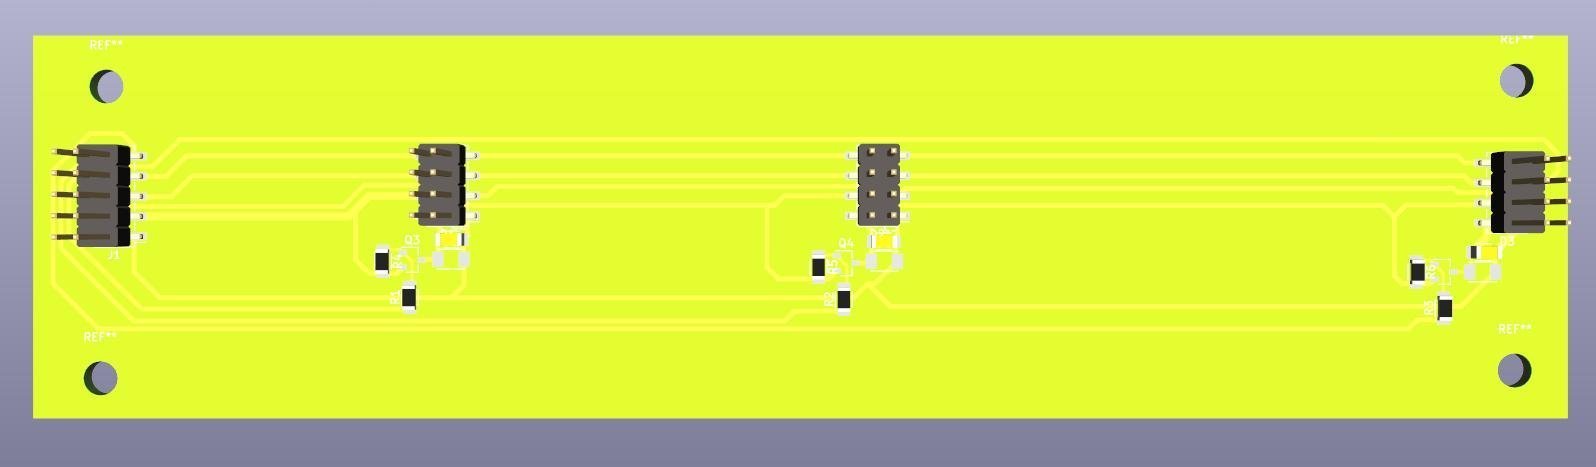
For more details on the PCB designing, you can check out my week-6 documentation .
PCB Design Part - 3: Drawer Board
Objective#
This was just a breakout board for the JST connectors for the solenoid, neopixel, and CH32V003J4M6 microcontroller nodes. This board splits the ribbon cable into the three different connectors for the solenoid, neopixel, and CH32V003J4M6 microcontroller nodes.
Designing the Drawer Board#
Just like parts 1 and 2, same steps, different board.
Schematic Design#
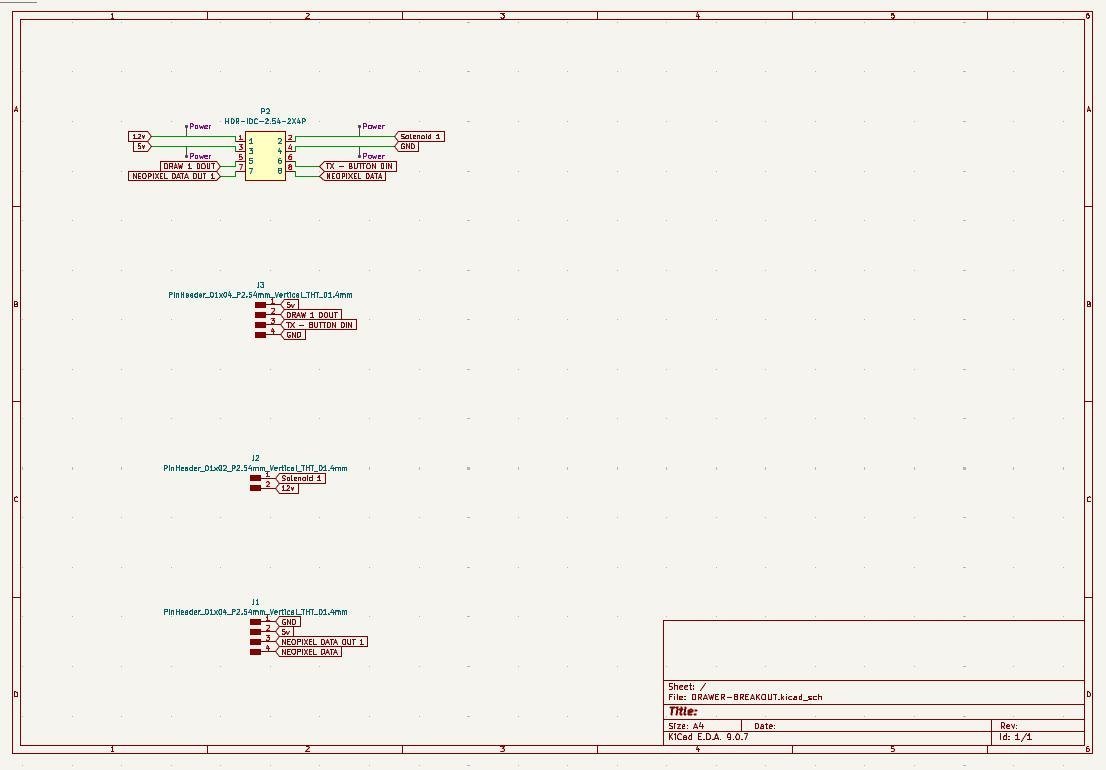
PCB Design#
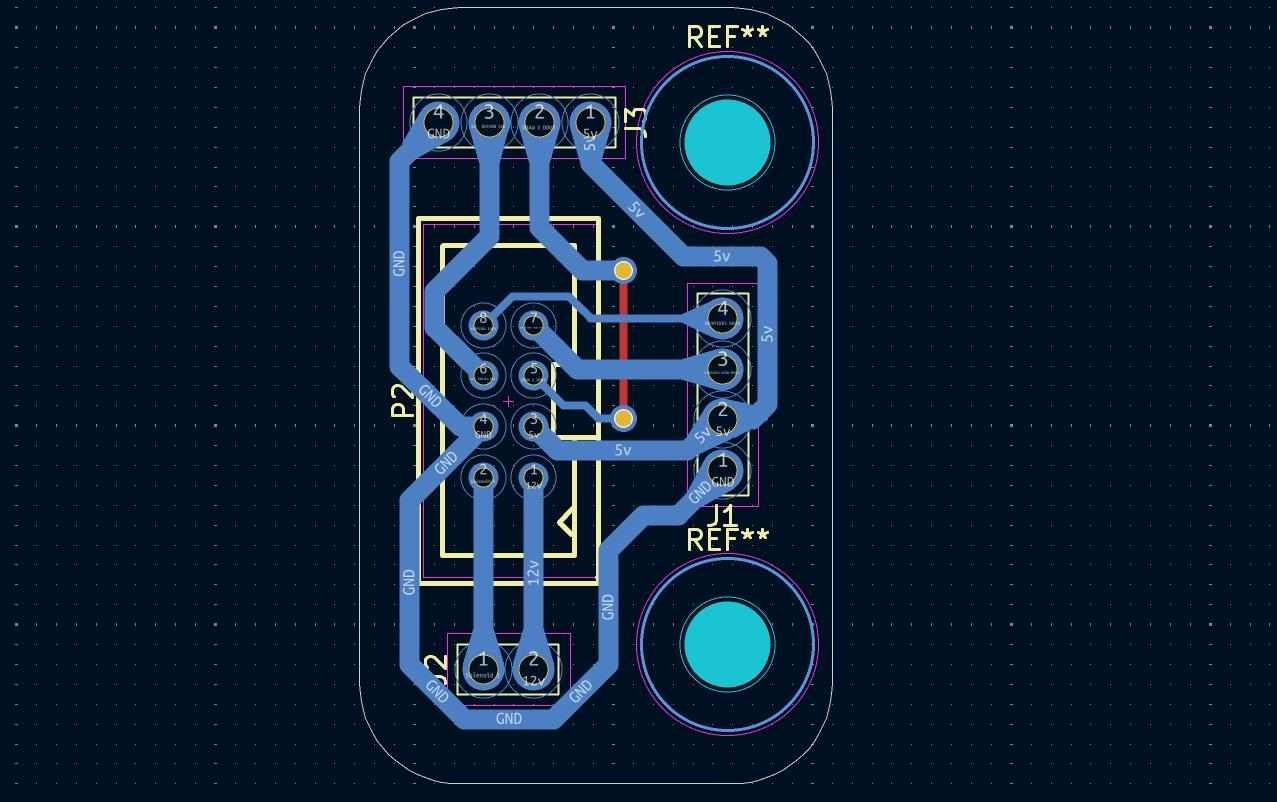
3D Model#
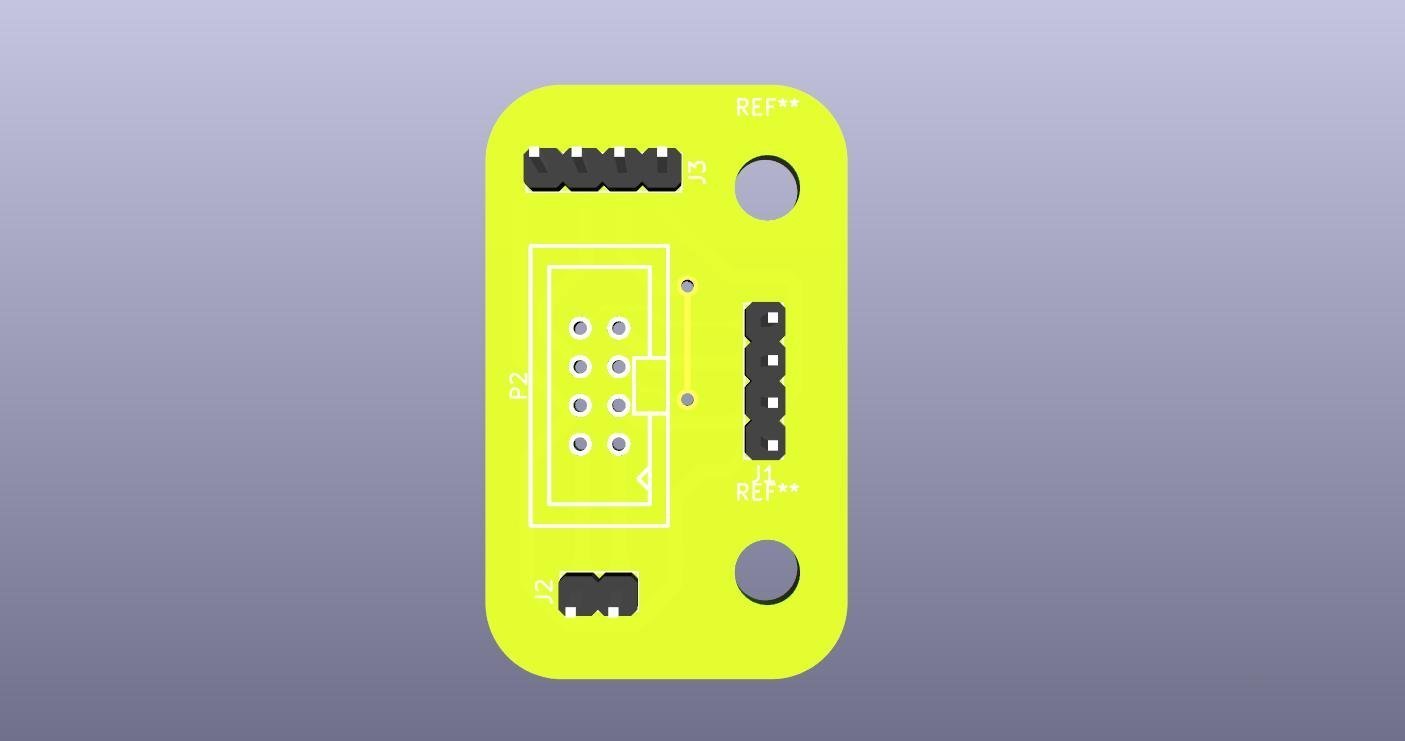
For more details on the PCB designing, you can check out my week-6 documentation .
PCB Design Part - 4: NEOBUTTON CH32V003J4M6
Objective#
This board was the individual node that would be attached to each tool. It has a CH32V003J4M6 microcontroller and works similarly to each of the nodes of the neopixel light strip.
It will have 4 pins:
- VCC
- GND
- Data In
- Data Out
The data would enter each node, and it will add a binary state to the string depending on the tool state as per the limit switch trigger (tool present or not), and then send the data to the next node in the chain.
Designing the NEOBUTTON Board#
Just like parts 1 and 2, same steps, different board.
Schematic Design#
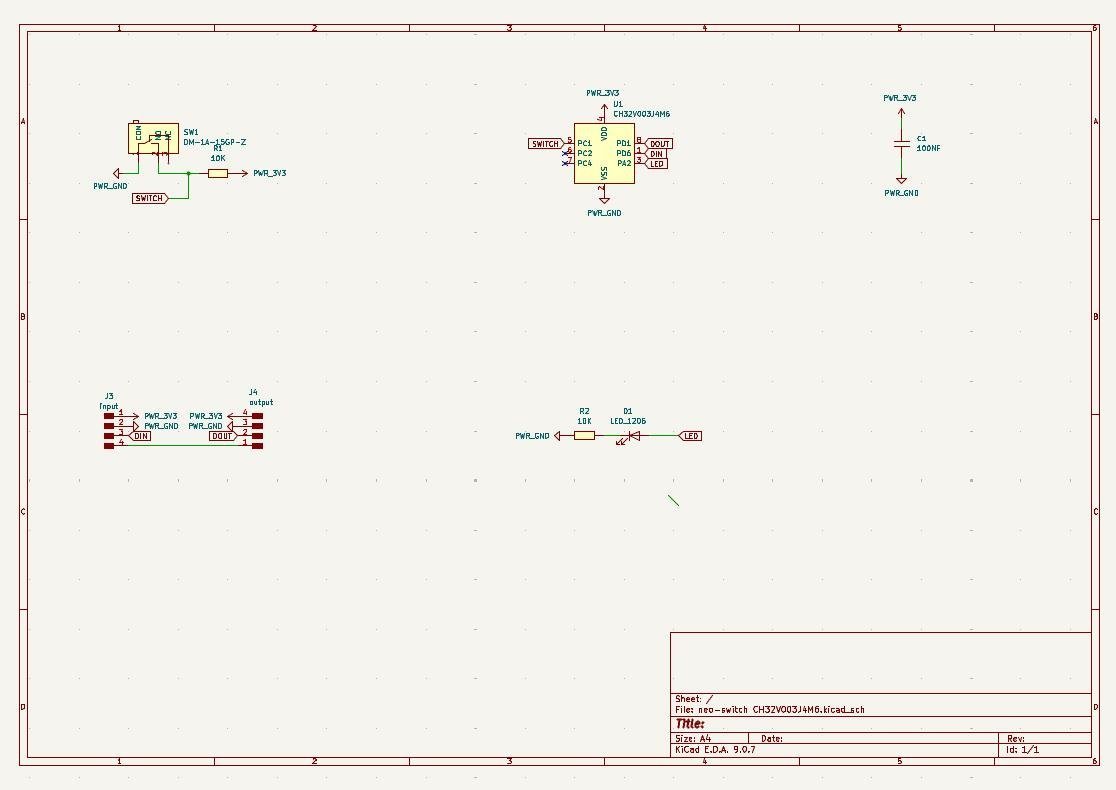
PCB Design#
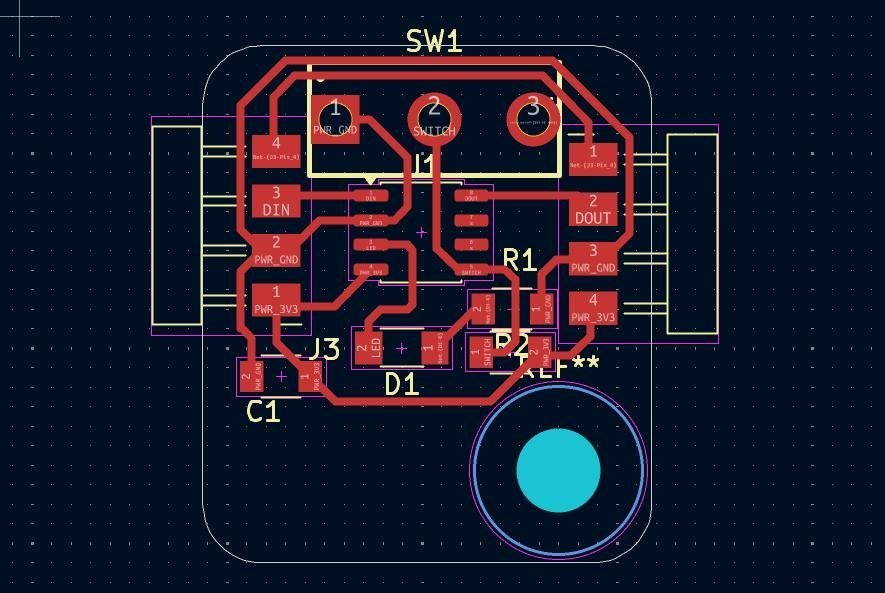
3D Model#
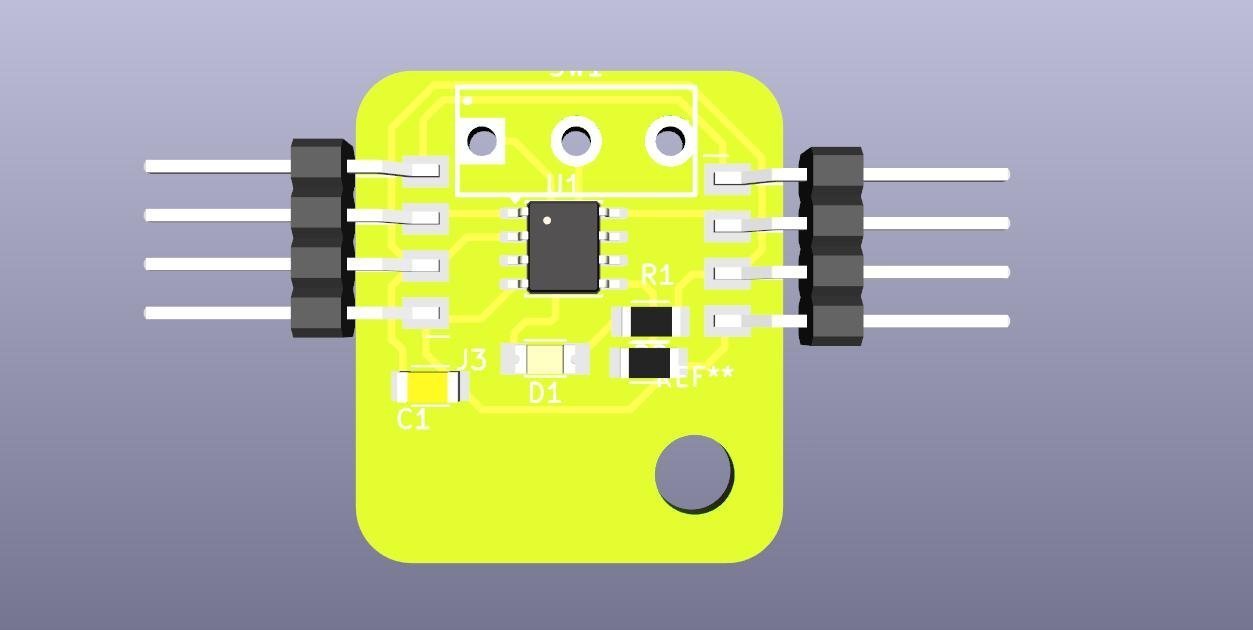
For more details on the PCB designing, you can check out my week-6 documentation .
PCB Design Part - 5: NEOHALL-EFFECT CH32V003J4M6
Objective#
This board was the individual node that would be attached to each drawer to check the drawer’s open or closed state. It has a CH32V003J4M6 microcontroller and works similarly to each of the nodes of the neopixel light strip.
It will have 4 pins:
- VCC
- GND
- Data In
- Data Out
The data would enter each node, and it will add a binary state to the string depending on the tool state as per the limit switch trigger (tool present or not), and then send the data to the next node in the chain.
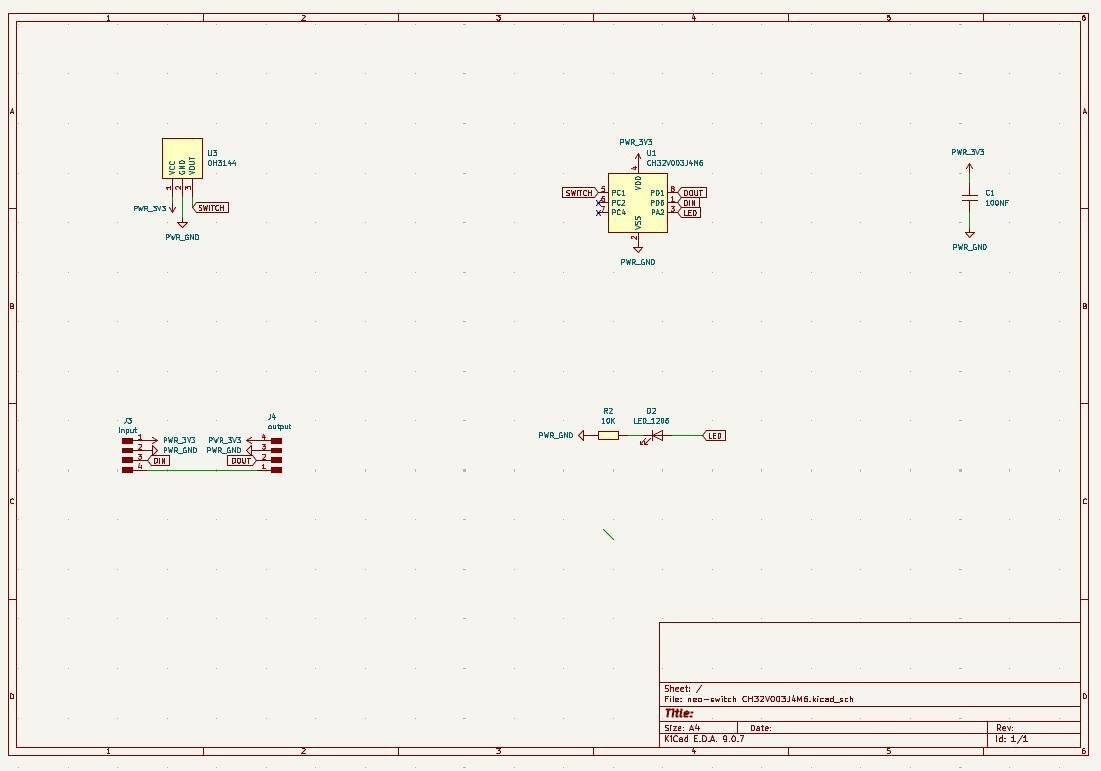
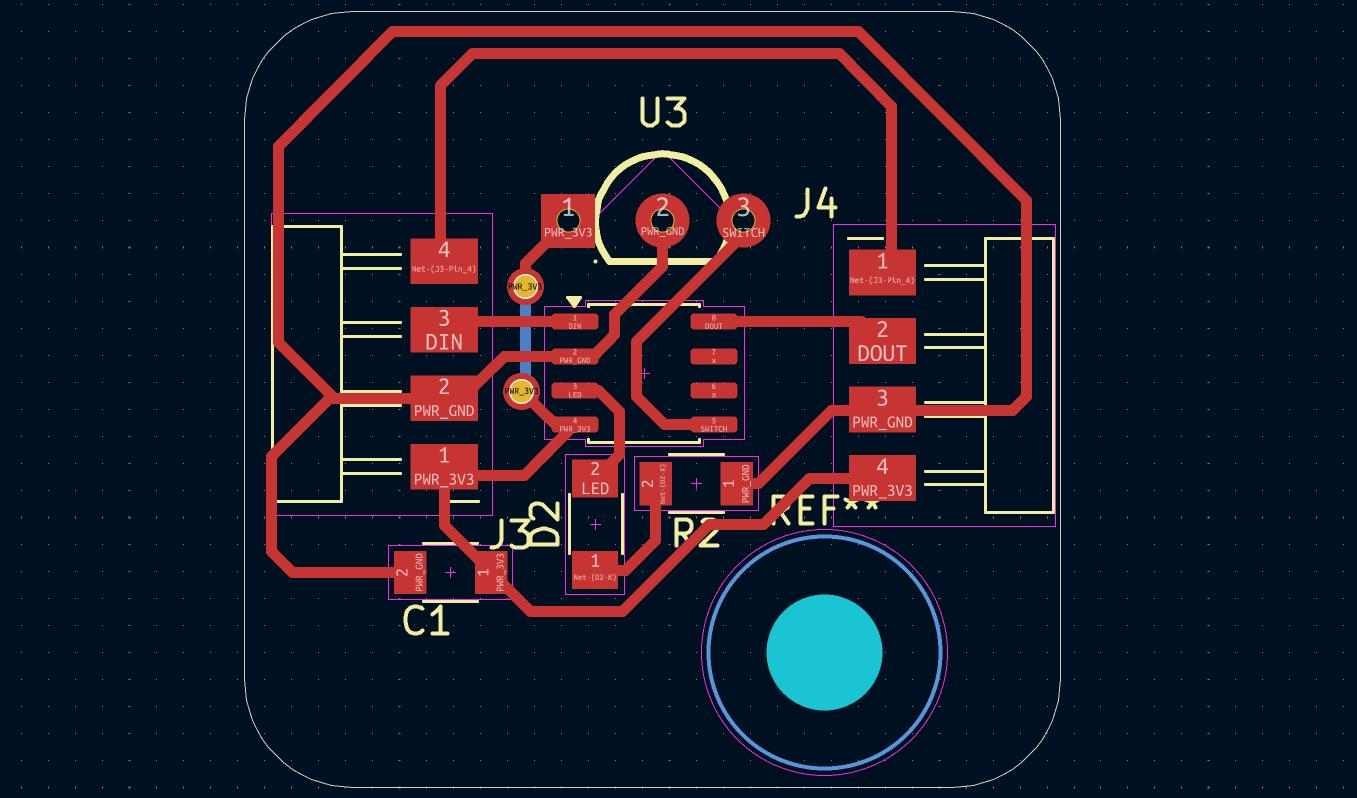
Designing the NEOHALL-EFFECT Board#
Just like parts 1 and 2, same steps, different board.
Schematic Design#
PCB Design#
3D Model#
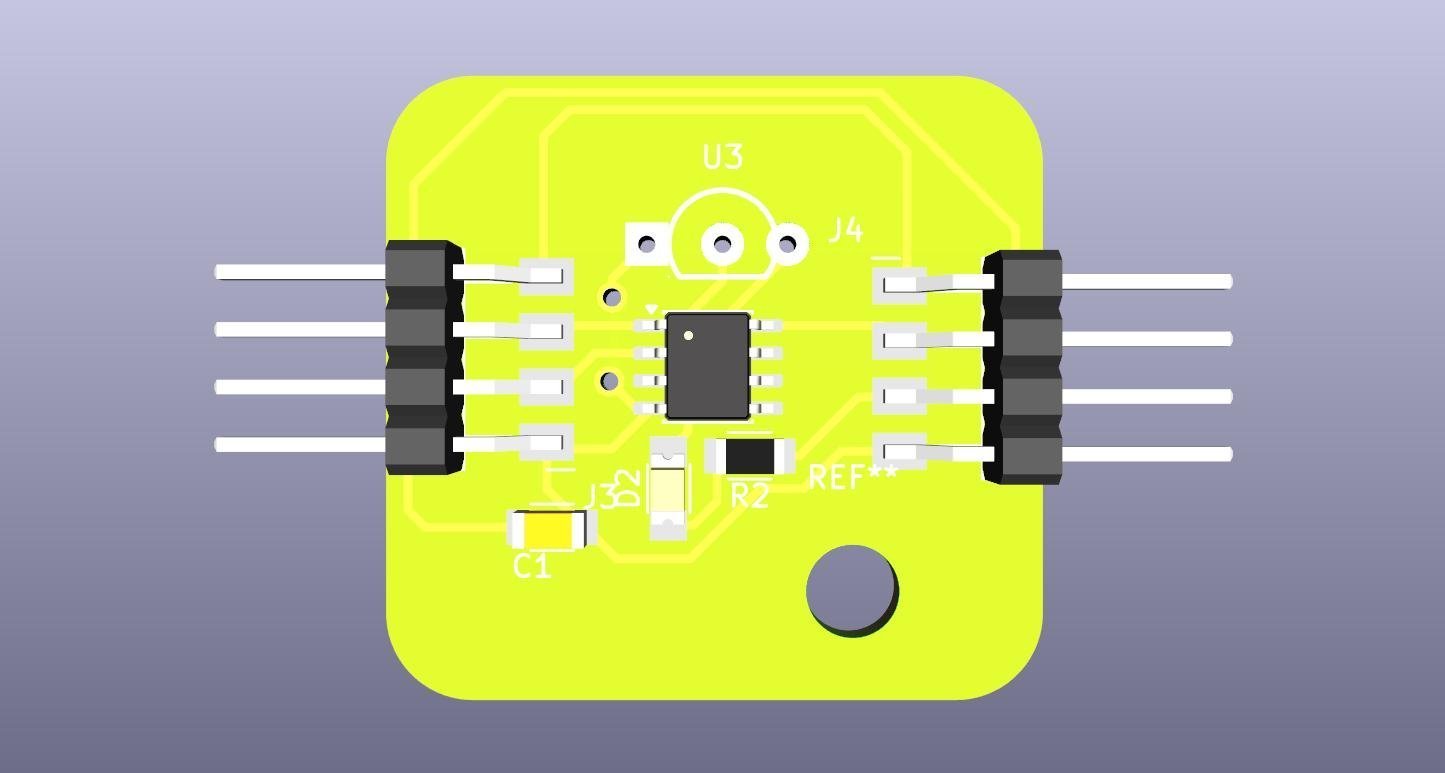
For more details on the PCB designing, you can check out my week-6 documentation .
Foam Cutout for Tool Box
Objective#
I wanted to create a foam cutout for the tools that would be placed inside the tool box. The foam cutout would help in organizing the tools.
First, I needed to make the designs for the tool cutouts.
Instead of drawing and scaling everything by hand, I found a tool called tooltrace.ai .
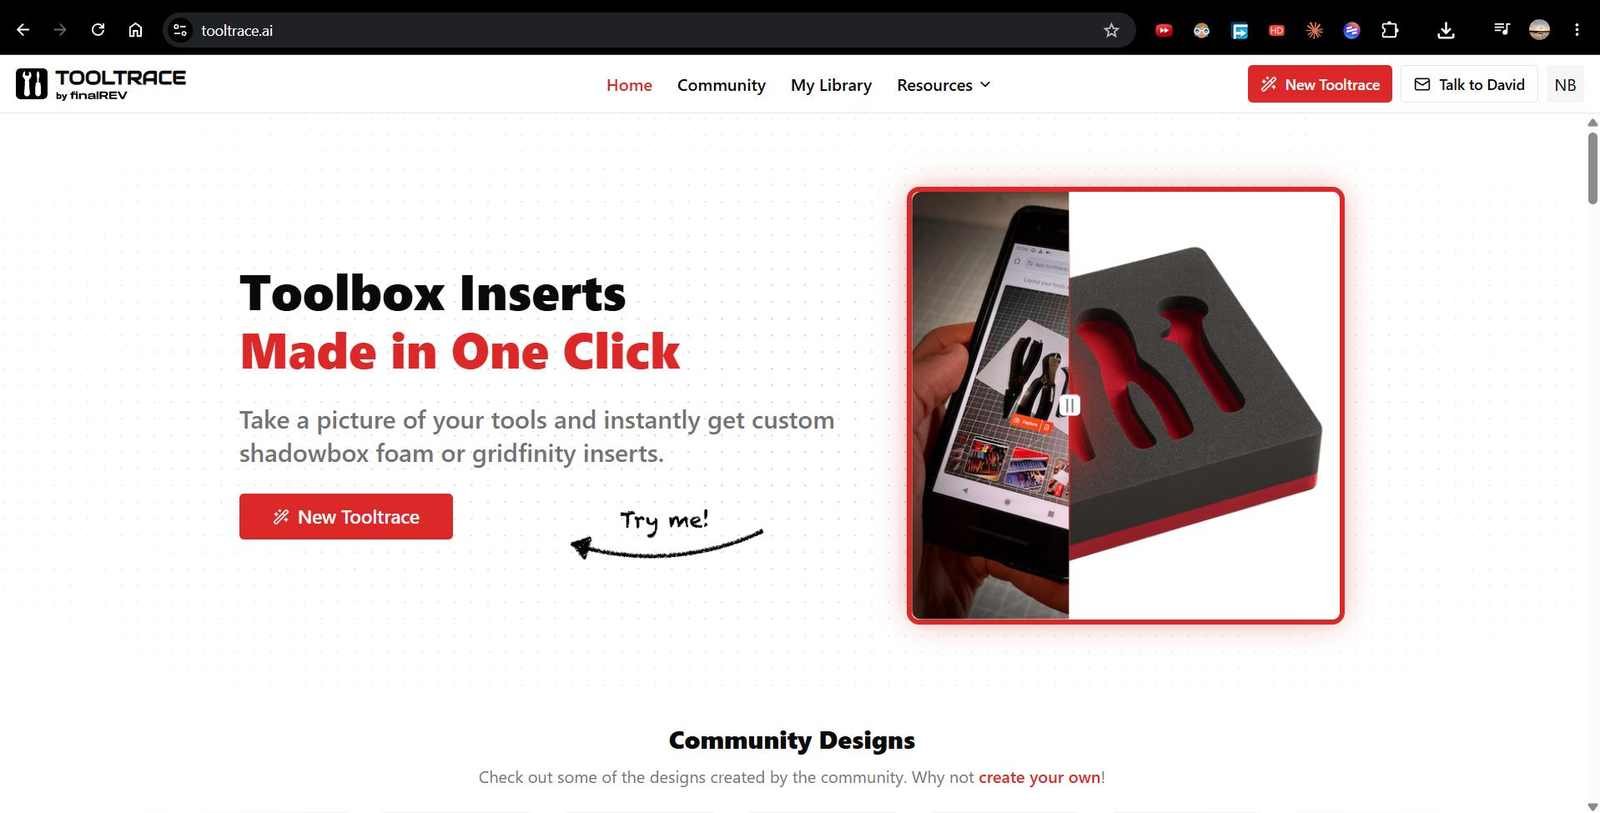
Here’s how it works:
- You take a picture of your tools next to an A4 or letter-size sheet of paper.
- The sheet is used as a size guide.
- Tool Trace then creates a scaled outline of each tool.
- You can use that outline to cut it out, 3D print it, or do whatever you want with it.
My first step was to figure out and list all the tools I wanted to add.
I walked around the lab, found a bunch of tools, made a list, and laid them all out next to an A4 sheet. I took a picture of that, and used Tool Trace to turn it into an SVG outline.
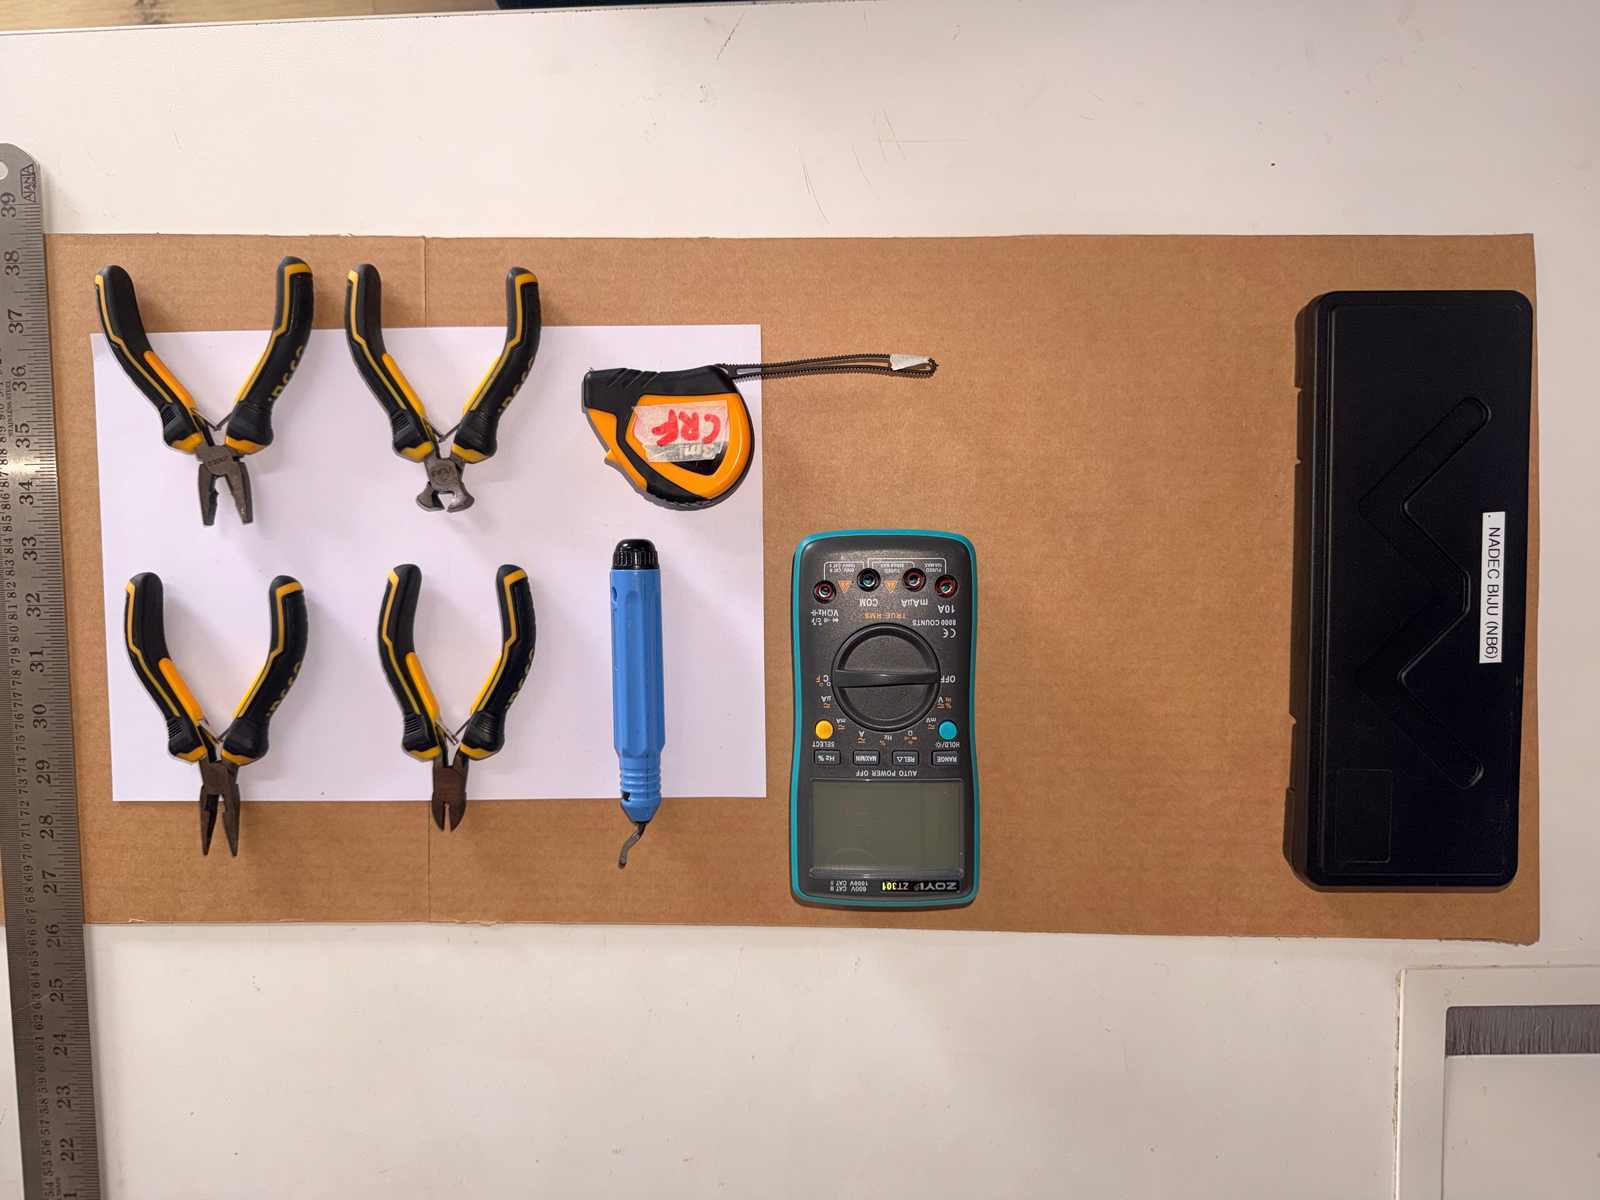
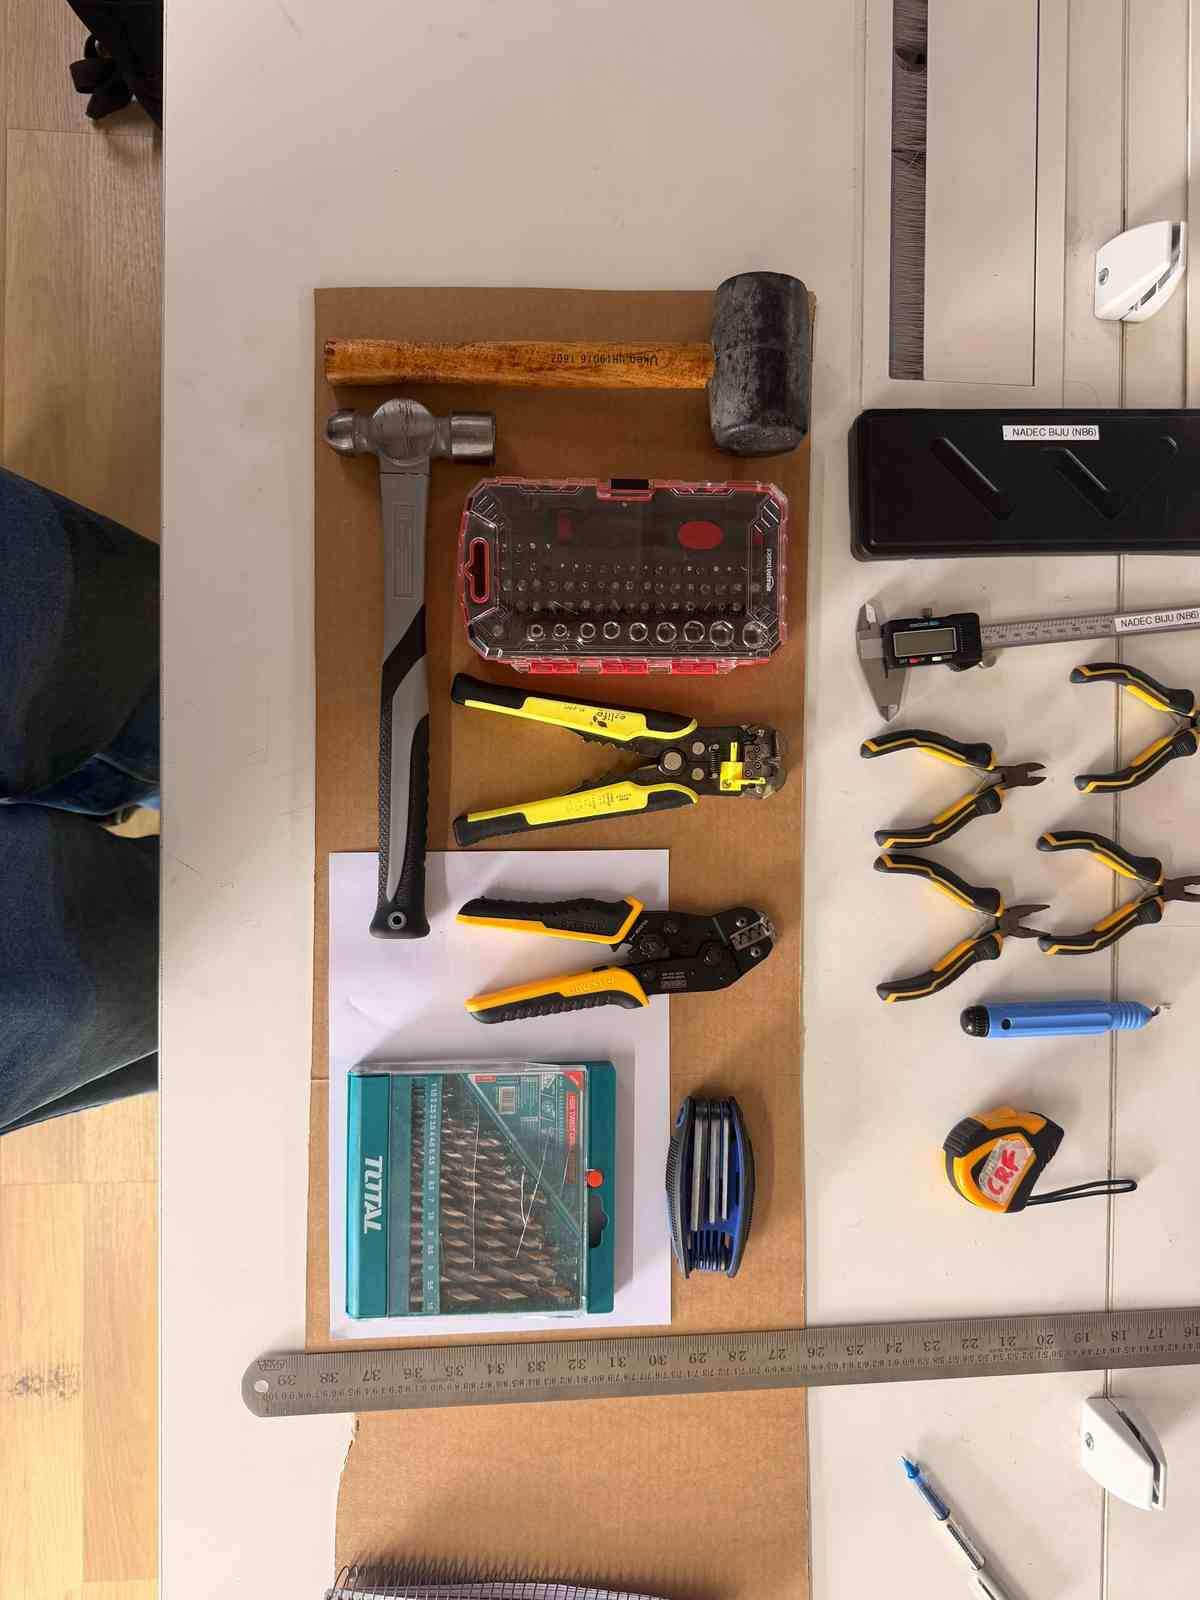
After that, I downloaded the file and went to cut it on the waterjet.
Using Tool Trace#
- Step 1: Import the image into Tool Trace.
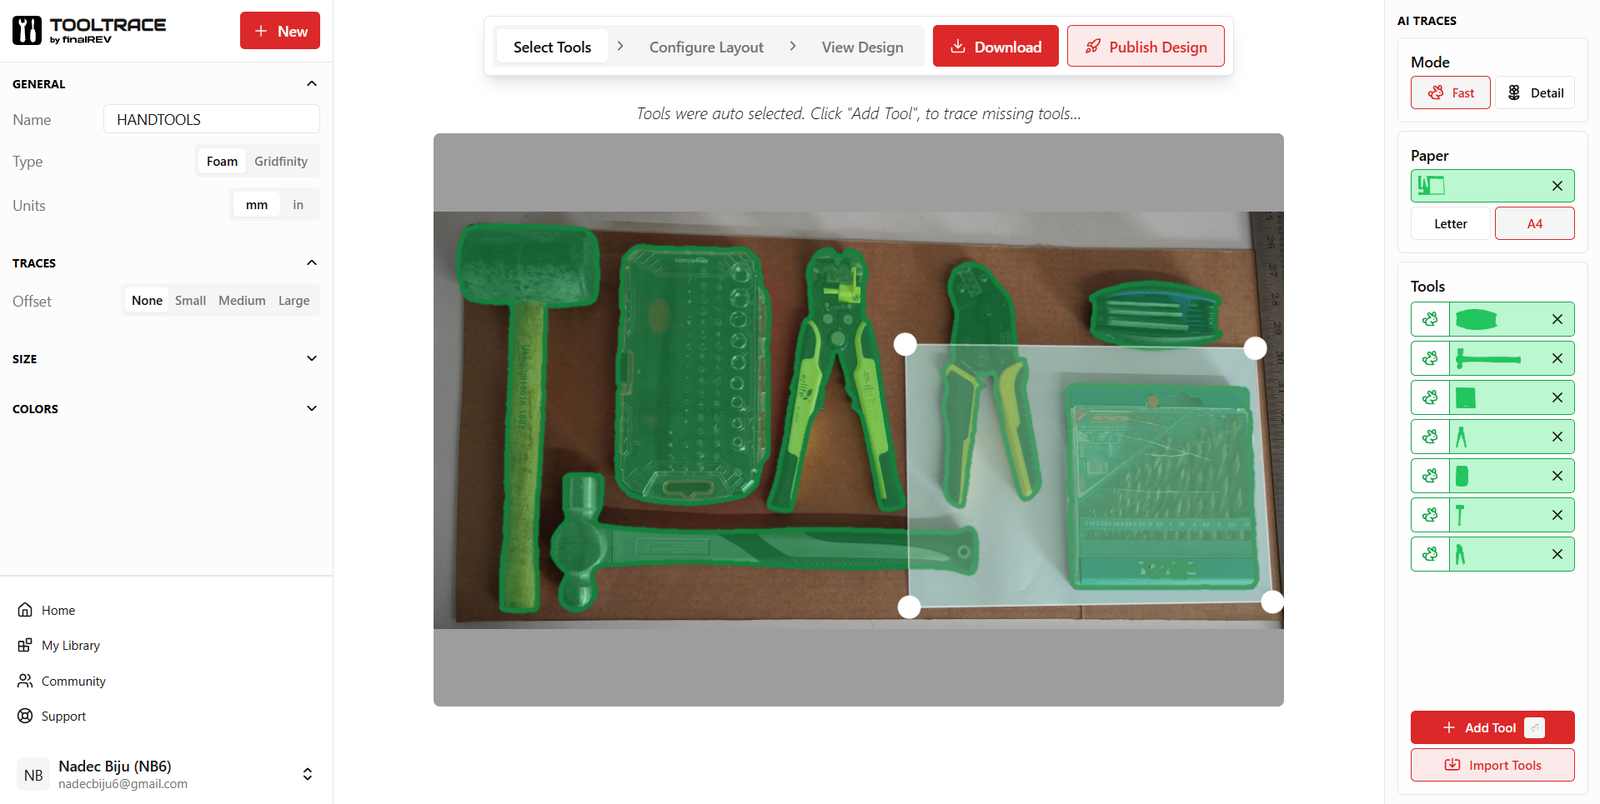
- Step 2: Add finger notches to the design so the tools can be easily lifted out of the foam.
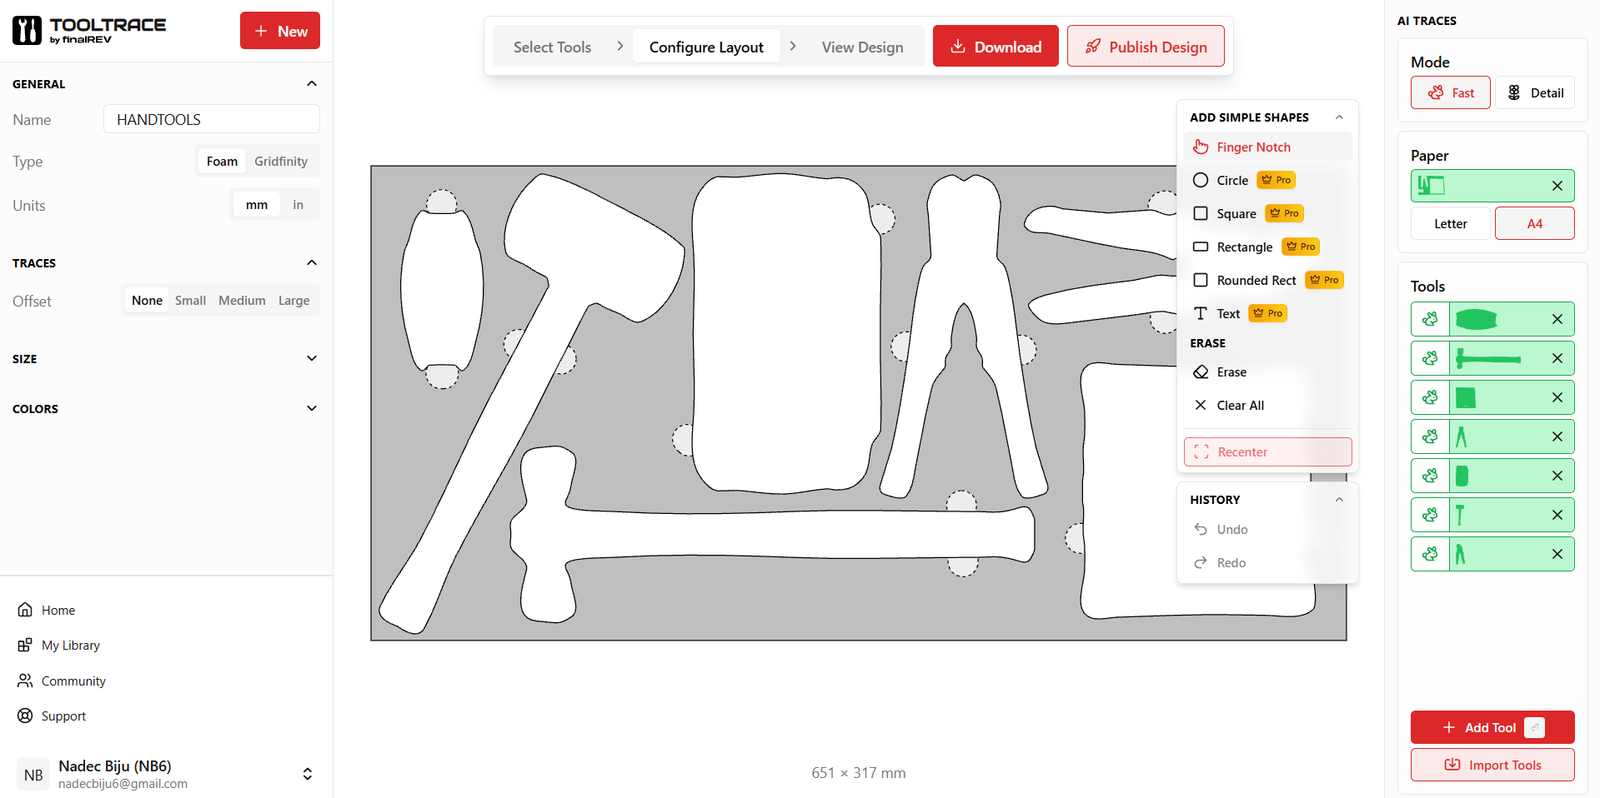
- Step 3: Wait for the finger joint preview to finish loading.
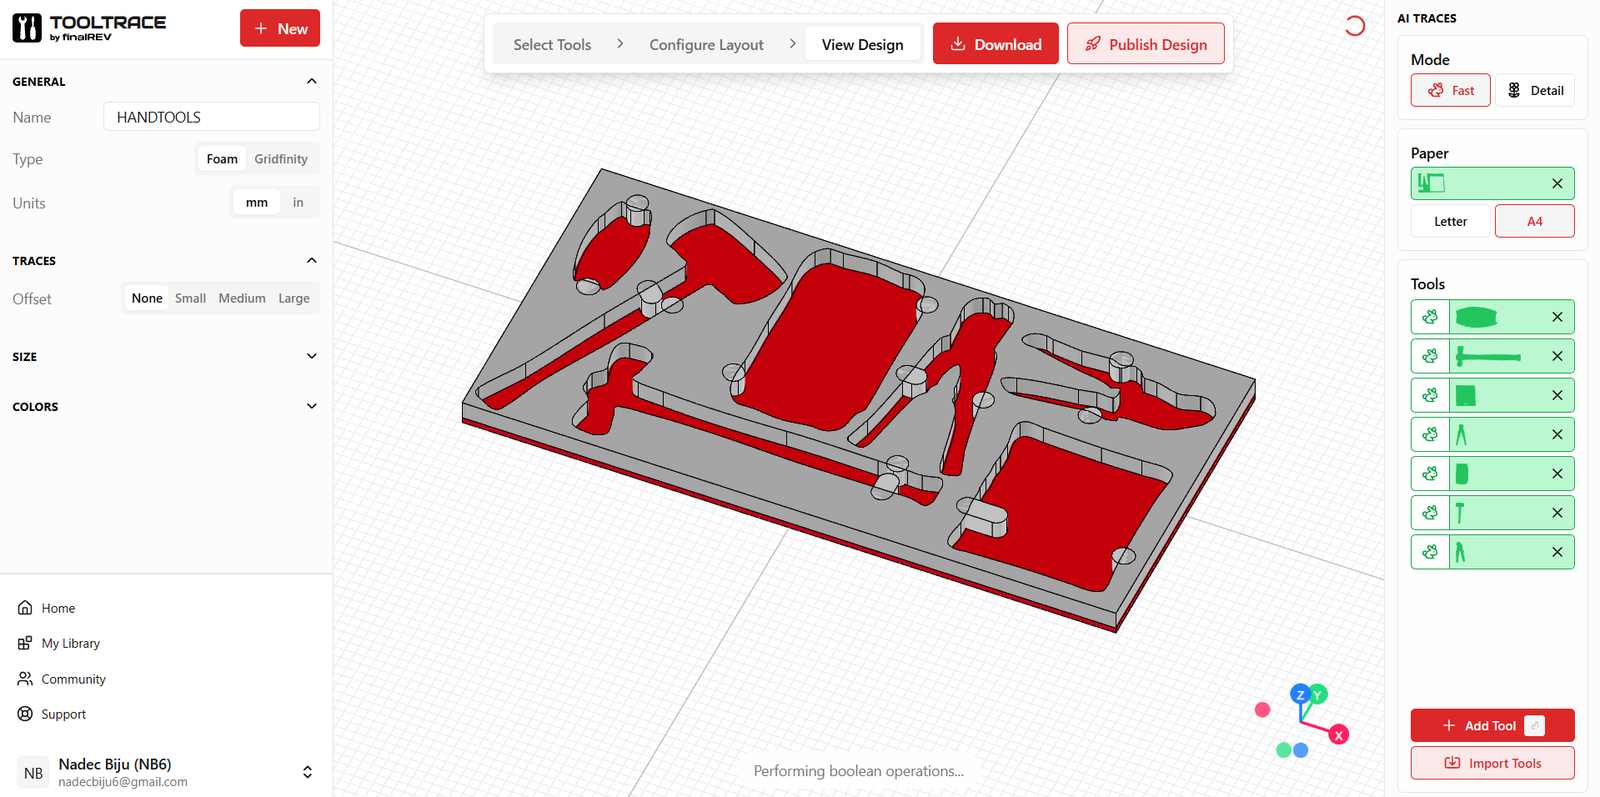
- Step 4: Download the SVG file.
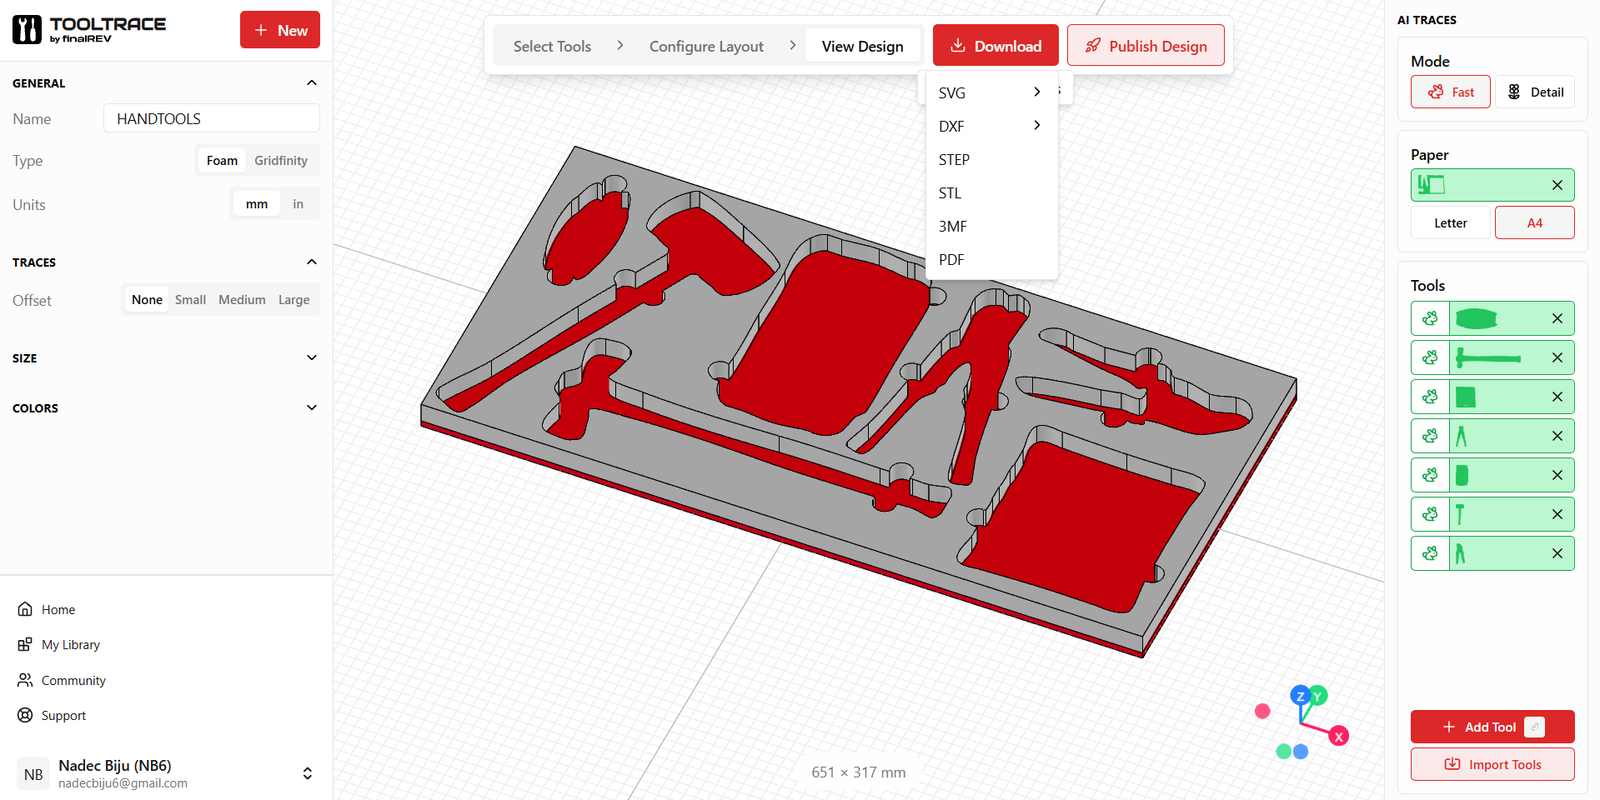
- Step 5: Set the scale to millimeters (mm).
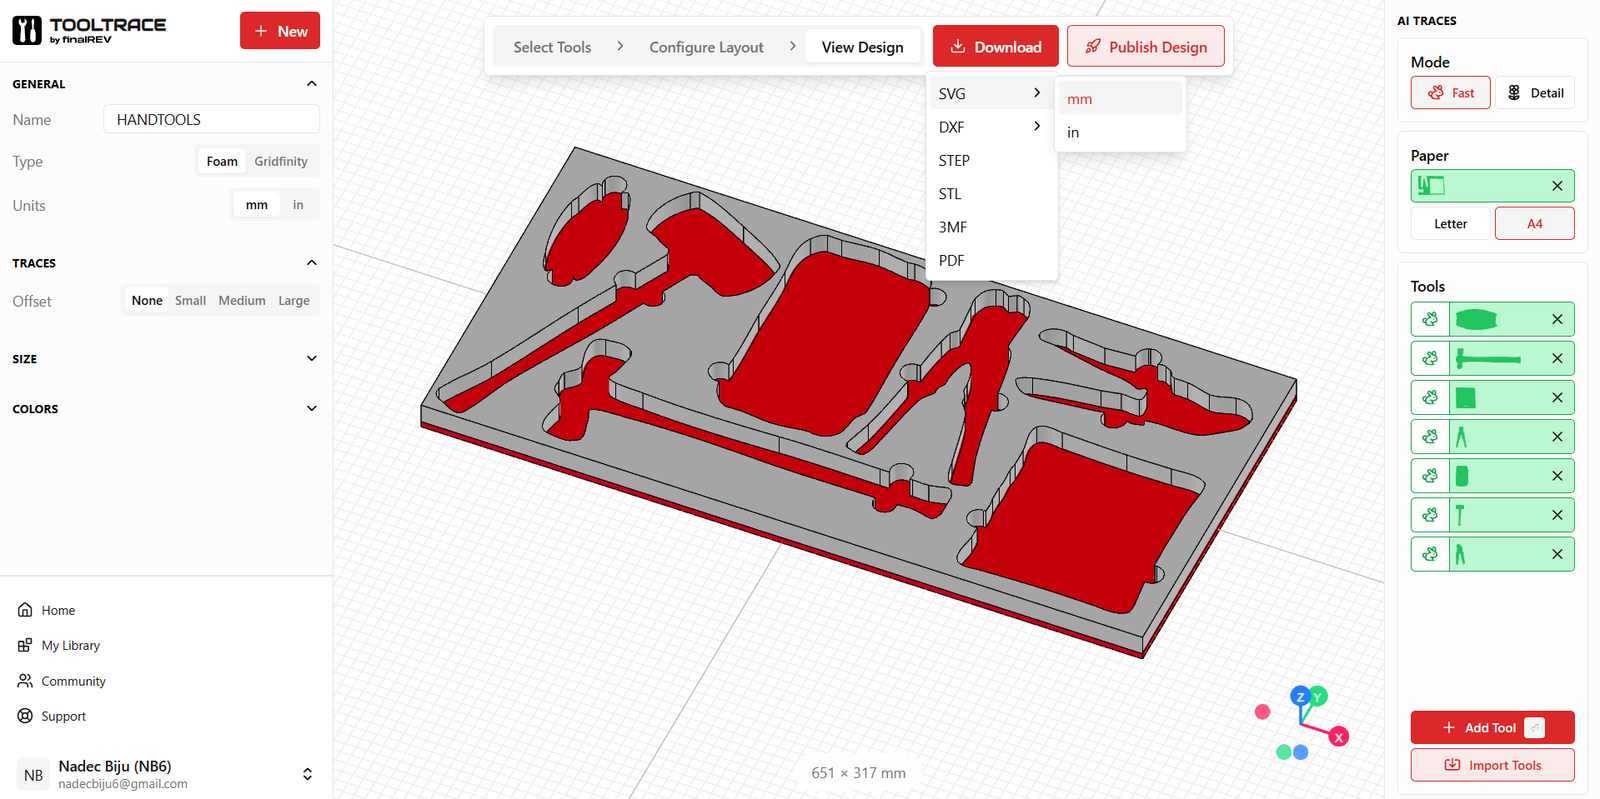
Hero Shots#
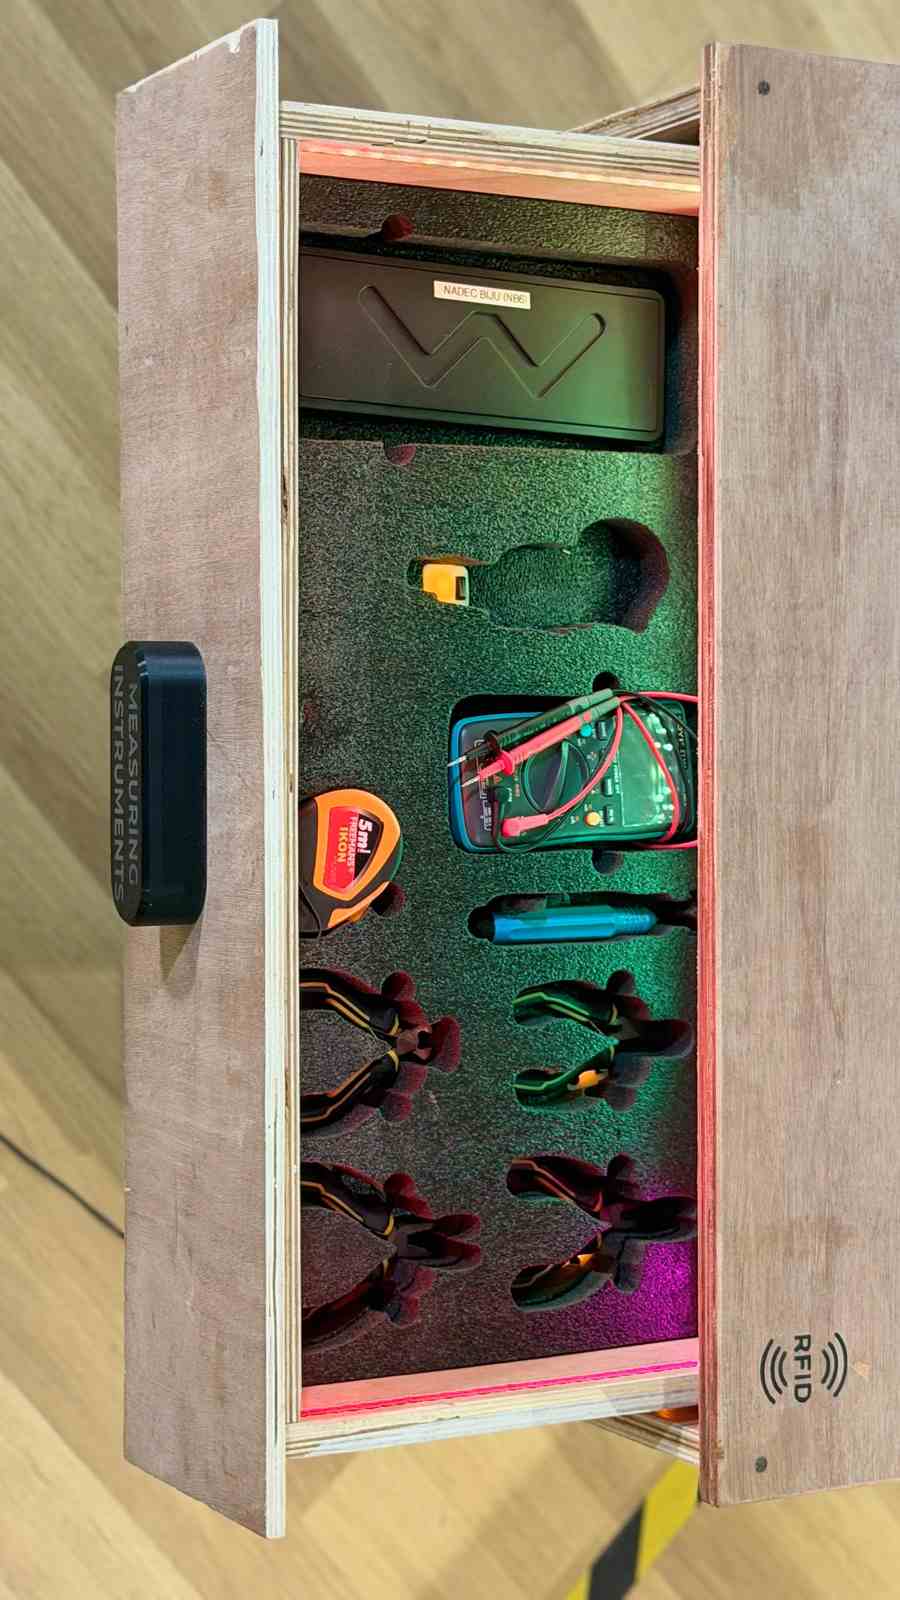
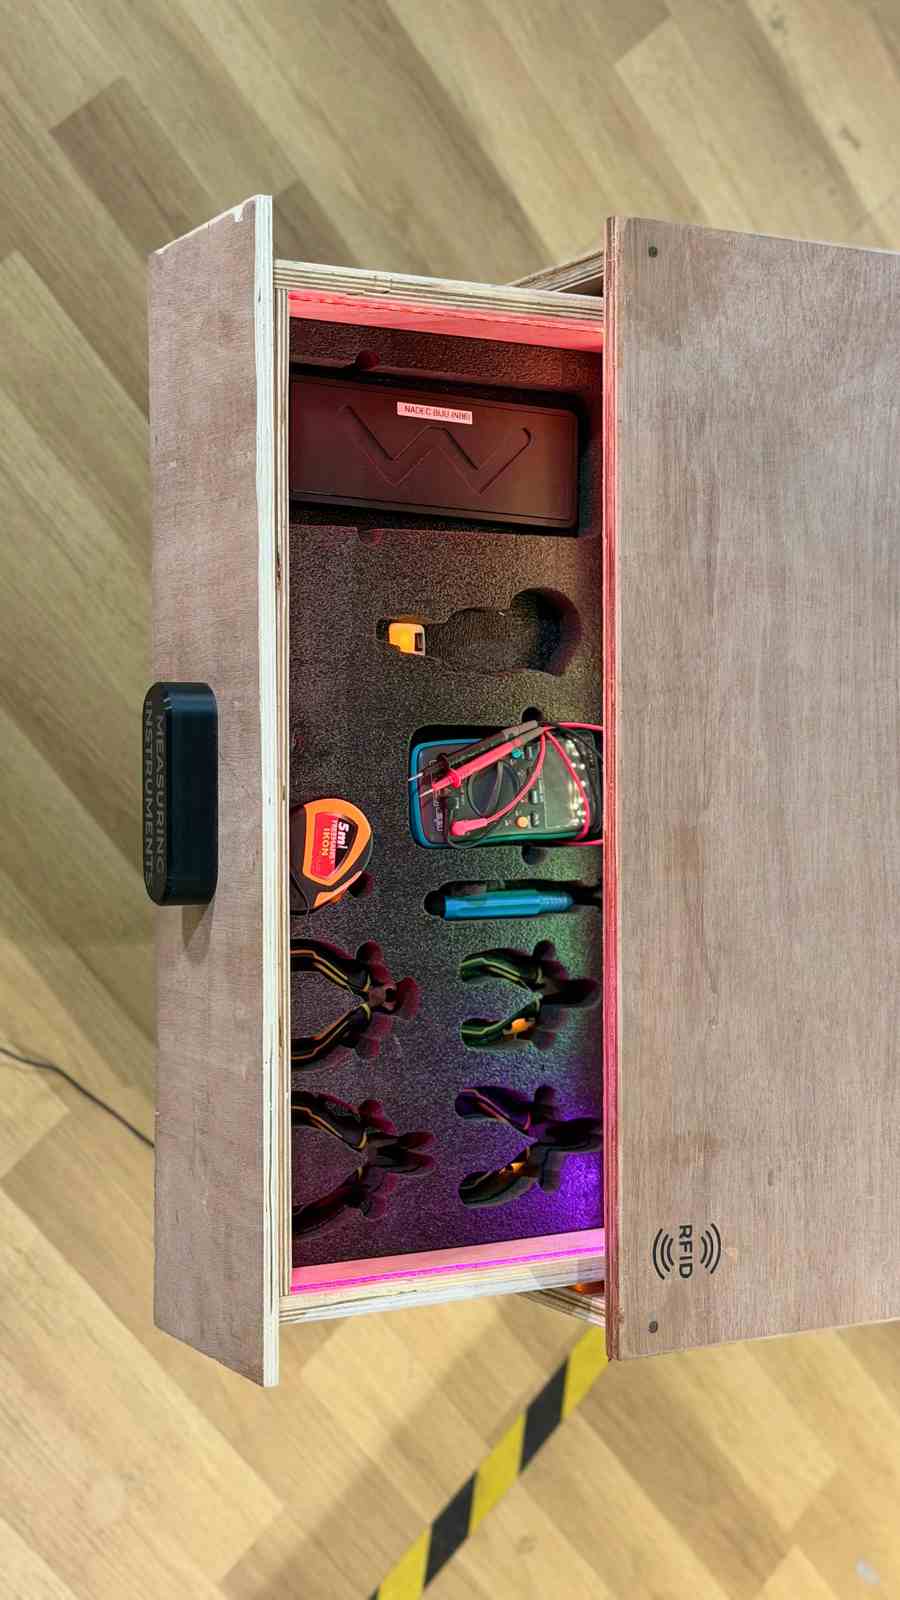
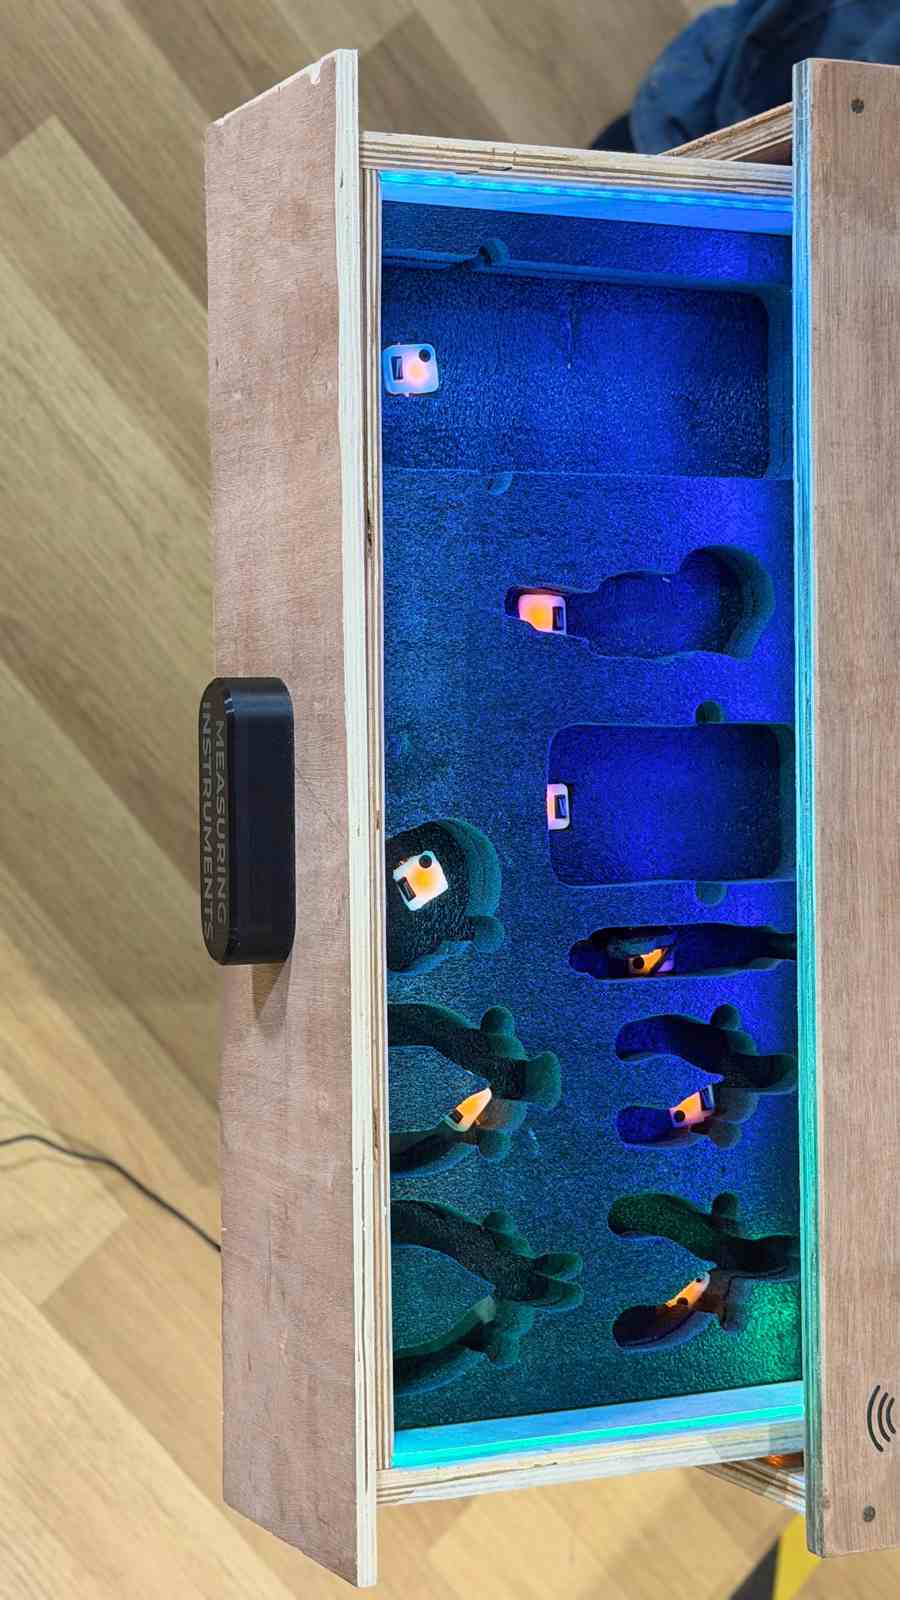
For more details, go to the week-17 documentation .
PCB Production
Milling the PCBs#
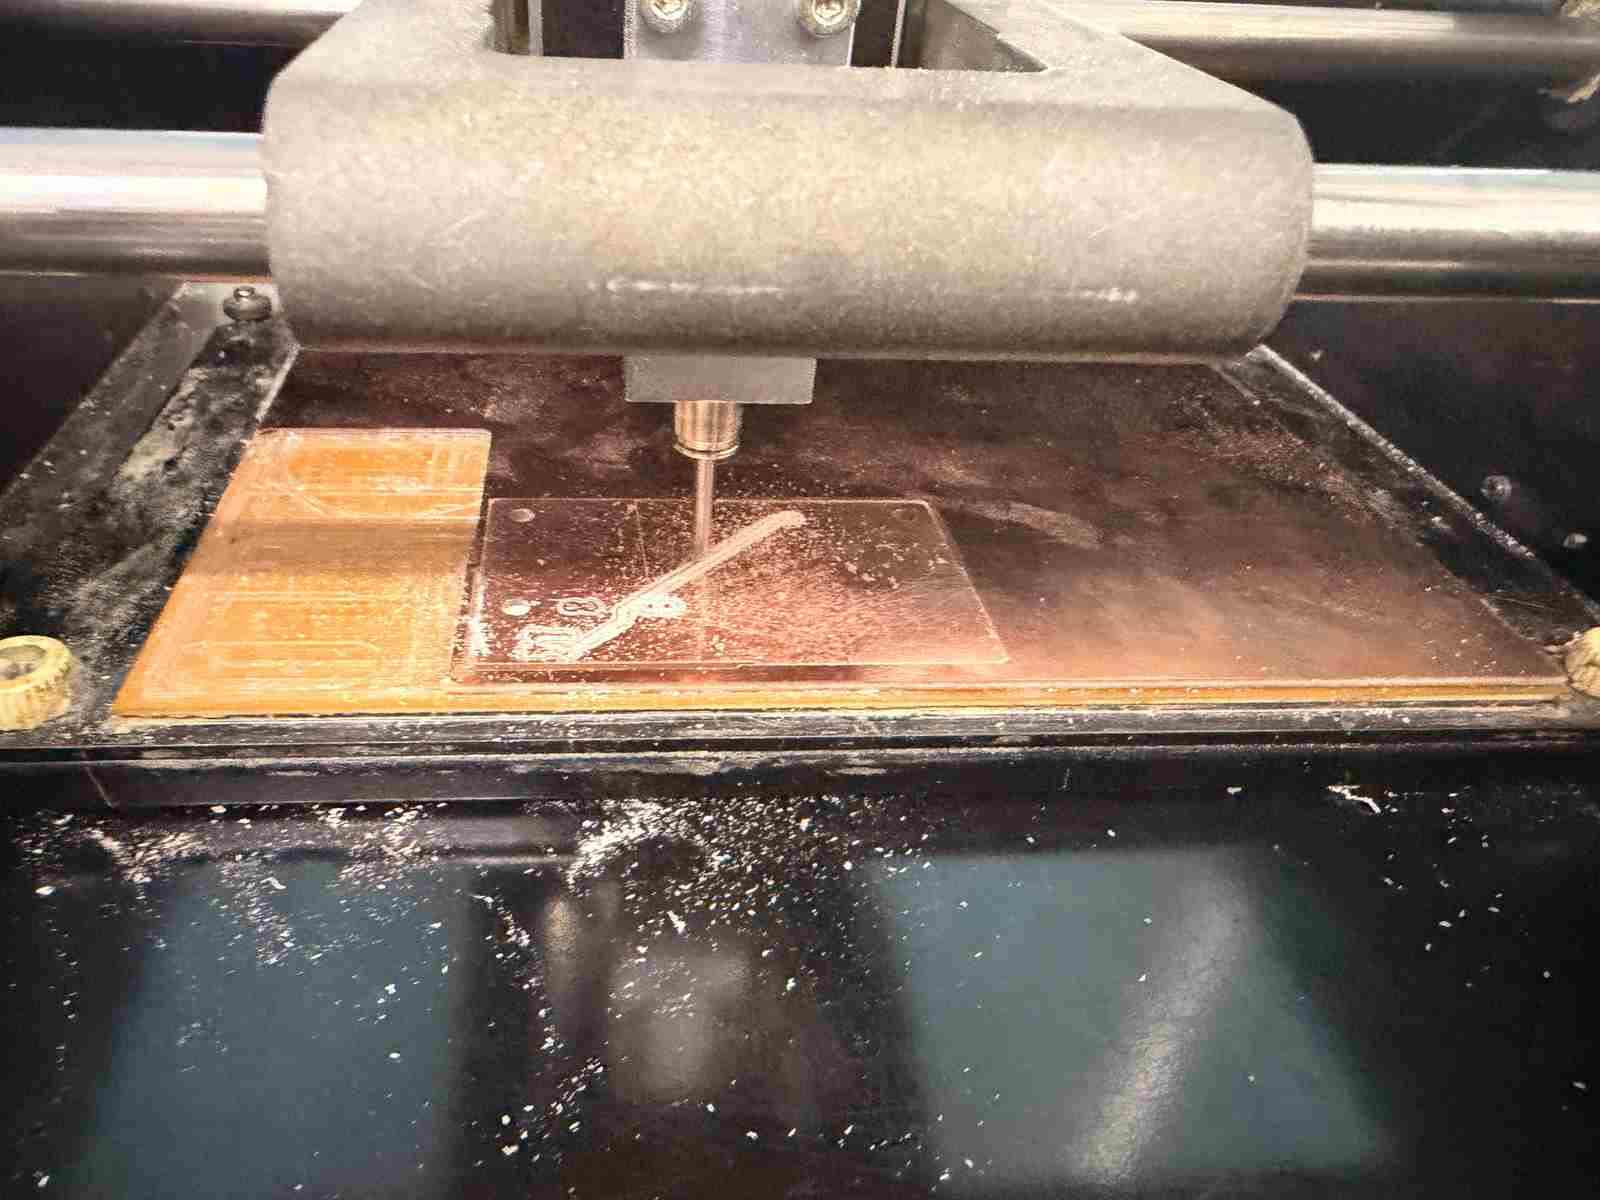
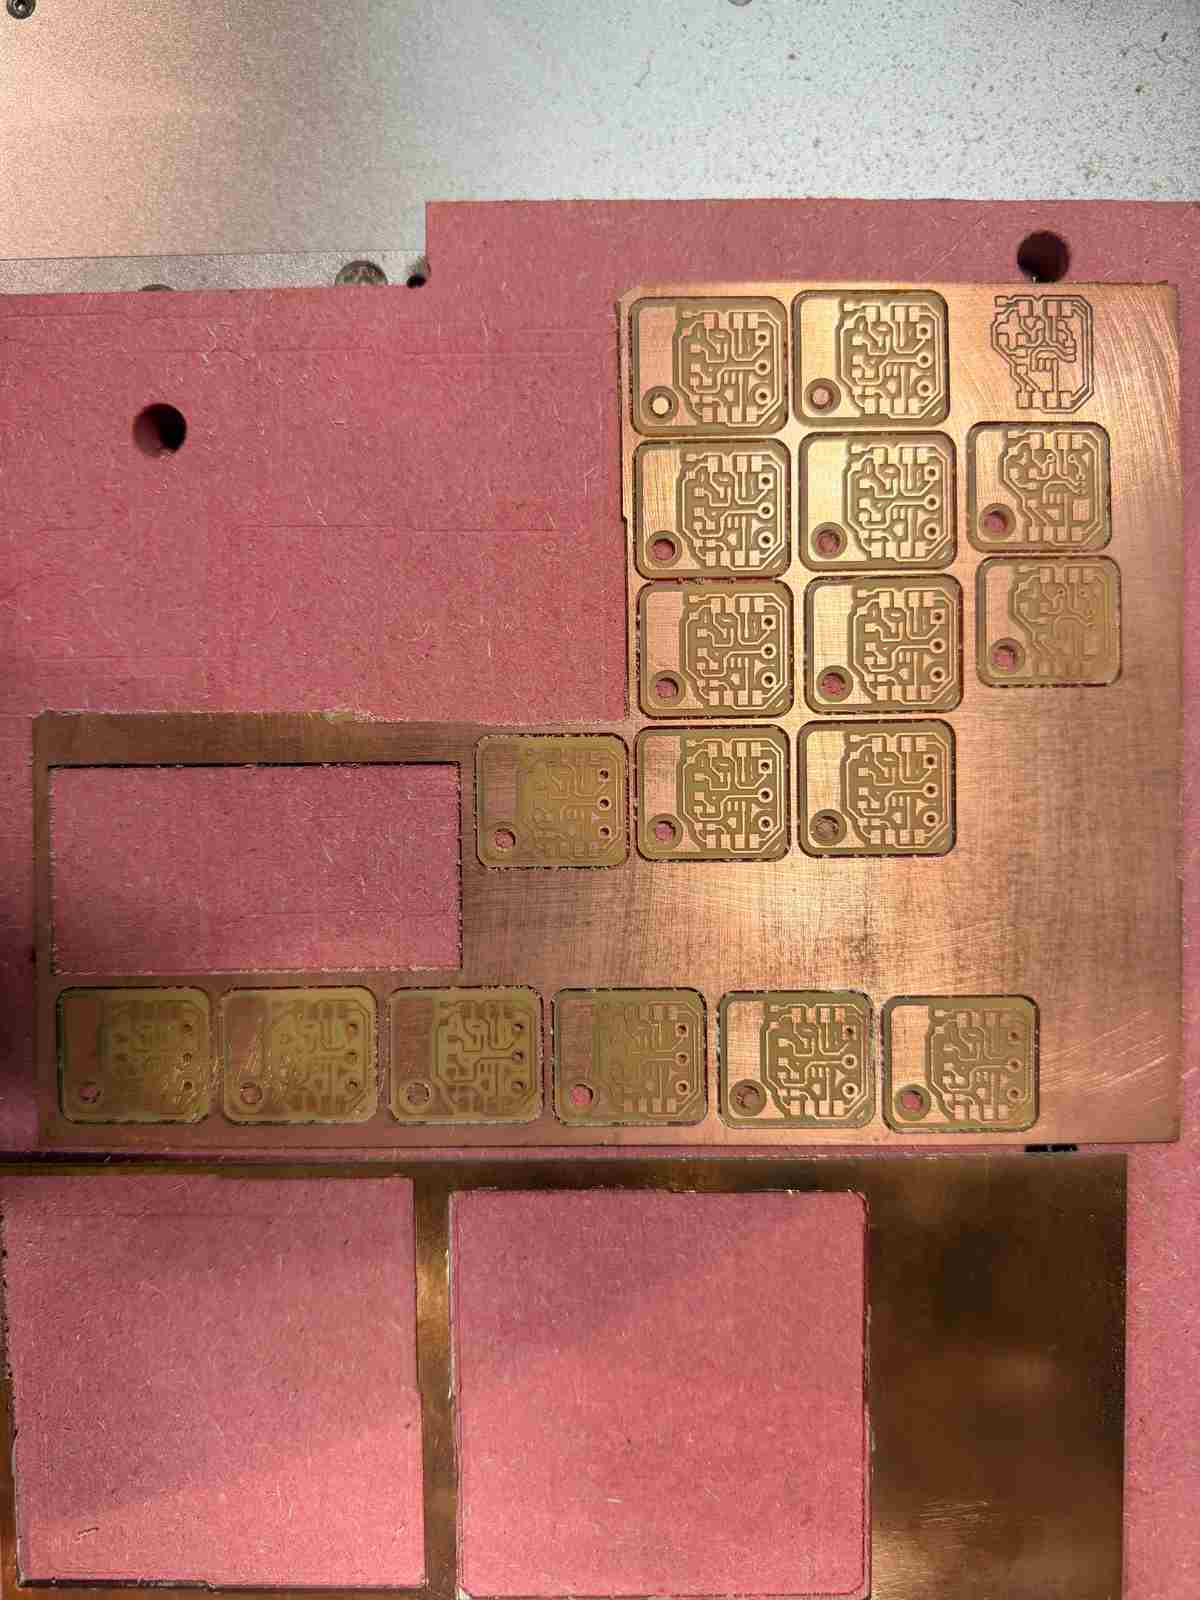
I used the Carvera CNC machine and the Roland MDX-20 to mill all the PCBs. I’ve documented this process in the Carvera Documentation section above and the electronics production week-8 documentation .
XIAO Main Board#
XIAO Sister Board#
Drawer Board#
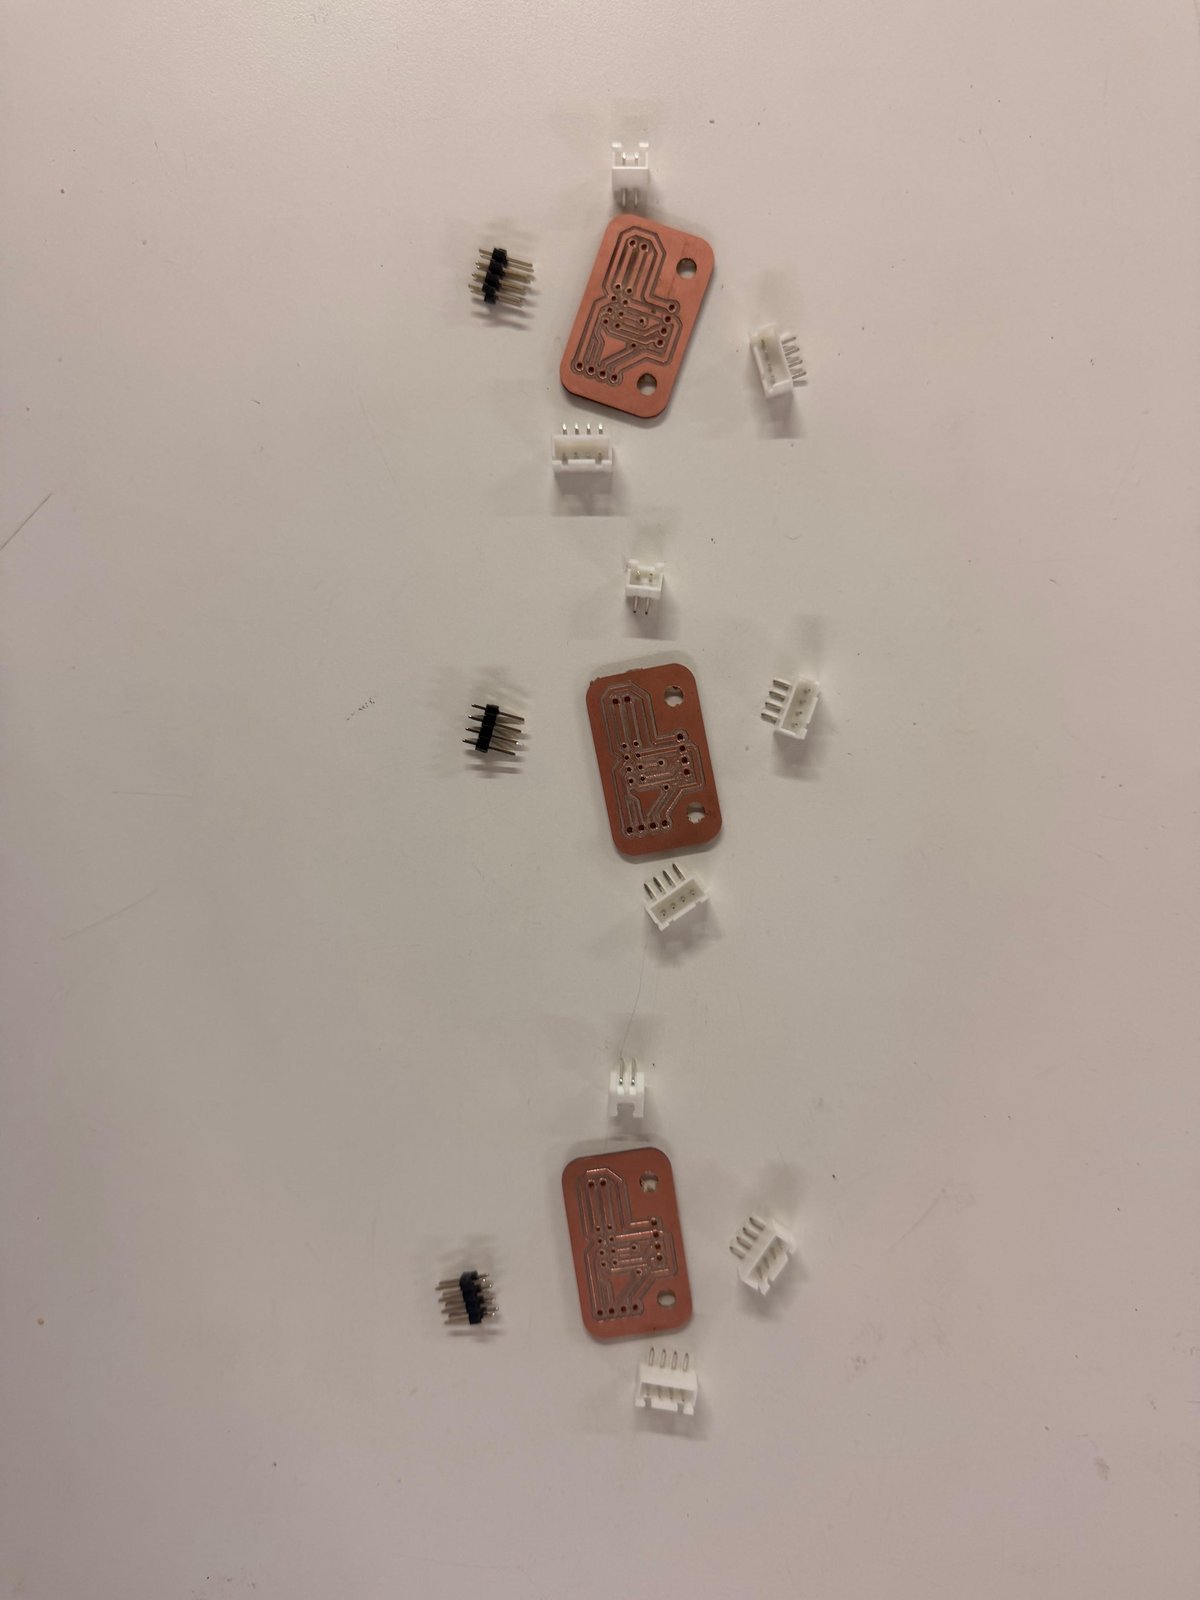
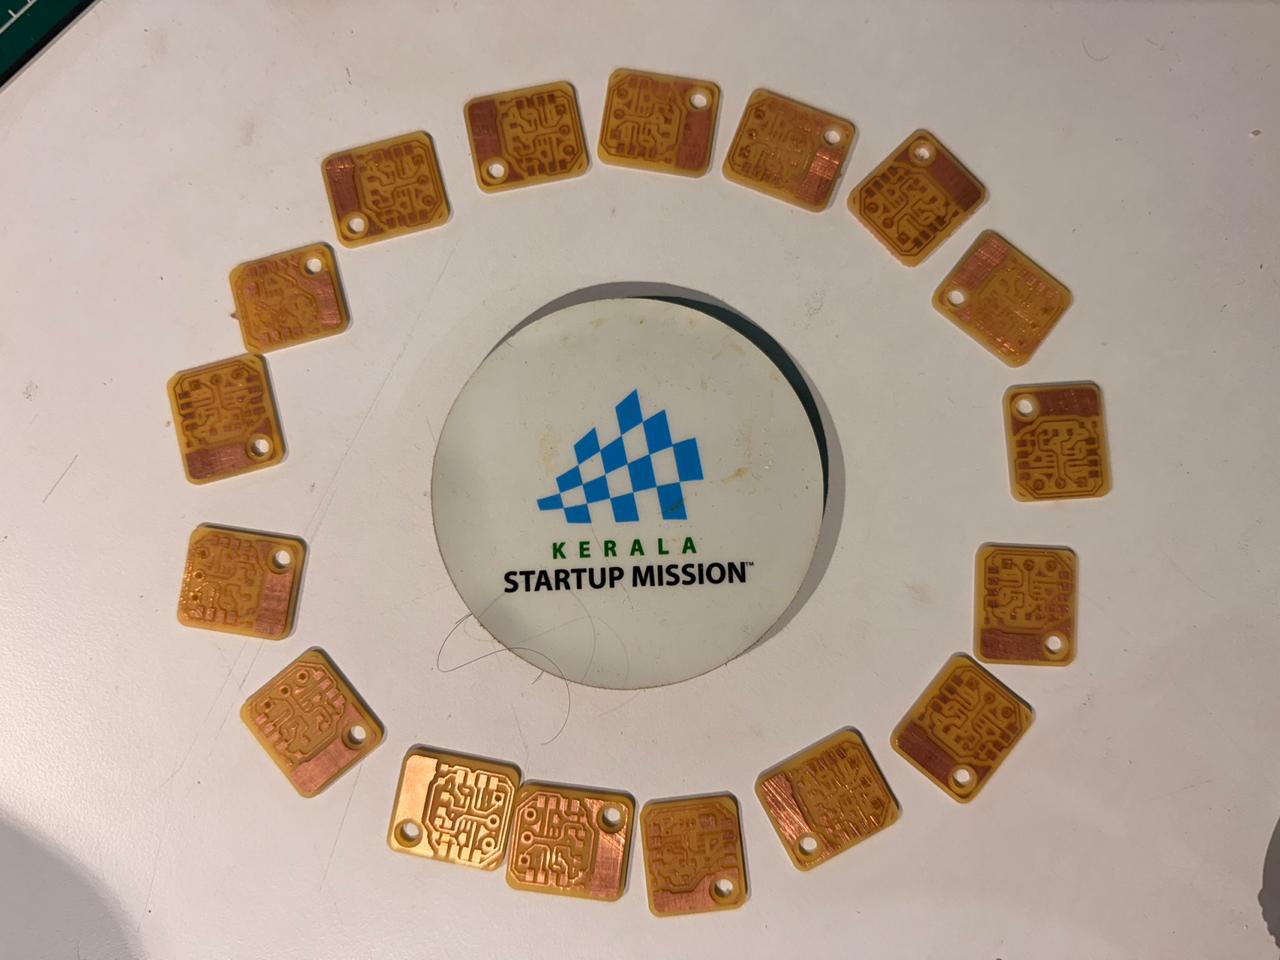
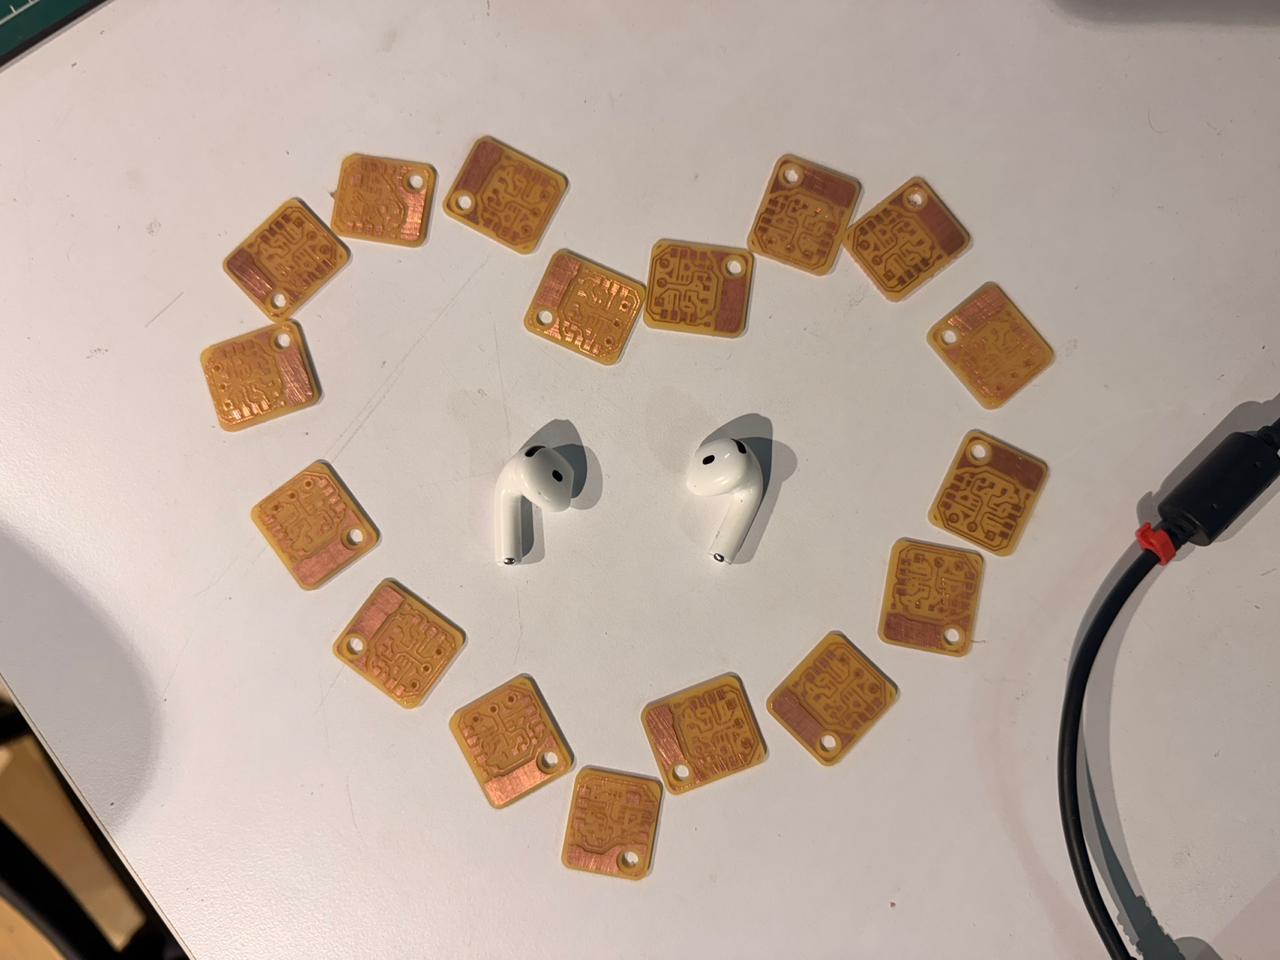
NEOBUTTON Board and NEOHALL-EFFECT Board#
Soldering the PCBs#
After milling all the PCBs, I soldered all the components onto them.
Adding the copper rivets for holding the limit switch legs.
Final Boards#
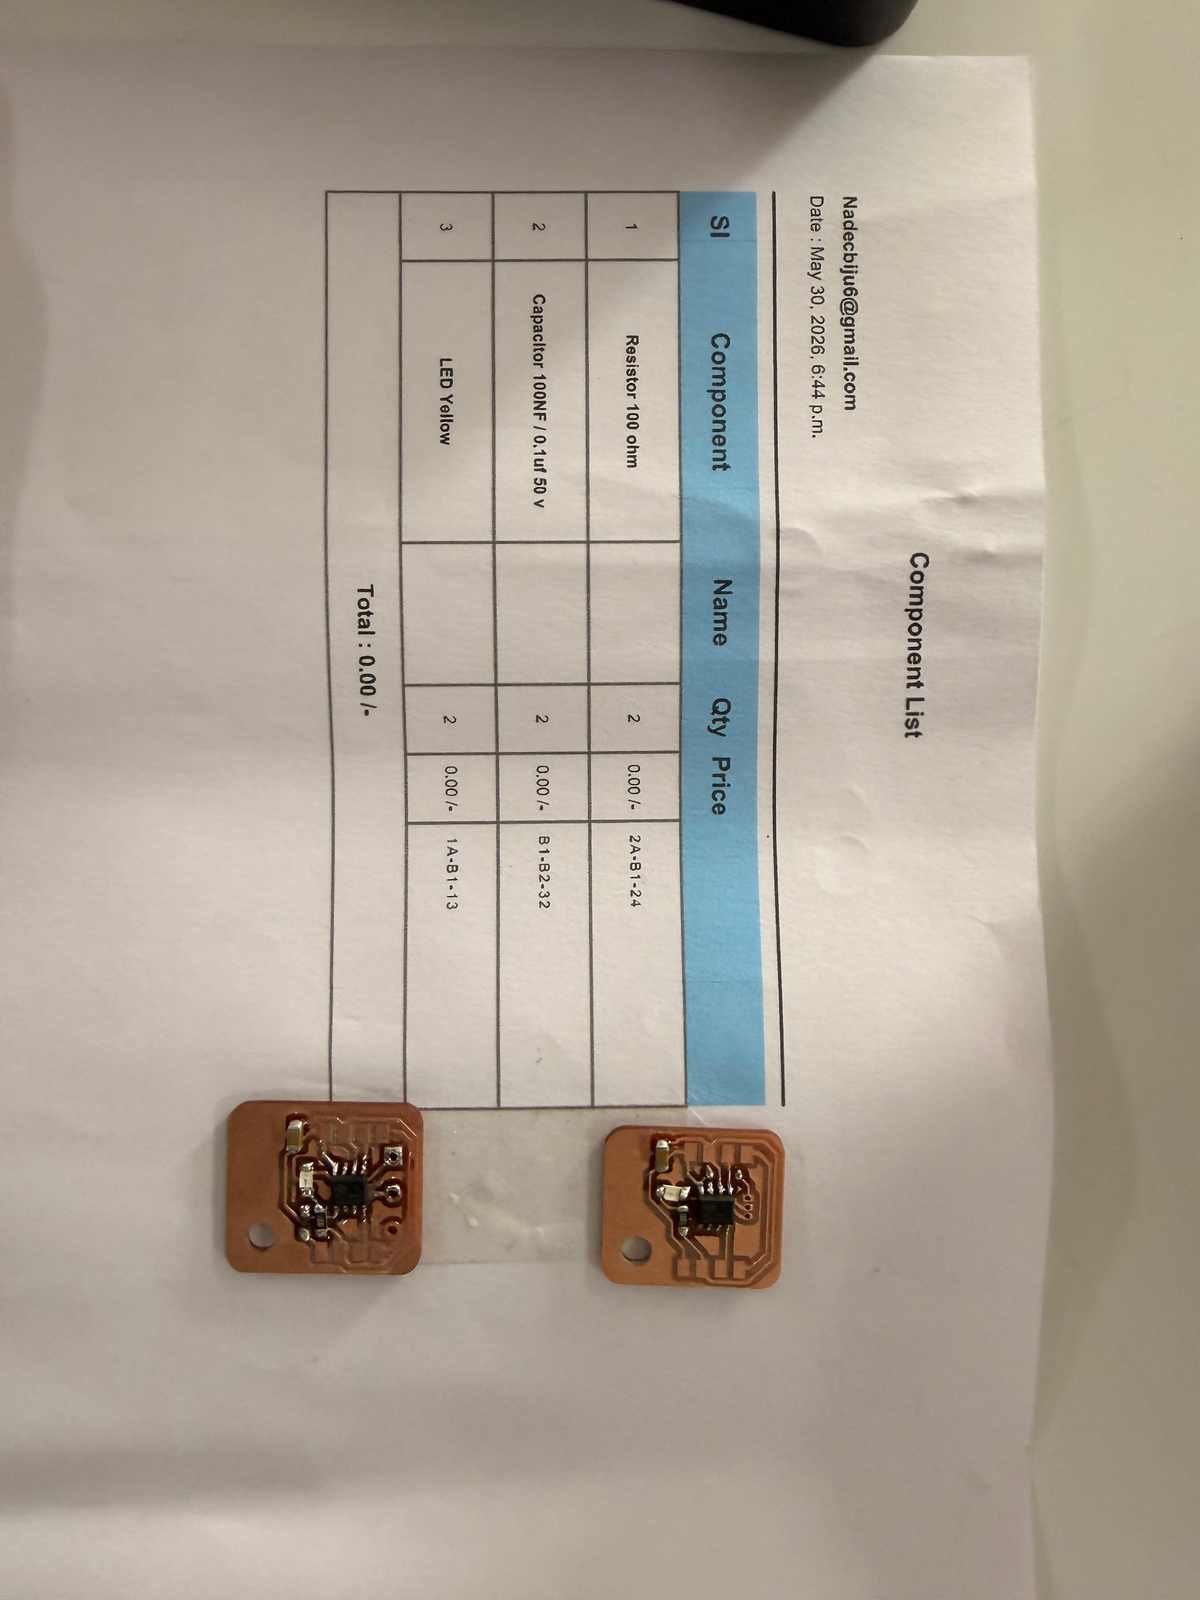
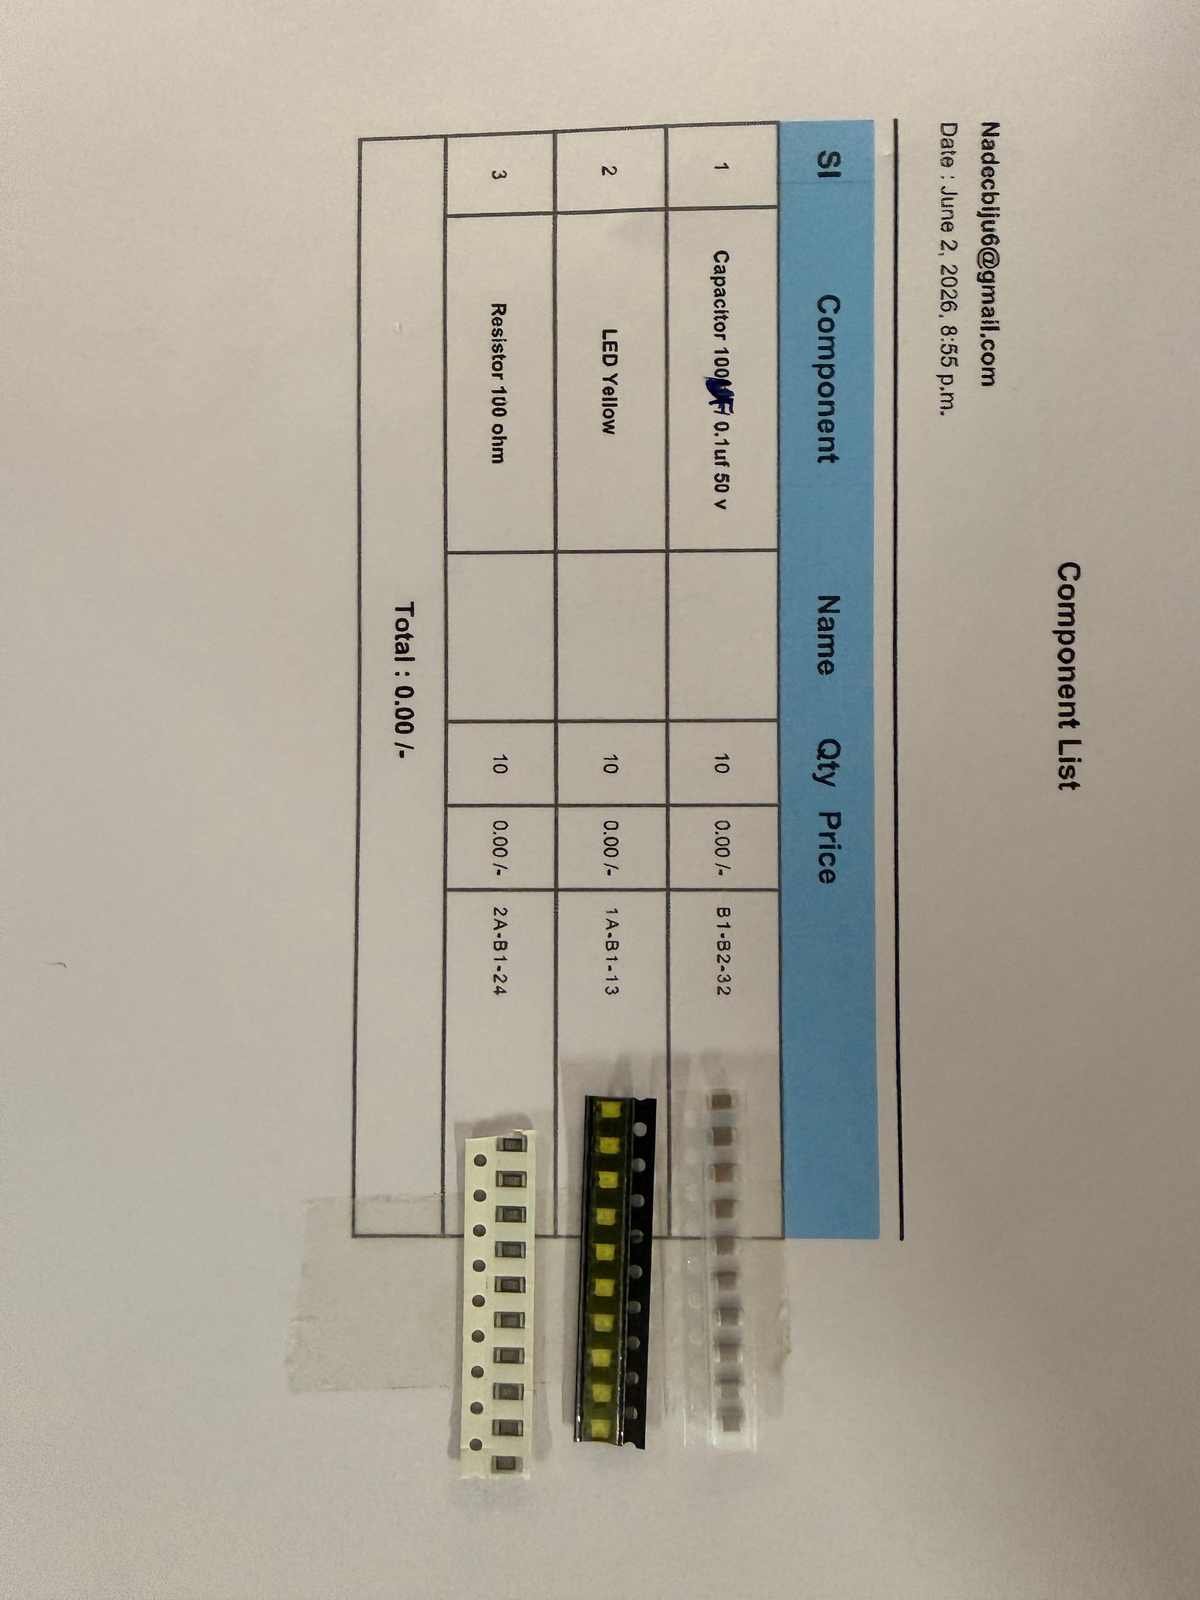
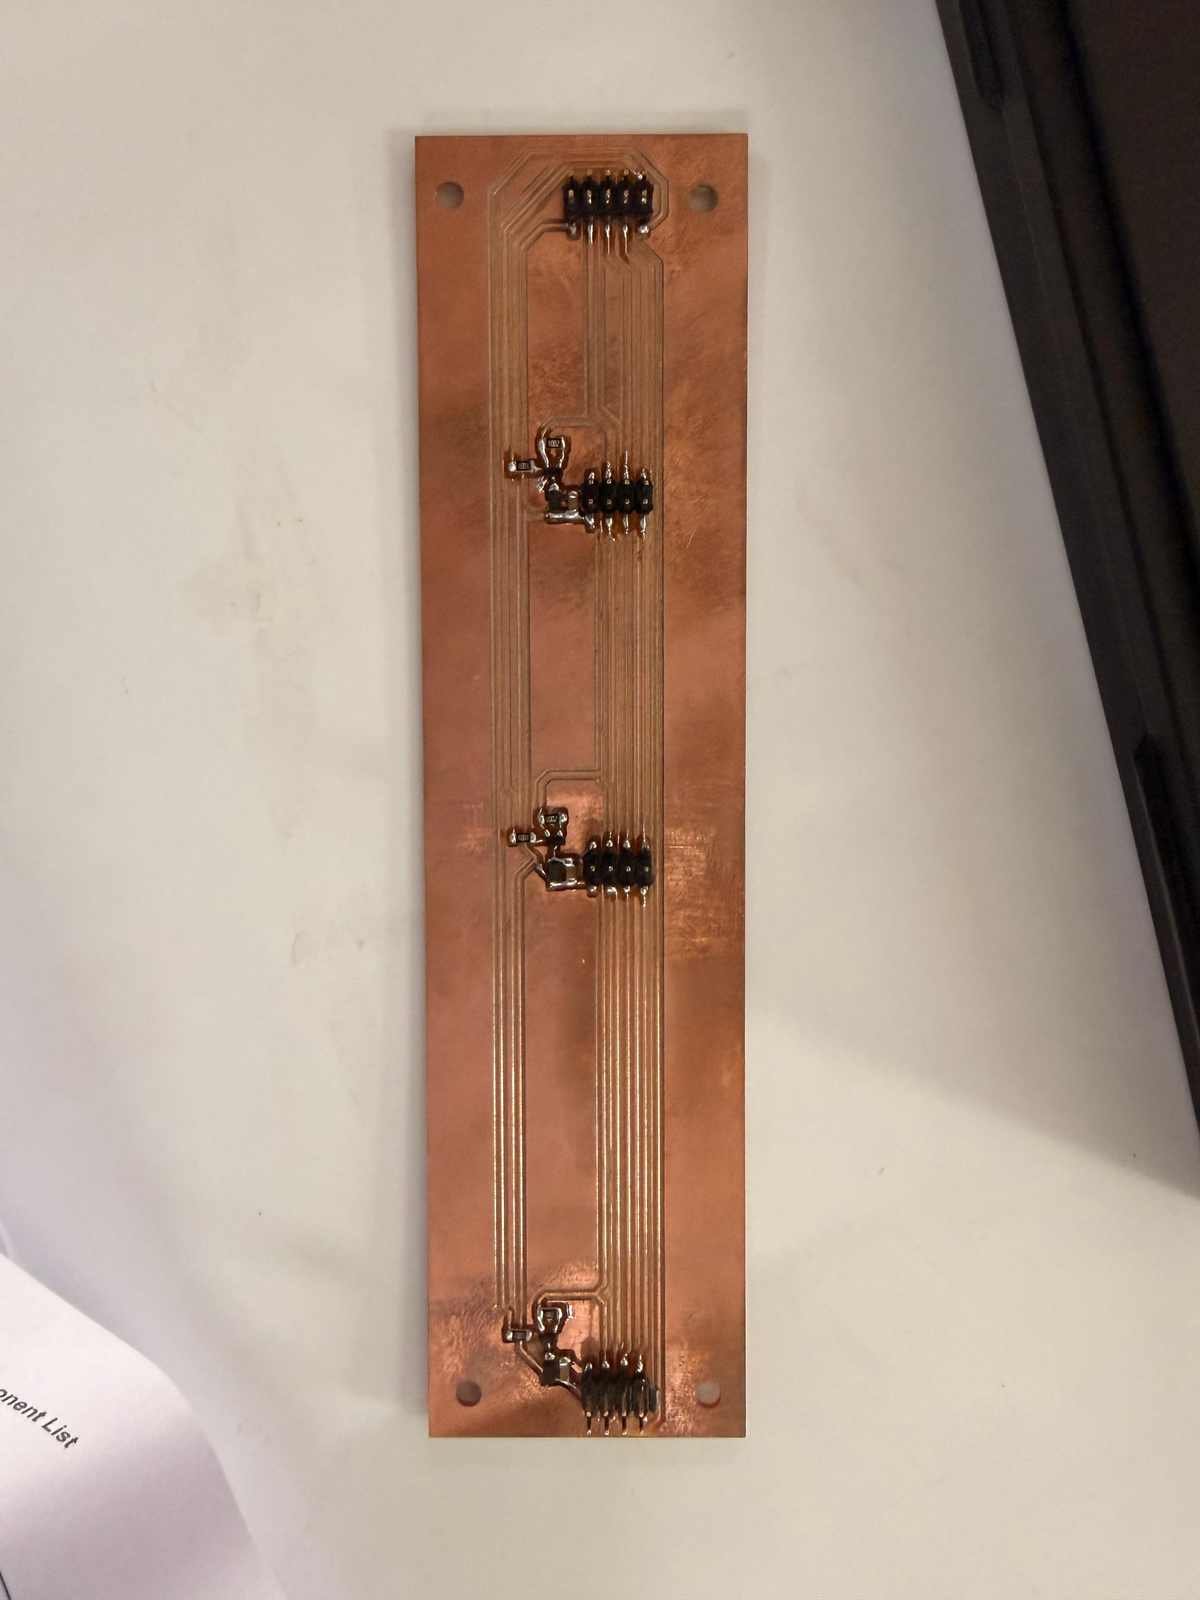
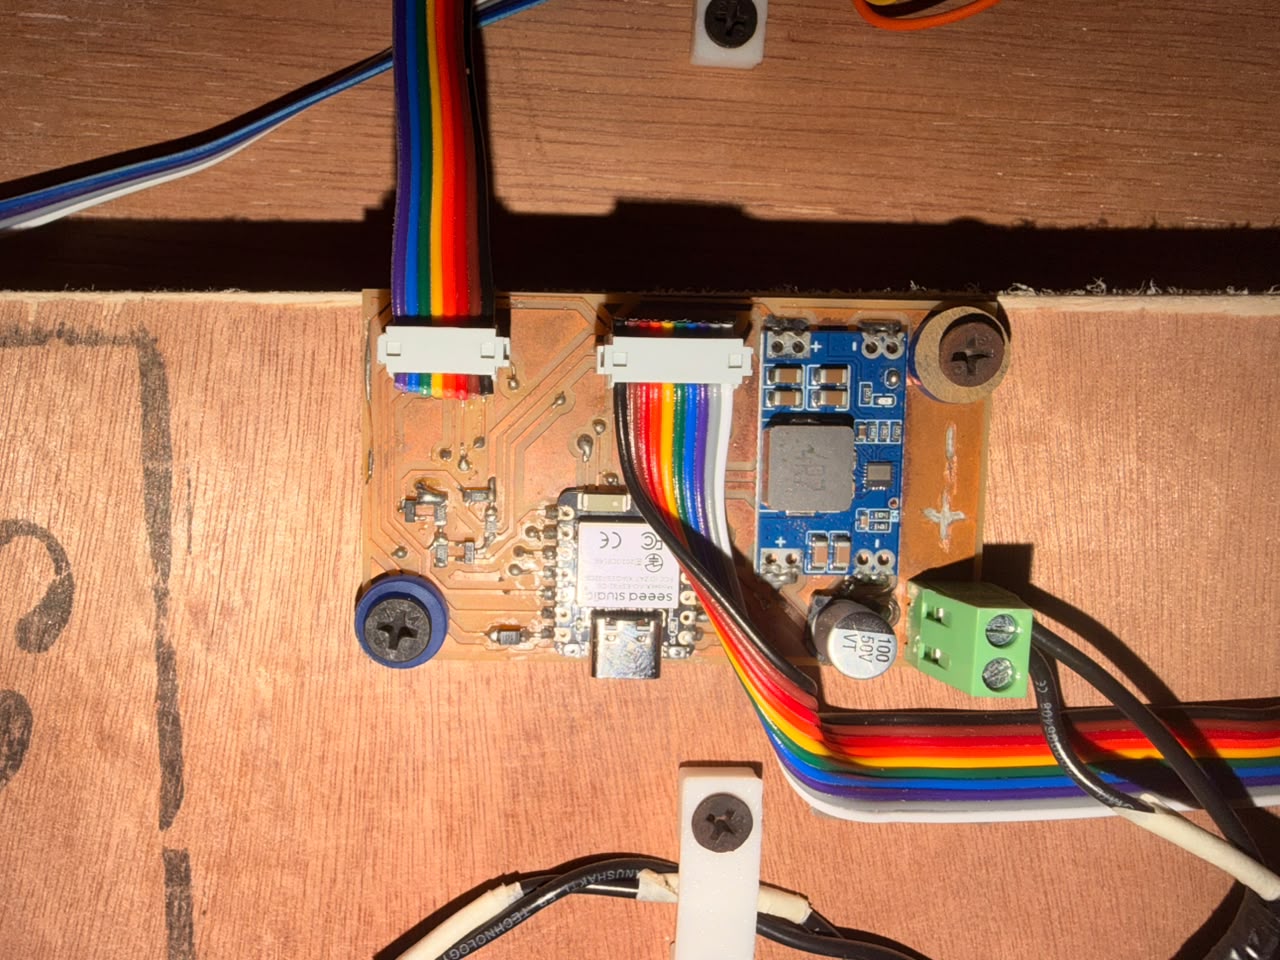
Milling on ShopBot
Milling the Plywood#
I had to get the plywood pieces cut for the cabinet and the drawers. I wanted to use the ShopBot CNC Router for this; I’m not going into much detail here, as it’s been covered in great detail in my week-7 documentation. You can check it out here .
The design for the cabinet and the drawers was completed in Fusion 360. But this time around, I used Fusion 360 for the CAM operations instead of VCarve, which is what I had used in week-7. I had to create the toolpaths for the ShopBot CNC Router, then export them as G-code files and run them on the ShopBot CNC Router.
But I have also done the CAM using Fusion 360 for the ProtoTrak CNC during my moulding and casting week-14 documentation. You can check it out here .
So here is the shortened version:
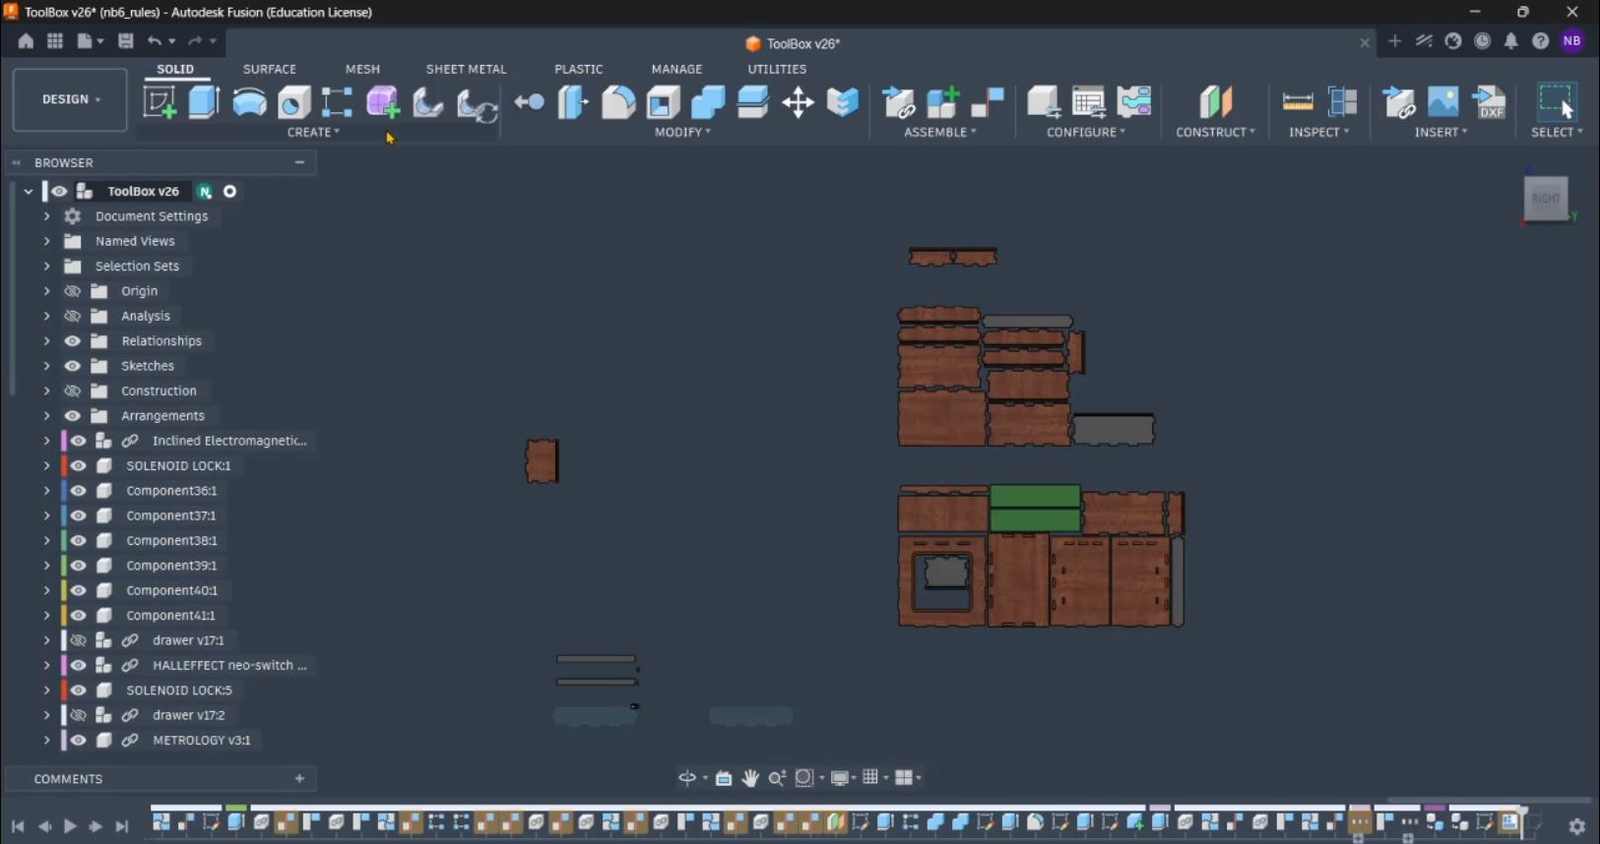
Firstly, I arranged all the parts using the arrange function.
Then I added dogbones wherever required.
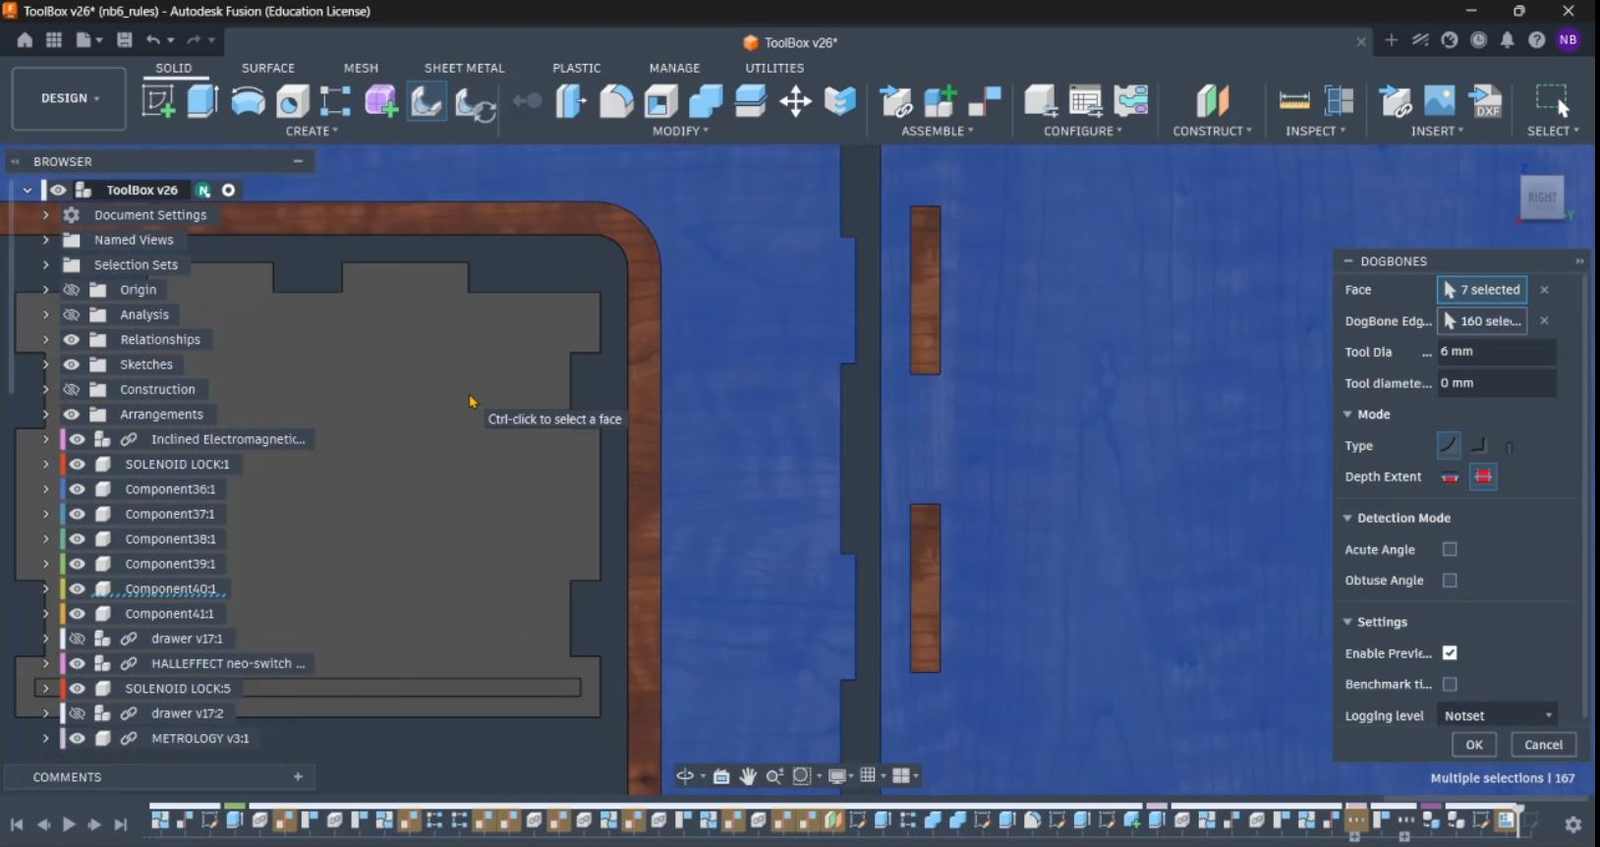
I wasn’t able to use the nifty dogbone tool I had used in week-7, as it was a free trial and I had run out of the trial period.
No worries, I came across an open-source one on GitHub and used it.
I’ve created a .BAT file so that any Windows user following this documentation who wants to install it can do so with just a one-click installation.
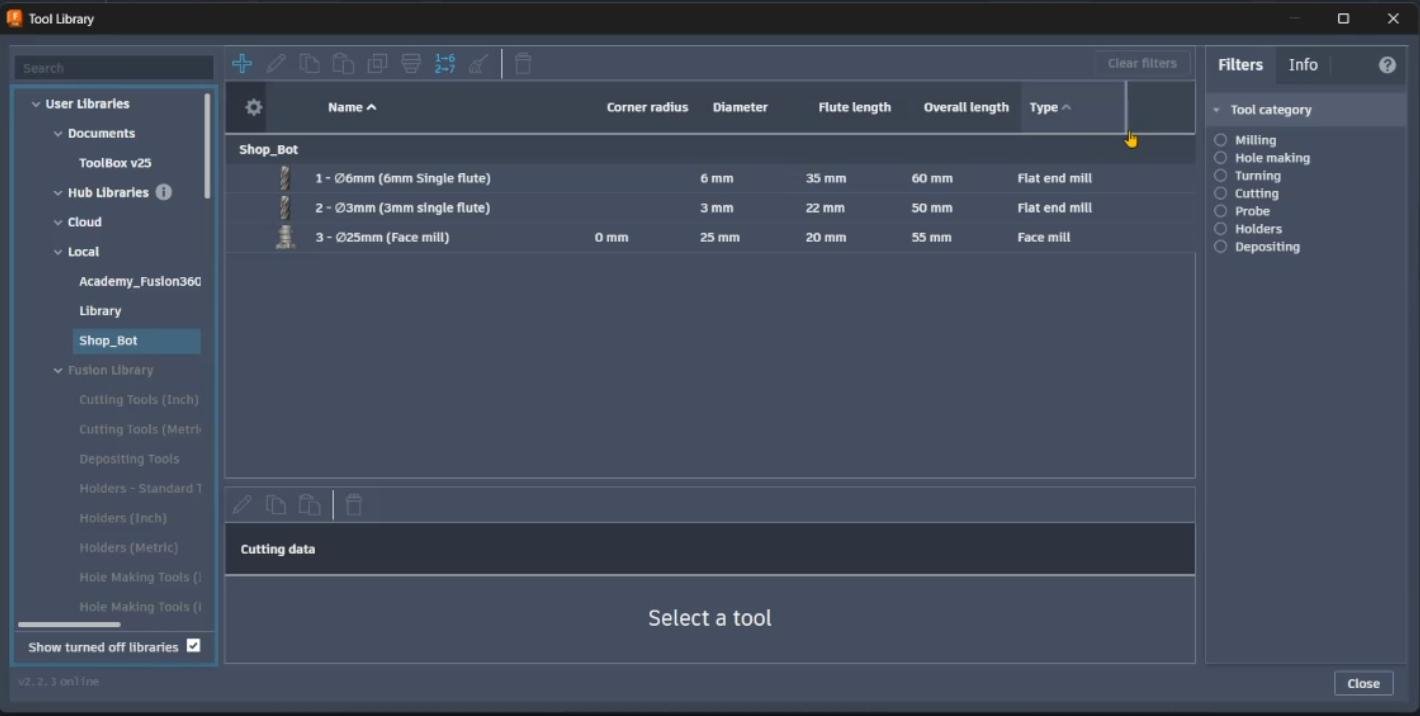
Then I imported the ShopBot tools to the tool library and set the parameters for the tools I was going to use for the routing operations, similar to how I did it in the week-13 documentation for the ProtoTrak CNC.
Then I created the setup and the operations for the routing operations, similar to how I did it in the week-13 documentation for the ProtoTrak CNC, using the same feed rate and speeds as I did in the week-7 documentation for the ShopBot CNC router.
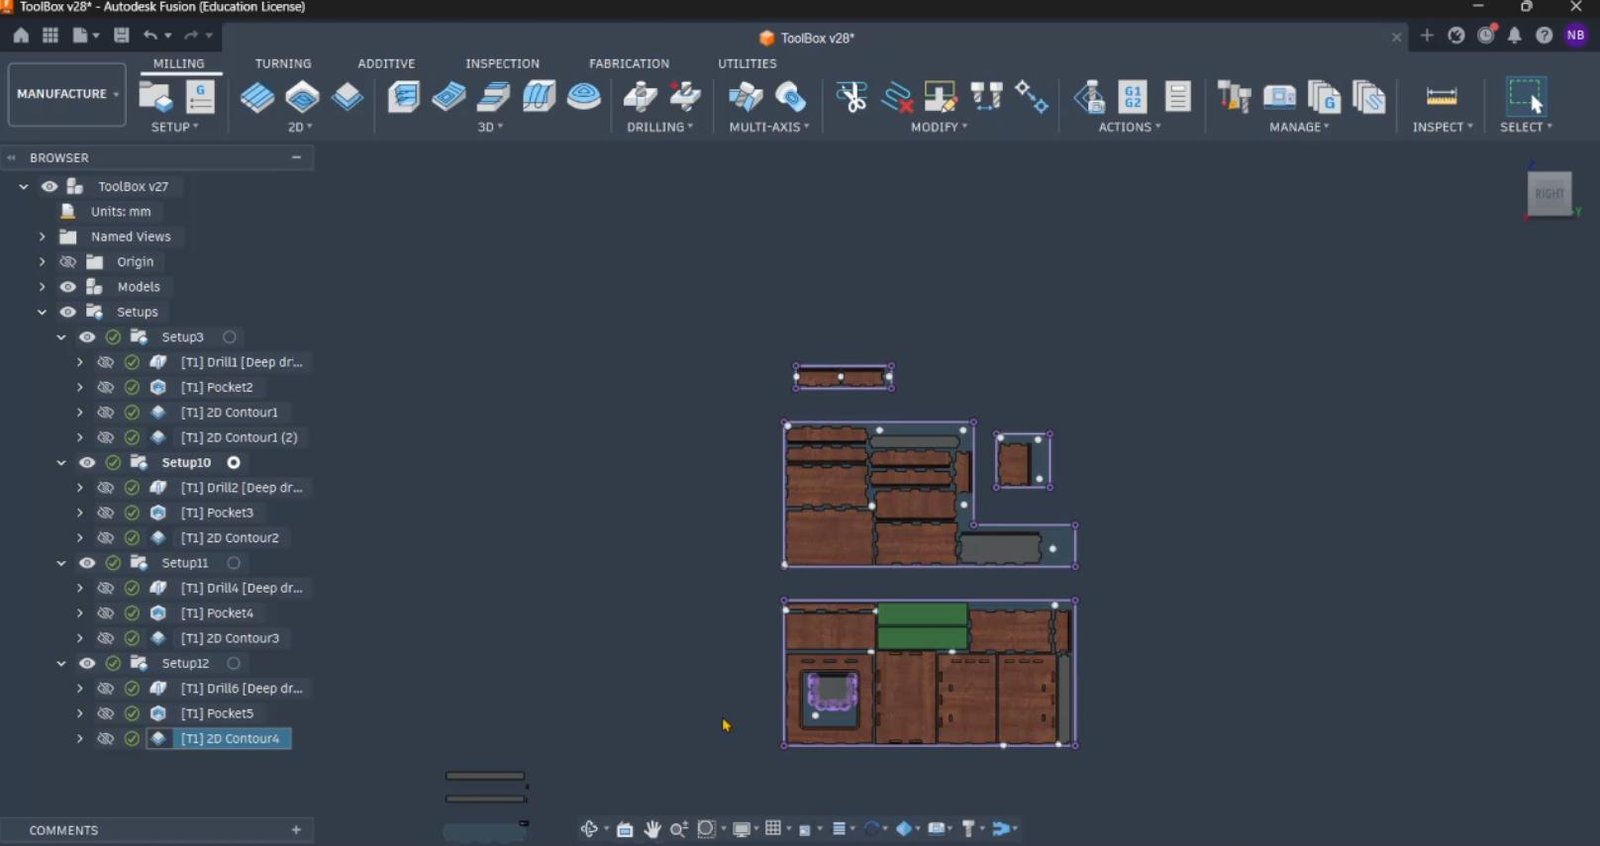
Then I post-processed the operations to generate the G-code files for the ShopBot CNC router.
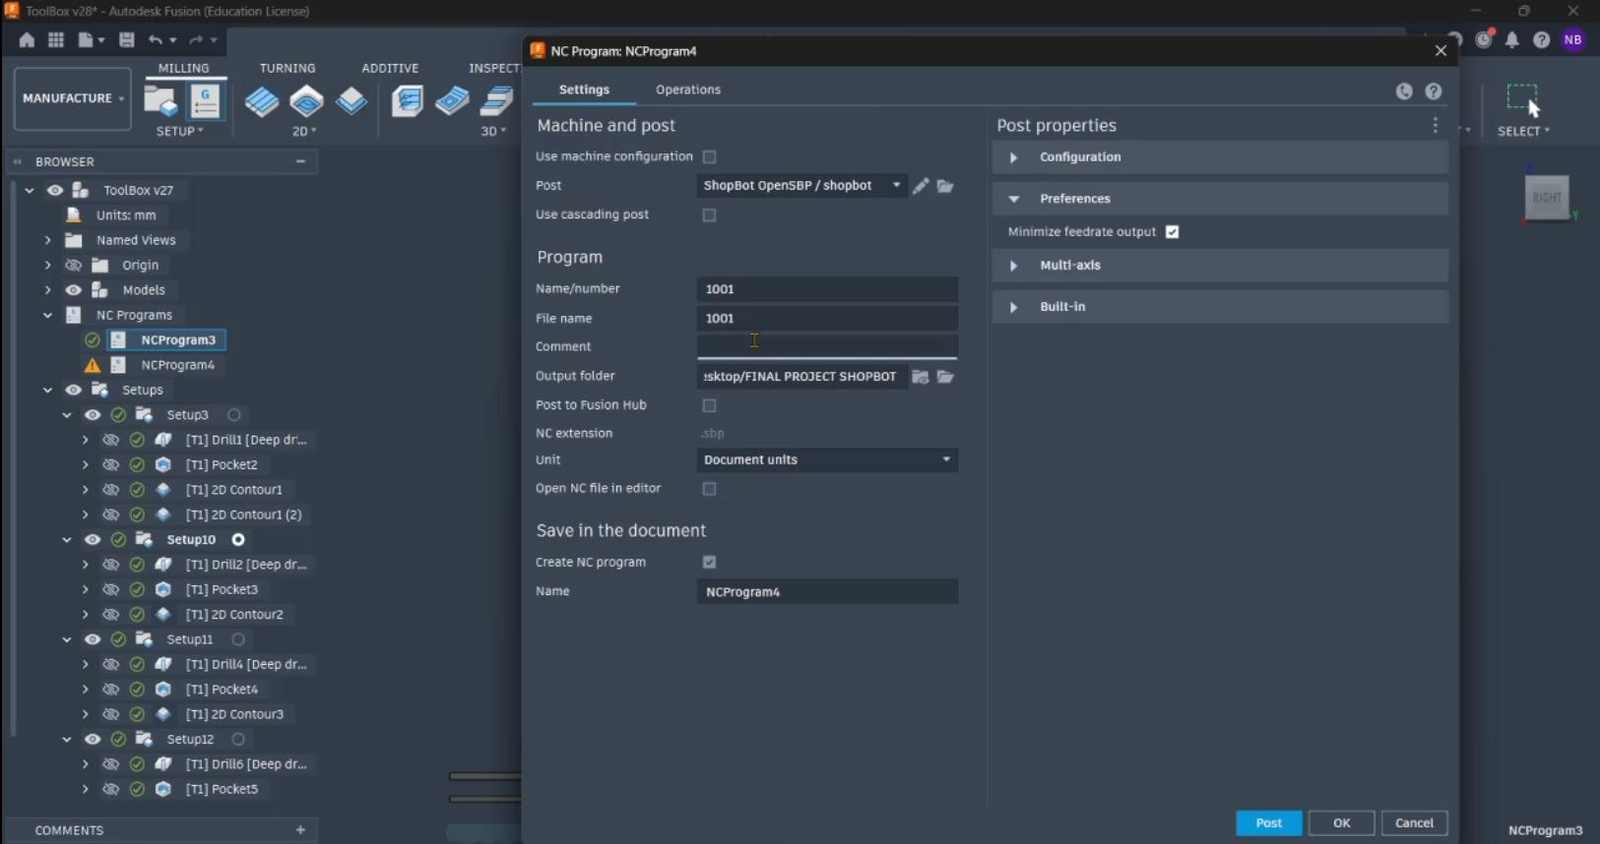
Then I copied the G-code files to the ShopBot CNC router and ran the operations to mill the plywood for the cabinet and the drawers.
3D Designing and Printing Handles, PCB Covers, Magnet Holder for Hall Effect Sensor, Solenoid Lock Traps, and Cable Management Accessories
The next step for me was to design a bunch of small accessories for the cabinet and the drawers. These included:
- Handles for the drawers
- PCB covers for the NEOBUTTON
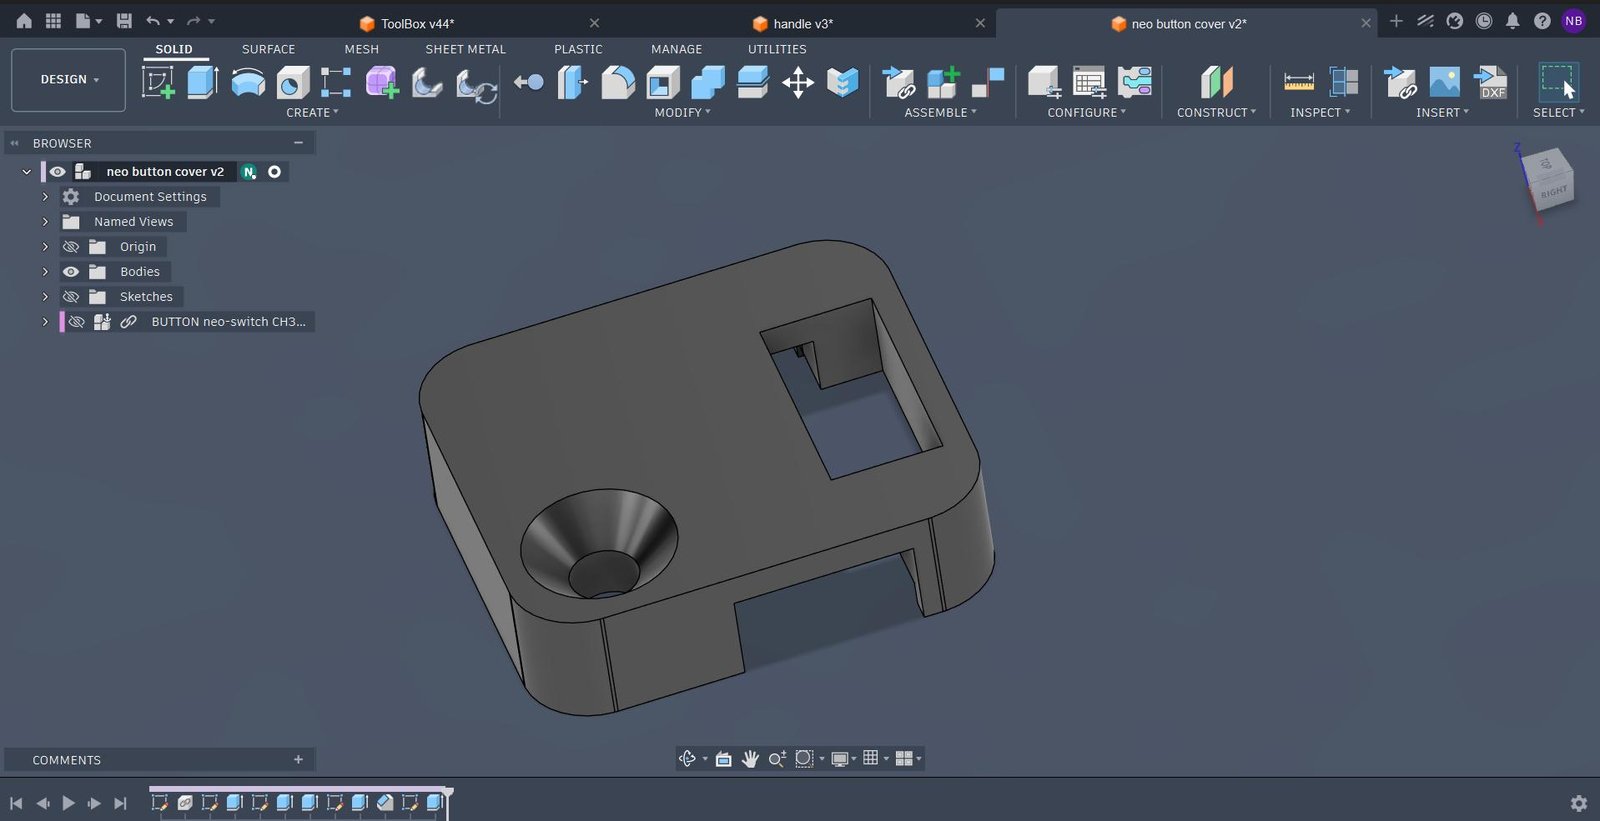
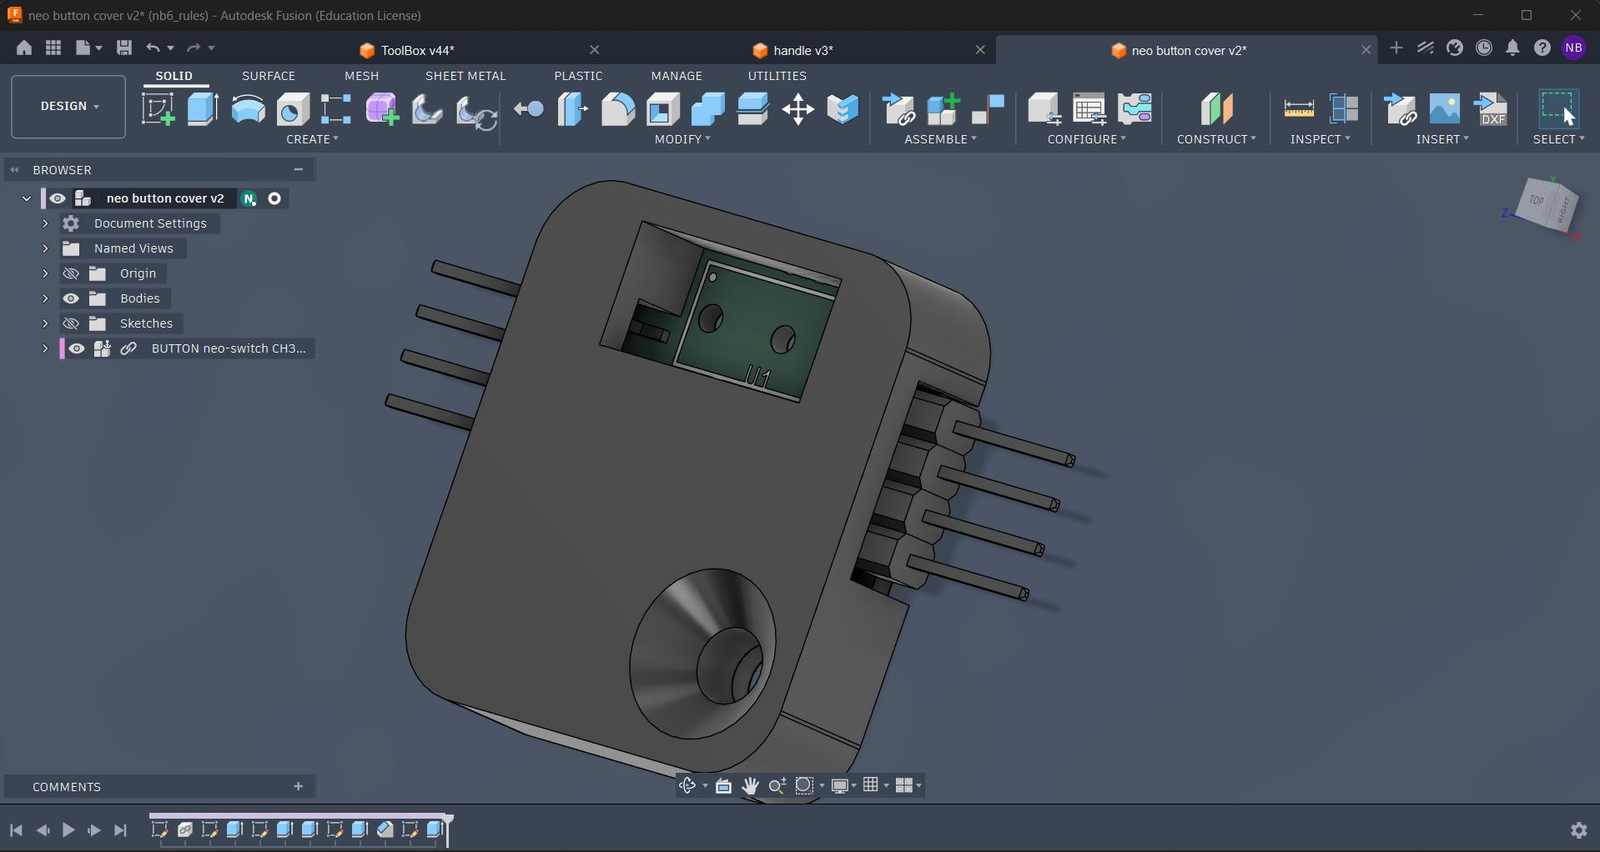
- Magnet holder for the hall effect sensor
- Solenoid lock traps for the solenoid locks
- Cable management accessories for the ribbon cables
For more details on the 3D designing and printing, you can check out my week-5 documentation and week-2 documentation .
Laser Engraving Handles Using Xtool
I had used the Xtool F1 in order to engrave the handle that I had 3D printed with the names of the drawers.
Steps#
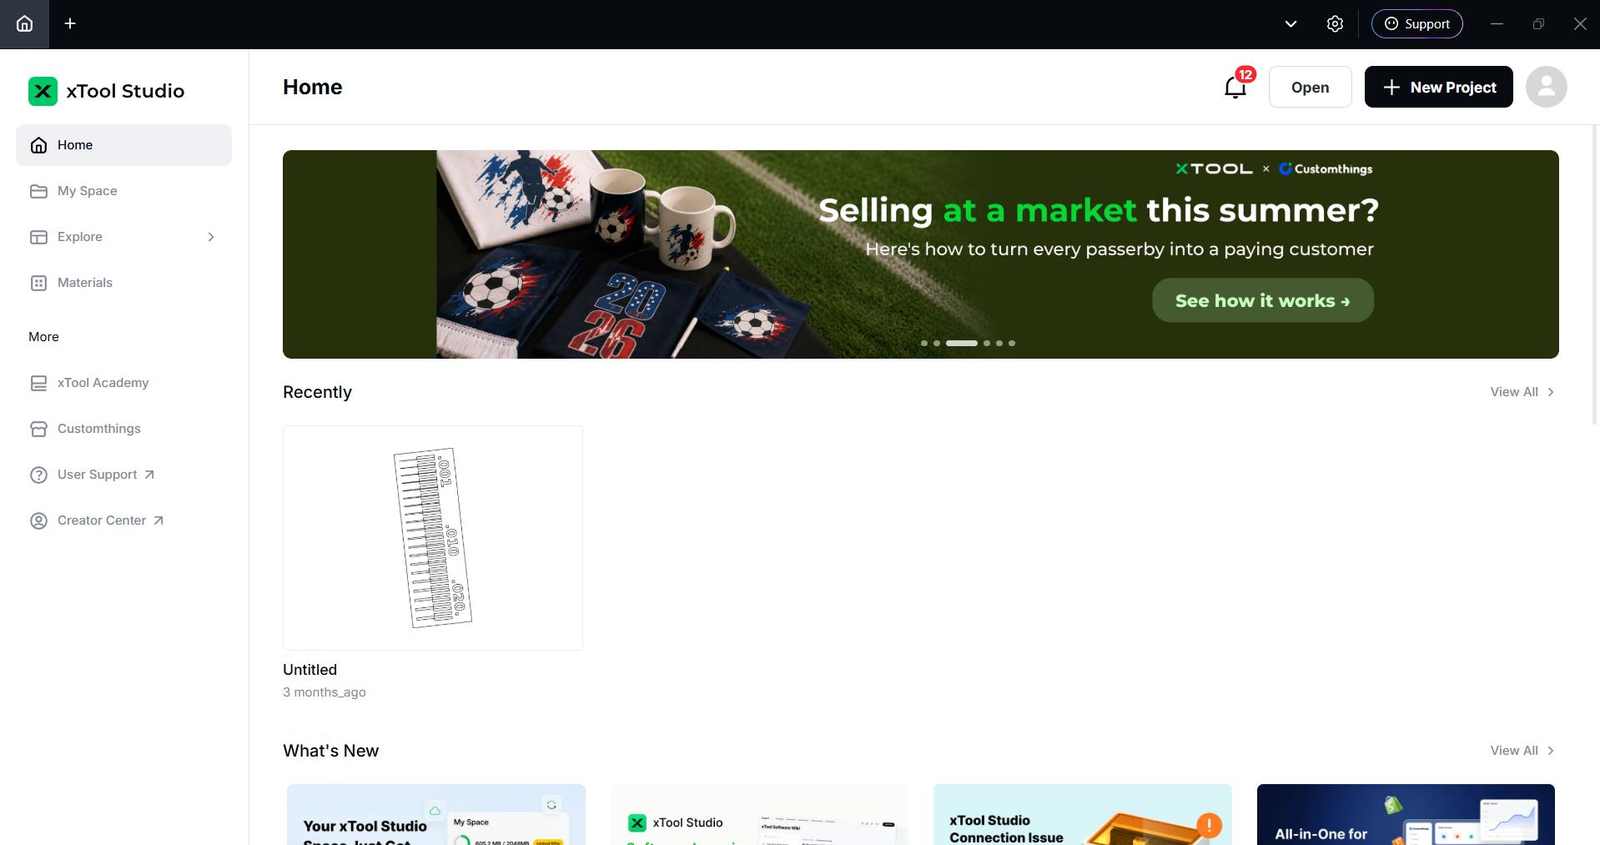
- Download the Xtool software from the official website and install it on your laptop. https://www.xtool.com/pages/software
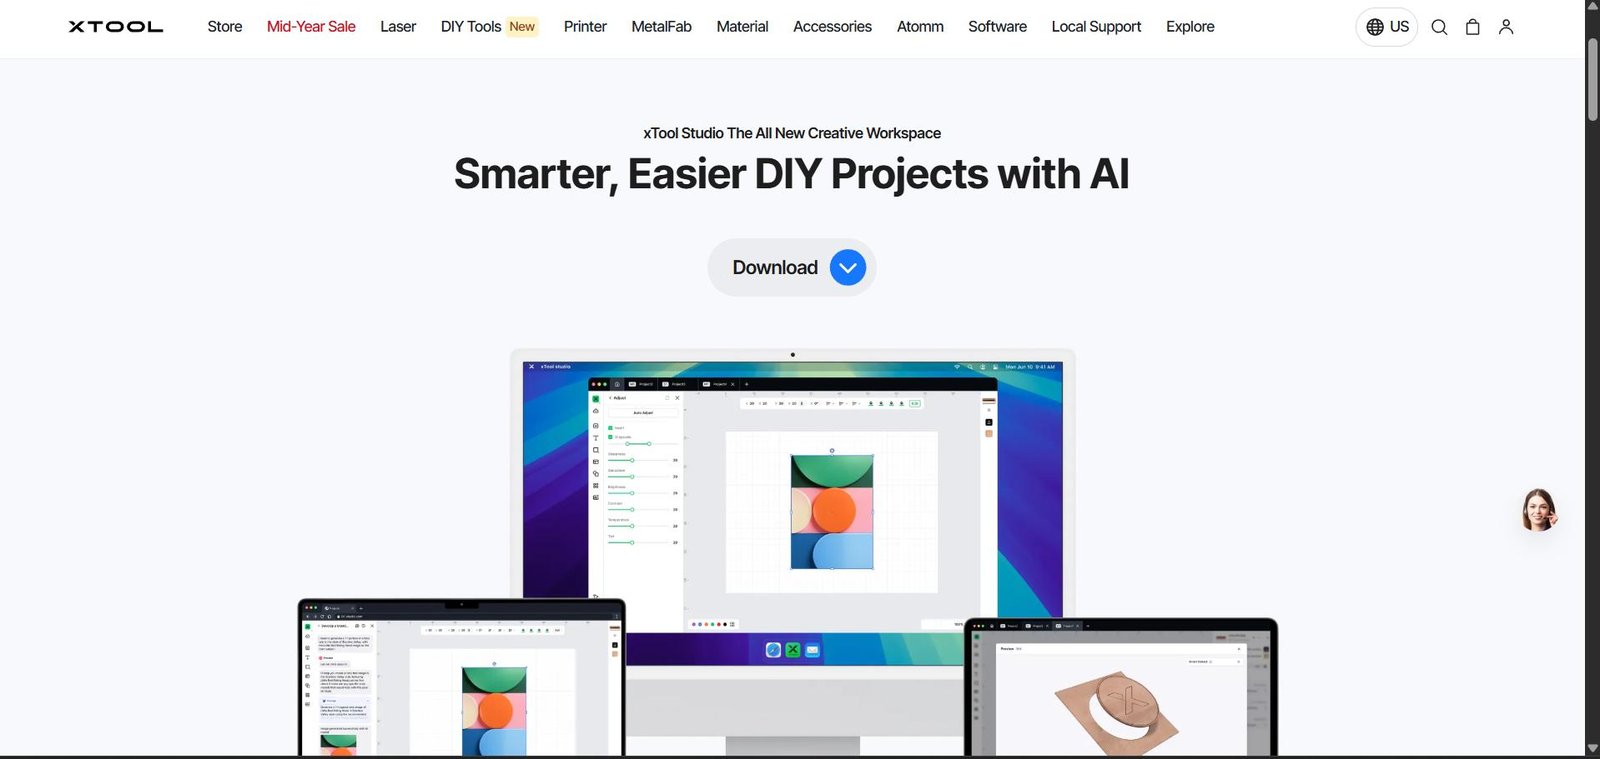
- Open the Xtool software and connect to the Xtool F1 laser engraver.
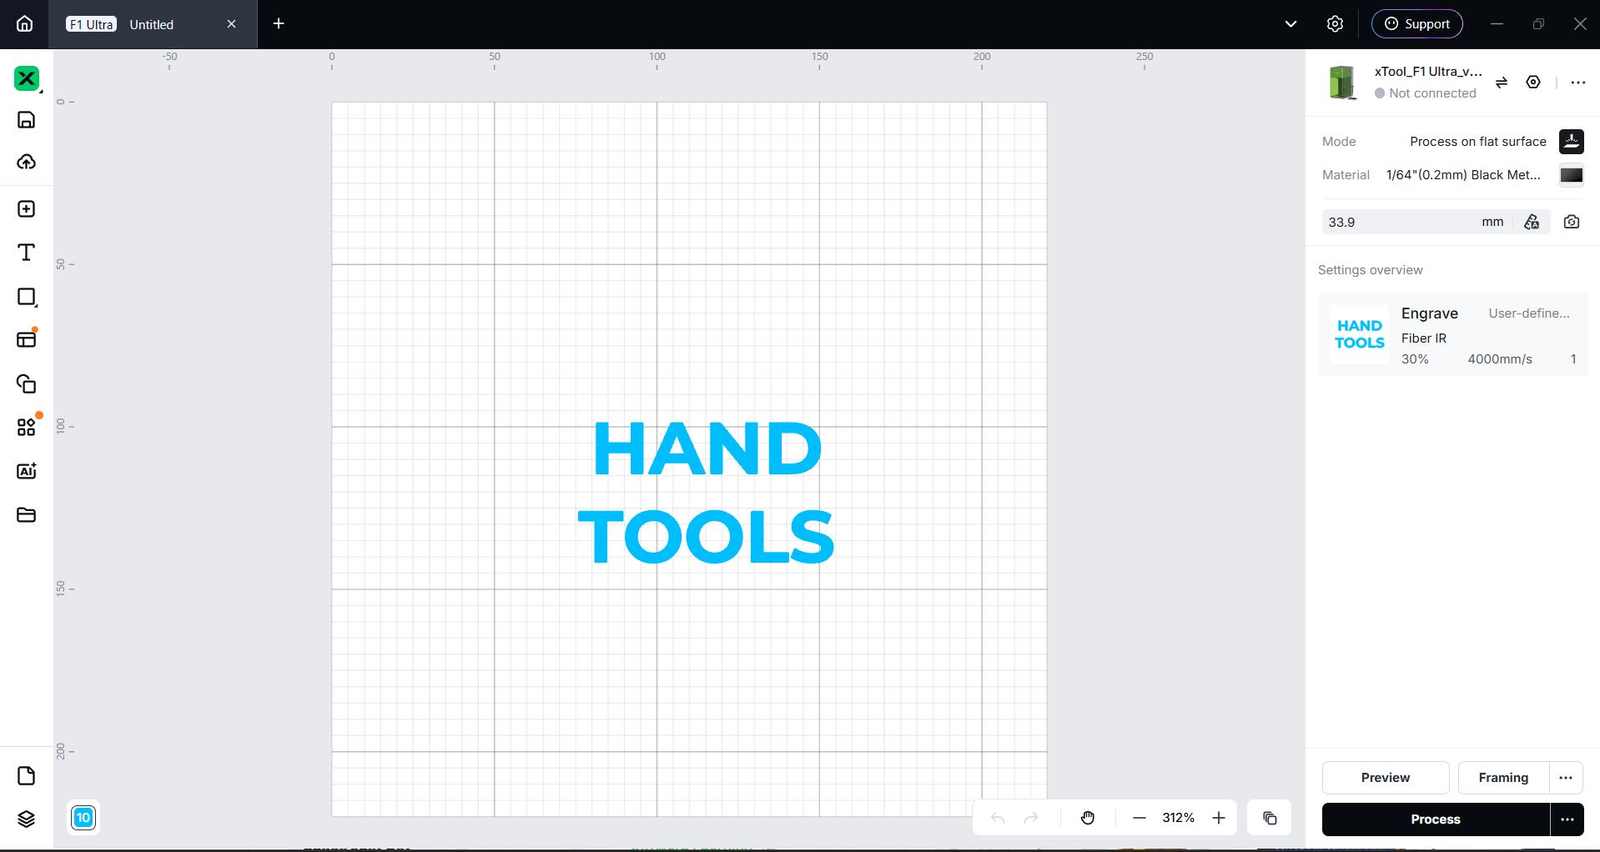
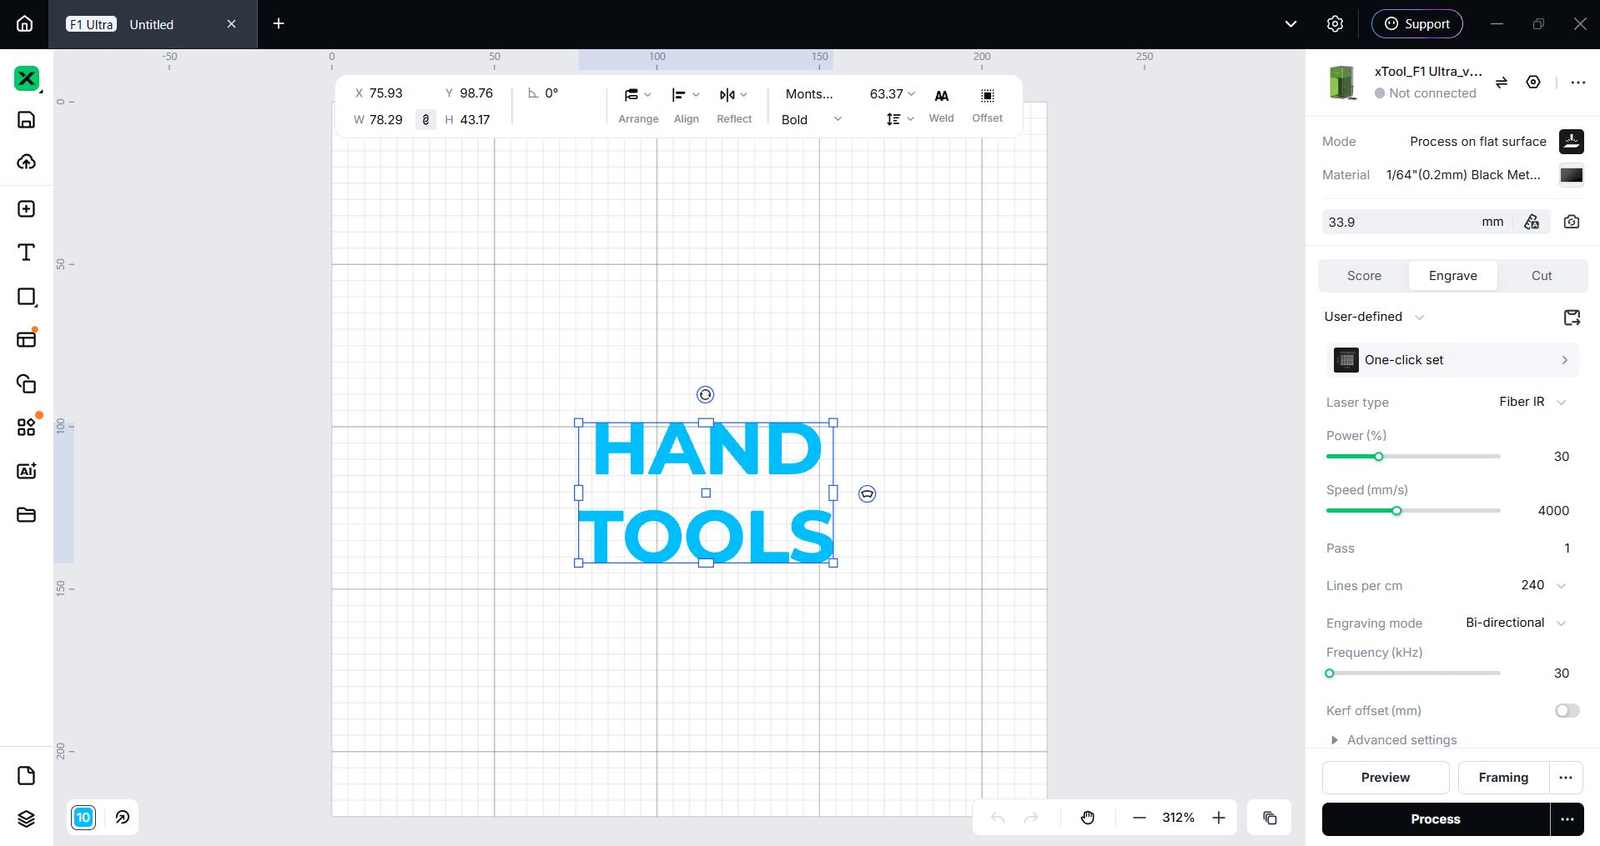
- Align the text on the handle using the software, set the parameters for engraving, and process the engraving.
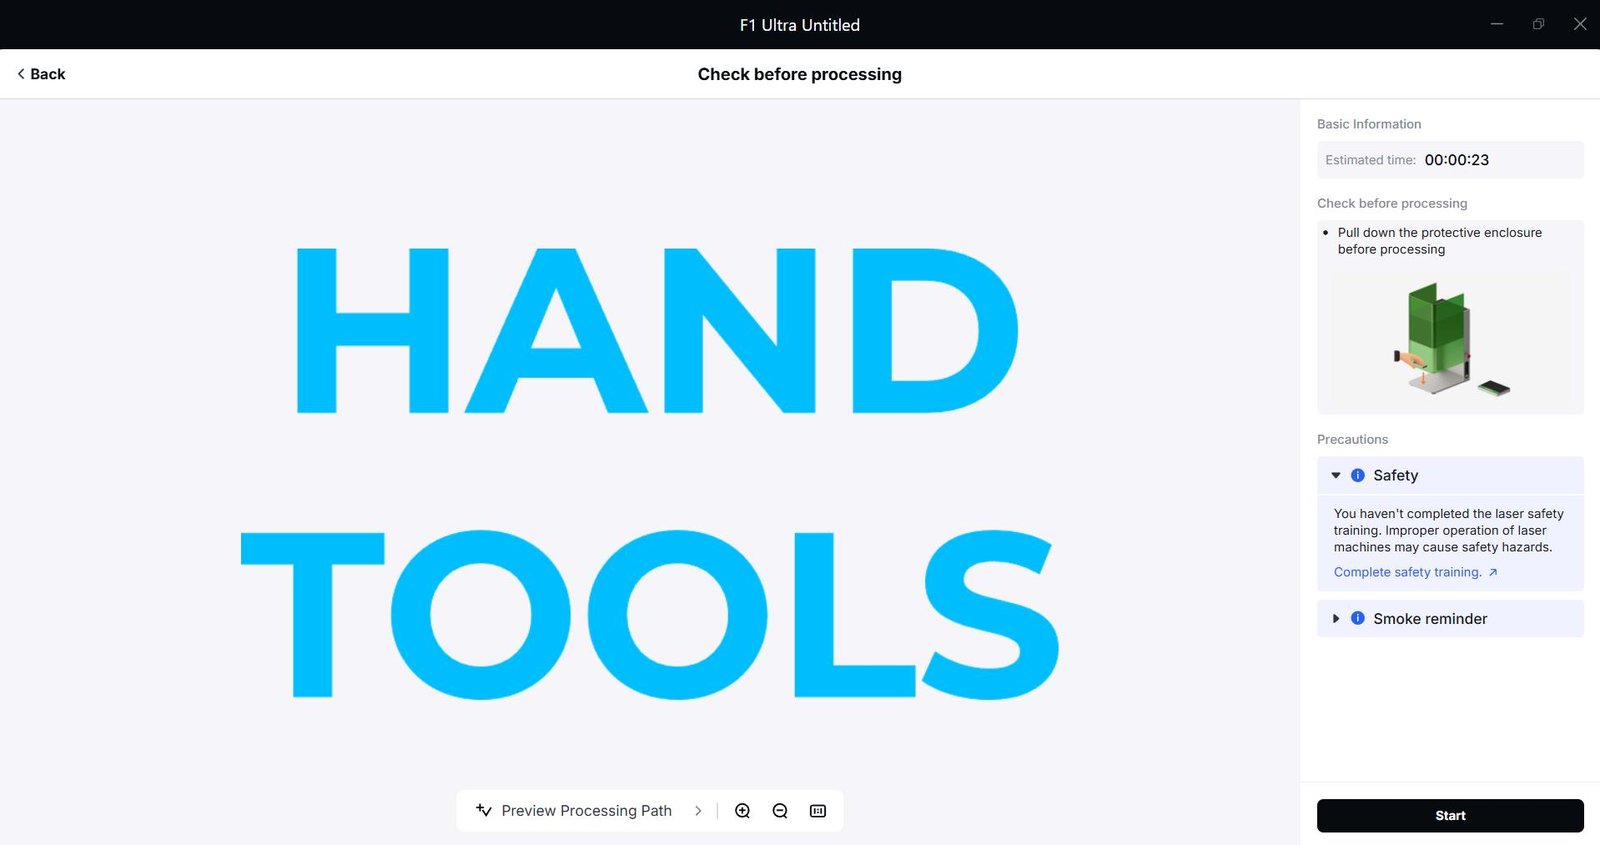
- Start the engraving process and wait for it to finish.
Design, Laser Cutting, and Engraving Back Panel
I wanted the back acrylic panel to have some sort of design on it, so I went to Claude by Anthropic and asked it to generate a prompt for creating an image relevant to my project using DALL-E by OpenAI.
Prompt generated by Claude by Anthropic
Minimalist-industrial logo for laser engraving on 500x500mm black acrylic panel. Central element: a bold stylized toolbox silhouette with a drawer slightly open, filled with thin circuit board trace patterns. Above the toolbox, a small RFID wave icon. Below: “SMART TOOLBOX” in clean geometric uppercase font, with “FAB LAB KOCHI” in smaller text underneath. Flanking both sides: thin vertical lines with small tick marks, like a technical blueprint ruler. Corner accents: small L-shaped bracket marks (like engineering drawing corners). Overall feel: blueprint meets tech product — detailed but not cluttered. White lines on black. No gradients. Engraving-safe vector style.
Using this prompt, I got the following image.

Then I moved on to laser cutting using the Trotec Speedy 400. I have documented the laser cutting process in my week-3 documentation. You can check it out here .
Cutting and Engraving a test panel using cardboard to check the sizes for the acrylic panel.#
Final Cut on transparent acrylic panel#
Hero Shots#
Embedded Programming XIAO and CH32V003J4M6 with Claude by Anthropic
XIAO Programming#
Prompt: I’m building a Smart Tool Box using a Seeed XIAO ESP32-C6, and I needed one Arduino sketch that handles everything together without anything blocking the main loop.
Here’s what’s hooked up to it: a long strip of addressable LEDs, a daisy-chain of limit switches and Hall sensors running down to each drawer, an RFID reader, and a few solenoid locks for the drawers.
Each tool slot maps to its own little range of LEDs, and the drawers each have a Hall sensor that just reports open or closed. By default the strip runs a slow rainbow animation, but if someone takes a tool out, just that tool’s LEDs should blink red while everything else keeps doing its own thing. Tapping an RFID card should unlock all the drawers for a few seconds with a green flash across the strip, then lock everything back up on its own.
It also needs to manage its own Wi-Fi, remembering saved networks and falling back to its own hotspot if it can’t connect so I can set it up from my phone. And it should push the tool and drawer status to my database in the background, without ever stalling the rest of the board while it does that.
The rest of the code flashing part was similar to the one I had done in my week-4 documentation. You can check it out here .
CH32V003J4M6 NEOBUTTON Programming#
Write me firmware for a small CH32V003 chip that sits on each tool slot as part of a daisy chain. Each one just watches a limit switch and has a status LED that’s on when the tool is in place and off when it’s missing.
When the chain gets pinged, every node should pass along whatever it received and add its own ID and switch state at the end, so the whole chain reports back together in one go. On power-up, blink the LED a few times first so I know it’s booted properly before it settles into normal operation.
CH32V003J4M6 NEOHALL-EFFECT Programming#
Same idea as the button node, but this one uses a Hall effect sensor instead of a switch, since it’s meant to sit on the drawer and tell whether it’s open or closed by sensing a magnet. It needs to fit into the exact same daisy chain as the button nodes, so the main board can’t tell the difference between the two types when it asks for an update.
Keep the boot blink the same as the button node, and make sure it settles down properly before joining the chain so it doesn’t report any junk readings right after waking up.
The code flashing for the CH32V003J4M6 will be discussed in the upcoming section.
MounRiver Studio Flashing
Steps#
Step 1: Download the MounRiver Studio from the official website and install it on your laptop.
Step 2: Open the MounRiver Studio
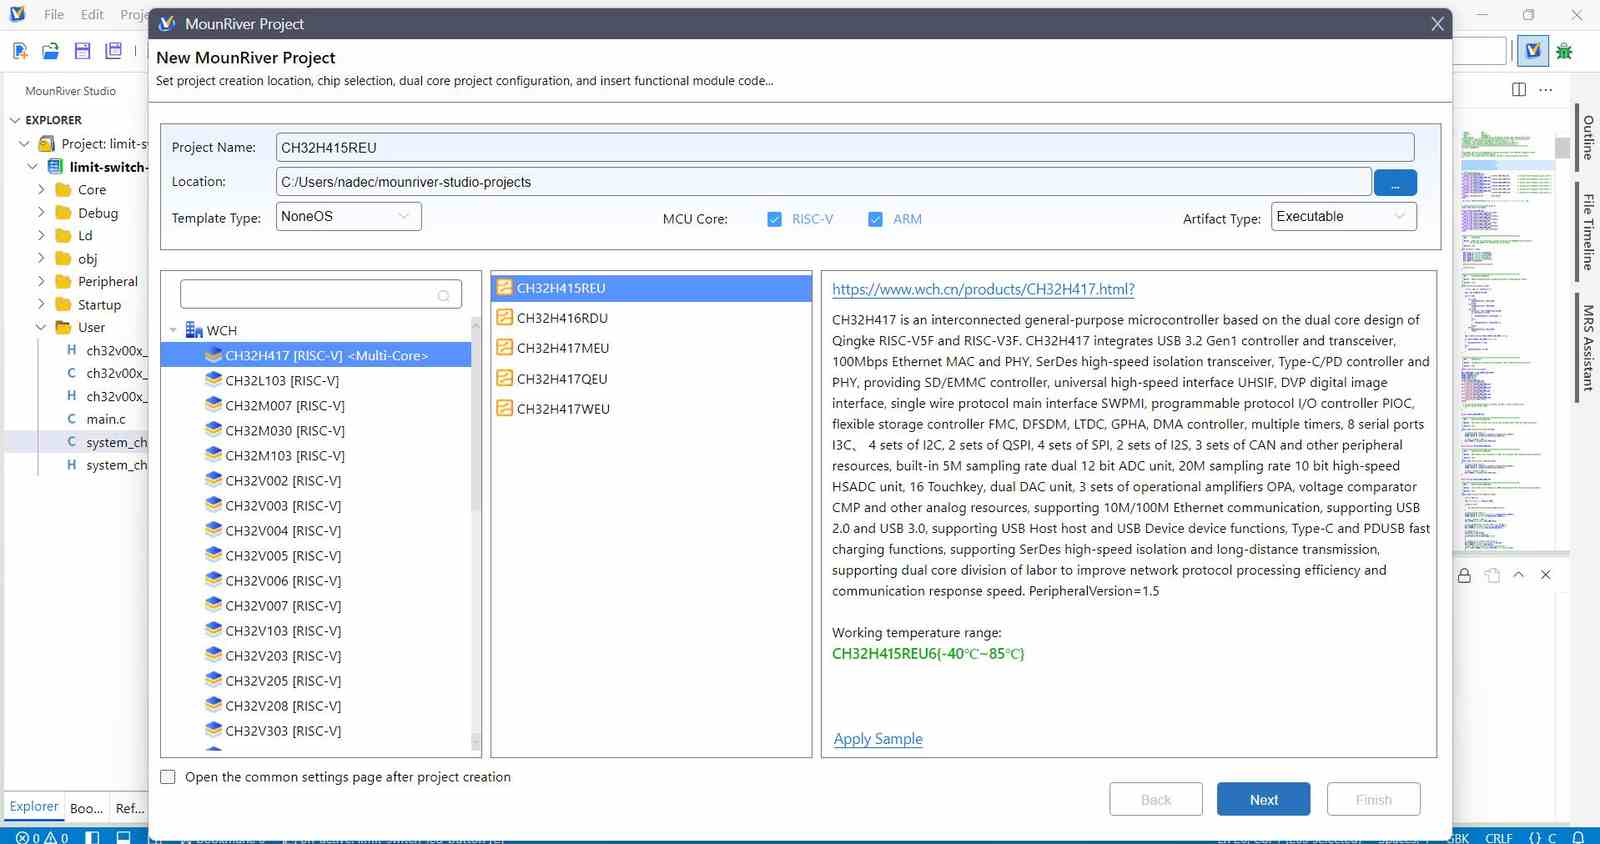
Step 3: Create a new project with the CH32V003J4M6 microcontroller.
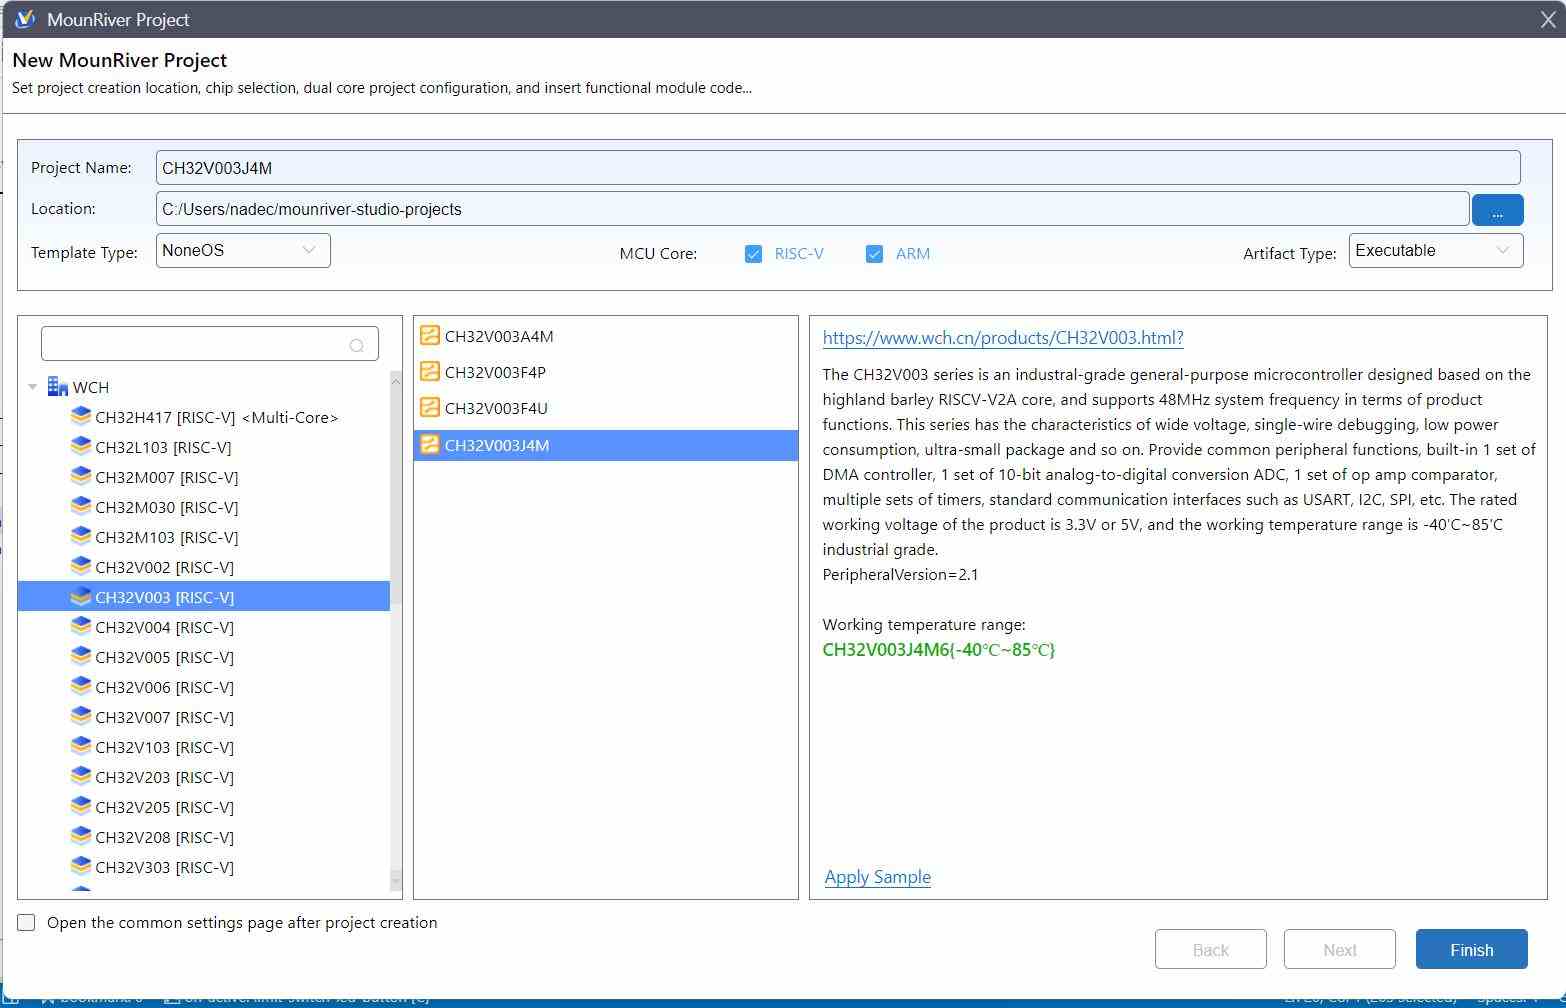
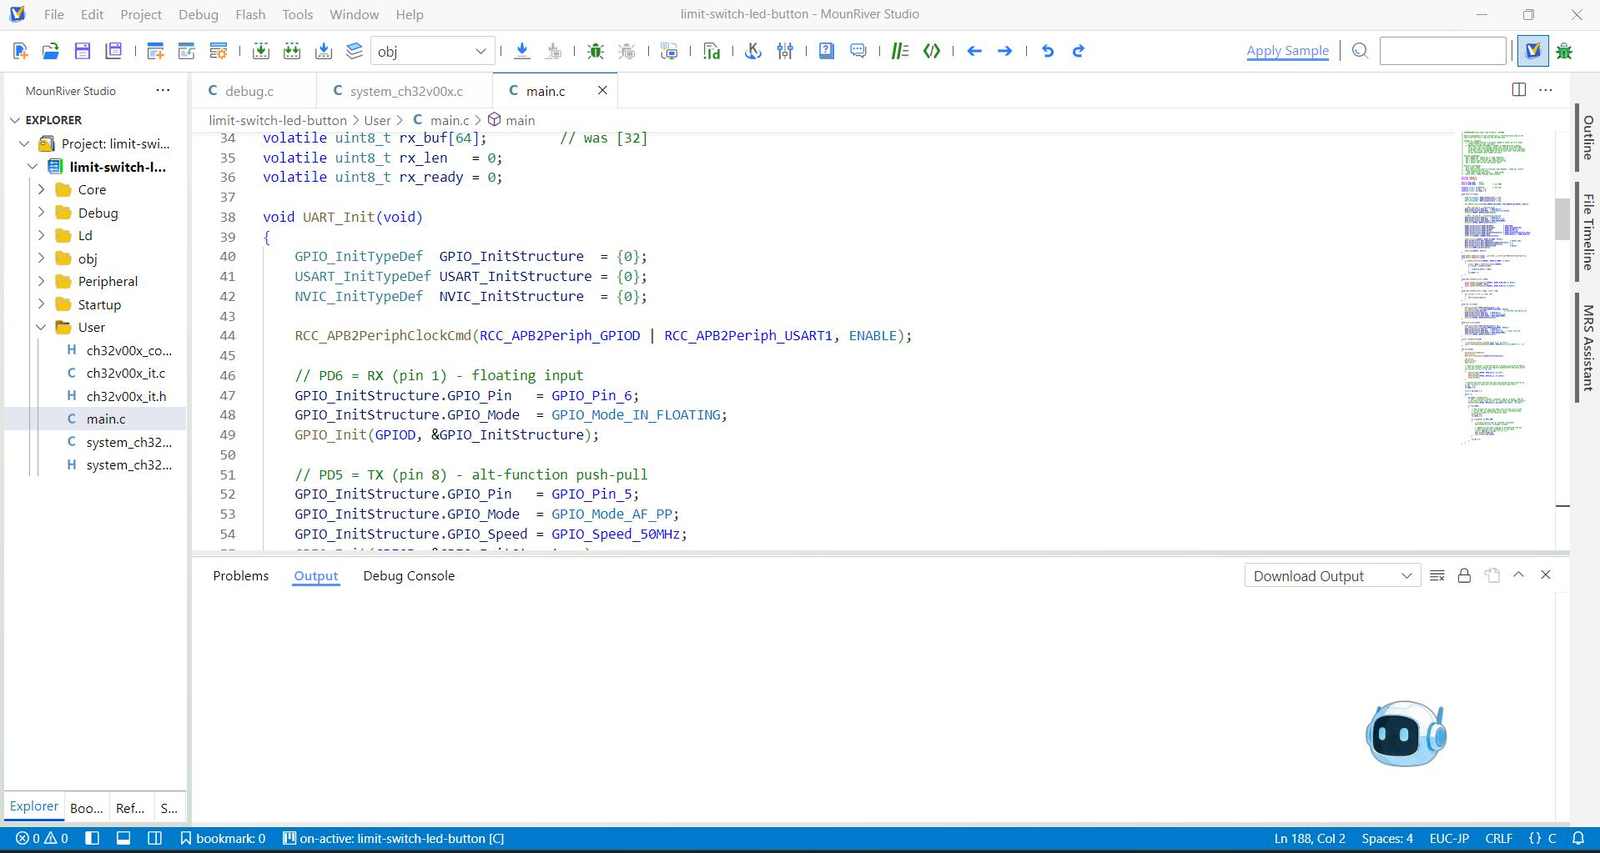
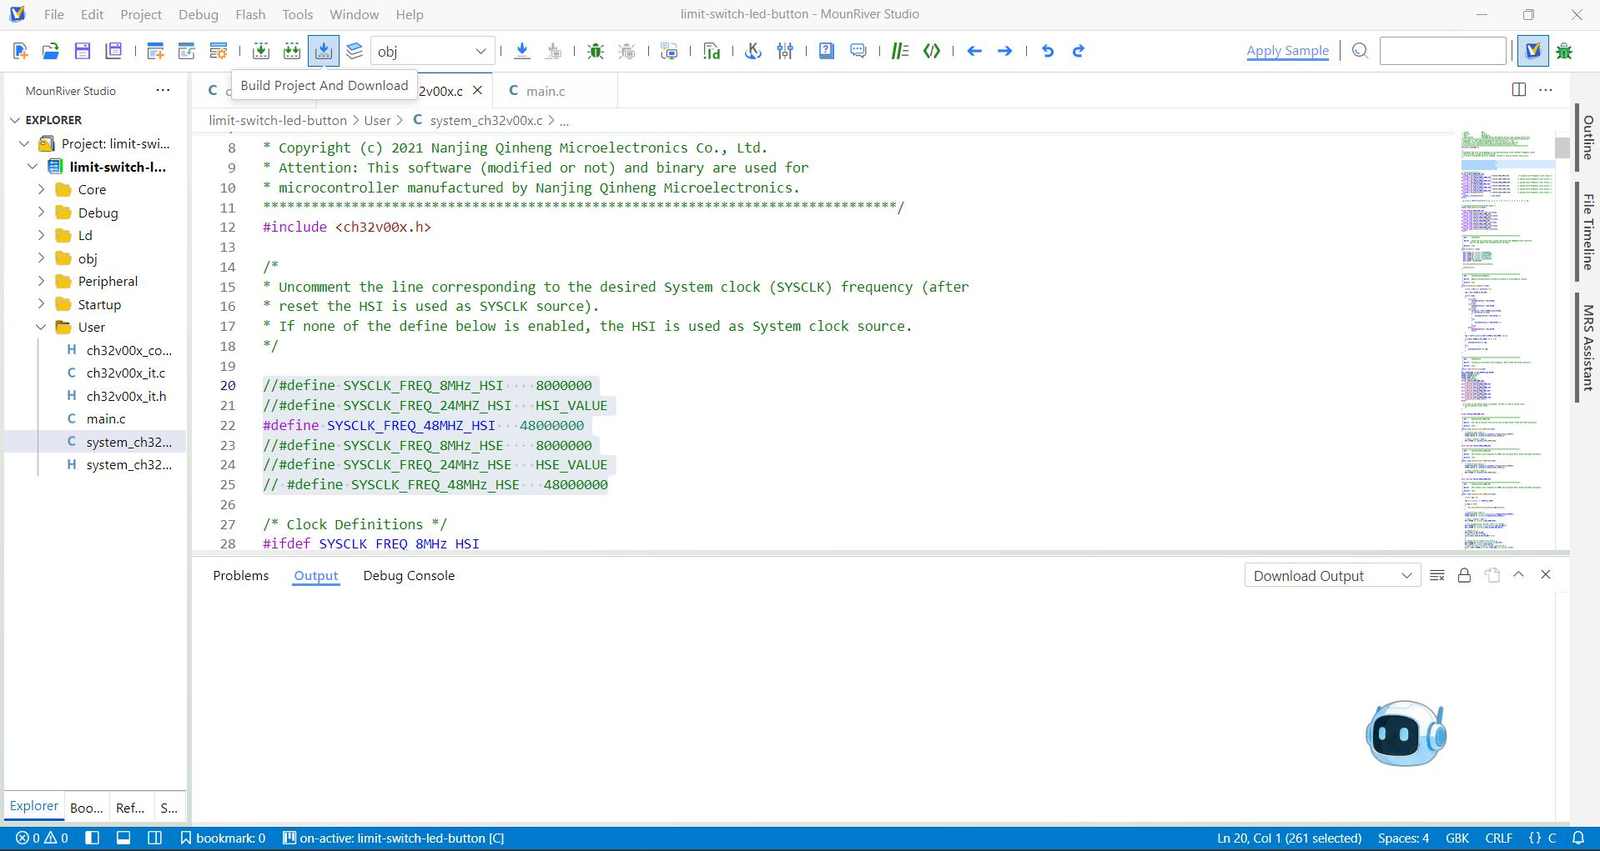
Step 4: Copy the code generated by Claude by Anthropic for the NEOBUTTON and NEOHALL-EFFECT nodes into MounRiver Studio, in the main.c file, and save it.
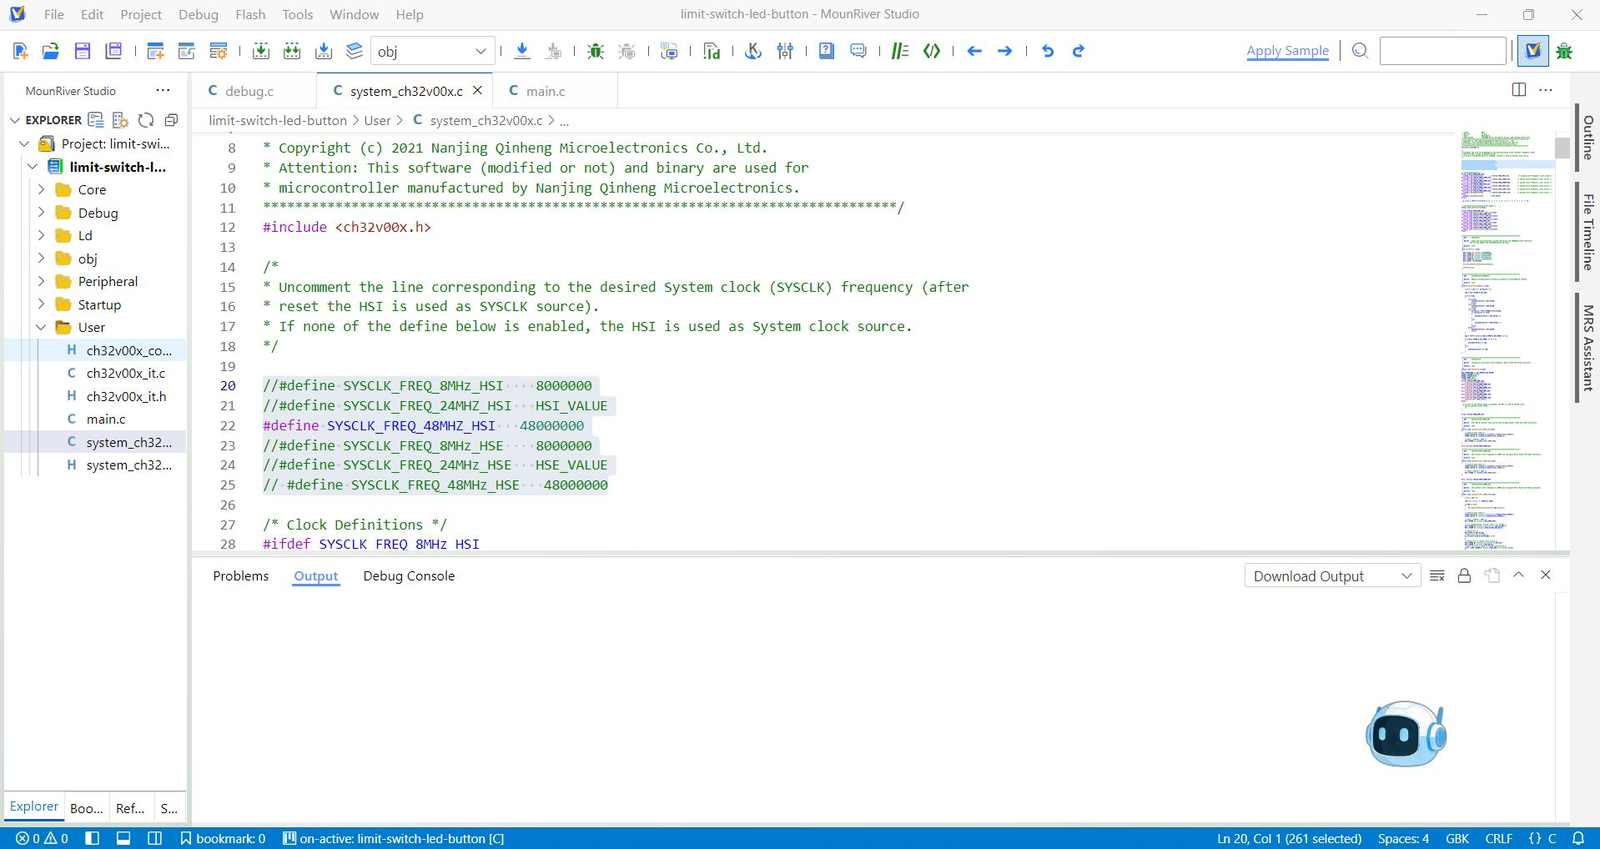
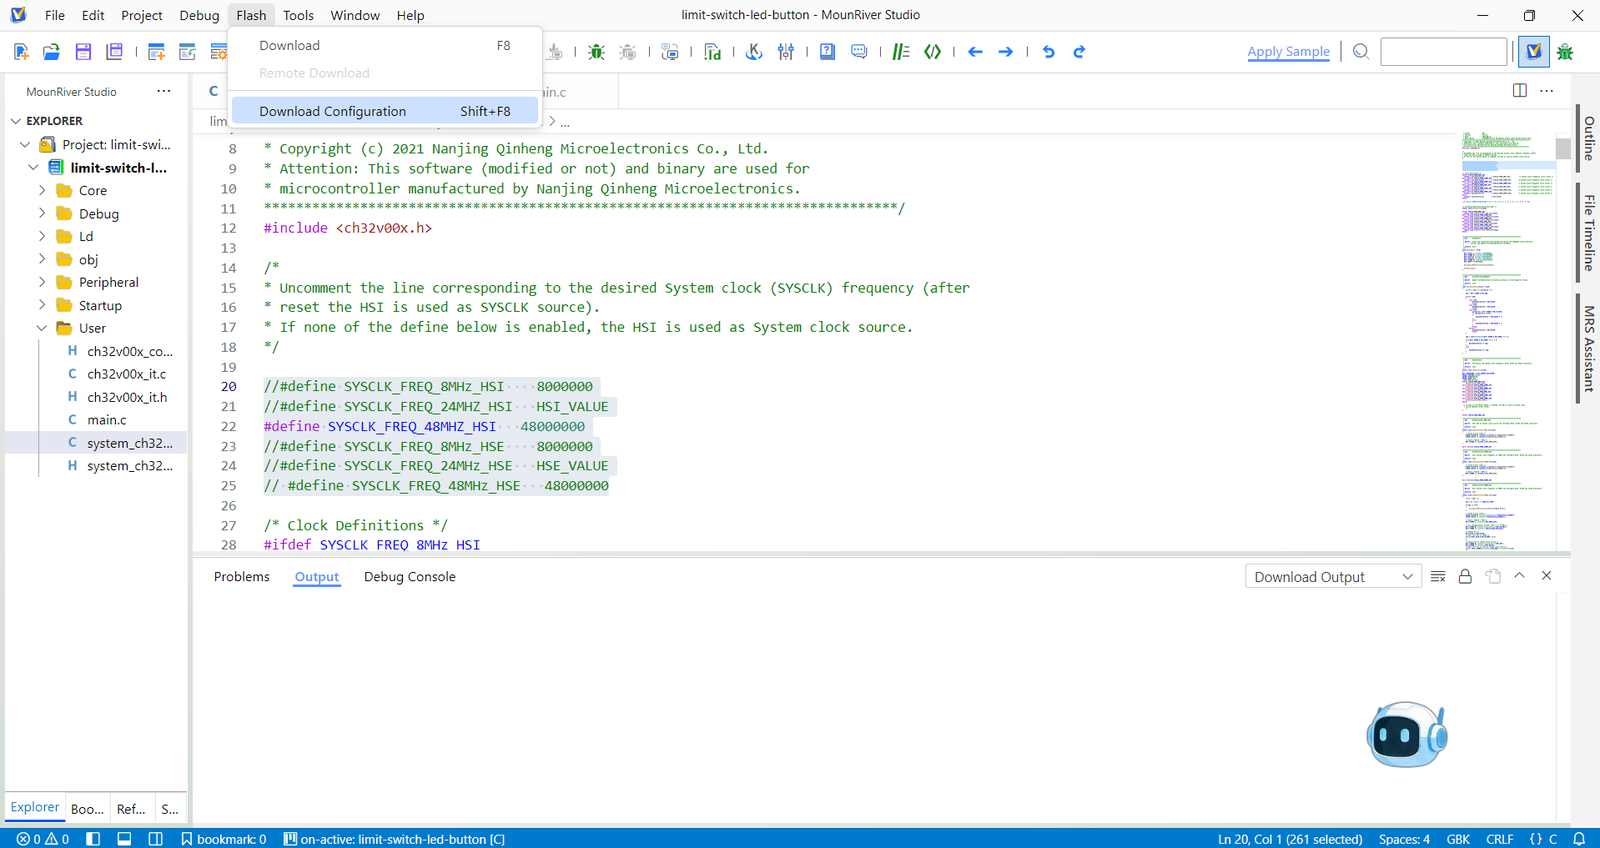
Step 5: In the ch32v003xx.c file, make sure that
#define SYSCLK_FREQ_48MHZ_HSI 48000000is uncommented and all others are commented out. This is to make sure that the microcontroller is running at 48MHz and not 32MHz or 16MHz. Save the file.
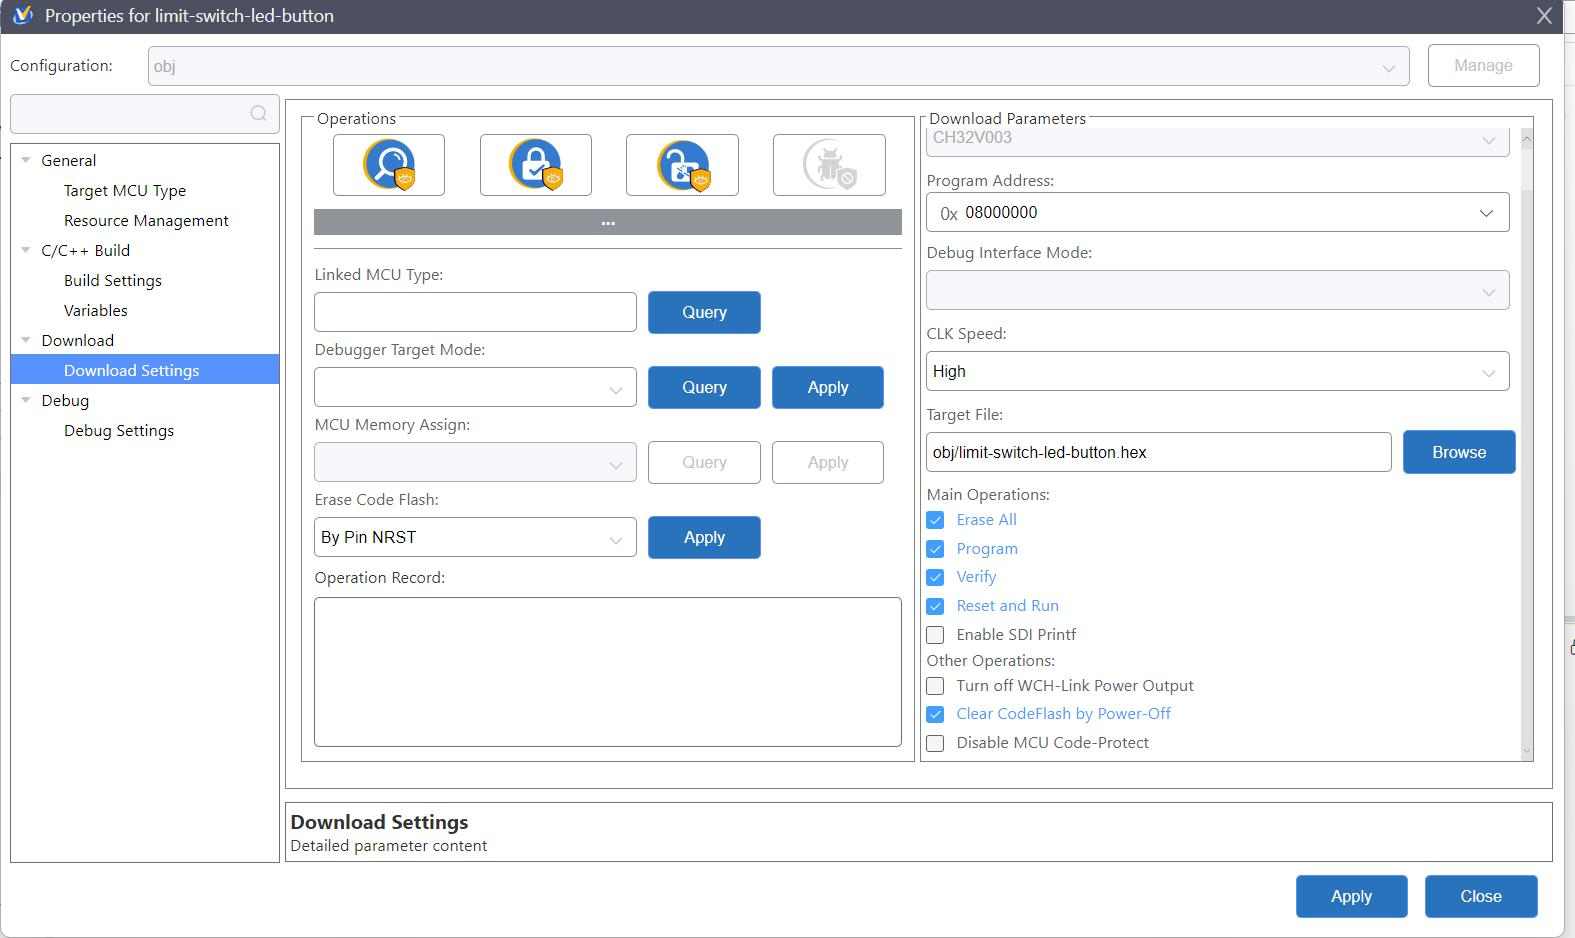
Step 6: After connecting the microcontroller to the board using the WCH-Link programmer, click on the build and download button to flash the code to the microcontroller.
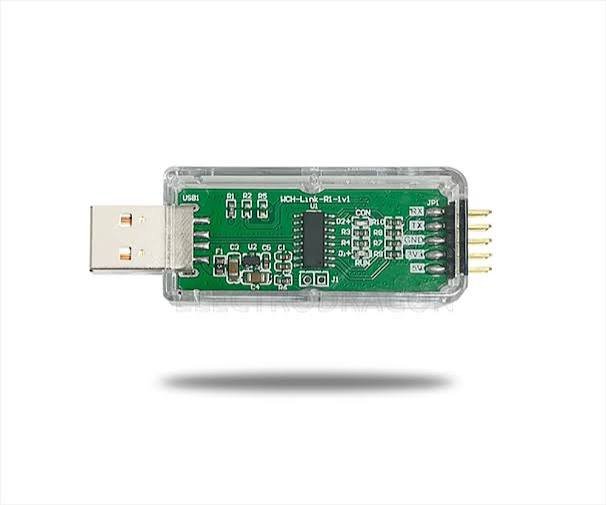
Step 7: If you are facing issues, please make sure that the WCH-Link is in RISC-V mode.
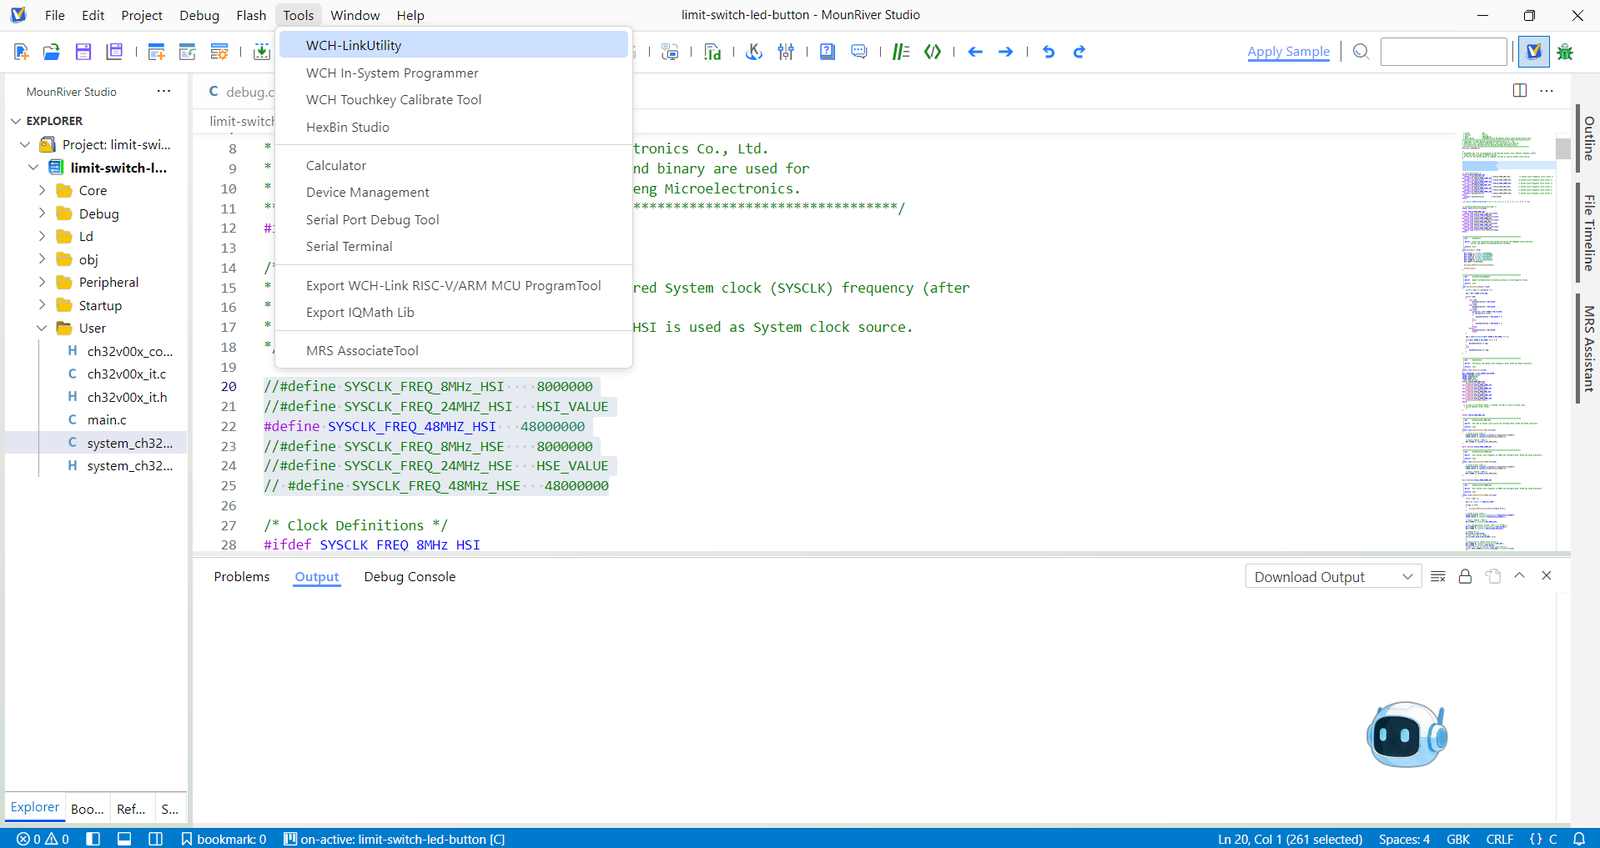
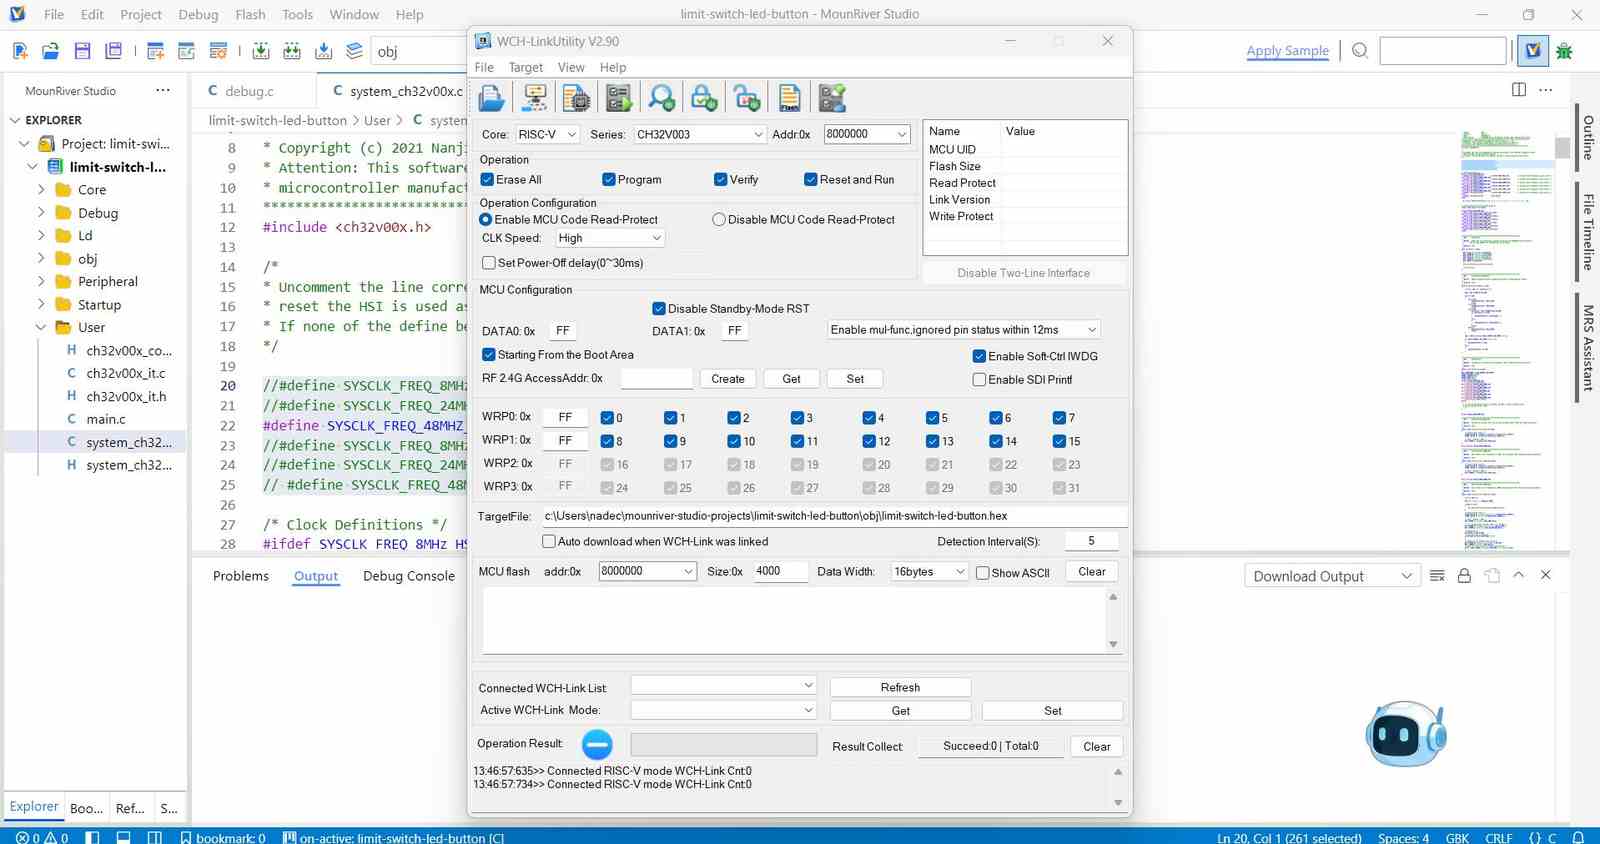
Step 8: If reflashing is not working for some reason, as the chip uses the same pin for RX and SWDIO, do these:
UI and Application Development
I have gotten deep into the UI and application development for the project. I have been using Flutter for the development of the application. The application is being developed for both Android and iOS platforms. One can view my week-15 documentation for more details on the application development. You can check it out here .
Post-Processing Plywood and Assembling Cabinet
After all these intermediate steps, I finally got to the point where I could assemble the cabinet and the drawers. But before that, I had to do some post-processing on the plywood pieces that were milled on the ShopBot CNC router. For more details on the machining, you can check out my week-7 documentation .
So it was off to the trusty orbital sander to sand out the edges and the sharp corners and make it smooth and nice. I also used a chisel to remove the burrs and the splinters that were left behind after the milling process.
System Integration and Electronics Testing
Vinyl Cutting RFID Sticker
I wanted to add a sticker on the top of the tool box in order to make the spot for tapping the RFID tag more visible. I downloaded an image from Google.

Then I used the workflow for vinyl cutting in my week-3 documentation to cut the sticker on the vinyl cutter.
Hero Shots#
Just for the Curious Minds (Not Required for the Project/Documentation - just a bonus)#
Did u notice the download button above? try downloading it , u myt notice that the file downloaded is a zip file that is bigger than the file size that Fabacademy allows us to push.
ITS 55MB !!!! I kinda had an idea that i wanted to try out and guess what , it worked out. LOL!! if u wanna do the same u can follow the steps below:
How The Download Button Works
⚙️ How The Download Button Works (And How To Build Your Own)#
The button above zips up every project file straight in your browser, with no backend doing the work. That is the whole reason it runs on GitLab Pages: the host only serves static files and can’t run any server-side script, so all the zipping has to happen on the visitor’s side.
The idea is pretty simple:
- The page carries a list of file paths (a manifest).
- On click, JavaScript
fetch()es each file off the site as raw bytes. - A tiny library called JSZip
packs those bytes into a
.zipin memory. - The finished zip is handed to the browser as a normal download.
A few choices that actually matter:
- STORE instead of DEFLATE: most of these files are already compressed (STL, 3MF, images, video), so compressing them again just burns CPU for basically zero size saving. STORE means “pack it without re-compressing”.
- Retry and skip: across a few hundred files, one request is bound to hiccup. Each fetch retries a few times, and a genuinely missing file gets skipped instead of killing the whole download.
- Parallel fetches: six files download at once so it does not crawl.
Sample Button For Any Site#
This is a stripped-down, self-contained version: no Hugo, no build step, no server. Edit BASE, ZIP_NAME, and the FILES list, then paste it into any HTML page:
<!-- Client-side "download all files as a zip" button. Works on any static host. -->
<button id="zipBtn" type="button">Download all files (.zip)</button>
<span id="zipStatus"></span>

<!-- JSZip does the actual zipping, all in the browser -->
<script src="https://cdn.jsdelivr.net/npm/jszip@3.10.1/dist/jszip.min.js"></script>
<script>
(function () {
  var BASE     = "files/myproject";   // folder your files live in (relative path or full URL)
  var ZIP_NAME = "myproject.zip";     // name of the downloaded zip
  var FILES = [                       // every file you want, paths relative to BASE
    "README.md",
    "cad/case.stl",
    "firmware/main.ino"
  ];

  var btn = document.getElementById("zipBtn");
  var status = document.getElementById("zipStatus");

  // grab one file as raw bytes; retry a few times, skip it on a 404
  async function fetchFile(rel) {
    var url = BASE + "/" + rel.split("/").map(encodeURIComponent).join("/");
    for (var i = 1; i <= 4; i++) {
      try {
        var res = await fetch(url);
        if (res.ok) return await res.arrayBuffer();
        if (res.status === 404) return null;
      } catch (e) { /* network blip: fall through and retry */ }
      await new Promise(function (r) { setTimeout(r, 250 * i); });
    }
    return null;
  }

  btn.addEventListener("click", async function () {
    if (typeof JSZip === "undefined") { alert("Zip library still loading, try again."); return; }
    btn.disabled = true;
    var zip = new JSZip(), queue = FILES.slice(), done = 0, added = 0;

    // 6 files downloading at once so it isn't slow
    async function worker() {
      while (queue.length) {
        var rel = queue.shift();
        var buf = await fetchFile(rel);
        status.textContent = "Fetching " + (++done) + " / " + FILES.length + "...";
        if (!buf) continue;                              // missing/failed -> skip
        zip.file(rel, buf, { compression: "STORE" });    // STORE = don't re-compress
        added++;
      }
    }
    await Promise.all([worker(), worker(), worker(), worker(), worker(), worker()]);

    if (!added) { status.textContent = "Download failed, try again."; btn.disabled = false; return; }

    status.textContent = "Zipping...";
    var blob = await zip.generateAsync({ type: "blob", compression: "STORE" });
    var a = document.createElement("a");
    a.href = URL.createObjectURL(blob);
    a.download = ZIP_NAME;
    document.body.appendChild(a); a.click(); document.body.removeChild(a);
    URL.revokeObjectURL(a.href);
    status.textContent = added + " files zipped";
    btn.disabled = false;
  });
})();
</script>
One gotcha worth knowing: if you embed the file list with a templating engine (like Hugo’s jsonify inside a <script> tag), the templating can double-encode it into a string and JSON.parse hands you back text instead of an array. The fix is to mark it as safe JS so it stays a real array, or just parse twice as a fallback.
Using It In Hugo (Reusable Shortcode)#
This whole site runs on Hugo, so instead of pasting that script onto every page I wrapped it in a shortcode and call it with a single line wherever I want the button:
{{< zipdownload dir="week-20" label="Download All Project Files" >}}Three pieces make that one-liner work:
1. The file list lives in a Hugo data file at data/zipmanifests/<dir>.json, just a plain JSON array of paths relative to the folder:
[
  "1. 3D FILES/ToolBox.f3z",
  "2. PCB DESIGN/XIAO MAINBOARD/XIAO MAINBOARD.kicad_pcb",
  "4. EMBEDDED PROGRAMS/Full_System/Full_System.ino"
]
You can type it by hand, but I generate mine with a small Python script, scripts/generate_zip_manifest.py, which I run as:
python scripts/generate_zip_manifest.py <dir>It walks static/files/<dir>, obeys every .gitignore it finds (so secrets and build junk never sneak into the zip), and writes the JSON list to data/zipmanifests/<dir>.json. You could also have Hugo build the list itself at build time with readDir.
Full scripts/generate_zip_manifest.py
"""
Builds a gitignore-aware file manifest for a folder under static/files/, so the
client-side zip-download button never ships secrets or build junk.

Walks the target folder, collects every .gitignore found in it (root-to-leaf
order, scoped to the directory it lives in, just like real git), and excludes
any file that matches. Writes the surviving relative paths to
data/zipmanifests/<name>.json for the `zipdownload` shortcode to read at build time.

Usage: python scripts/generate_zip_manifest.py week-20
"""
import json
import os
import sys

import pathspec

REPO_ROOT = os.path.dirname(os.path.dirname(os.path.abspath(__file__)))

# Defense in depth: always excluded, gitignore or not. Real credentials / project
# config that must never ship in the downloadable zip (and are also excluded from the
# published site via hugo.toml's module-mount excludeFiles).
HARD_EXCLUDE_NAMES = {
    "cloud_secrets.h",
    "google-services.json",
    "firebase_options.dart",
    ".firebaserc",
    ".git",
}


def scope_pattern(reldir, pattern):
    negate = pattern.startswith("!")
    body = pattern[1:] if negate else pattern
    is_dir_only = body.endswith("/")
    body = body.rstrip("/")

    if reldir:
        if body.startswith("/"):
            scoped = f"/{reldir}{body}"
        elif "/" in body:
            scoped = f"/{reldir}/{body}"
        else:
            scoped = f"/{reldir}/**/{body}"
    else:
        scoped = body if body.startswith("/") else f"/**/{body}" if "/" not in body else f"/{body}"

    if is_dir_only:
        scoped = f"{scoped}/**"

    return ("!" + scoped) if negate else scoped


def build_spec(base_dir):
    patterns = []
    for dirpath, _, filenames in os.walk(base_dir):
        if ".gitignore" not in filenames:
            continue
        reldir = os.path.relpath(dirpath, base_dir).replace("\\", "/")
        reldir = "" if reldir == "." else reldir
        with open(os.path.join(dirpath, ".gitignore"), "r", encoding="utf-8", errors="ignore") as f:
            for line in f:
                line = line.rstrip("\n")
                stripped = line.strip()
                if not stripped or stripped.startswith("#"):
                    continue
                patterns.append(scope_pattern(reldir, stripped))
    return pathspec.PathSpec.from_lines("gitwildmatch", patterns)


def main():
    if len(sys.argv) != 2:
        print("Usage: python scripts/generate_zip_manifest.py <folder-name-under-static/files>")
        sys.exit(1)

    name = sys.argv[1]
    base_dir = os.path.join(REPO_ROOT, "static", "files", name)
    if not os.path.isdir(base_dir):
        print(f"Not a directory: {base_dir}")
        sys.exit(1)

    spec = build_spec(base_dir)

    kept = []
    skipped = []
    for dirpath, dirnames, filenames in os.walk(base_dir):
        reldir = os.path.relpath(dirpath, base_dir).replace("\\", "/")
        reldir = "" if reldir == "." else reldir
        for fname in filenames:
            if fname == ".gitignore":
                continue
            relpath = f"{reldir}/{fname}" if reldir else fname
            if fname in HARD_EXCLUDE_NAMES or spec.match_file(relpath):
                skipped.append(relpath)
            else:
                kept.append(relpath)

    kept.sort()
    skipped.sort()

    out_dir = os.path.join(REPO_ROOT, "data", "zipmanifests")
    os.makedirs(out_dir, exist_ok=True)
    out_path = os.path.join(out_dir, f"{name}.json")
    with open(out_path, "w", encoding="utf-8", newline="\n") as f:
        json.dump(kept, f, ensure_ascii=False, indent=2)
        f.write("\n")

    print(f"Wrote {len(kept)} files to {out_path}")
    print(f"Excluded {len(skipped)} files:")
    for p in skipped:
        print(f"  - {p}")


if __name__ == "__main__":
    main()
2. The files sit in static/files/<dir>/ so Hugo publishes them as-is, and the button fetches them straight from there.
3. The shortcode at layouts/shortcodes/zipdownload.html ties it together: it is the same fetch-and-zip logic from the sample above, plus a Hugo wrapper that injects the file list. The one line that really matters is {{ $files | jsonify | safeJS }}. Without safeJS, Hugo’s HTML template JS-escapes the array into a quoted string and the button dies with “Download failed” (that was the exact bug I hit).
Full layouts/shortcodes/zipdownload.html
{{ $dir := .Get "dir" }}
{{ $label := .Get "label" | default (printf "Download All Files (%s)" $dir) }}
{{ $files := index site.Data.zipmanifests $dir }}
{{ $bp := (urls.Parse site.BaseURL).Path | strings.TrimSuffix "/" }}
{{ $webBase := printf "%s/files/%s" $bp $dir }}
{{ $id := printf "zipdl-%d" (now.UnixNano) }}

<div style="margin:1.25rem 0; max-width:420px;">
  <button type="button" id="{{ $id }}" class="zip-download-btn"
          data-web-base="{{ $webBase }}" data-zip-name="{{ $dir }}.zip"
          style="background:rgba(121,176,255,0.12); border:1px solid rgba(121,176,255,0.25); cursor:pointer; padding:1rem; border-radius:12px; width:100%; text-align:left; color:#79b0ff;">
    <b class="zip-label">{{ $label }}</b>
    <span class="zip-status" style="display:block; font-size:11px; opacity:.6;">{{ len $files }} files</span>
  </button>
  <!-- safeJS keeps Hugo from JS-escaping (double-encoding) the array into a string -->
  <script type="application/json" data-zip-manifest-for="{{ $id }}">{{ $files | jsonify | safeJS }}</script>
</div>

<script src="https://cdn.jsdelivr.net/npm/jszip@3.10.1/dist/jszip.min.js" defer onload="window.__jsZipReady && window.__jsZipReady()"></script>
<script>
(function() {
  function init() {
    var btn = document.getElementById("{{ $id }}");
    if (!btn || btn.dataset.zipBound) return;
    btn.dataset.zipBound = "1";

    var manifestEl = document.querySelector('script[data-zip-manifest-for="{{ $id }}"]');
    var files = JSON.parse(manifestEl.textContent);
    while (typeof files === "string") files = JSON.parse(files); // tolerate double-encoding
    if (!Array.isArray(files)) files = [];
    var webBase = btn.dataset.webBase, zipName = btn.dataset.zipName;

    // fetch one file, retrying transient failures so one blip can't kill the batch
    async function fetchFile(relPath) {
      var url = webBase + "/" + relPath.split("/").map(encodeURIComponent).join("/");
      for (var attempt = 1; attempt <= 4; attempt++) {
        try {
          var res = await fetch(url);
          if (res.ok) return await res.arrayBuffer();
          if (res.status === 404) return null;   // gone -> skip
        } catch (e) { /* retry */ }
        await new Promise(function(r) { setTimeout(r, 250 * attempt); });
      }
      return undefined;
    }

    btn.addEventListener("click", async function() {
      if (typeof JSZip === "undefined") { alert("Still loading the zip library, try again."); return; }
      var statusEl = btn.querySelector(".zip-status");
      var originalStatus = statusEl.textContent;
      btn.disabled = true;
      try {
        var zip = new JSZip(), done = 0, added = 0, failed = [], queue = files.slice();
        async function worker() {
          while (queue.length) {
            var relPath = queue.shift();
            var buf = await fetchFile(relPath);
            statusEl.textContent = "Fetching " + (++done) + " / " + files.length + "...";
            if (buf === null) continue;
            if (buf === undefined) { failed.push(relPath); continue; }
            zip.file(relPath, buf, { compression: "STORE" }); // STORE: don't re-compress binaries
            added++;
          }
        }
        await Promise.all(Array.from({ length: Math.min(6, files.length) }, worker));
        if (added === 0) throw new Error("no files could be fetched");

        statusEl.textContent = "Zipping...";
        var blob = await zip.generateAsync({ type: "blob", compression: "STORE" });
        var a = document.createElement("a");
        a.href = URL.createObjectURL(blob);
        a.download = zipName;
        document.body.appendChild(a); a.click(); document.body.removeChild(a);
        URL.revokeObjectURL(a.href);
        statusEl.textContent = failed.length ? (added + " zipped (" + failed.length + " skipped)") : originalStatus;
      } catch (e) {
        console.error(e);
        statusEl.textContent = "Download failed, try again.";
      } finally { btn.disabled = false; }
    });
  }
  if (typeof JSZip !== "undefined") init();
  else { window.__jsZipReady = init; document.addEventListener("DOMContentLoaded", function() { setTimeout(function() { if (typeof JSZip !== "undefined") init(); }, 0); }); }
})();
</script>
Save that file, add a data/zipmanifests/<dir>.json list, drop your files in static/files/<dir>/, and the one-line shortcode does the rest on any page.