Week 15 — Interface and application programming
Week 15 follows
Interface and Application Programming.
On the individual assignment I wrote a UI for my own
ESP32-WROOM board: a 2.4″ ILI9341 TFT (SPI) plus FT6336 capacitive touch (I²C). I started with one
combined sketch, hit GPIO12 / wrong-touch-chip problems, then split display and touch into two test
programs before porting five swipe pages to firmware. For the final-project plant companion I also made a
320×240 HTML mock-up, connected my Week 8 XIAO sensor board to the WROOM display over I²C, and wired
open Mandarin speech through Alibaba Bailian ASR/LLM/TTS (§11). Code is in
code/week15-individual/final/ and
code/week17-individual/;
the group assignment compares Arduino IDE, Thonny, VS Code, and MATLAB.
Downloads — source code and UI files
Bench setup this week: ESP32-WROOM-32D + 2.4″ ILI9341 (SPI) + FT6336 touch (I²C). Use Download if the browser opens a file instead of saving it.
Display + sensor UI demo (XIAO + WROOM display):
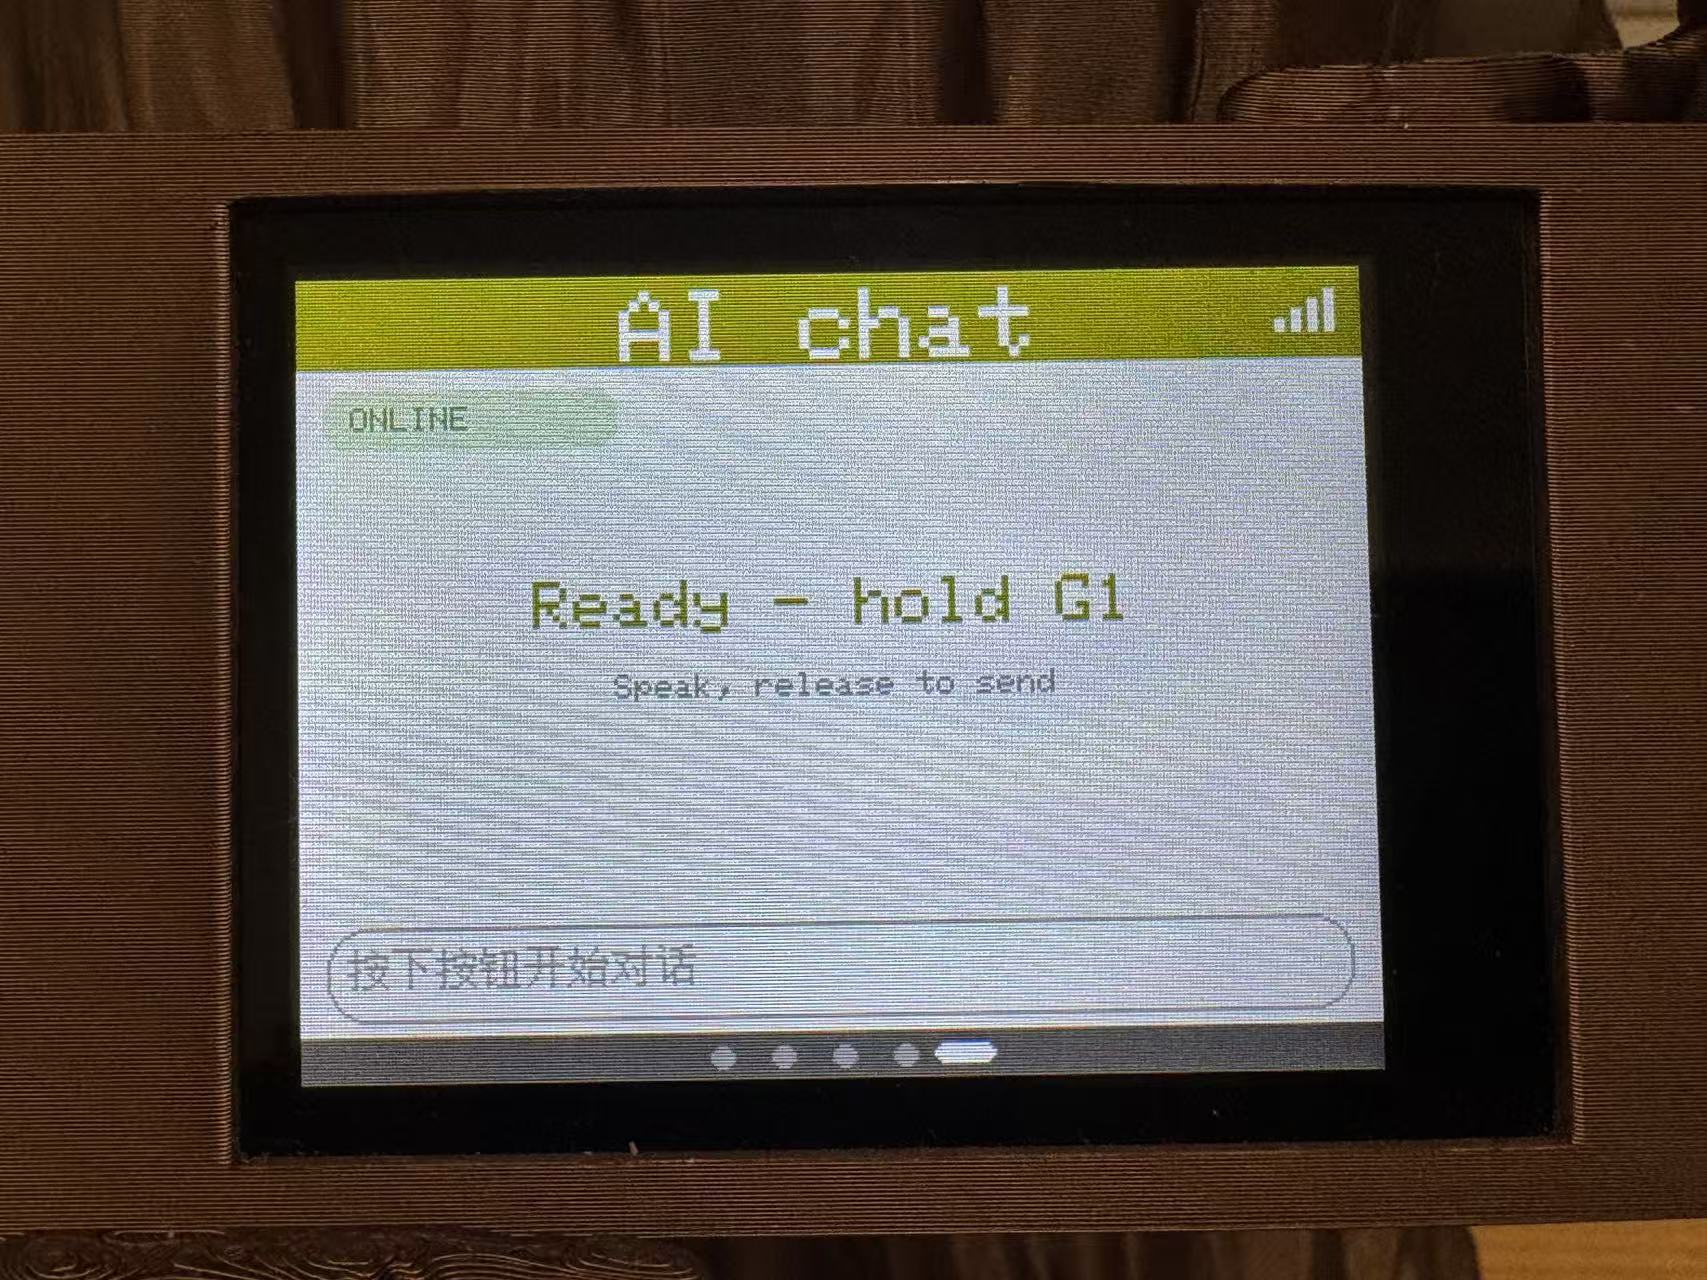
▶ Open on-device UI video — five-panel interface running on the TFT
▶ Open voice dialogue demo — full speech conversation with chat bubbles on the TFT
↓ Browse code/week15-individual/final/
↓ Browse wroom-display/
— five-page TFT UI (PlatformIO, env:esp32dev)
Display firmware (wroom-display/src/, notes in §7d):
↓ Browse s3-hub/
— XIAO sensor + WiFi + DeepSeek
Sensor hub firmware (s3-hub/src/):
↓ Download main.cpp
·
↓ Download i2c_env_link.h
·
↓ Download platformio.ini
Earlier bring-up sketches (display / touch split tests):
↓ Download main_test_screen.cpp
↓ Download main_test_touch.cpp
UI mockups (320×240 HTML, five swipe panels):
↓ Download week15-smart-plant-companion-lcd-ui.html
↗ Open HTML prototype in new tab
↗ Open screen-ui.html
— same panel order as firmware
Wiring notes:
↓ Download i2c_wiring_notes_zh.txt
Voice / Bailian cloud firmware (§11):
↓ Browse code/week17-individual/
— push-to-talk mic, Bailian WSS client, TFT chat page
Individual assignment
The brief asks for an application on a board I designed, with input and/or output devices. My UI is the ILI9341 + FT6336 stack on the WROOM display PCB from Week 10. Main evidence is the screen harness on that PCB (§3) and the five live TFT pages in §7d.
| Nueval item | Where on this page |
|---|---|
| Linked group assignment | Group assignment + §10 reflection |
| Documented process | §1–7 (sketch → split tests → HTML → firmware → board link) |
| Explained the UI and how I built it | §6, §7d |
| How the app talks to my microcontroller board | §3 (harness), §7d (SPI / I²C) |
| Problems encountered and fixes | §1 (GPIO12 reset, resistive-touch assumption), §7 (I²C data path and redraw behavior) |
| Original source code | Downloads, §8 |
| Hero shot — app running with the board | On-device video + five TFT pages (§7d) |
| Voice / cloud dialogue loop | §11 (Bailian console, mic/speaker, demo video) |
1) Task and starting idea
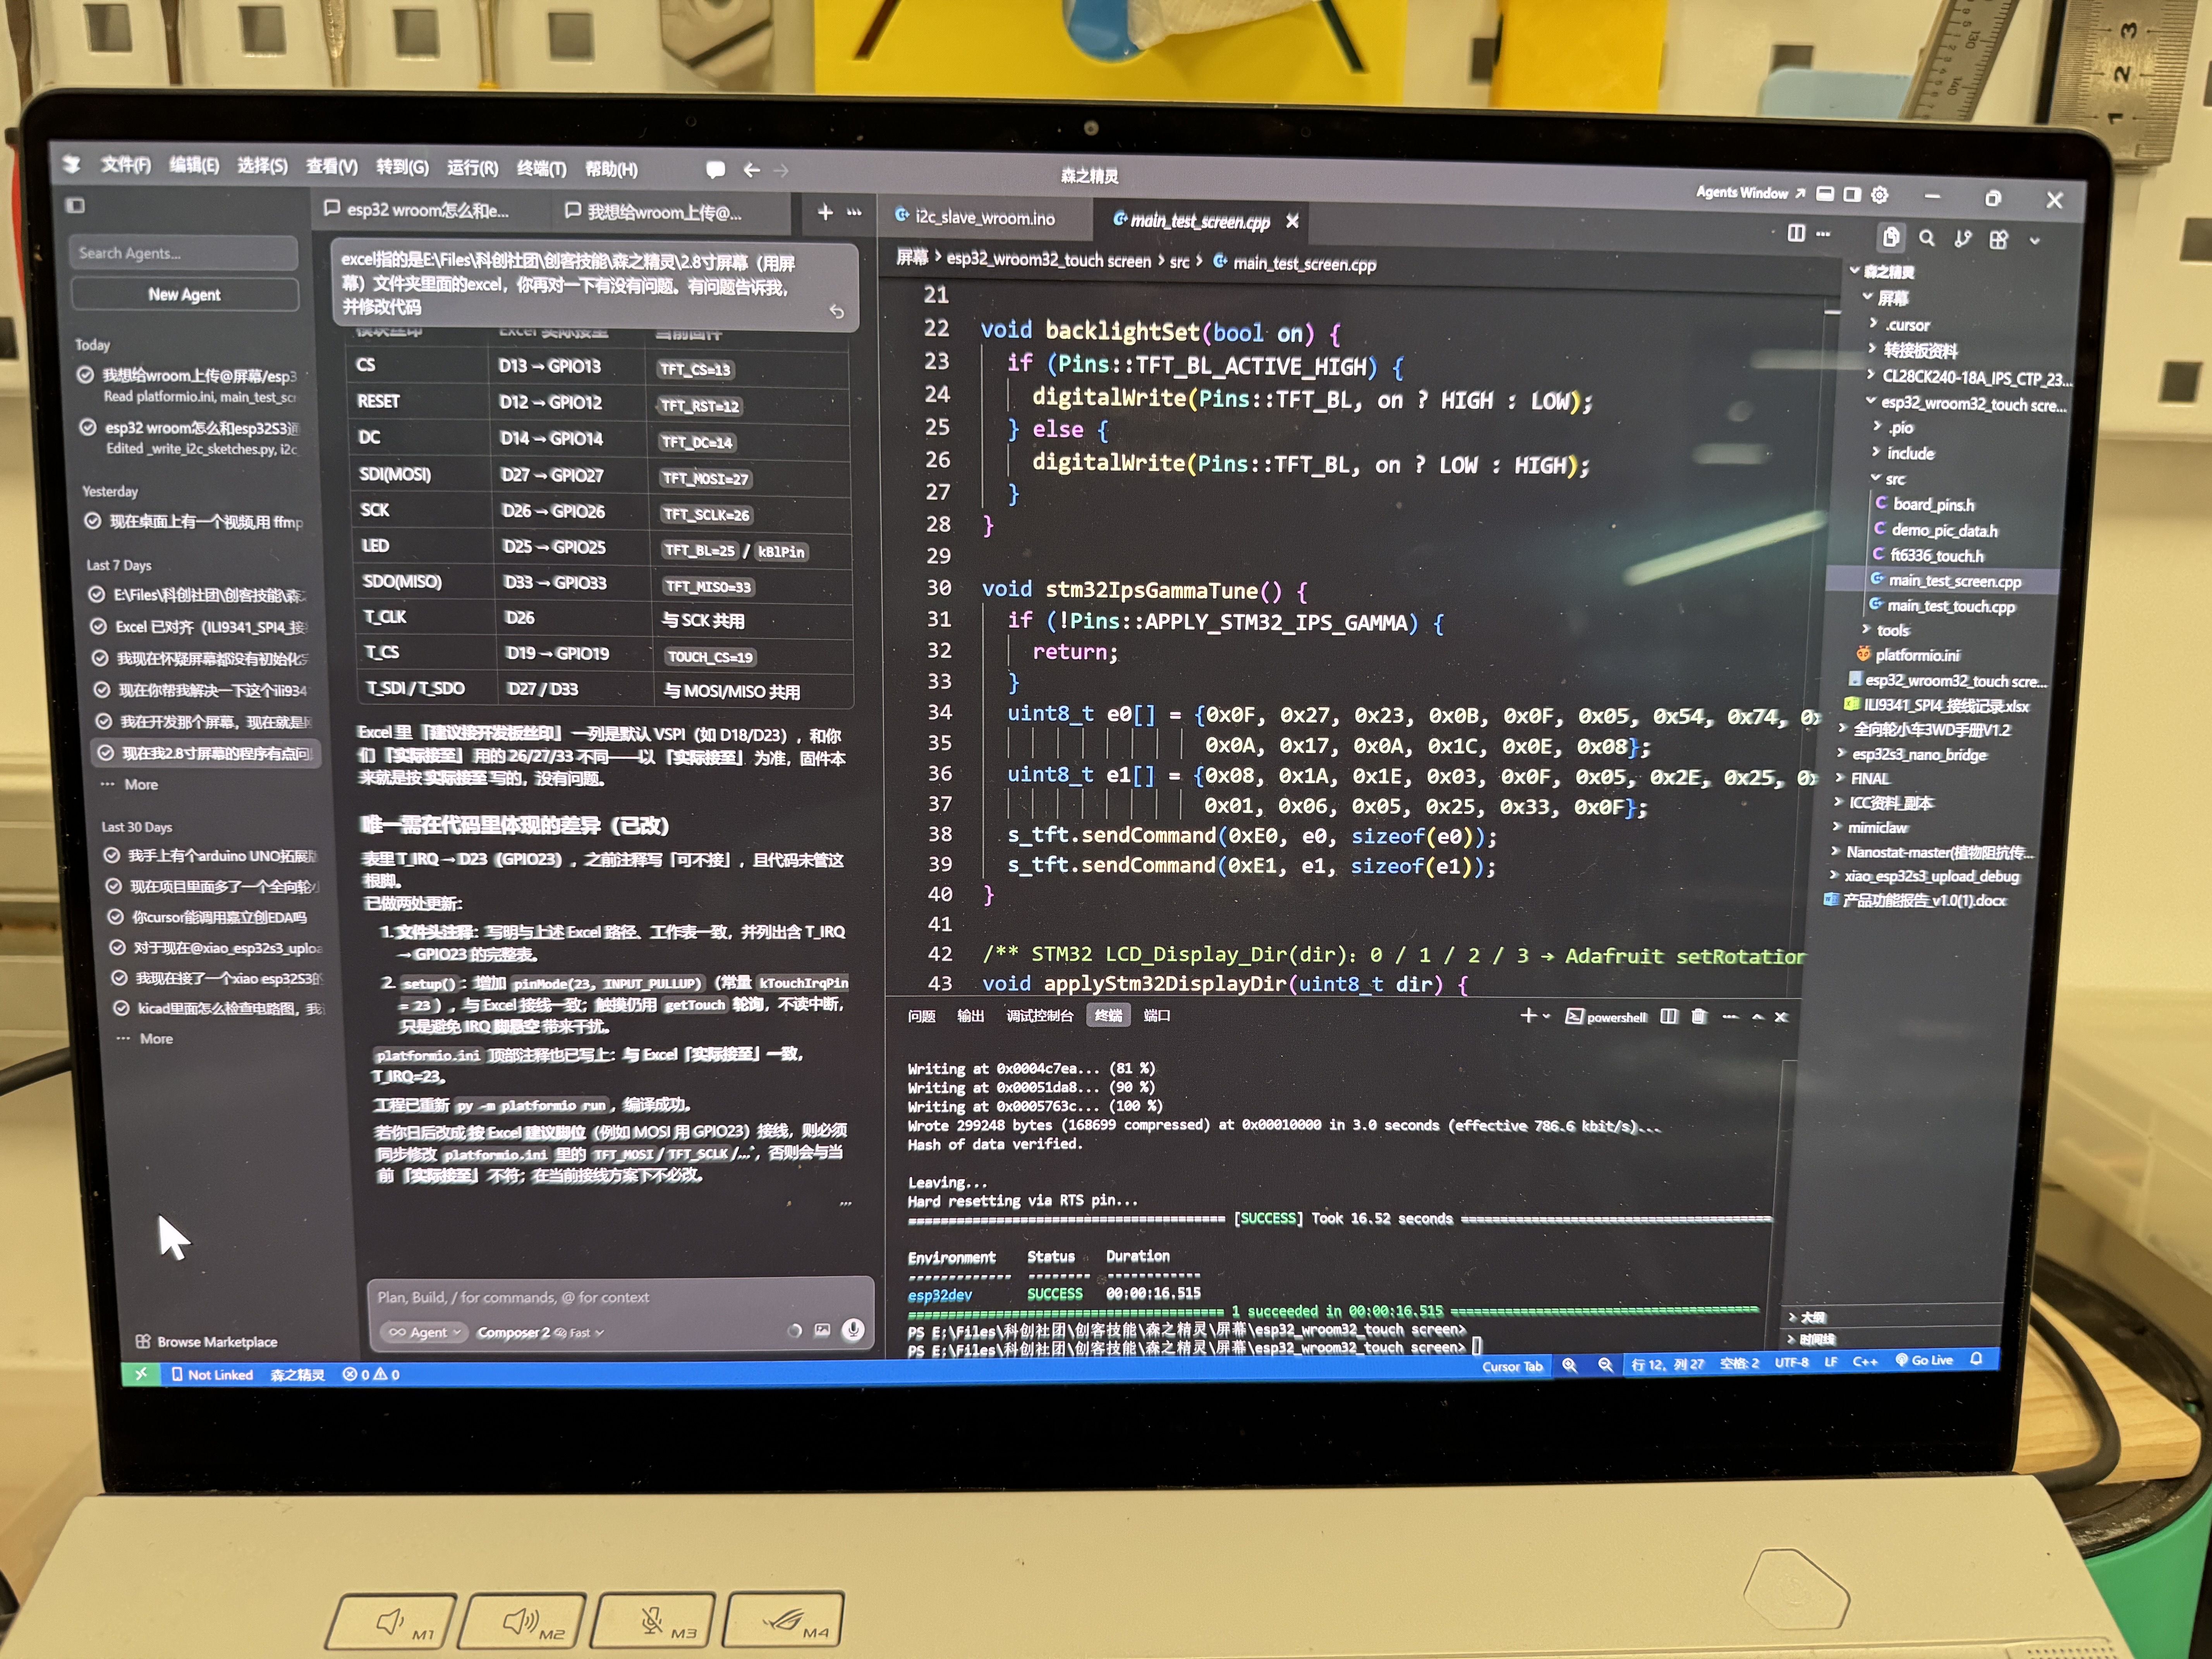
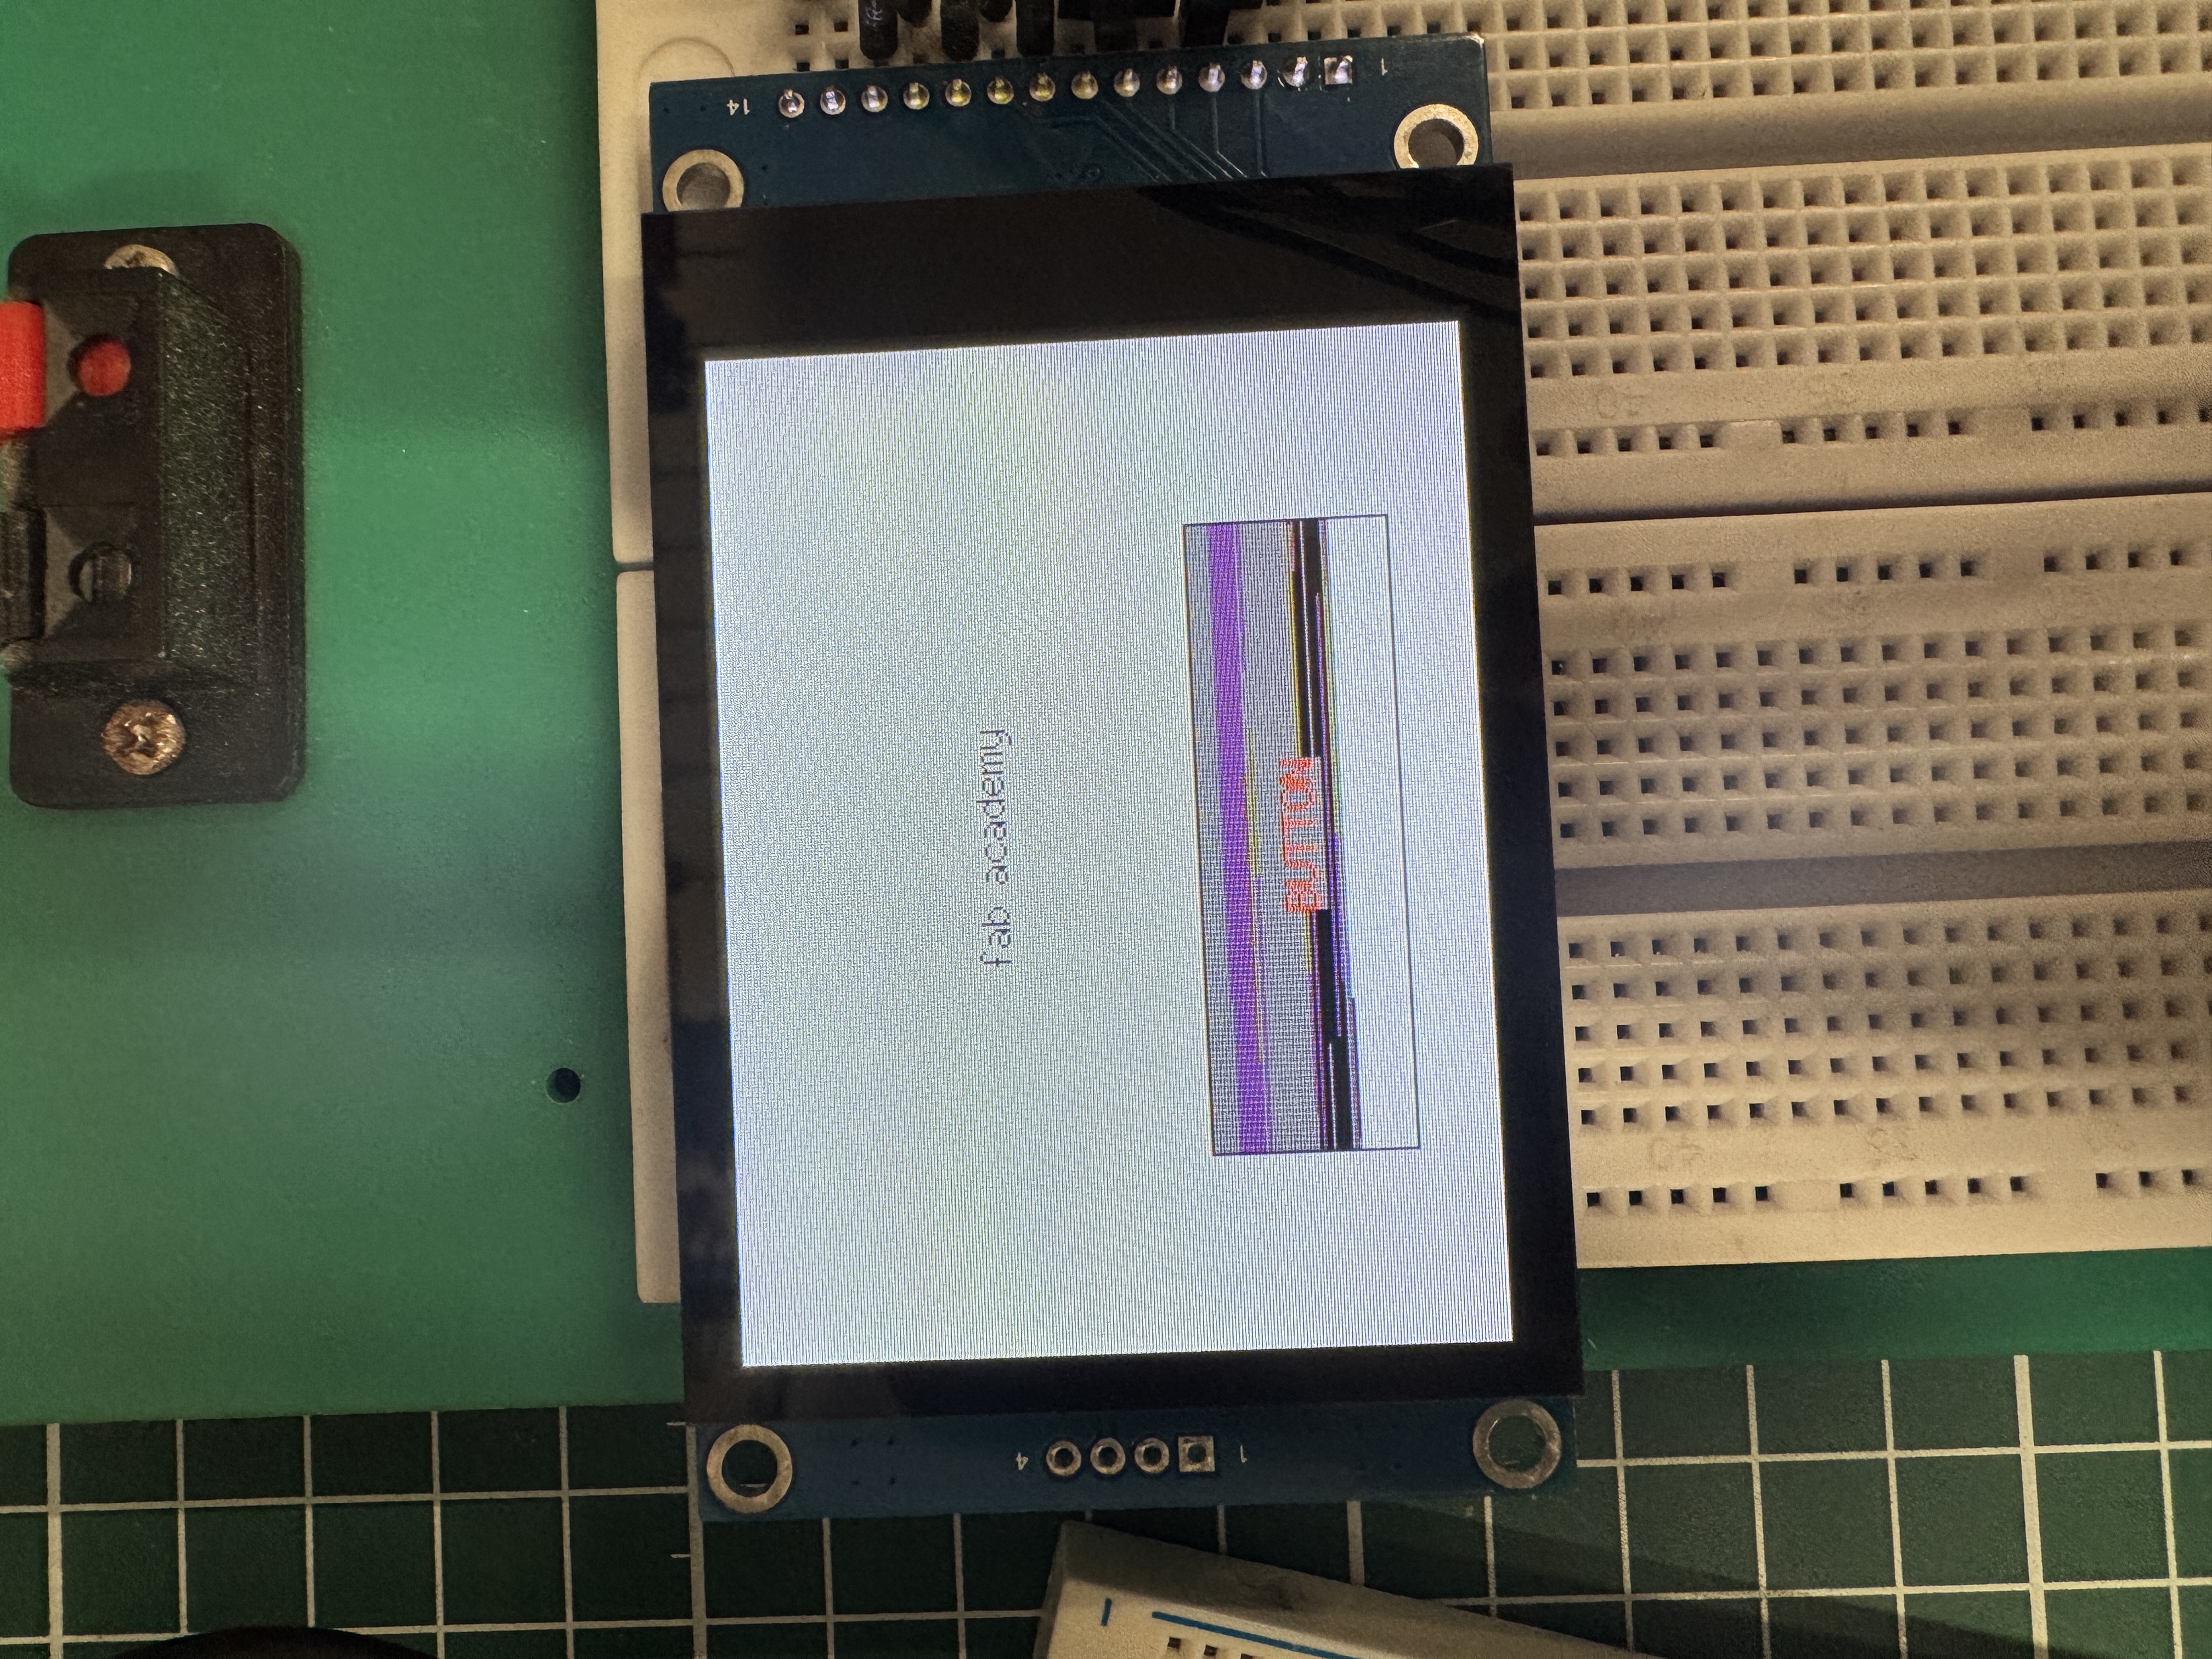
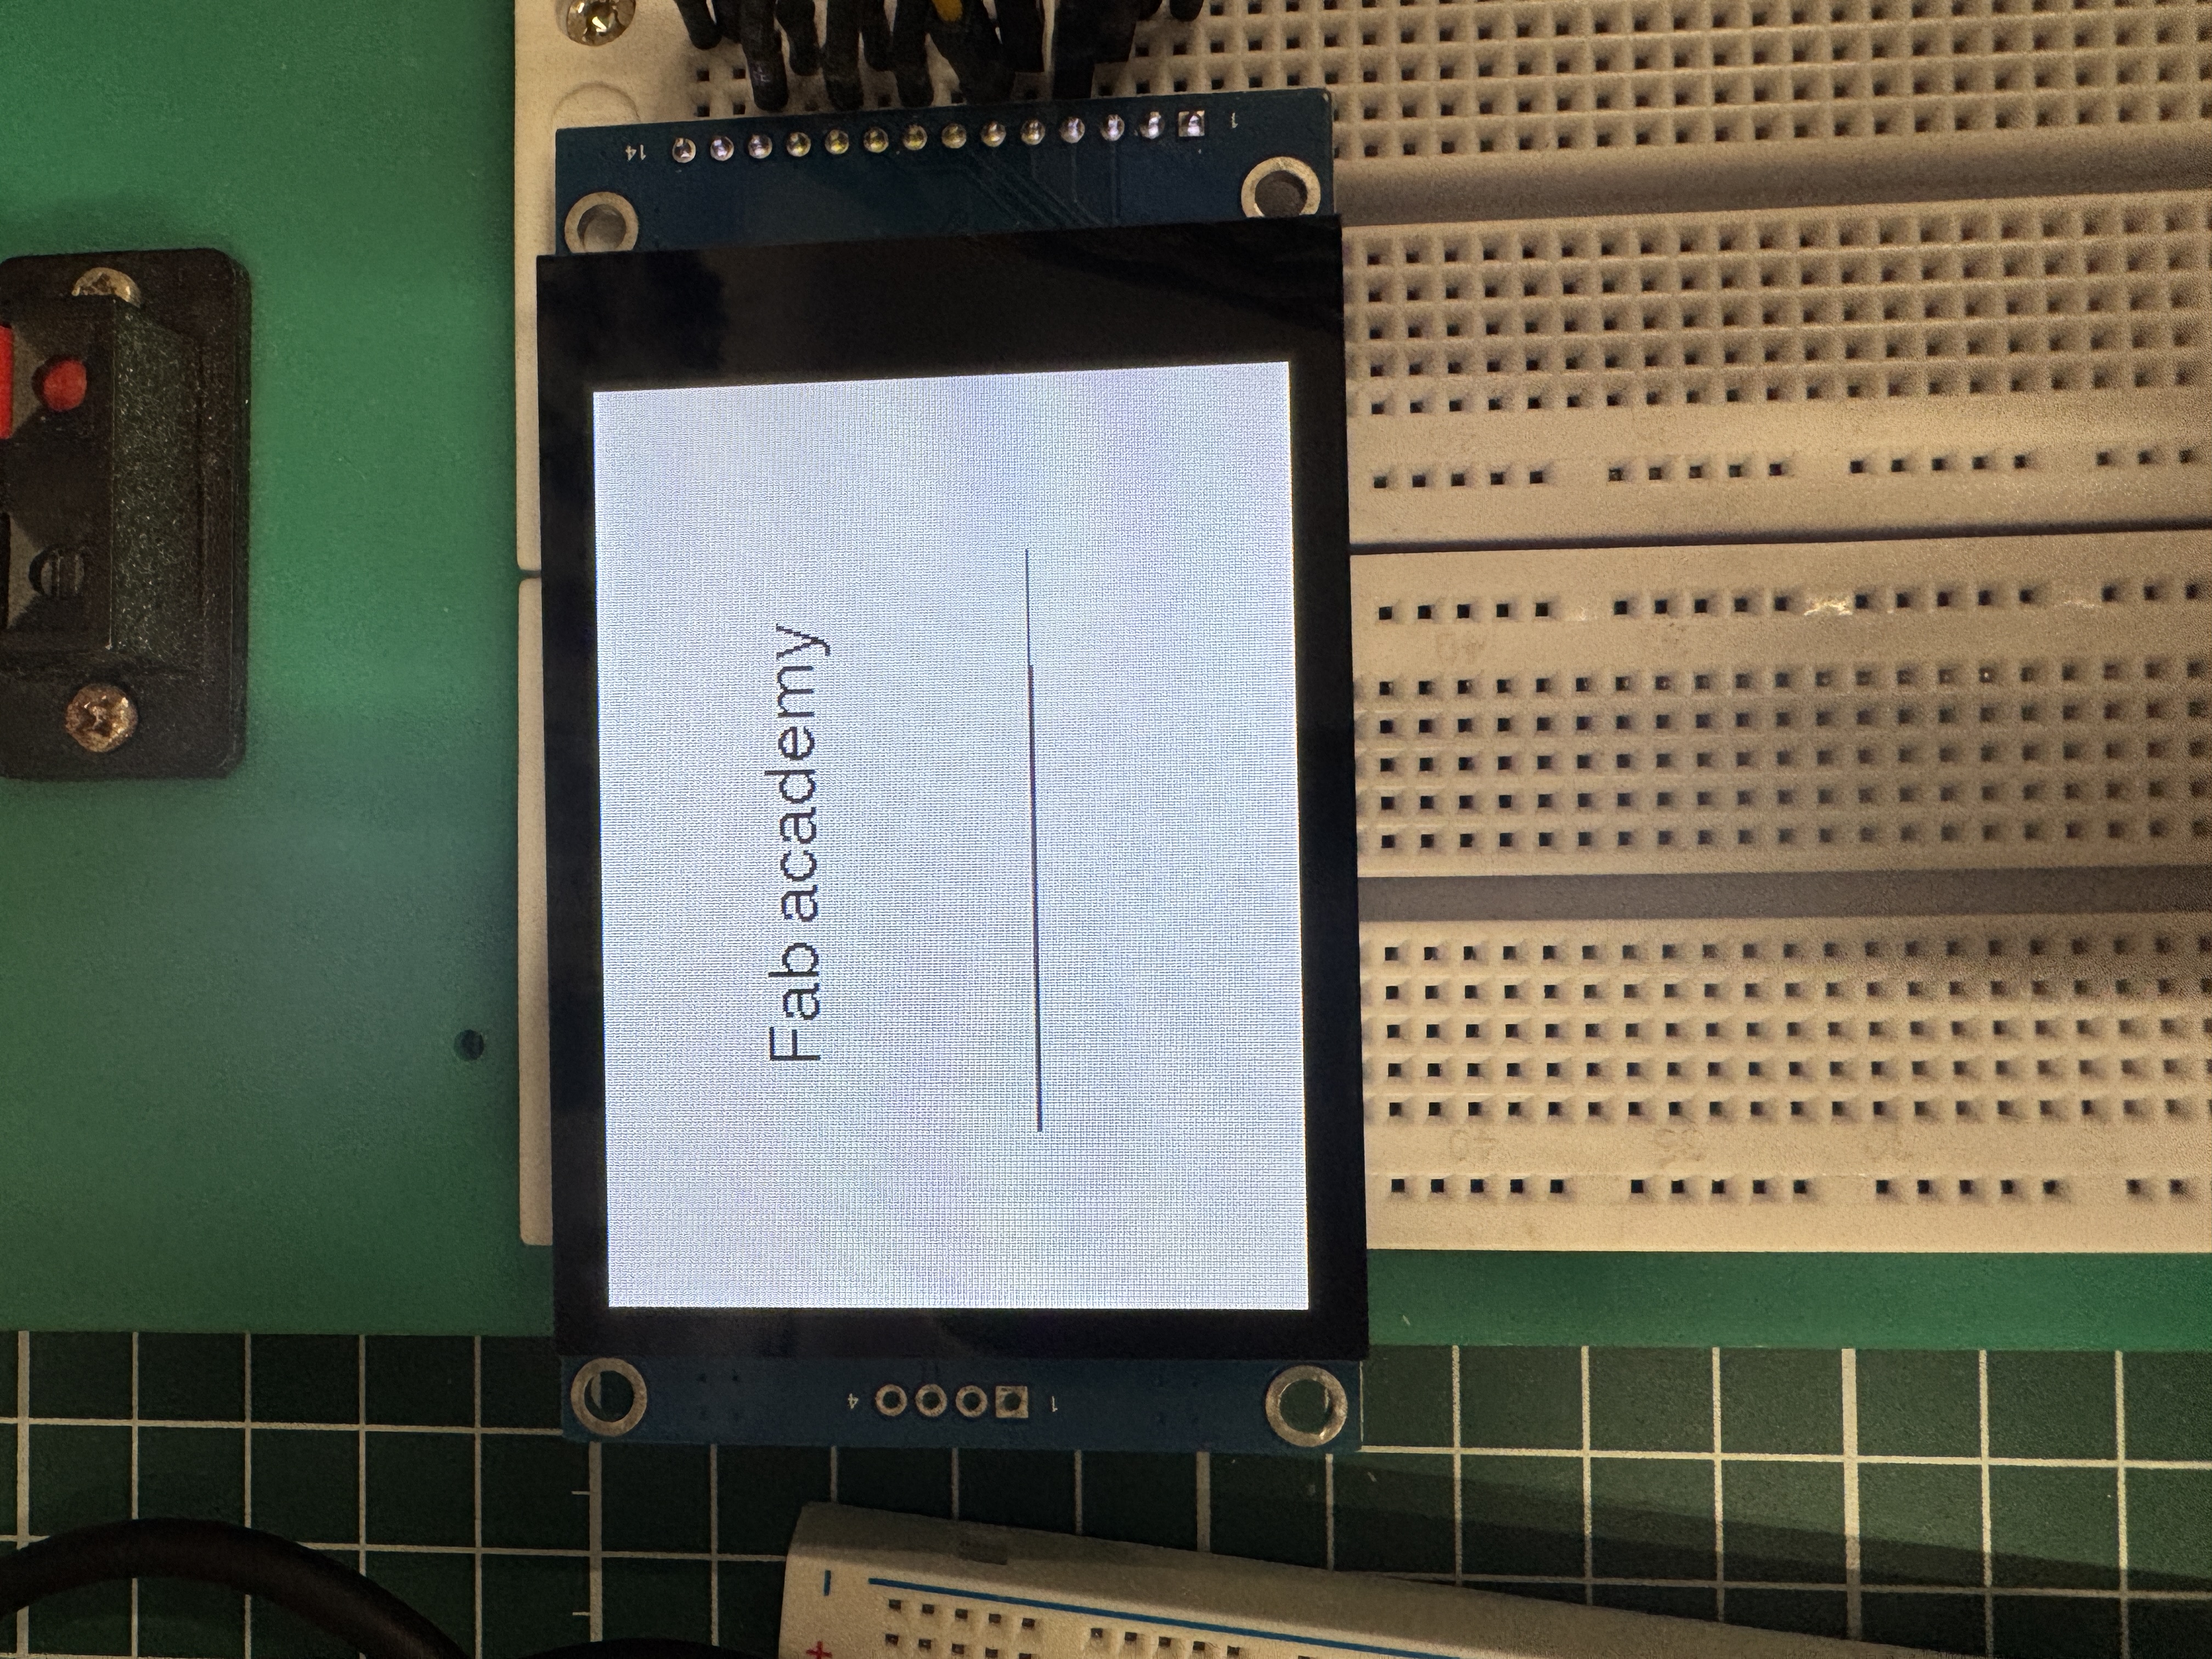
I wanted one firmware image that showed the words Fab Academy with a tappable button below, exercising both the panel and the touch controller in a single pass. I used an AI assistant inside Cursor to draft that combined sketch. In practice the button graphic did not refresh reliably and the Serial monitor stayed quiet when I tapped, so I stopped guessing and split the work into two programs: display-only bring-up, then touch-focused bring-up. That separation made it obvious whether SPI wiring, reset timing, or the touch stack was the weak link.
2) Learning (pins, controllers, and references)
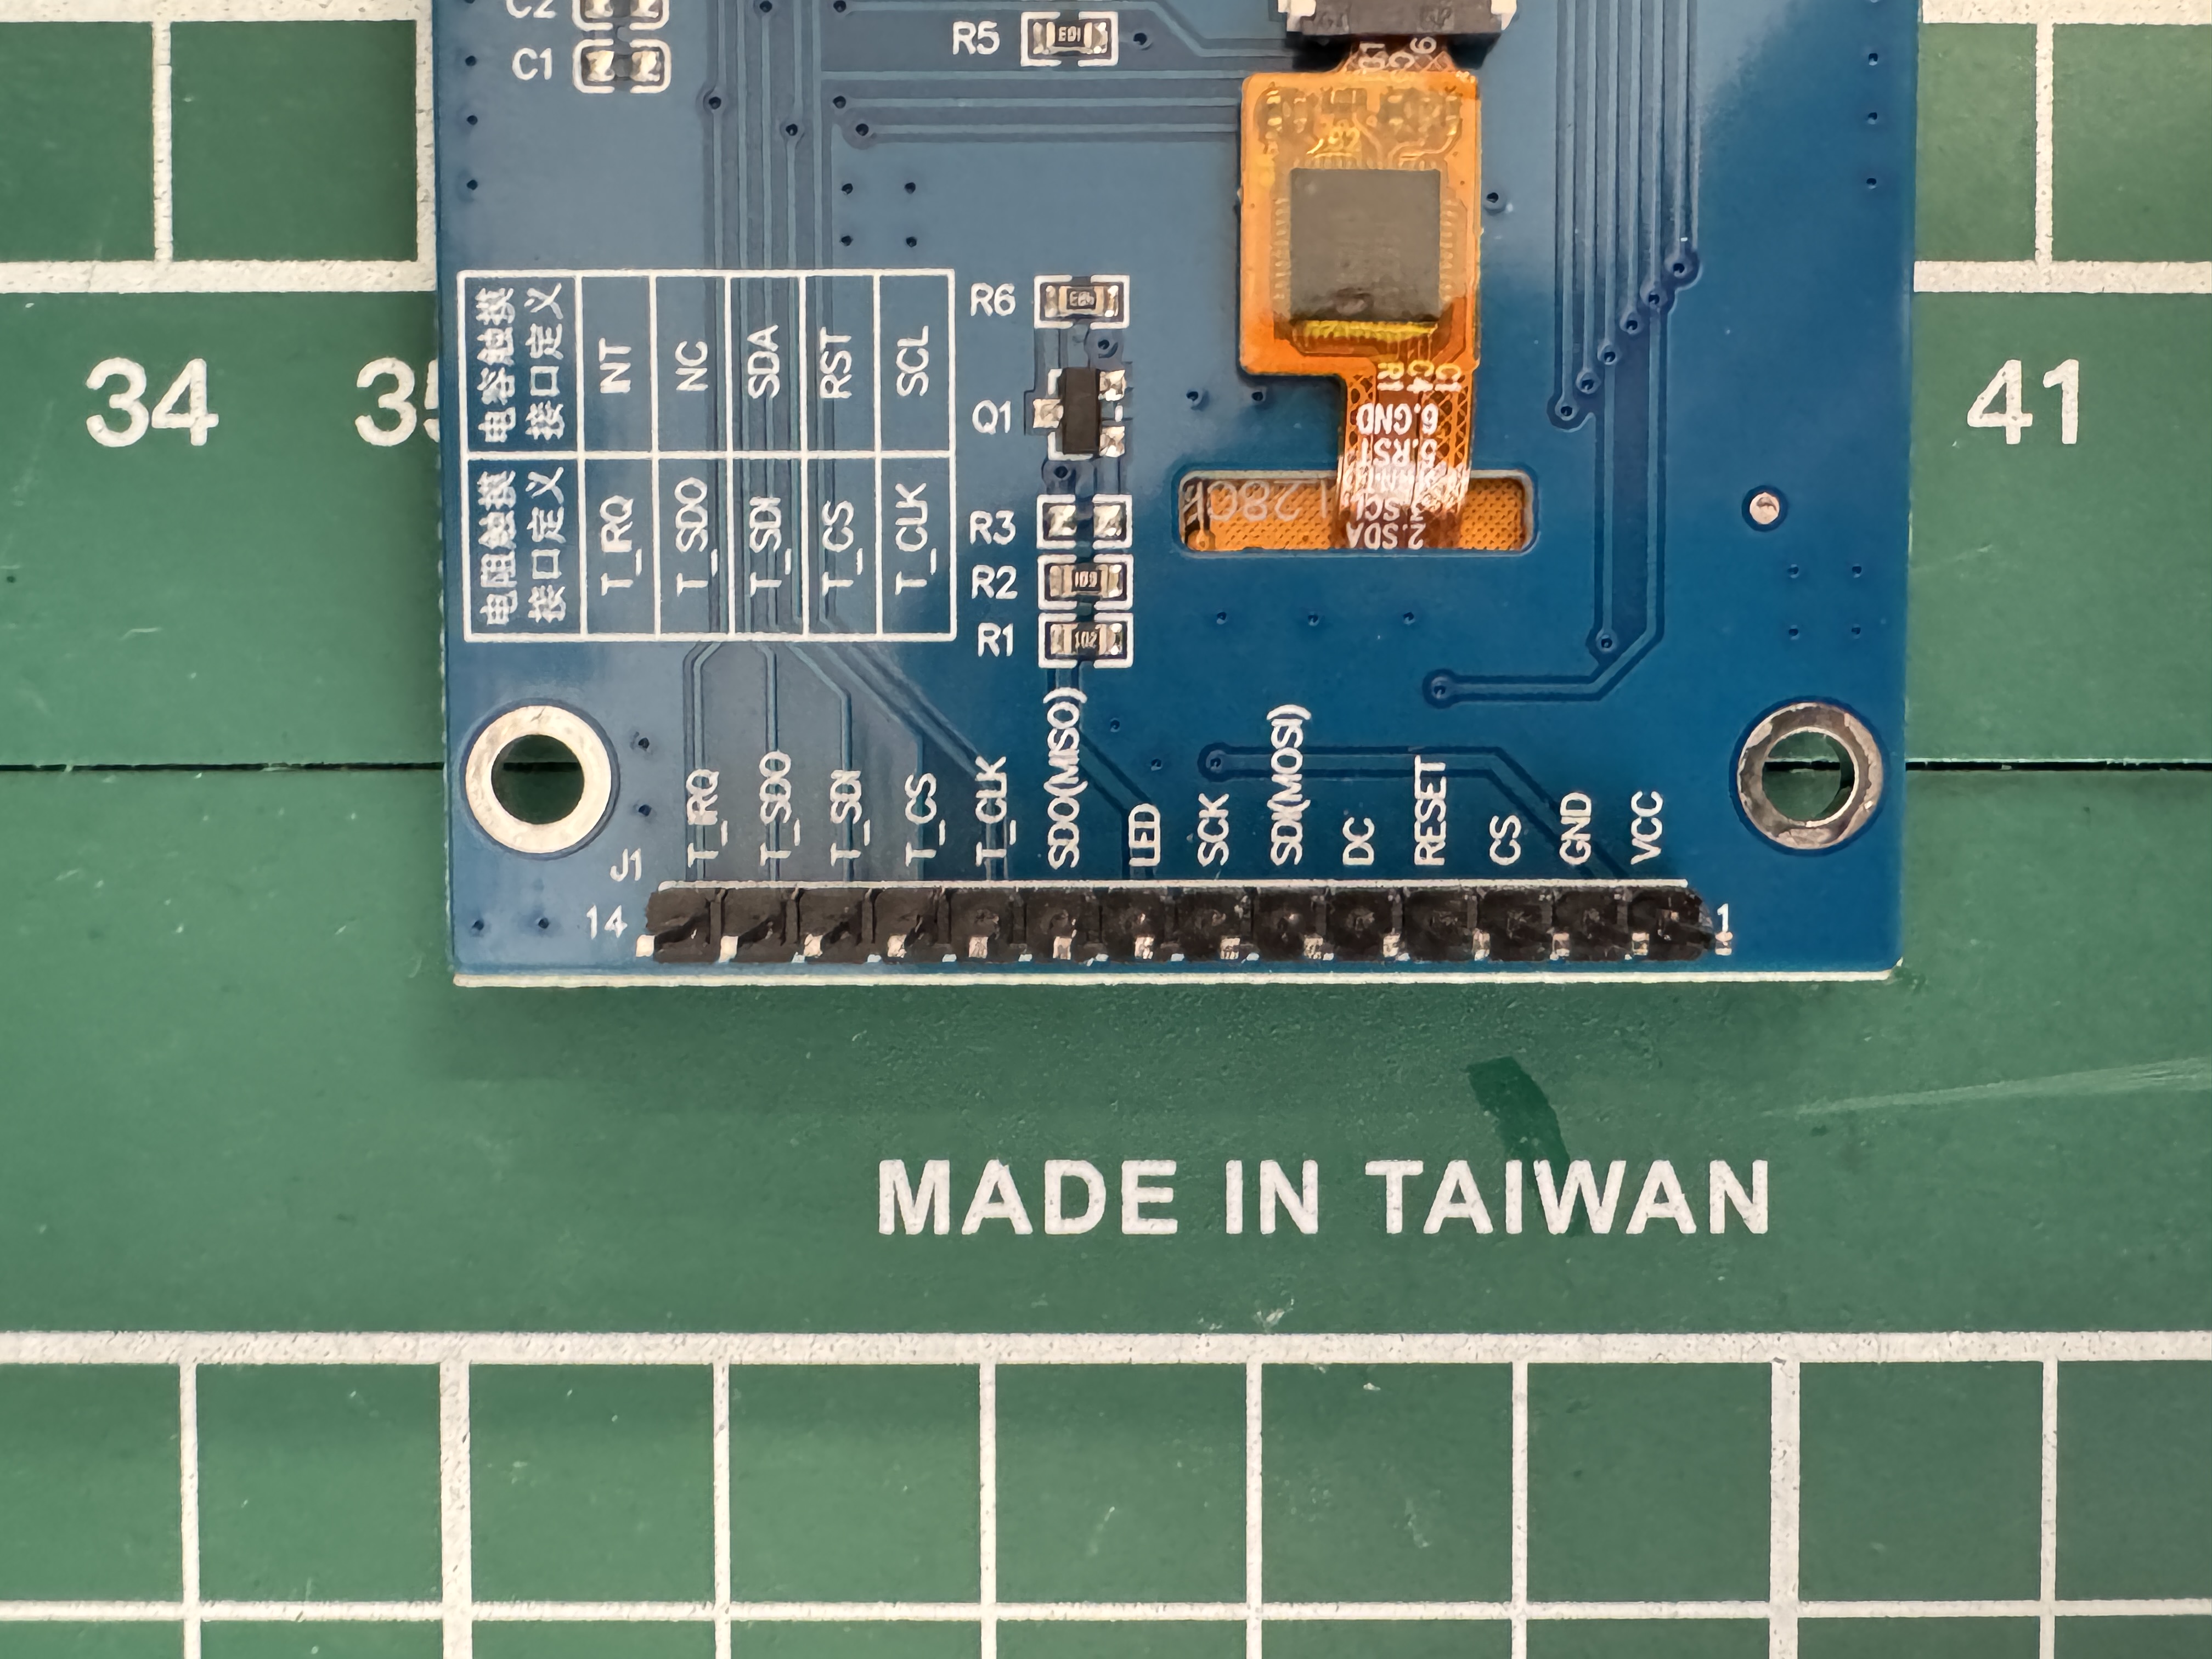
ILI9341 over 4-wire SPI was the baseline: chip-select, data/command, SPI clock/MOSI (and MISO
where the library or readback path needs it), plus backlight and reset. The vendor shipped an STM32-oriented
example; I ported the drawing tests to ESP32-Arduino with Adafruit_ILI9341 +
Adafruit_GFX, keeping their gamma tables and rotation mapping where it helped this particular IPS
panel look correct.
The bigger lesson was strapping pins on the ESP32. I first tied the LCD RST line to GPIO12 because that matched a convenient label on a pinout card. The panel stayed dark even though SPI traffic looked plausible in code. Digging into Espressif’s documentation, GPIO12 is also MTDI, a strapping pin that is sampled at chip reset to configure the flash voltage behavior of the VDD_SDIO domain. At reset, the voltage expected on that strapping state must match the flash fitted on the module (the common WROOM modules use 3.3 V flash). If GPIO12 is driven or pulled to the wrong level during that sampling window, boot or flash access can fail or behave intermittently. Many reference designs treat GPIO12 as risky for outputs such as an active-low reset that might sit in the wrong state at power-up. After I moved TFT_RST to a normal, non-strapping GPIO (and kept the net short and clean), the ILI9341 initialization sequence finally ran as expected.
Primary references I used while writing this up: ESP32 datasheet (strapping pins / MTDI) and Espressif’s boot mode / strapping overview.
For touch, the panel is capacitive with an FT6336 controller, not a resistive
XPT2046 on bit-banged SPI. The first AI-generated sketch assumed resistive SPI touch, which
never matched the wiring on my FPC. Switching to an I²C driver path (address commonly
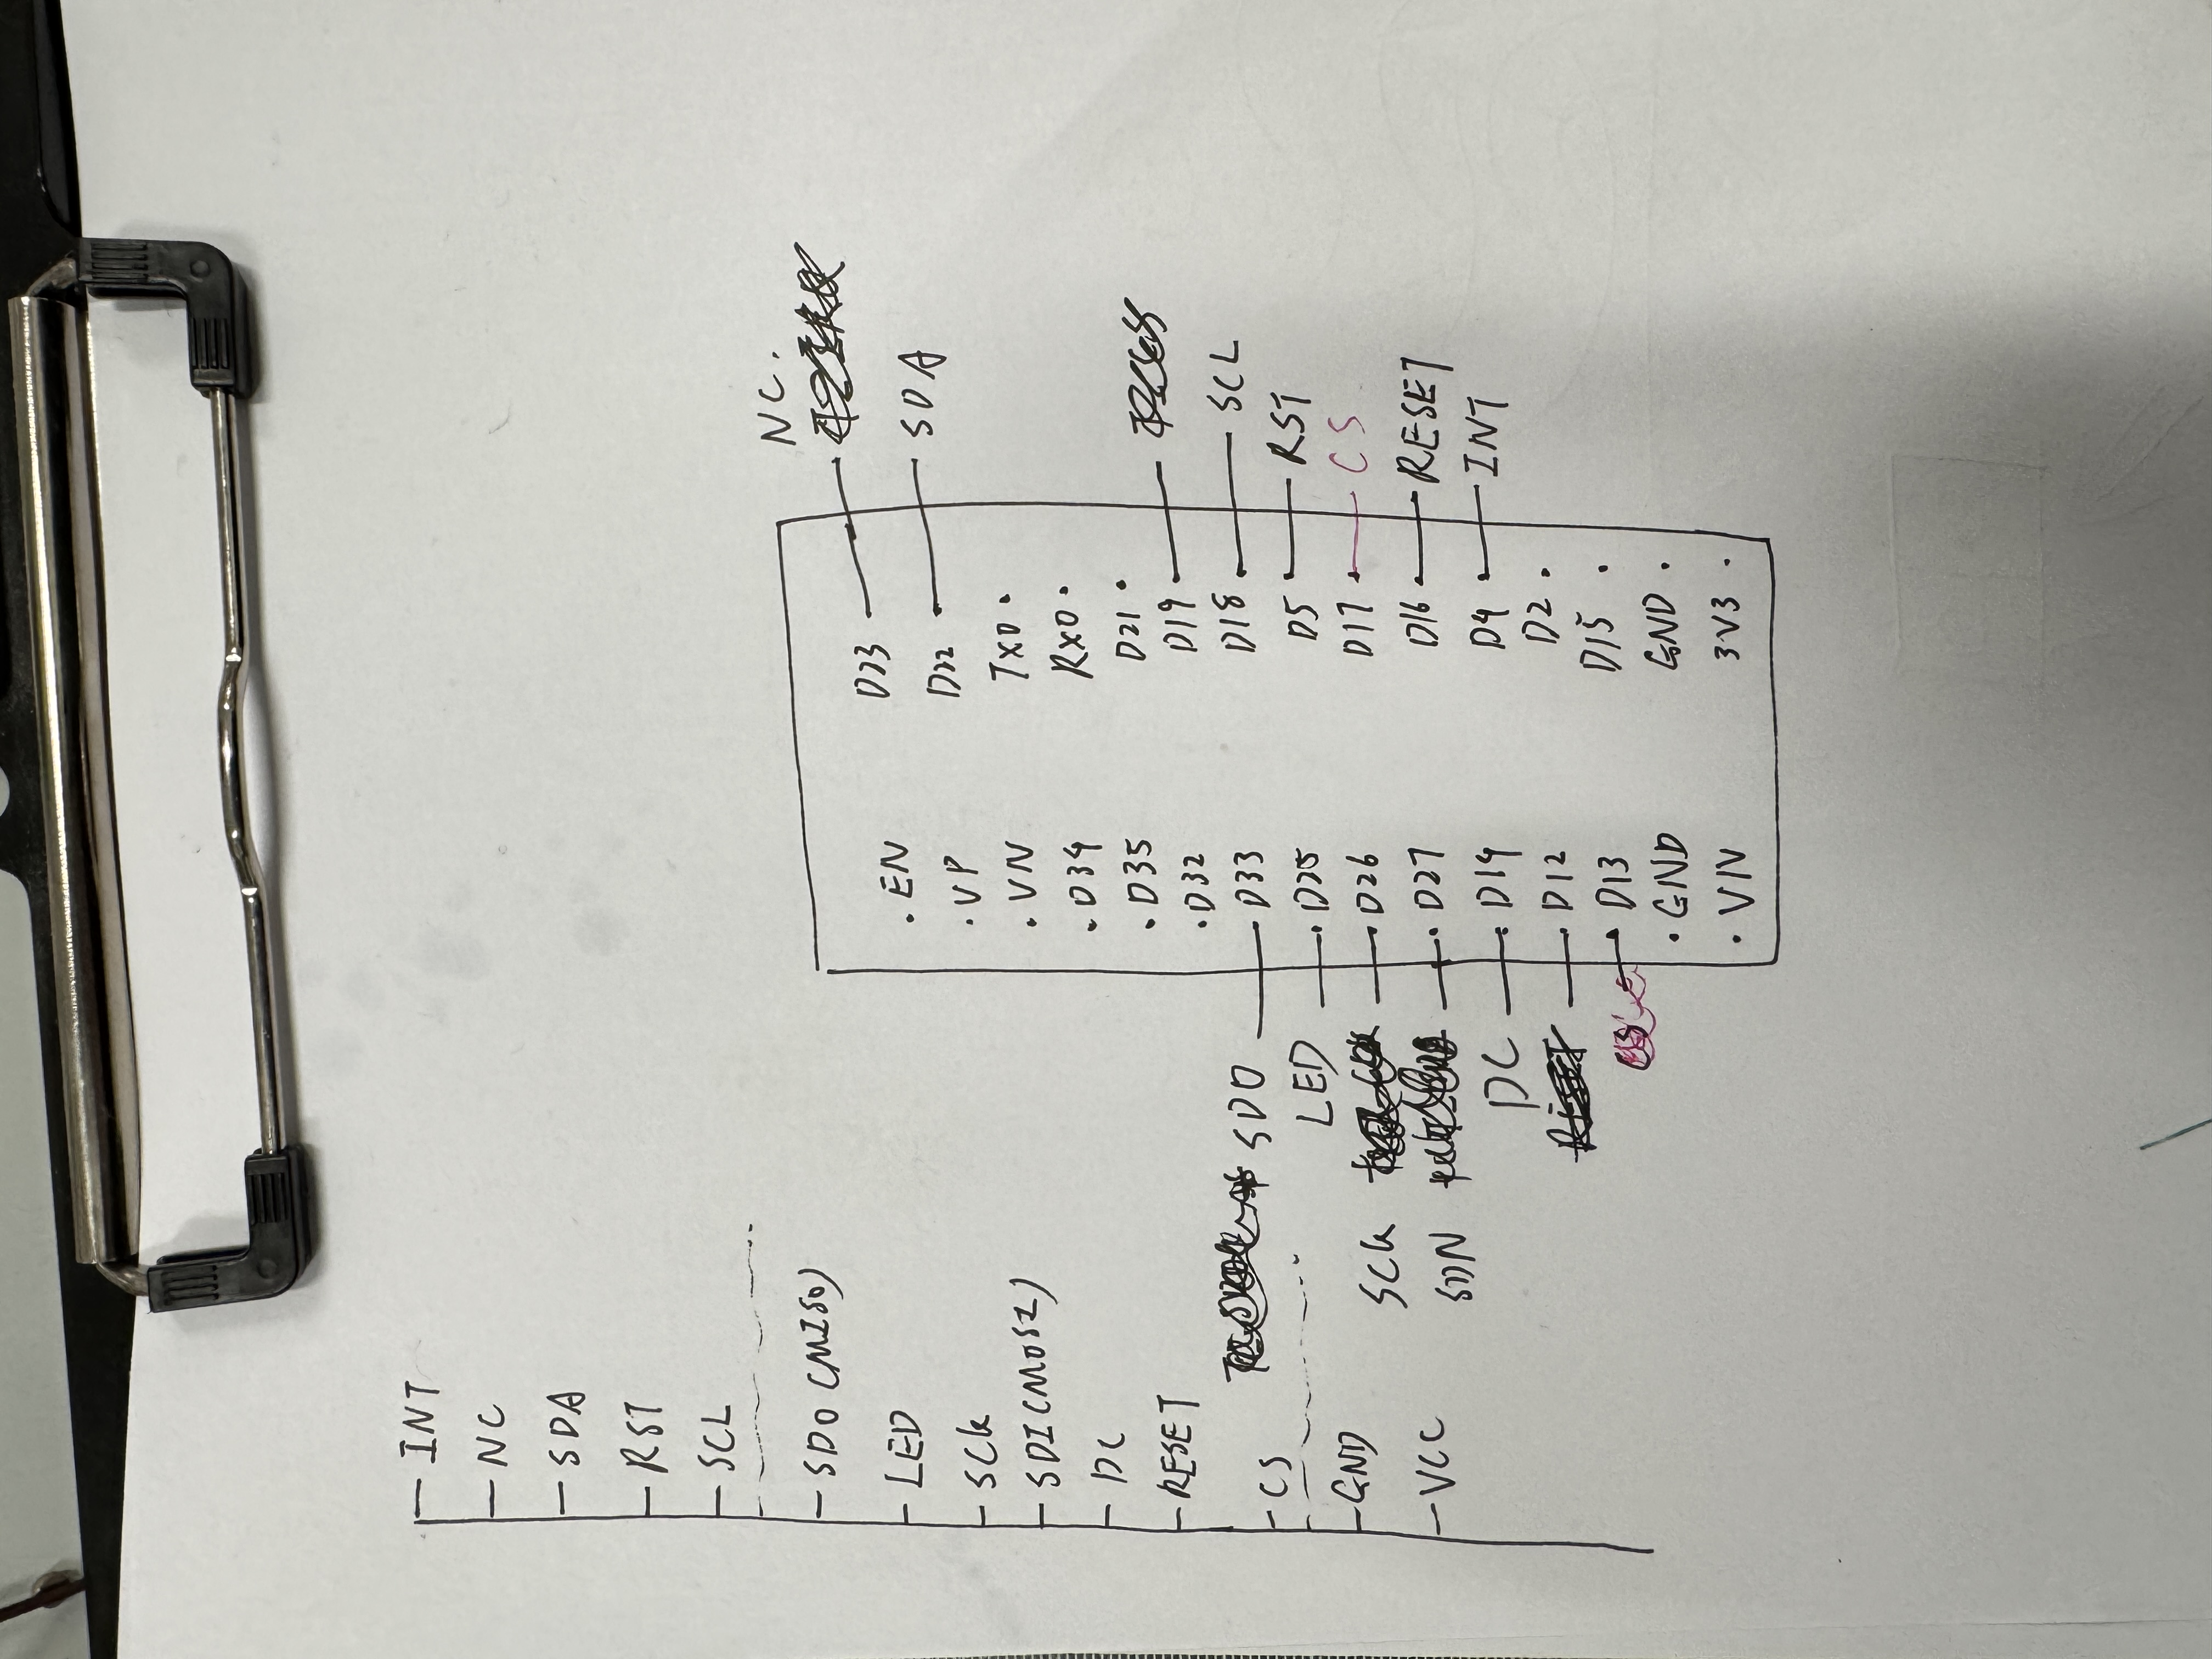
0x38, with I²C SDA/SCL, optional INT, and a
controller reset pin) matched the vendor examples and started returning coordinates. In the sketch I ship here,
the bring-up messages assume SDA on GPIO22, SCL on GPIO18, and a
CTP reset on GPIO5 (see the comments in
main_test_touch.cpp and your local
board_pins.h).
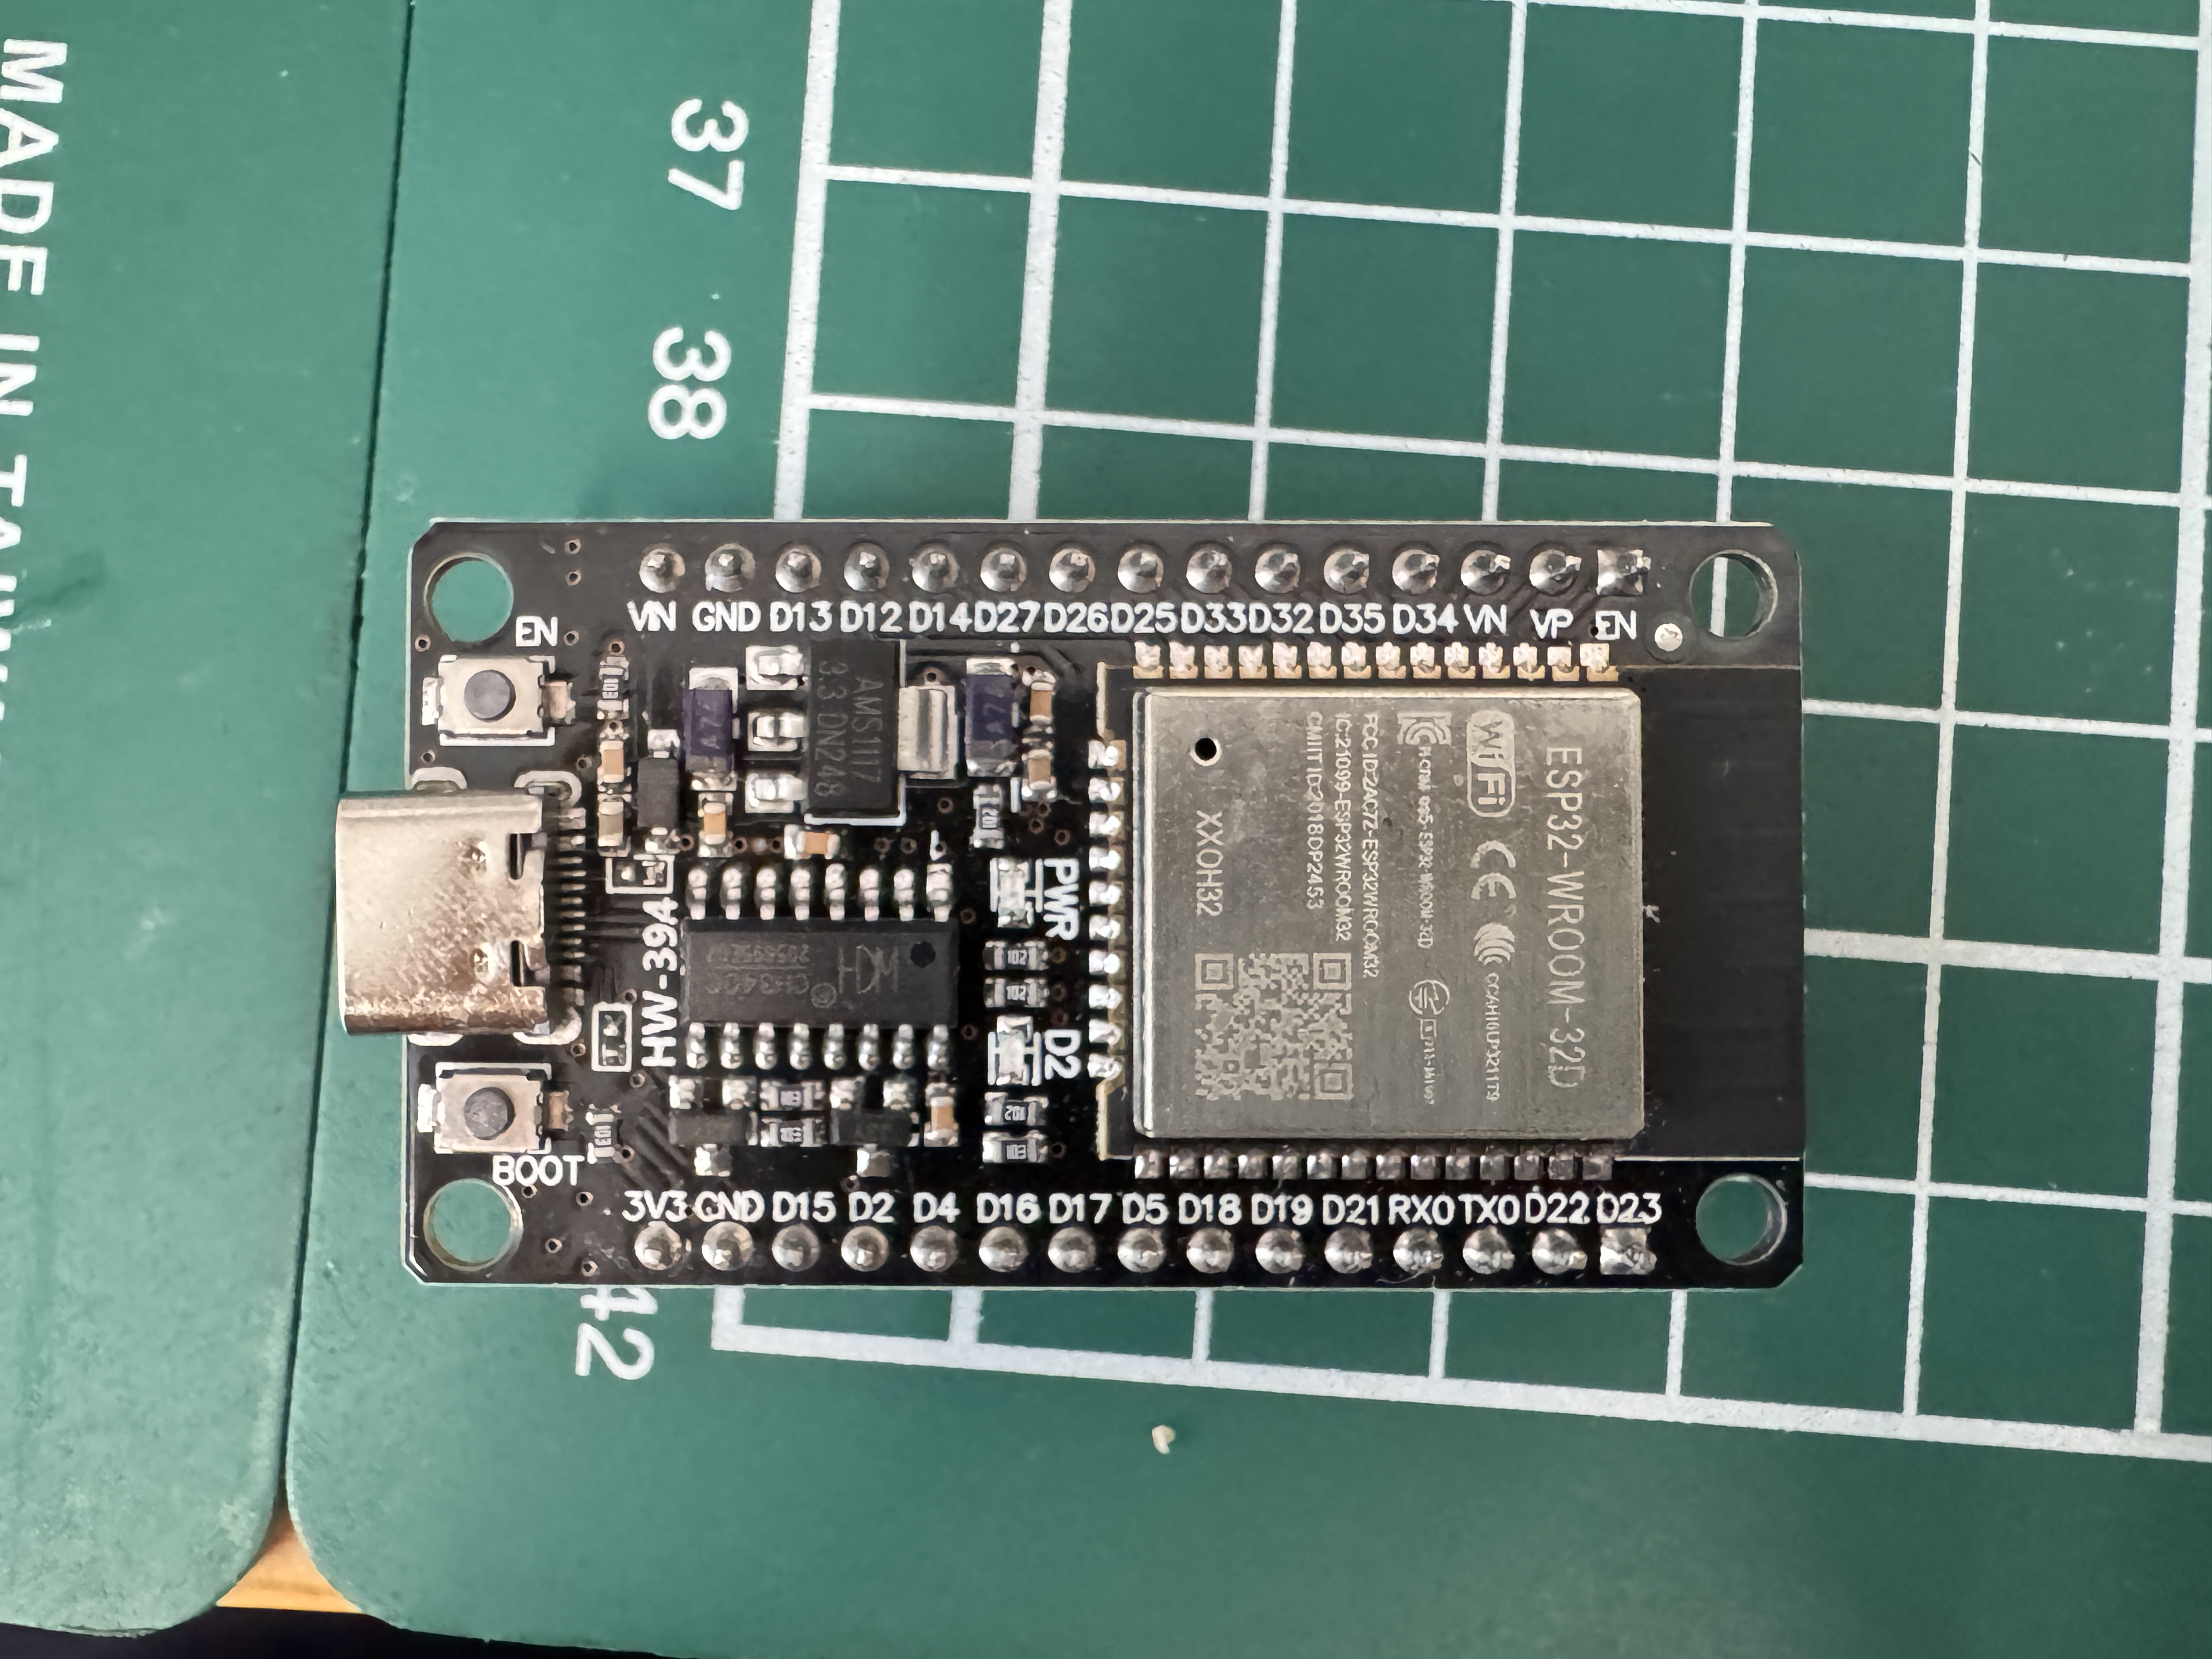
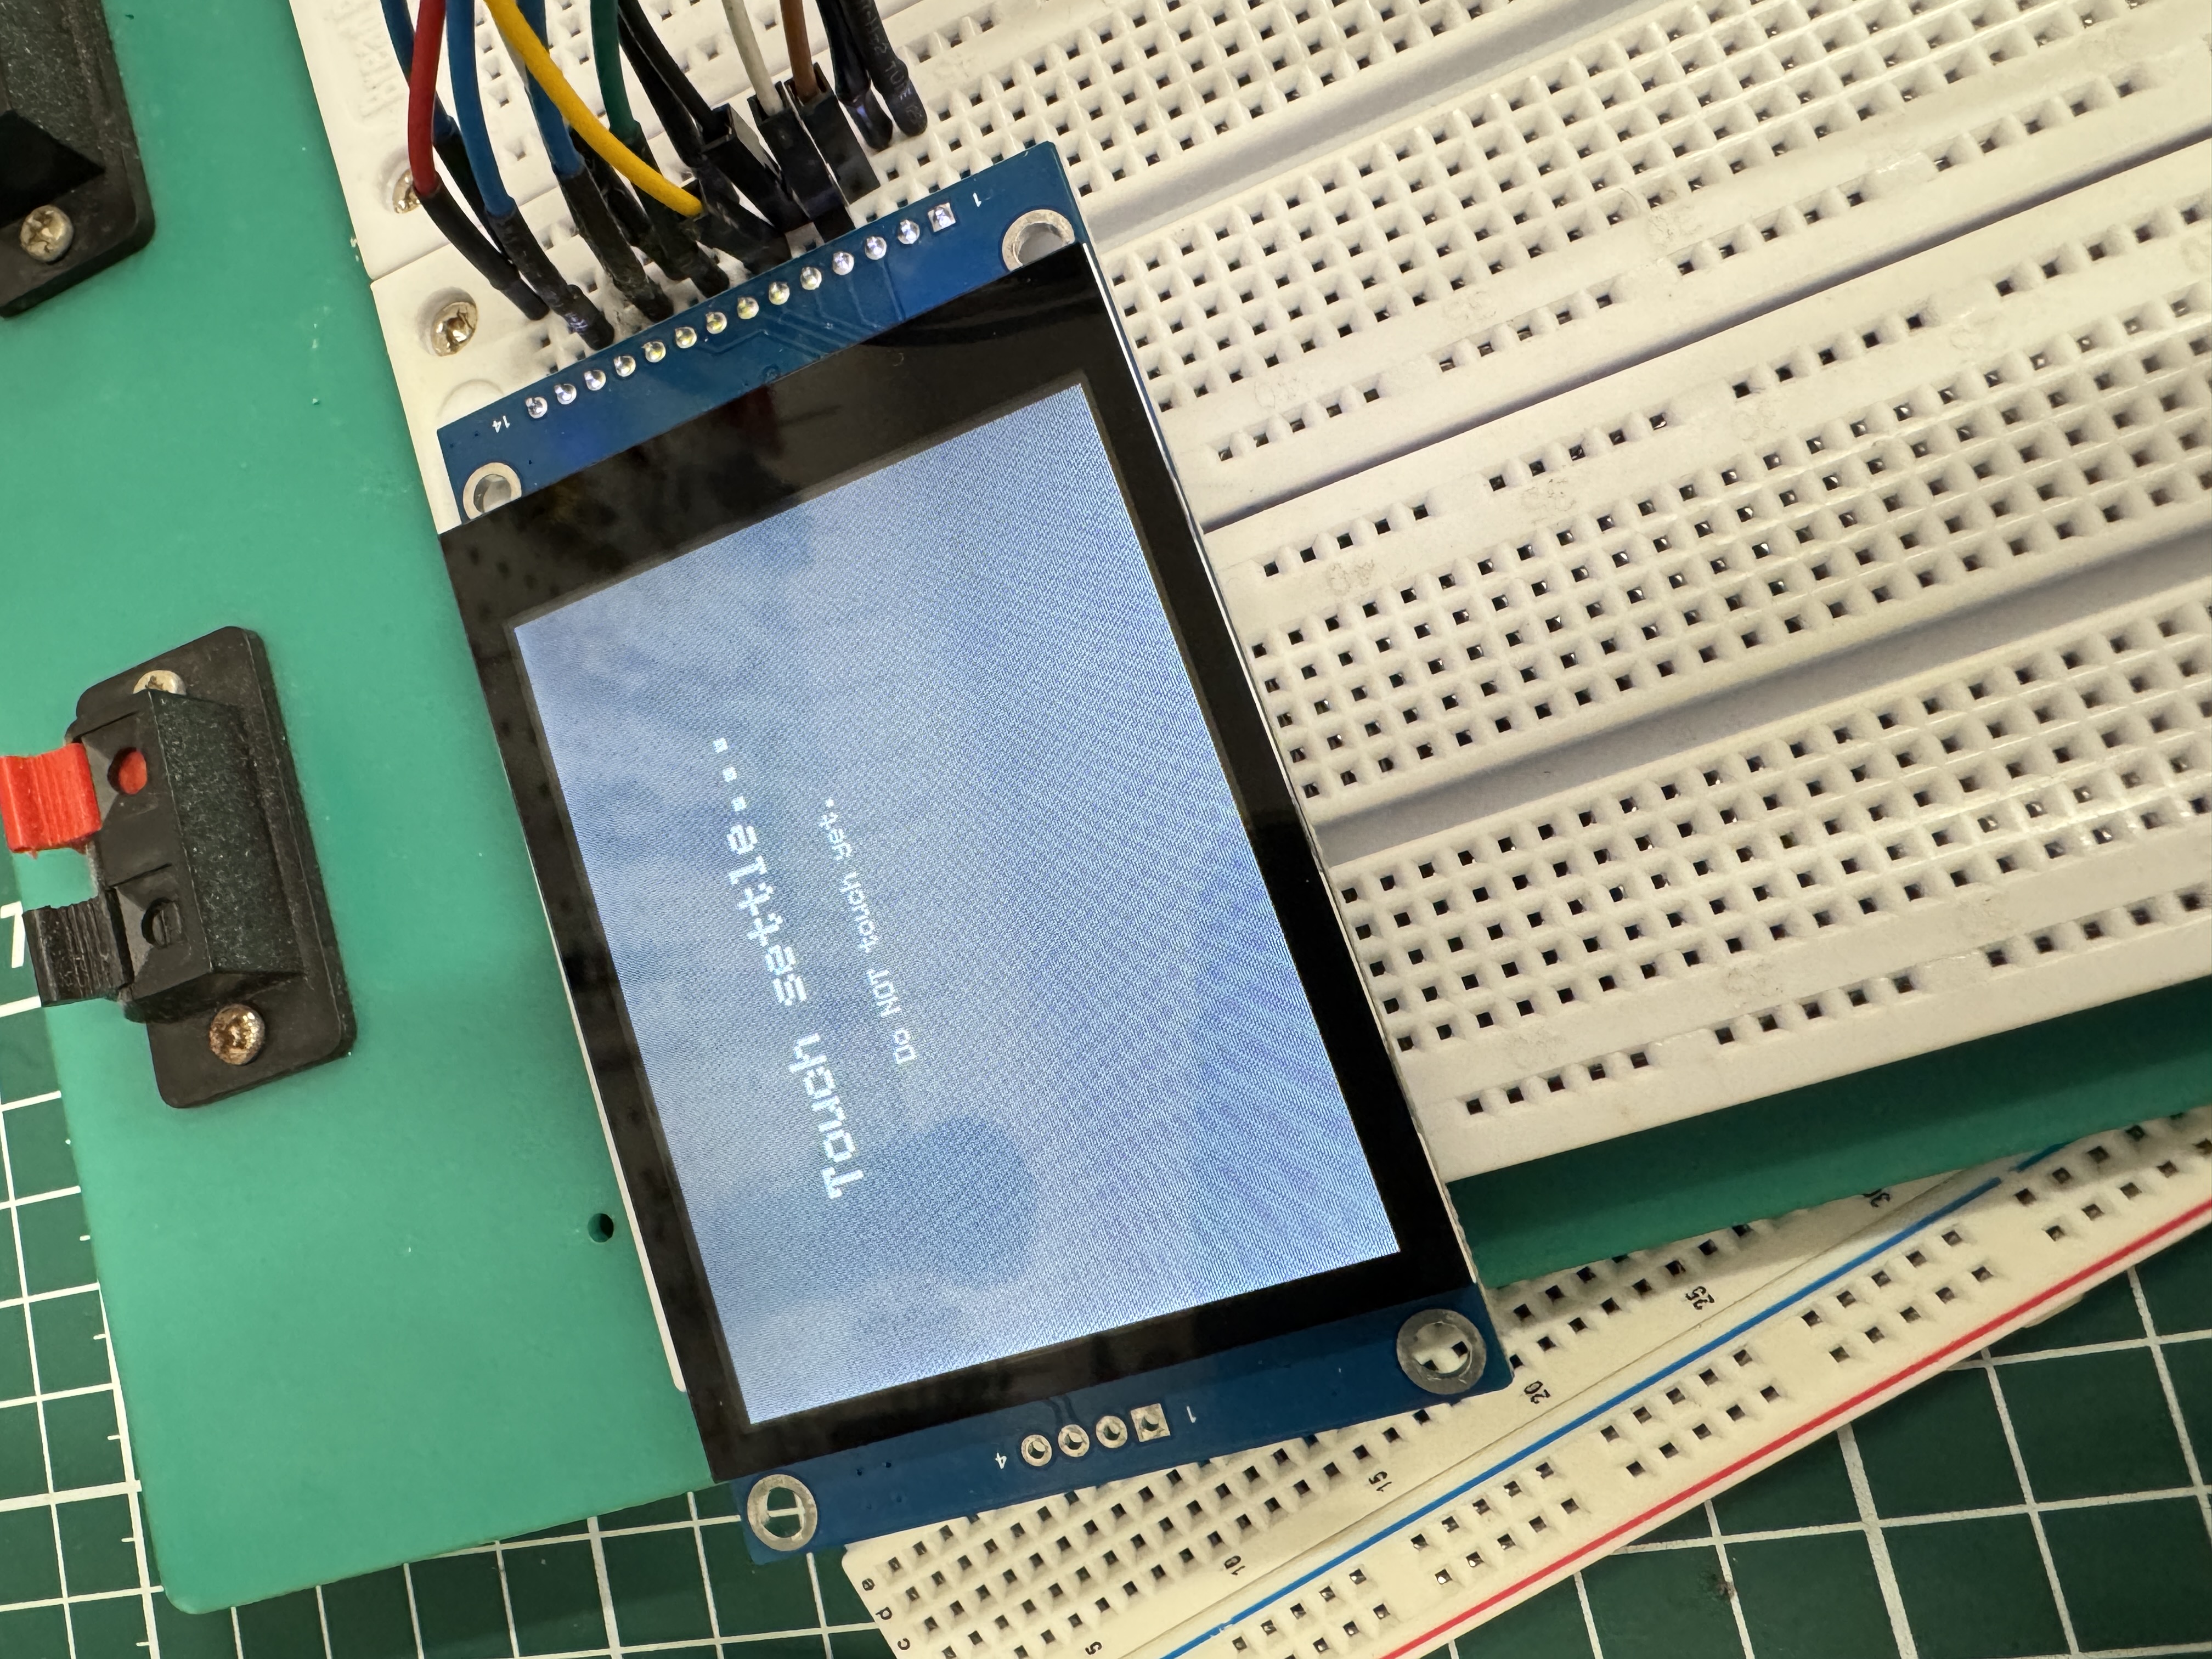
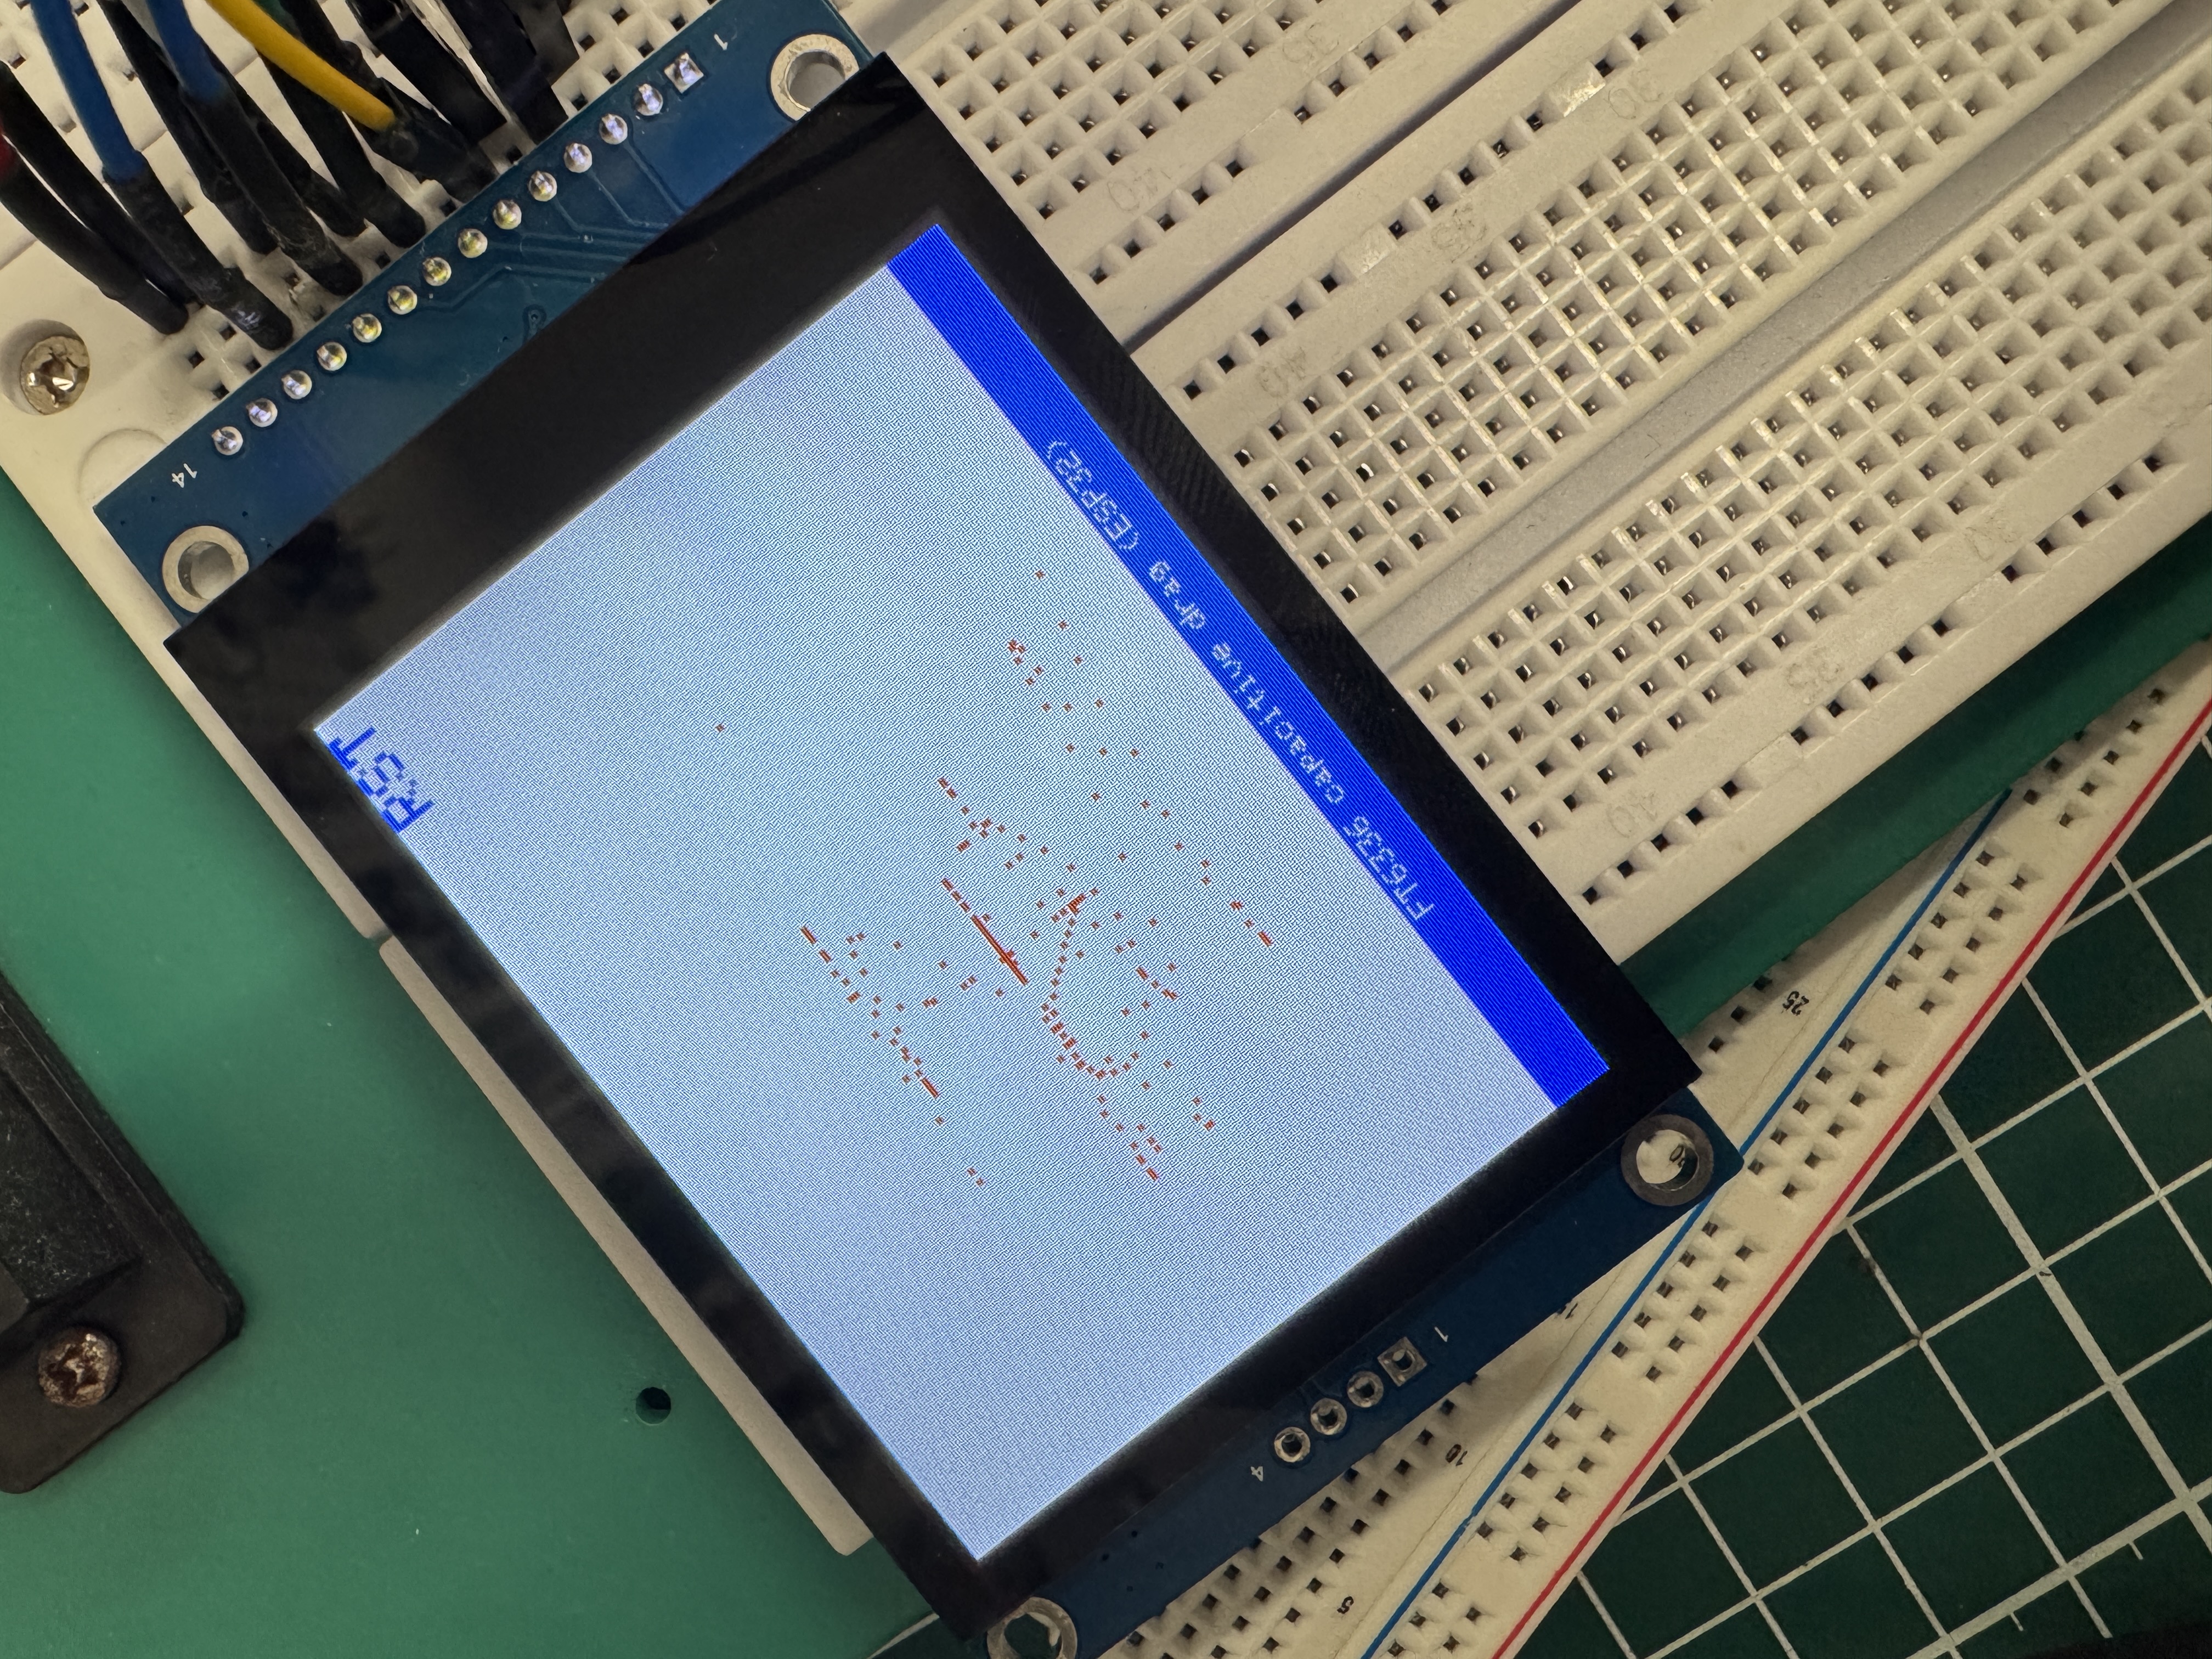
Before I trusted the application UI, I tested the capacitive touch layer by itself. These two photos belong to the testing stage: first I checked whether the FT6336 returned stable reads, then I drew trails to confirm the I²C path, coordinate mapping, and refresh loop.
3) Main hardware evidence — screen harness on my own WROOM PCB
The important hardware story for this week is not the temporary breadboard. My application is meant for the screen-facing WROOM board I designed for the final project. I had already documented the physical screen route in Week 10: the TFT sits on the front of the pot, the harness passes through the shell, and the wires land on the pad groups of my WROOM display PCB. I am copying those photos here because they explain the real board-to-screen connection better than the debugging bench photo.
The Week 10 photos were taken during the ST7789 output-device build, while this week’s debug panel is ILI9341-class. I keep the distinction clear: the photos prove the physical screen harness to my PCB; the Week 15 code below proves the application UI, touch input, SPI display output, and I²C communication.
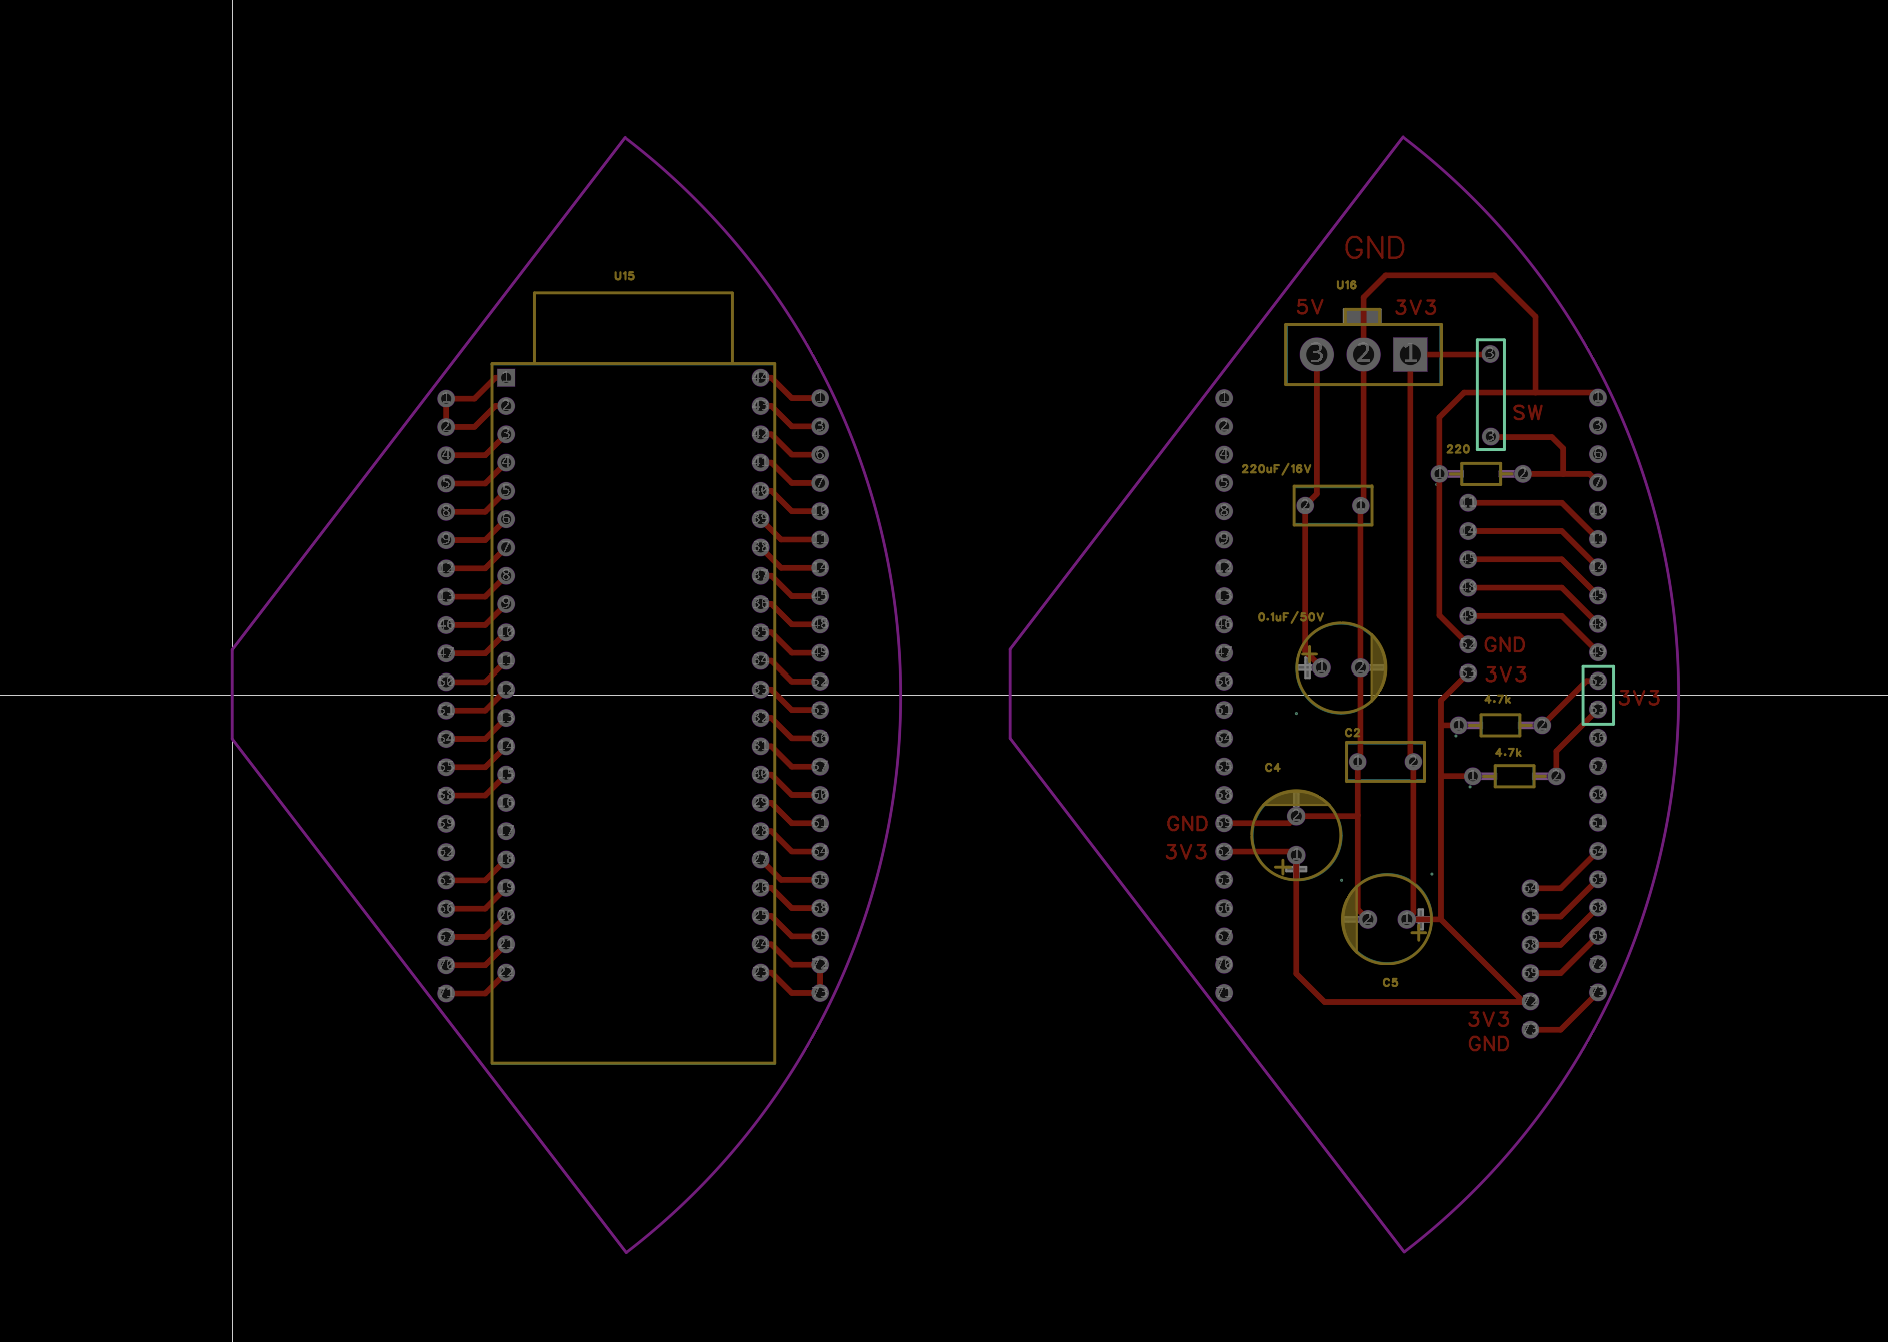
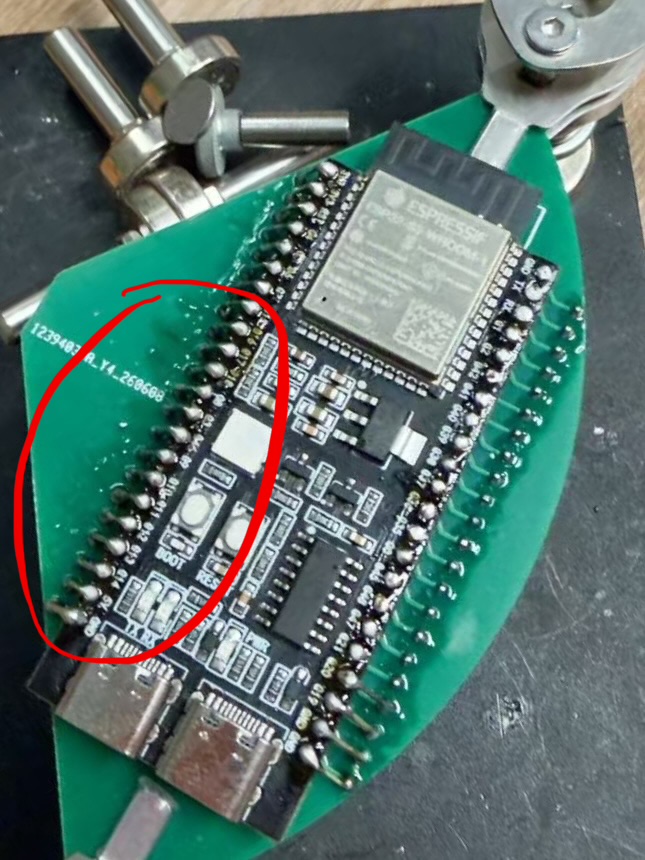
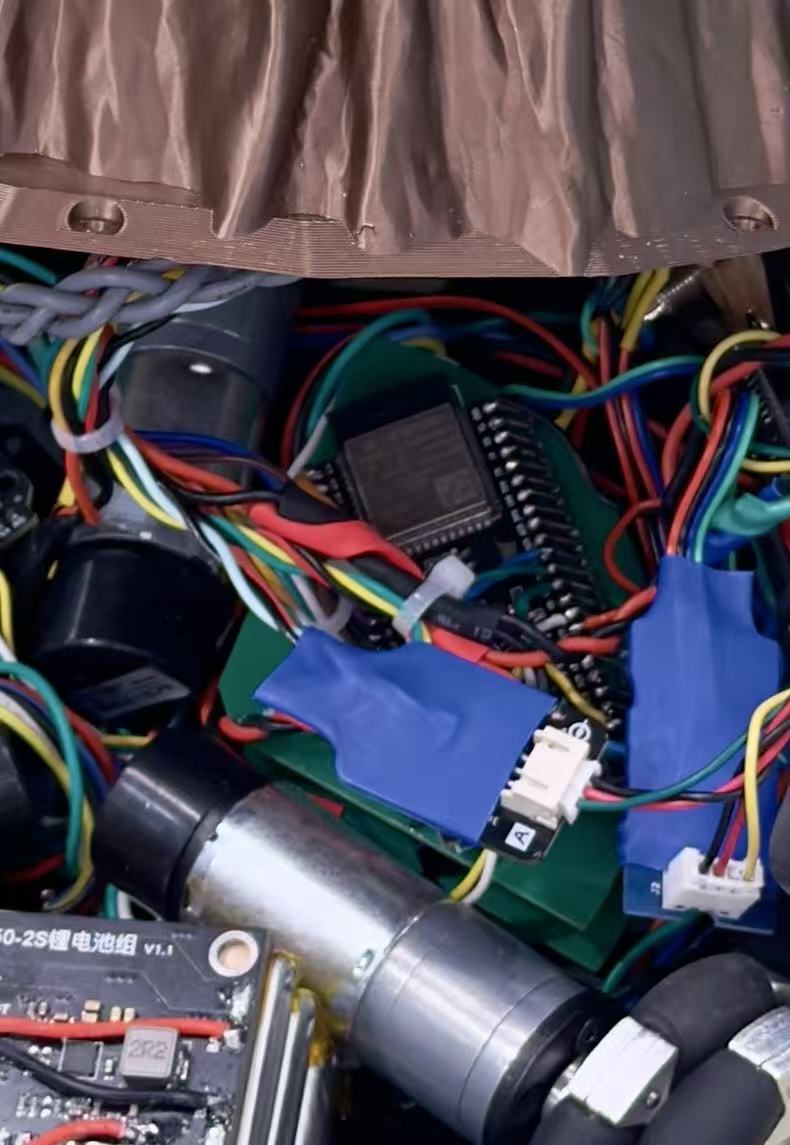
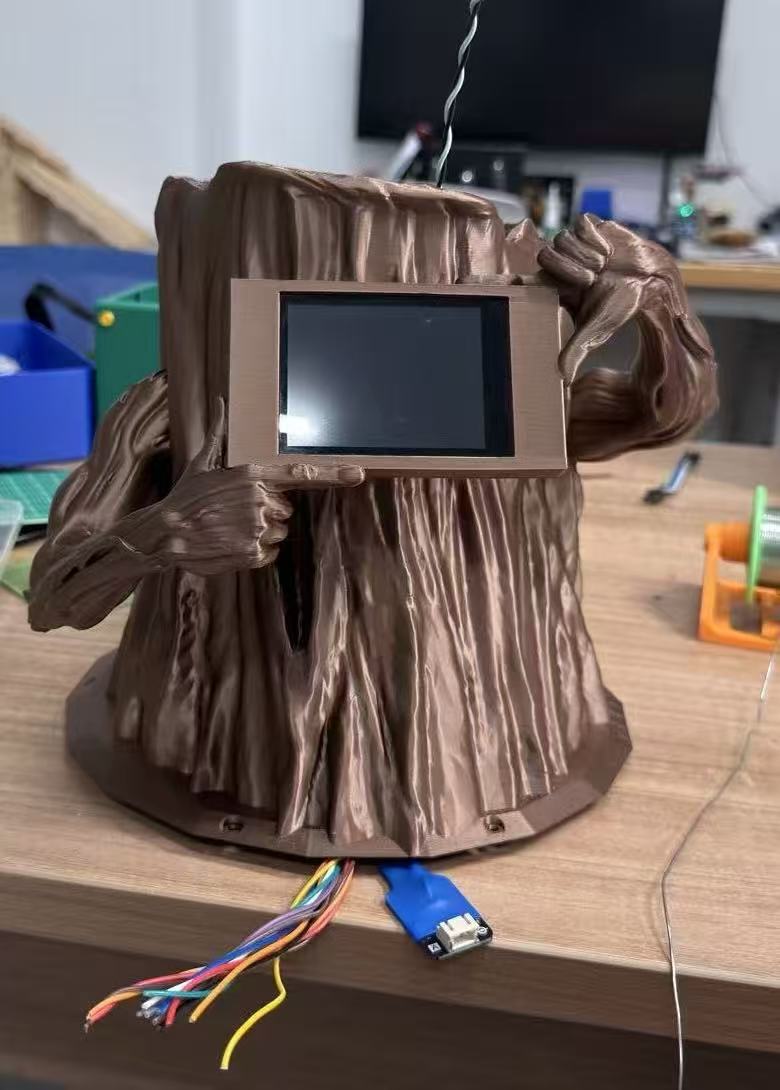
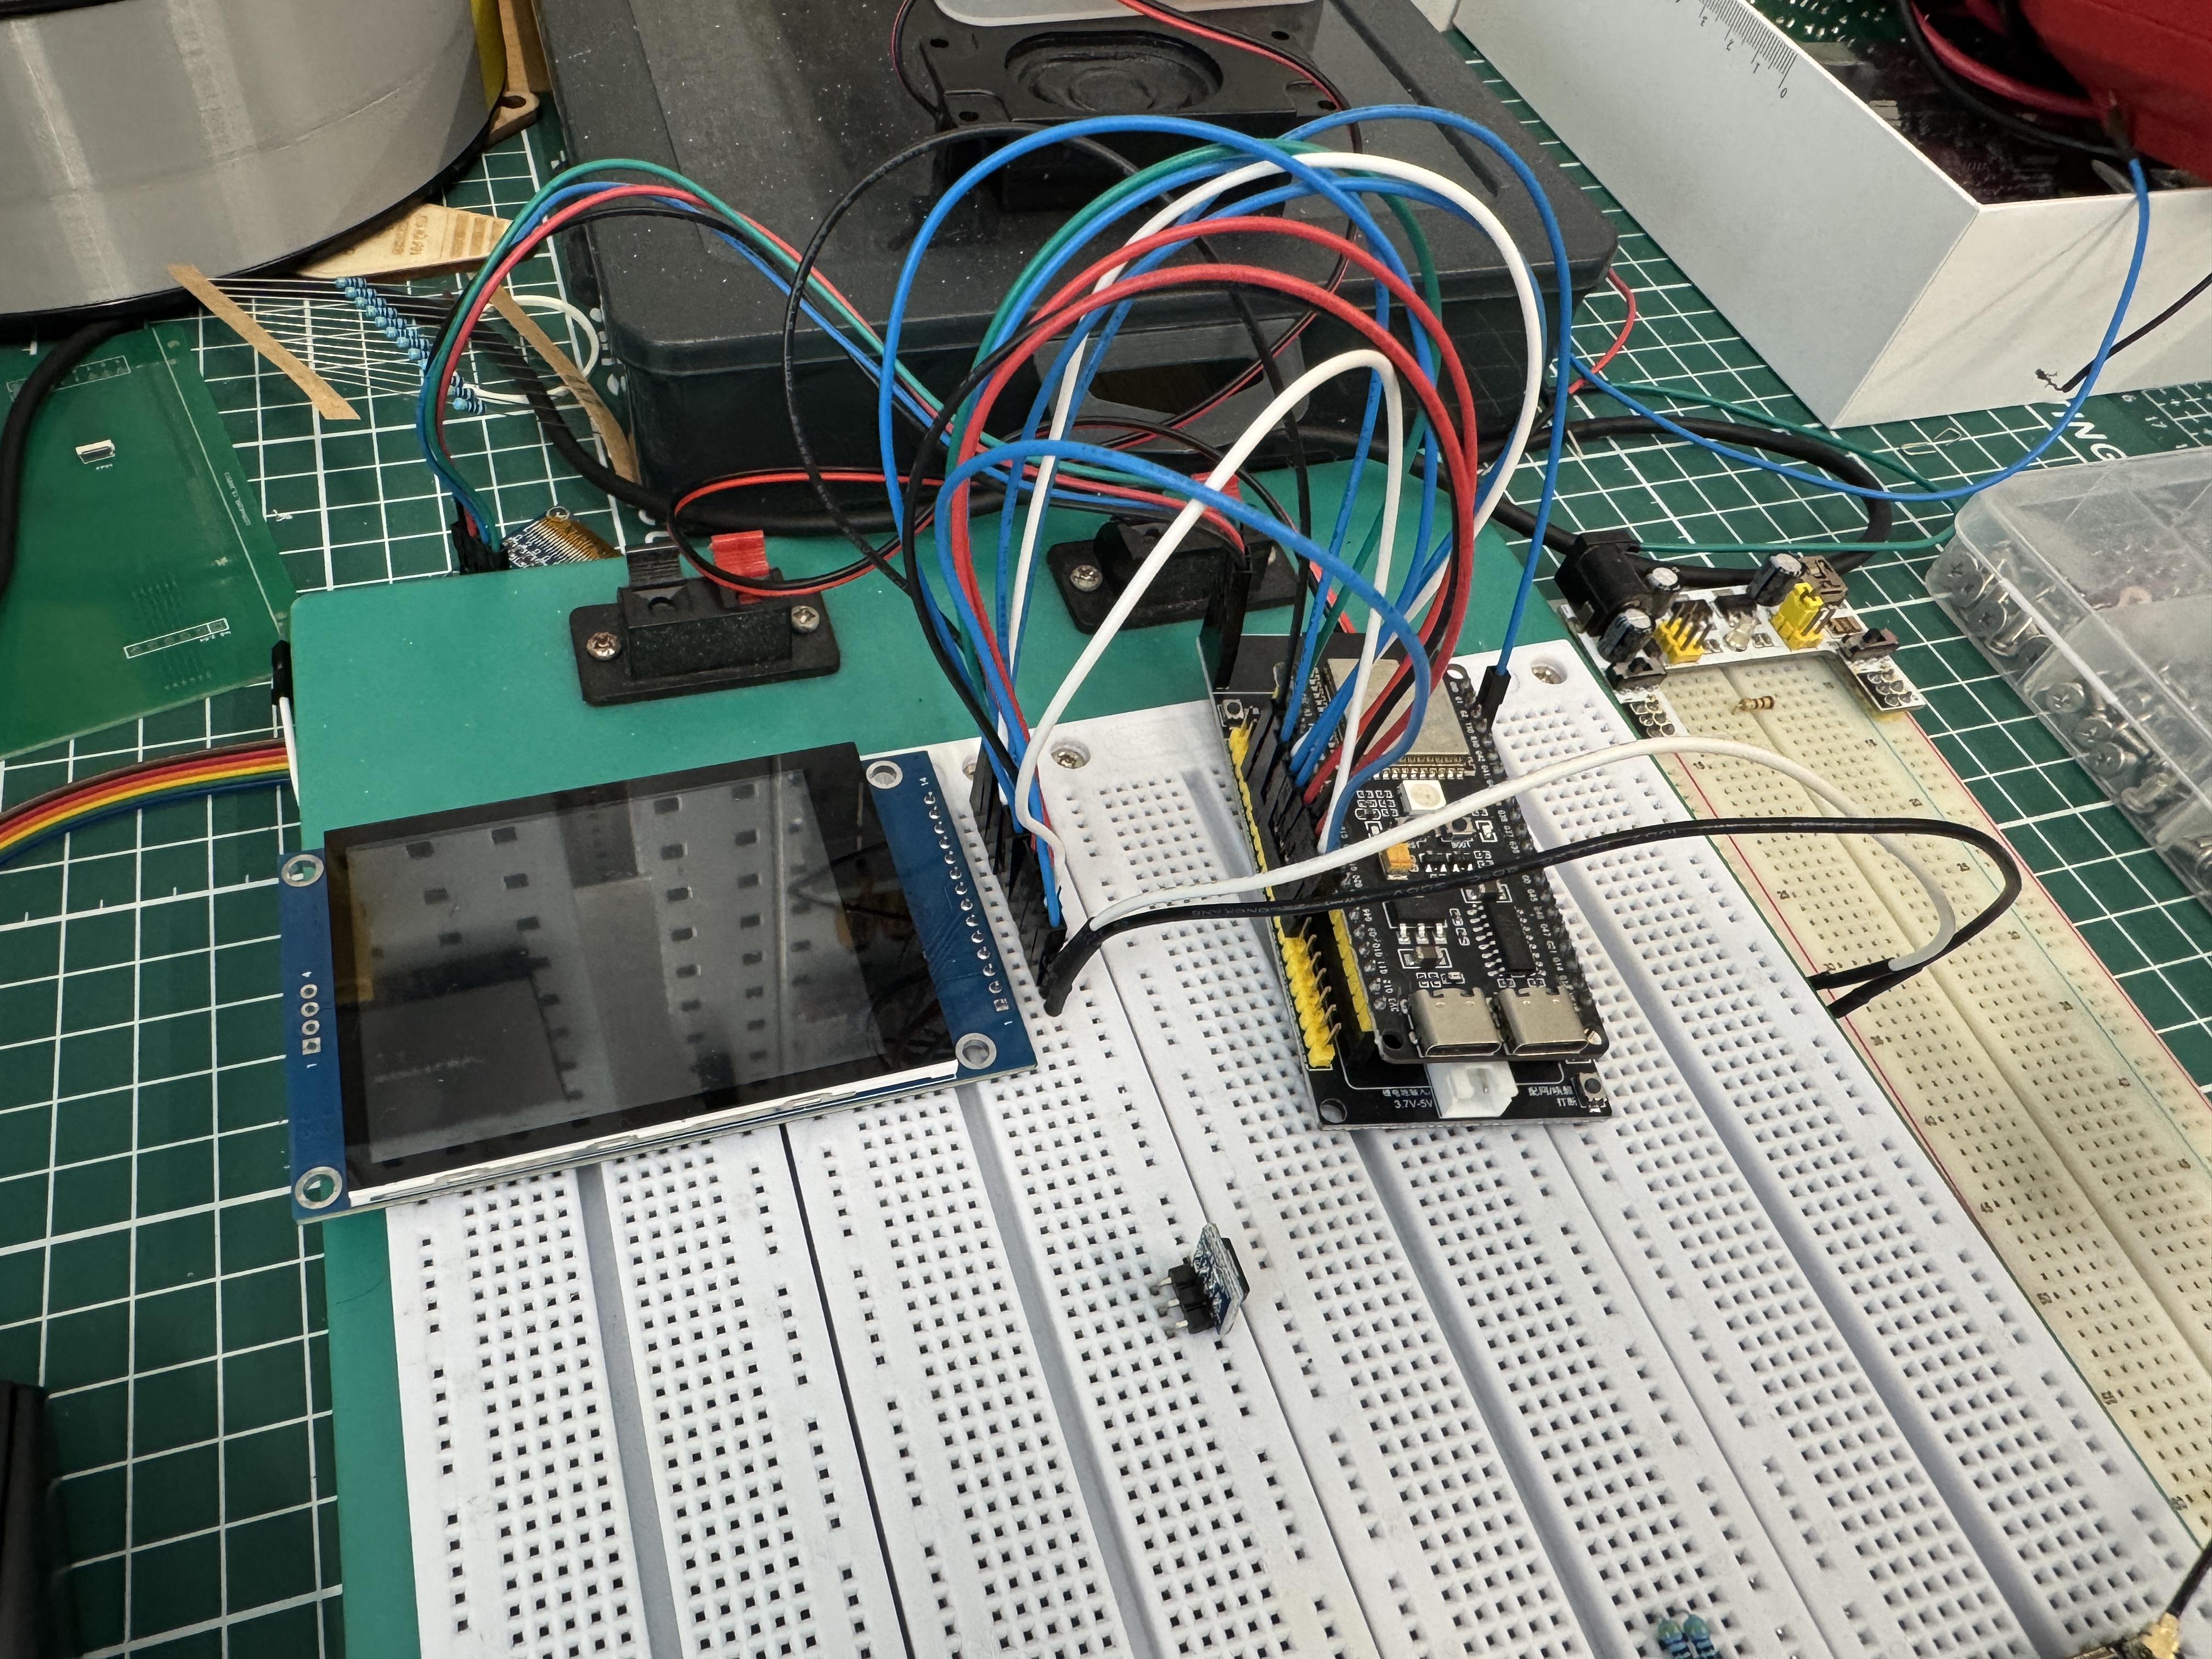
I still used temporary wiring during the Week 15 ILI9341/FT6336 bring-up because it made wrong reset pins and touch-bus assumptions easier to isolate. I do not use that as the main photo evidence here. The assessed wiring story is the board-side screen connection above, plus the application firmware that drives the display, reads touch, and exchanges data over I²C.
4) Plan
- Stabilize 3.3 V, GND, and SPI signals; confirm
begin()succeeds. - Run the vendor-style color-bar and fill tests to prove the glass is alive.
- Probe the touch controller on I²C, then map raw coordinates into display space.
-
Capture photos and a short clip for documentation; keep two
.cppentry points so display and touch stay easy to retest.
5) Operation and evidence
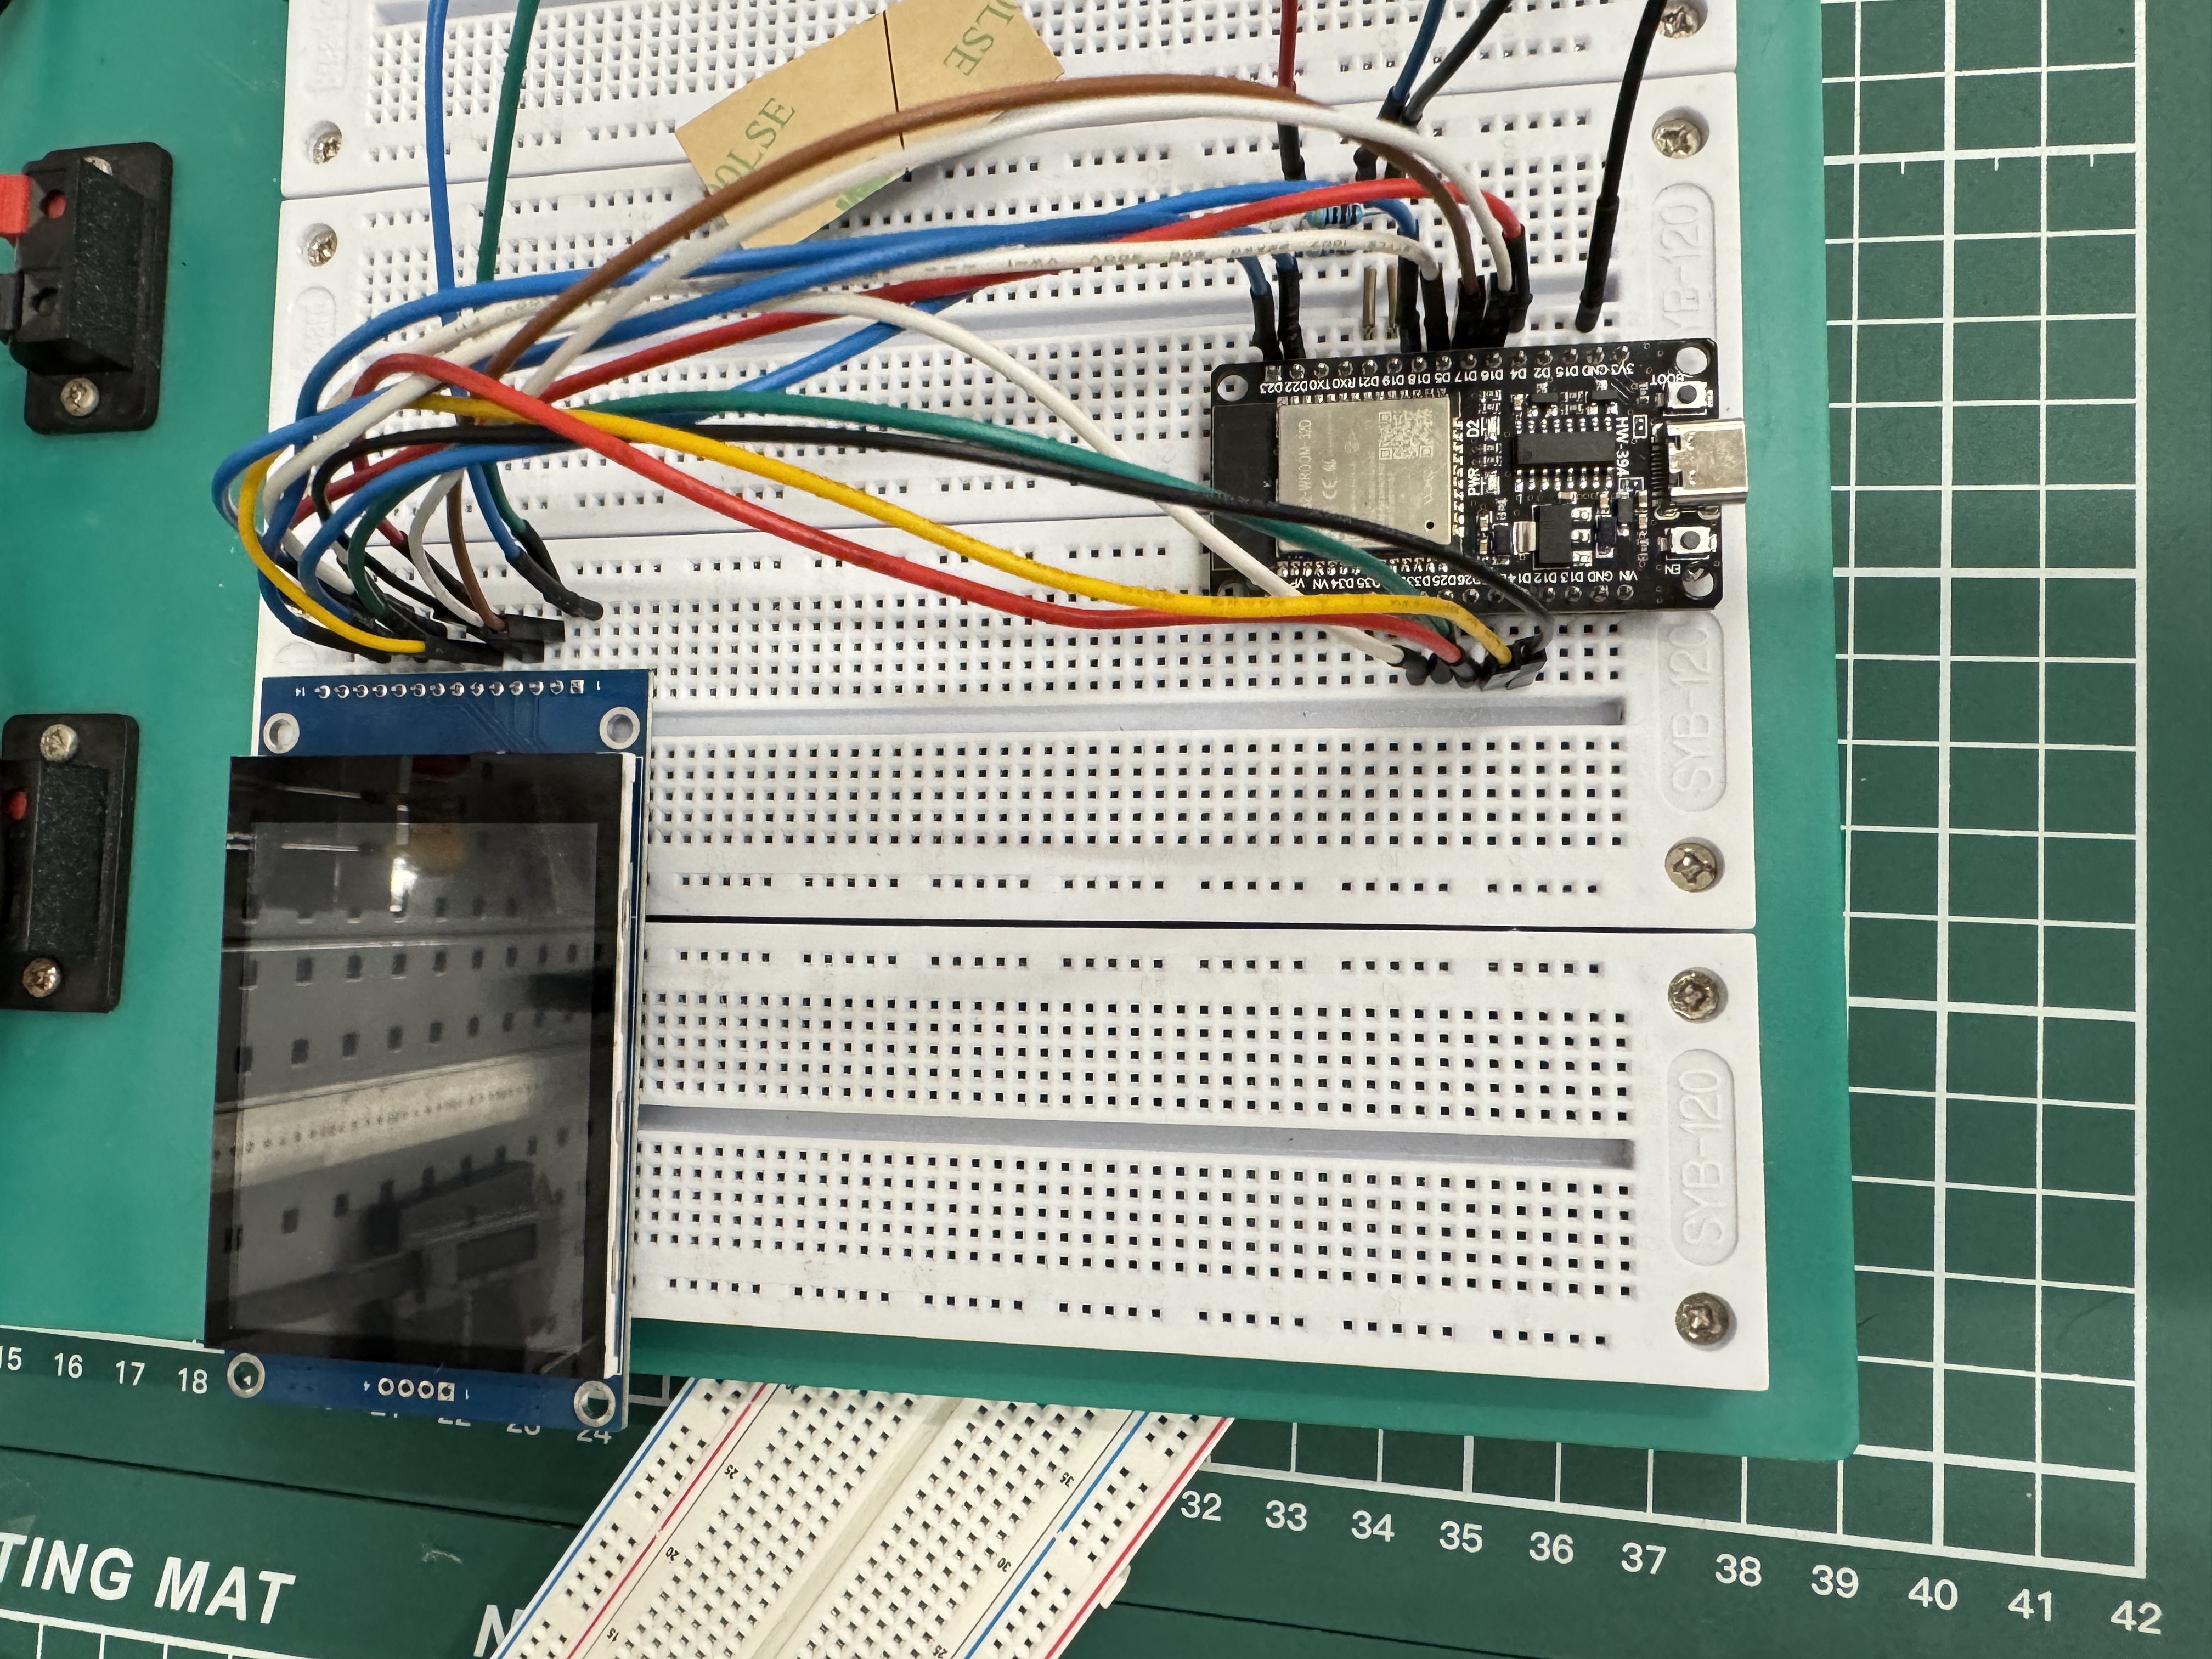
After I moved TFT reset off GPIO12, the display-only sketch ran the vendor colour bars and fill tests. The touch sketch then drew red trails and printed coordinates on Serial when a finger stayed down. Before the harness sat on my Week 10 PCB, I used a breadboard rig so I could swap reset pins and touch-bus wiring without reheating solder joints.
6) LCD UI mockups (sketch → HTML → on-device)
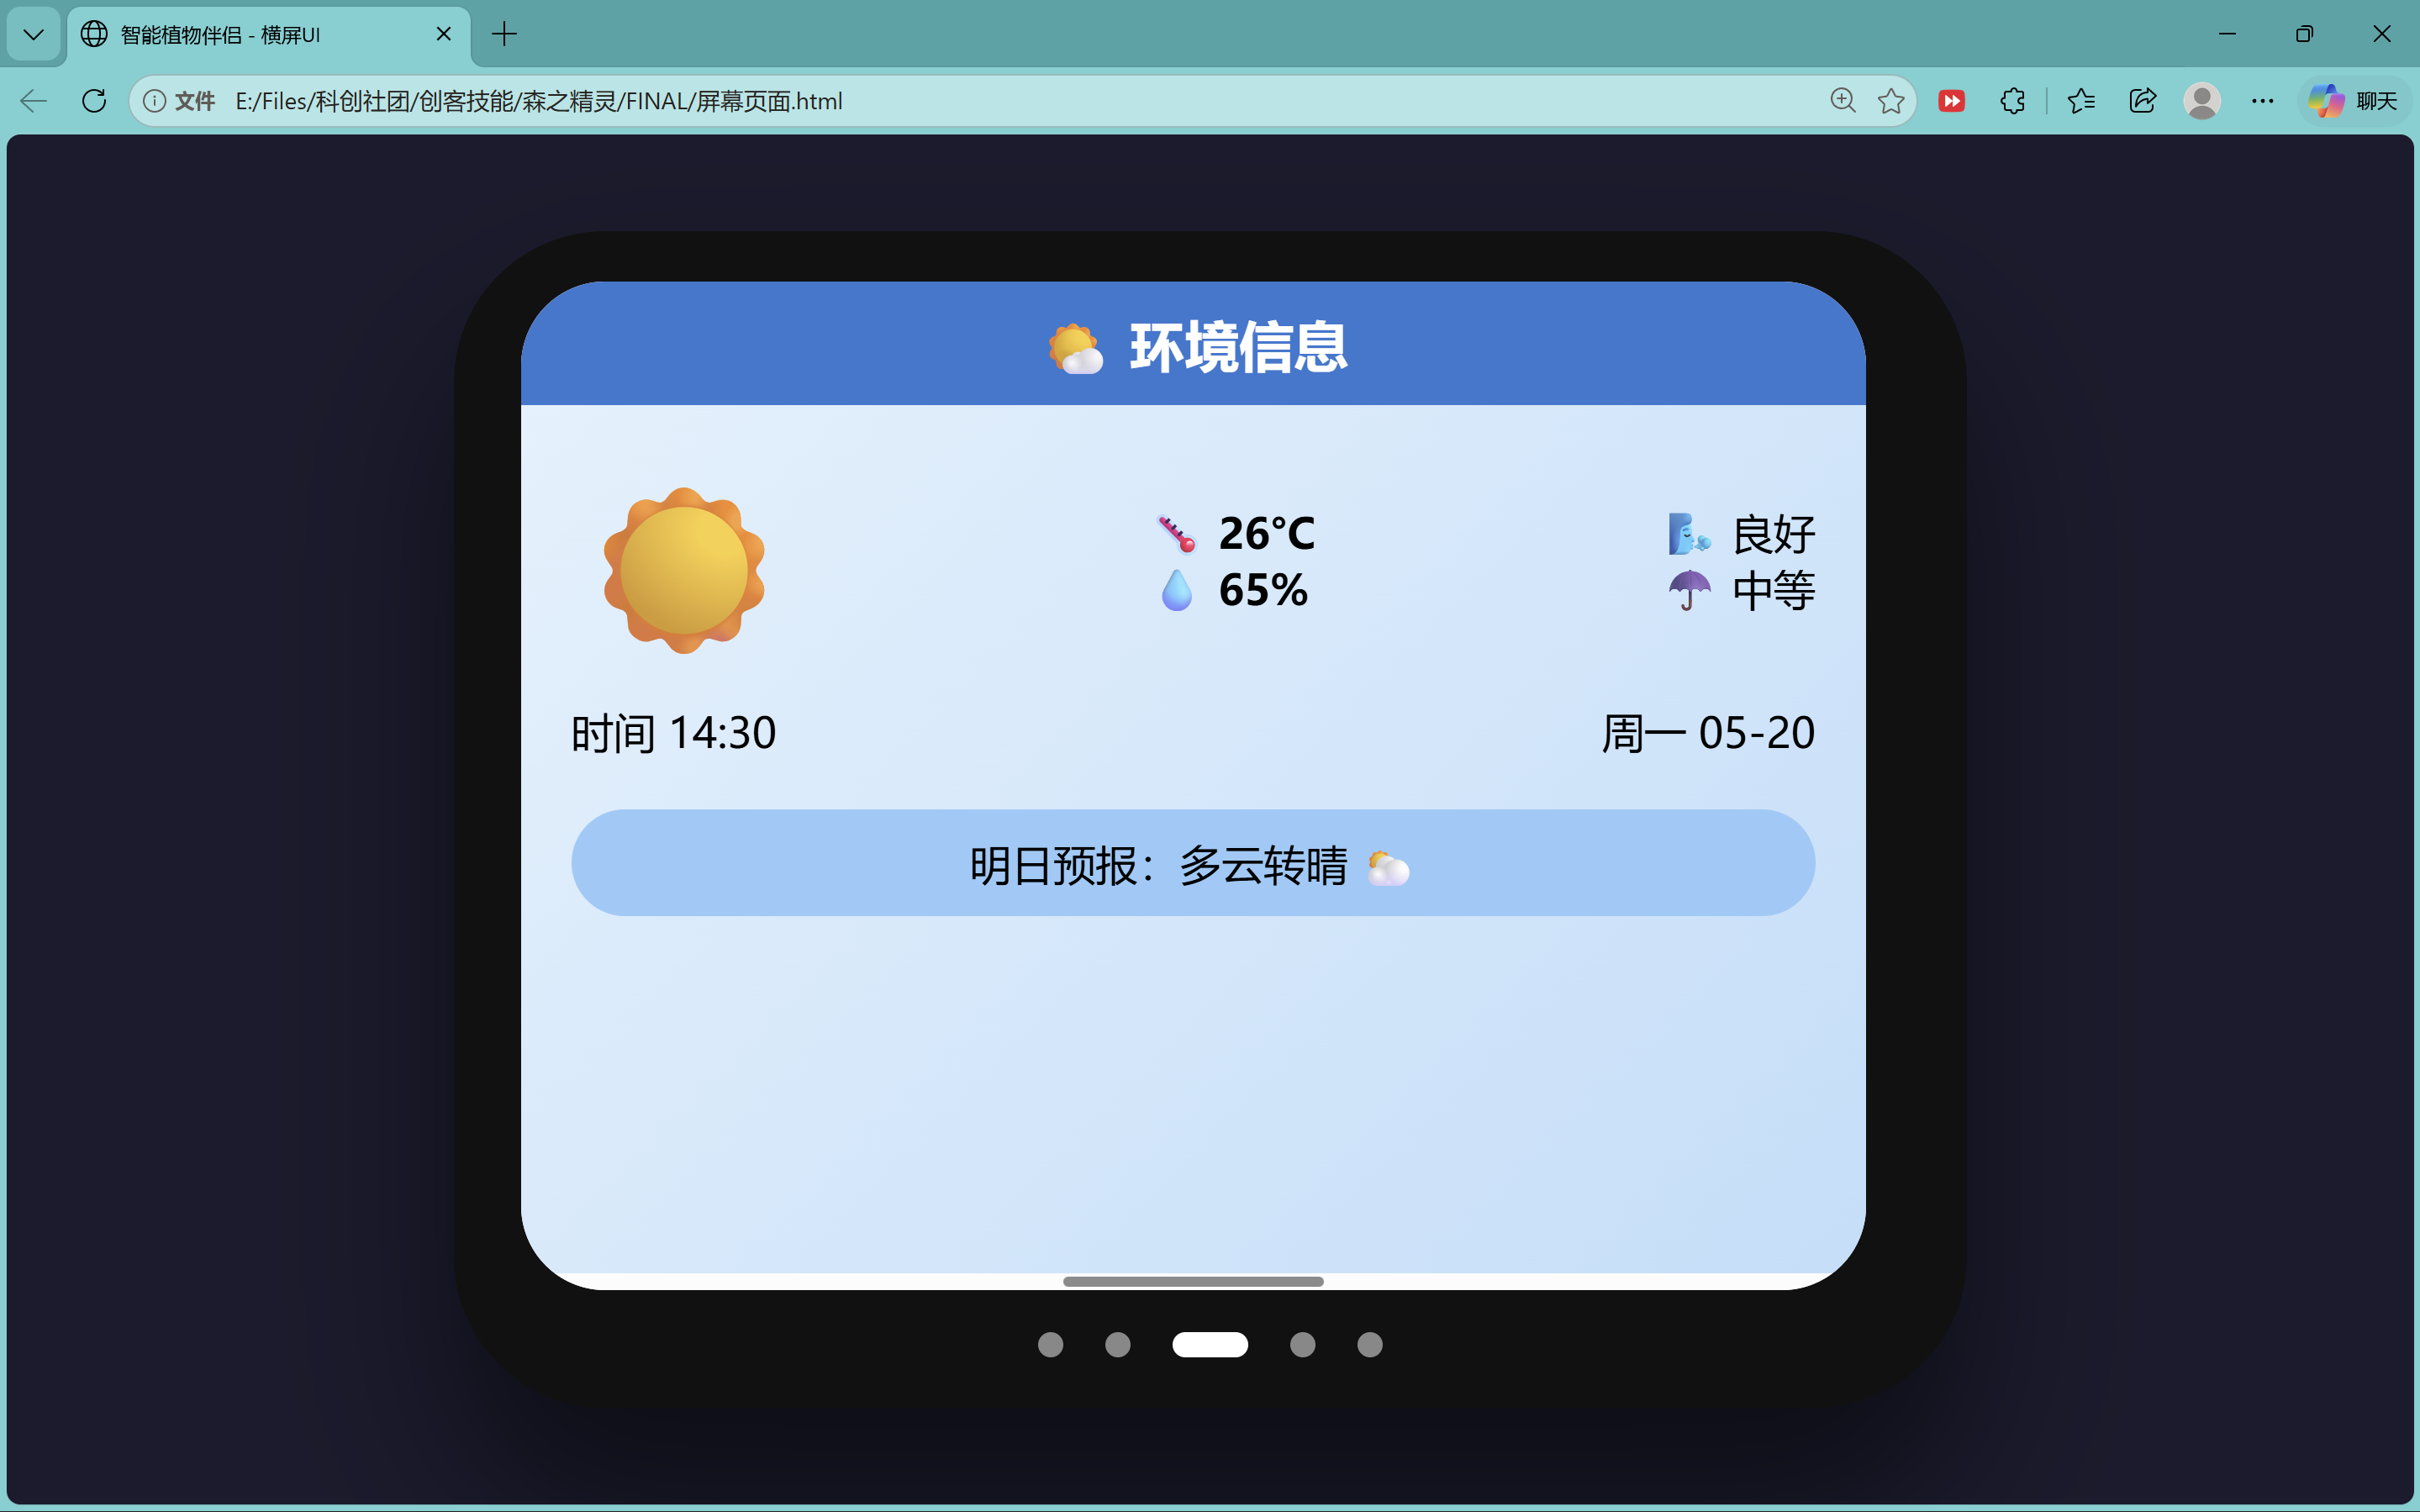
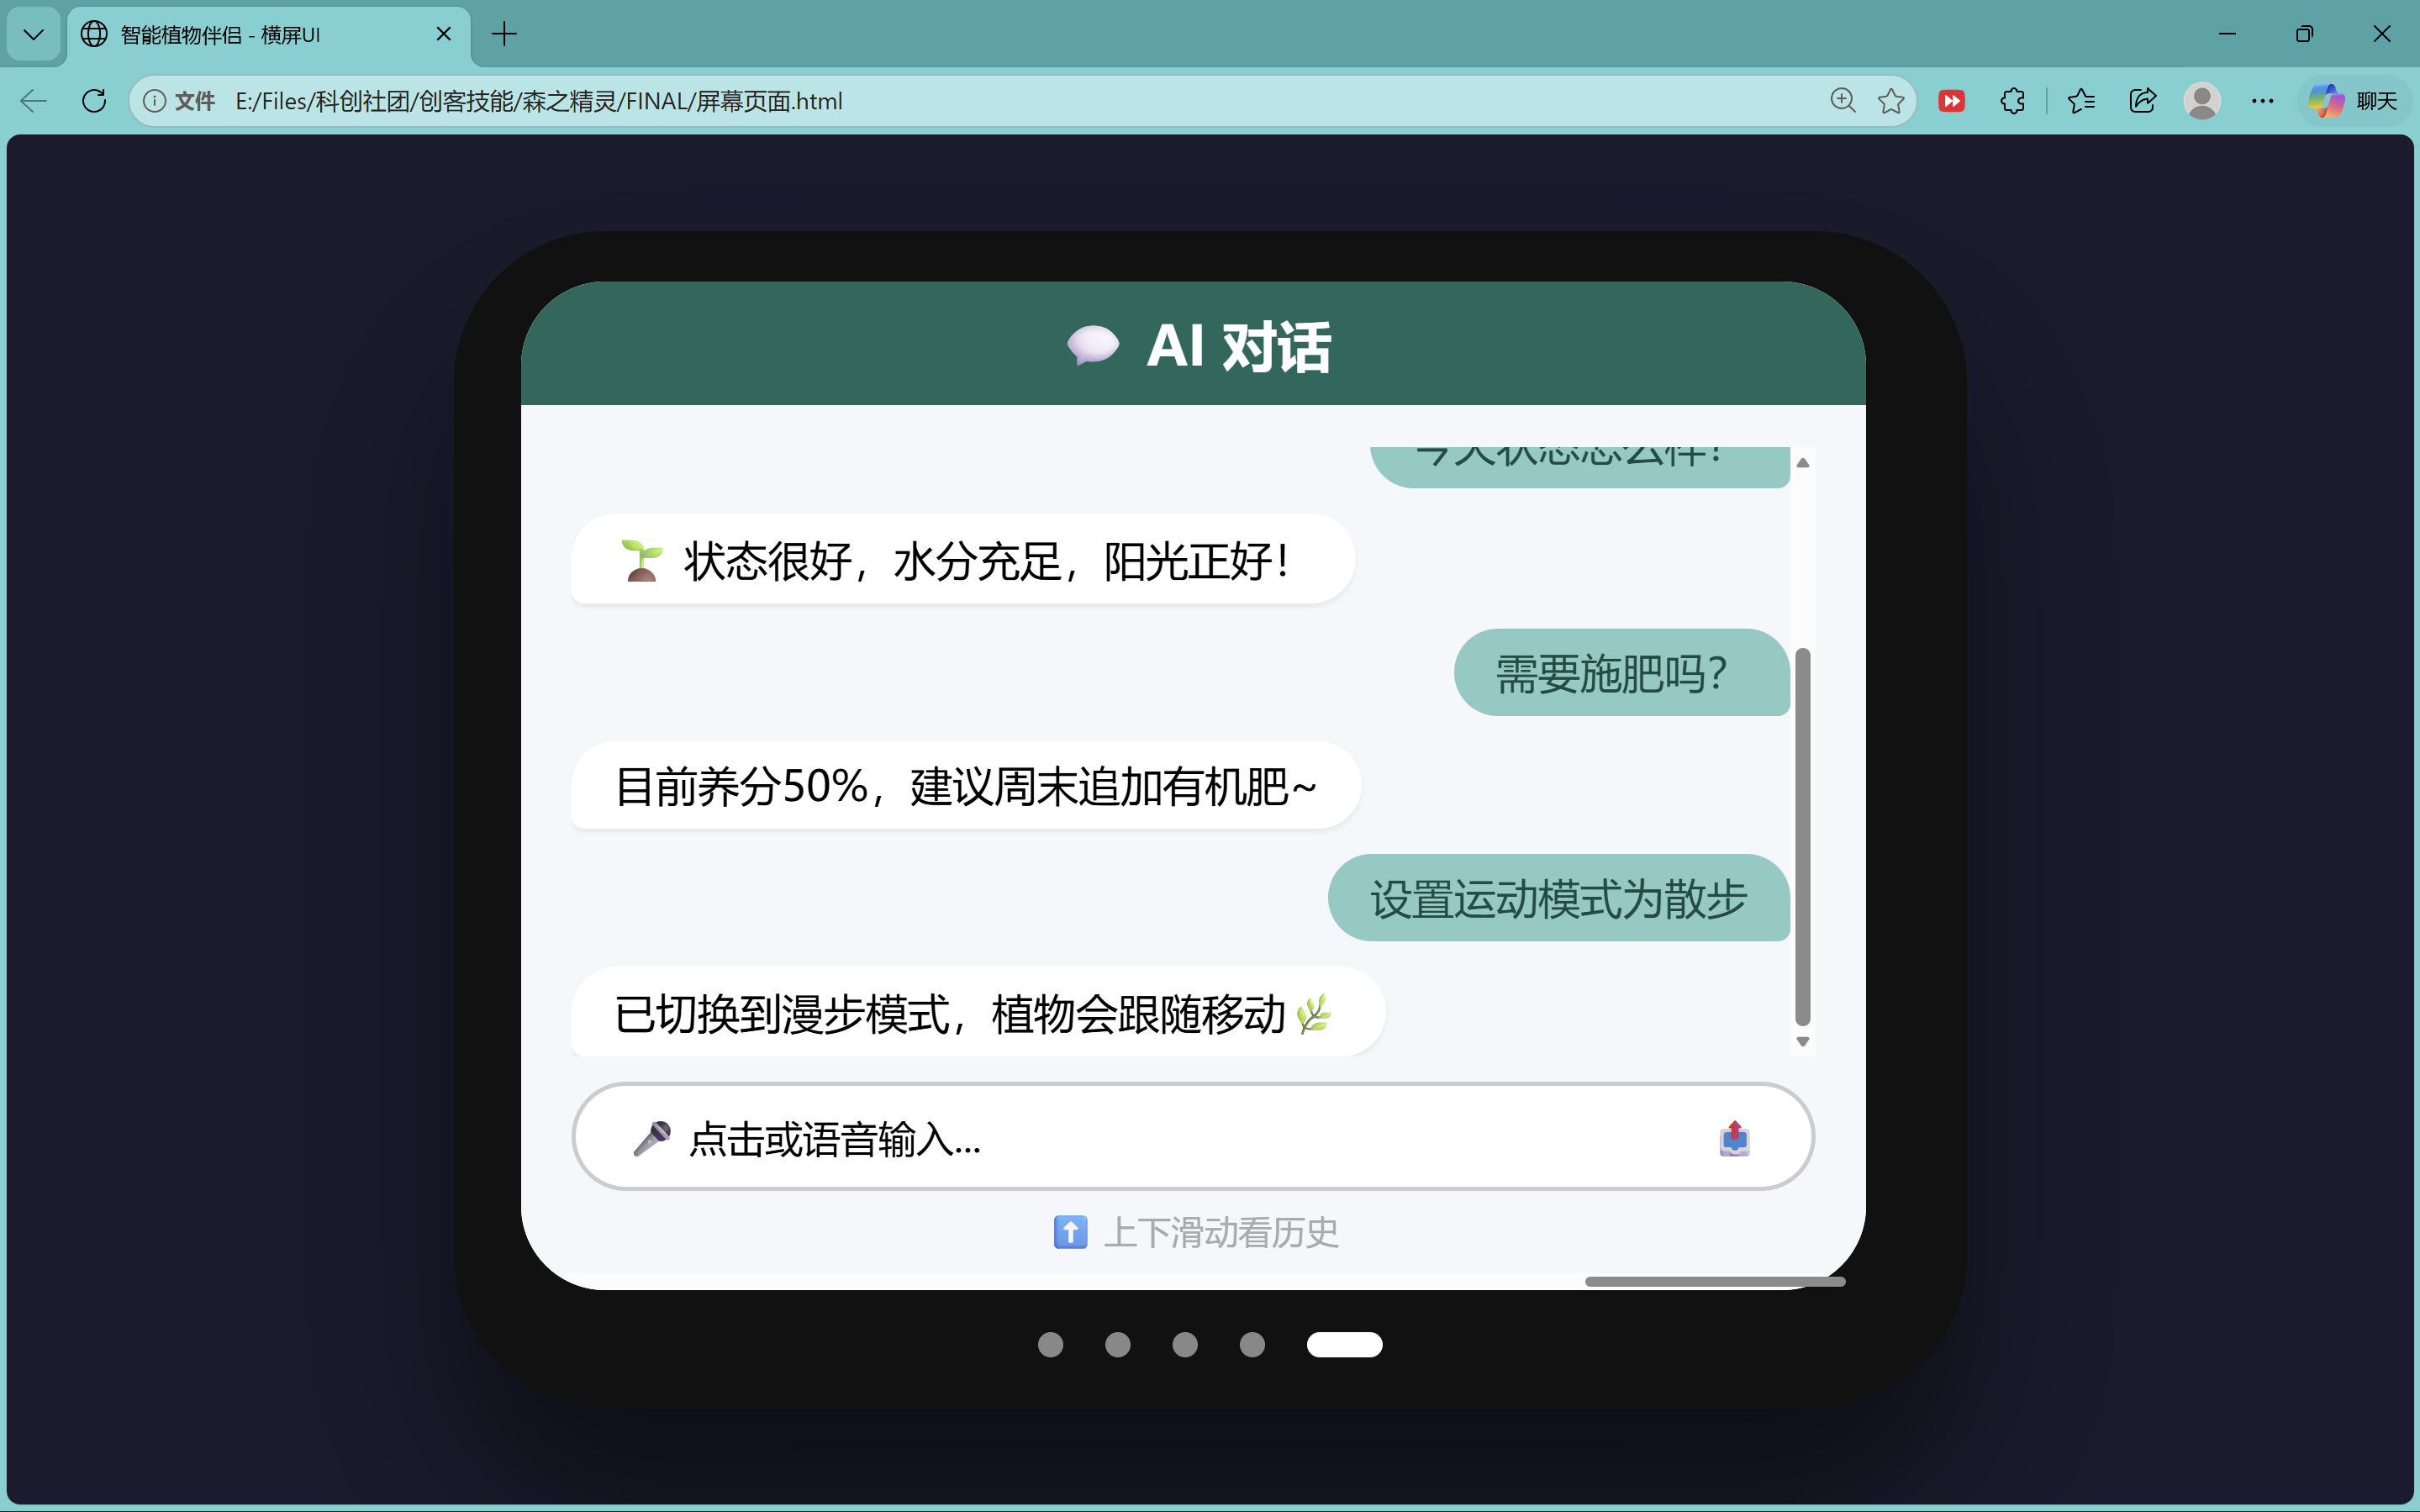
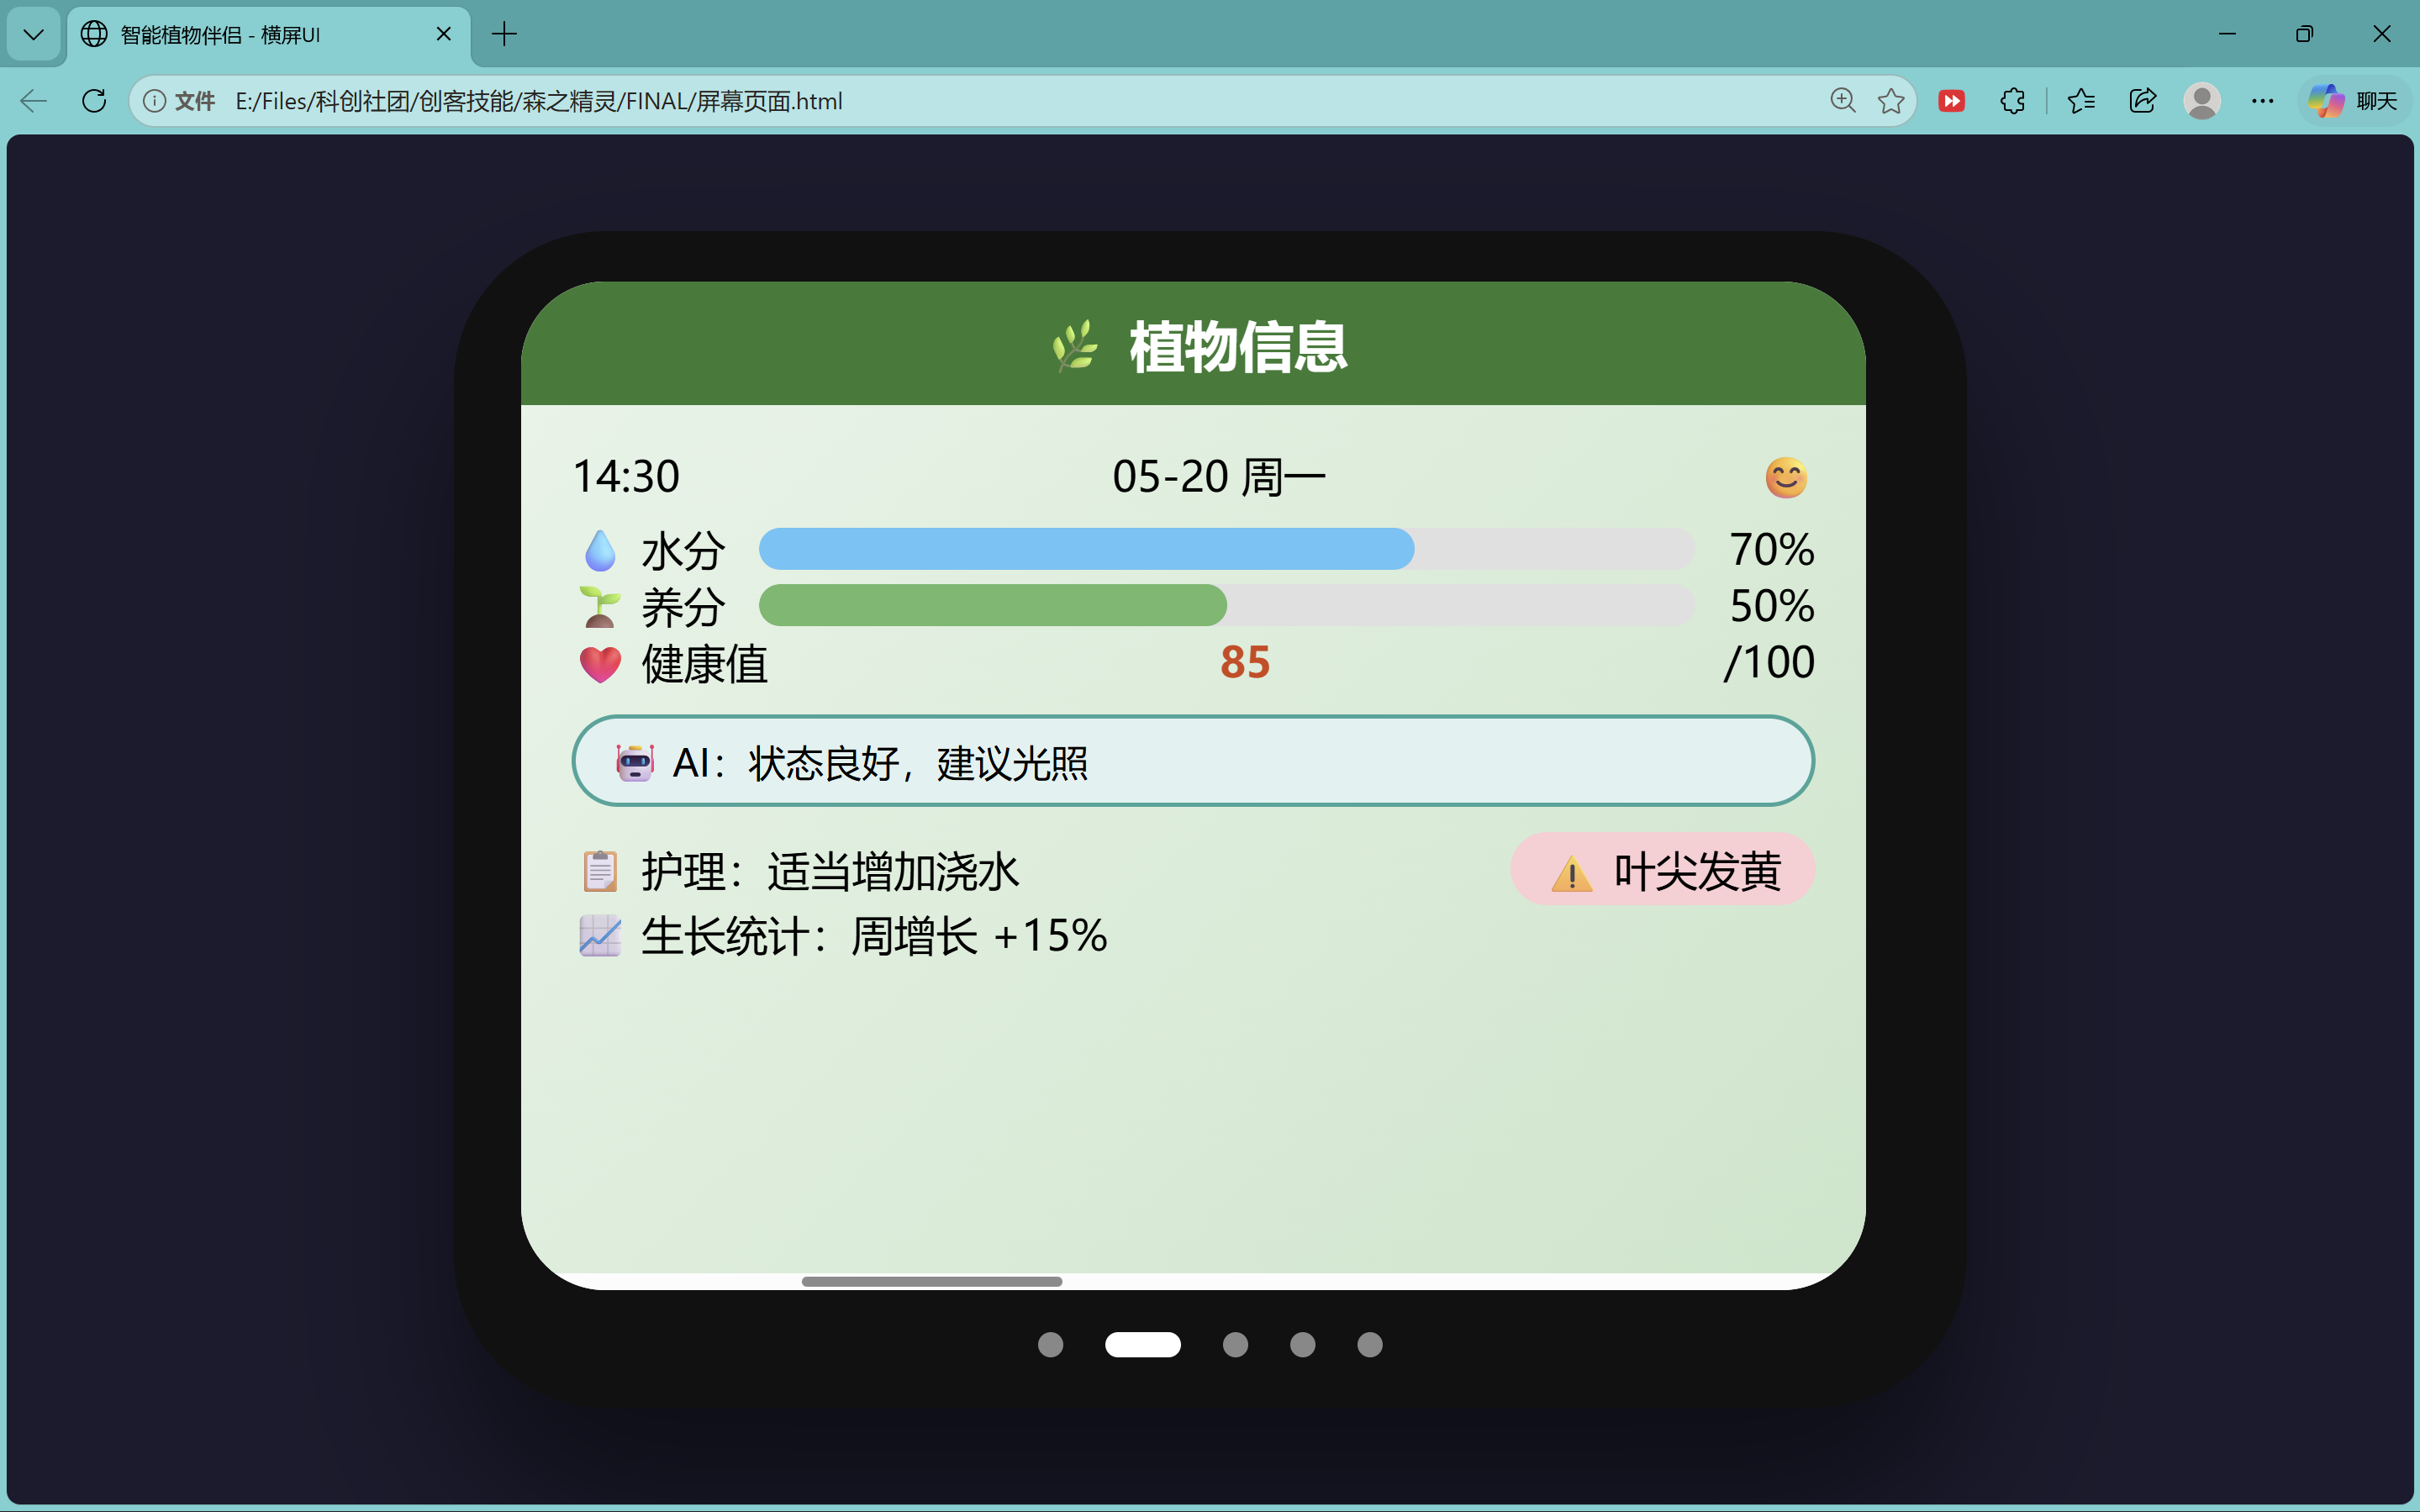
I wanted to see layout at the real 320×240 pixel size before writing C++. I drew a paper sketch, described each panel in short prompts, and had Cursor generate one HTML file with five horizontal swipe panels. The copy is in Chinese because that matches how I talk to the plant-companion character; this write-up stays in English.
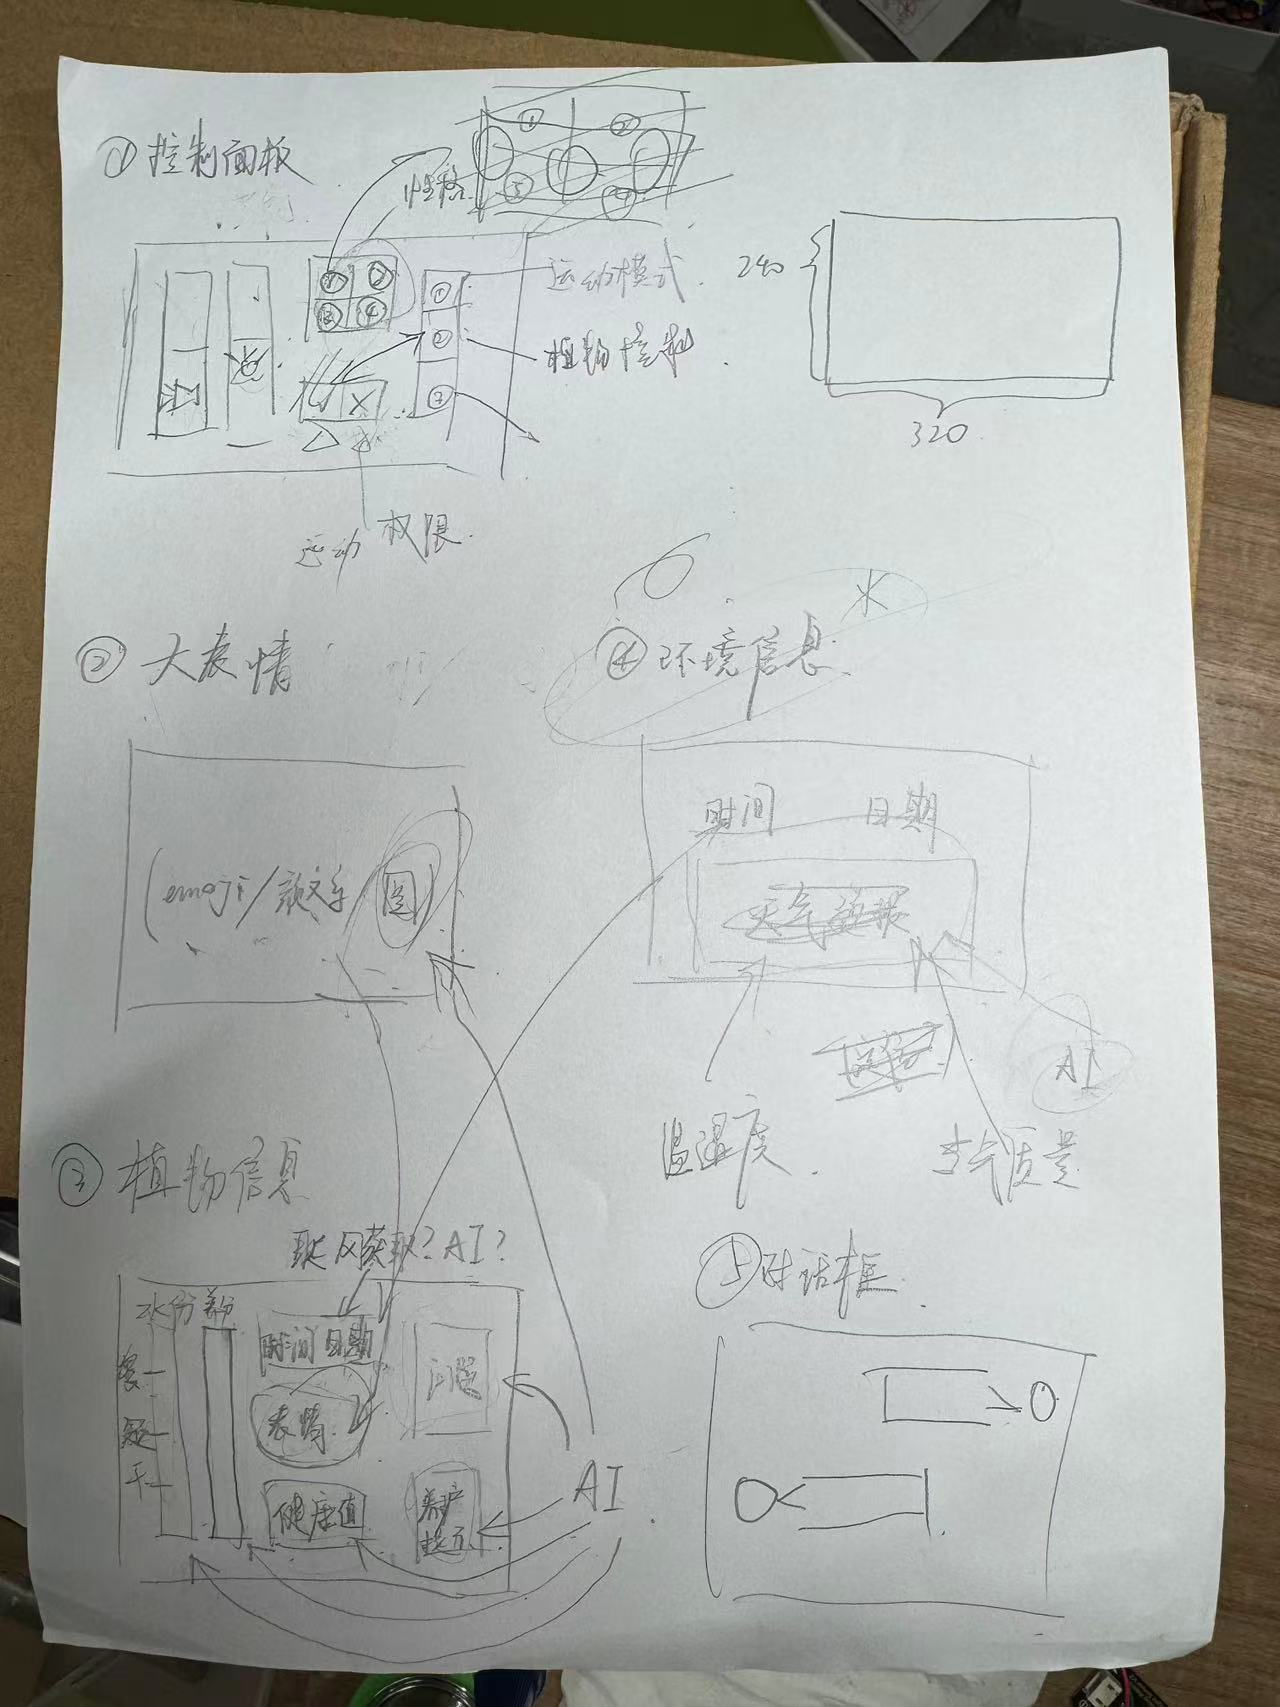
UI prototype file — 320×240 HTML, five horizontal swipe panels sized for the ILI9341 canvas.
If the browser previews instead of saving, use Download or Save As….
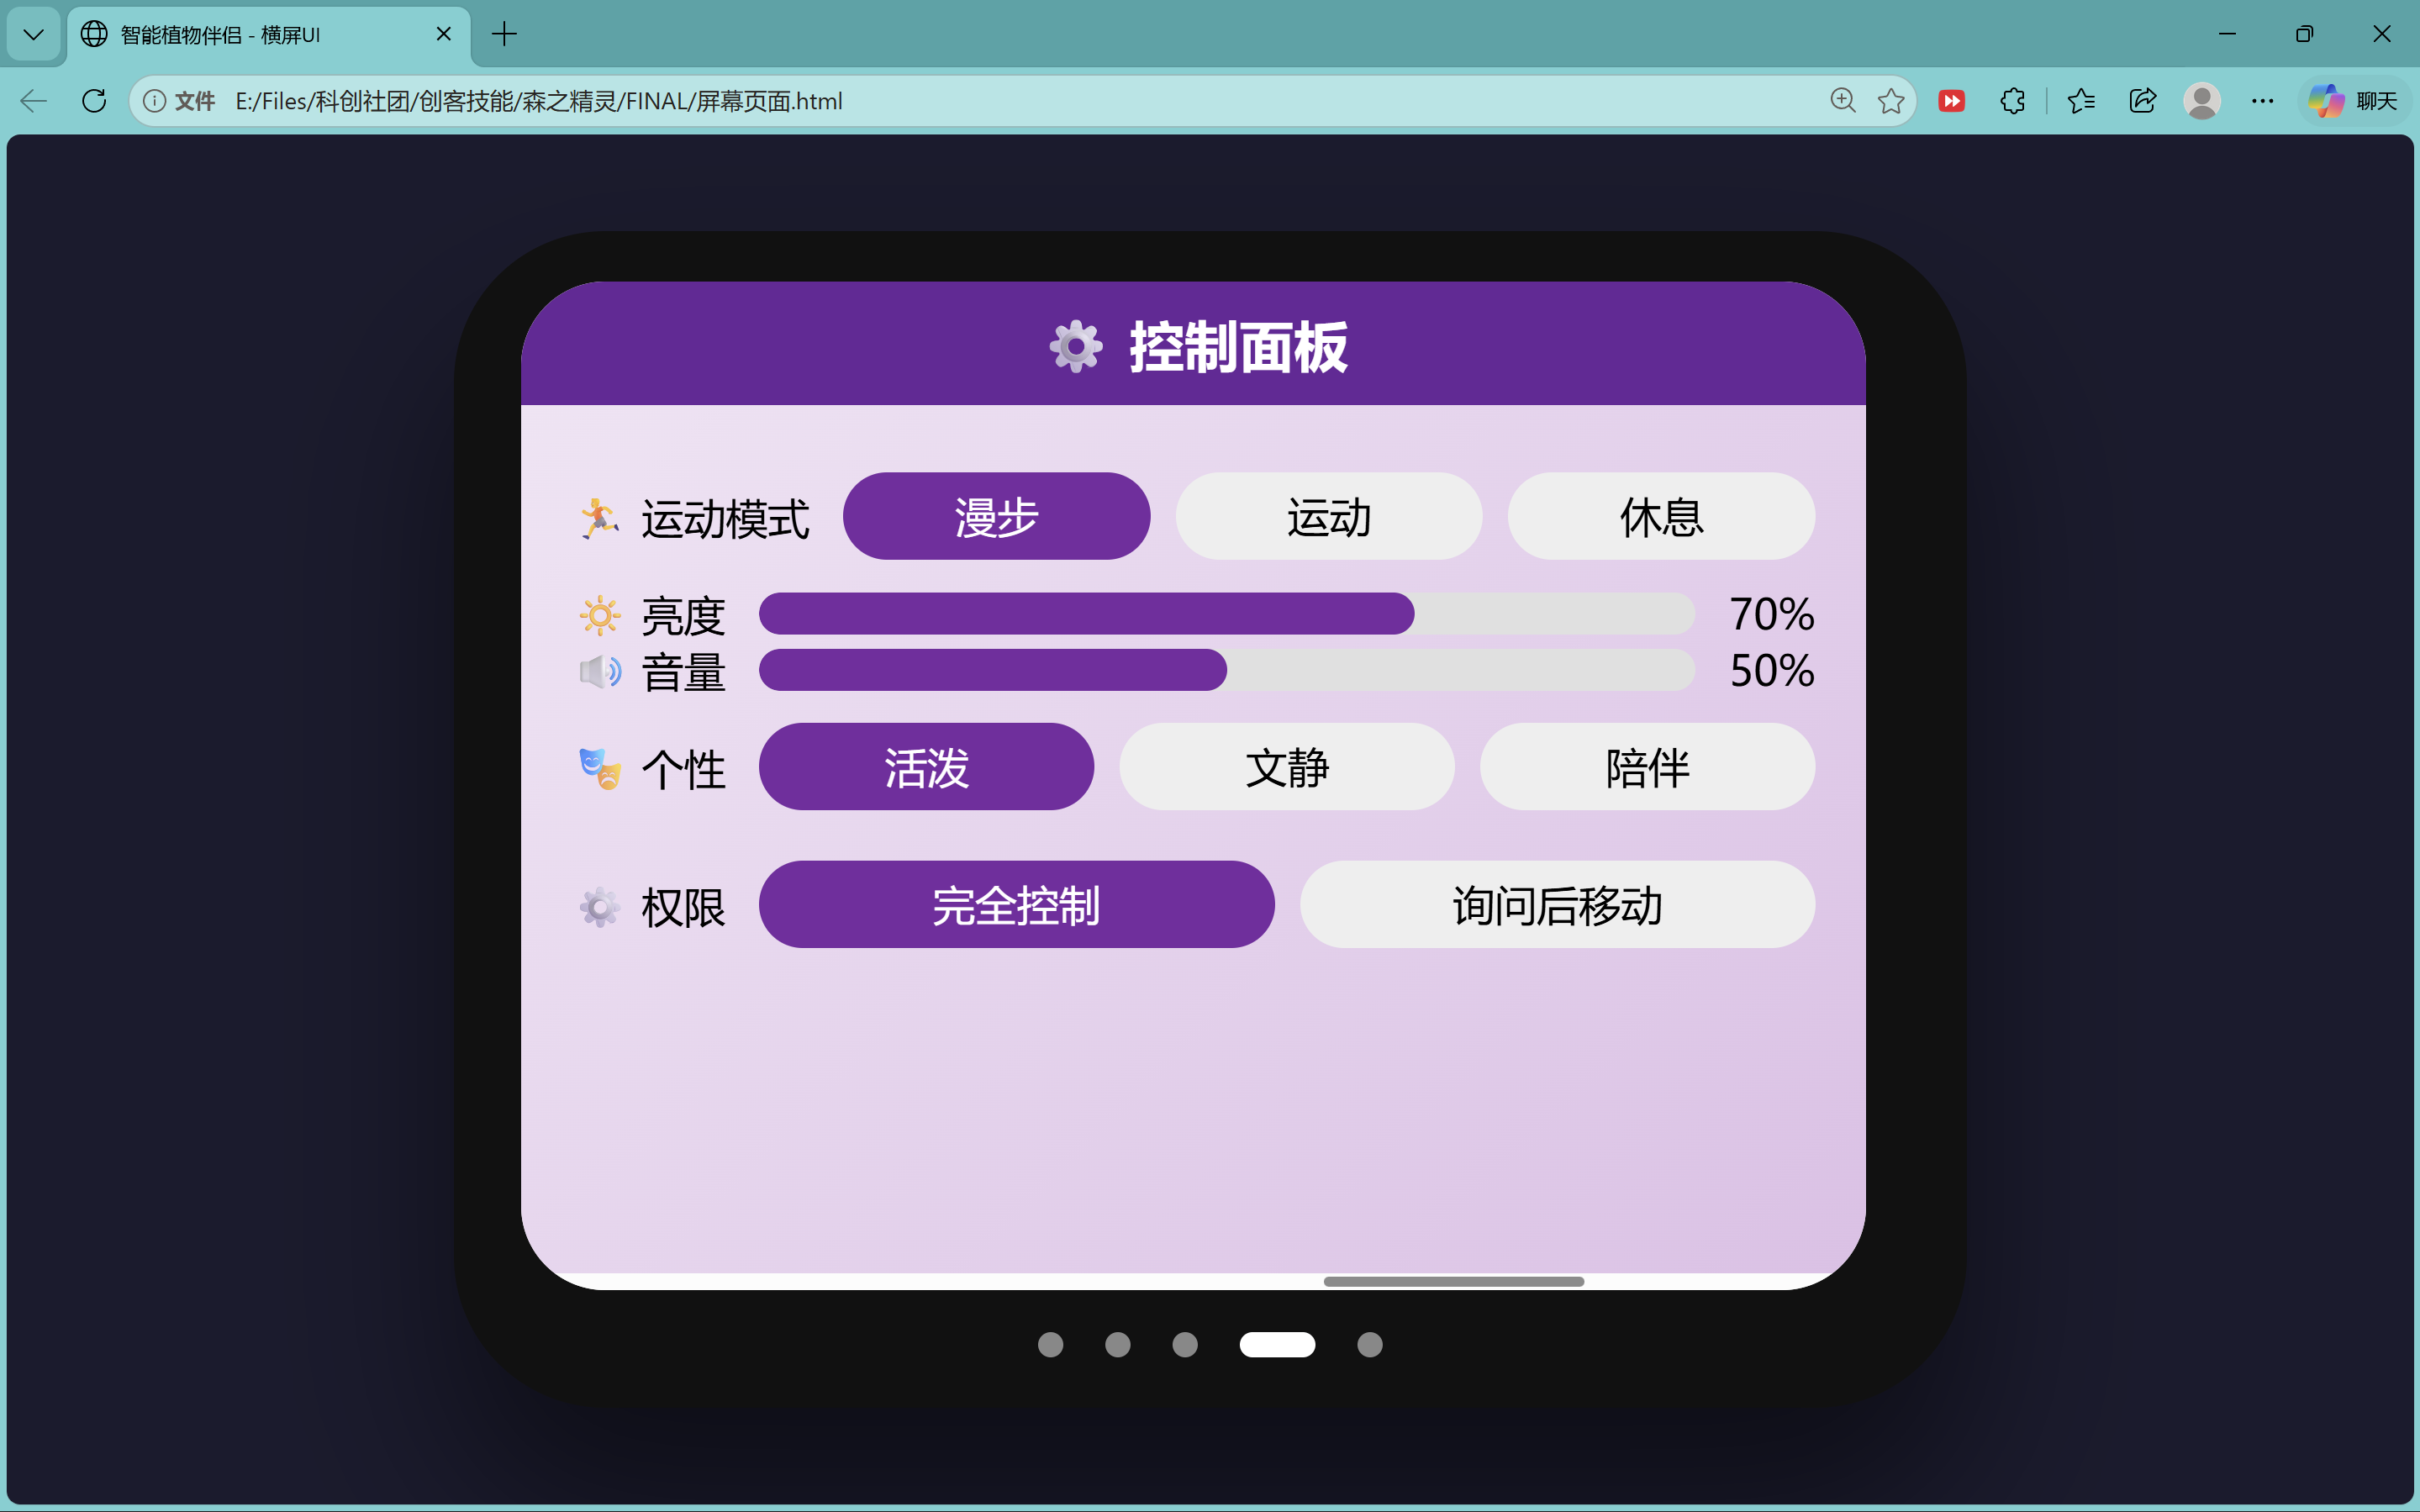
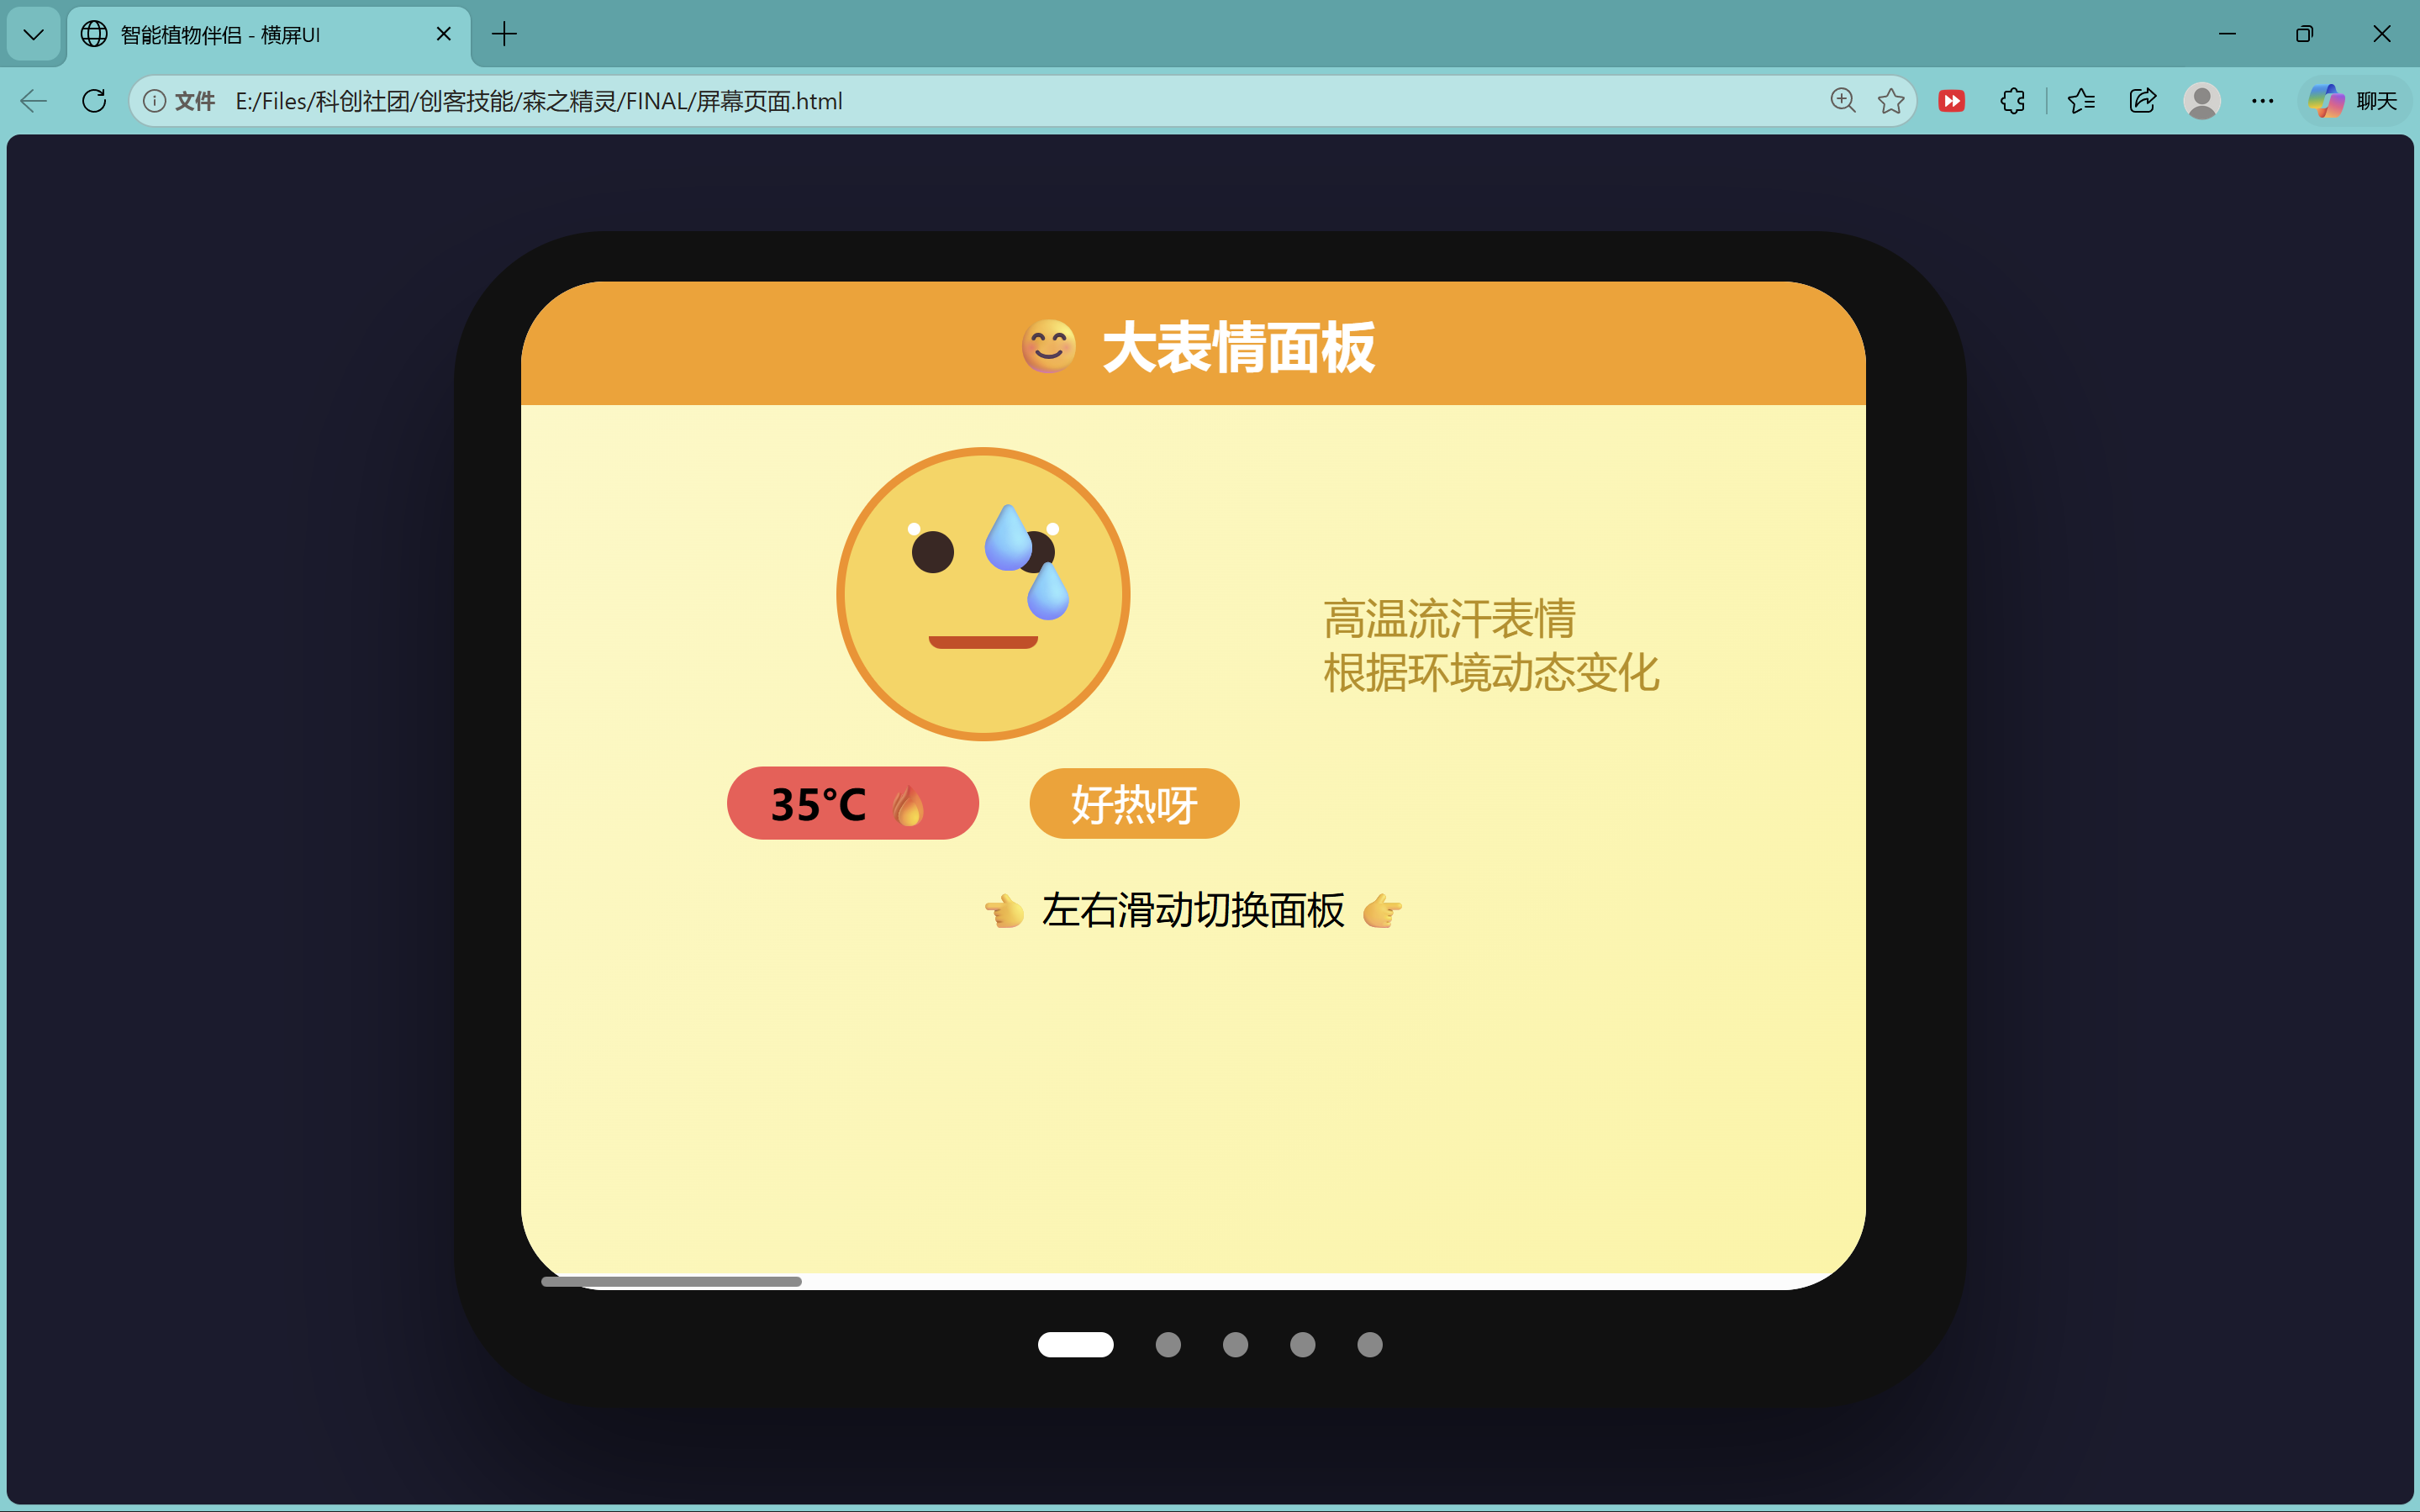
Five PNG exports (one per panel):
7) How the UI code works
I used Cursor to code the HTML swipe prototype, the split test sketches
(main_test_screen.cpp, main_test_touch.cpp), and the first passes of
wroom-display/src/main.cpp. I rewrote pin assignments, reset timing, and FT6336 touch handling after
each hardware test — the model once assumed resistive SPI touch and the wrong reset pin.
The UI runs on the WROOM display PCB from Week 10. Sensor data and chat text come from my Week 8 XIAO over the host-link I²C connection.
Steps I actually took
- Paper sketch → 320×240 HTML swipe file (§6,
screen-ui.html). - Checked Week 10 photos so firmware pin names matched the harness (§3).
- Display-only test in
main_test_screen.cpp, then touch inmain_test_touch.cpp. - Copied each HTML panel into a
drawPage…()function inwroom-display/src/main.cpp. - Let the XIAO push sensor readings, network state, and chat text over I²C.
flowchart LR
  subgraph design["Design"]
    SK["Paper sketch"]
    HTML["320×240 HTML prototype"]
  end
  subgraph wroom["ESP32-WROOM — display MCU"]
    UI["main.cpp drawPage*()"]
    TFT["ILI9341 via SPI"]
    CTP["FT6336 via I2C Wire"]
    SLV["env_i2c_slave @ 0x55 Wire1"]
  end
  subgraph hub["XIAO ESP32-S3 — designed Week 8 hub"]
    SENS["DHT11 + light"]
    WIFI["WiFi → DeepSeek"]
    MST["I2C master D4/D5"]
  end
  SK --> HTML --> UI
  UI --> TFT
  CTP --> UI
  MST --> SLV
  SENS --> MST
  WIFI --> MST
Drawing the five pages
There is no GUI framework on the MCU. Each frame I call Adafruit GFX shapes and text on top of
Adafruit_ILI9341. Five functions match the HTML panels:
- Page 0 — emoji face from DHT temperature (data from the XIAO over I²C).
- Page 1 — plant status row + clock line.
- Page 2 — humidity, temperature, light bars.
- Page 3 — brightness/volume sliders and three toggle buttons.
- Page 4 — chat bubbles when voice dialogue runs.
Variable s_page picks which drawer runs. Horizontal swipes change pages after the finger lifts;
on the control page I handle slider drags first so they do not accidentally flip pages. Colours and order follow
screen-ui.html.
How numbers and text get updated
Touch state (page index, slider values, toggle flags) lives in main.cpp. Incoming I²C bytes are
queued in env_i2c_slave.cpp on a second I²C port (Wire1) so they do not fight the
touch chip on Wire. Fixed 8-byte blocks carry humidity and temperature; longer packets carry chat
lines, WiFi status, and clock strings (format in
i2c_env_link.h).
When I tap control buttons, syncHostUiStatus() sends a short status block back so the XIAO can
adjust dialogue tone. The main loop only redraws a page when its data version counter changes, so the screen
does not flicker on every bus byte.
SPI to the TFT, I²C to touch and other boards
The ILI9341 gets pixels over 4-wire SPI at 40 MHz (TFT_SPI_HZ in board_pins.h).
I kept the vendor gamma table and rotation mapping because this IPS panel looked wrong without them. Backlight is
PWM on GPIO25; the control-page slider calls backlightSetPct() live.
Touch uses Wire at 400 kHz to FT6336 address 0x38. Host-link I²C uses Wire1 on
GPIO19/21 (see board_pins.h) so touch polling and sensor traffic stay on separate drivers.
Bus summary
| What | Wires | Direction | Files |
|---|---|---|---|
| TFT | SPI + D/C + CS + RST | WROOM → screen pixels | main.cpp, board_pins.h |
| Touch | I²C on Wire |
FT6336 → swipe/tap | ft6336_touch.h |
| Sensor + chat data | I²C slave 0x55 on Wire1 |
XIAO → WROOM | env_i2c_slave.cpp, i2c_env_link.h |
| Control toggles | I²C read by XIAO | WROOM → XIAO | syncHostUiStatus() in main.cpp |
| Debug | UART 115200 | Each board → PC | Serial monitor |
XIAO firmware: s3-hub/.
Libraries and tools I used
| Tool / library | Why |
|---|---|
PlatformIO + Arduino on espressif32 | Build and upload WROOM and XIAO firmware |
| Adafruit GFX + ILI9341 | Draw the five TFT pages |
ESP32 Wire / Wire1 | Touch on one port, sensor link on the other |
| VS Code / Cursor | Edit repo; Cursor only for the first HTML draft |
| HTML mock-up files | Layout reference before embedding |
On-board photos (hero evidence)
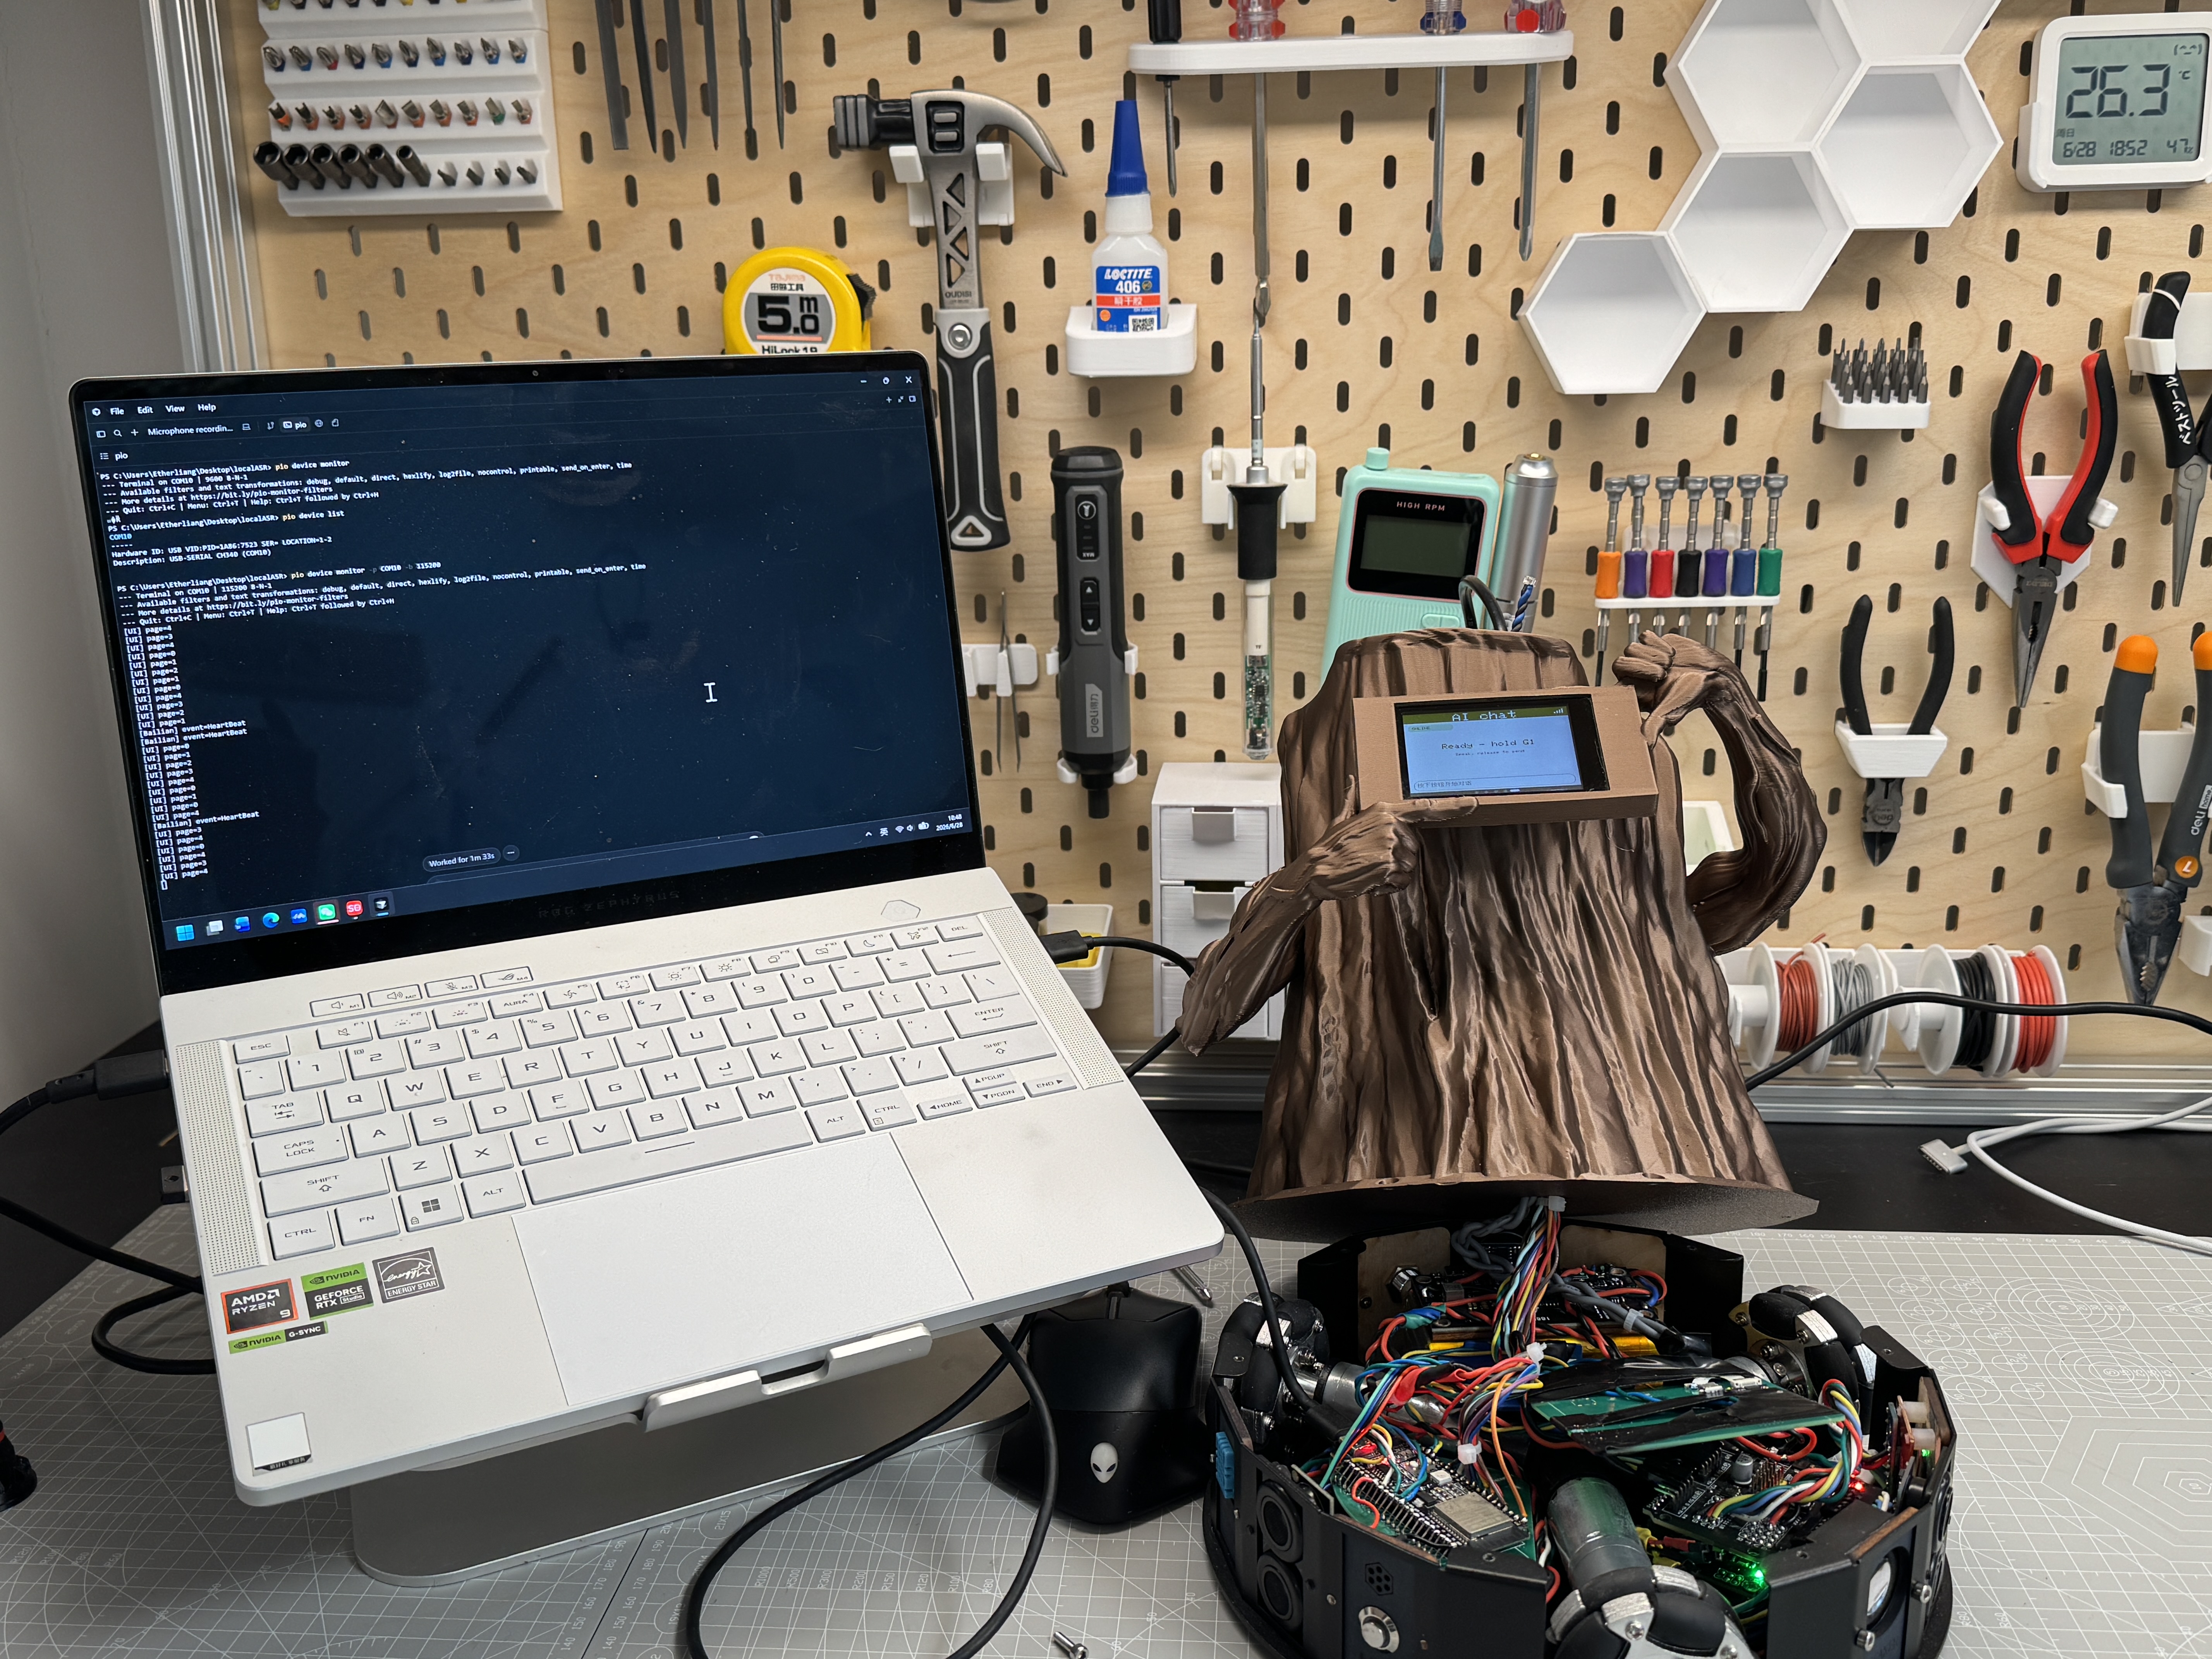
All shots below are from the real TFT, not a desktop simulator. The harness-to-PCB story is in §3; these bench photos make the five pages easier to read.
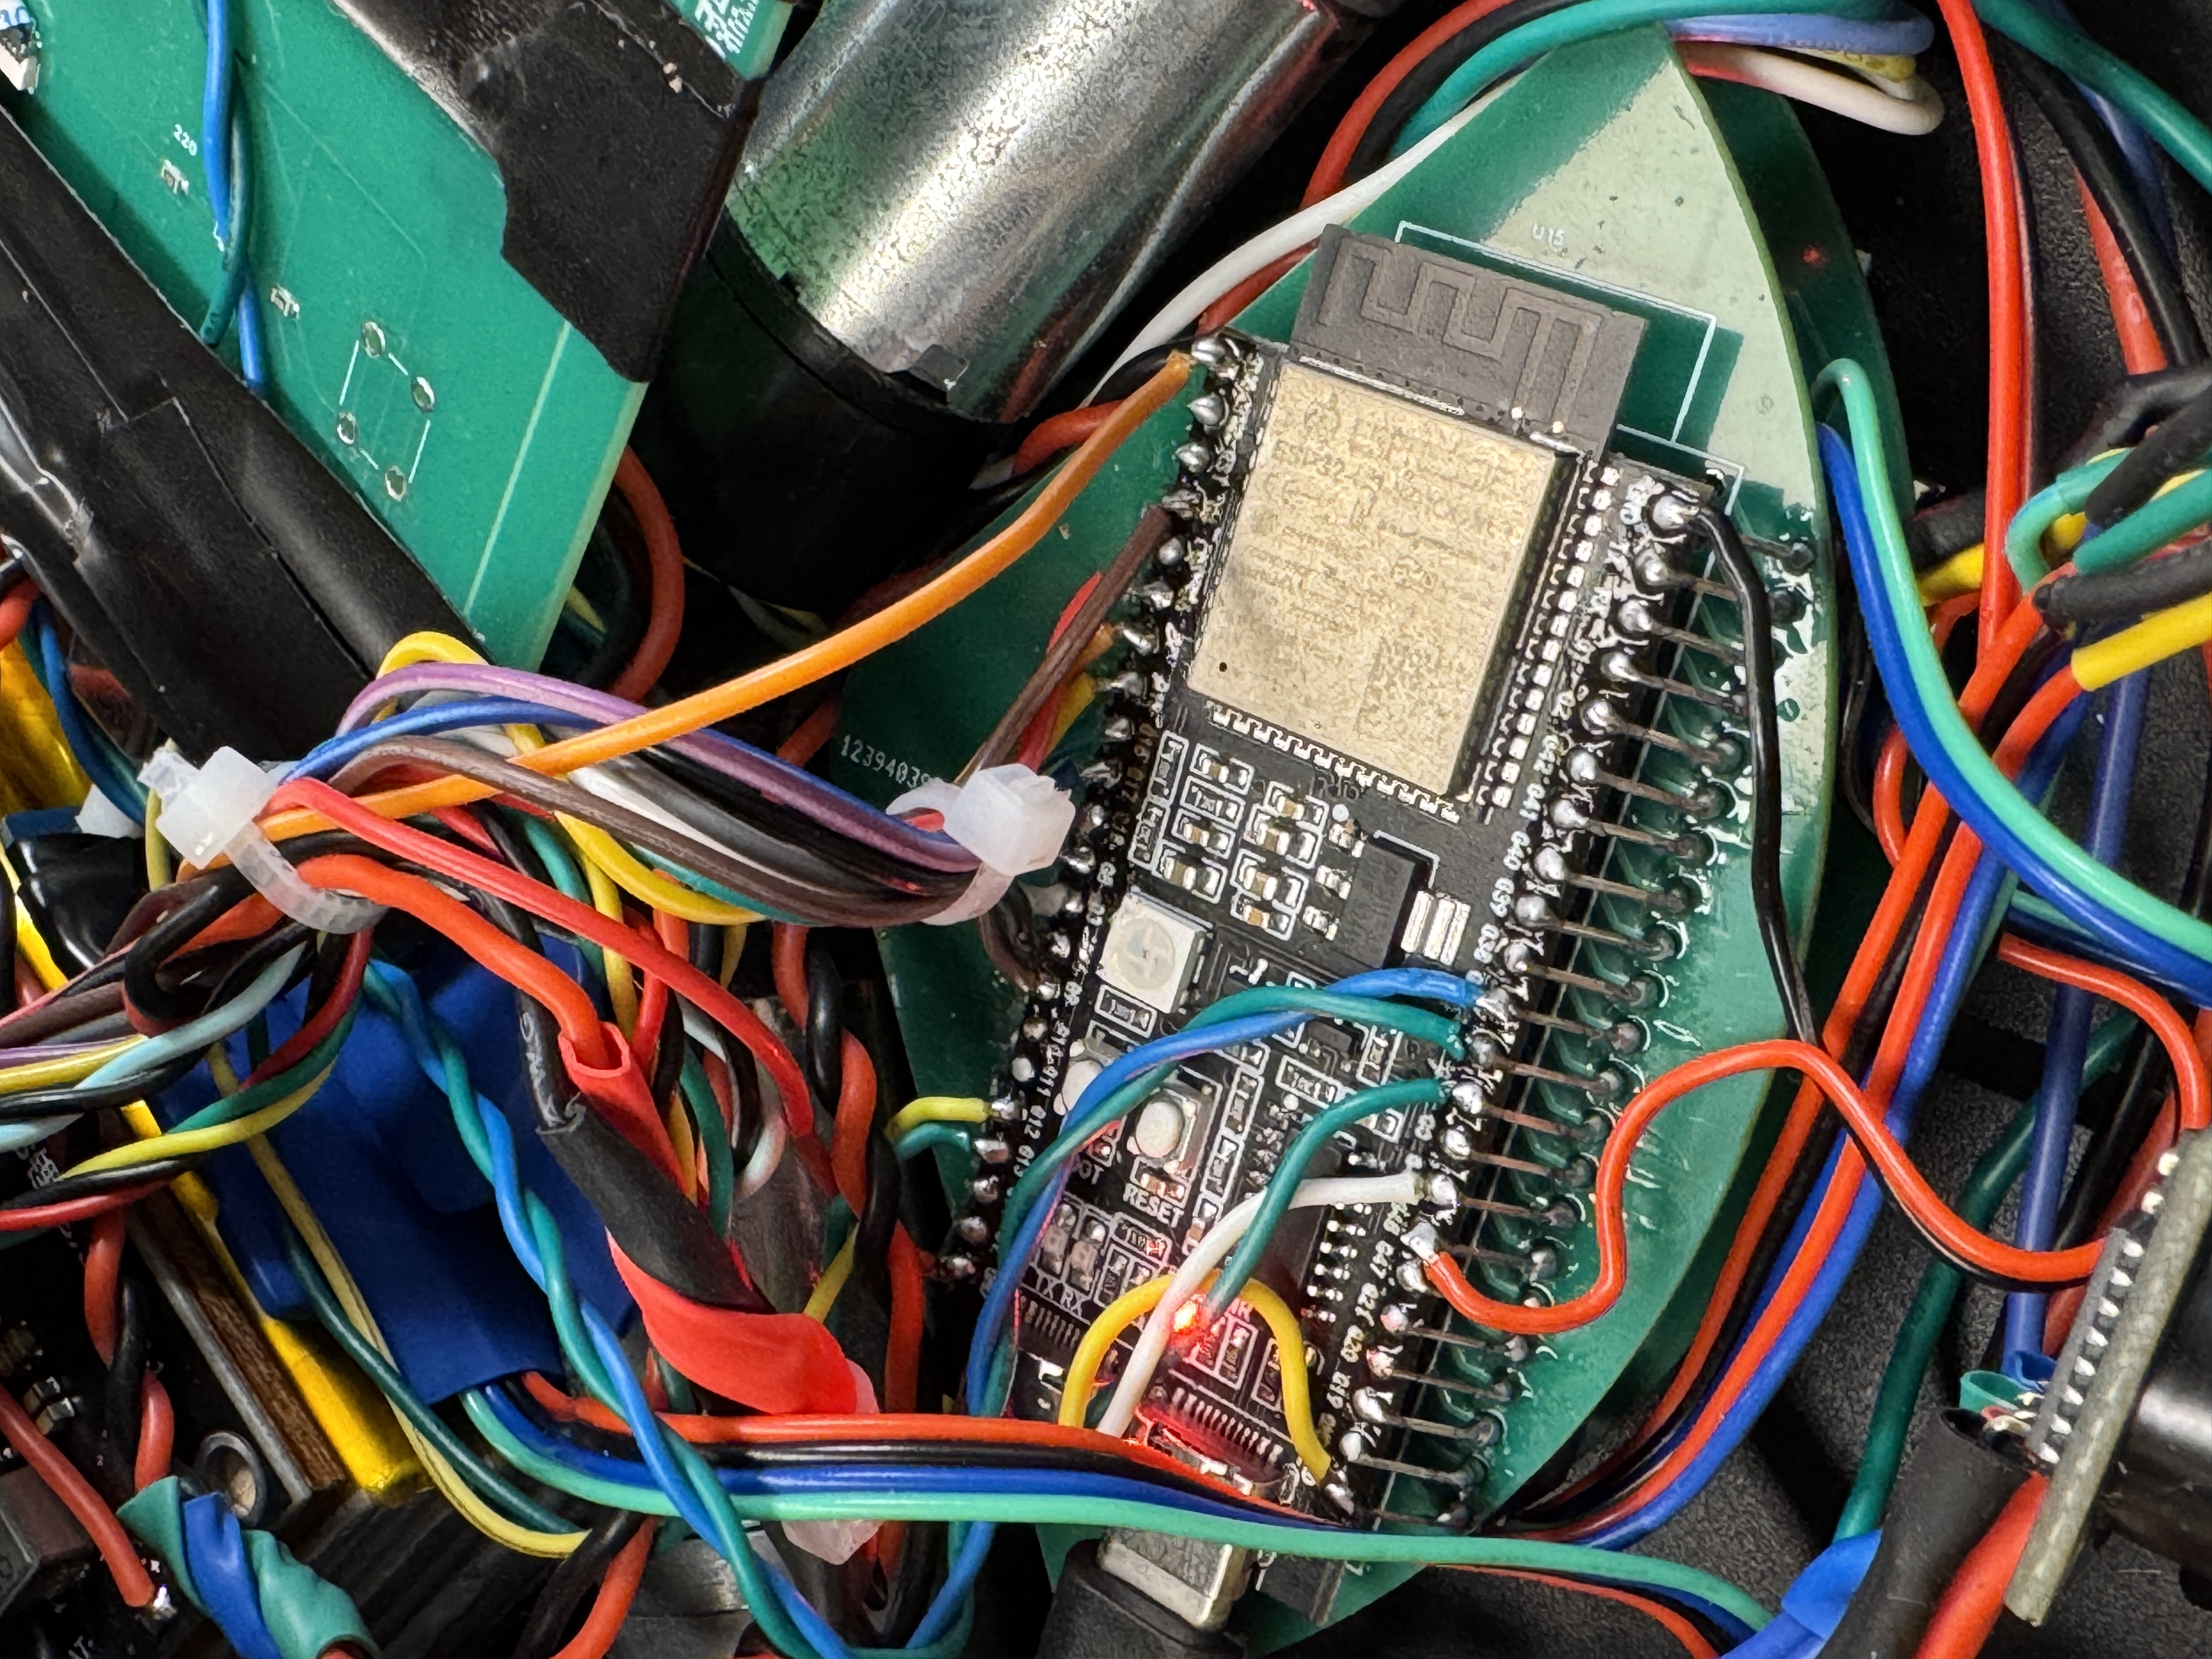
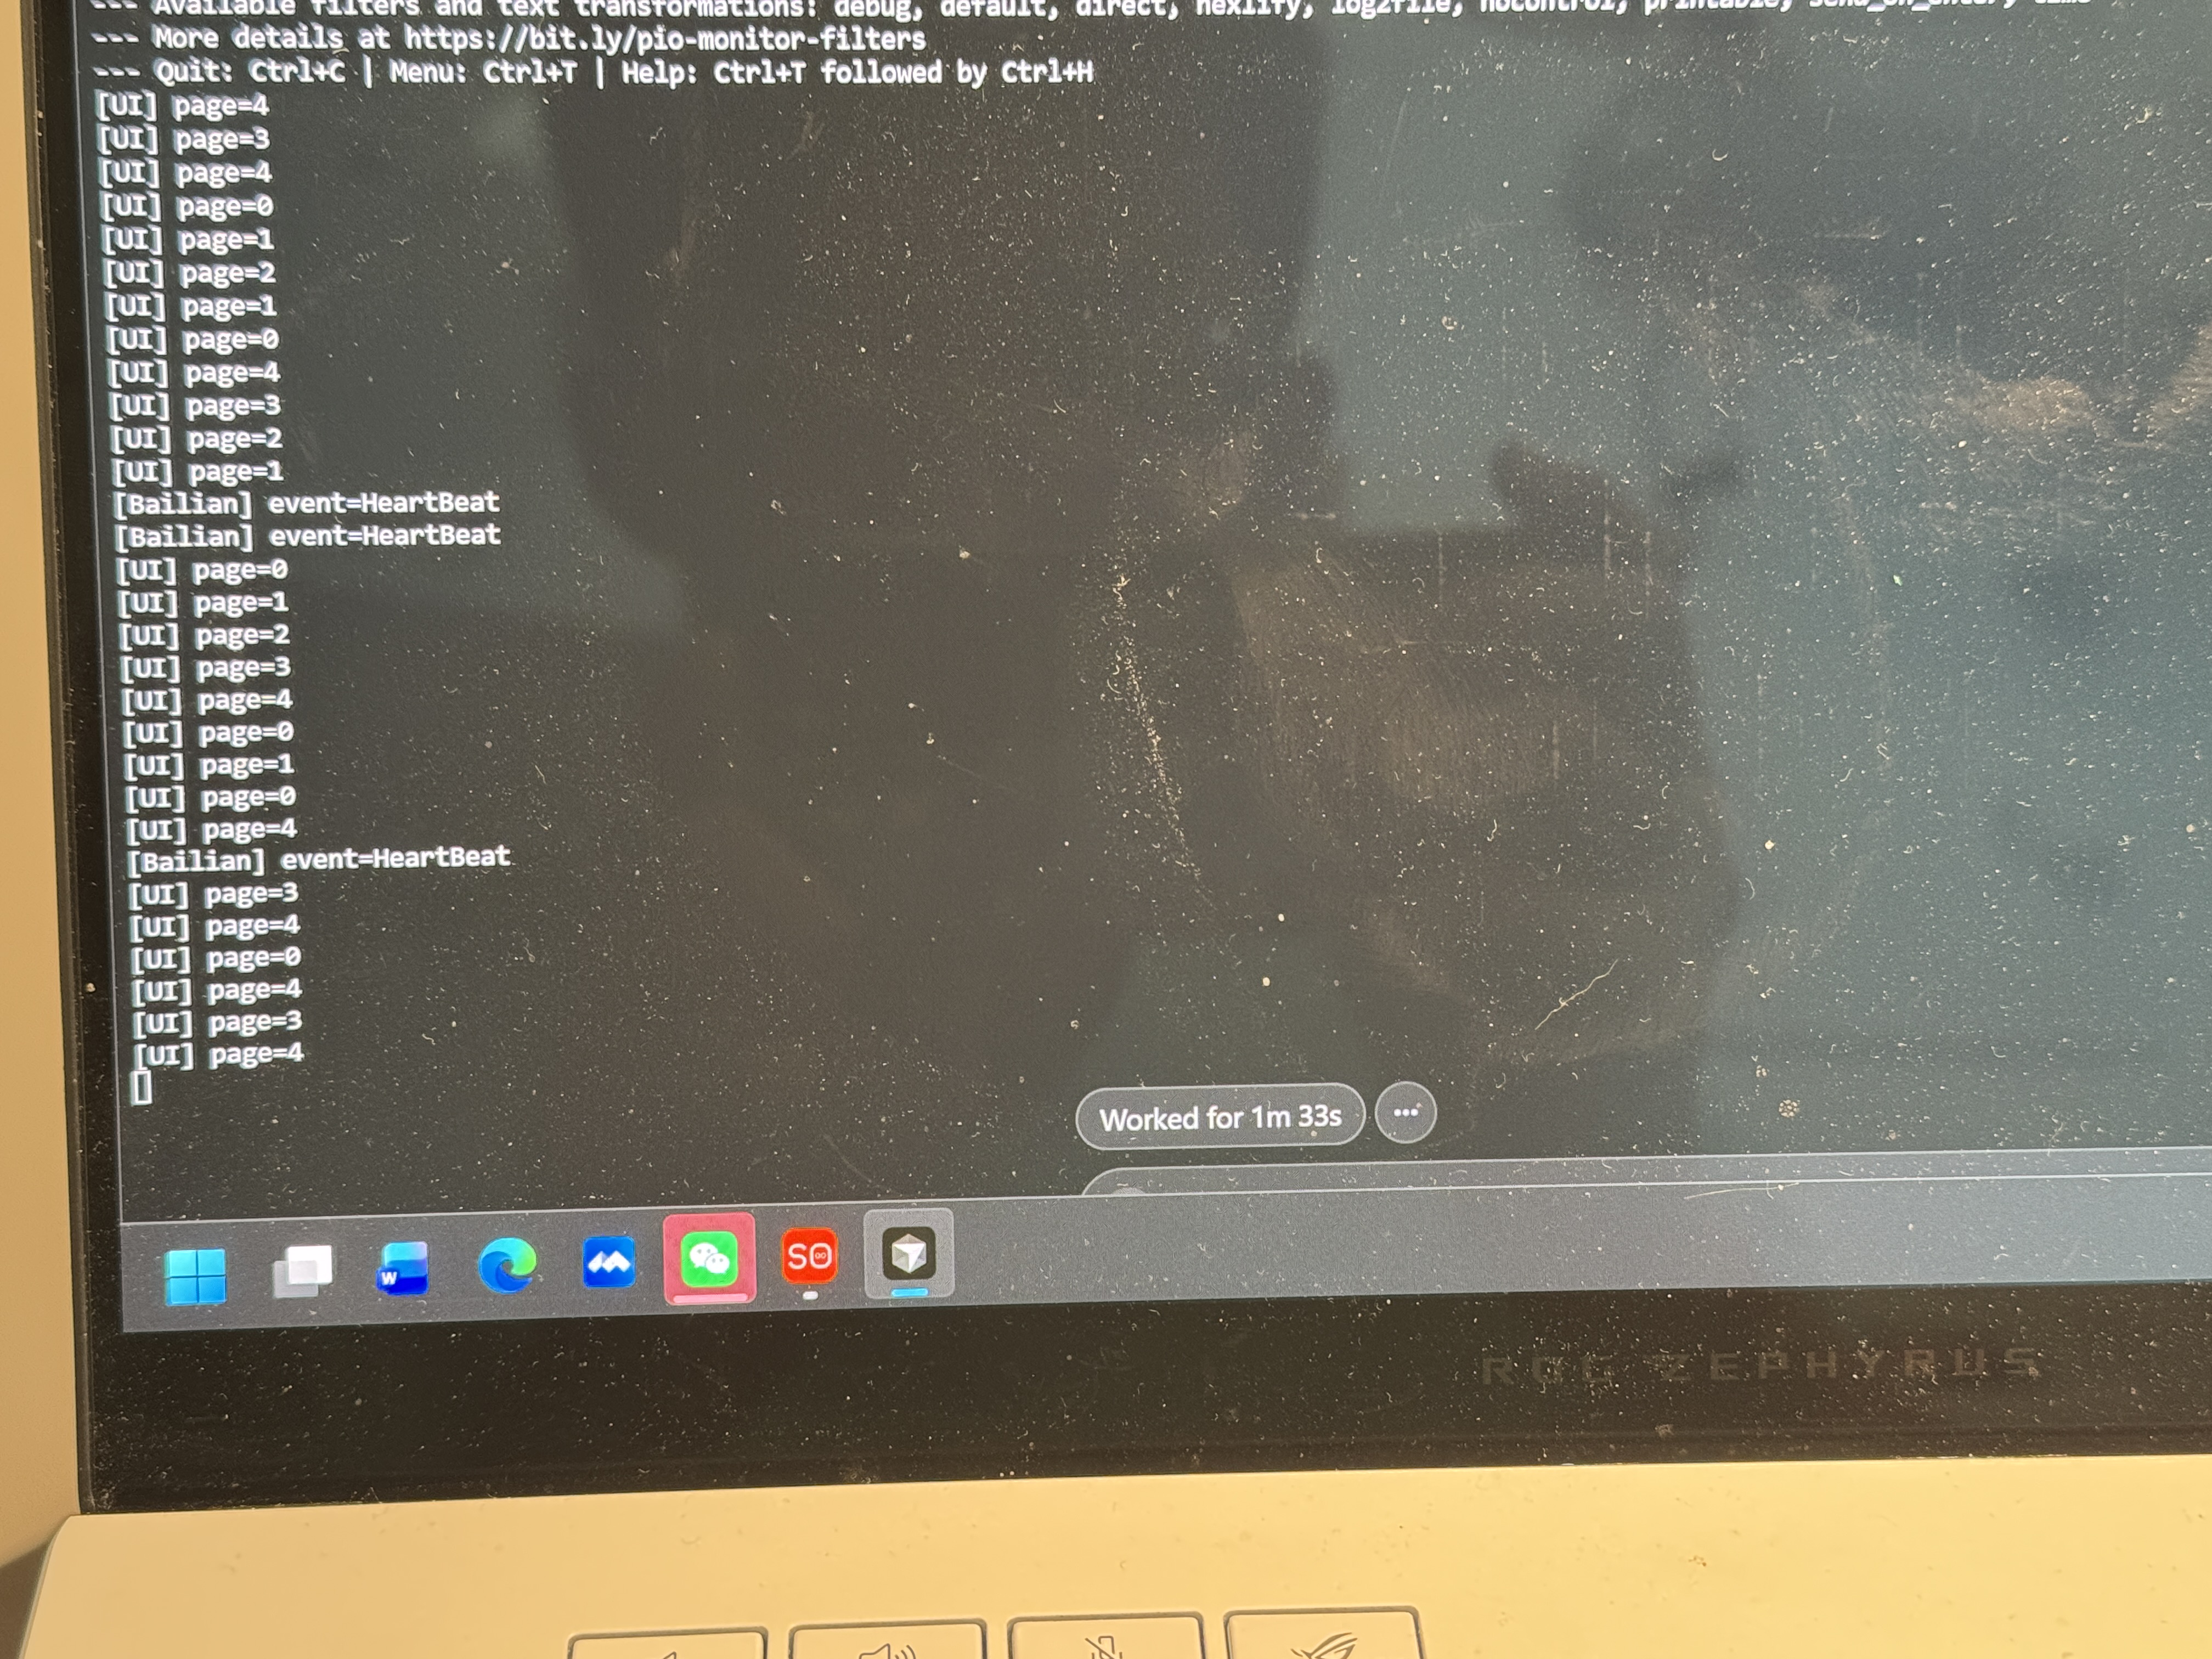
Integrated board and debug evidence
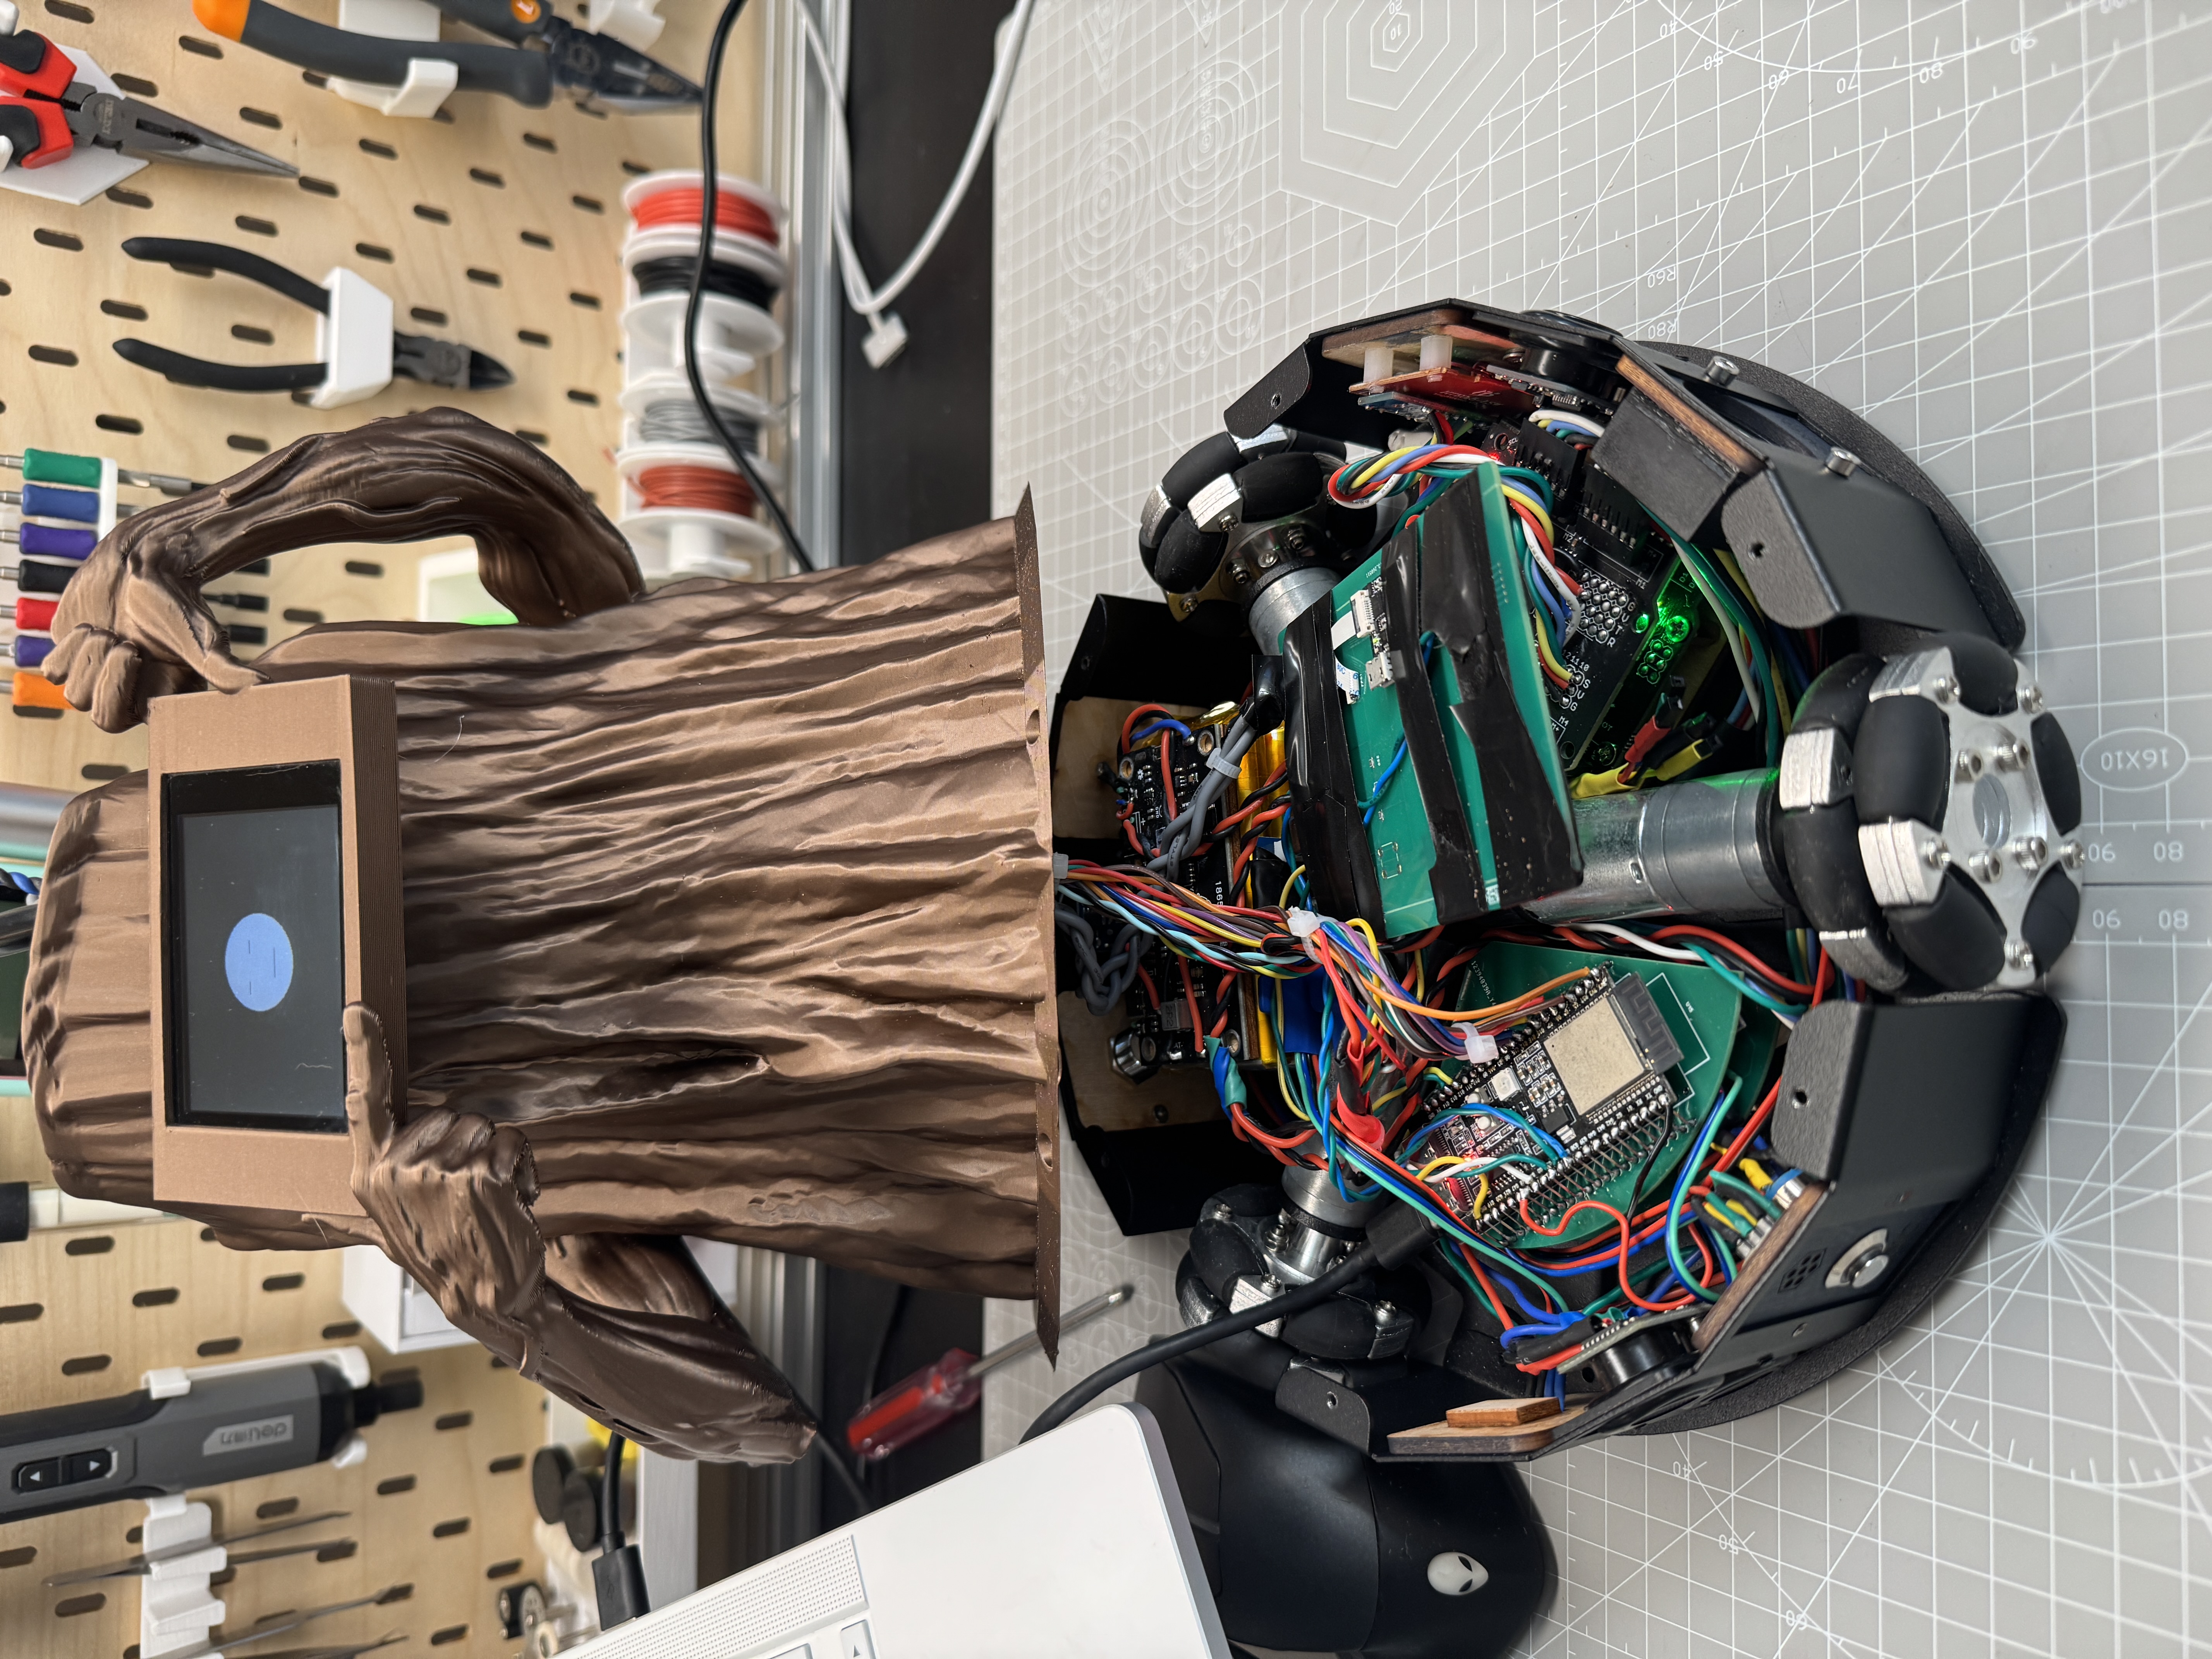
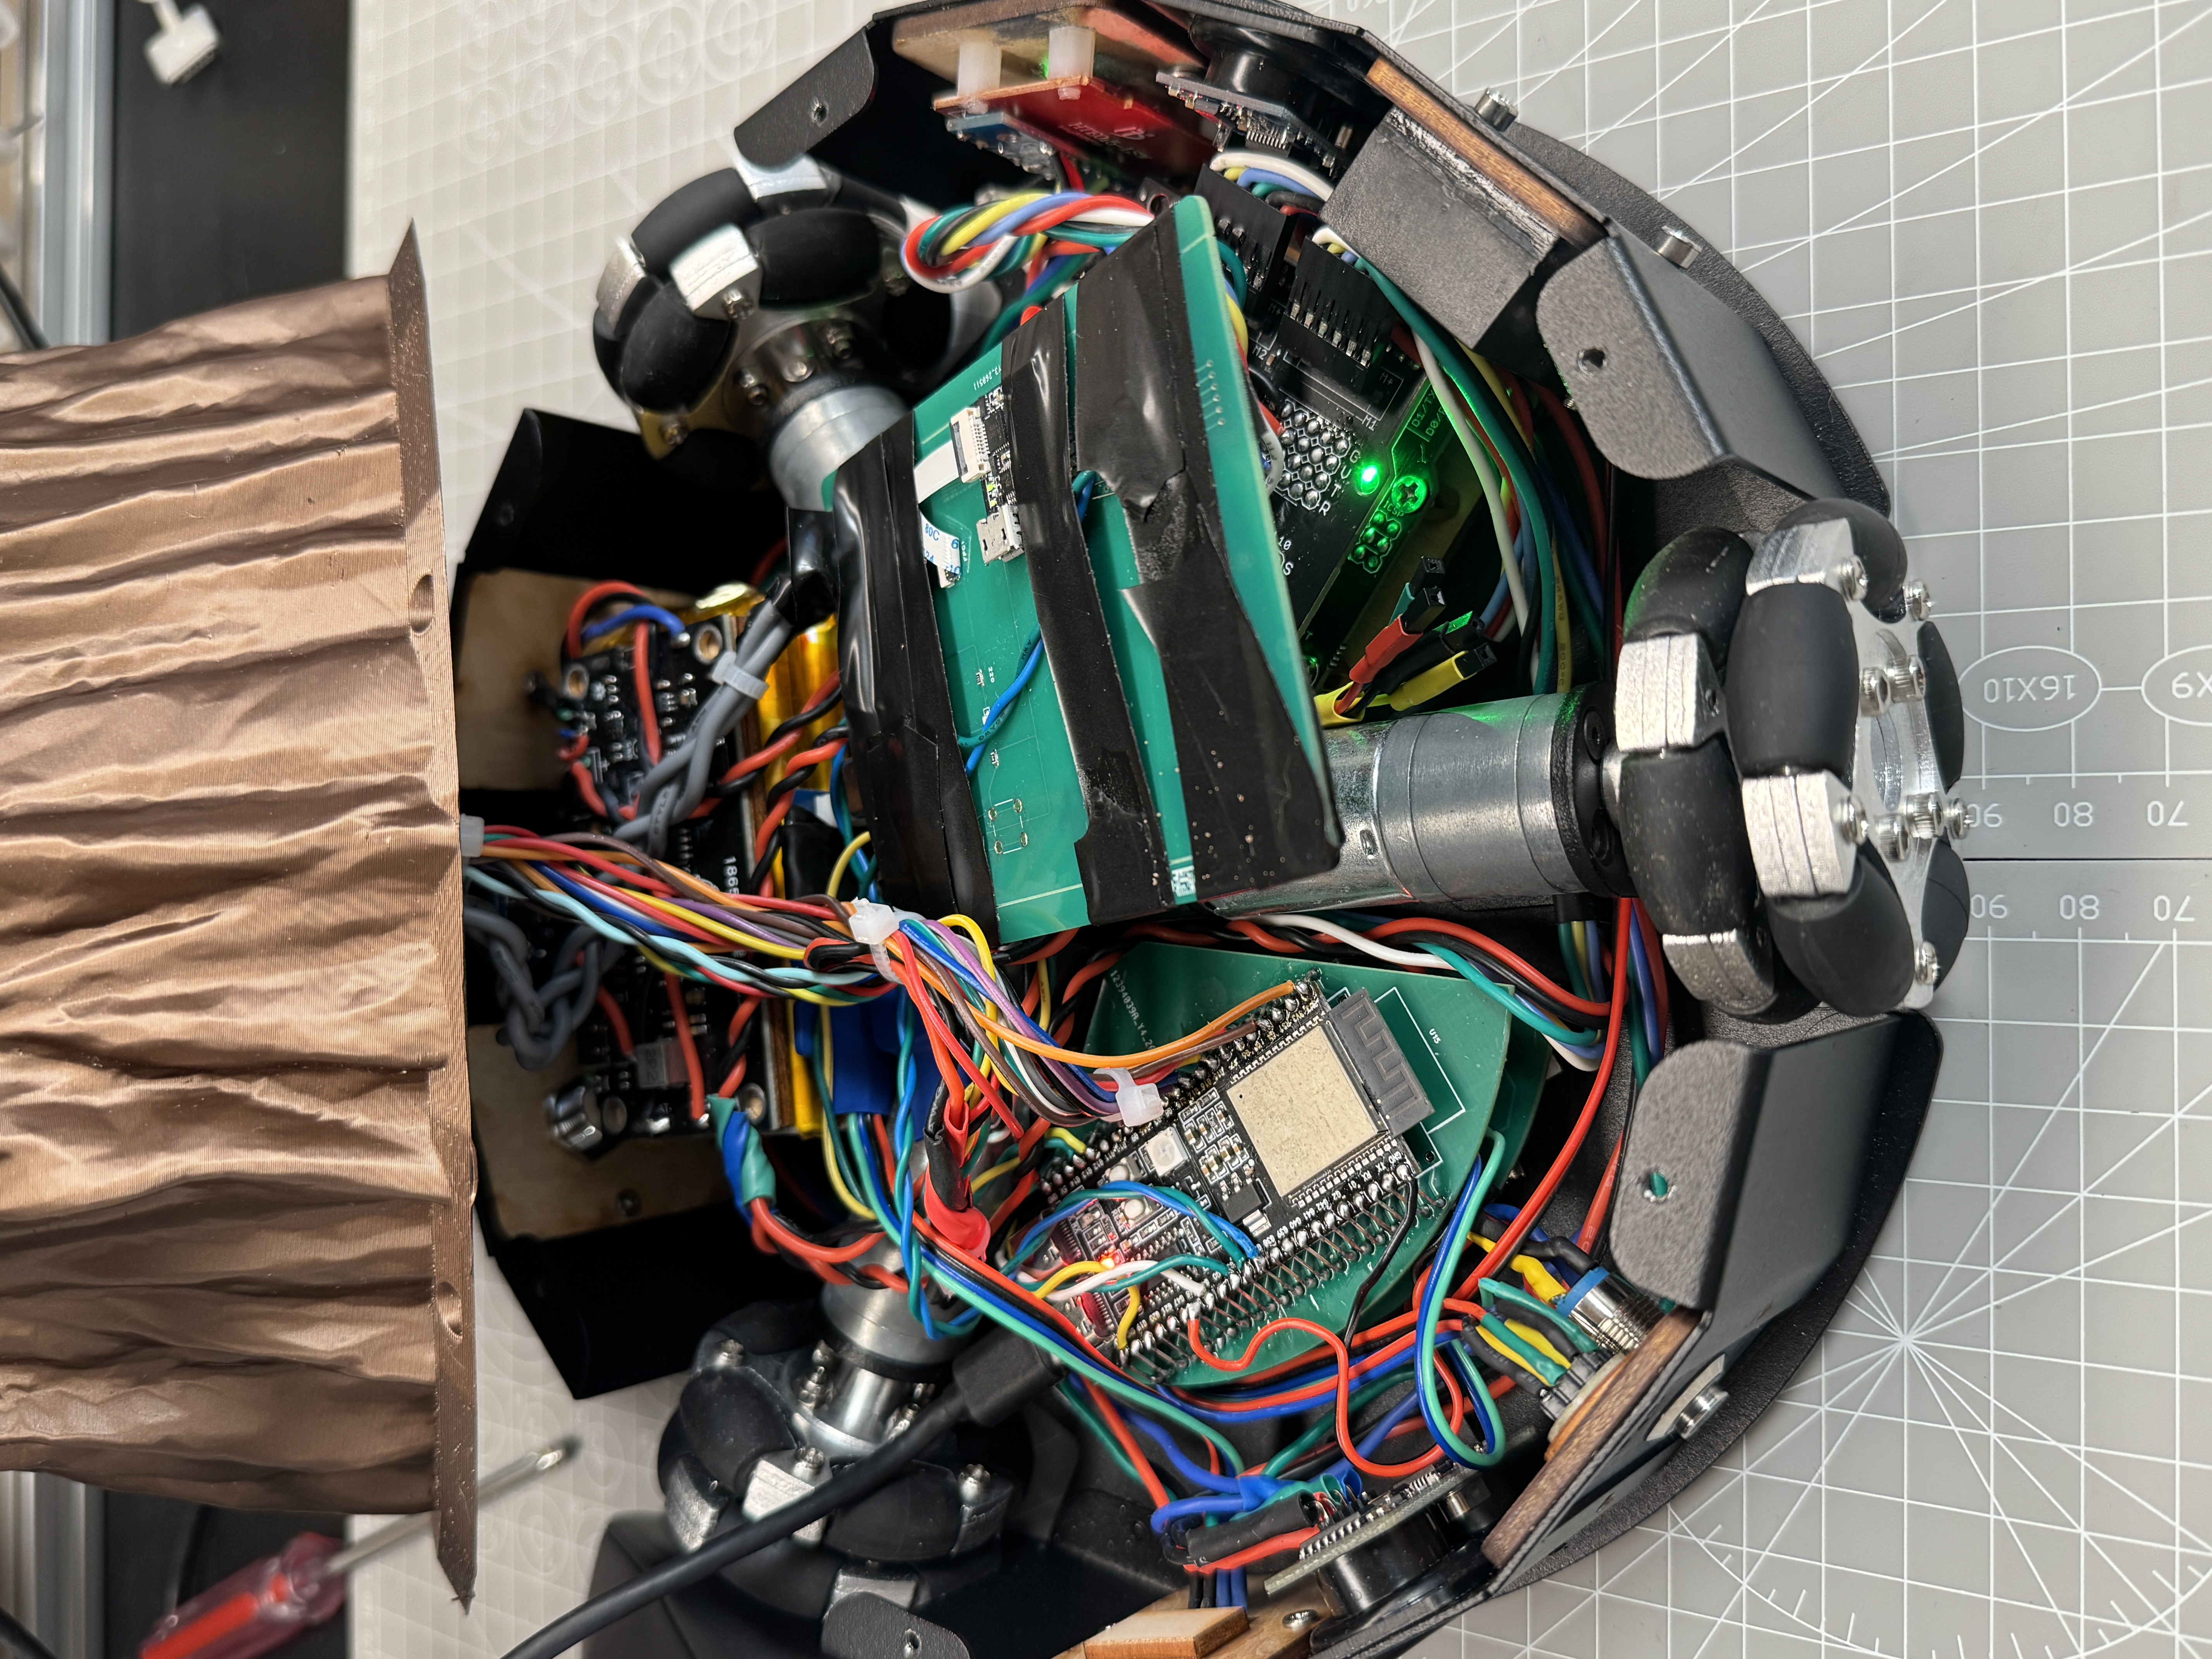
board_pins.h.
Five UI pages on the TFT
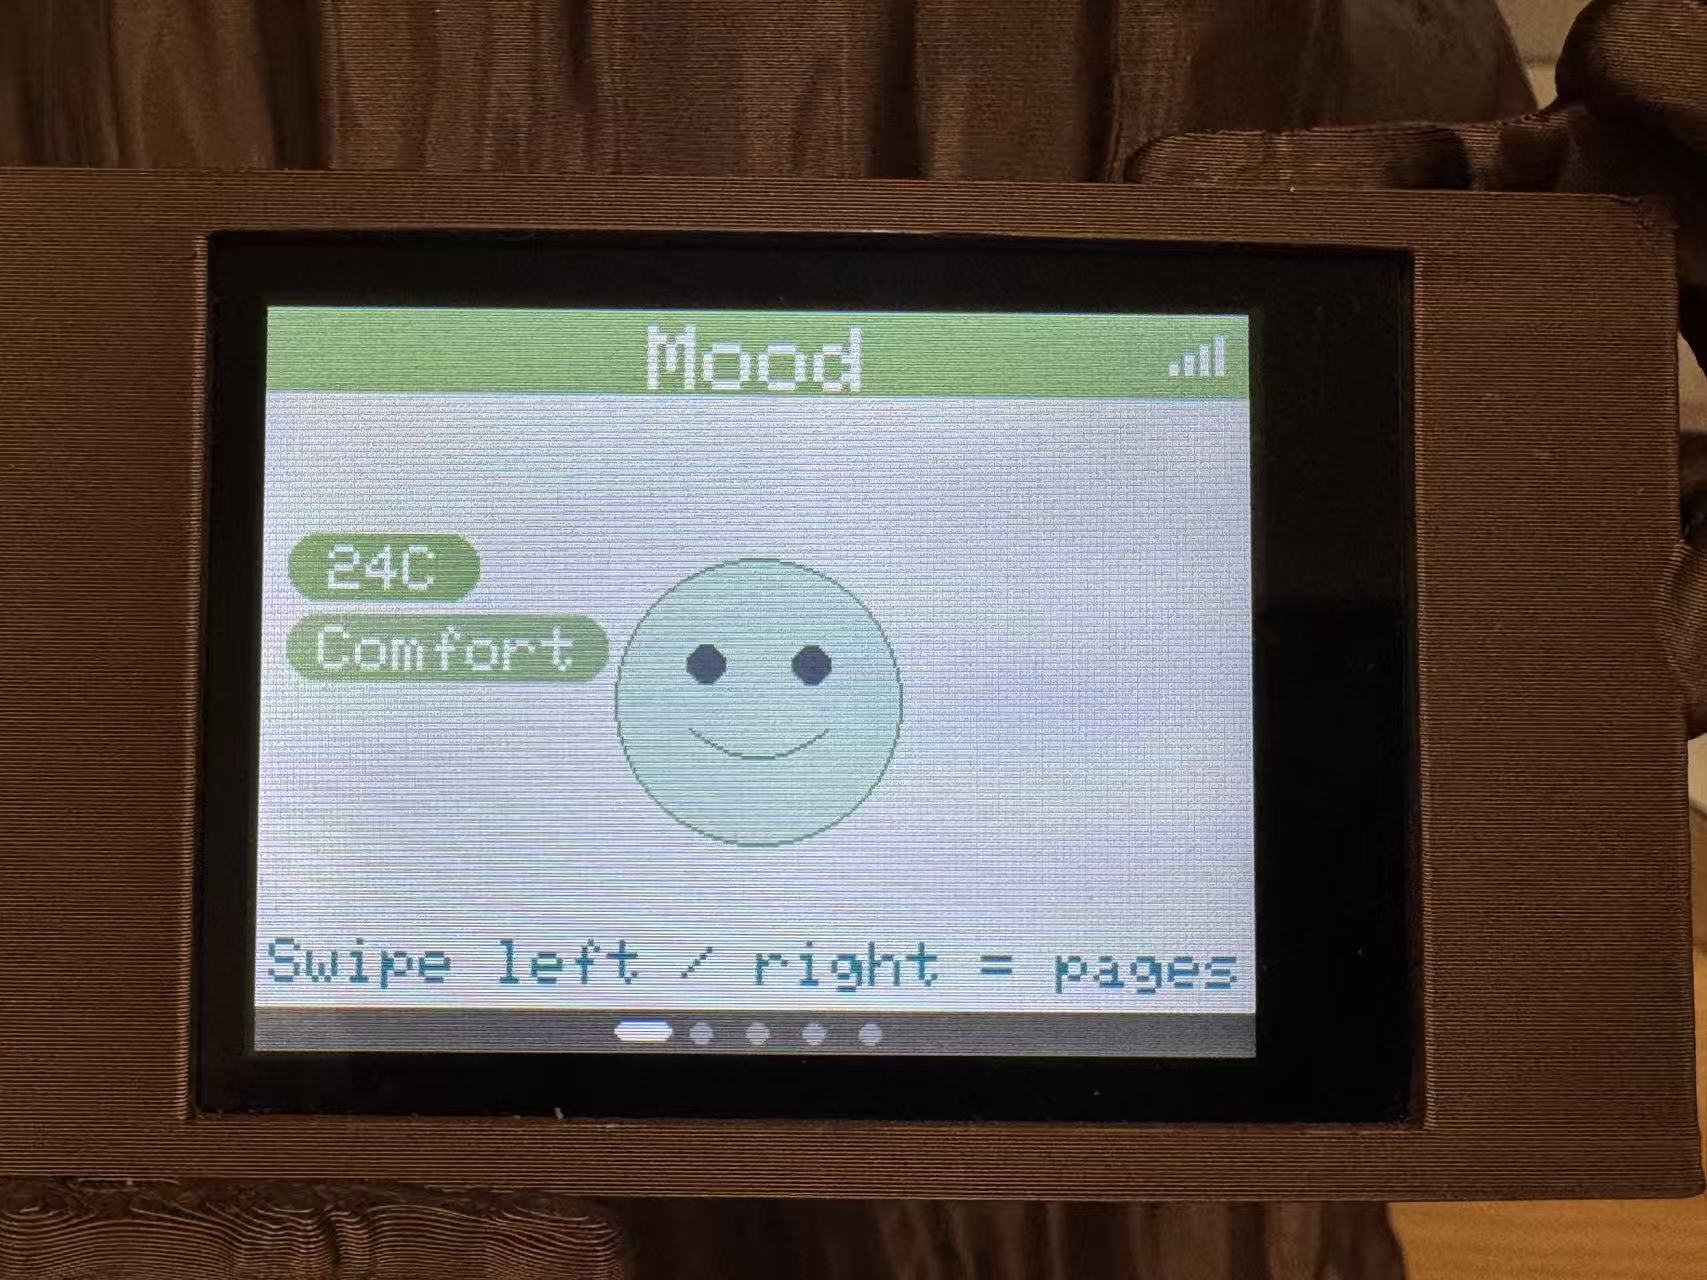
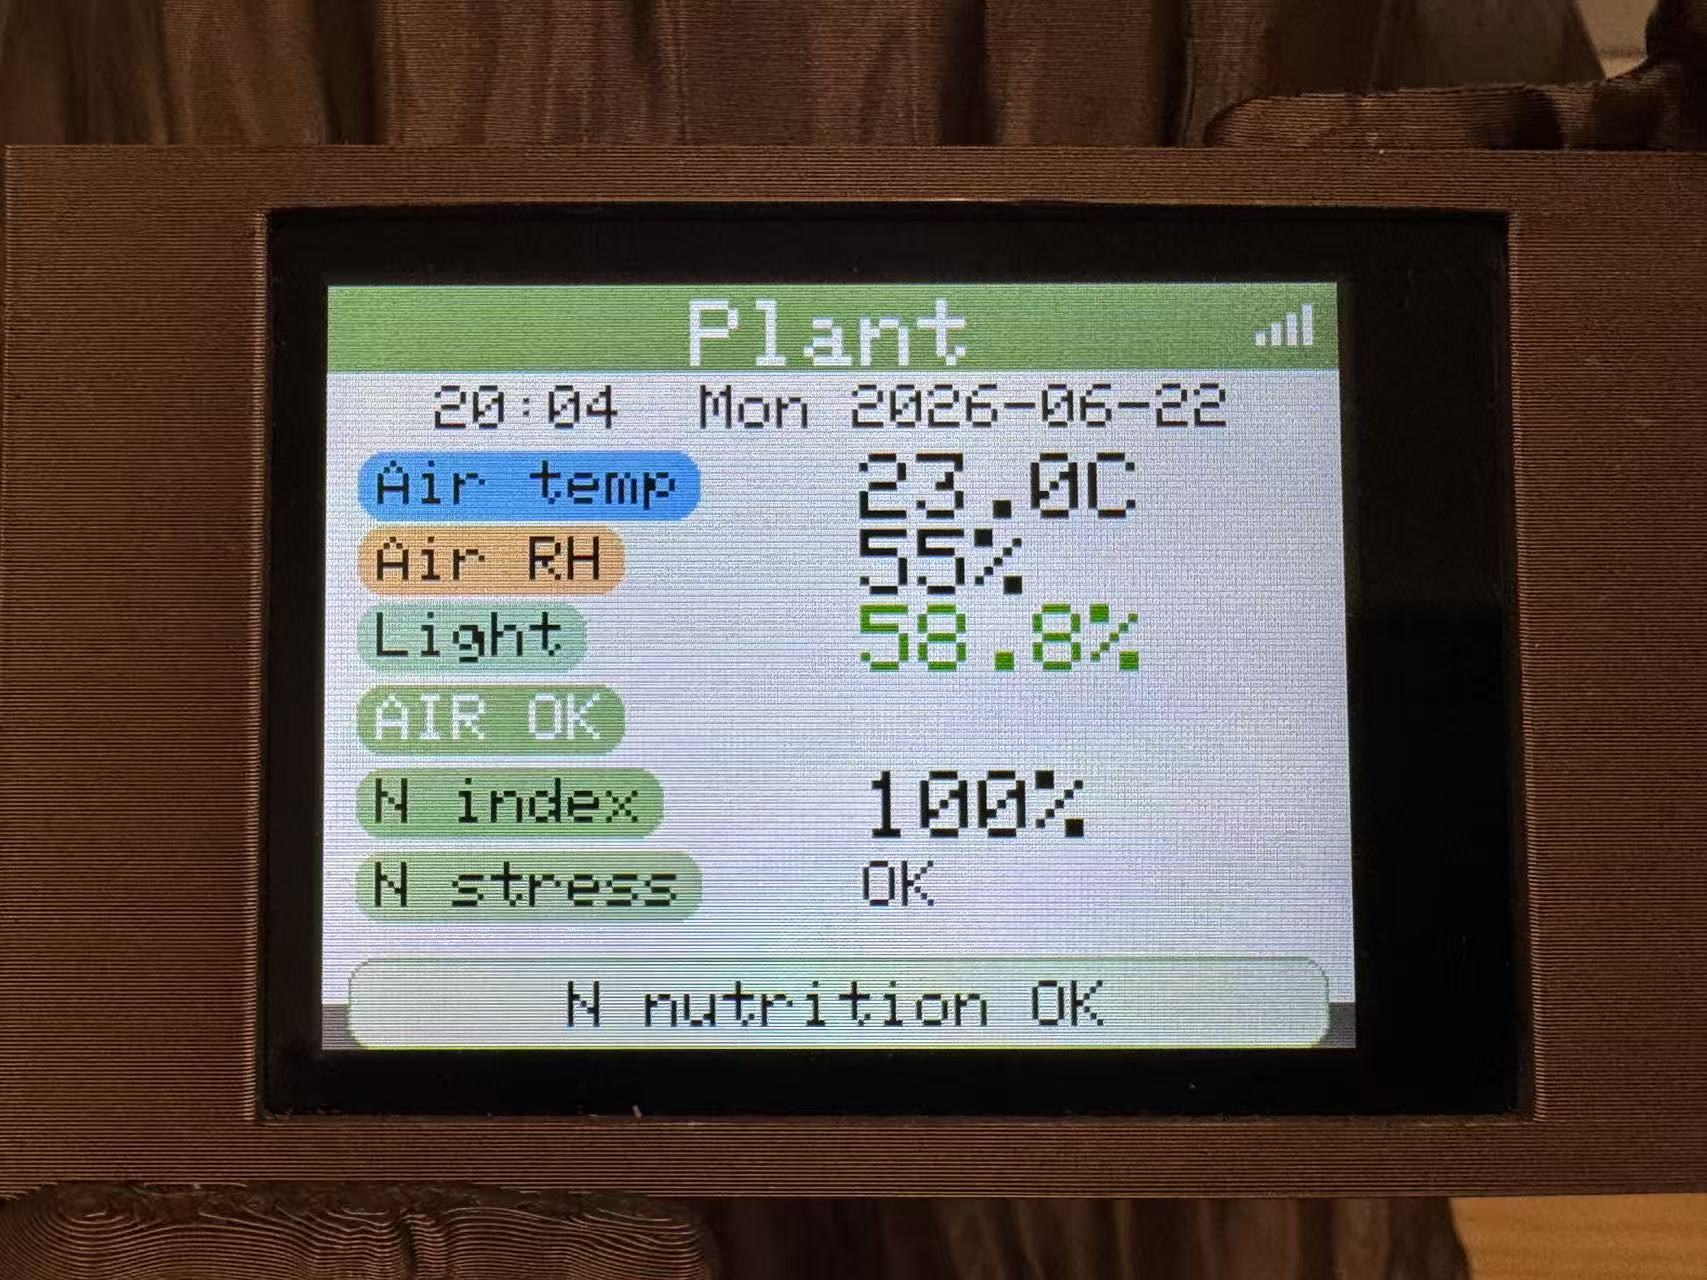
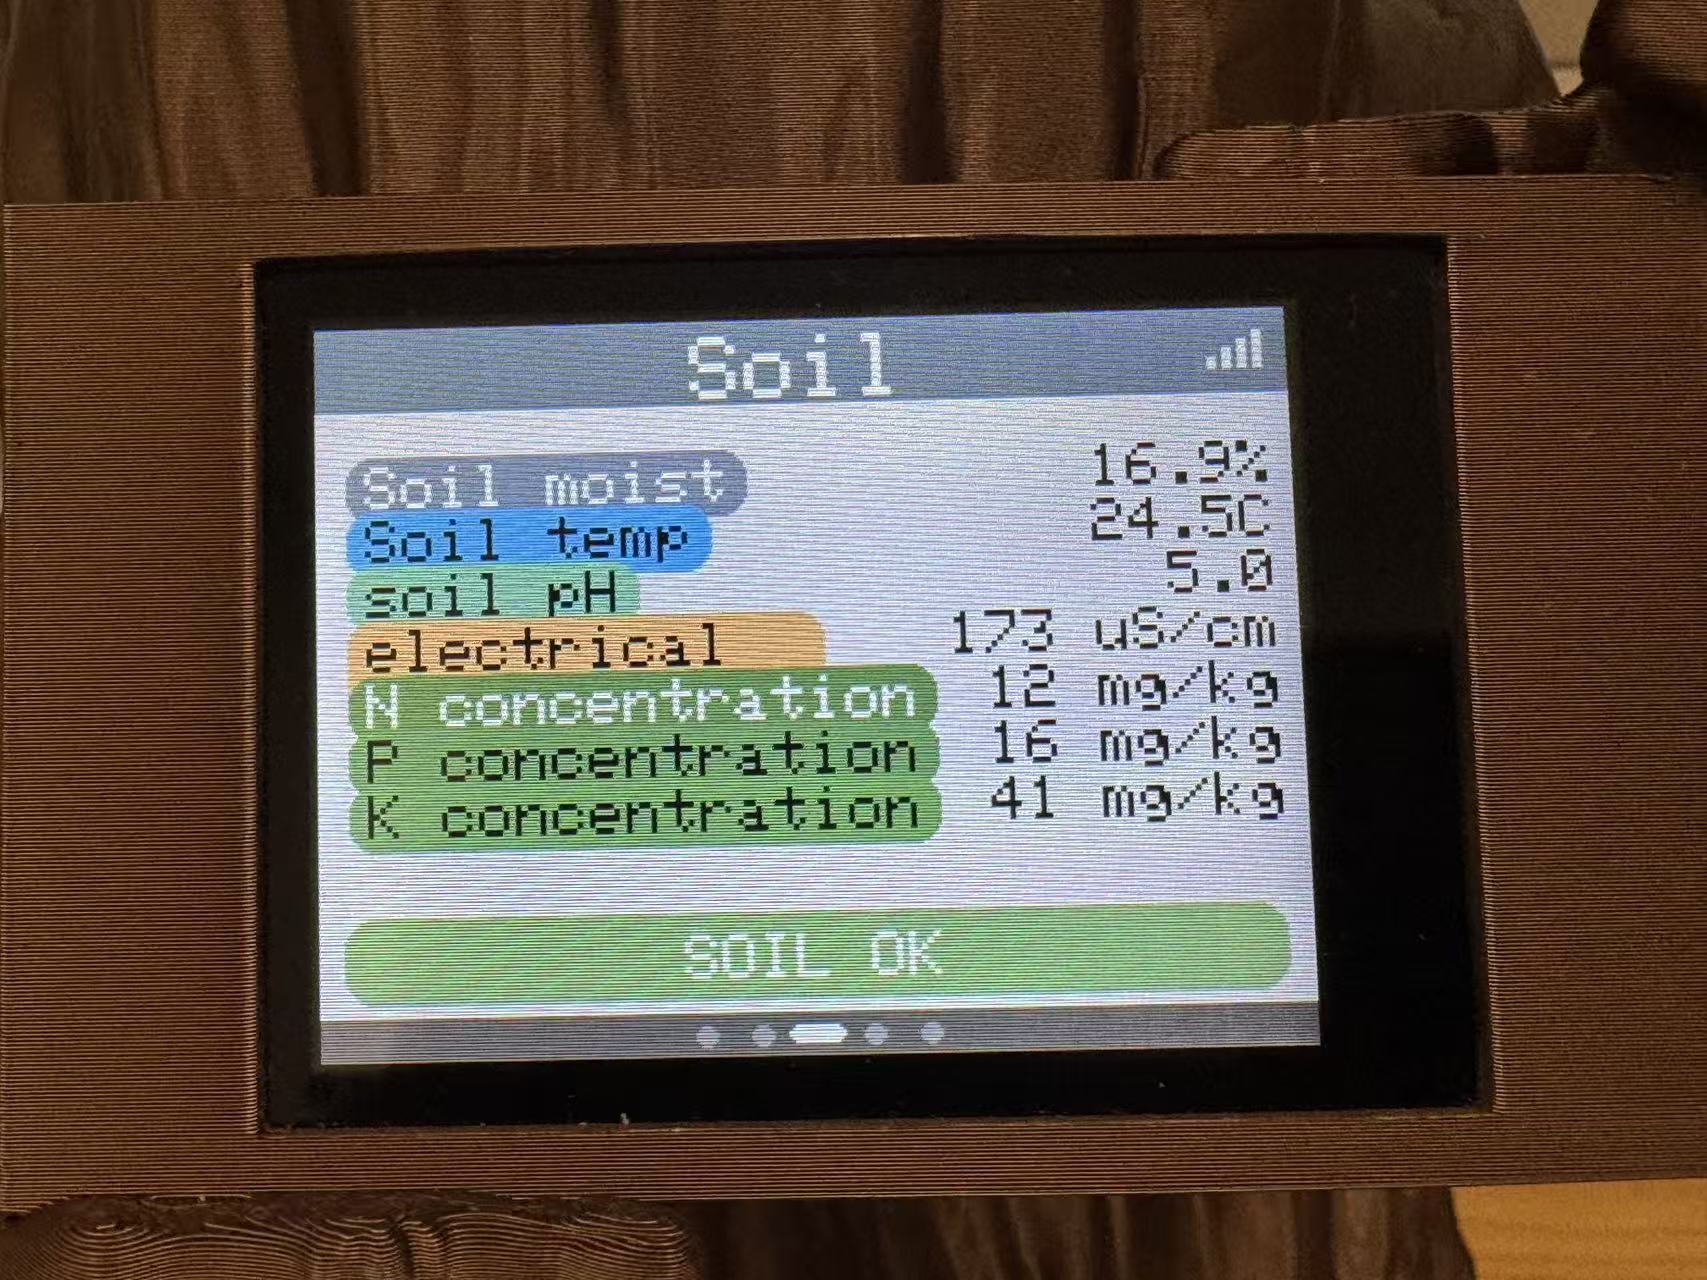
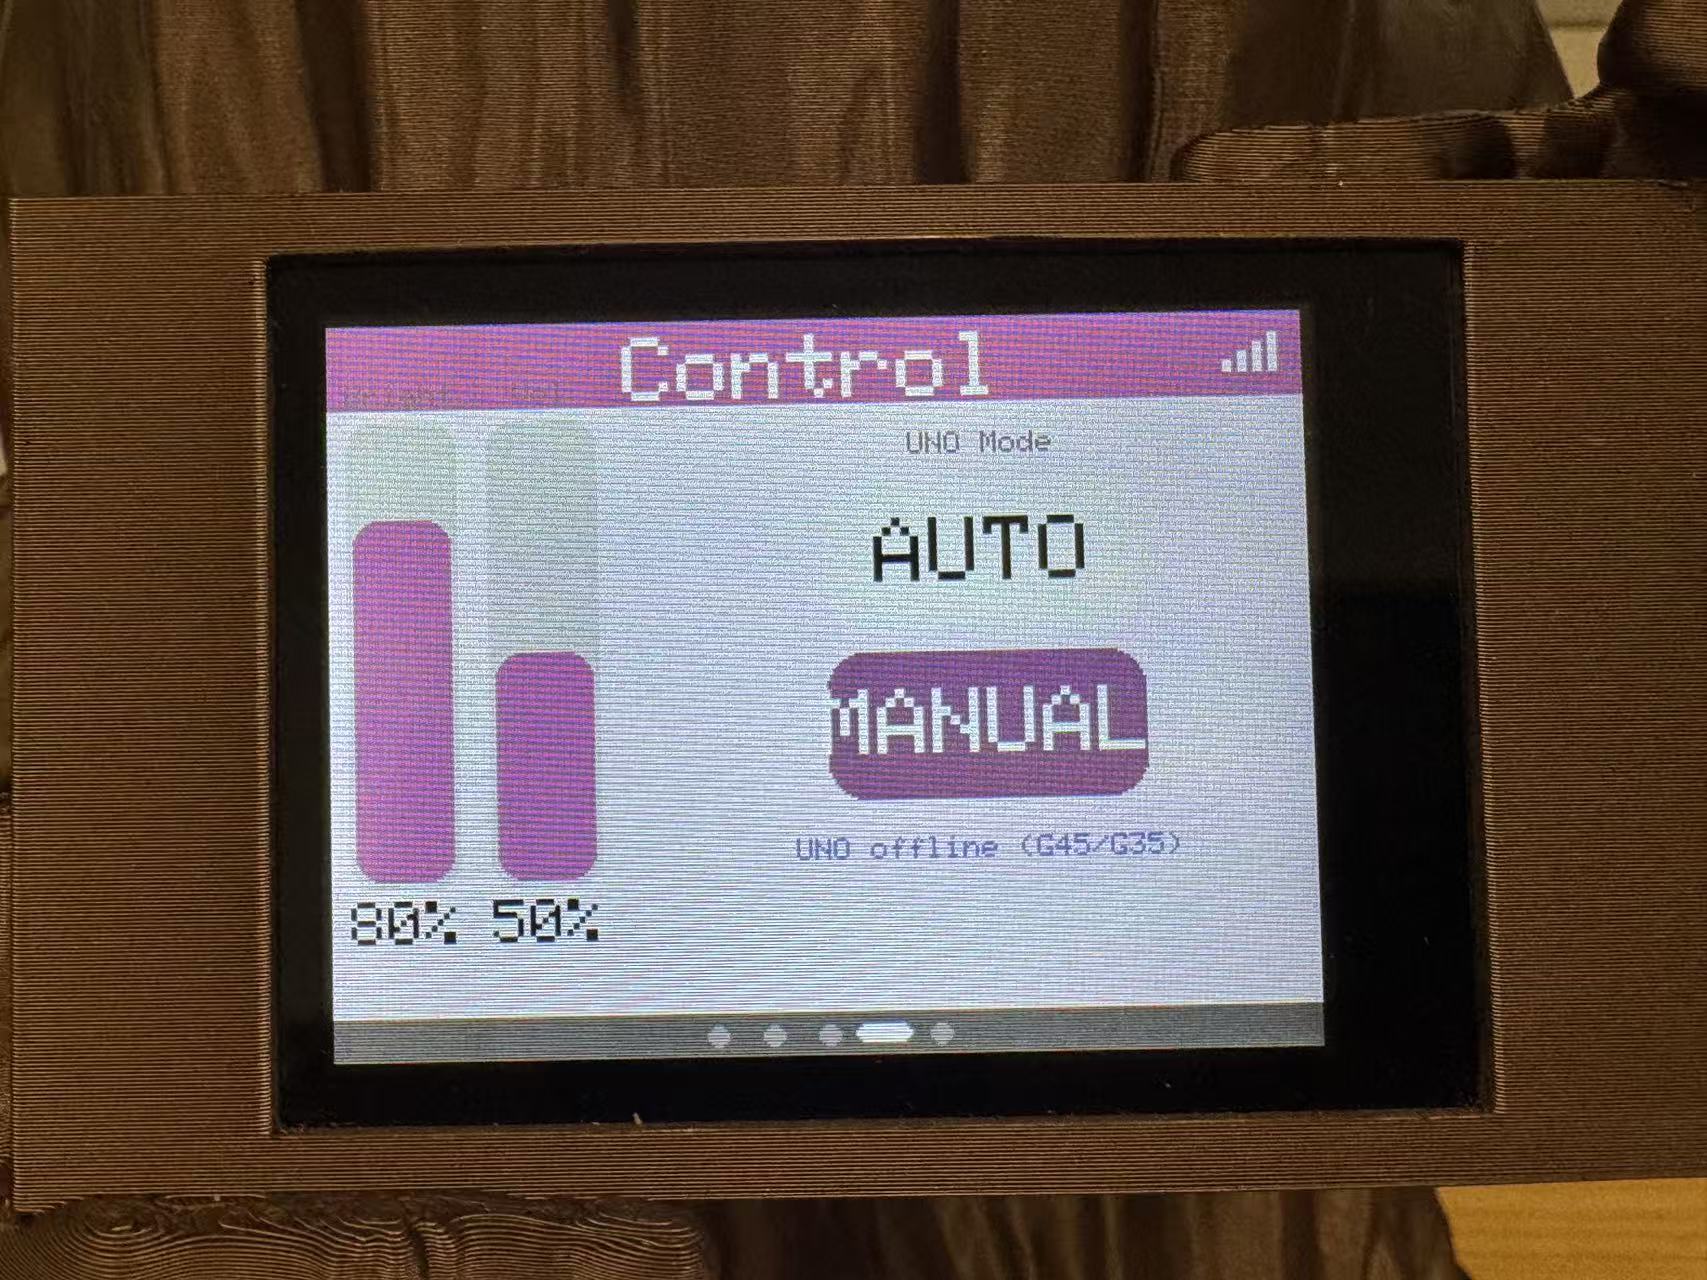
Application swipe order
Five-page UI on the TFT: horizontal swipe through Emoji → Plant → Environment → Control → Chat on the WROOM setup (matches the HTML prototype order).
8) Source code (same as Downloads)
Duplicate of the Downloads block for readers who scroll to the end. §7d explains what the files do.
↓ Browse code/week15-individual/final/
— s3-hub/, wroom-display/, screen-ui.html
Display UI originals (wroom-display/src/):
↓ Download main.cpp
·
↓ Download env_i2c_slave.cpp
·
↓ Download i2c_env_link.h
·
↓ Download board_pins.h
·
↓ Download ft6336_touch.h
·
↓ Download platformio.ini
Earlier Week 15 bring-up sketches (WROOM‑32D + ILI9341 display/touch split tests):
↓ Download main_test_screen.cpp
— display tests + optional CTP paint loop
↓ Download main_test_touch.cpp
— touch-centric demo with serial traces
↓ Download week15-smart-plant-companion-lcd-ui.html
— first 320×240 HTML swipe prototype (§6)
PlatformIO projects pull Adafruit GFX / ILI9341 and DHT libraries via lib_deps. See
final/README.md for pins and upload order.
9) Conclusion
The first combined Cursor sketch was a dead end: it assumed resistive SPI touch and put TFT reset on GPIO12, so I spent time on graphics when boot strapping was the real fault. Splitting display vs touch tests and moving reset off MTDI gave me a repeatable ILI9341 + FT6336 setup.
The finished UI redraws five HTML panels in C++ (§7d), sends pixels over SPI,
reads touch on I²C, and pulls sensor/chat data on a second I²C port from my Week 8 XIAO. Sources are in
wroom-display/; hero photos are at
#week15-hero-ui-pages.
The host-link I²C path was the bridge between the screen UI and the rest of the plant companion. Adding Bailian push-to-talk speech (§11) turned the chat page from static mock-up into a live loop. Next I want the enclosure closed and the harness tested on the pot-mounted screen, not only temporary bring-up wiring.
10) What I took from the group toolchain comparison
The group section and the
Chaihuo group page
forced me to name when I actually open each tool instead of copying a feature matrix. Arduino IDE for the first
“does the panel light up?” flash; VS Code + PlatformIO once wroom-display/ grew past one file;
Cursor for the first HTML swipe draft I later ported into drawPage*() by hand.
Node-RED and MATLAB stayed on the comparison list even though I did not run them for the TFT UI. Thonny is still my MicroPython tool between hardware tests.
Group write-up: Chaihuo Week 15 group assignment.
11) Voice dialogue — Alibaba Bailian cloud path
The chat page in §7d is static in the hero photos. Forest Fairy also needs to answer in normal Mandarin sentences, not a fixed menu. I tried a XiaoZhi module first: mic and speaker were useful, but the bundled program fought our sensor bus and display stack. I kept the audio hardware and built our own cloud path instead.
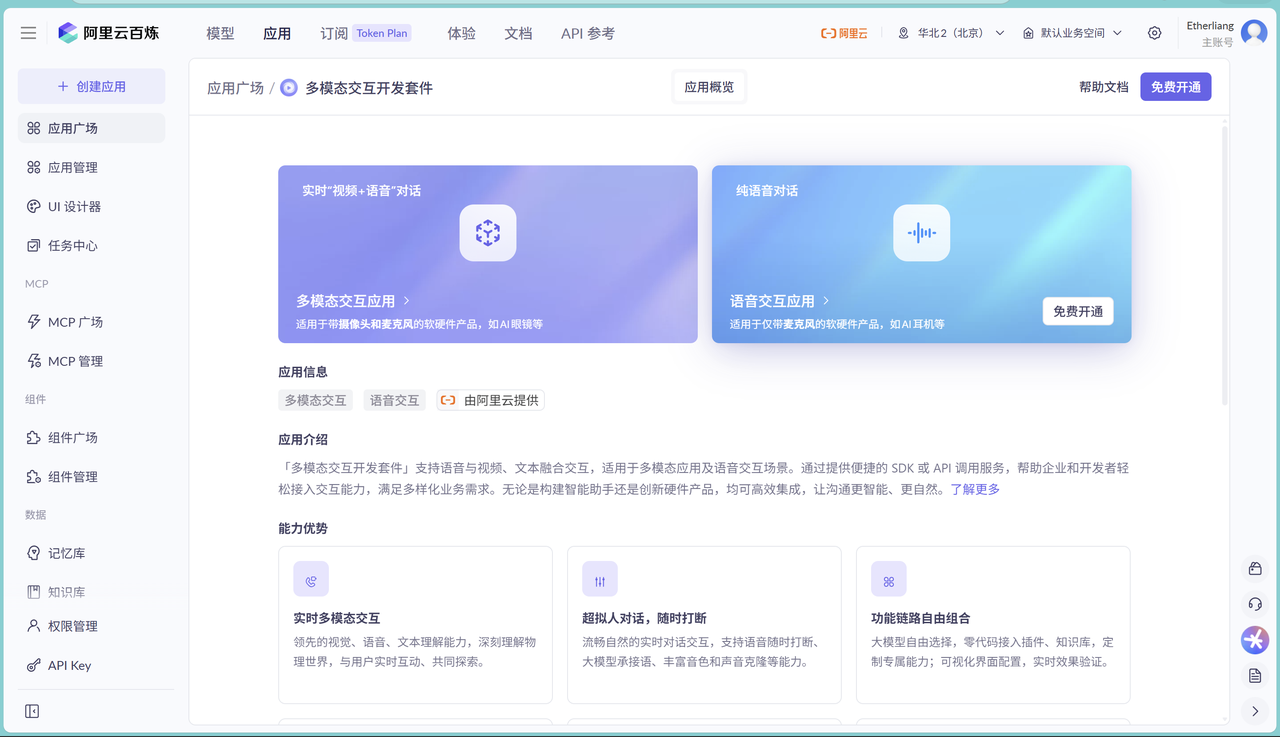
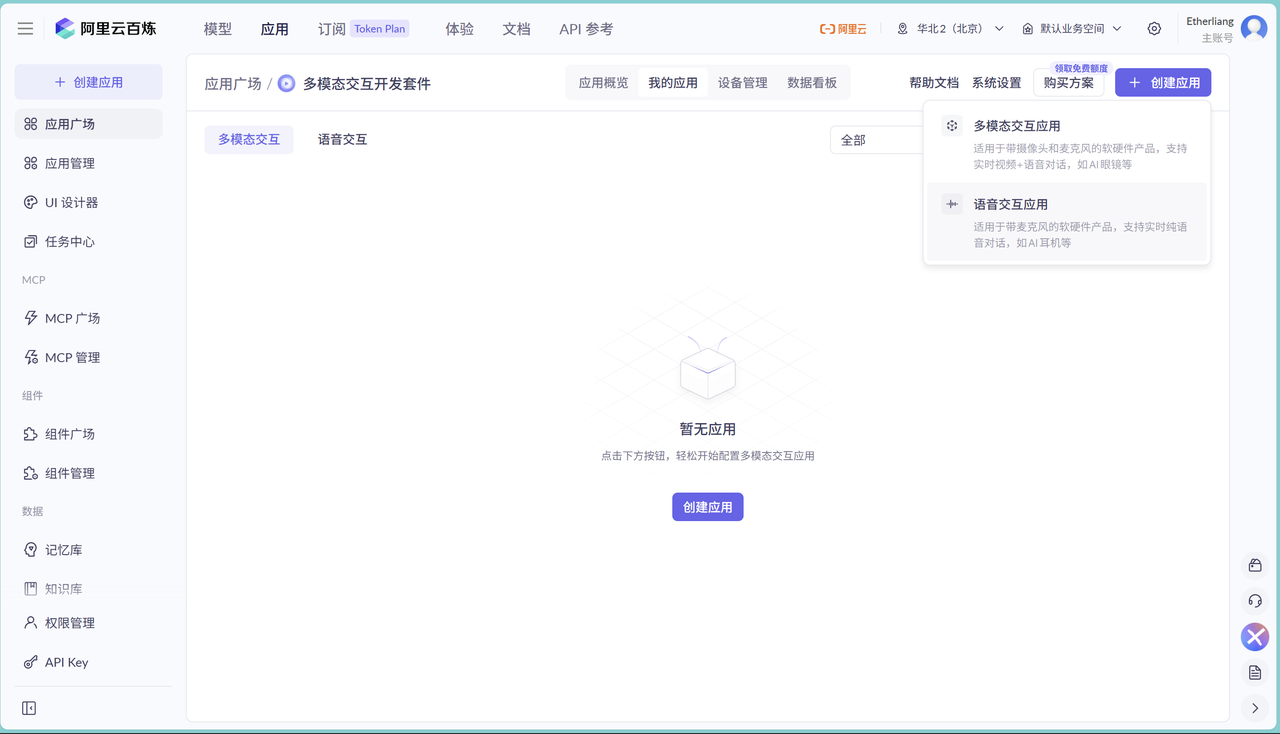
Learning — Bailian multimodal dialog
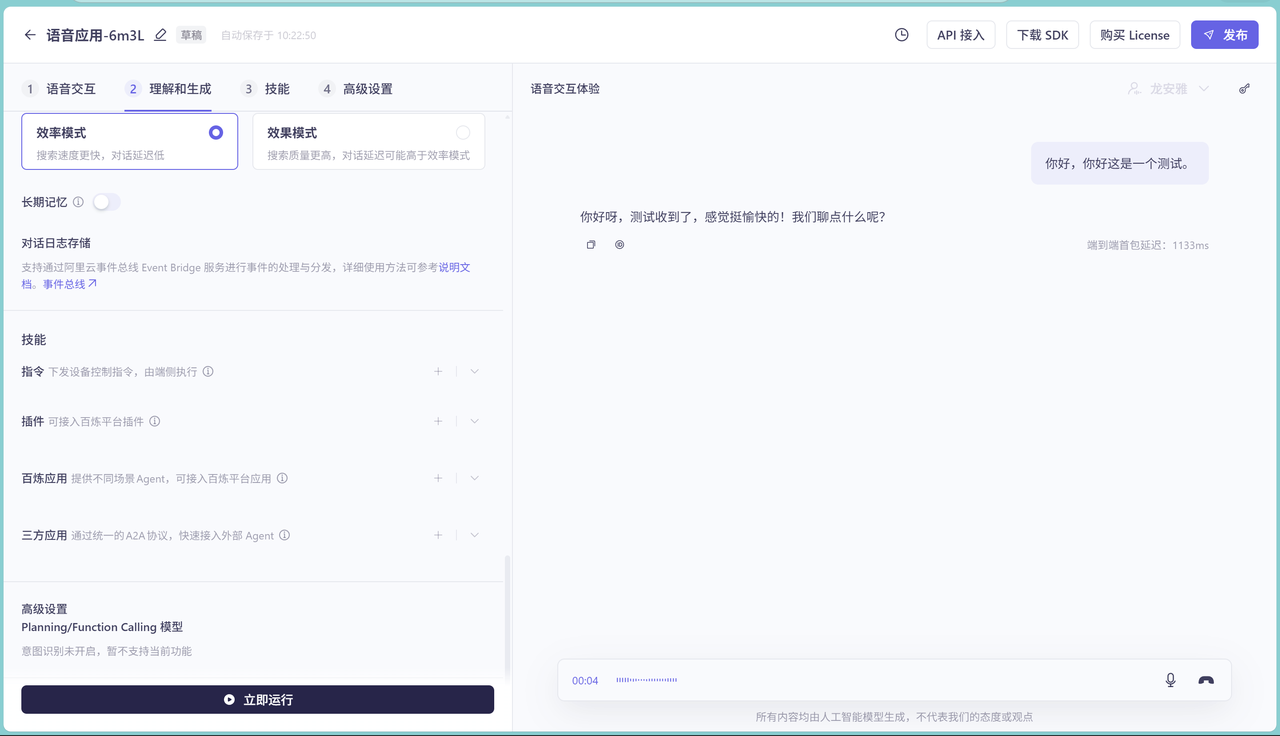
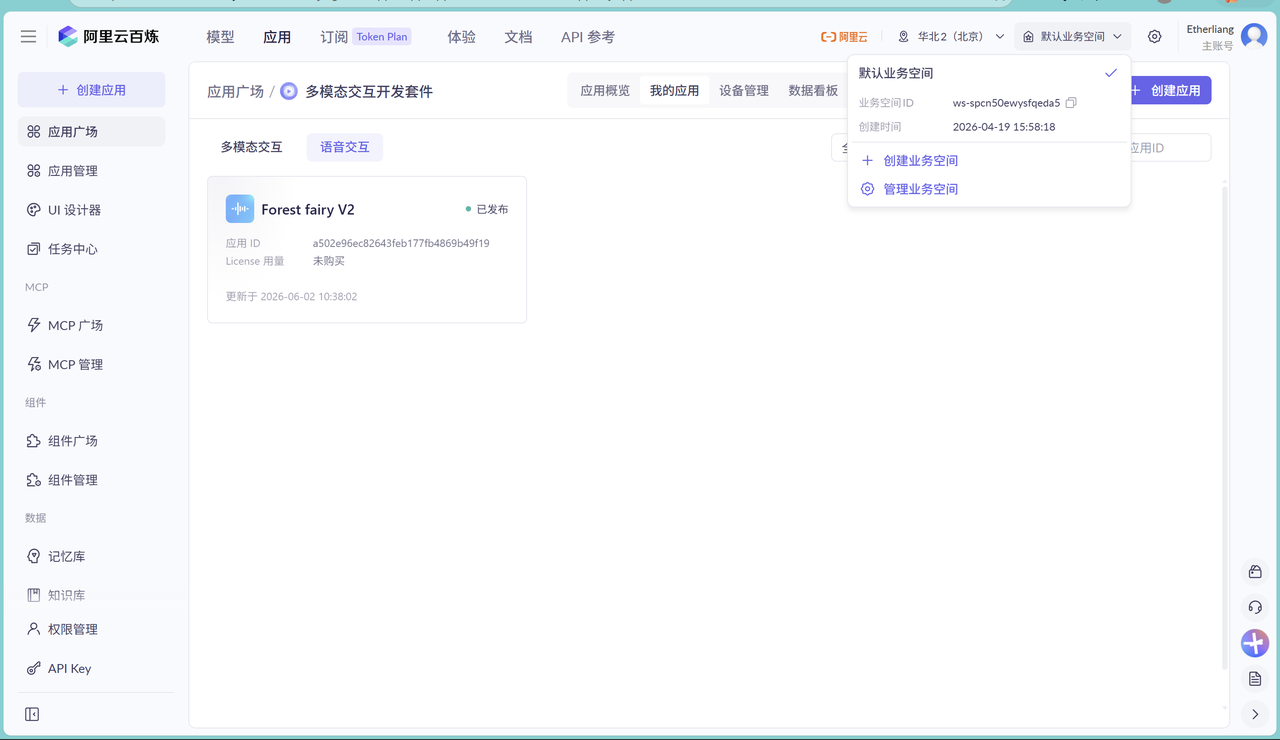
Alibaba Bailian (百炼) exposes a multimodal-dialog WebSocket API on DashScope. Firmware opens
wss://dashscope.aliyuncs.com/api-ws/v1/inference, sends 16 kHz mono PCM on push-to-talk, and receives
24 kHz TTS plus text events (transcript, dialog). The LLM model (e.g. Qwen) is chosen in
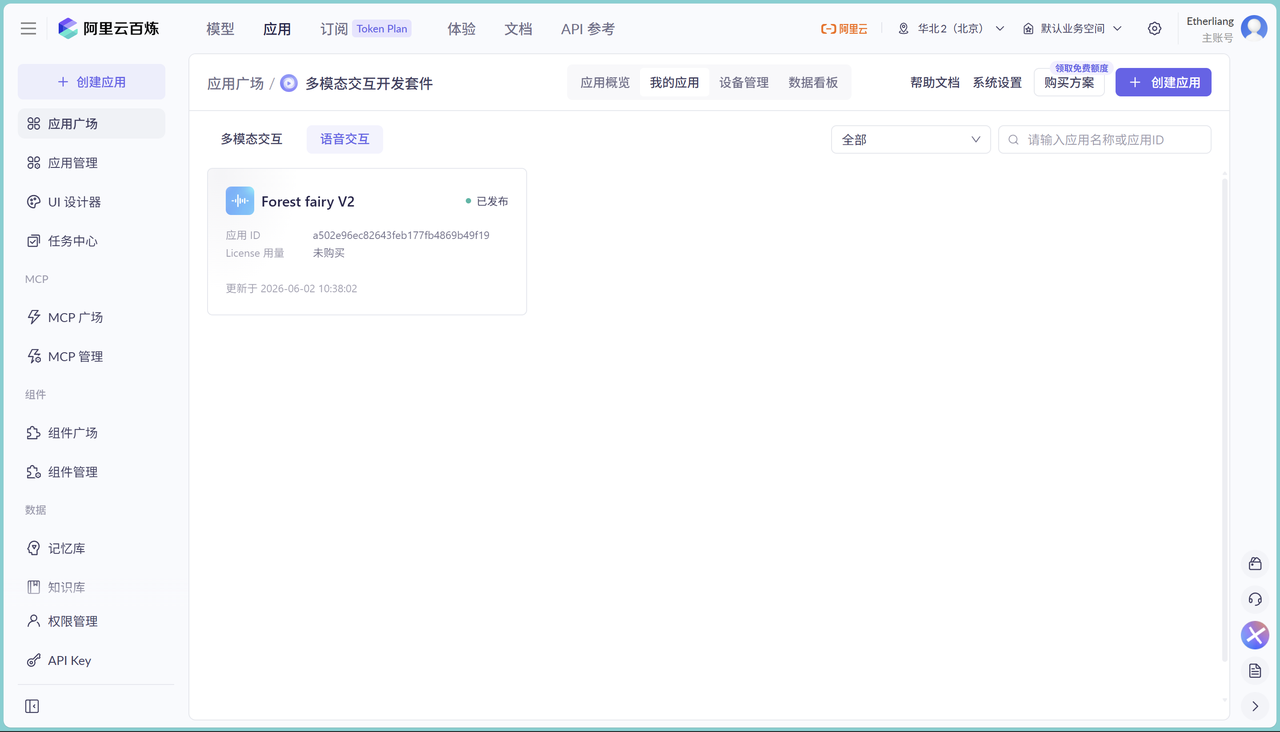
the Bailian console when you create the app, not hard-coded in C++.
I set up a Forest Fairy app in the console, copied app_id and workspace_id into
bailian_secrets.h, and ran pc_bailian_wss_test.py on the PC before flashing the board.
Plan and hardware
- PC smoke test: verify keys, app id, and workspace with Python WSS client.
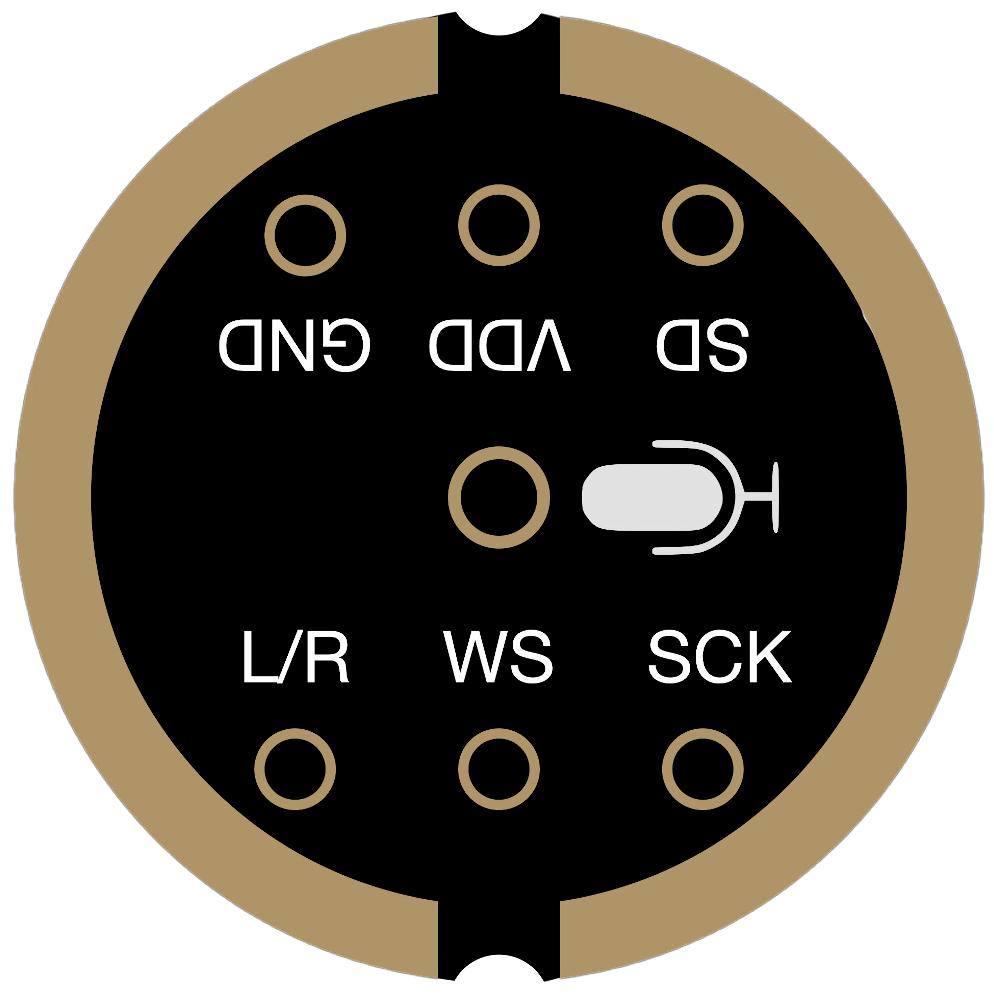
- Wire mic module and speaker to the WROOM display board (no third-party voice firmware).
- Port push-to-talk capture (
asr_record.cpp) and WSS state machine (bailian_dialog_client.cpp). - Print ASR and LLM strings on the AI chat TFT page; play TTS on I²S speaker.
- Archive sources under
code/week17-individual/; merge into final upload tree later.
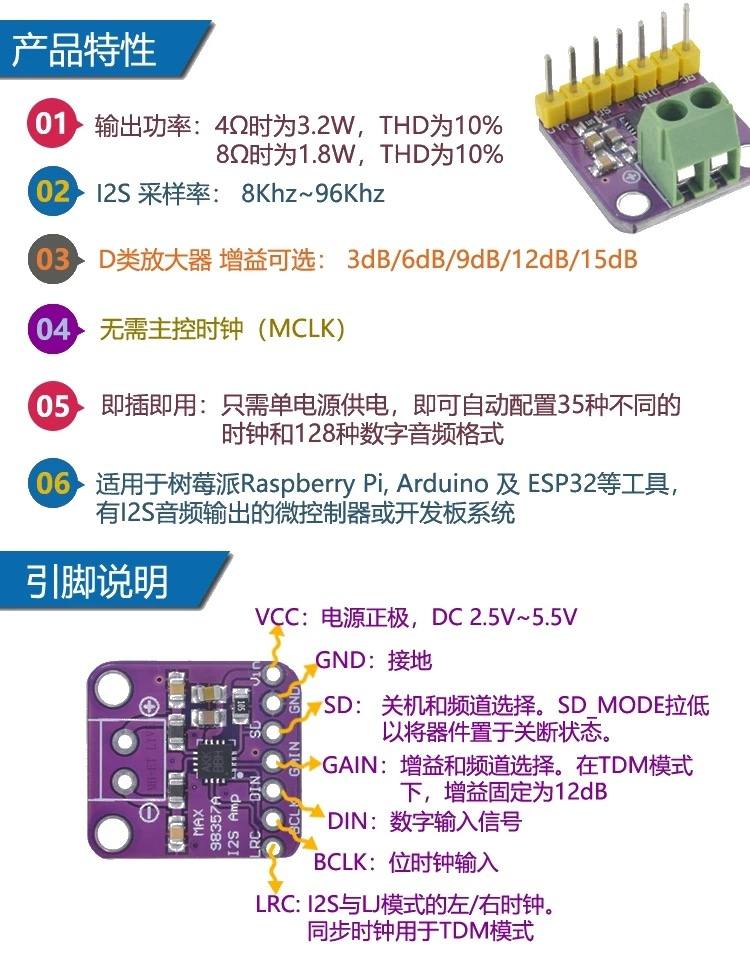
Source files
| File | Role |
|---|---|
asr_record.cpp | I²S mic capture, G1 button, stream PCM to WSS |
bailian_dialog_client.cpp | Duplex WSS: Start → SendSpeech → StopSpeech → events |
bailian_multimodal.cpp | Thin API wrapper around the dialog client |
local_chat.h | ASR + LLM reply strings for TFT chat page |
pc_bailian_wss_test.py | PC smoke test before flash |
Full build tree:
code/week17-individual/ (week archive) and
code/final-project-upload/wroom-upload/
(final upload). See README.md for PlatformIO targets
and serial acceptance logs.
Demo video
This recording shows the full loop: I speak to the plant companion, Bailian returns ASR/LLM/TTS over WebSocket, the host board sends reply text over I²C, the TFT chat bubbles update, and the speaker plays the answer.
Latency is fine for a demo script but not for rapid back-and-forth. I will not ship scare alerts or mood stories from noisy sensor channels — spoken lines should trace to a sensor flag or an explicit unknown.
Group assignment
Guangzhou (Chaihuo) — we compared IDE options for interface programming. I wrote when I actually use each tool, not a copied feature matrix. Photos are shared group references.
1) Arduino IDE — first flash, first blink
I still open Arduino IDE when the only question is “does this board boot and drive one pin?” Library manager plus one sketch file beats setting up a new PlatformIO tree for a ten-minute sensor check.
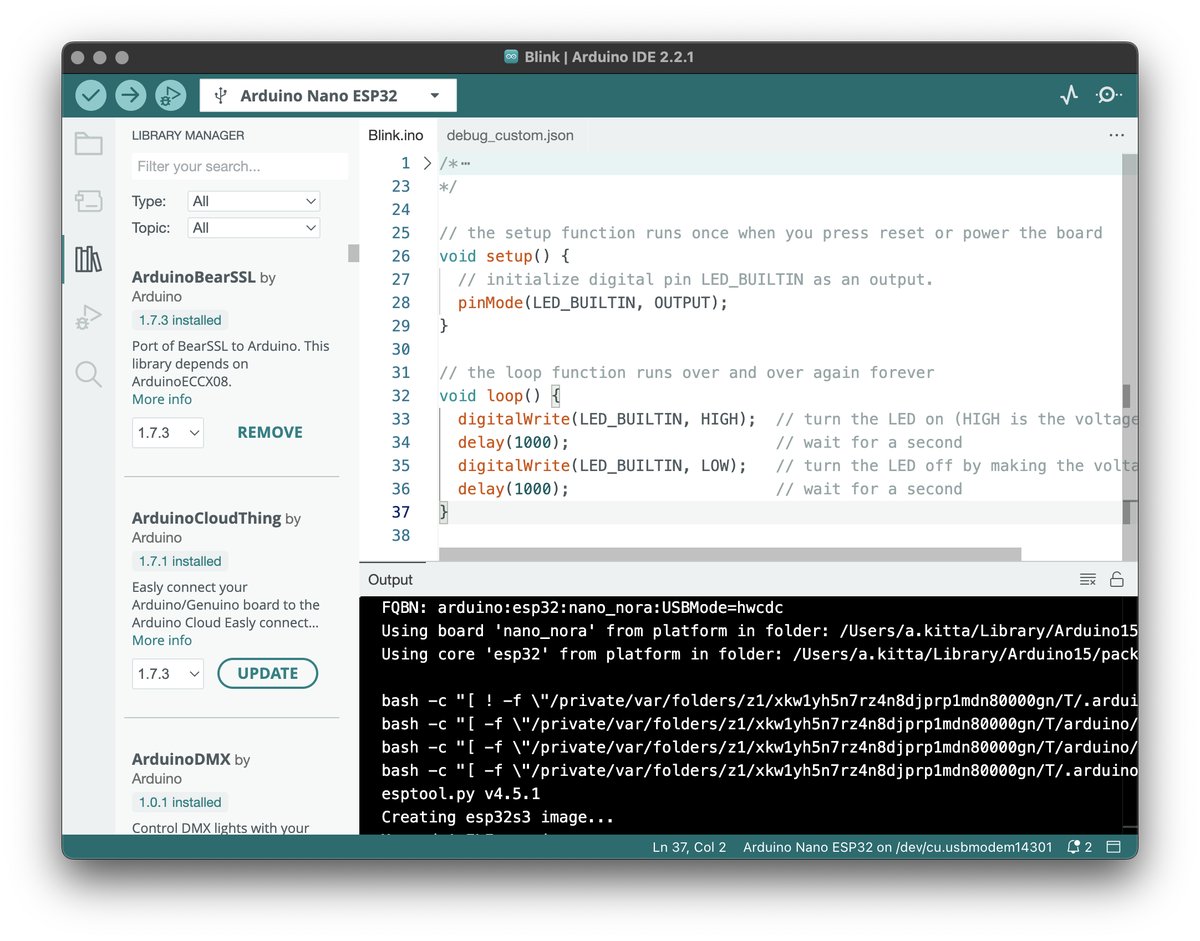
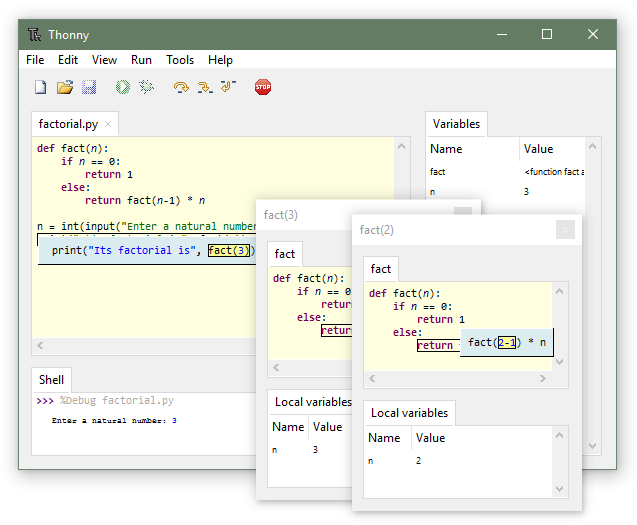
2) Thonny — MicroPython without ceremony
Thonny’s REPL and stop-on-error layout helped when I was toggling GPIO from MicroPython between hardware tests. I would not ship production firmware from it, but it is fine for classroom-scale scripts.
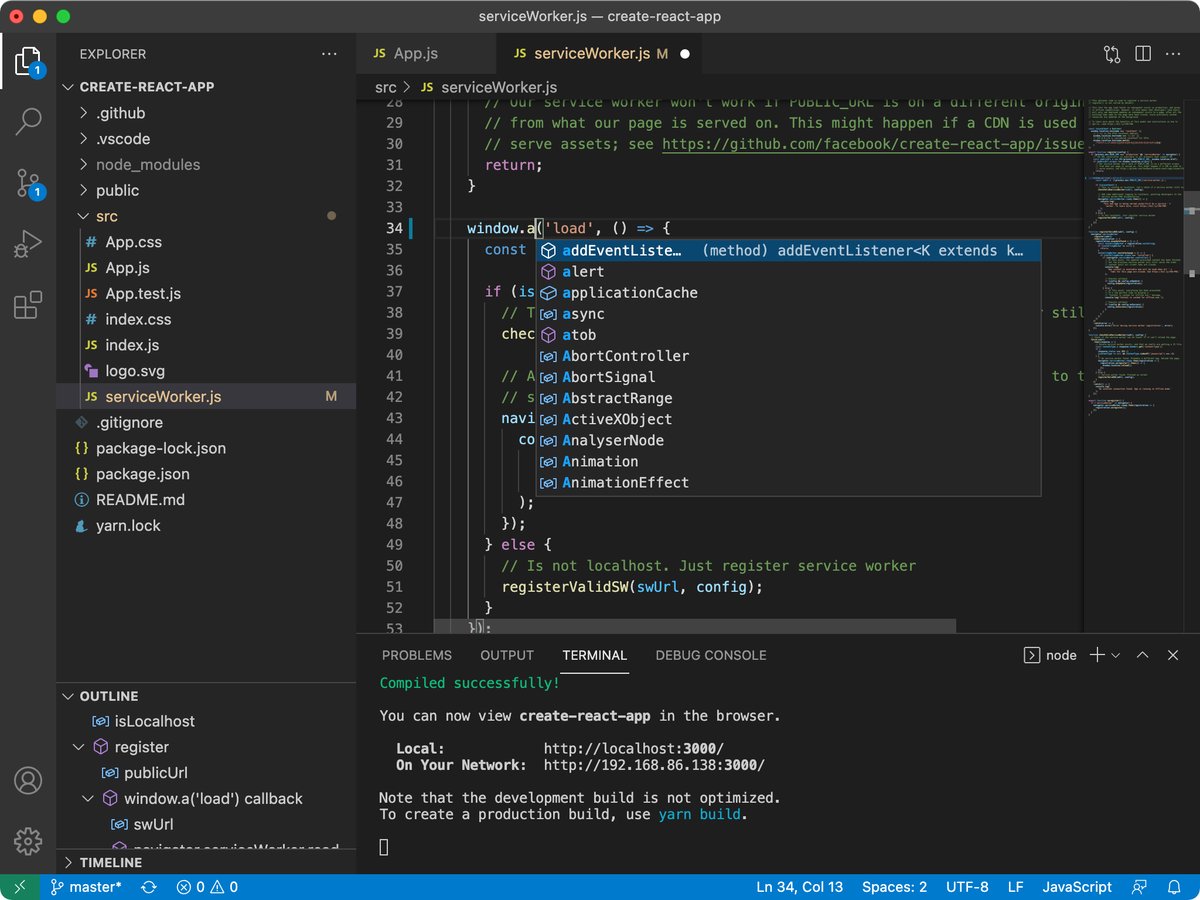
3) VS Code — daily editor for mixed work
Most of my Fab repo work lives in VS Code: PlatformIO builds, HTML assignment pages, and markdown notes in one tree. Cursor sits on top for the same reason when I want help drafting UI code.
4) Node-RED — flow wiring for IoT glue
Our Chaihuo group page also listed Node-RED for visual flow-based IoT glue (sensors → APIs → dashboards). I did not run Node-RED on this week’s TFT UI path, but I would reach for it when the task is “connect three cloud services and a sensor feed” without writing a full firmware tree. The group comparison table lives on the Chaihuo Week 15 group page.
5) MATLAB/Simulink — model before wiring risky loops
I have not used Simulink on every week, but when a control loop or filter needs tuning before hardware smoke, modeling there is cheaper than burning a motor driver. Speed is not the point; fewer blind retries is.
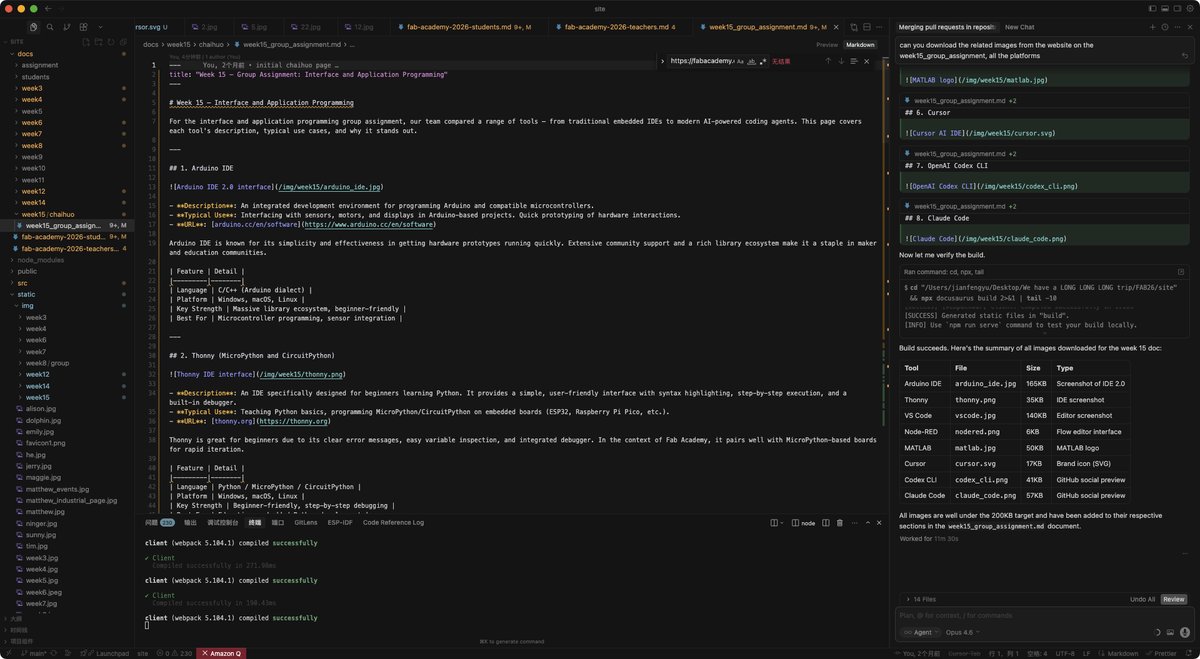
6) Cursor — AI on top of VS Code
I used Cursor to draft the first combined Fab Academy + button sketch and the 320×240 HTML swipe file, then rewrote
the firmware by hand. It helps with multi-file edits, but I still check pin names against board_pins.h
because the model once assumed resistive touch.
7) OpenAI Codex CLI
Codex CLI runs in the terminal. I use it when I am already in a shell (git status, PlatformIO upload, grep) and do not want to switch to an editor.
8) Claude Code
Our group also documented Claude Code in the terminal. I use it for refactors across wroom-display/ and
s3-hub/, but I still flash and read Serial myself before calling the week done.
How I actually pick a toolchain
- Arduino IDE for the first wire-up on unfamiliar boards.
- VS Code (often with PlatformIO) once the project has more than one file or target.
- Thonny for short MicroPython experiments.
- Node-RED when the job is IoT service wiring, not on-device UI drawing.
- MATLAB/Simulink when I need a simulated loop before touching power electronics.
- Cursor, Codex CLI, or Claude Code when I want AI help drafting or refactoring — always followed by hardware tests.
| Tool | Type | AI | When I reach for it |
|---|---|---|---|
| Arduino IDE | Desktop IDE | No | First flash, one-file sensor checks |
| Thonny | Desktop IDE | No | MicroPython pin toggles between hardware tests |
| VS Code | Editor + extensions | Via extensions | Daily repo work, PlatformIO builds |
| Node-RED | Visual flows | No | IoT glue; not used on this TFT week |
| MATLAB + Simulink | Simulation | No | Control loops before risky hardware |
| Cursor | AI IDE | Yes | HTML UI draft, early combined sketch |
| Codex CLI | Terminal agent | Yes | Shell-first edits and uploads |
| Claude Code | Terminal agent | Yes | Multi-folder refactors with git context |
Source
Group template and media source: Week 15 — Group Assignment: Interface and Application Programming.