Week 5: 3D Scanning and Printing
Planted February 19, 2026
Overview
3D scanning and printing: capture real-world objects as digital models and fabricate designs additively. This week: design and print something that can’t be made subtractively, and 3D scan an object.
Group assignment
Individual assignments
tools used
Scanning: Shining 3D by Einstar 3D printing: Bambulab P1S and A1
3D scan an object
I used the SHINING 3D Einstar handheld scanner and its software. Workflow: Device → Calibration → Scan → Post Processing → Measurement.
Device and software
Einstar connects via USB. The software guides you through project creation, calibration, scanning, and post-processing (new or open project group).

Calibration (before scanning)
Calibrate first so the scanner and software align. The Calibration guide shows the scanner over the calibration board. Do Quick Calibration and White Balance with the board in view—keep it clean, move it slowly. Hold the scanner above the white sheet (grid of black markers) on a stable surface.


When enough data is captured, the software shows a green checkmark. A Reminder then says “Quick calibration succeeded” and recommends storing the board safely.


New project and scan settings
Create a new project and name it (e.g. save to Desktop).

In New Project choose:
- Mode: Portrait (person) or Object (general object). For an object scan, select Object.
- Object size: Medium and large objects or Small objects (choose according to your subject).
- Mode of alignment: Features, Texture alignment, or Hybrid alignment (Features & Markers). Features is often used for object scanning.
- Resolution: Slider from 0.1 mm (high) to 0.5 mm (low); e.g. 0.2 mm for a balance of detail and speed.
- Texture scan: Toggle on to capture color and surface texture.
Click Apply to create the project.

Scan stage and hardware
In Scan you get the camera preview, Scan Setting (Brightness, Working distance 160–250 mm), and Texture Flashing (recommended on). Use Start Scan Preview; navigate with left mouse = rotate, middle = pan, scroll = zoom. Hold the scanner steadily and move slowly around the object.


Scan result
The software shows the 3D model (with color). You may get floating artifacts to clean up in post-processing.

Post-processing (meshing)
Post Processing turns the capture into a mesh (Meshing Data); a progress bar shows completion. Then export or use the model for measurement or 3D printing.

3D Printing
OpenSCAD
I used OpenSCAD to create 3D designs (I’d planned to use it for generative design). Below are the designs and process.
I had to design and 3D print something that could not be made subtractively—so no milling or cutting from a solid block. I did everything in OpenSCAD (2021.01); all my source files live in the 3dprinting_assets folder.
1. Spiral vase (twisted hollow container)
I started with a parametric twisted polygon container—a hollow vase that twists from base to top. You can’t make this subtractively because the twist and the inner cavity can’t be reached with a single tool from the outside.
Design

I designed this in OpenSCAD in spiral_vase.scad with: base radius 40 mm, top radius 48 mm, height 65 mm, wall thickness 2.5 mm; 6 sides and 120° total twist (more twist gives a deeper spiral); a pinch around 35% height and a flare at the top; 60 layers for the extrusion. The body is built by extruding a polygon that rotates and scales with height, then I used a difference() between outer and inner twisted shells to get the hollow. That’s the kind of shape that only really makes sense for additive.
Printed

I exported the model as STL and then printed it.
2. Klein bottle
I wanted at least one “impossible” object, so I did a Klein bottle—the mathematical surface that passes through itself and has no boundary. You can’t machine it from a block because the surface is closed and self-intersecting; there’s no way to get a tool inside.
Design

I designed this in OpenSCAD using the klein.scad script, which pulls in klein-bottle-functions.scad (parametrization from mathcurve.com) and solid.scad for turning the surface into a solid. The script builds inner and outer surfaces with a wall thickness of 0.7 and combines them into a watertight solid.
Printed
 I exported it as STL and then printed it.
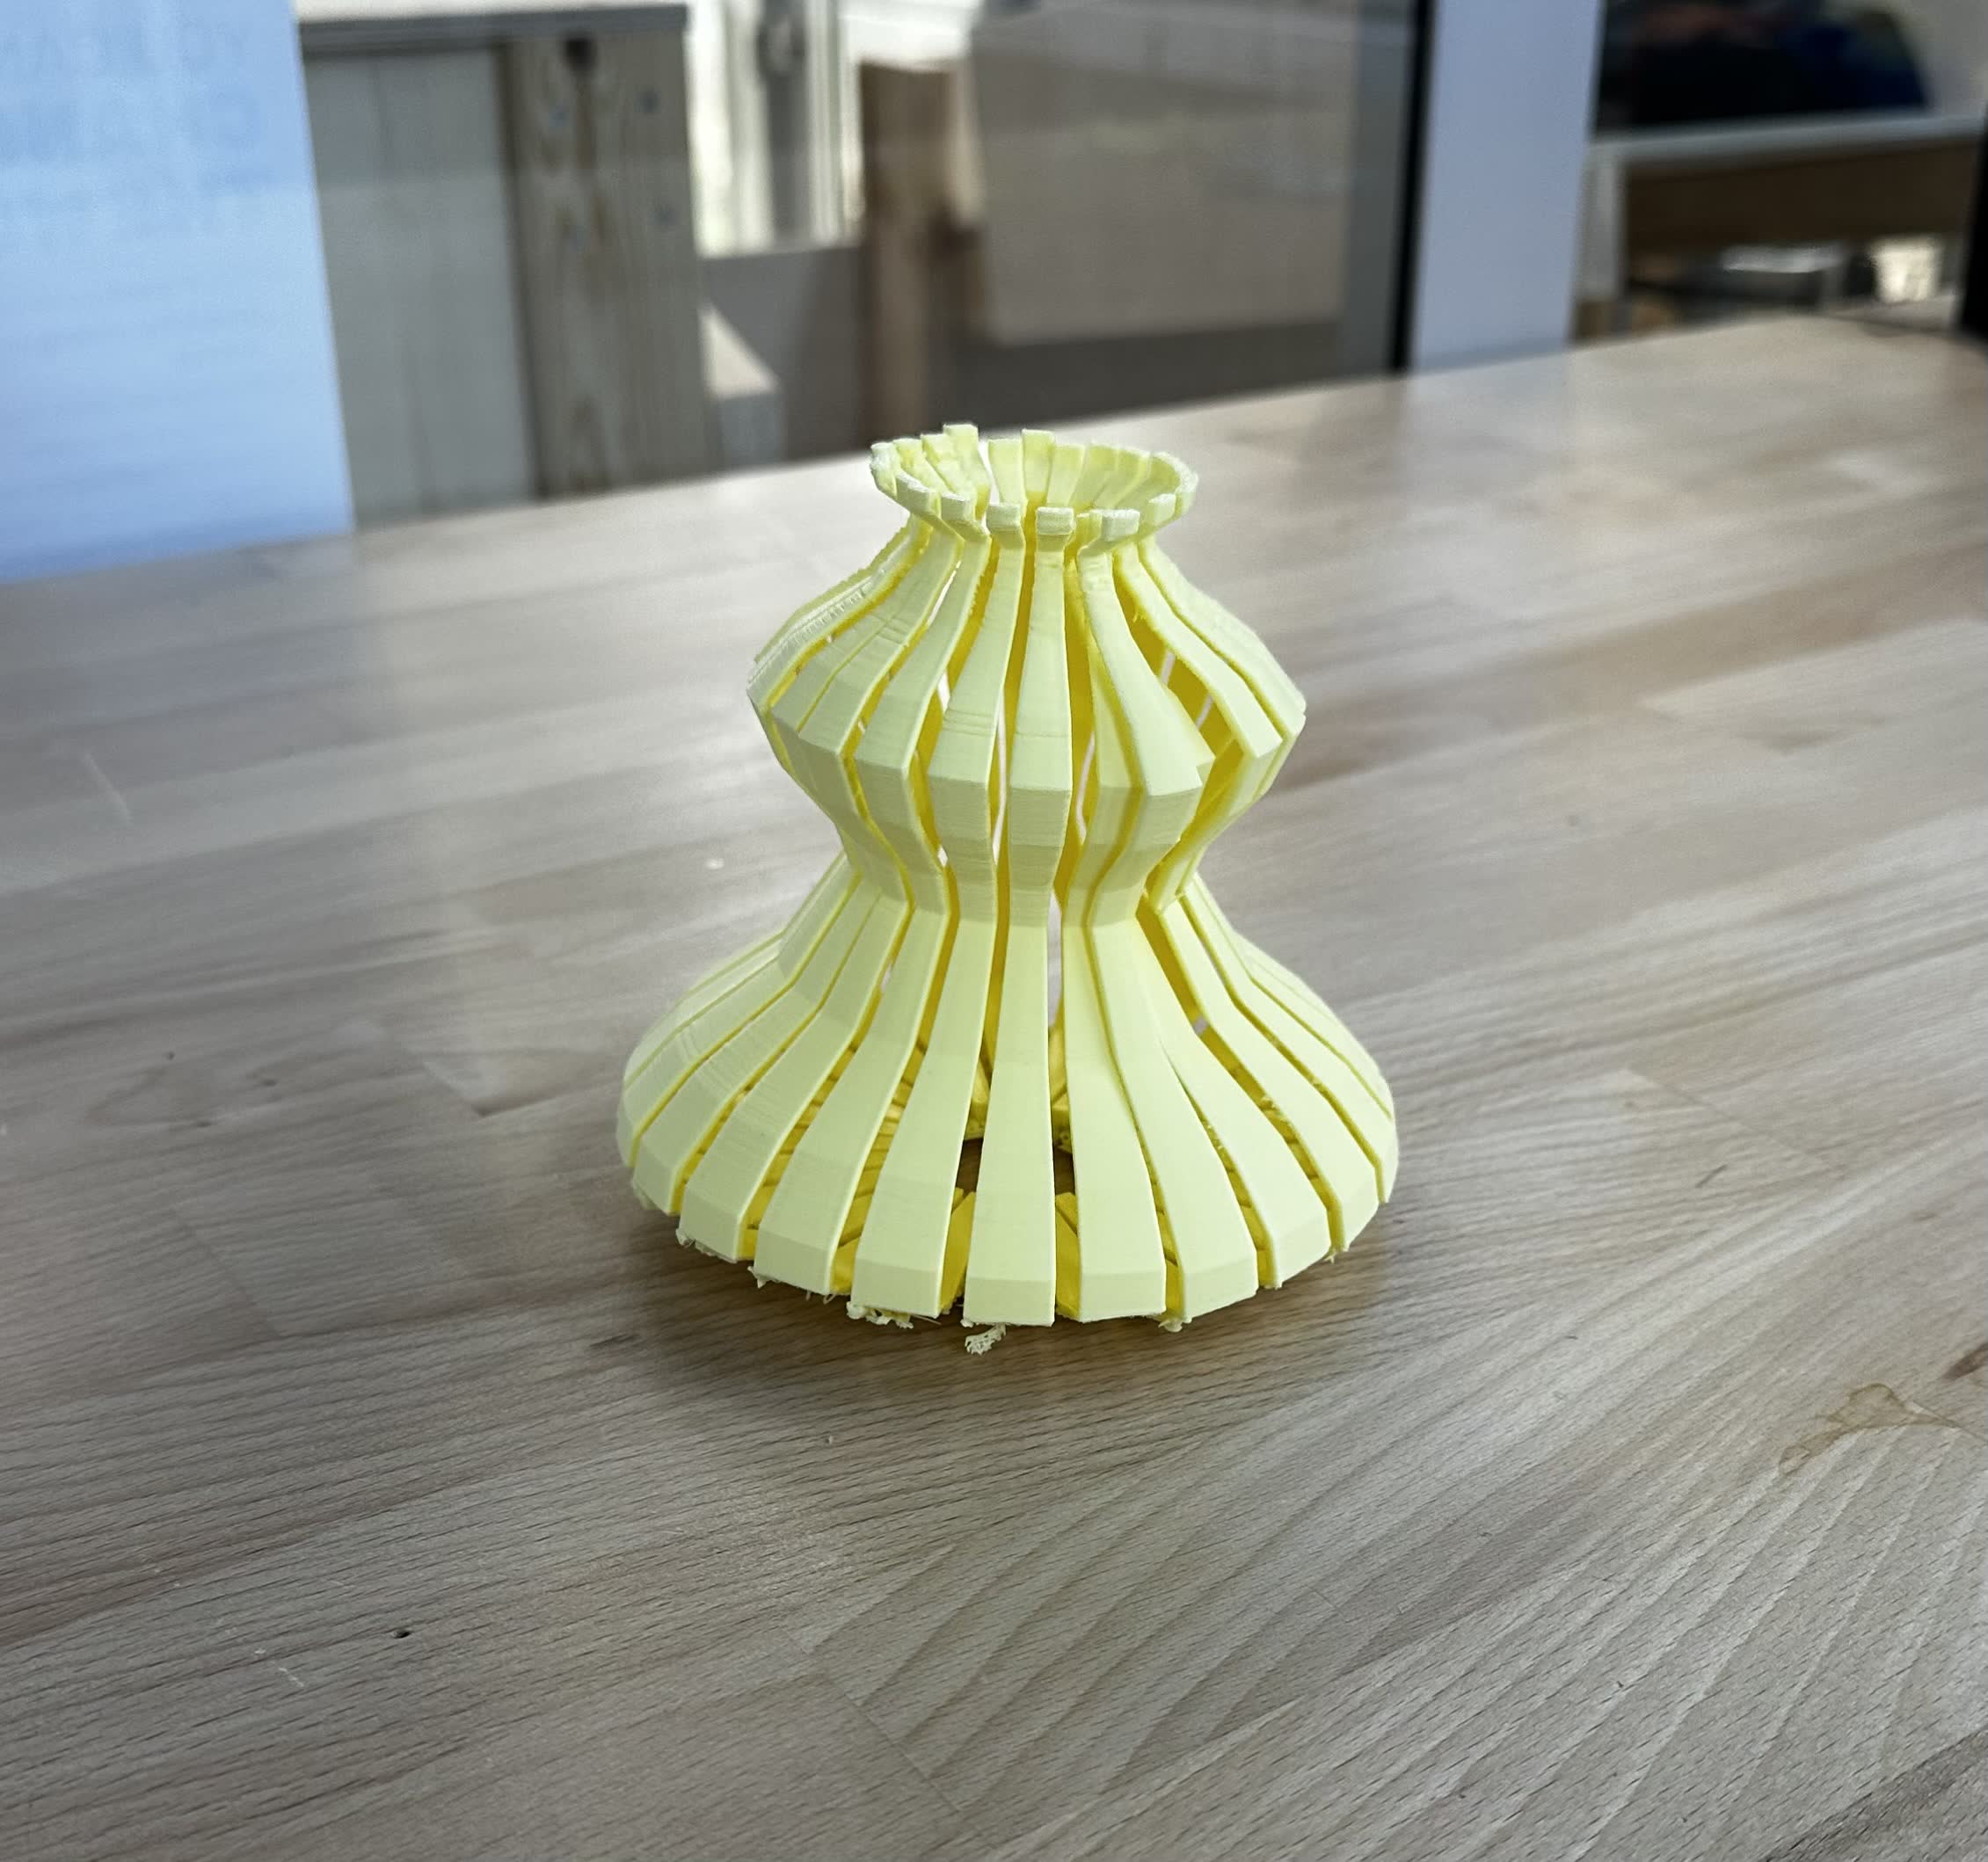
3. Decorative ribbed vase
For the third design I made a parametric vase with several bulges, 24 vertical ribs, and a hollow shell. The undercuts, ribs, and internal cavity would be impractical to do subtractively in one setup.
Design

I designed this in OpenSCAD in decorative_vase.scad: 24 segments with a 3° gap between ribs; wall thickness 2.5 mm and a solid base 3 mm thick; and a profile with total height 115 mm and radii for base, waist, upper bulge, neck, and rim. The profile is a list of [radius, height] points that I rotate_extrude() into a solid, then I cut it with angular wedges to get the ribbed segments. The result is one hollow, ribbed body that 3D printing can do in one go.
Printed

I exported the model as STL and then printed it.
Files and export
Everything is in the 3dprinting_assets folder:
spiral_vase.scad— twisted polygon containerklein.scad— Klein bottle (usesklein-bottle-functions.scadandsolid.scad)decorative_vase.scad— ribbed vasesolid.scad— surface/solid helpers for the Klein bottleklein-bottle-functions.scad— Klein bottle parametrization
I exported each design from OpenSCAD with Design → Export as STL (or the Export as STL icon), then opened the STLs in the slicer and adjusted layer height, infill, and supports for our lab printer and material.
Gaudi
I wanted to build something parametric and 3D-printable inspired by Antoni Gaudí. Two things stood out: the vaults at Casa Milà (La Pedrera), and Gaudí’s hanging chain models—the catenary arches he used for form-finding at the Church of Colònia Güell and the Sagrada Família. He hung chains and weights from a ceiling and looked at the inverted shape in a mirror; the catenary is the natural shape under gravity, and when you flip it you get an arch in pure compression. I implemented both: a vault system driven by catenary profiles (Casa Milà–style) and a digital hanging-chain network (Gaudí’s catenary arches). The app is written in JavaScript with Three.js, runs in the browser, and exports STL. You can switch between vault and chain, tweak parameters, and export for 3D printing. The code is in the gaudi folder; below is the core logic and how the geometry is generated.
Vaults
Catenary-arch vaults: span and height define the profile; inner and outer curves form a thick shell; modules are extruded and arranged radially or in a row.
vault arch 1

vault arch 2

Chains
Hanging chain network: rings with shrinking radius, per-spoke sag, circumferential and radial catenaries, suspension threads and weights; invert to get an arch.
chain

CatenaryCurve.js — mathematical core
The catenary is y = a cosh(x/a). For a given span and height we solve for a with bisection, then sample the curve. hanging3D builds a 3D catenary between two points (used for each chain segment).
import * as THREE from 'three';

/* CatenaryCurve — y = a * cosh(x / a), solved numerically via bisection */
export class CatenaryCurve {

  static solveCatenaryParam(span, height) {
    if (height <= 0.001) return span * 200;
    const half = span / 2;
    let lo = 1e-4, hi = span * 200;
    const f = a => a * Math.cosh(half / a) - a;
    for (let i = 0; i < 120; i++) {
      const mid = (lo + hi) / 2;
      if (f(mid) > height) lo = mid; else hi = mid;
    }
    return (lo + hi) / 2;
  }

  static generatePoints(span, height, resolution) {
    const a = this.solveCatenaryParam(span, height);
    const half = span / 2;
    const pts = [];
    for (let i = 0; i <= resolution; i++) {
      const x = -half + (i / resolution) * span;
      const y = height - (a * Math.cosh(x / a) - a);
      pts.push({ x, y: Math.max(y, 0) });
    }
    return { points: pts, param: a };
  }

  static hanging3D(pA, pB, sag, res = 20) {
    const dx = pB.x - pA.x, dy = pB.y - pA.y, dz = pB.z - pA.z;
    const hDist = Math.sqrt(dx * dx + dz * dz);
    if (hDist < 0.001) {
      const out = [];
      for (let i = 0; i <= res; i++) {
        const t = i / res;
        out.push(new THREE.Vector3(pA.x + t * dx, pA.y + t * dy, pA.z + t * dz));
      }
      return out;
    }
    const safeSag = Math.max(sag, 0.01);
    const a = this.solveCatenaryParam(hDist, safeSag);
    const out = [];
    for (let i = 0; i <= res; i++) {
      const t = i / res;
      const localX = -hDist / 2 + t * hDist;
      const catenaryVal = a * Math.cosh(localX / a) - a;
      const sagOffset = catenaryVal - safeSag;
      out.push(new THREE.Vector3(
        pA.x + t * dx,
        pA.y + t * dy + sagOffset,
        pA.z + t * dz
      ));
    }
    return out;
  }
}
GeometryUtils.js — offset curve and arch shape
Thick shell = inner + outer catenary. Offset uses the curve normal: ox = x + t·tanh(x/a), oy = y + t/cosh(x/a). Trace inner → ground → outer → ground → close for extrusion.
import * as THREE from 'three';

export class GeometryUtils {
  static offsetCurve(points, thickness, a) {
    return points.map(p => ({
      x: p.x + thickness * Math.tanh(p.x / a),
      y: p.y + thickness / Math.cosh(p.x / a)
    }));
  }

  static createArchShape(inner, outer) {
    const s = new THREE.Shape();
    s.moveTo(inner[0].x, inner[0].y);
    for (let i = 1; i < inner.length; i++) s.lineTo(inner[i].x, inner[i].y);
    const oR = outer[outer.length - 1];
    s.lineTo(oR.x, 0);
    s.lineTo(oR.x, oR.y);
    for (let i = outer.length - 2; i >= 0; i--) s.lineTo(outer[i].x, outer[i].y);
    s.lineTo(outer[0].x, 0);
    s.lineTo(inner[0].x, inner[0].y);
    return s;
  }

  static maxOverhangDeg(points) {
    let max = 0;
    for (let i = 1; i < points.length; i++) {
      const dx = points[i].x - points[i - 1].x;
      const dy = points[i].y - points[i - 1].y;
      const fromVertical = Math.PI / 2 - Math.atan2(Math.abs(dy), Math.abs(dx));
      if (fromVertical > max) max = fromVertical;
    }
    return max * 180 / Math.PI;
  }
}
VaultModule.js and VaultSystem.js — vault modules
A single vault is one catenary arch: inner profile, offset outer profile, closed shape, then extrude along the vault length. VaultSystem creates several modules and arranges them radially (like a ceiling) or in a row; it centers the group on the ground and can optionally invert Y (hanging mode) or scale to a build volume.
import * as THREE from 'three';
import { CatenaryCurve } from './CatenaryCurve.js';
import { GeometryUtils } from './GeometryUtils.js';

export class VaultModule {
  constructor() { this.geometry = null; }
  create(params) {
    this.dispose();
    const { span, height, thickness, curveResolution, vaultLength } = params;
    const { points: inner, param: a } = CatenaryCurve.generatePoints(span, height, curveResolution);
    const outer = GeometryUtils.offsetCurve(inner, thickness, a);
    const shape = GeometryUtils.createArchShape(inner, outer);
    this.geometry = new THREE.ExtrudeGeometry(shape, {
      steps: Math.max(2, Math.round(vaultLength / 4)),
      depth: vaultLength,
      bevelEnabled: false
    });
    this.geometry.computeVertexNormals();
    return this.geometry;
  }
  dispose() {
    if (this.geometry) { this.geometry.dispose(); this.geometry = null; }
  }
}

import { VaultModule } from './VaultModule.js';

export class VaultSystem {
  constructor(scene) {
    this.scene = scene;
    this.group = new THREE.Group();
    scene.add(this.group);
    this.modules = [];
    this.material = new THREE.MeshStandardMaterial({
      color: 0xc8a878, roughness: 0.72, metalness: 0.08,
      side: THREE.DoubleSide
    });
  }
  generate(params) {
    this.clear();
    const { numberOfModules, radialAngle, arrangementMode, vaultLength, hangingMode, autoScaleToBuildVolume } = params;
    const moduleAngle = (radialAngle / numberOfModules) * Math.PI / 180;
    for (let i = 0; i < numberOfModules; i++) {
      const mod = new VaultModule();
      const geom = mod.create(params);
      const mesh = new THREE.Mesh(geom, this.material);
      if (arrangementMode === 'radial') {
        mesh.position.z = -vaultLength / 2;
        const pivot = new THREE.Group();
        pivot.add(mesh);
        pivot.rotation.y = i * moduleAngle;
        this.group.add(pivot);
      } else {
        mesh.position.z = i * vaultLength;
        this.group.add(mesh);
      }
      this.modules.push(mod);
    }
    const box = new THREE.Box3().setFromObject(this.group);
    const center = new THREE.Vector3();
    box.getCenter(center);
    this.group.position.set(-center.x, -box.min.y, -center.z);
    if (autoScaleToBuildVolume) {
      const box2 = new THREE.Box3().setFromObject(this.group);
      const size = new THREE.Vector3();
      box2.getSize(size);
      const maxDim = Math.max(size.x, size.y, size.z);
      if (maxDim > 80) this.group.scale.setScalar(80 / maxDim);
    }
    if (hangingMode) {
      this.group.scale.y *= -1;
      const box3 = new THREE.Box3().setFromObject(this.group);
      this.group.position.y -= box3.min.y;
    }
  }
  worldBox() { return new THREE.Box3().setFromObject(this.group); }
  clear() { /* ... */ }
}
HangingChainModel.js — chain network
The chain model mimics Gaudí’s physical setup: a top disk, several levels of rings (radius shrinking toward the center), and per-spoke “character” so each spoke sags differently for an organic look. We compute node positions per ring, then draw circumferential and radial chains (CatenaryCurve.hanging3D), suspension threads, and weight bags. Tubes = TubeGeometry on catenary points; weights = lathed. Center, scale to build volume, or invert Y for an arch. Full source: gaudi/HangingChainModel.js.
Generating the Arch
First we fix span and height and solve for the catenary parameter a so the curve passes through the desired rise. We sample the inner arch with generatePoints, then offset outward using the analytical normal to get the outer curve. The arch shape is closed (inner → ground → outer → ground → inner) and passed to ExtrudeGeometry with a depth equal to vault length. Each vault module is a mesh; we duplicate it and either rotate copies around the Y axis (radial) or stack them along Z (linear). The group is centered and its bottom placed on the ground; we can flip Y for a “hanging” view or scale so the longest dimension fits a 80 mm build volume. Overhang is computed from the arch points so you can keep it under ~50° for printing.

Generating the Chain Model
We build a list of rings: at each level the radius shrinks (e.g. by 80% toward the center), and we apply an alternating angle offset so radial chains branch in a binary pattern. Each spoke has a “character” multiplier (a combination of sines and cosines in angle) so sag varies per direction and the result isn’t perfectly symmetric. Node positions are computed by accumulating sag along each spoke. Circumferential chains run between neighboring nodes in the same ring; radial chains run from each node to the node(s) in the next ring (one direct + one phase-shifted for branching). Suspension threads run from the disk boundary to inner nodes with a small sag. Weights are placed at the bottom ring and every other intermediate ring, with a short vertical thread and a lathed “bag” below. Every segment between two 3D points is a catenary via hanging3D. The mesh is then centered, optionally scaled, and optionally inverted to produce an arch form. Export STL when you’re happy with the parameters.

fabrication
After these generations I exported them using the STL export and sent them over to the printers through the bambulab slicer on our printer farm computer for fabrication.
Vault
in printer

final pose

Chains
in printer
 final pose

gaudis together

Fun with models
After Sedat saw my models said cool why not light ’em up so I did
fun with vase/lamp
fun with gaudi
Overall it was an interesting and productive week especially getting to do something related to gaudi a core memory for me.