Week 1: Principles and Practices, Project Management
In this section you will find:
> How I created the Website
> About Git and GitLab
> My Final Project Idea (Proposal)
Assignment
- Work through a Git tutorial
- Create a website and document how I did it
- Plan and sketch a potential final project
Timetable for the week

Link to my schedule
Creating my Website!
To build my website I will be using MkDocs, a static site generator. The site's source files will be written in Markdown and configured using a single YAML configuration file.
Why MkDocs?
I chose MkDocs because: - Write documentation in simple Markdown - Automatic conversion to HTML - Easy to maintain and update - Clean, professional look with Material theme
Planning the Website with Claude AI
Before installing anything, I actually started by talking to Claude AI to figure out what kind of website I wanted. I shared my GitLab repository link and asked for help. At first I had the default template that Fab Academy provides, and I wasn't sure whether to keep it or start from scratch.
Claude helped me decide to go with MkDocs because I wanted to write my documentation in .md files and have it automatically convert to HTML — which is exactly what MkDocs does.
After deciding to go with MkDocs, I asked Claude to:
- Help me with the mkdocs.yml configuration file
- Customize the colors and theme
- Explain how to write in Markdown
Claude generated the initial config files and folder structure for me. I then copy-pasted them into VS Code and went through everything line by line to understand what each part did. It wasn't just copy-paste and done — I made changes along the way based on what I actually wanted.
Installing MkDocs on Windows PC
We first need to make sure that we have the latest version of Python installed. As of January 2026, the latest stable version is Python 3.14.2.

When installing, make sure to check the box that says "Add Python to PATH" before clicking Install Now! This is crucial - if you forget this, Python commands won't work in your command prompt.

Install MkDocs and Plugins
Now that Python is installed, let's install MkDocs. To install MkDocs and other plugins, open your Command Prompt and enter the following commands one by one and press enter after each:

Yay! We have installed MkDocs with required plugins to our document. Now let's download Git.
Customizing the Theme
Once I had the basic config from Claude, I started making it my own. Here is what my mkdocs.yml looks like:
site_name: Fab Academy - Sonam Tshering
site_description: My Fab Academy documentation
site_author: Sonam Tshering

theme:
  name: material
  logo: images/logo.png
  favicon: images/logo.png
  palette:
    - scheme: slate
      primary: black
      accent: deep purple
      toggle:
        icon: material/brightness-4
        name: Switch to light mode
    - scheme: default
      primary: black
      accent: deep purple
      toggle:
        icon: material/brightness-7
        name: Switch to dark mode
Here is the link to view my full mkdocs.yml file.
Two things I specifically did myself:
Dark mode as default — I set scheme: slate as the first palette option, which means the site loads in dark mode by default. I wanted this because I personally prefer dark mode and I think it looks cleaner.
Logo — I added my own logo.png file to the images folder and linked it in the config. This shows up in the top left corner of the site and also as the favicon (the small icon on the browser tab).
Here is the link to view my logo file: logo.png
What is Git?
Git is a version control system (VCS), which you can think of as a "time machine" for your project files. It's a free, open-source tool that helps you save and manage different versions of your code and other files on your computer.
Here is the link to how I learned about Git.
Here is the link to download Git

After that we need to configure Git. Configuring Git means telling Git who you are. You can use Git Bash or Command Prompt - I used Command Prompt.
Configure it using these commands:
To check your identity, use:

Generating SSH Key
An SSH key is like a digital key that helps you log in to servers safely. The private key stays on your computer, and the public key is shared with GitLab so it knows it's really you.
Generate your SSH key using the following command:
When it asks where to save the key, just press Enter to use the default location. When it asks for a passphrase, you can either press Enter twice to skip it (easier but less secure), or set a password for extra security (you'll have to enter it each time).

To open your SSH key in Notepad so you can copy it easily, use:

What is GitLab?
GitLab is a website where people work together on code. It stores code in one place, helps track changes using Git, and can automatically test and deploy projects. Basically, it's a tool that helps teams collaborate and manage a project from start to finish.
Adding SSH Key to GitLab
Now let's add our SSH key to GitLab:
Go to GitLab and log in. Click your profile picture (top right), then click Preferences. From the left menu, click SSH Keys. Paste your key into the big "Key" box. Give it a simple title. Click Add key.

Setting Up the Folder Structure in VS Code
Now that your SSH key is ready, make a folder to save your repo. I called mine sonam-tshering.
Go to FabCloud on GitLab and copy the Clone with SSH link.

Open your Command Prompt and navigate to your Desktop:
Now clone your repository:

Then navigate into your project folder:
Now create the folder structure for MkDocs:
Opening in VS Code
Now open the project in VS Code using:
This opens your whole project folder in VS Code. From here I created the MkDocs files that Claude had generated for me — I copy-pasted them directly into VS Code:
mkdocs.yml— in the root folder (this controls the site config, theme, colors, and navigation).gitlab-ci.yml— updated to build MkDocs instead of just serving static filesdocs/index.md— home pagedocs/about.md— about pagedocs/assignments/week01.md— week 1 documentation

During the process of editing the website I learned about HTML and Markdown.
Here is the link where I learned about Markdown
Here is the link from where I learned about HTML
Testing Locally
Before pushing to GitLab, I tested the site locally by running:
Then opened my browser and went to http://127.0.0.1:8000 to see the site live on my computer. This is super helpful because you can see changes in real time without pushing to GitLab every time.
Git Mantra
Once you've made some changes to your project, you can push it to your remote repository on GitLab. This lets you work on your own computer, make changes, and then sync them with GitLab. Git keeps track of all changes so you can undo them if needed. By syncing with GitLab, you and others can work together without messing up each other's work.
Here's the Git Mantra:
Shows what changes you made and which ones are being tracked. Tracks all the changes you made so they can be uploaded. Saves your changes with a message. Make the message clear! Sends all your saved changes to GitLab.
My website is live, yay!

Terminology
Definitions below were generated using AI (ChatGPT and Claude AI) to provide clear and concise explanations. The prompt I used was: "Explain the following terms in layman's terms" — then I listed the terms. I fact-checked and edited the definitions based on my own understanding before publishing.
Definitions
Local repository – A Git project that exists on your local computer.
Remote repository – The same Git project hosted online for collaboration and backup.
Version control – A system used to track and manage changes made to files over time.
Branch – An independent version of the code where new features or changes can be developed without affecting the main codebase.
Commit – A recorded snapshot of changes made to the code at a specific point in time.
Pipeline – A series of automated processes that build, test, and deploy code.
CI/CD – Continuous Integration and Continuous Deployment is a workflow that automates building, testing, and deploying software to improve speed and reliability.
.gitlab-ci.yml – A configuration file used to define and control the CI/CD pipeline.
Basic Git Commands Learned This Week
-
git --version— Displays the installed Git version. -
git init— Creates a new Git repository. -
git clone <repo-url>— Copies an existing repository to your local machine. -
git status— Shows the current state of files and changes. -
git add .— Stages all modified files for commit. -
git commit -m "message"— Records staged changes with a message. -
git push— Uploads local commits to the remote repository. -
git pull— Fetches and merges updates from the remote repository. -
git log— Displays the commit history. -
git branch— Lists all branches in the repository. -
git checkout <branch-name>— Switches to a different branch. -
git merge <branch-name>— Merges changes from one branch into another. -
git remote -v— Shows the configured remote repositories.
Final Project Proposal: Vision Voice
The Concept
Vision Voice is a wearable assistive device designed to facilitate communication for individuals who are Deaf. Since most people are not fluent in Sign Language, this device translates American Sign Language (ASL) gestures into audible speech and visible text in real time, enabling seamless interaction between users and those unfamiliar with sign language.

The "Why"
Communication is a basic human right. Most current solutions use cameras, so the user has to stay in front of a laptop or phone. Vision Voice is a small wearable that works anywhere, letting the user communicate naturally with their hands.

Prior Art & Research
What has been done before?
Some similar ideas already exist, which give inspiration and help improve the design:
- SignAloud (University of Washington): Gloves that won the Lemelson-MIT Student Prize. They used flex sensors but needed to be connected to a computer.
- Sign-IO (Roy Allela): A smart glove that connects to a mobile app via Bluetooth.
- Fab Academy Projects: Students have made "Data Gloves" for music or VR.
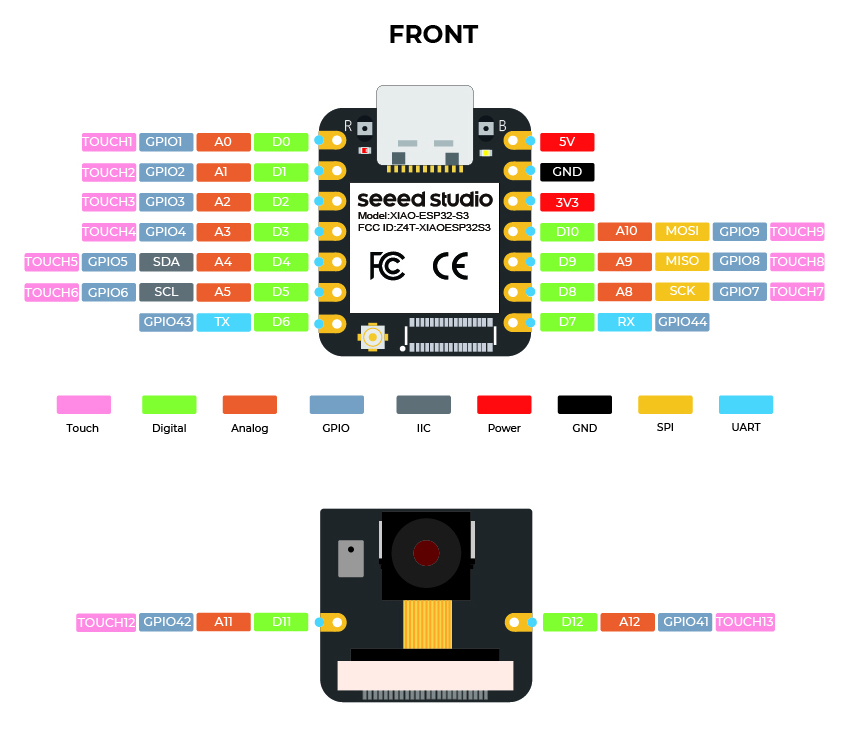
How my project is different: My glove does all processing on the wrist using the XIAO ESP32-S3. It doesn't need a phone or laptop, so it works anywhere on its own.
Digital Prototyping & Simulation
Before making the actual glove, I will test the logic and connections using online circuit simulators.
Tools: I will use Wokwi and Tinkercad.
Goal: To check the pins and working of the components.
Benefit: This creates a "Digital Twin" of the project, so I can test and debug the translation code in software. It lowers the risk of damaging parts during assembly.
Components
| Components | Function |
|---|---|
| XIAO ESP32-S3 | The Brain. Controls everything. |
| Flex Sensor (4.5") | Finger Sensing. Detects bending. |
| MPU6050 | Hand Tilt. Detects rotation/gravity. |
| OLED Display (0.96") | Visual Output. Shows text. |
| DFPlayer Mini | Audio Player. Plays MP3 files. |
| Speaker (3W 4Ω) | Sound Output. Voices the translation. |
| Push Button | Controls. (Calibrate, Speak). |
| LiPo Battery | Power Source. |
| Slide Switch | On/Off. |
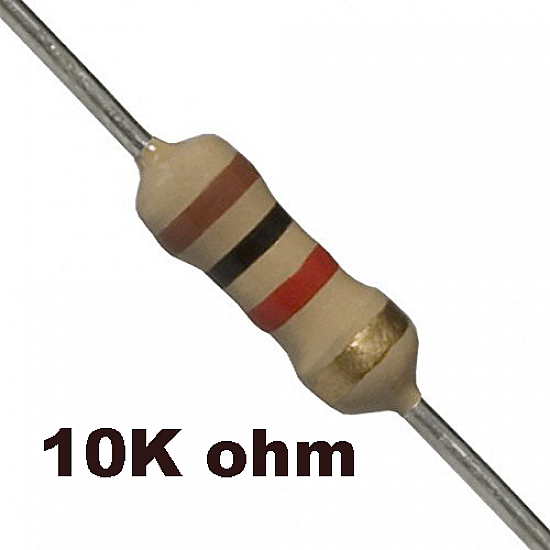
| Resistors | Circuit Logic. |
| MicroSD Card | Memory. Stores MP3 files. |
| Velcro Strap | To hold the case. |
Here is the link to details about the components I will be using for my final project
Visualize
To clearly visualize my final project, I used Canva to jot down the ideas and features of my project.

Here is the link to my Canva for reference
Circuit

Here is the link to detailed connection.
So, that's it! I want to learn and build my project Vision Voice this year. Good luck to me!
Challenges I faced this week (week 01)
- Setting up SSH keys for the first time
- Understanding the MkDocs folder structure
- Learning Markdown syntax