Week 15:Interface and application programming
Assignments
Group assignment: Document your work on the group work page and reflect on your individual page what you learned.
Individual Assignments: Write an application for the embedded board that you made, that interfaces a user with an input and/or output device(s).
Group Work Assignment Reflection
This week I learned the basics of programming languagesand explored the different tools that can be used to program the applicaiton and interface the board with the application, and try to list the features of the tools.
- The “Hello World” program is a tradition used to show how different programming languages print a simple message. With codes :
- Javascript (turns static websites into interactive apps) V8 engine : compiles Javascript into machine code (analogous to GCC x C/C++) Node.js : allows Javascript to run outside the browser (e.g. APIs). Backend of Javascript
- Python (used for AI/machine learning, datascience, automation scripts, etc)
- Languages :
- Low-code/No-code tools (systems that use blocks or flows instead of typing code) Scratchhttps://scratch.mit.edu/ MIT App Inventorhttps://appinventor.mit.edu/ Node-REDhttps://nodered.org/ Modshttps://modsproject.org/ Device interfaces (how machines talk to each other)
- MQTT (a communication protocol) Needs a broker (middleman) for example Mosquitto
- Data interfaces (how data is structured and stored)
- Data structure : JSONhttps://www.json.org/json-en.html TOMLhttps://toml.io/en/
- Database : MySQL : Data stored in tables like excel and so fixed structure MongoDB : Data stored as documents (JSON-like) and so dynamic structure
- User interfaces (how humans interact with software)
- No graphics : Ncurses : built UI inside the terminal
- With graphics: Desktop application Tkinter : built in python wxPython : More advanced than Tkinter, looks more like native OS apps Browser-based dat.GUI Bootstrap FlatUI
- Cross-platform UI system (works across web, mobile, etc) Example : Blynk Difficult to implement because each devices behaves differently e.g. tiny screens, touch screens, performance limits, etc
- Graphics layer (how it looks visually)
- 2D : Canvas (pixel) SVG (vector) -3D : Three.js : 3D engine built on WebGL (harder version) WebGPU : successor to WebGL. More complicated than Three.js
- Game engines : Unity : Most popular game engine Uses C# Unreal engine : uses C++ + visual scripting Godot : opensource
- Audio system
- On desktop : SDL/Pygame Python wrapper over SDL. Used for simple games, sound effects, basic animation
- OpenFrameworks
- On web : Web audio API WebRTC (real time communication)
- VR, AR, XR : Virtual reality (VR) : User inside a fully digital world Augmented reality (AR) : Digital objects placed on real world. Uses camera + sensors (e.g. Pokemon Go) Extended reality (XR) : Combination of VR + AR. Three.js ecosystem could be used
- Performance optimisation : Python itself is generally slow for heavy computation loops (i.e. many lines of code). Numpy faster. Numba is even faster Webworkers : Javascript normally runs on one thread. Web Workers allow parallel CPU usage Machine learning (system that learns patterns from data instead of being explicitly programmed) :
- Frameworks : PyTorch : easiest to use TensorFlow JAX : fastest
- Model sharing ecosystem : Hugging Face
- Cloud platforms (renting computers over the internet): could run ML models and store data (AWS, Google Cloud, Microsoft Azure).
Programming & interface tools
| Tool | Type | Language | Best For | URL |
|---|---|---|---|---|
| Arduino IDE | Desktop IDE | C/C++ (Arduino dialect) | Microcontroller programming | https://www.arduino.cc/en/software |
| Thonny | Desktop IDE | Python / MicroPython / CircuitPython | Python/MicroPython education | https://thonny.org/ |
| VS Code | Desktop IDE | Any (inherits VS Code ecosystem) | General-purpose development | https://code.visualstudio.com/ |
| Node-RED | Visual flow editor | Visual flows (JavaScript under the hood) | IoT & service integration | https://nodered.org/ |
| MATLAB + Simulink | Computing platform | MATLAB scripting language | Research & system simulation | https://www.mathworks.com/products/matlab.html |
| Cursor | AI IDE | Any (inherits VS Code ecosystem) | AI-assisted full-stack development | https://code.visualstudio.com/ |
| Codex CLI | Terminal agent | Any | CLI-native AI coding | https://code.visualstudio.com/ |
| Claude Code | Terminal agent | Any | Autonomous agent development | https://code.visualstudio.com/ |
Individual Assignments
This week, I used Deepseek as a coding assistant, especially to speed up drafting the web server logic and HEEP route handlers to handle a web-based interface for the Xiao ESP32 board.I also use Arduino IDE fo compiling and uploading firmware to the ESP32 board.After generateing initial code, I tested each feature on hardware and adjust the pin mapping ,route behavior, and network setup until the interface and output devices worked reliably.
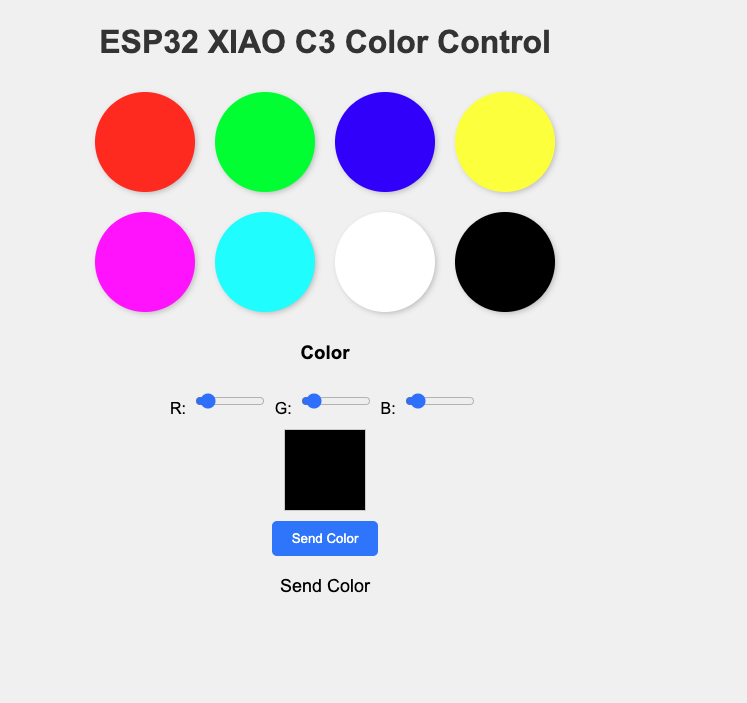
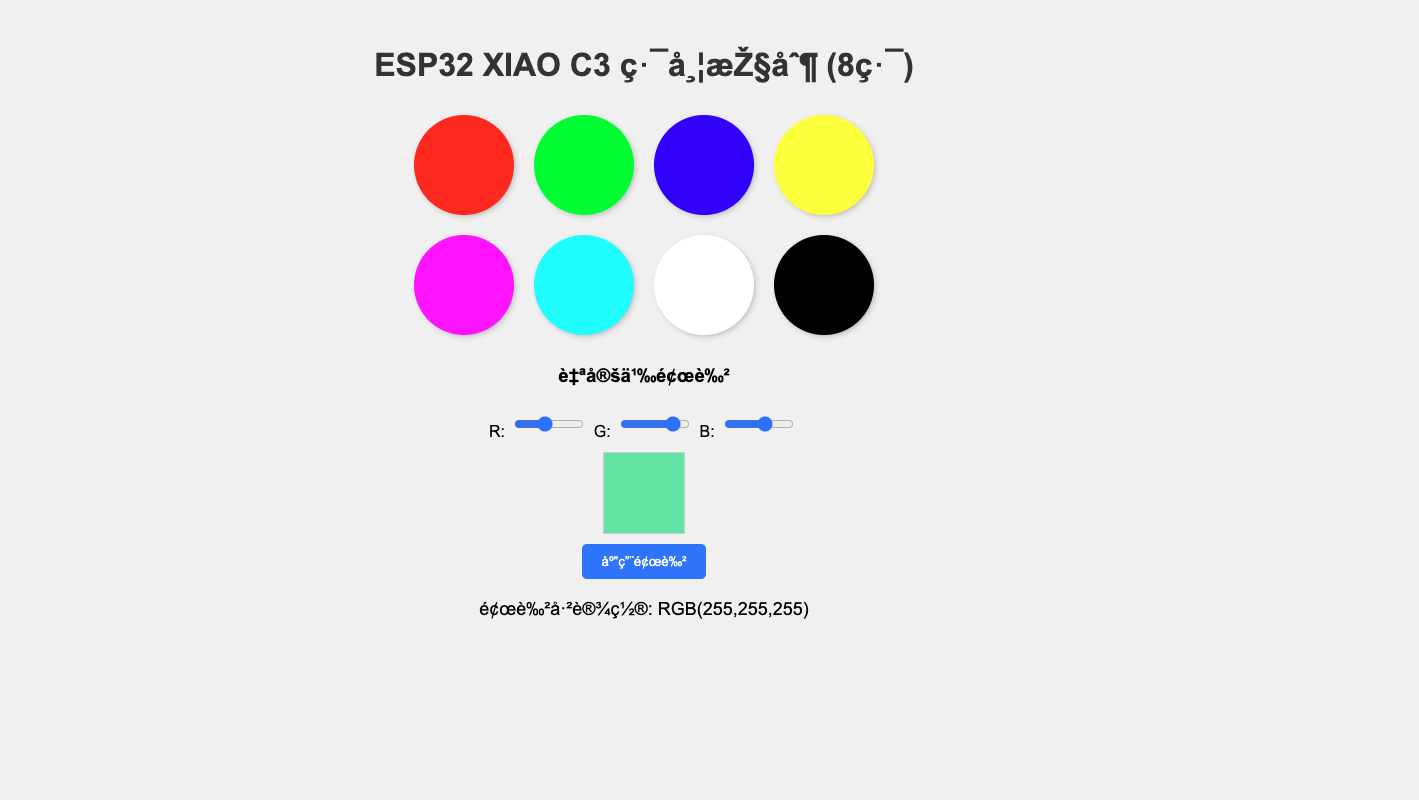
Input Device Interface in the browser
- Brightnees slider and button: sending brightness value from 0-255
- Color control:sending color command to NeoPixel LED strip
Output Device Interface
- NeoPixel LED strip: displaying color and brightness
Technology Tracking
| Category | Tool / Technology |
|---|---|
| Embedded board | XIAO ESP32 |
| Programming language | Arduino C/C++ |
| User interface | HTML, CSS, JavaScript |
| Communication protocol | HTTP over Wi-Fi |
| LED control | Adafruit NeoPixel library |
| Application type | Web-based interface |
Method Comparison
| Method | How It Works | Advantages | Disadvantages |
|---|---|---|---|
| HTTP Web Server | ESP32 hosts webpage and receives control requests | Simple, wireless, no extra app, easy to document | Usually best on same Wi-Fi network |
| MQTT + Node-RED | Node-RED publishes MQTT messages to ESP32 | Scalable, good for multi-device systems | Needs broker, more setup and debugging |
| USB Serial + Python Tkinter | Desktop app sends serial commands by USB | Stable and easy to debug | Wired to computer, less suitable for smart lamp use |
I compared different method to implement the interface and the output device, but at last I chose HTTP Web Server to implement the interface and the output device because of the following reasons:
- It runs directly on XIAO ESP32 with built-in Wi-Fi
- No extra app needed, easy to deploy and update
- It is simple to explain and test in browser, and easy to debug
Workflow for the project
HTTP Web Server path: from browser UI to hardware on the same Wi-Fi network.
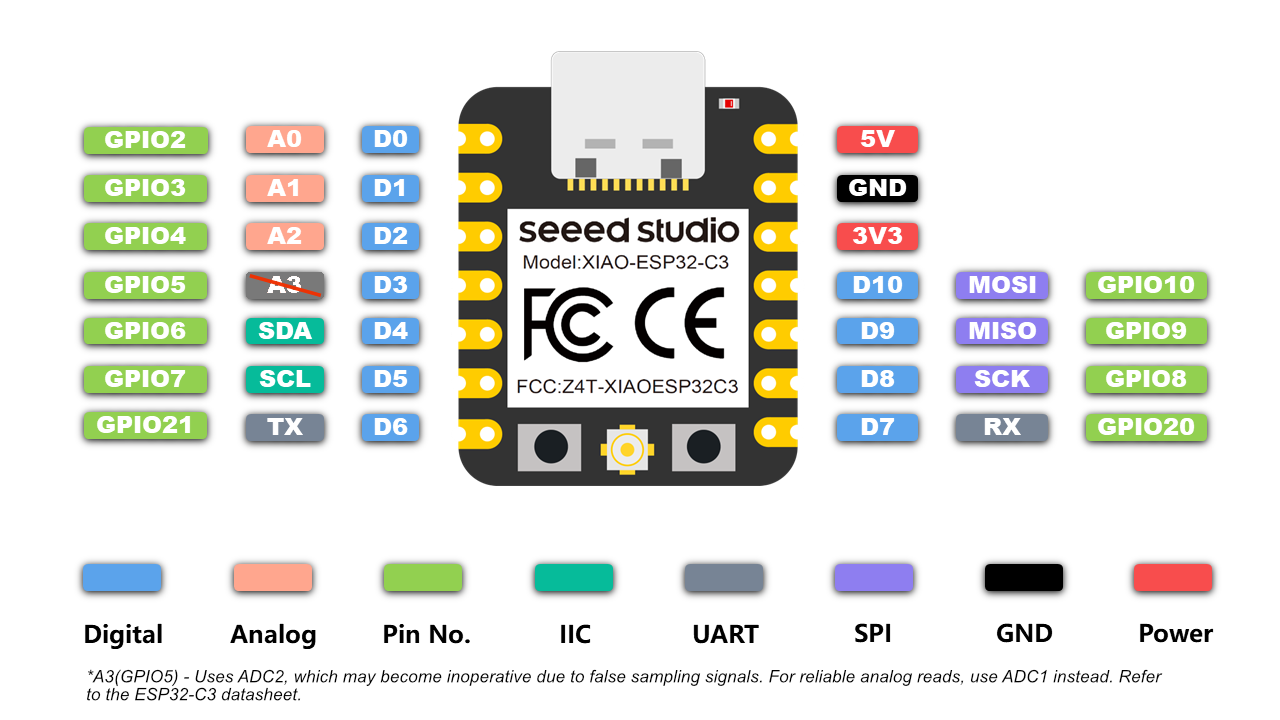
Hardware — XIAO ESP32
I chose XIAO ESP32 as the main embedded board. The XIAO ESP32 is a small, low-cost, and powerful microcontroller board that is widely used in IoT projects. It is based on the ESP32 chip, which is a dual-core Wi-Fi + Bluetooth chip. It is a great choice for projects that require Wi-Fi connectivity and Bluetooth communication.
NeoPixel LED Strip
| NeoPixel Pin | Connection |
|---|---|
| DIN | XIAO ESP32 D3 |
| VCC | 5V |
| GND | Common GND |
![]()
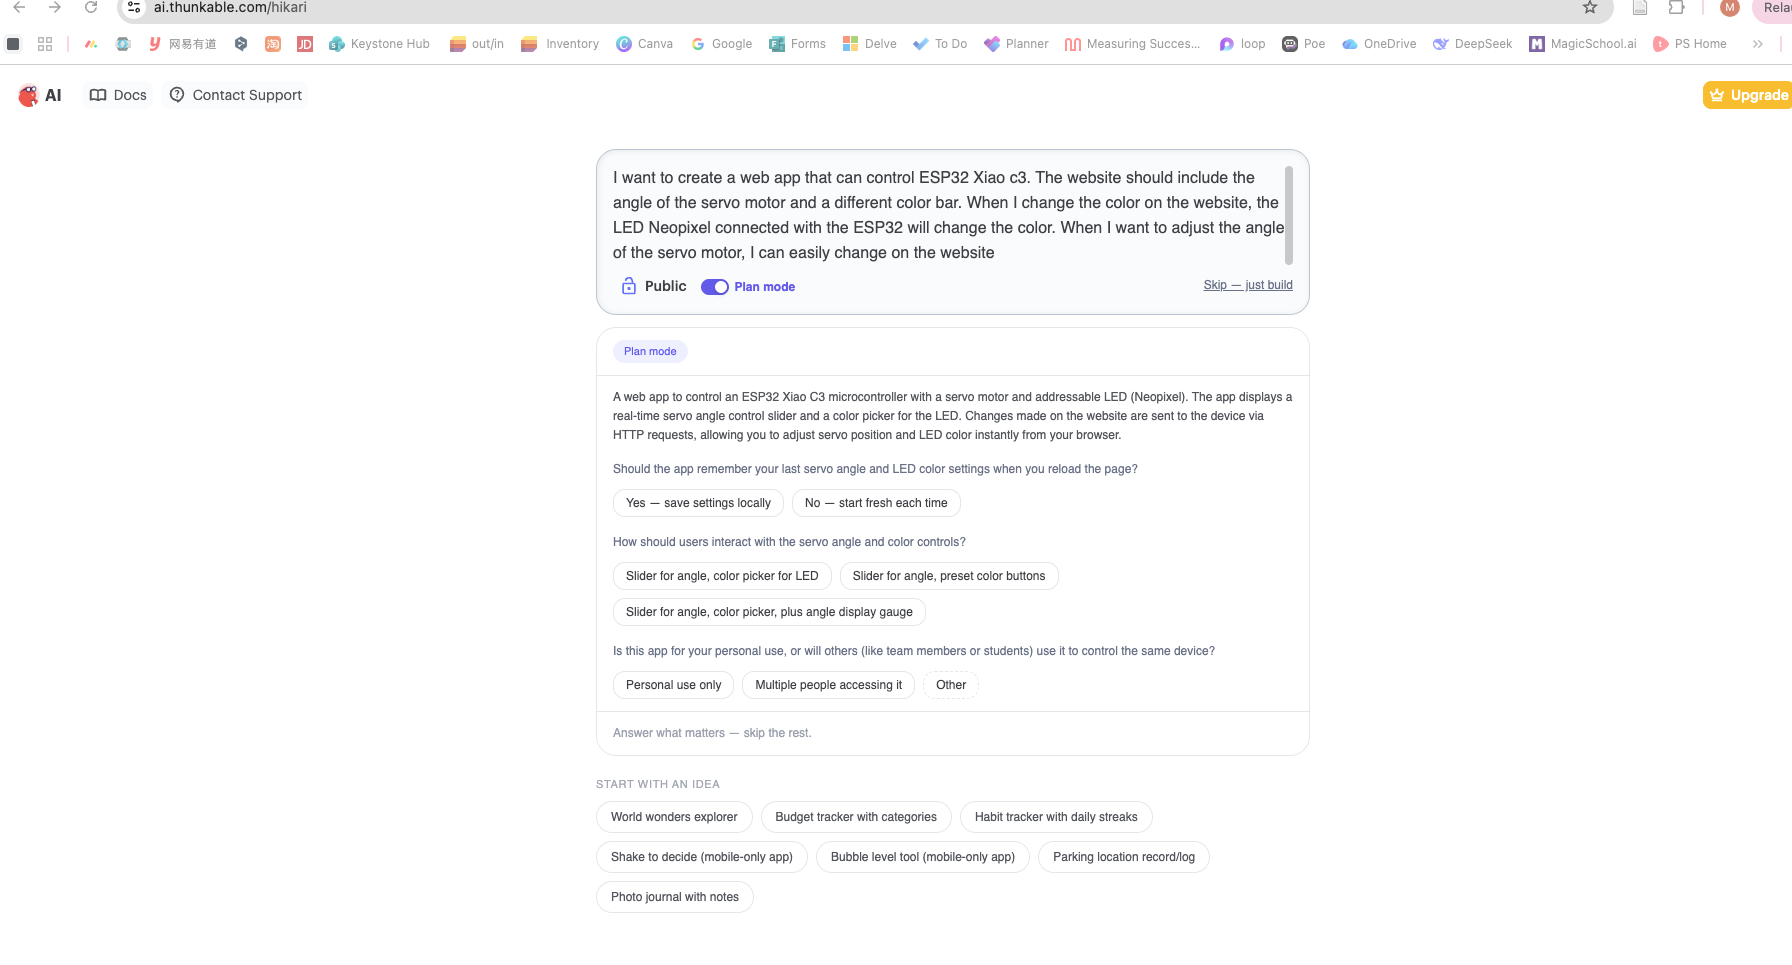
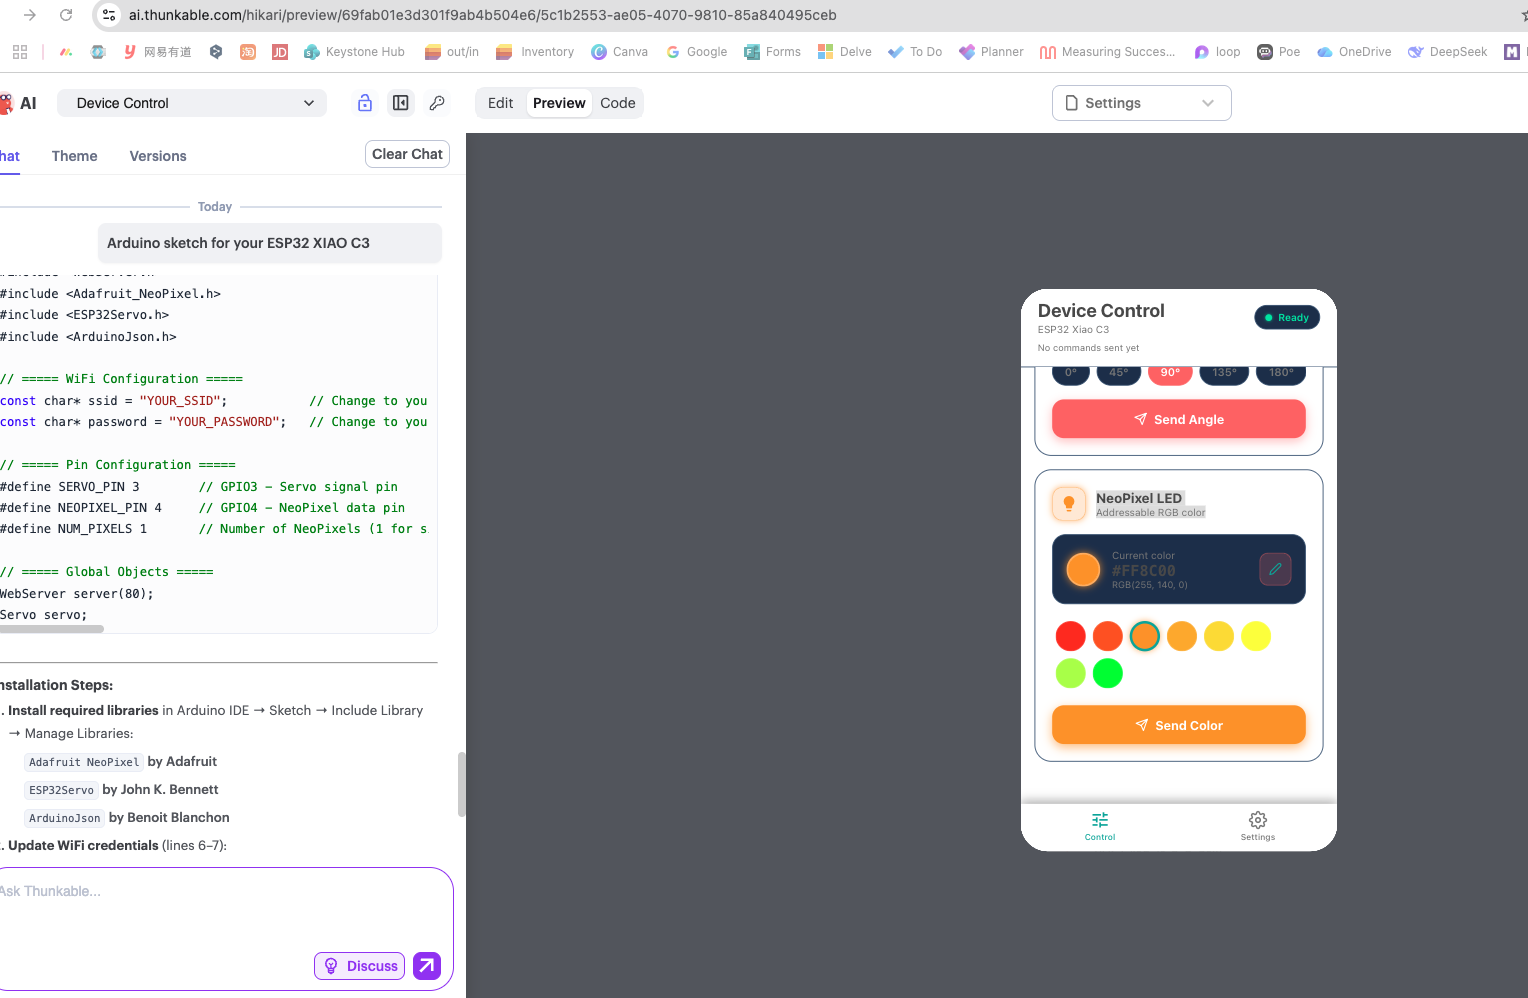
UI Design
I also tried to use Thunkable https://thunkable.com/ to create a web app, which is the most powerful mobile app development platform that allows anyone to create an app without needing to know how to code.
Communication Between App and Board
The board runs as a web server. When the user moves sliders or clicks buttons, JavaScript fetch() sends HTTP requests to ESP32 routes. ESP32 parses parameters and updates NeoPixel state.
| User Action | HTTP Request | Board Action |
|---|---|---|
| Move servo to 90 | /servo?angle=90 |
Servo moves to 90 |
| Set brightness to 180 | /brightness?value=180 |
NeoPixel brightness changes |
| Set color | /color?r=255&g=100&b=50 |
NeoPixel color updates |
| Turn off light | /off |
NeoPixel turns off |
Programming Process
Set up the development environment: Installed the ESP32 board package in Arduino IDE and selected the correct XIAO ESP32 board profile.
- Step 1. Download and install the latest Arduino IDE for your operating system.

- Step 2. Launch the Arduino application.
- Step 3. Add the ESP32 board package: open File → Preferences and paste this URL under Additional Boards Manager URLs:
https://jihulab.com/esp-mirror/espressif/arduino-esp32.git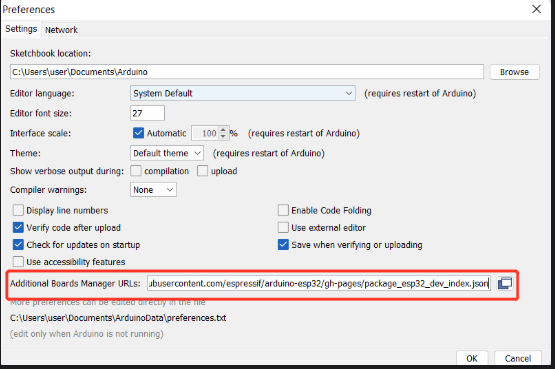
- Open Tools → Board → Boards Manager…, search for
esp32, select the latest package, and install it.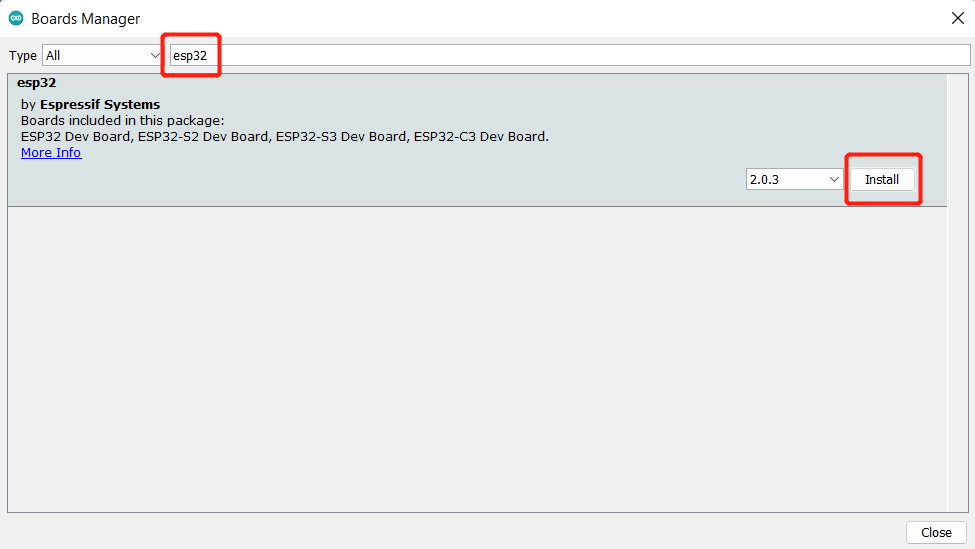
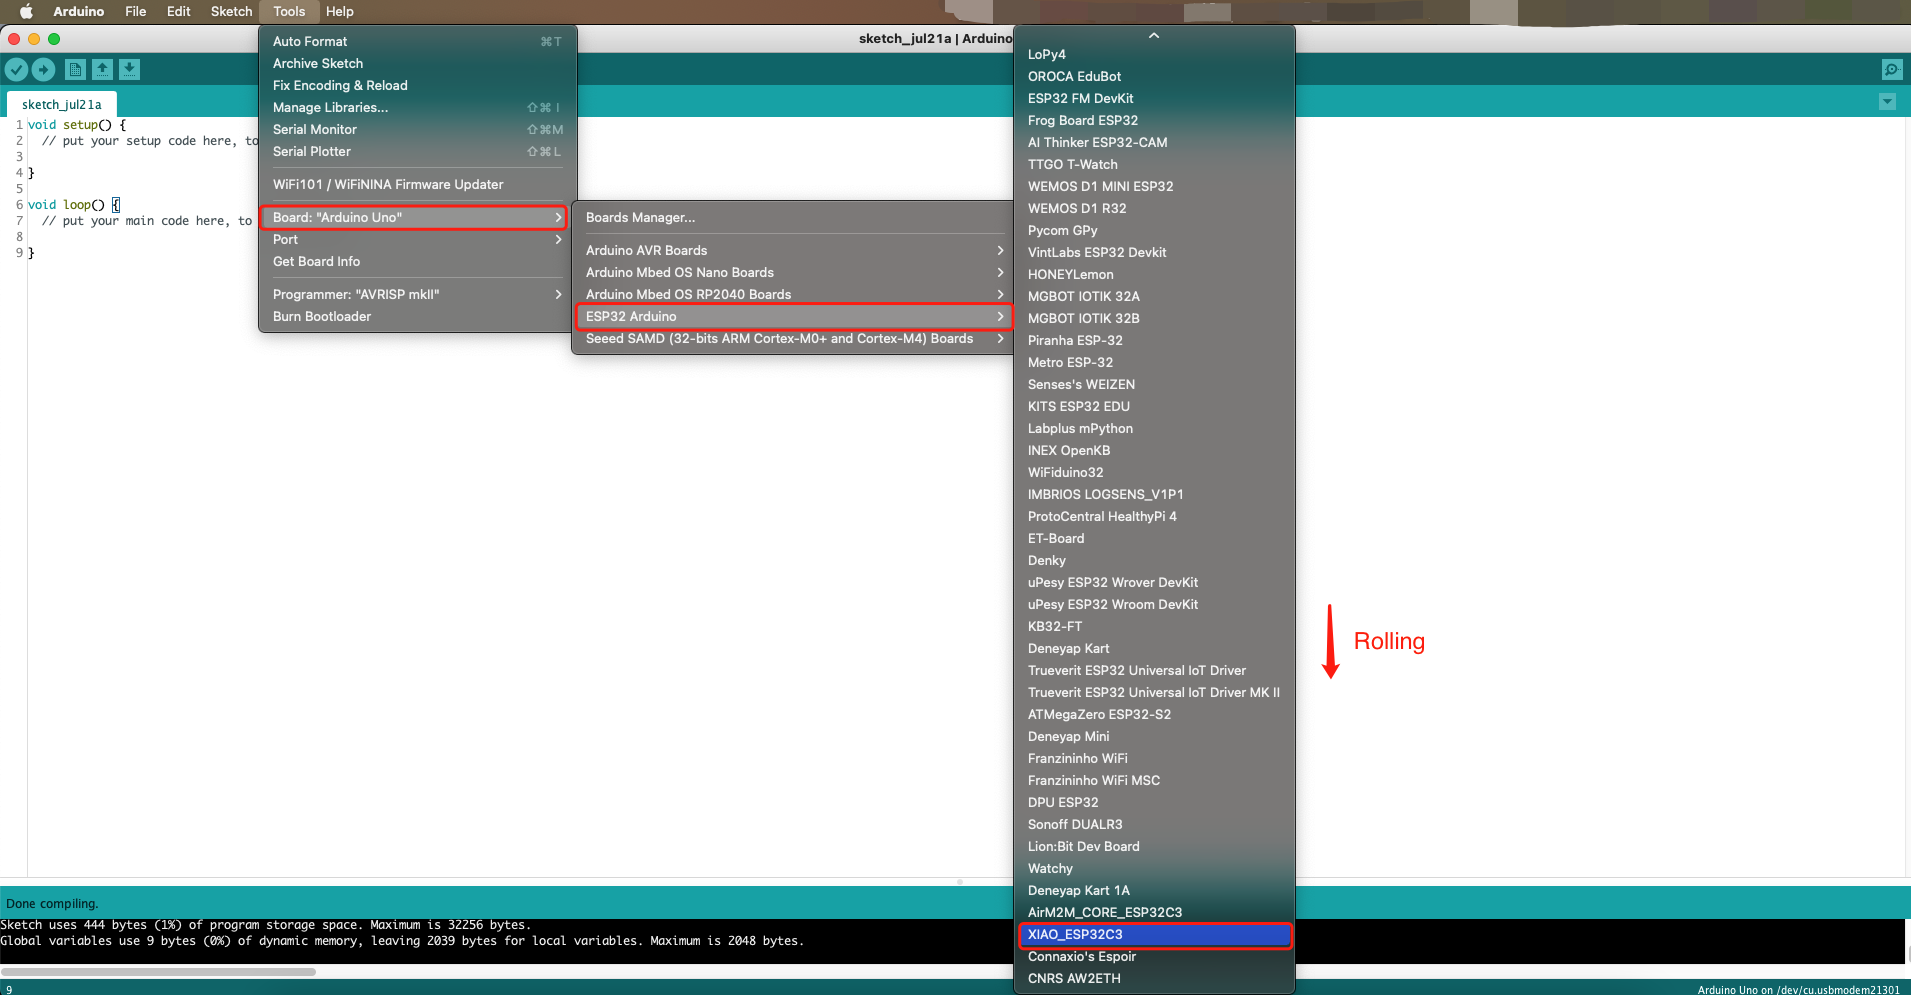
- Step 4. Select your board and port: Tools → Board → ESP32 Arduino → XIAO_ESP32C3 (the list is long — scroll to the bottom).
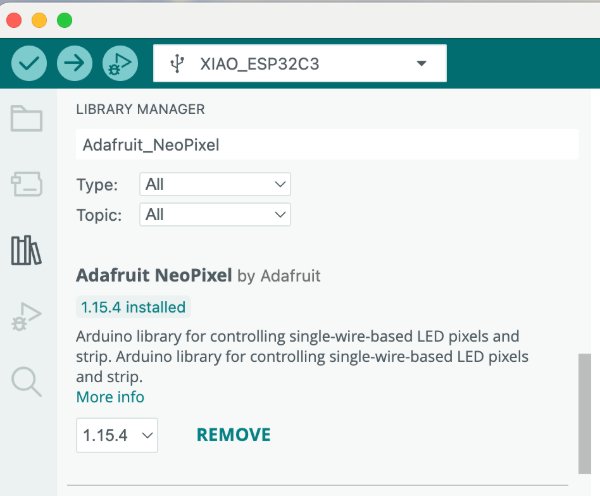
- Install required libraries: add Adafruit NeoPixel so the firmware can control the strip.
Test each output device independently (NeoPixel color and brightness) with small test sketches before integration. Implement Wi-Fi and the web server, connect to the hotspot, verify the IP in Serial Monitor, then build the HTML/CSS/JavaScript page (servo slider, brightness, color, reset/off). Map UI actions to HTTP routes (/brightness, /color, /off, /reset). Integrate and debug end-to-end until browser actions match hardware.
Problem Encountered
- First I tested on school Wi-Fi but could not connect due to restrictions; an iPhone hotspot still failed. Finally a Huawei phone hotspot worked.
- When designing the UI, some content did not display correctly; switching the interface to English fixed it.
Source Code (Full Firmware)
            #include <WiFi.h>
                #include <WebServer.h>
                #include <Adafruit_NeoPixel.h>

                // ===== WiFi 配置 =====
                const char* ssid = "HGN_MATE";
                const char* password = "18626876203";

                // ===== LED 配置 =====
                #define LED_PIN     D4          // XIAO ESP32C3 的 D4 引脚 (GPIO4)
                #define NUM_LEDS    8           // 关键修改:灯带上有8颗灯珠

                Adafruit_NeoPixel strip(NUM_LEDS, LED_PIN, NEO_GRB + NEO_KHZ800);
                WebServer server(80);

                int currentR = 0, currentG = 0, currentB = 0;

                // 设置整条灯带的颜色(所有灯珠同时变色)
                void setColor(int r, int g, int b) {
                  for (int i = 0; i < NUM_LEDS; i++) {
                    strip.setPixelColor(i, strip.Color(r, g, b));
                  }
                  strip.show();
                  currentR = r; currentG = g; currentB = b;
                  Serial.printf("All %d LEDs set to RGB(%d, %d, %d)\n", NUM_LEDS, r, g, b);
                }

                // ===== 网页内容(与之前相同,无需修改)=====
                const char index_html[] PROGMEM = R"rawliteral(
                <!DOCTYPE html>
                <html>
                <head>
                  <meta name="viewport" content="width=device-width, initial-scale=1">
                  <title>ESP32 LED Control</title>
                  <style>
                    body { font-family: Arial; text-align: center; margin-top: 50px; background: #f0f0f0; }
                    h1 { color: #333; }
                    .btn { width: 100px; height: 100px; border: none; border-radius: 50%; margin: 10px; cursor: pointer; transition: 0.2s; box-shadow: 2px 2px 5px rgba(0,0,0,0.2); }
                    .btn:hover { transform: scale(1.05); }
                    .btn:active { transform: scale(0.95); }
                    .color-panel { display: flex; flex-wrap: wrap; justify-content: center; max-width: 500px; margin: auto; }
                    .custom { margin-top: 20px; }
                    input { width: 60px; padding: 5px; margin: 5px; }
                    button { padding: 10px 20px; background: #007bff; color: white; border: none; border-radius: 5px; cursor: pointer; }
                    .status { margin-top: 20px; font-size: 18px; }
                  </style>
                </head>
                <body>
                  <h1>ESP32 XIAO C3 Color Control</h1>
                  <div class="color-panel">
                    <button class="btn" style="background:#ff0000;" onclick="setColor(255,0,0)"></button>
                    <button class="btn" style="background:#00ff00;" onclick="setColor(0,255,0)"></button>
                    <button class="btn" style="background:#0000ff;" onclick="setColor(0,0,255)"></button>
                    <button class="btn" style="background:#ffff00;" onclick="setColor(255,255,0)"></button>
                    <button class="btn" style="background:#ff00ff;" onclick="setColor(255,0,255)"></button>
                    <button class="btn" style="background:#00ffff;" onclick="setColor(0,255,255)"></button>
                    <button class="btn" style="background:#ffffff;" onclick="setColor(255,255,255)"></button>
                    <button class="btn" style="background:#000000;" onclick="setColor(0,0,0)"></button>
                  </div>
                  <div class="custom">
                    <h3>Color</h3>
                    R: <input type="range" id="r" min="0" max="255" value="0" oninput="updatePreview()">
                    G: <input type="range" id="g" min="0" max="255" value="0" oninput="updatePreview()">
                    B: <input type="range" id="b" min="0" max="255" value="0" oninput="updatePreview()">
                    <div style="width:80px;height:80px;border:1px solid #ccc;margin:10px auto;" id="preview"></div>
                    <button onclick="sendCustomColor()">Send Color</button>
                  </div>
                  <div class="status" id="status">Send Color</div>

                  <script>
                    function setColor(r,g,b) {
                      fetch('/color?r='+r+'&g='+g+'&b='+b)
                        .then(response => response.text())
                        .then(data => {
                          document.getElementById('status').innerHTML = 'Addressable RGB color: RGB('+r+','+g+','+b+')';
                        })
                        .catch(err => console.error(err));
                    }
                    function updatePreview() {
                      let r = document.getElementById('r').value;
                      let g = document.getElementById('g').value;
                      let b = document.getElementById('b').value;
                      document.getElementById('preview').style.backgroundColor = `rgb(${r},${g},${b})`;
                    }
                    function sendCustomColor() {
                      let r = document.getElementById('r').value;
                      let g = document.getElementById('g').value;
                      let b = document.getElementById('b').value;
                      setColor(r,g,b);
                    }
                    updatePreview();
                  </script>
                </body>
                </html>
                )rawliteral";

                // ===== HTTP 请求处理 =====
                void handleColor() {
                  if (server.hasArg("r") && server.hasArg("g") && server.hasArg("b")) {
                    int r = server.arg("r").toInt();
                    int g = server.arg("g").toInt();
                    int b = server.arg("b").toInt();
                    r = constrain(r, 0, 255);
                    g = constrain(g, 0, 255);
                    b = constrain(b, 0, 255);
                    setColor(r, g, b);
                    server.send(200, "text/plain", "OK");
                  } else {
                    server.send(400, "text/plain", "Missing parameters");
                  }
                }

                void handleRoot() {
                  server.send(200, "text/html", index_html);
                }

                void handleNotFound() {
                  server.send(404, "text/html", "<h1>404 Not Found</h1>");
                }

                // ===== 初始化 =====
                void setup() {
                  Serial.begin(115200);
                  delay(500);

                  strip.begin();
                  strip.show(); // 初始全灭
                  setColor(0, 0, 0);

                  // 连接 WiFi
                  WiFi.begin(ssid, password);
                  Serial.print("Connecting to WiFi");
                  while (WiFi.status() != WL_CONNECTED) {
                    delay(500);
                    Serial.print(".");
                  }
                  Serial.println("\nWiFi connected!");
                  Serial.print("IP address: ");
                  Serial.println(WiFi.localIP());

                  server.on("/", handleRoot);
                  server.on("/color", handleColor);
                  server.onNotFound(handleNotFound);
                  server.begin();
                  Serial.println("HTTP server started");
                }

                void loop() {
                  server.handleClient();
                  delay(10);
                }
Gerber source file designed by EasyKAD: week15 Device Control IDE File