Week 4: Embedded Programming
Group Work Assignment Reflection
In embedded programming, the architecture of a microcontroller affects not only the hardware performance of a board, but also the entire development experience. Different embedded architectures use different compilers, libraries, upload tools, debugging methods, and programming workflows. For this reason, comparing embedded platforms is not only a comparison of chips or boards, but also a comparison of the complete software and hardware ecosystem behind them.As part of the group assignment, we compared programming workflows, toolchains, and communication interfaces across microcontroller families available in the lab — AVR (Arduino), ARM Cortex-M (e.g. RP2040, SAMD21), ESP32, and Raspberry Pi. Full side-by-side documentation is on our group page:
Why I chose Arduino to control the servo
After reading our group comparison (Week 4 Group Assignment), I decided to use Arduino (AVR) — not ESP32 or Raspberry Pi — to drive the servo for the auto-lifting bridge demo and for teaching Grade 2 students.
My task was simple embedded output: move a servo to a defined angle (0° → 45°) and hold it so a small bridge deck could lift. The group documentation maps this kind of work to AVR / basic Arduino boards: low toolchain complexity, enough I/O for one actuator, and a workflow that beginners can follow on the first day.
- Toolchain & workflow — Arduino IDE installs the AVR core, compiles with
avr-gcc, and uploads through the bootloader withavrdude. Setup is usually: pick board, pick port, Verify, Upload. Our group notes rate AVR complexity as low, while ESP32 needs board packages,esptool.py, flash size / partition schemes, and sometimes manual boot mode — extra steps that do not help a one-servo lesson. - Servo control in code — The built-in Servo library (
#include <Servo.h>,servo.attach(D5),servo.write(angle)) matches exactly what I needed. I could prototype in Cirkit Designer first, then move the same logic to a real Uno on pin D5 without learning PWM timers or chip-specific APIs. - Teaching context — I was explaining coding to young students: blink, serial print, then servo motion. Arduino’s
setup()/loop()model and Serial Monitor at 9600 baud are easy to demonstrate live. Fewer failure modes (wrong partition, boot strap, Wi-Fi credentials) mean more time on the bridge mechanism and less on debugging the toolchain. - Why not ESP32 (yet)? — ESP32 is powerful for Wi-Fi, Bluetooth, and IoT — our group places it at medium to high complexity. For this week the bridge did not need wireless networking. I explored ESP32 specifications and pins in my individual notes, but I kept the actuator on Arduino so the lesson stayed focused on “code moves the motor.” I plan to use ESP32 in later weeks (e.g. networking, final project) where wireless and more memory actually matter.
- Why not Raspberry Pi or RP2040? — Raspberry Pi is a Linux computer: development looks like deploying apps and services, not flashing a tight firmware loop for a single servo. RP2040 / other ARM boards are flexible but often involve UF2, OpenOCD, or vendor tools — medium complexity without a clear benefit for one hobby servo on a breadboard.
In short, choosing a board means choosing a whole workflow. For precise, local servo control and a classroom-friendly first embedded experience, Arduino was the best fit after our group comparison. ESP32 and Pi remain the right tools when connectivity or software richness becomes the main requirement.
Individual Assignment
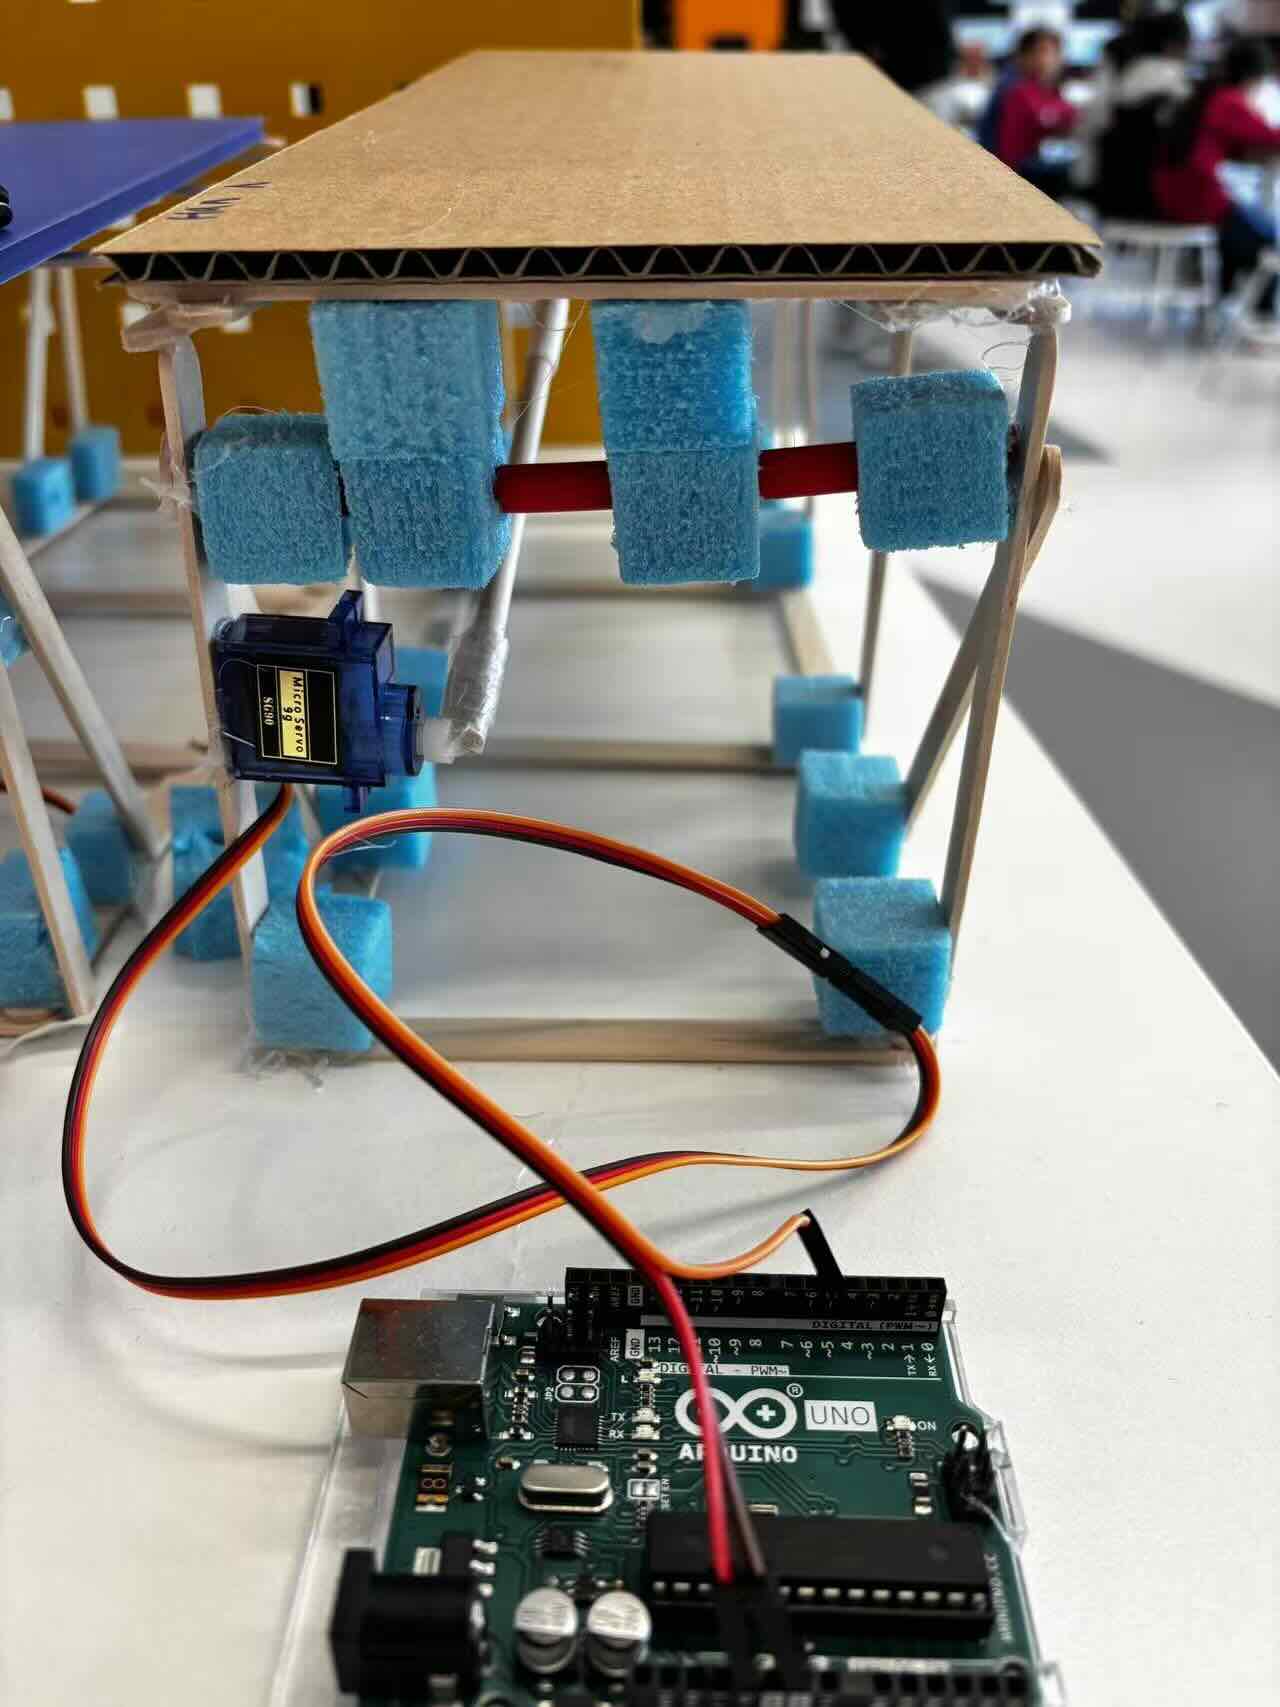
This week, I helped Grade 2 students turn their handmade bridges into auto-lifting bridges by showing them what coding is, how programming drives a servo motor, what Arduino is, and how it works.
I was also explore what is ESP32 how powerful it is including spercifications,features power pins
Workflow
1.Arduino workflow: I tested on the cirkit designer by adding the components and then make the simulation. The Servo library is included to control the Servo motor. The Servo is attached to pin D5. The setup() function initializes the Servo at 0 degrees. The loop() function gradually moves the Servo to 45 degrees and then back to 0 degrees, with a delay to control the speed of rotation.
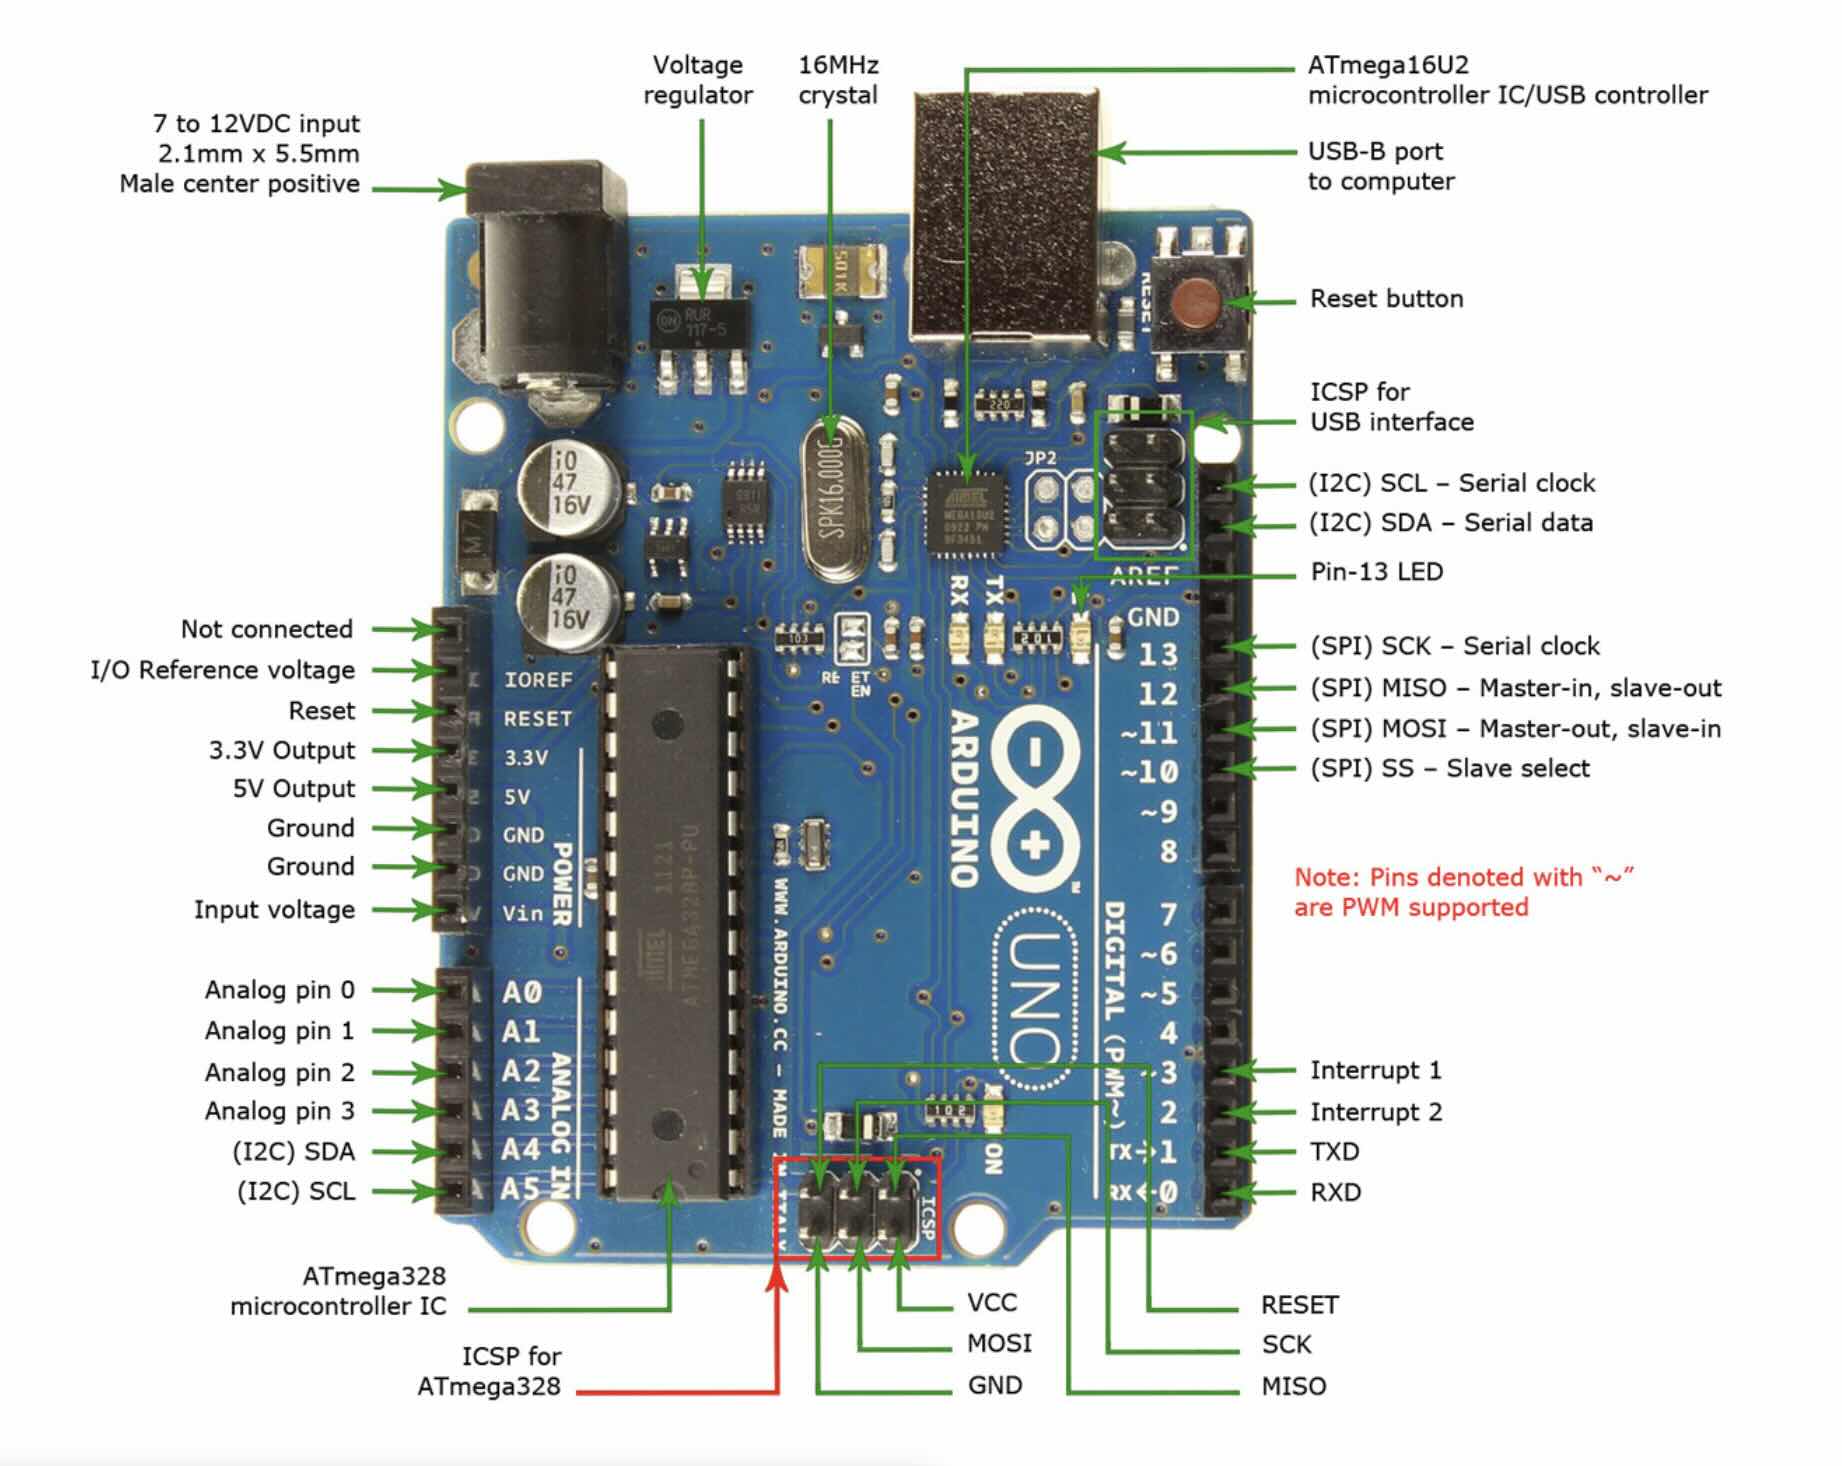
What is Arduino? Arduino is an open-source electronics platform based on easy-to-use hardware and software. Arduino consists of both a physical programmable circuit board (often referred to as a microcontroller) and a piece of software, The software, called the Arduino programming language, includes built-in syntax rules and a library of pre-written code that simplifies the process of creating a program. The board’s versatility allows it to be used in a wide range of applications, from simple projects to complex systems.
What is servo motor and what does it do? How Servo Motors work and how to control servos using Arduino.
servo motor is a special type of motor designed for precise control of angular position. It is an automatic device that uses a feedback system to correct its performance. Unlike a standard DC motor which just spins continuously, a servo motor can be commanded to move to a specific angle and hold that position against external forces.

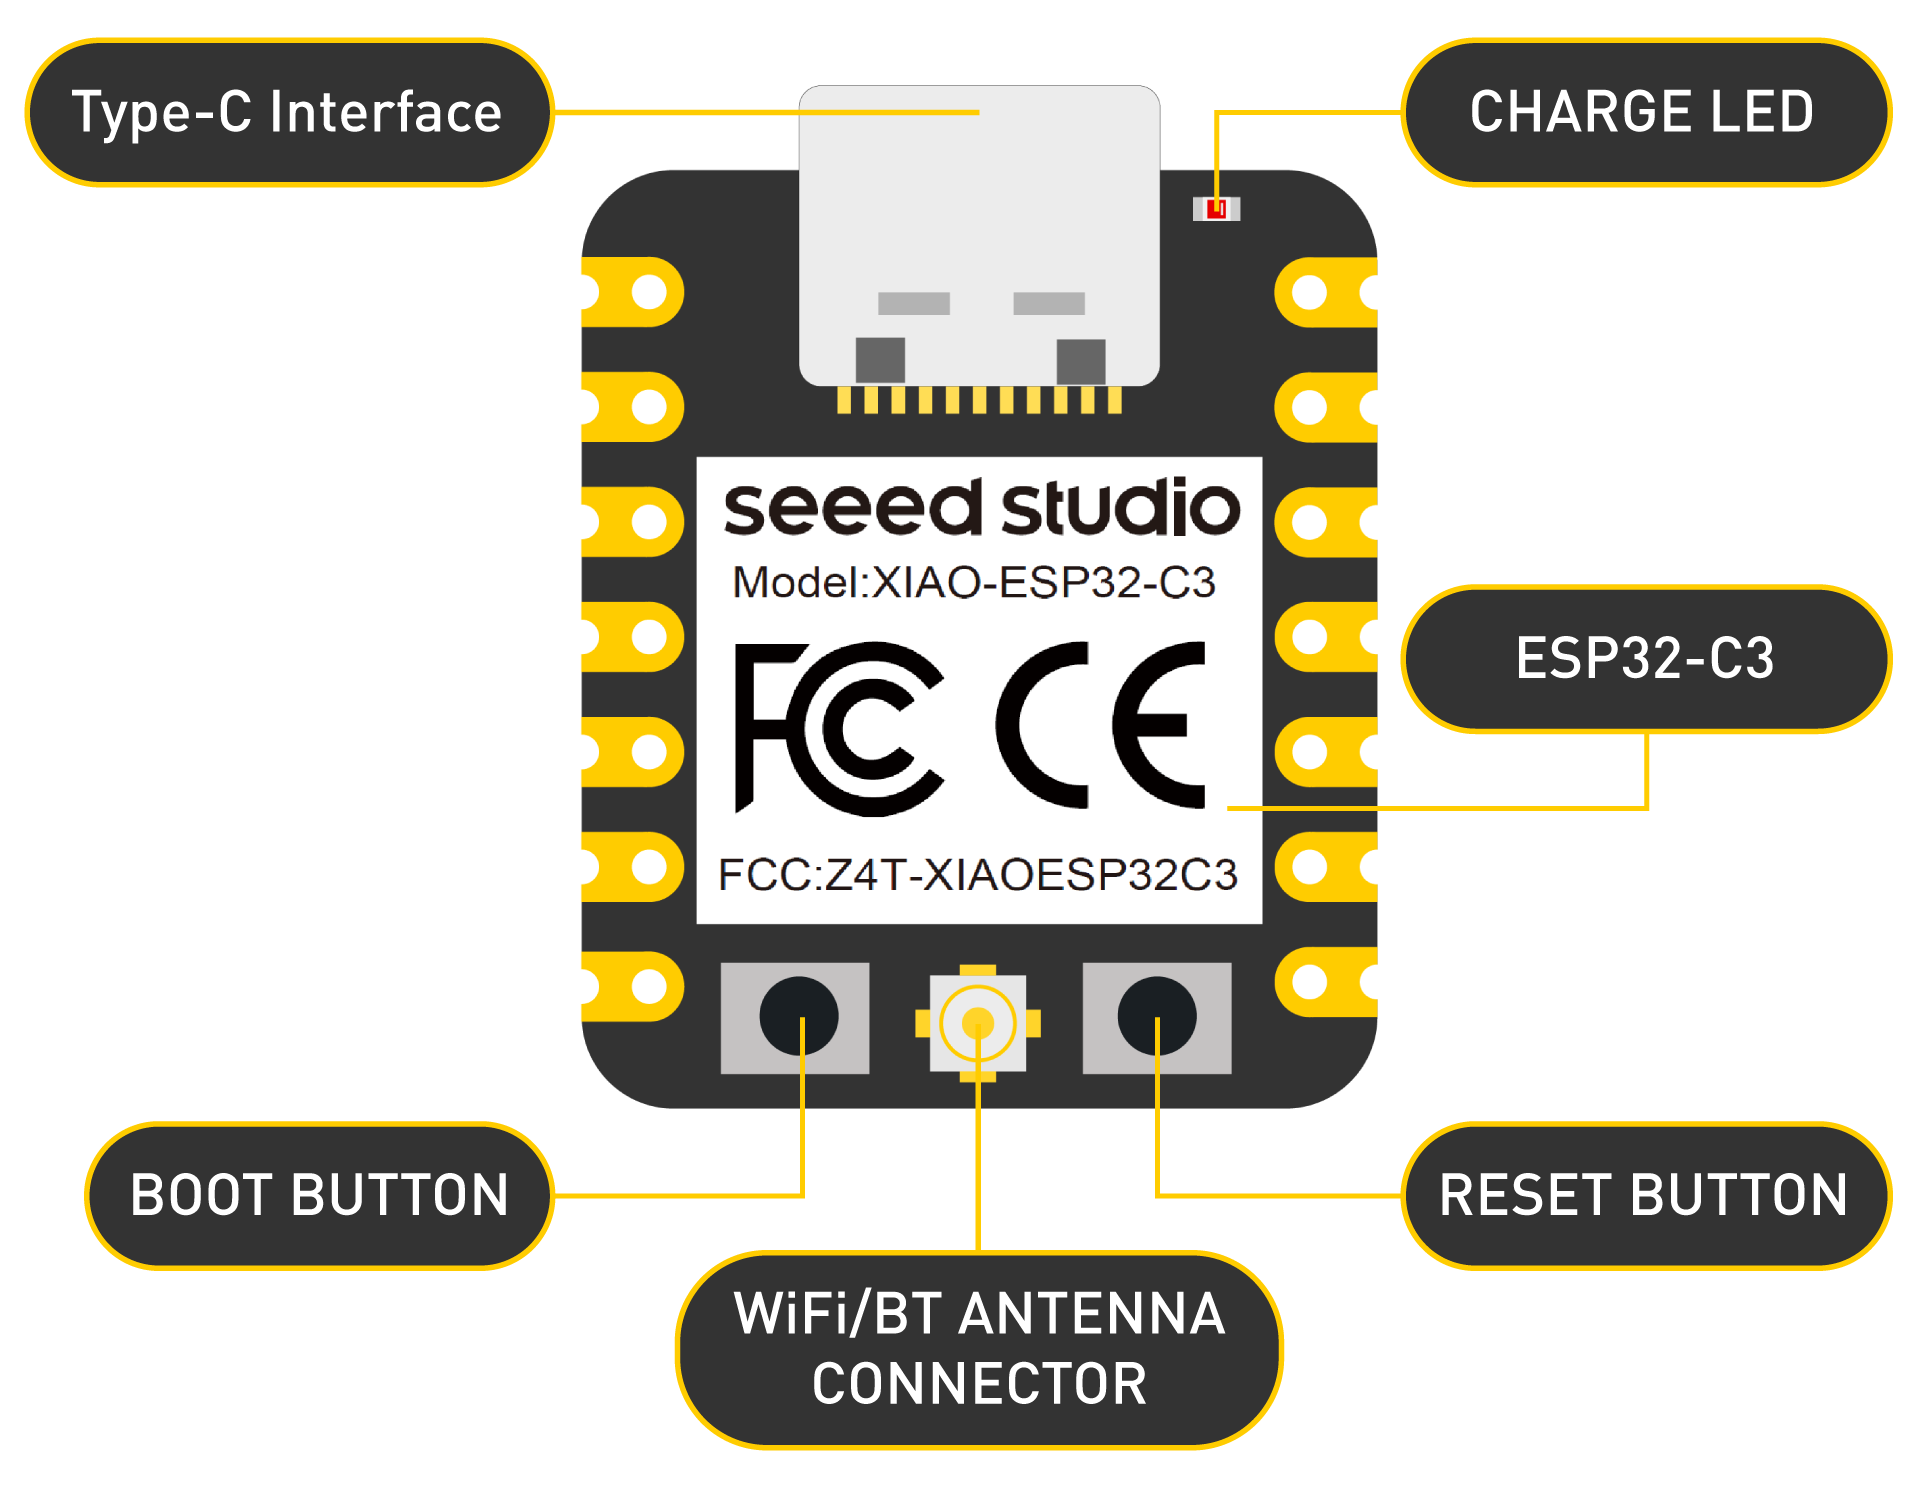
2.What is ESP32? ESP32 is highly-integrated with in-built antenna switches, RF balun, power amplifier, low-noise receive amplifier, filters, and power management modules.
ESP32 adds priceless functionality and versatility to your applications with minimal Printed Circuit Board (PCB) requirements. Hybrid Wi-Fi & Bluetooth Chip.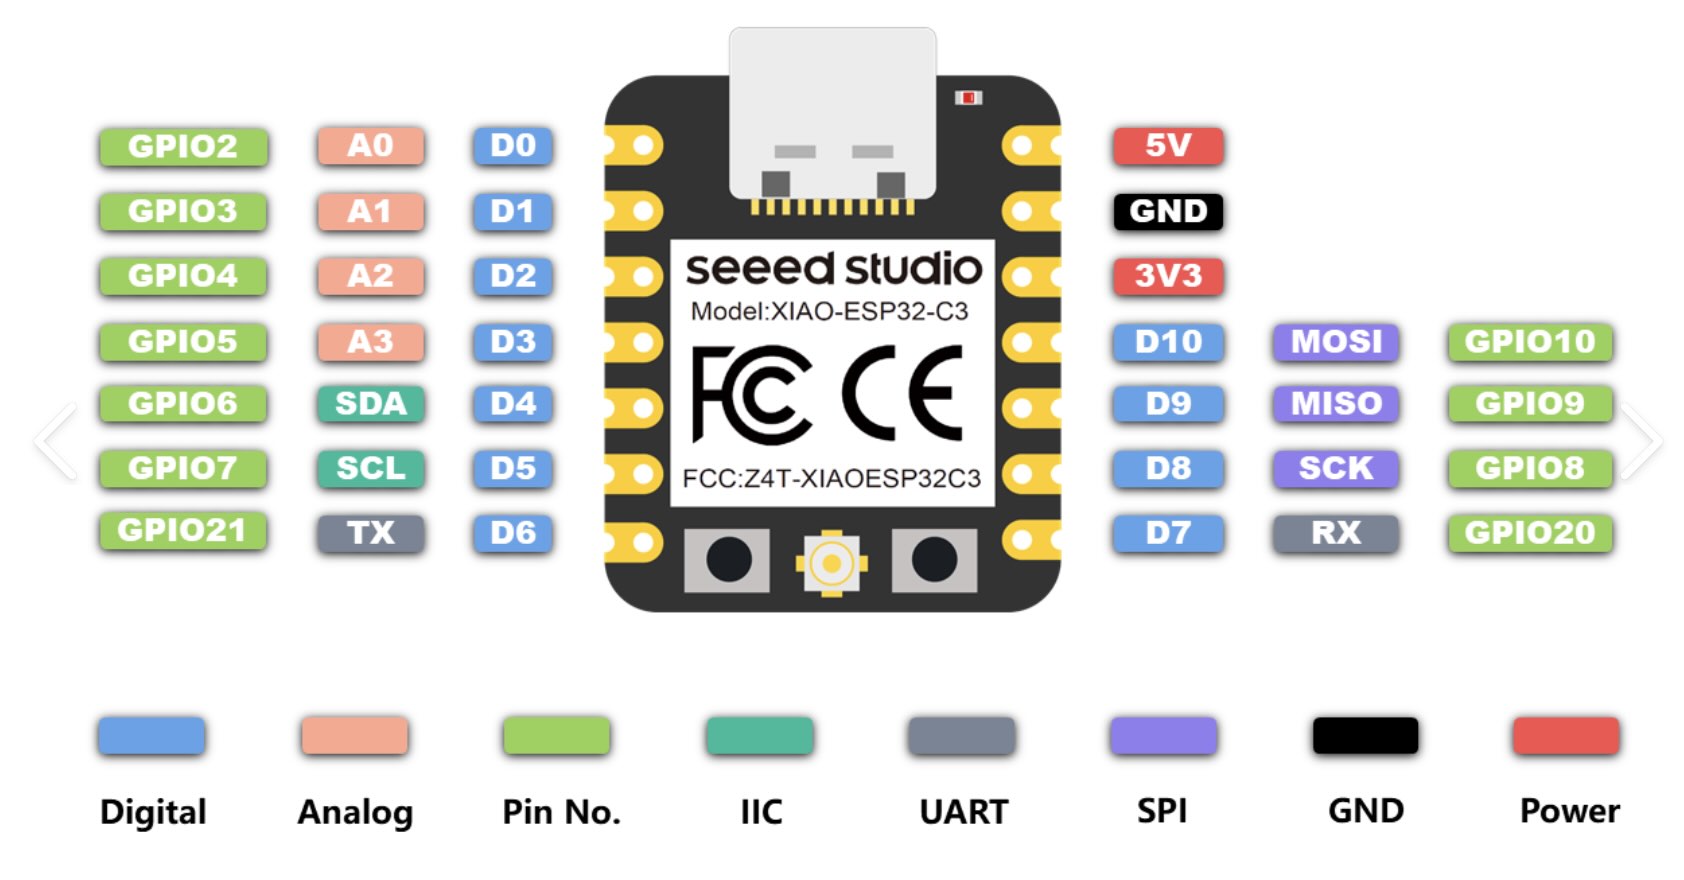

| Abbreviation | Full name | Chinese Definition | Pin(XIAO ESP32-C3) | 主要用途Applications |
|---|---|---|---|---|
| SDA | Serial Data Line | 串行数据线 | D4 (GPIO6) | I²C通信的数据线 |
| SCL | Serial Clock Line | 串行时钟线 | D5 (GPIO7) | I²C通信的时钟线 |
| MOSI | Master Out Slave In | 主出从入 | D10 (GPIO10) | SPI通信:主设备发送,从设备接收 |
| MISO | Master In Slave Out | 主入从出 | D9 (GPIO9) | SPI通信:主设备接收,从设备发送 |
| SCK | Serial Clock | 串行时钟 | D8 (GPIO8) | SPI通信的时钟线 |
| TX | Transmit | 发送 | D6 (GPIO21) | 串口(UART)数据发送 |
| RX | Receive | 接收 | D7 (GPIO20) | 串口(UART)数据接收 |
How it works:
- SDA is the data line – it carries the actual data being transferred.
- SCL is the clock line – it synchronises the data transmission.
- MOSI (Master Out Slave In) – data sent from the master to the slave.
- MISO (Master In Slave Out) – data sent from the slave to the master.
- SCK (Serial Clock) – generated by the master to synchronise each bit.
- CS/SS (Chip Select / Slave Select) – an extra pin used to choose which slave the master wants to talk to (not listed in your original six, but essential for SPI).
- TX (Transmit) sends data out from the device.
- RX (Receive) listens for incoming data.
- To connect two devices, you must cross‑wire them:
- Device A TX → Device B RX
- Device A RX ← Device B TX
- Also connect GND to GND.
This week, I worked on using Arduino to build an auto-lifting bridge and explored how to use the ESP32.
Arduino Code Wiring Connections
                    #include

                        Servo myServo;  // Create a Servo object

                        void setup() {
                          myServo.attach(5);  // Attach the Servo to pin D5
                          myServo.write(0);   // Start at 0 degrees
                          delay(1000);        // Wait for the servo to reach the position
                        }

                        void loop() {
                          // Rotate to 45 degrees slowly
                          for (int pos = 0; pos <= 45; pos++) {
                            myServo.write(pos);  // Move to the position
                            delay(15);           // Wait for the servo to reach the position
                          }

                          delay(1000);  // Hold at 45 degrees for a second

                          // Return to 0 degrees slowly
                          for (int pos = 45; pos >= 0; pos--) {
                            myServo.write(pos);  // Move to the position
                            delay(15);           // Wait for the servo to reach the position
                          }

                          delay(1000);  // Hold at 0 degrees for a second
                        }