This week our group explored, programmed and compared the embedded development boards and toolchains available in our lab.
Before diving into boards, it helps to understand what we are actually comparing. An embedded system is a computing system designed to perform a specific, dedicated function, unlike a general-purpose computer that runs many tasks. Microcontrollers (MCUs) are the heart of most embedded systems: they integrate a processor, memory, and I/O peripherals onto a single chip.
This is different from a microprocessor, which depends on external components for memory and I/O. The self-contained nature of MCUs is what makes them ideal for embedded work — lower cost, smaller footprint, lower power.
As Neil put it in the session: we are using Harvard architecture (separate instruction and data memory) over Von Neumann (shared), and RISC (fewer, simpler instructions executed fast) over CISC (many complex instructions). This combination — Harvard + RISC + Microcontroller — is what all seven boards below share at their core, even though their implementations differ enormously.
The week's goal was to understand the toolchain: the full chain of tools that takes code from text in an editor to instructions running on silicon. That means the compiler, the programmer, the bootloader, the IDE, the libraries, and the board itself.
"Asking which processor to use, as Neil said, is like asking who you should date."
Across our seven boards, we encountered three processor families:
The original Arduino architecture. Simple, 5V, well-documented. The ATmega328P running at 16 MHz is slow by modern standards but deeply understood. Every register, every peripheral is explained in exhaustive detail in the datasheet. A good architecture to learn on because there is nowhere to hide.
The dominant family for modern embedded work. The Cortex-M0+ (RP2040, SAMD21) is a simple, low-power core. The Cortex-M4 (Renesas RA4M1 in the Uno R4) adds a floating point unit for maths-heavy applications. ARM cores are produced by dozens of manufacturers — Microchip, Renesas, Nordic, ST — which means the same toolchain can target very different silicon.
An open-source instruction set architecture. Not owned by any company. The ESP32-C6 uses dual RISC-V cores, and while the ecosystem is less mature than ARM, it is growing fast. The significance of RISC-V is political as much as technical — it removes a licensing dependency from the supply chain.
The Xtensa LX7 in the ESP32-S3 sits slightly outside these families: it is a proprietary 32-bit RISC architecture from Cadence, optimized for signal processing and used exclusively in Espressif chips.
| Board | MCU | Architecture | Clock | Flash | SRAM | GPIO | Wireless | Size (mm) |
|---|---|---|---|---|---|---|---|---|
| Arduino Uno R3 | ATmega328P | AVR 8-bit | 16 MHz | 32 KB | 2 KB | 14D / 6A | None | 68.6×53.4 |
| Arduino Uno R4 WiFi | RA4M1 + ESP32-S3 | ARM M4 + Xtensa | 48 + 240 MHz | 256 KB + 8 MB | 32 KB + 512 KB | 14D / 6A | WiFi, BLE 5.0 | 68.6×53.4 |
| XIAO SAMD21 | ATSAMD21G18A | ARM M0+ | 48 MHz | 256 KB | 32 KB | 11 (all PWM) | None | 20×17.5 |
| XIAO ESP32C6 | ESP32-C6 | RISC-V dual | 160 MHz | 4 MB | 512 KB | 15 | WiFi 6, BLE 5.3, Zigbee | 21×17.5 |
| XIAO ESP32S3 | ESP32-S3 | Xtensa LX7 dual | 240 MHz | 8 MB | 512 KB + 8 MB PSRAM | 11D / 9A | WiFi, BLE 5.0 | 21×17.5 |
| XIAO RP2040 | RP2040 | ARM M0+ dual | 133 MHz | 2 MB | 264 KB | 11 (all PWM) | None | 20×17.5 |
| Raspberry Pi Pico | RP2040 | ARM M0+ dual | 133 MHz | 2 MB | 264 KB | 26 (all PWM) | None | 51×21 |
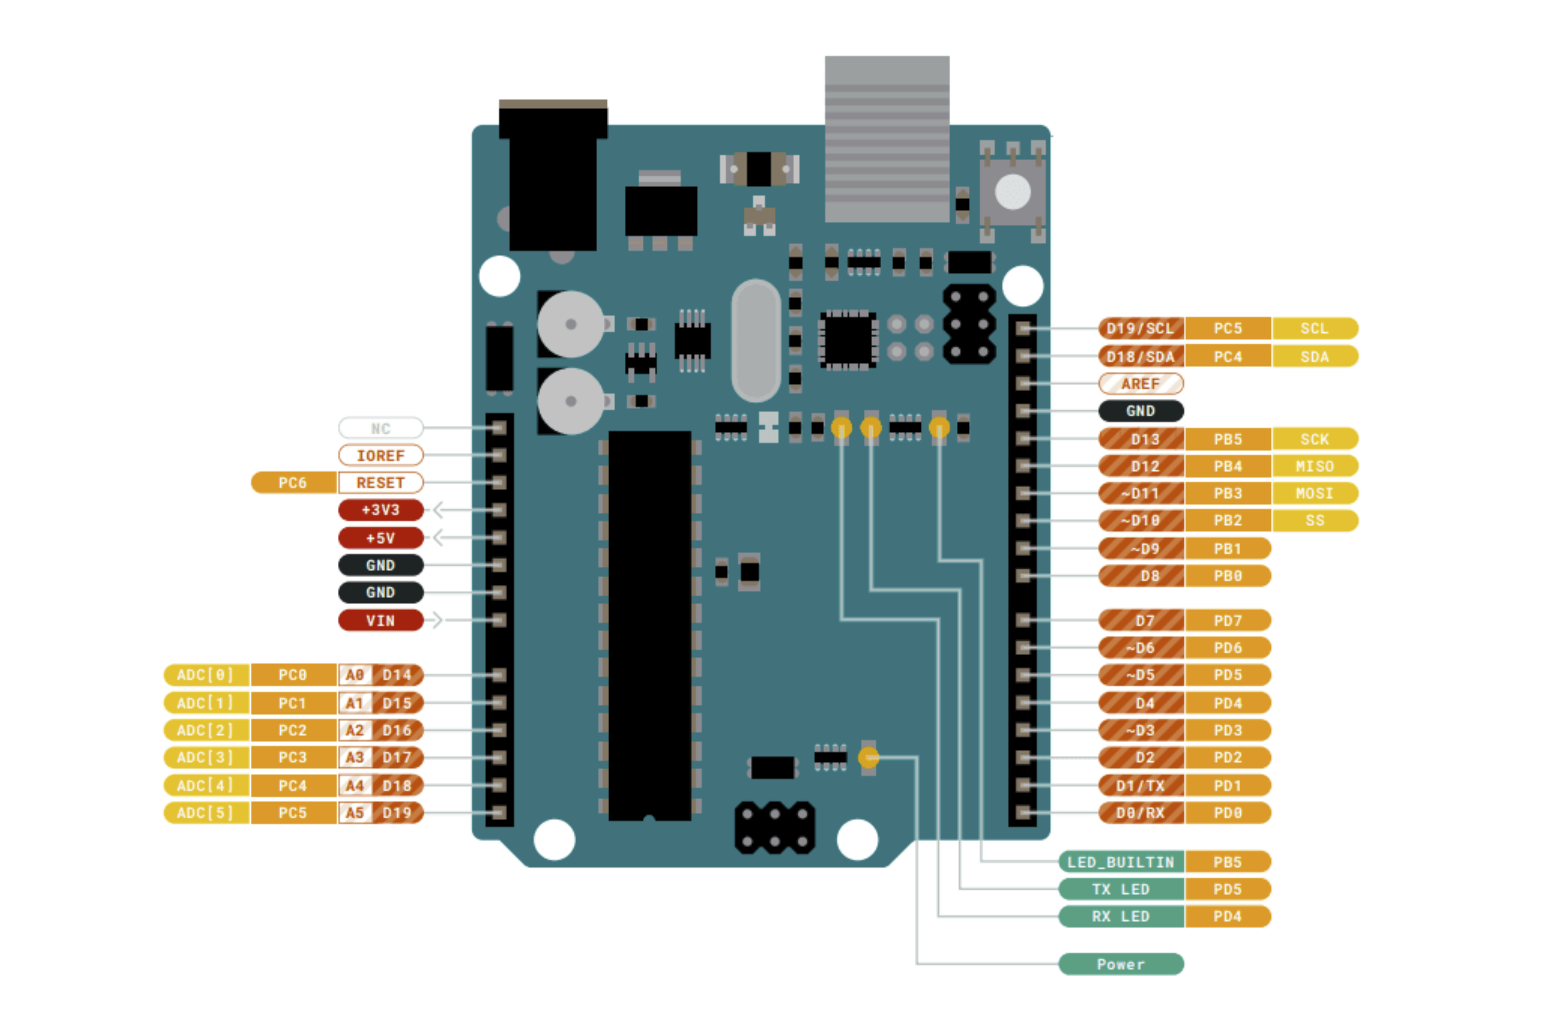
Overview: ATmega328P, 8-bit AVR, 16 MHz, Datasheet
The Uno R3 is where most people start. 32 KB flash, 2 KB SRAM. Those limits sound small because they are.
5V logic means it works with most older sensors and modules out of the box. But you can't connect 3.3V-only devices directly without a level shifter.
Programming goes through a USB-B connector and the ATmega16U2 chip acting as USB-to-serial bridge. The IDE is not native USB. The ICSP header lets you bypass the bootloader with an external programmer if you need the 512 bytes back.
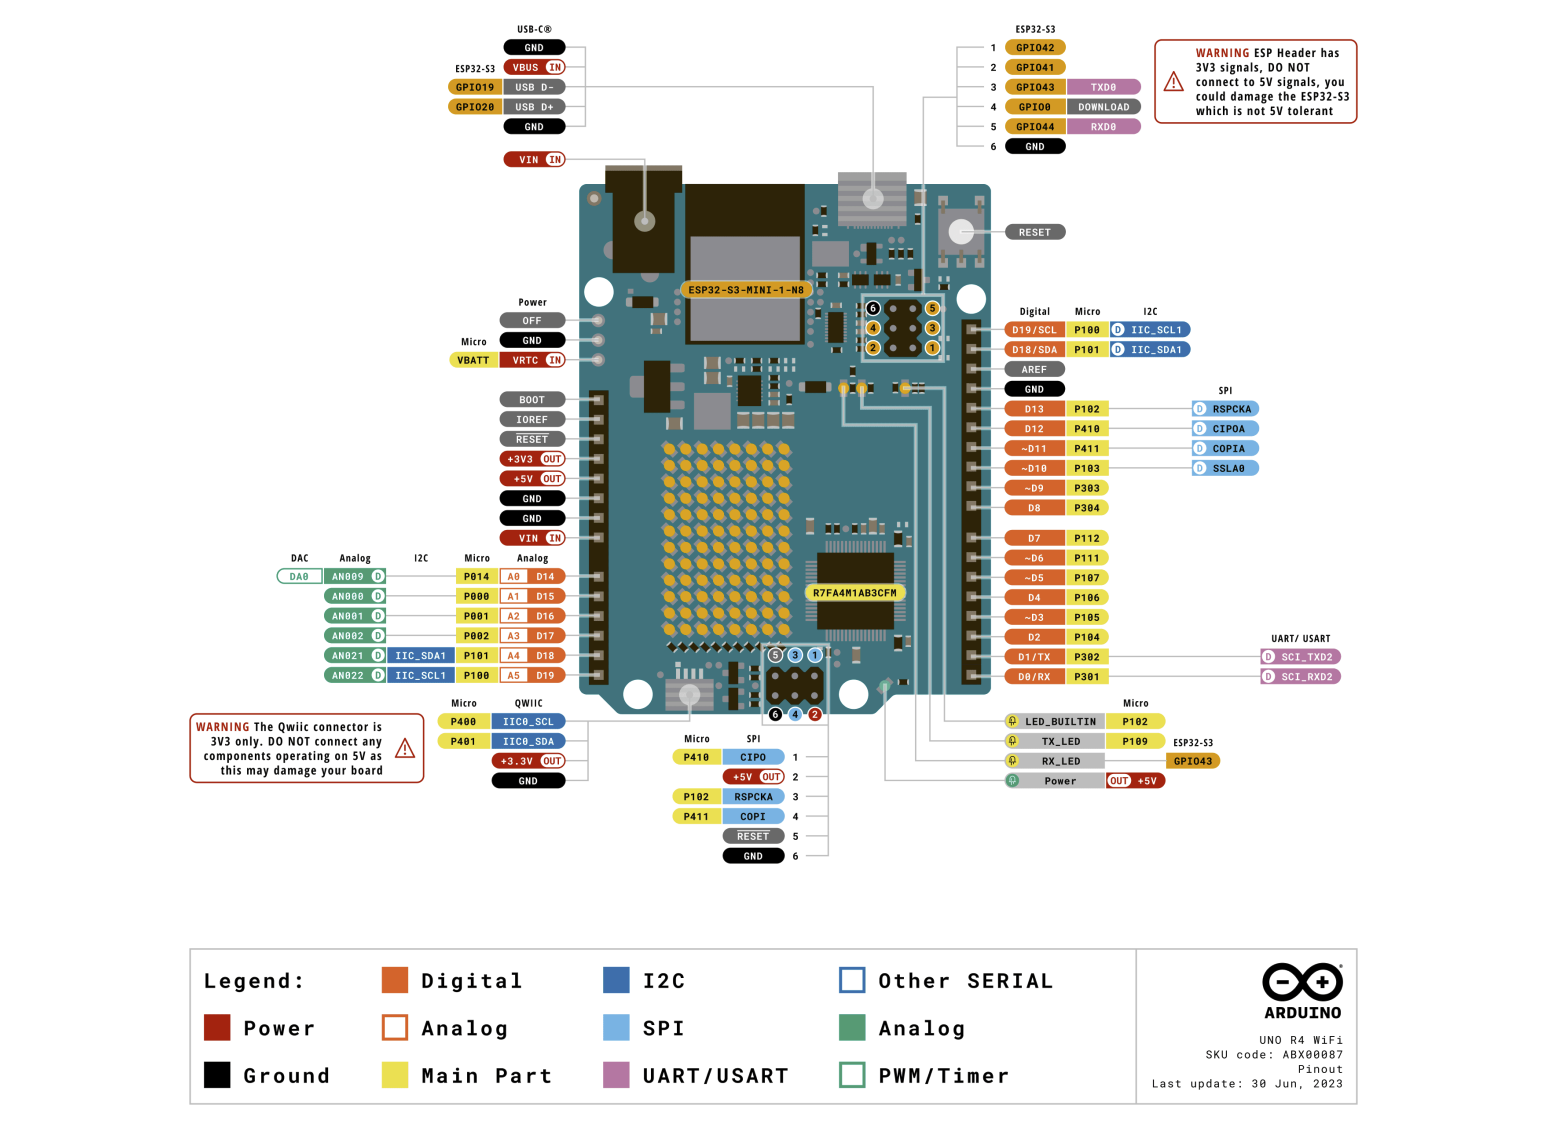
Overview: Renesas RA4M1 + ESP32-S3, ARM Cortex-M4 + Xtensa LX7, 48 + 240 MHz, Datasheet
It has two processors on one board. The RA4M1 runs your sketch and handles pins. The ESP32-S3 handles WiFi and Bluetooth, communicating with the RA4M1 over UART through a logic-level translator (TXB0108DQSR) bridging 5V to 3.3V.
This keeps the Uno form factor and 5V compatibility while adding wireless. The ESP32-S3 can also be reprogrammed independently through a dedicated header.
Compared to the R3:
The Cortex-M4 has a hardware FPU, so floating-point maths runs in hardware instead of software emulation.
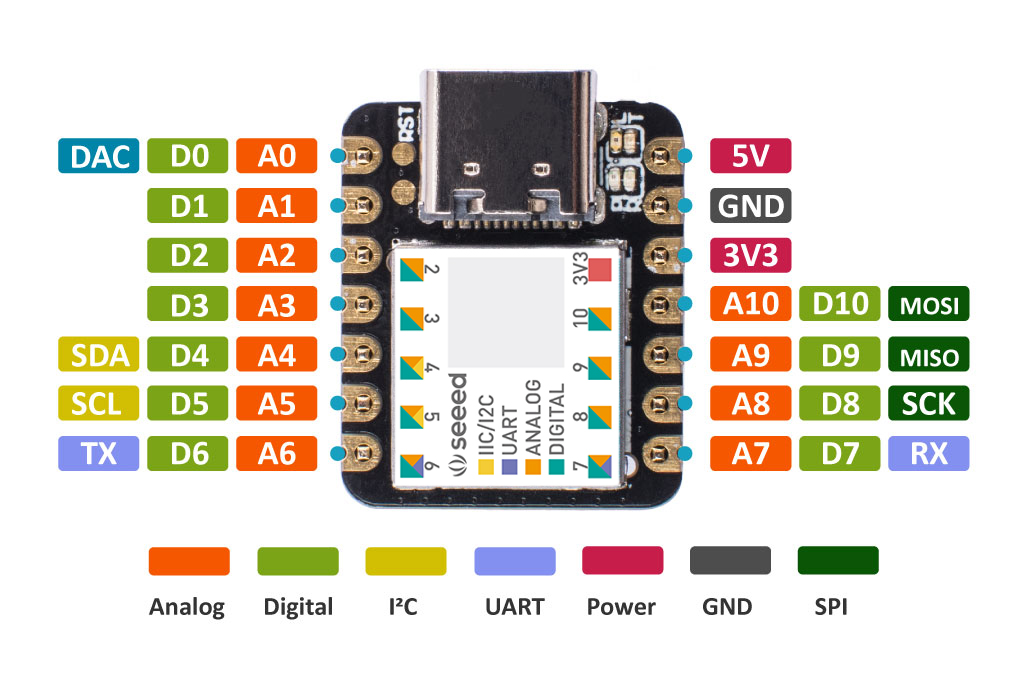
Overview: ATSAMD21G18A, ARM Cortex-M0+, 48 MHz, Documentation, Datasheet
20×17.5 mm. Thumb-sized. The Cortex-M0+ is a minimal ARM core: no FPU, simple pipeline, but 32-bit at 48 MHz puts it ahead of the Uno for most tasks.
Native USB, so the SAMD21 can appear as a serial port, keyboard, mouse, or MIDI device without an extra chip. The Uno needs the ATmega16U2 for this.
3.3V only. Not 5V tolerant. Connecting a 5V signal to a pin will damage the chip.
All 11 pins support PWM (the Uno has only 6 of 14). The flexible peripheral assignment lets most signals route to most pins, which helps in PCB layout.
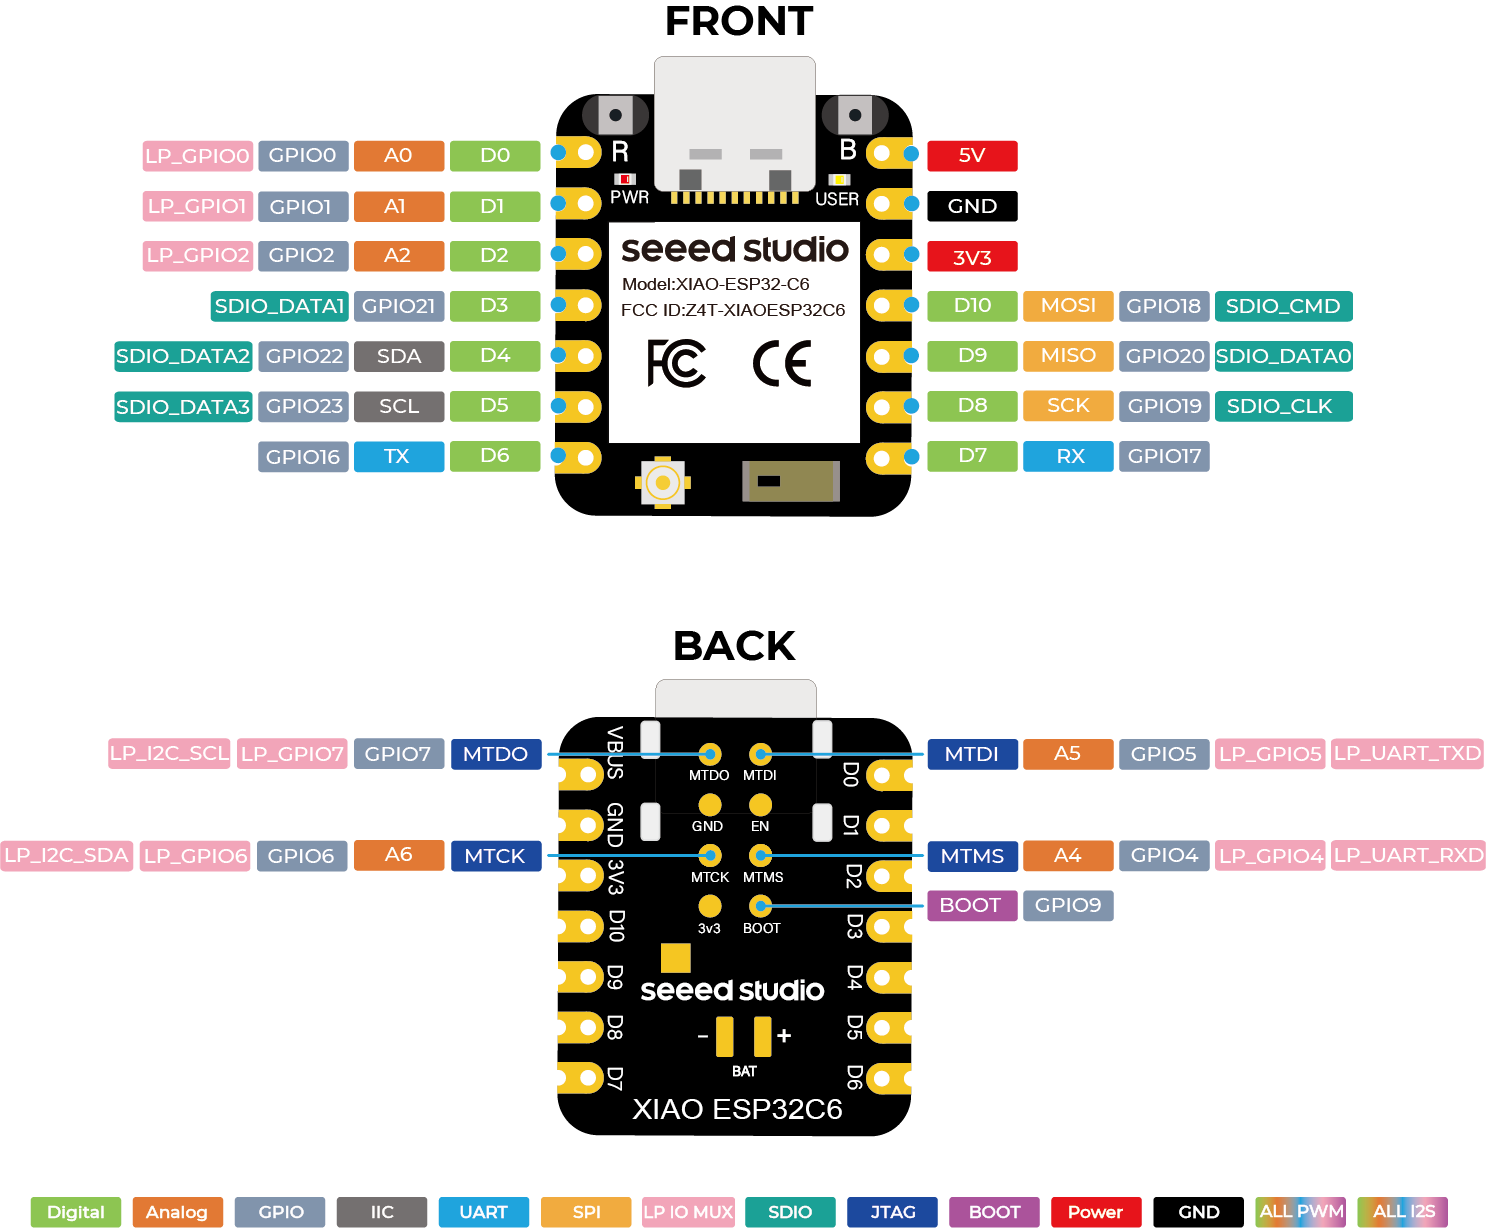
Overview: ESP32-C6, Dual RISC-V, 160 MHz HP + 20 MHz LP, Documentation, Datasheet
WiFi 6, Bluetooth 5.3, Zigbee, and Thread on one chip. The HP core (160 MHz) runs application code, the LP core (20 MHz) handles background tasks like maintaining wireless connections while the HP core sleeps.
Thread and Zigbee (via 802.15.4 radio) make this chip Matter-compatible. It is the smart home standard from Apple, Google, Amazon, Samsung. Not needed for a blink demo, but matters for home automation projects.
Security: secure boot, flash encryption, hardware TEE.
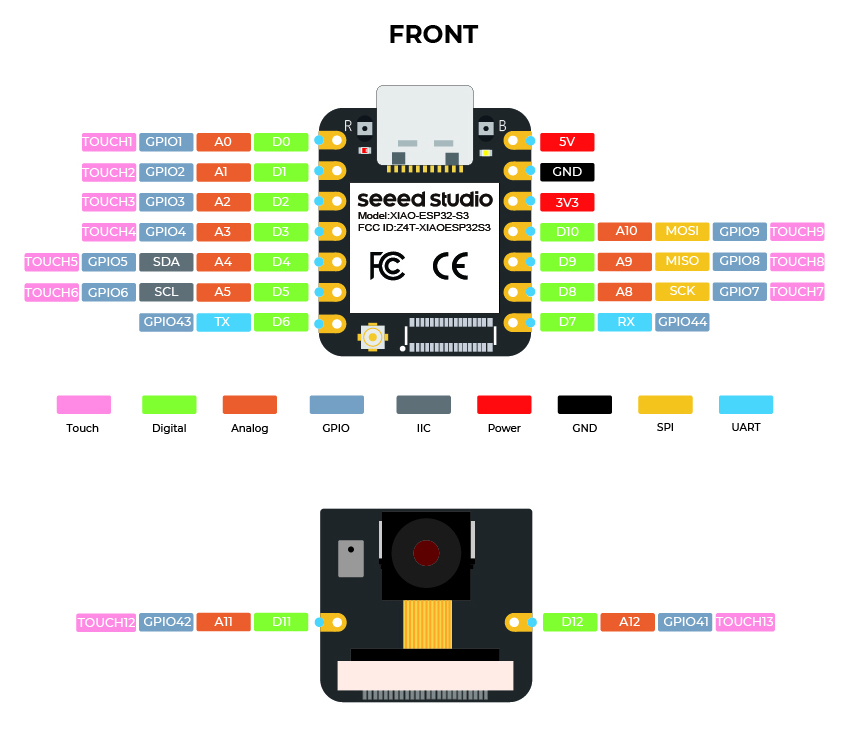
Overview: ESP32-S3, Dual Xtensa LX7, 240 MHz, Documentation, Datasheet
Fastest in the XIAO lineup. 240 MHz dual-core, 8 MB flash, 8 MB PSRAM, 14 μA deep sleep. A coin cell can keep it alive in deep sleep for months.
The PSRAM is what makes TinyML possible here. Running model inference requires holding a model in memory, which is not feasible on 264 KB or 512 KB. With 8 MB PSRAM you can run image classification or keyword detection.
The Sense variant adds an OV2640 camera and digital microphone via B2B connector on the underside.
Four power modes: active, modem sleep, light sleep, deep sleep.
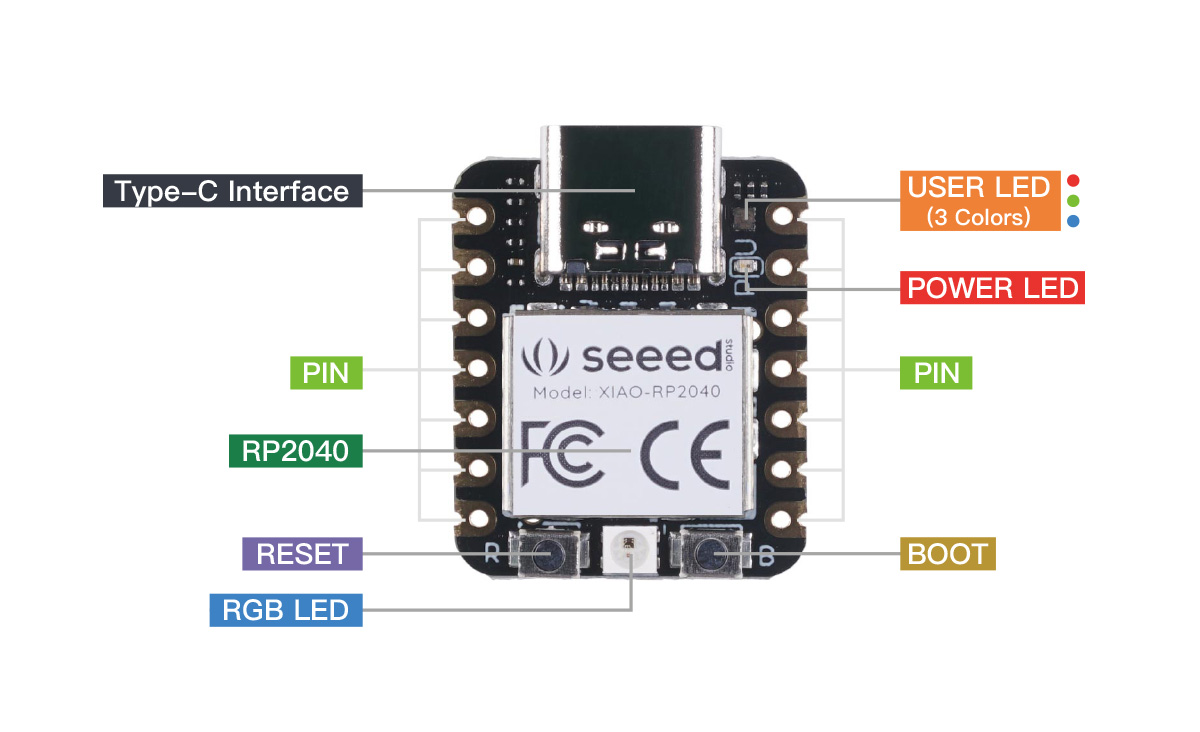
Overview: RP2040, Dual ARM Cortex-M0+, 133 MHz, Datasheet
Raspberry Pi's first custom silicon. The standout feature is PIO: 8 state machines running independently of the main cores, generating or receiving digital signals at precise timing. You can implement I2S, DVI, WS2812, or custom bus protocols without using CPU time.
People have used PIO for DVI video output, multiple SPI displays, and UART at unusual baud rates. Nothing else in this comparison can do that.
The XIAO version adds a NeoPixel RGB LED and USB-C. Bootloader supports drag-and-drop: hold B while plugging in, the board appears as mass storage, drop a UF2 file, it reboots and runs.
No wireless. For WiFi/Bluetooth, use ESP32 variants or Pico W.

Overview: RP2040, Dual ARM Cortex-M0+, 133 MHz, Datasheet
Same chip as XIAO RP2040. The difference is pins: 26 GPIO (all PWM) on a 51×21 mm board vs 11 on 20×17.5 mm.
Castellated edge pads let you solder it flat onto a custom PCB as a module — design a carrier board, mount a Pico, inherit its USB and bootloader.
Best official documentation of any board here. The RP2040 datasheet is 650 pages. You'll need it if you want to use PIO.
Very cheap: ~$4 USD.
Grove is Seeed Studio's modular prototyping system. Every module uses the same 4-pin connector (VCC, GND, and two signal lines), so you plug sensors and actuators in without soldering or worrying about pinout. The connector is keyed so it can't go in backwards. We used Grove shields for both the XIAO and the Raspberry Pi Pico to connect modules from the Grove Creator Kit Beta.

The Grove Shield for XIAO sits between the XIAO boards and the Grove sensor ecosystem. It breaks out the XIAO's 11 pins to 8 Grove connectors (2× I2C, 1× UART, and 5× configurable) and adds a battery management circuit with charging indicator. A power switch on the board lets you cut power without disconnecting USB.
For prototyping, this is significant. Instead of breadboarding every connection, sensors simply click in. The standardized connector removes a whole category of wiring error: wrong pin, wrong polarity, intermittent contact. When you are trying to understand a sensor's behaviour, removing the hardware noise from the debugging process is valuable.
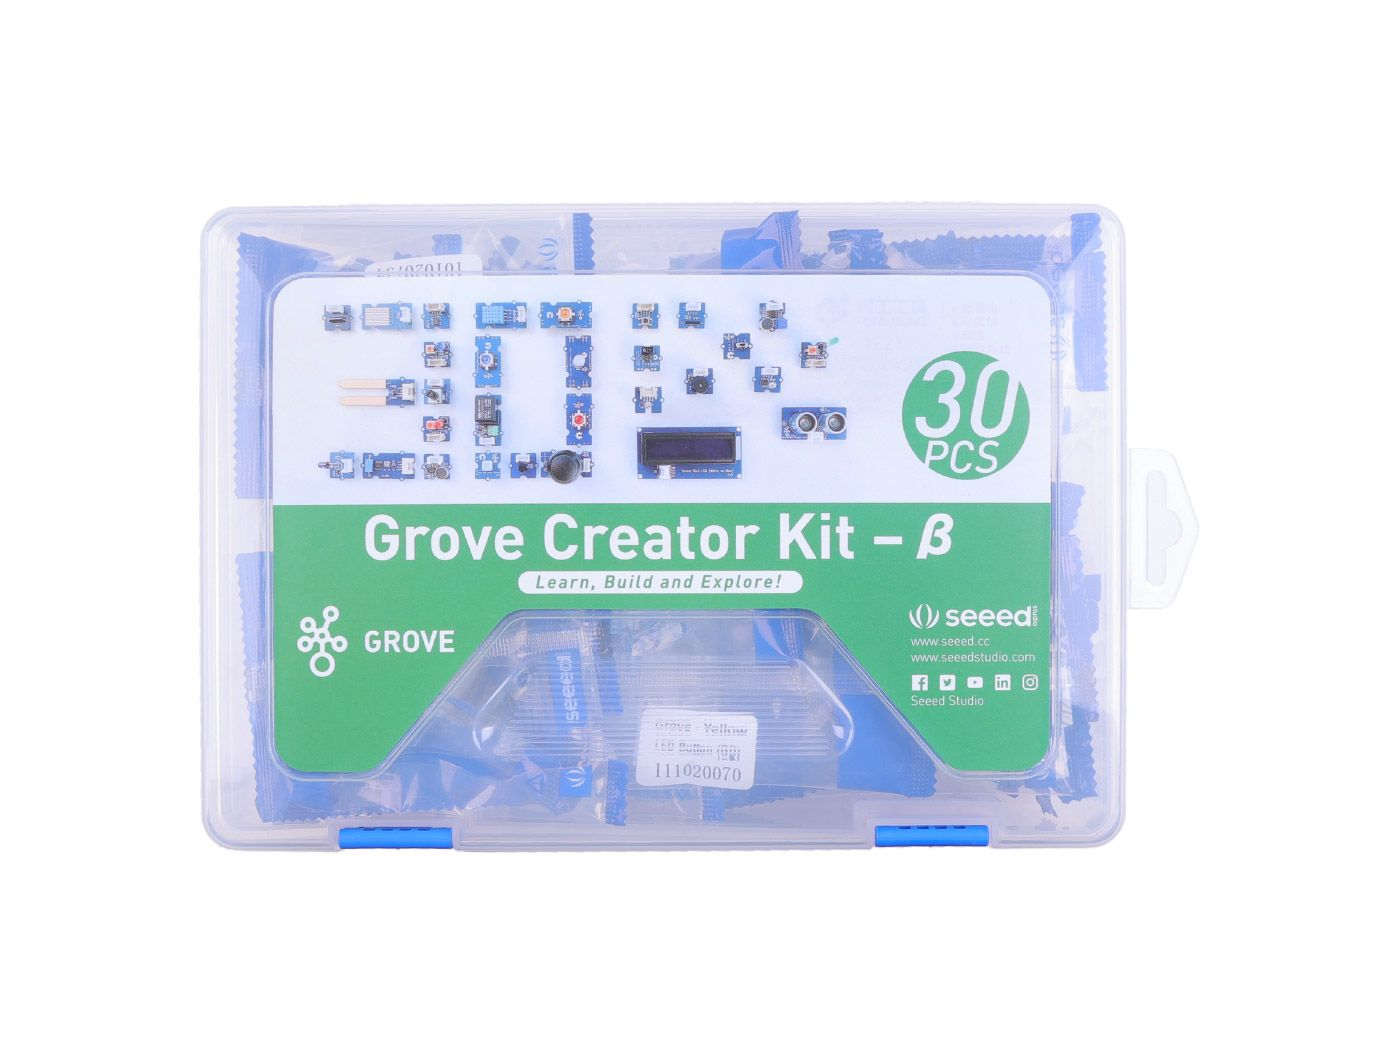
The Grove Creator Kit Beta contains 30 modules. We used a selection of them this week alongside the XIAO boards and the Pico with its Raspberry Pi Grove Shield.
The 4-pin Grove connector carries VCC, GND, and two signal lines. Depending on the module, those signal lines carry digital I/O, analog voltage, I2C (SDA/SCL), or UART (TX/RX). The connector is physically keyed so it cannot be inserted backwards.
Some sensors in the kit: temperature and humidity (DHT11), light sensor, ultrasonic ranger for distance, PIR motion sensor, button and rotary angle sensor for input.
Some outputs in the kit: buzzer, chainable RGB LEDs, LCD display.
A toolchain is the full set of tools that converts source code into a running program on a microcontroller. At minimum: a compiler (translates C/C++ to machine code), a linker (combines compiled objects), a programmer (transfers the binary to flash), and some way to interact with the running program (serial monitor, debugger). The IDE wraps all of this in a user interface.
We used two toolchains this week: Arduino IDE and PlatformIO.
The Arduino IDE is the traditional entry point to embedded programming. It abstracts most of the toolchain — you press Upload and something happens on the board. For learning, this is the right trade-off: the complexity exists, but you do not have to manage it until you are ready.
Under the hood, Arduino IDE is calling avr-gcc or arm-none-eabi-gcc, running avrdude or the appropriate programmer, and linking against the Arduino core libraries. The abstraction is thin enough that you can inspect it if you want to, but opaque enough to not require it.
For boards beyond the standard Arduino hardware, the Board Manager downloads additional cores: packages that tell the IDE how to compile for and communicate with a specific chip. The XIAO boards require Seeed's core package, the RP2040 boards require either Earle Philhower's arduino-pico or the official Raspberry Pi package.
Best for: first projects, quick tests, teaching, situations where setup time matters more than capability.
Start by downloading the Arduino IDE.
Execution on Linux requires a flag, otherwise it won't run properly:
./arduino-ide_2.3.7_Linux_64bit.AppImage --no-sandboxWe need to select the correct Board and Port. In our case it was the UNO R3, which can be set just as the UNO.
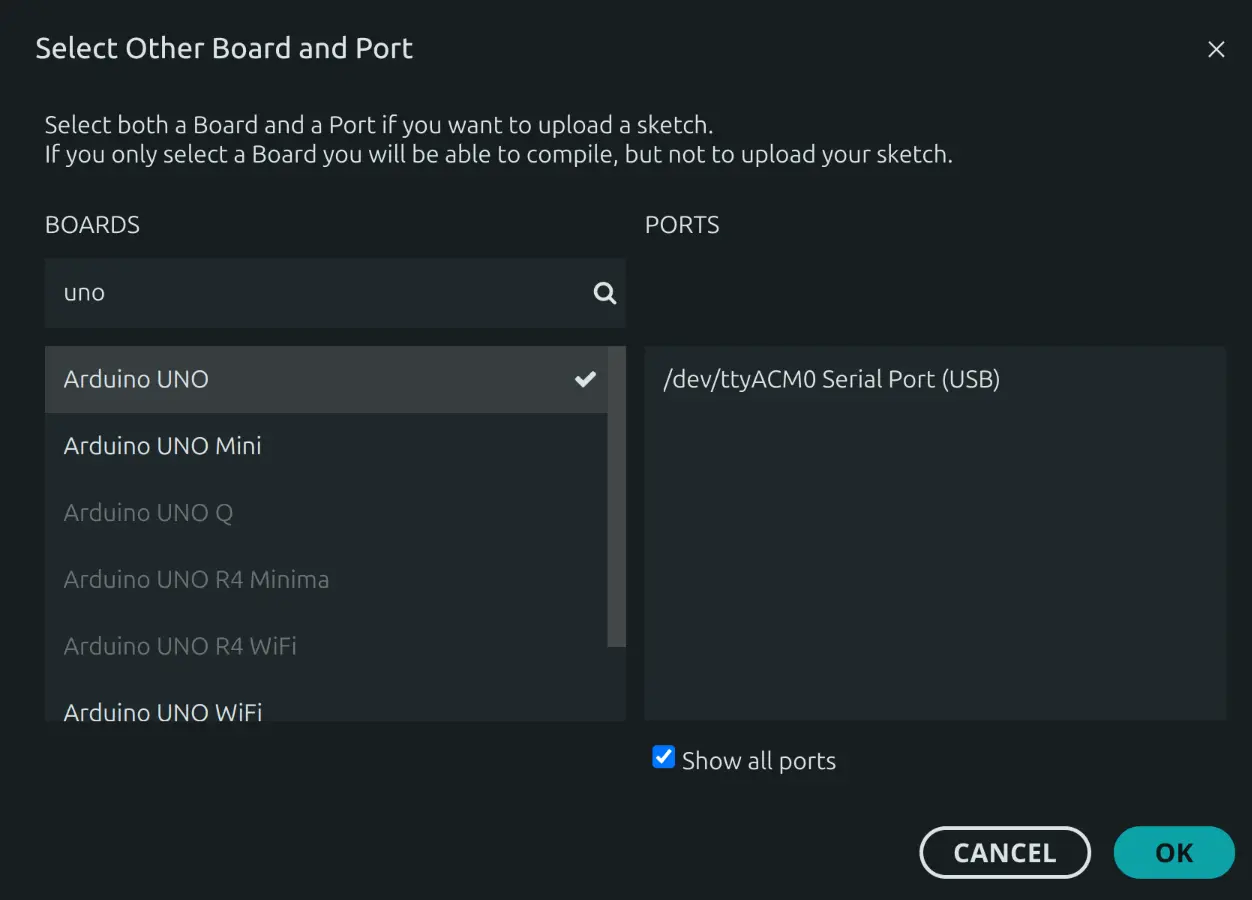
Sadly the default permissions don't allow access to the serial port as seen in the red error:

So, we needed to add ourselves to the user group that does have permission to handle serial ports, which is the group "dialout":
sudo usermod -a -G dialout $USEROnce that's done we can either log in and out to activate the permission or, which is what we did, execute:
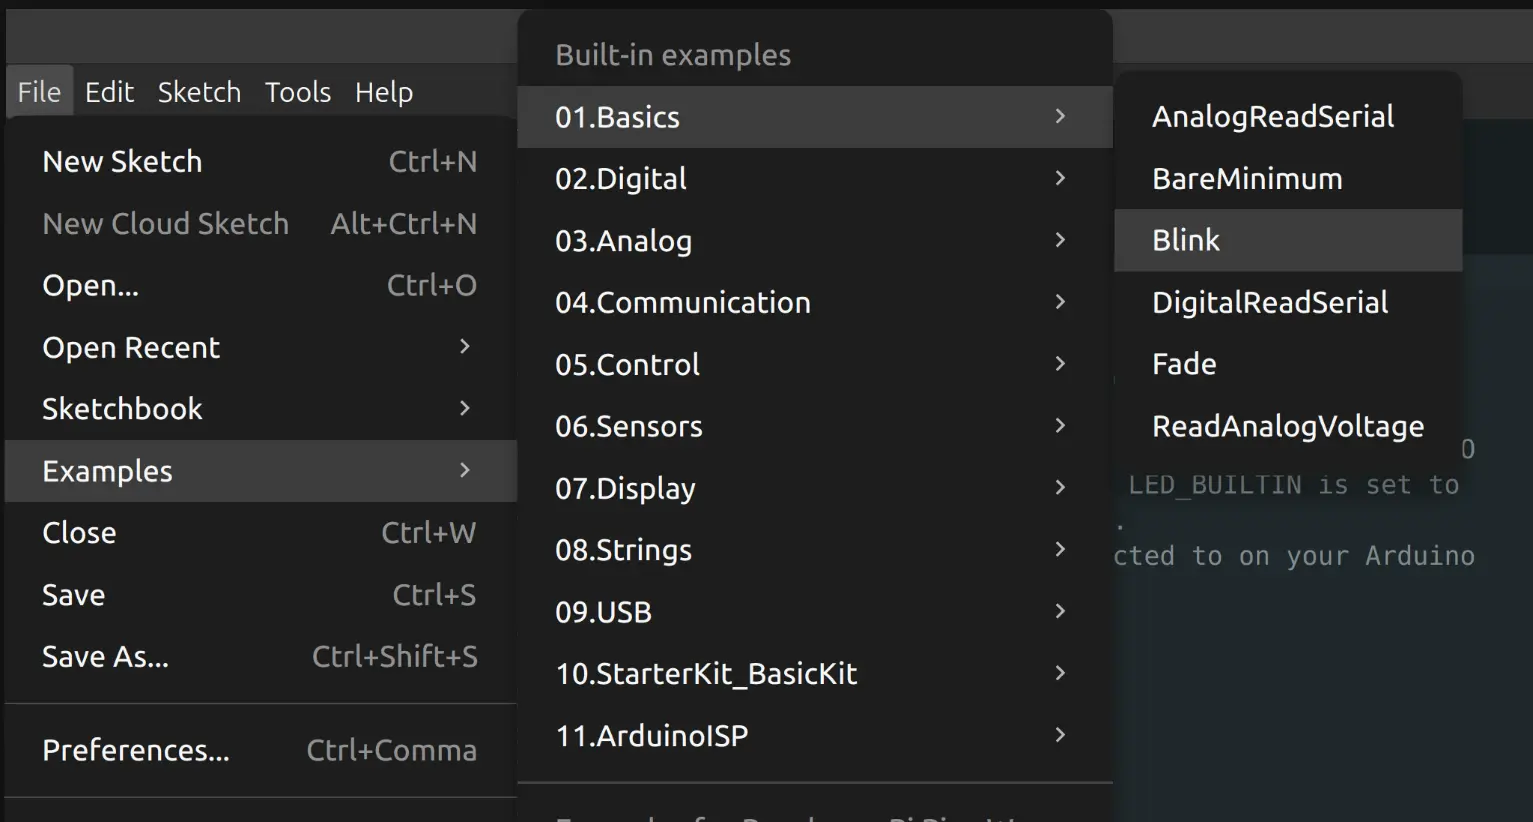
newgrp dialoutOnce that was set, we loaded the example from File → Examples → Basics → Blink:
Once that's loaded, one just has to click the Upload button and the internal LED will blink. We then evolved the code to something a bit more sophisticated, to make sure we understood the timings and flow. We made it blink Morse code for SOS:
static const int dotTime = 200 ;       // time the LED is on for a dot
static const int dashTime = 500 ;      // time the LED is on for a dash
static const int dotdashSpacing = 200 ; // time the LED is off between dots or dashes
static const int letterSpacing = 500 ; // time the LED is off between letters
static const int wordSpacing = 2000 ;  // time the LED is off between words

// the setup function runs once when you press reset or power the board
void setup() {
  // initialize digital pin LED_BUILTIN as an output.
  pinMode(LED_BUILTIN, OUTPUT);
}

// the loop function runs over and over again forever
void loop() {
  blinkS();
  blinkO();
  blinkS();
  delay(wordSpacing);
}

void blinkS(){
  blinkDot();
  blinkDot();
  blinkDot();
  delay(letterSpacing);
}

void blinkO(){
  blinkDash();
  blinkDash();
  blinkDash();
  delay(letterSpacing);
}

void blinkDot(){
  ledOn();
  delay(dotTime);
  ledOff();
  delay(dotdashSpacing);
}

void blinkDash(){
  ledOn();
  delay(dashTime);
  ledOff();
  delay(dotdashSpacing);
}

void ledOn(){
  digitalWrite(LED_BUILTIN, HIGH);  // turn the LED on (HIGH is the voltage level)
}

void ledOff(){
  digitalWrite(LED_BUILTIN, LOW);   // turn the LED off by making the voltage LOW
}
And here's the final result:
PlatformIO is a professional embedded development platform that runs as an extension inside Visual Studio Code. Where Arduino IDE hides the toolchain, PlatformIO exposes it, and gives you control over it.
The key difference in practice is not the feature list but the debugging. Arduino IDE's only debugging mechanism is printing to the serial monitor. PlatformIO supports hardware debugging with breakpoints, variable inspection, and step-through execution on supported boards.
For any non-trivial project, the ability to pause execution and inspect state is the difference between debugging in minutes and debugging in hours.
The other meaningful difference is project organization. Every PlatformIO project has a platformio.ini file that declares the board, framework, libraries, upload protocol, and monitor baud rate. This file can be committed to git, meaning a collaborator can clone a repository and have an identical build environment immediately. Arduino IDE projects do not have this property.
Best for: multi-file projects, debugging, team development, situations where you will come back to the code after time away.
1. Prerequisites: VS Code, Python 3.5+. On Linux, also python3-venv.
Important: if the Microsoft Arduino extension is installed in VS Code, remove it. The two extensions conflict.
2. Install VS Code: Download from code.visualstudio.com
3. Install PlatformIO IDE extension: Open VS Code → Extensions → search PlatformIO IDE → Install.
PlatformIO appears as an ant icon in the sidebar. On first launch it downloads compilers and frameworks automatically — this takes a few minutes.

4. Create a project: PlatformIO Home → New Project → select board → select framework (Arduino) → Finish.
Project structure:
project/
├── src/
│   └── main.cpp
├── lib/
├── include/
└── platformio.ini
5. Configure platformio.ini: Example for XIAO ESP32S3:
[env:seeed_xiao_esp32s3]
platform = espressif32
board = seeed_xiao_esp32s3
framework = arduino
monitor_speed = 115200
6. Build and upload:
Build: ✓ in the bottom toolbar. Upload: → in the bottom toolbar. Monitor: the plug icon.

All three are also available as pio command-line commands, which is useful for automation or scripting.
| Feature | Arduino IDE | PlatformIO |
|---|---|---|
| Learning curve | Low | Medium |
| Debugging | Serial print only | Breakpoints, variable inspection |
| Build speed | Slower | Faster (incremental) |
| Project portability | Manual | platformio.ini in version control |
| Library management | Board Manager | Registry + platformio.ini |
| Multi-board support | Manual switching | Multiple envs in one project |
| Best for | Learning, quick tests | Complex projects, teams |
Our experience this week: Arduino IDE worked well for the initial blink and SOS tests where iteration speed mattered. PlatformIO came into its own when working with Grove sensor libraries, where dependency management and the ability to inspect sensor readings during execution saved significant time.
The most useful outcome of this week was developing an instinct for which board fits which context — not memorising specs, but understanding the trade-offs.
The Grove system made sensor integration fast enough that we could actually test ideas rather than spend the session routing wires. That speed of iteration — trying something, seeing it fail, adjusting, trying again — is what embedded programming practice is actually about.