1. Project Management
This week I began to work on an idea for my final project. The information below documents my exploration and skill building for the first module on web development. Please visit the final project link above for final project updates.
Cloning the Git Respository
The first thing we learned how to do was clone a repository so that I could access the content for the course and be able to create weekly updates of all the things that work on and learn. I was able to clone the repo very by visiting Gitlab and clicking on my own personal page. I then clicked on the blue box down arrow that says code and then copied and pasted the SSH clone link. Next I visited the gitbash interface and used the "git clone" command followed by SSH code I had copied and pressed enter. By cloning this repo I will be able to work on editing my personal webpage files and can share my work with the instructors or any groups I will work with.
Researching the Documentation Process & Learning HTML
I attended the Saturday Morning Global Open Time and was introduced to several Fab Academy participants and instructors from all over the world. I found this session helpful as some of the questions and concerns that were discussed were similar to my own. It was an amazing group of aspiring inventors and innovators and I can't wait to see everyone's final projects.
I worked through the practice slides explaining html and css provided by instructor Brandon. This was great practice to prep me for this week's homework assignment of setting up and editing the webpages for notes, the final project, and my about me page. I also watched a video on youtube to help me understand html and css structure and tags.
I downloaded a photo compression software but it seemed to have a negative effect on my computer's operating system so I decided to use the "Sent to Email" function when right clicking on my photo files and that seems to compress the photo files substantially.
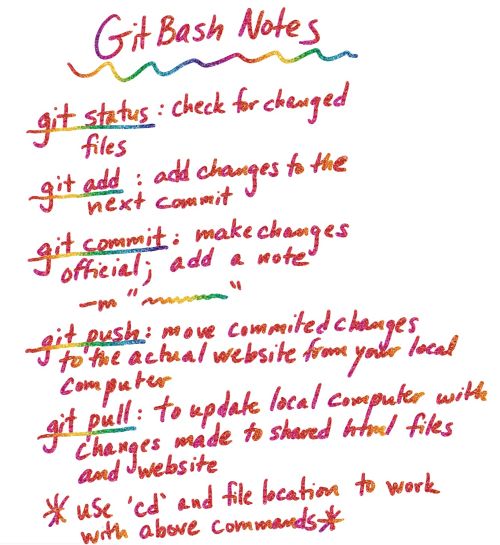
Each day I practiced the different "git" commands in GitBash : git status, git add, git commit, git push; in order to complete this week's assignment. I was able to successfully update the files in Visual Studio in order to update my "About me page" and "Final Project" page.
I am still having challenges adding photos and making adjustments to the Project Management assignment as the code that worked on the other pages does not seem to work with the current page. It may be necessary to eliminate the code that was supplied completely in order to start from scratch at some point. There is definitely a challenge associated with the quotation marks in the original code that was provided.
I completed a first sketch of the product I've dreamed up simply with pencil and paper. I've included a copy of the sketch on the Final Project Page.
A Note on Compressing photos
In compressing photos I used the Windows photo app and also made photos smaller by email compression. I initally thought that these two methods diminished the quality of the photos, but in the end I was wrong. The problem was that I over-compressed the photos. I misunderstood how much space was available for each of our websites so attempted to compress every photo to below 40% quality which made each photo file smaller than 10KB. I now know that I can have larger file sizes but still need to consesrve space while making sure the quality of the pictures uploaded will have better definition. I am making this note in hindsight as a week 5 addendum. Hindsight is 20/20 but only if you don't over-compress your photos 😊
CSS Style and Editing Page Appearance
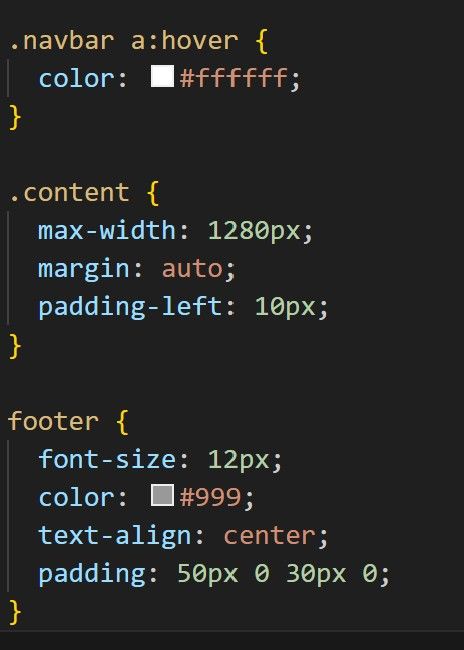
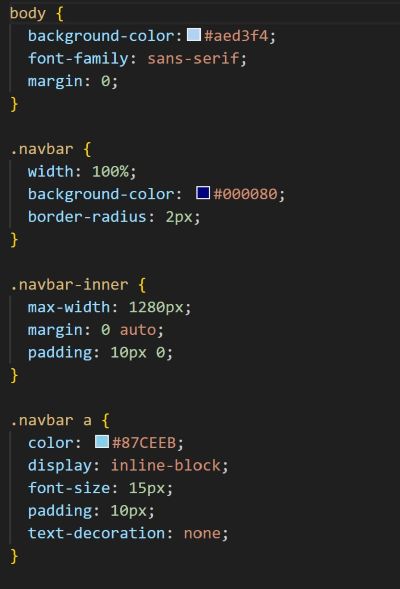
I began to make edits to the css syle file for my Fab Academy page. The STYLE file can be found in the public folder and this is where adjustments can be made to the layout of your web page. It serves as a template for how things will be organized. Here you can presribe heading types, spacing, background colors, layout of navigation bars, text color, and how items will look when scrolled over with the mouse cursor. This is just scratching the surface of course. There are many coded templates that can be used to create incredibly advanced designs which I plan to learn more about. This week was my first time interacting with anything html and css related so I began by changing the appearance of my website. Since I am at Wheaton College in Massachussets, I decided to show my school spirit by making my page Wheaton Blue! I performed a few color searches on Too see our findings, please visit the following link: HTML Color Code Search. In my search I looked for a few different blues that would work well together, specifically I wanted to find a lighter color blue for the background and dark colored blue for the navigation bar. I also wanted the light grey text in the footer to be darker in color and easier to read. As such I used the following hex code colors and entered their codes into the style file. You can see the hexcode colors I chose in the pictures below:
Using the Windows Snipping Tool>
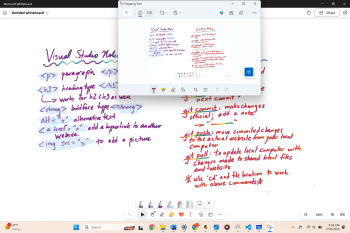
Using the windows snipping tool makes it very easy to trim and capture things from your computer screen for the purpose of creating photos for the documentation process. I imagine Macs have a similar feature. I was able to capture some of my notes from my digital notes both on my phone in samsung note as well as on my computer using the snipping tool. There is a photo example below.
Useful Links
- Link to Video Tutorial I watched on YouTube
- Link to HTML question directory
- W3 HTML chools (open in new window)
- GitLab Pages examples
Sample Coding for this Week
- Link to Video Tutorial I watched on YouTube
- Link to HTML question directory
- W3 HTML chools (open in new window)
- GitLab Pages examples
Sample Coding for this Week
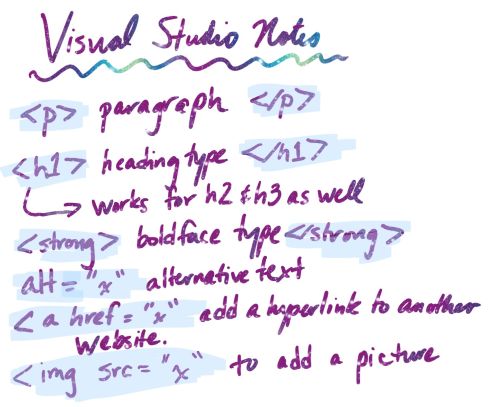
Below is a screenshot of some of the "coding" I did this week. I was having difficulty remembering the path name so I made some digital notes for myself to revisit for everytime I use Git Bash and Visual Studio Code. I've placed enlarged screenshots of those below.

Git Bash Digital Notes
Visual Studio Digital Notes
