14.Molding and Casting
Hero Shot of the Week

Summary

Group assignment
This week, we reviewed the safety data sheets (SDS) of our molding and casting materials, made test casts, and compared 3D-printed molds vs. milled molds.
Below is our complete documentation.
Safety
Before working with epoxy resin, silicone rubber, and gypsum, I reviewed the Safety Data Sheets (SDS) for each material to understand potential hazards and required protective measures.
General precautions
-
I worked in a well-ventilated area to avoid inhaling fumes or dust.
-
I used nitrile gloves when handling epoxy and silicone to avoid skin contact.
-
I wore protective glasses to prevent splashes.
-
I used a lab coat / apron to avoid contamination of clothing.
-
I followed recommended mixing ratios and avoided unnecessary exposure.
-
All waste and leftover materials were disposed of properly according to Fab Lab guidelines.
Materials SDS Overview
| Material | Key Hazards | Required PPE | Notes / Properties |
|---|---|---|---|
| Epoxy Resin (Part A + Part B) | Skin irritation, allergic reaction, harmful fumes | Gloves, safety glasses, ventilation | Two-part system; cures exothermically; requires exact ratio |
| Silicone Rubber | Low hazard, may irritate skin | Gloves | Flexible, elastic mold material; long working time |
| Gypsum / Plaster | Dust irritation to eyes/lungs | Mask, gloves, glasses | Hardens with water; gets warm during curing; safe after set |
| Release Agent (if used) | Flammable, skin/eye irritation | Gloves, glasses | Applied to mold surfaces to prevent sticking |
What I used during my work
-
Nitrile gloves during all mixing and pouring processes
-
Safety glasses while handling epoxy and gypsum
-
Respirator mask when working with plaster powder (dust)
-
Ventilation fan during epoxy mixing and curing
-
Disposable cups and sticks for clean and safe mixing
Short Summary for Documentation
I worked with epoxy resin, silicone, and gypsum. Before starting, I reviewed their SDS documents to understand safety risks. I used gloves, glasses, and ventilation throughout the process. I followed the recommended mixing ratios and handled all materials carefully to avoid skin contact and fumes. This ensured the molding and casting process was safe and aligned with Fab Academy standards.
1. Materials
Epoxy Resin — Component A & B
We worked with a two-part epoxy resin system (Component A and Component B).
Component B:

Component A:

2. Test Casting Experiments
2.1 Epoxy Casting – Chess Pieces
We created several test casts using clear epoxy resin, experimenting with:
- Transparent resin
- Pigment variations
- Decorative additives (gold flakes)
- Different curing conditions
Our goal was to evaluate surface finish, transparency, and bubble formation.
Results:


3. Mold Fabrication Methods
I used were silicone molds specifically designed for casting chess pieces. Silicone is flexible and non-stick by nature, so in this case I did not need to use a release agent. The epoxy cured cleanly and could be removed easily from the mold without damaging the shape.
For the coloring, I added liquid epoxy pigment directly into the resin during mixing. I first mixed the resin and hardener according to the correct ratio, and then added a small amount of pigment to achieve a smooth, even color. The pigment blends very well with epoxy, so the final chess pieces came out with a clean and uniform finish.
3.1 3D-Printed TPU Molds
We designed chess-piece molds and 3D printed them using flexible TPU filament.
TPU flexibility made demolding easier and prevented damage to the cast pieces.
TPU Printed Molds:

Advantages
- Very flexible → effortless demolding
- Low cost
- Fast to produce
- Works well for small casting projects
Disadvantages
- Visible layer lines
- Not suitable for high-temperature materials
4. Casting with Gypsum (Plaster)
To compare different casting materials, we also cast pieces using gypsum (plaster).
Mixing Process
We mixed water with gypsum powder until achieving a uniform consistency.


We poured the gypsum mixture into a mold that was previously milled.

Final Gypsum Cast
After curing, we removed the cast from the mold.

Summary:
- 3D-printed TPU molds are ideal for quick, flexible, low-cost mold fabrication.
Conclusion
During this group assignment, we successfully explored multiple molding and casting techniques.
We gained hands-on experience with:
- Reading and understanding SDS documents
- Working safely with epoxy and gypsum
- Creating both 3D-printed and milled molds
- Casting resin and plaster
This week provided essential knowledge for future Fab Academy projects and improved our understanding of materials, molding techniques, and casting workflows.
Individual Assignment
Introduction
This week I worked on molding and casting by creating a small rabbit-shaped mold and casting it with plaster. I designed the 2D sketch and 3D model in Fusion 360, printed the mold using PLA on a Bambu Lab 3D printer, prepared and mixed plaster, and finally cast it into the mold. This assignment helped me understand the full workflow: designing, preparing the mold, mixing materials, and safely casting the final shape.

This image shows the initial 2D sketch created in Fusion 360. I designed the outline of the rabbit mold, ensuring accurate boundaries and adding necessary dimensions before moving to the 3D stage.

Here is the completed 3D model of the rabbit mold in Fusion 360. The design includes smooth internal surfaces and mounting holes, preparing it for fabrication.

In this photo, the STL file is loaded into Bambu Lab Studio. I configured printing parameters such as layer height, infill, and support structure before sending the job to the printer.

This is the final 3D-printed mold made from PLA. The print came out clean and detailed, ready for sanding and casting preparation.

This image shows all materials prepared for casting: the printed mold, a container for mixing water and plaster, and tools needed for the process.

Here I am pouring the mixed plaster (water-to-plaster ratio 1:2) into the mold. This ensures a smooth flow into all internal areas of the cavity.

After pouring, I gently tapped the mold with a small hammer to help release air bubbles and ensure the plaster fills every detail of the mold.


This photo shows the mold completely filled with plaster. At this stage, it is left to cure until fully hardened. Another view of the filled mold after casting. The surface is leveled, and the mold is ready to rest until the plaster is solid.

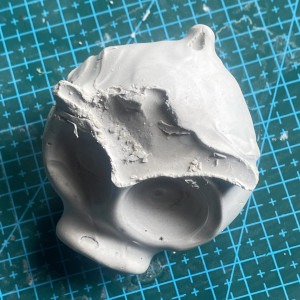
After the plaster fully cured, I removed it from the mold. The cast shape came out, but it cracked in several places. This happened because the plaster layer was thin in some areas and I removed it too early while it was still fragile. Even though the result is broken, the test helped me understand how important proper mixing, thickness, and curing time are in the molding and casting process.
Conclusion
In this assignment I designed, printed, and cast my own custom mold.
I learned how different materials behave during the casting process and how important mold geometry and venting are.
Next time, I will improve the mold finish and add better escape channels to achieve a cleaner surface.