Group Assignment:
Group Assignment SummaryAs part of the group assignment, we collaboratively designed and developed a simple interactive game. We learned how to create and arrange the game interface by organizing sprites, backgrounds, and screen layouts to provide a clear user experience. The assignment helped us understand the fundamentals of visual design and game structure.
We gained practical experience in programming sprite movements using event and motion blocks, allowing the player character to respond to user inputs such as jumping and movement. We also implemented collision detection between the player and obstacles, enabling game-over and restart functionalities when collisions occurred.
Additionally, we learned how to control the overall game flow using loops, timers, variables, and scoring systems. By integrating these features, we were able to create a more engaging and interactive gameplay experience while understanding the logic behind real-time game development.
Individual Assignment
Write an application for the embedded board that you made. that interfaces a user with an input and/or output device(s)
Interface and Application Programming – Introduction
ESP32 Web Interface Demo
ESP32 Web Interface Demo
In this week of Fab Academy, I focused on Interface and Application Programming. The goal was to connect a user interface with my custom embedded board and control it through a communication protocol.
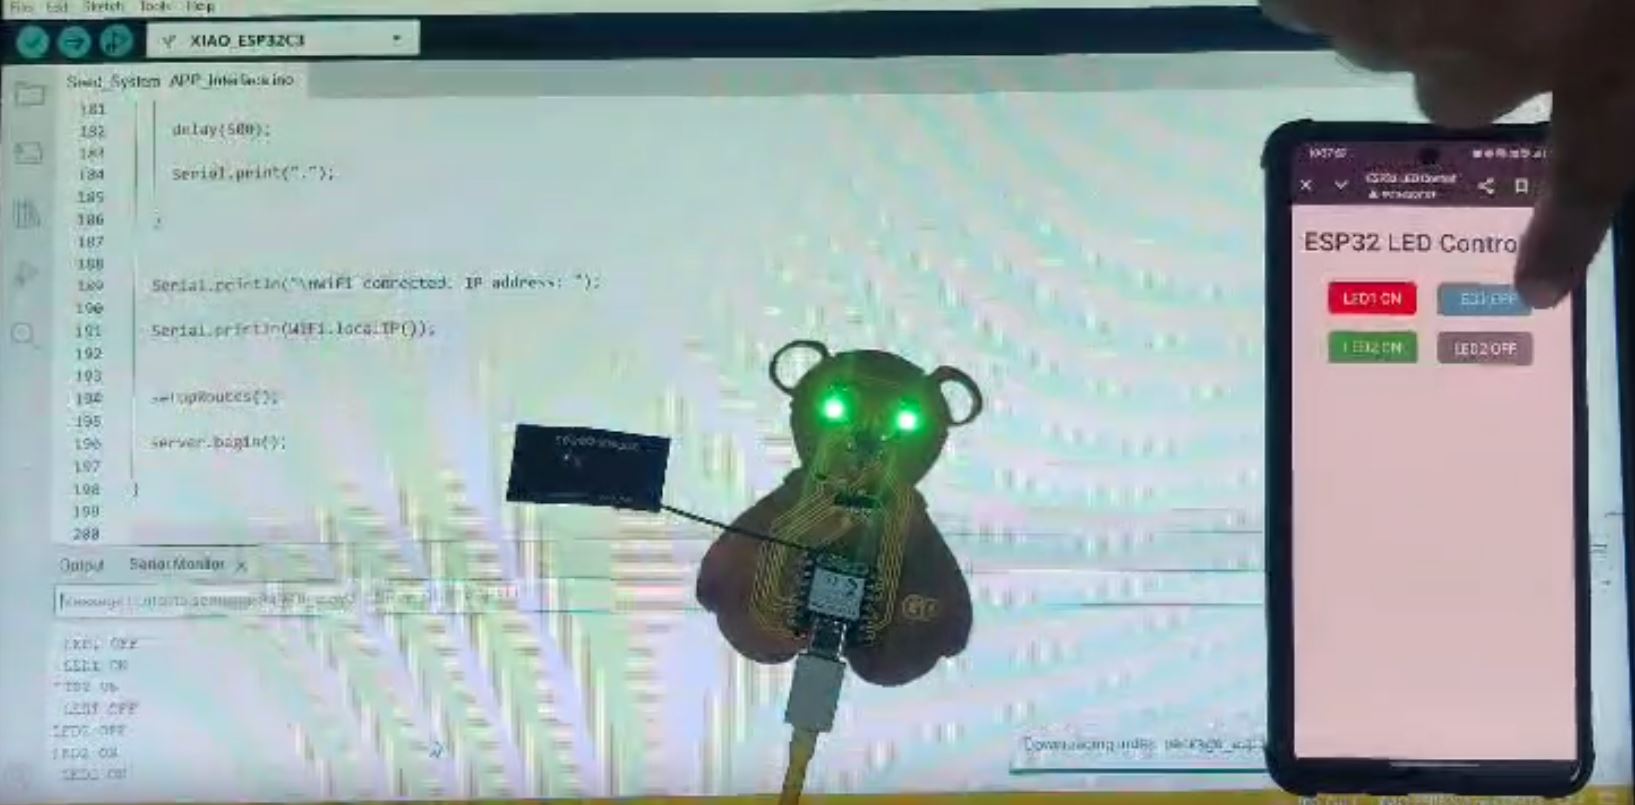
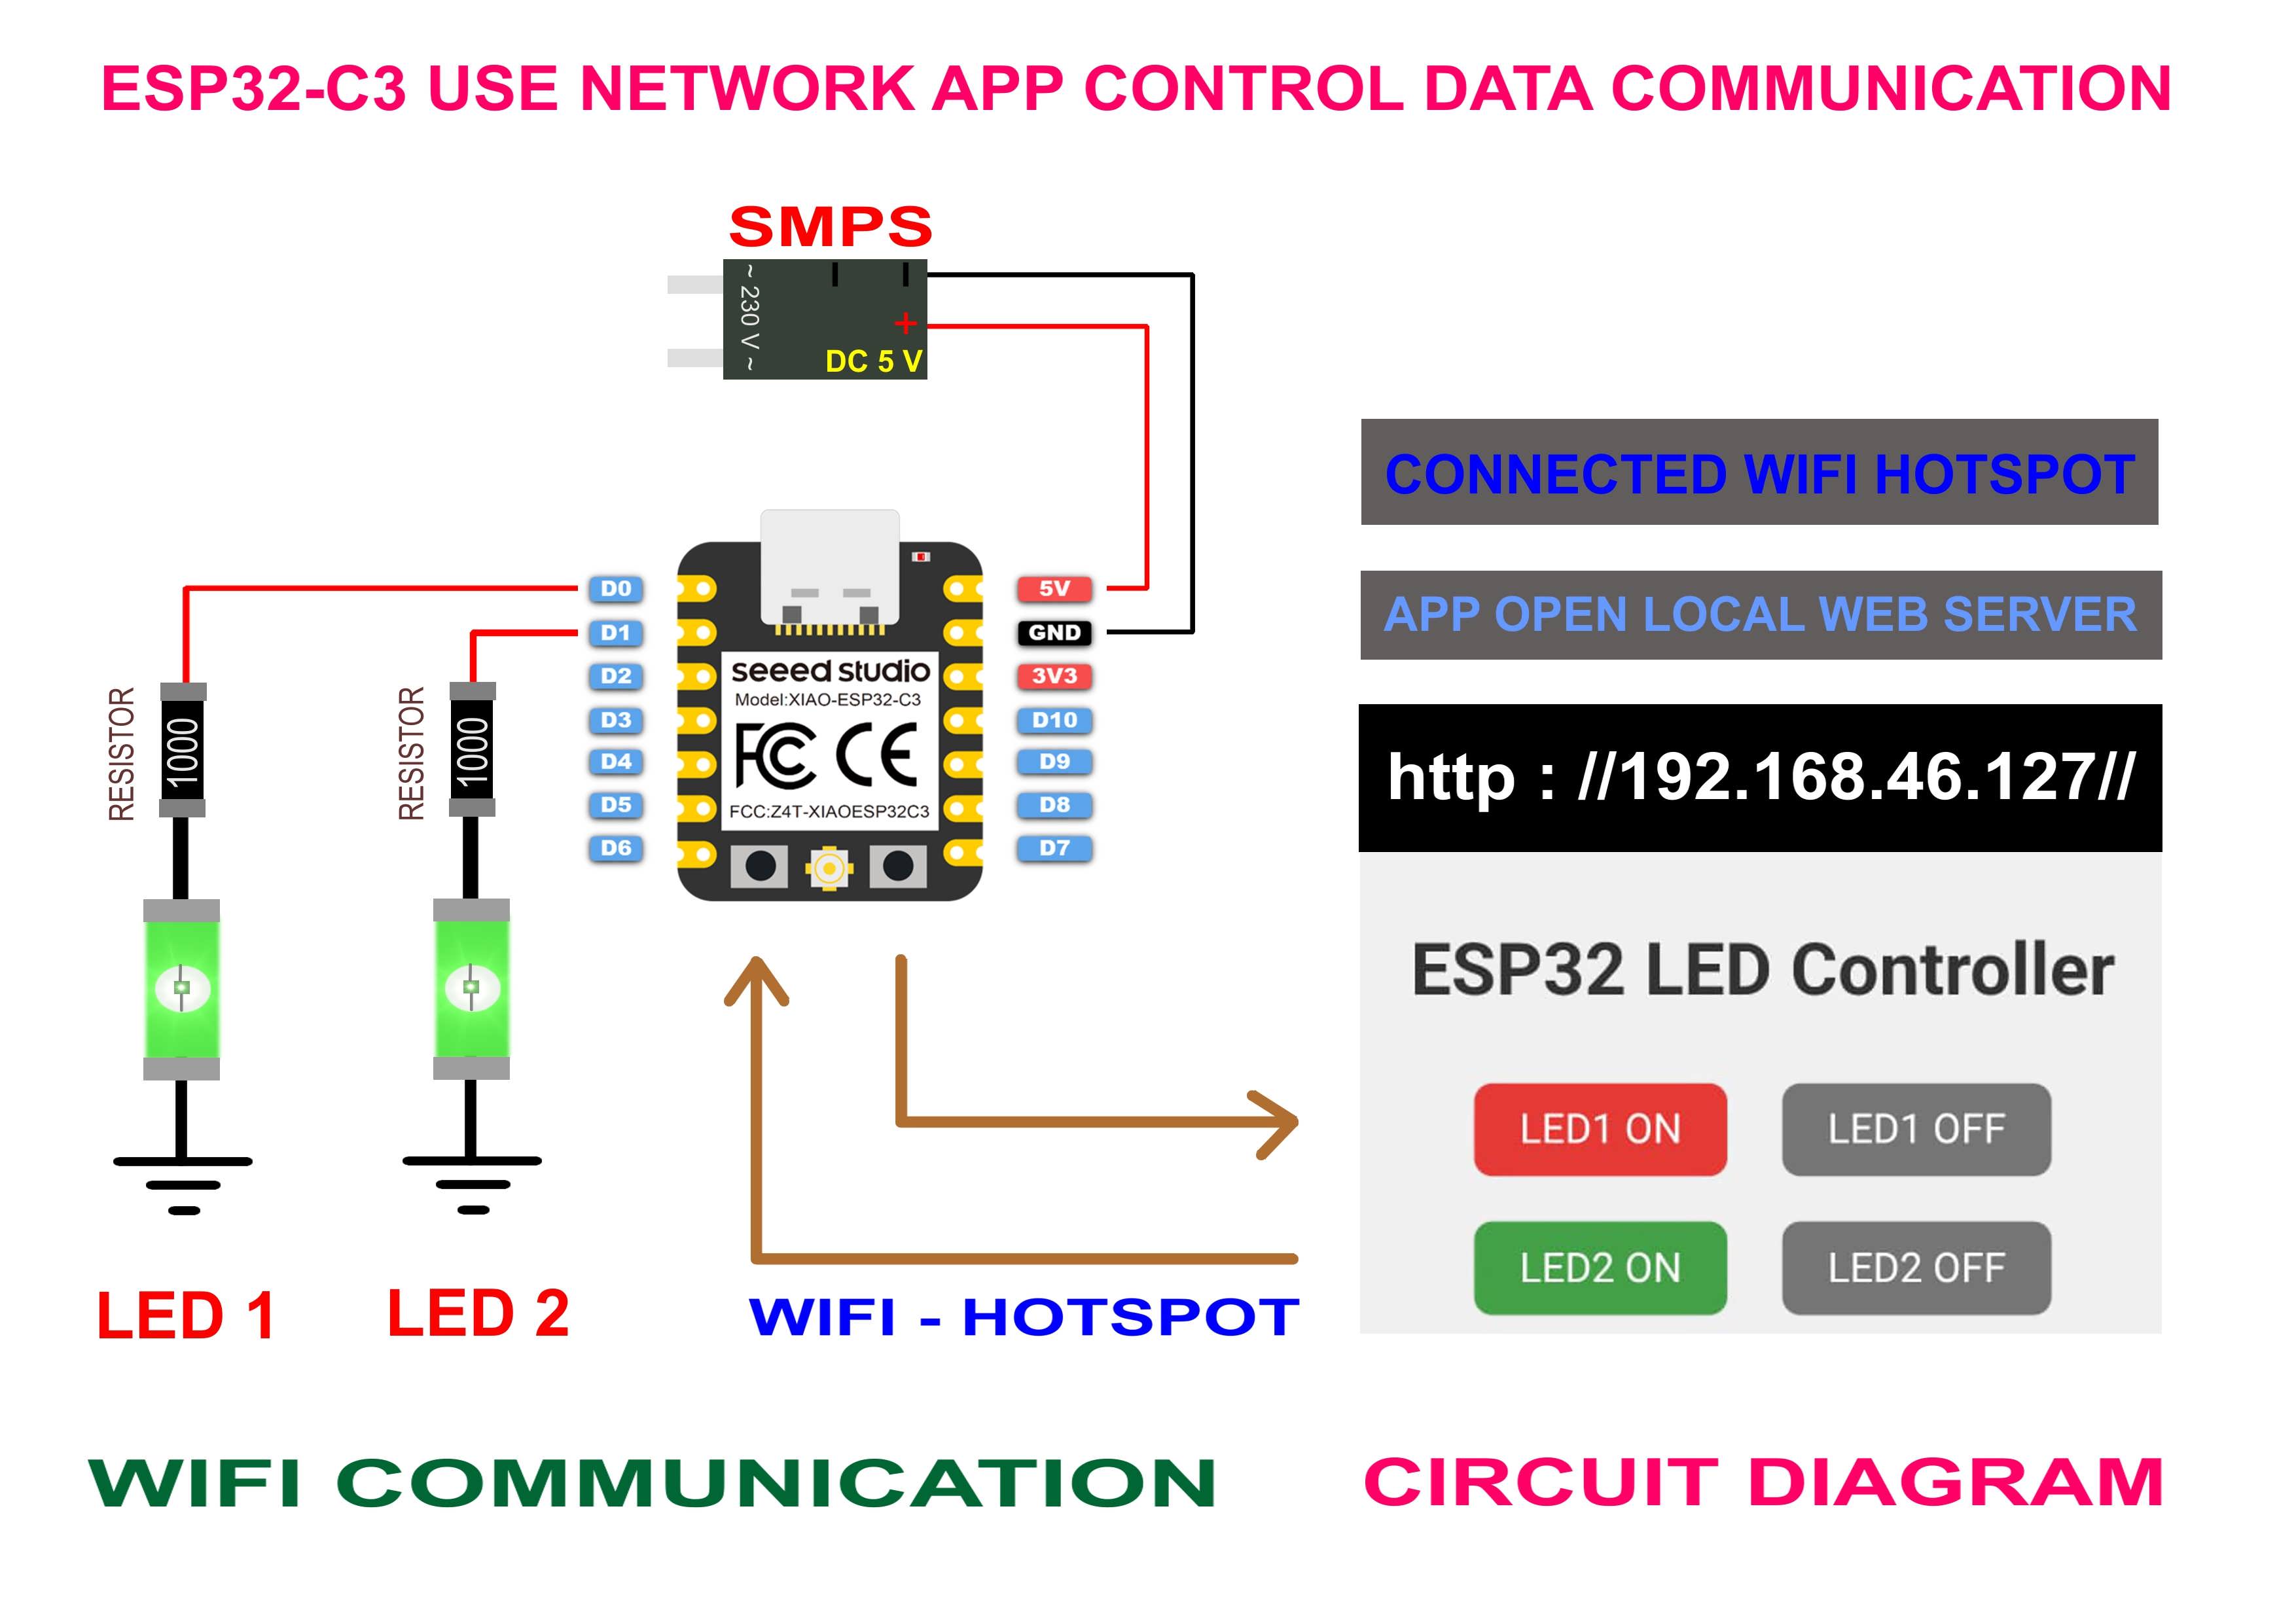
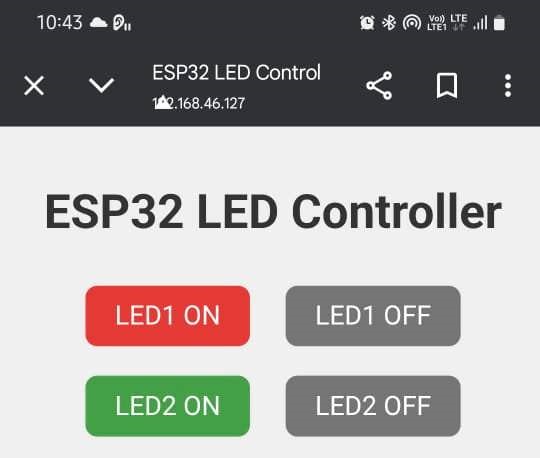
For this assignment, I used the ESP32-C3 board from Seeed Studio. This board supports WiFi and Bluetooth, making it ideal for wireless applications. I developed a simple WiFi-based control interface using an HTML code in a mobile phone, allowing real-time communication between the user and the device.
The ESP32-C3 receives commands from the app via WiFi and controls connected output devices accordingly. This setup demonstrates how embedded hardware can be controlled through a custom wireless interface, bridging the gap between user input and physical output.
Creating a Web Interface with ESP32 for Remote Control
This method allows the ESP32 microcontroller to function as a standalone web server. By embedding HTML code directly into the Arduino sketch, the ESP32 hosts a webpage accessible from any device connected to the same Wi-Fi network. Users can interact with the page through buttons, sliders, or other UI elements to control connected hardware remotely. This approach eliminates the need for external apps or software, providing a lightweight and efficient way to build custom interfaces for embedded systems using just a browser.
Definition
- HTTP (HyperText Transfer Protocol) is the foundation of data communication on the World Wide Web.
- It is used for requesting and delivering web content between clients and servers.
How HTTP Works
- Follows a client-server model.
- The client sends an HTTP request, and the server responds with the requested data.
- Each request is independent (stateless communication).
Structure of HTTP
- HTTP Request: Request line, headers, optional body.
- HTTP Response: Status line, headers, body.
Common HTTP Methods
- GET – Retrieve data.
- POST – Submit data.
- PUT – Update existing data.
- DELETE – Remove data.
- HEAD – Retrieve headers only.
- OPTIONS – Discover allowed methods.
- PATCH – Apply partial updates.
HTTP Status Codes
- 1xx – Informational (e.g., 100 Continue).
- 2xx – Success (e.g., 200 OK).
- 3xx – Redirection (e.g., 301 Moved Permanently).
- 4xx – Client Error (e.g., 404 Not Found).
- 5xx – Server Error (e.g., 500 Internal Server Error).
HTTP Versions
- HTTP/1.0 – Basic version, single request per connection.
- HTTP/1.1 – Persistent connections, chunked transfer.
- HTTP/2 – Binary protocol, supports multiplexing.
- HTTP/3 – Uses QUIC, more secure and faster.
Features of HTTP
- Stateless and connectionless.
- Media independent and flexible.
- Supports caching and content negotiation.
HTTPS – Secure Version
- HTTPS uses SSL/TLS to encrypt HTTP communication.
- Provides secure and encrypted data transfer.
Real-Life Example
- Typing a URL in the browser triggers an HTTP request.
- The server returns the webpage using an HTTP response.
Applications of HTTP
- Web browsing.
- Mobile and desktop apps.
- REST APIs and IoT communication.
Codings
Html Code
<html>

<head>

  <title>ESP32 LED Control</title>

  <style>

    body { font-family: Arial; text-align: center; margin-top: 40px; background: #f0f0f0; }

    h1 { color: #333; }

    button {

      font-size: 18px; padding: 10px 20px; margin: 10px;

      border: none; border-radius: 8px;

      cursor: pointer;

      color: white;

    }

    .red { background-color: #e53935; }

    .green { background-color: #43a047; }

    .blue { background-color: #1e88e5; }

    .pink { background-color: #d81b60; }

    .off { background-color: #757575; }

  </style>

</head>

<body>

  <h1>ESP32 LED Controller</h1>

  <div>

    <button class="red" onclick="send('red/on')">LED1 ON</button>

    <button class="off" onclick="send('red/off')">LED1 OFF</button><br>

    <button class="green" onclick="send('green/on')">LED2 ON</button>

    <button class="off" onclick="send('green/off')">LED2 OFF</button><br>

  </div>

  <script>

    function send(path) {

      fetch('/' + path)

        .then(response => response.text())

        .then(data => console.log(data));

    }

  </script>

</body>

</html>
ESP32 Connectivity and Library Initialization
#include <WiFi.h>
#include <WebServer.h>

// Wi-Fi Credentials
const char* ssid = "F62";
const char* password = "CA****47";
LED pins Details
//const int ledPins[4] = {3, 4, 2, 6}; // GPIOs for Red, Green, Blue, Pink
const int ledPins[4] = {3, 2}; // GPIOs for Red, Green
ESP32 Web Server Setup
// Create web server object on port 80 (HTTP)
WebServer server(80);
This creates an instance of a web server that listens for incoming HTTP requests on port 80.
Problem Encountered in Interface and Application Programming
- Problem: Web Interface Button Not Updating LED Status Reliably
- Description: While testing the LED control interface hosted on the ESP32, clicking the ON/OFF button on the webpage sometimes did not reflect the correct LED state on the hardware.
- Possible Causes:
- HTTP request was not received or processed properly by the ESP32.
- ESP32 loop was busy with other tasks, missing the request.
- No real-time feedback from ESP32 to confirm LED status on the webpage.
- Solution:
- Use AJAX or WebSocket for better reliability and real-time updates.
- Implement status confirmation response from ESP32 to the interface.
- Optimize the ESP32 loop to avoid blocking delays.
ESP32 Web Interface Demo
What I Learned
- Learned how to configure the ESP32 as a standalone web server connected to a Wi-Fi network.
- Understood how to embed HTML code directly into an Arduino sketch to create a browser-based user interface.
- Gained experience in designing simple web pages with buttons, sliders, and control elements for user interaction.
- Learned how the ESP32 handles HTTP requests and responds to user actions through a web browser.
- Understood the communication between the web interface and the ESP32 GPIO pins for controlling hardware devices.
- Explored remote control concepts without requiring dedicated mobile applications or additional software.
- Learned how to test and access the web interface from different devices connected to the same network.
- Improved my understanding of IoT-based device control using web technologies and embedded programming.
Conclusion
This assignment helped me understand how to create a web-based control interface using the ESP32. By hosting an HTML webpage directly on the microcontroller, I was able to remotely monitor and control hardware through a standard web browser. The project demonstrated the integration of embedded systems, networking, and web technologies, providing a simple and efficient solution for IoT applications without the need for external applications. This experience strengthened my skills in ESP32 programming, wireless communication, and web interface development for connected devices.