11. Embedded Networking and Communications
Week assignment
-
Group assignment:
- Send a message between two projects
- Document your work to the group work page and reflect on your individual page what you learned
-
Individual assignment:
- design, build and connect wired or wireless node(s) with network or bus addresses and a local input and/or output devices
Link to goup assignment page for Networking week
Research
In the research part in this assignmenrt i did look at I2C protocol and decided to use I2C for my assignment cause it fits good for simple communication. I2C bus was devwloped by Philips semiconductors for over 20 years ago. I2C is a serial bus platform that means it can send the data bits one at the time after each other, parallel bus wil send 8 or 32 bits at the same time throug 8 or 32 wires.
When doing research i found out there is many comunication protocols out there, We have Ethernet that is mostly use for data systems to day, asynchronuous serial protocolas like RS-232 that is common serial data standard that was initially intended to support modem and printer applications on IBM PCs to day its enables a variety of peripherals to communicate with PCs.
Group assignment
I used my node in the group assignment. we found out that with some code we made with help from chatgpt wo got all the nodes to work. we used one node from me one from Albert and master and node from Magnús. we did not have any big complication geting them to work.
The assignment
i made code with some help from copilot that turn on led when button is pressed and turn it off if button is pressed again. I made the first code very simple just a loop that turn on the led and turn it off but that did work like that if button was pressed then the LED light up onlu while the buton was pressed. Then i ask copilot to change that code to make sure it will turn the LED on and it will stay on until next time the button is pressed, this is the code copilot came up whit then. and that is the code i will use for this project.
code used to turn on and off the LED rp2040
#include <Wire.h>

const int buttonPin = 27;    // Pin where the button is connected
const int ledPin = 28;       // Pin where the LED is connected

bool ledState = LOW;         // Variable to store the LED state
bool buttonState = HIGH;     // Variable to store the button state
bool lastButtonState = HIGH; // Variable to store the last button state

void setup() {
  pinMode(buttonPin, INPUT_PULLUP);  // Initialize the button pin as an input
  pinMode(ledPin, OUTPUT);           // Initialize the LED pin as an output
  digitalWrite(ledPin, ledState);    // Set the initial state of the LED
}

void loop() {
  // Read the state of the button
  buttonState = digitalRead(buttonPin);

  // Check if the button is pressed and released
  if (buttonState == LOW && lastButtonState == HIGH) {
    // Toggle the LED state
    ledState = !ledState;
    digitalWrite(ledPin, ledState);
  }

  // Save the current button state as the last button state
  lastButtonState = buttonState;
}
ESP32C3
#include <Wire.h>

const int buttonPin = D1;    // Pin where the button is connected
const int ledPin = D2;       // Pin where the LED is connected

bool ledState = LOW;         // Variable to store the LED state
bool buttonState = HIGH;     // Variable to store the button state
bool lastButtonState = HIGH; // Variable to store the last button state

void setup() {
  pinMode(buttonPin, INPUT_PULLUP);  // Initialize the button pin as an input
  pinMode(ledPin, OUTPUT);           // Initialize the LED pin as an output
  digitalWrite(ledPin, ledState);    // Set the initial state of the LED
}

void loop() {
  // Read the state of the button
  buttonState = digitalRead(buttonPin);

  // Check if the button is pressed and released
  if (buttonState == LOW && lastButtonState == HIGH) {
    // Toggle the LED state
    ledState = !ledState;
    digitalWrite(ledPin, ledState);
  }

  // Save the current button state as the last button state
  lastButtonState = buttonState;
}
This is the same code difference is the pin number in RP2040 we use pin 27 for the inoutt and pin 28 for the output but in the ESP32C3 we use the pin number D1 for the input and D2 for the output.
Next will be to finde out how to program this so the circut will talk togeathe r trough I2C bus. That will be some headach.
I will start by checking code that other persons have done in simular circuts, I startet looking at Adrians code that i found here on Andri site this was for the master, Here is the code for the slave but tho i found this code on Andri site the credit for this code goes to Adrian Torres.
This code did not work completley for my project so after few attempts trying to find out how to fix it i turn to my friend Copilot and gave him the code for both master and slave, and Copilot made few changes on the code and it worked great after that.
Here comes the final code i used this is the code i got in the end from copilot: ESP32C3 final code
#include <Wire.h>

const int buttonPin = D1;    // Pin where the button is connected
const int ledPin = D2;       // Pin where the LED is connected

bool ledState = LOW;         // Variable to store the LED state
bool buttonState = HIGH;     // Variable to store the button state
bool lastButtonState = HIGH; // Variable to store the last button state

void setup() {
  Serial.begin(115200); // Speed of the communications

  // Begin Communication, no need for any address because this is the master
  Wire.begin();
  pinMode(buttonPin, INPUT_PULLUP);  // Initialize the button pin as an input
  pinMode(ledPin, OUTPUT);           // Initialize the LED pin as an output
  digitalWrite(ledPin, ledState);    // Set the initial state of the LED
}

void loop() {
  // Read the state of the button
  buttonState = digitalRead(buttonPin);

  // Check if the button is pressed and released
  if (buttonState == LOW && lastButtonState == HIGH) {
    // Toggle the LED state
    ledState = !ledState;
    digitalWrite(ledPin, ledState);

    // Send the LED state over I2C
    Wire.beginTransmission(8); // Node number 1
    Wire.write(ledState);
    Wire.endTransmission();

    // Print the LED state to the Serial Monitor
    Serial.println(ledState ? "LED ON master" : "LED OFF master");
  }

  // Save the current button state as the last button state
  lastButtonState = buttonState;
}
RP2040 final code
#include <Wire.h>

const int buttonPin = 27;    // Pin where the button is connected
const int ledPin = 28;       // Pin where the LED is connected

bool ledState = LOW;         // Variable to store the LED state
bool buttonState = HIGH;     // Variable to store the button state
bool lastButtonState = HIGH; // Variable to store the last button state

void setup() {
  pinMode(buttonPin, INPUT_PULLUP);  // Initialize the button pin as an input
  pinMode(ledPin, OUTPUT);           // Initialize the LED pin as an output
  digitalWrite(ledPin, ledState);    // Set the initial state of the LED
  Serial.begin(115200);
  Wire.begin(8);     // Change address for the nodes in my case I use 8 and 9.
  Wire.onReceive(receiveEvent);
}

void loop() {
  // Read the state of the button
  buttonState = digitalRead(buttonPin);

  // Check if the button is pressed and released
  if (buttonState == LOW && lastButtonState == HIGH) {
    // Toggle the LED state
    ledState = !ledState;
    Serial.println("LED ON NODE 1");
    digitalWrite(ledPin, ledState);
  }

  // Save the current button state as the last button state
  lastButtonState = buttonState;
}

void receiveEvent(int howMany) {
  while (Wire.available()) {
    ledState = Wire.read();
    digitalWrite(ledPin, ledState);
    Serial.println(ledState ? "LED ON NODE 1" : "LED OFF NODE 1");
  }
}
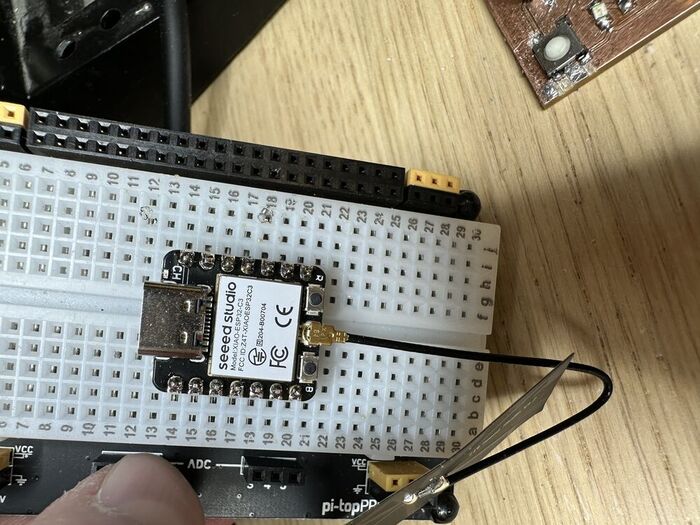
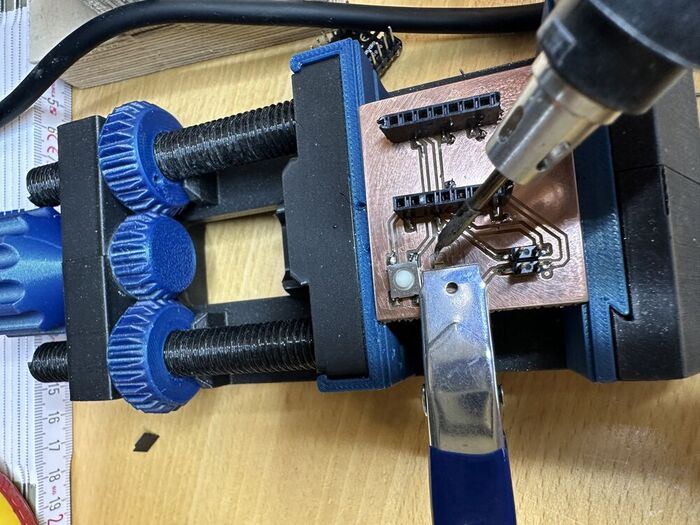
On thes two pictures we see how i did solder the pins to the ESP32C with a help from breadboard. and then when i was soldering the Master board using a clamp to hold the resistor.
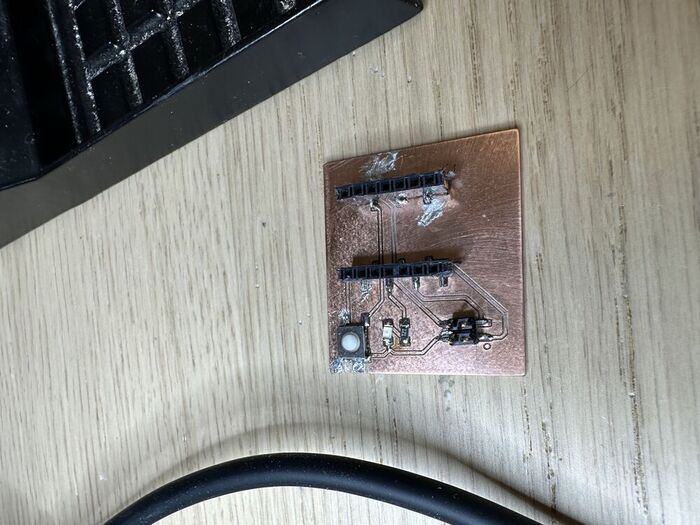
Here we see the final node board and the finnal system master an noed board to geather.
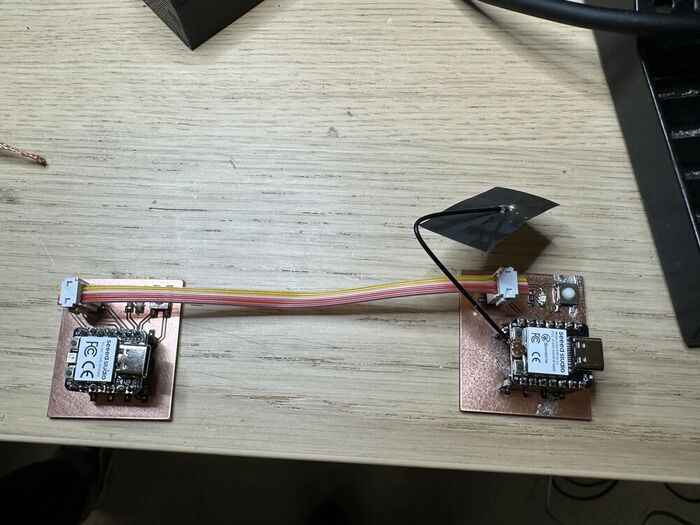

This circut was working as expected that you could control the node from the master board.
Here is a little video showing how the network is working.
Files
Kicad Zip File
code for Rp2040
code for ESP32C3 Master
Promt from copilot