9. Input Devices
Push Button Input
What did I learn about adding input devices to a microcontroller.
I have experimented with push buttons, distance detection, noise and
voice detection. I will post some of that information on this page.
This demonstation will cover the push button sensor, and how it
triggers an a sequnce that activates an output device, such as an LED
I will cover LED's in the Output week, as I have used them alot in my
journey of learning electronics and circuits.
I also learned that the LED is highly capable of doing several
cool things when other input and output devices are added to the
circuit One of those inputs is the push button sensor. Pushing or
holding the button down will either close the circuit or open it.
This button acts as a switch. This input devices allows the LED to
blink or stay on or off for as long as the programmer wants them to.
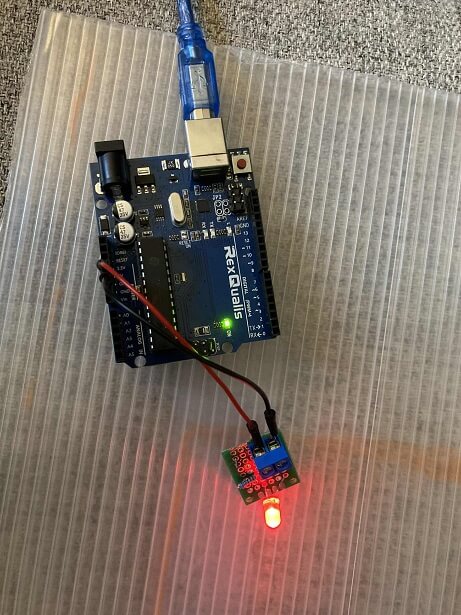
Push button sensor to turn on an LED
The LED will stay on for as long as the button is held down.
The moment that the button is released, the LED will power off
instantly.
Here is a video of me turning on the LED with a push button
Button powers on LEDHere is the code to power on an LED
Power on Led code1st test of motion/distance detection
I wanted to try using motion detection with an Arduino. As seen in the video I used
a microphone sensor rather than an ultrasonic sensor. It was a cool experiment to see
how a similar result could be created with 2 different input devices. In the pictures
below I used an ultrasonic sensor to detect the motion/movement and distance of the
encroaching object
Here is a video where used an audio sensor to detect air fluctuation
(motion sensing). When a physical item such as a hand enters within a
few inches of the sensor, it sends a signal to the led array to signal that
there is an interference or change in air moving near the sensor. I plan
on adding a buzzer sensor or an lcd display to show interaction with
input device for the next week assignment. Whereas 'Outputs' are the new
assignment.
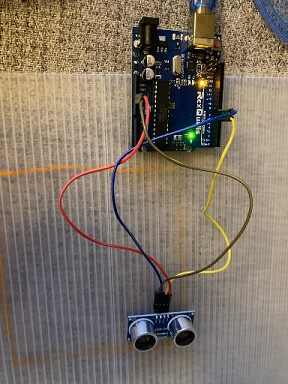
Using an ultrasonic sensor to measure distance in cm
I managed to locate my ultrasonic sensor, now I can use it to measure
the distance an item is from the sensor in terms of centimeters. I will use
the serial monitor in Arduino IDE to show display a variation in values
based on how close or how far my hand is from the sensor. The closer that
my hand is to the sensor, the lower the value we will receive in the
serial monitor tab. Here is a shot of the sensor connected to an Arduino Uno
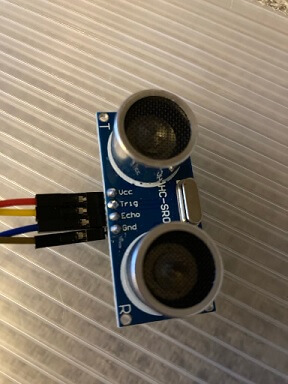
About the sensor
The sensor that I used is a HC-SR04, which is a ultrasonic sensor that measures distancesas far as 400 cm. This sensor has 4 onboard pins that connect to a microcontroller.
I used an Arduino Uno R3 for this exercise. These pins are as 'VCC' for Power,
'Trig' for the trigger mechanism that receives signal from the returned 'Echo'
that was sent out. The next pin is called'Echo'. Responsible for echo signal
being sent out and returned to the 'Trig' (Trigger). The last pin is the
GND also known as the ground pin.
How the sensor works
It works by sending out ultrasonic waves from a transmitter and measuring thetime it takes for the waves to bounce off an object and return to the sensor.
This sensor is comprised of 2 parts, sending out signal, and receiving signal
These two parts look the exact same but happen serve 2 different purposes entirely.
The transmitter emits the sound waves, while the receiver detects the reflected
waves coming back from the object ahead.
Process Explained:
Step 1:
When the Trigger pin is set to HIGH (activated via code), the sensor emitsultrasonic sound waves from its transmitter.
Note A: At this moment, the Echo pin also goes HIGH (outputs 5V). Let’s call this time t1.
Note B: The speed of sound is around 343 m/s.
Step 2:
The sound waves travel through the air and bounce off the object in front of the sensor.As soon as the reflected waves reach the receiver, the Echo pin switches to LOW, refer
to this moment as time t2.
Step 3:
The Arduino measures how long the Echo pin stays HIGH, which corresponds to the total timetaken for the sound waves to travel to the object and back.
Total time = t2 - t1
This is the round-trip time of the sound waves.
Step 4:
Using the basic formulaDistance = Speed × Time,
we can calculate the total distance the sound traveled:
Dtotal = (t2 - t1) × speed of sound
Step 5:
Since this distance includes both the trip to the object and the return, we divide it by 2to find the one-way distance from the sensor to the object:
D = Dtotal / 2
Wiring Instructions
Connect the VCC and GND pins of the sensor to the 5 v and GND pins of Arduino.Connect the trigger and echo pin to digital pin 6 and echo to digital pin 7.
How the code is executed
Measuring distance with an ultrasonic sensor requires a few small steps.That being said....First,notice the trigger pin is set to HIGH for 10 microseconds
to send the sound pulse. Next, the `pulseIn` function is used to measure how long
the echo pin stays HIGH. Finally, the distance in centimeters is calculated using the formula:
distance= totaltime*0.034/2;
A video of serial monitor values
The values in the video vary greatly as a result of my hand placement and movement
in front and away from the sensor
Below is a shot of me using a multimeter to test voltage of the circuit to confirm 5v

Arduino Uno Code file
Here is a copy of the Arduino Ide code