Group Assignment - Embedded Programming
In this Week, I have Contributed in the understanding of Embedded Programming and browse through different Microcontrollers Datasheet
Objectives of the Week
- Browse through the datasheet for our microcontroller
- Compare the performance and development workflows for other architectures
Comparison of Toolchains and Development Workflows using Arduino IDE and Thonny IDE for AVR and ESP32-C3 Architectures
1. Introduction
This document explores and compares the software development workflows and toolchains for two popular embedded system architectures: AVR ATmega328P (Arduino Uno) and ESP32-C3 (RISC-V). The comparison is made across two development environments: Arduino IDE, which is widely used for C/C++ embedded programming, and Thonny IDE, a Python environment commonly used for MicroPython development.
Since AVR architecture does not support MicroPython, it is tested only with Arduino IDE. ESP32-C3 is tested with both Arduino IDE and Thonny using MicroPython firmware.
2. Environment and Architecture Mapping
| Architecture | Language | IDE | Code Type |
|---|---|---|---|
| AVR (ATmega328P) | Arduino C++ | Arduino IDE | .ino Sketch |
| ESP32-C3 (RISC-V) | Arduino C++ | Arduino IDE | .ino Sketch |
| ESP32-C3 (RISC-V) | MicroPython | Thonny IDE | .py Script |
3. Arduino Uno R3 Technical Datasheet
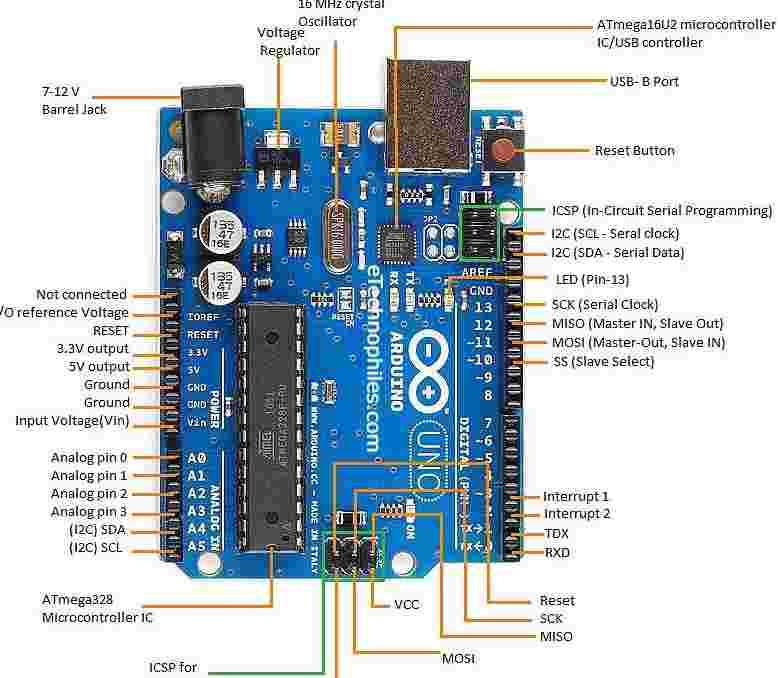
The Arduino Uno R3 is a popular microcontroller board used for various applications such as robotics, IoT, automation, and more. It is based on the ATmega328P by Atmel, which is a low-power, 8-bit AVR microcontroller. The board has 14 digital input/output pins, 6 analog input pins, 16 megabytes of flash memory, 2 kilobytes of SRAM, and 1 kilobyte of EEPROM. The board is also equipped with a 16 MHz quartz crystal oscillator, a USB connection, a power jack, an ICSP header, and a reset button. The Arduino Uno is a popular platform for beginners and experienced users alike, and is widely used in education and industry.
AVR (ATmega328P - Arduino Uno) Architecture
Core Specifications
| Specification | Details |
|---|---|
| Microcontroller | ATmega328P (8-bit AVR) |
| Operating Voltage | 5V |
| Clock Speed | 16 MHz |
| Flash Memory | 32KB (0.5KB for bootloader) |
| SRAM | 2KB |
| EEPROM | 1KB |
| Digital I/O Pins | 14 (6 provide PWM output) |
| Analog Input Pins | 6 (10-bit ADC) |
| Toolchain | Arduino IDE (AVR-GCC) |
| Uploader | avrdude via USB (ATmega16U2) |
Communication Interfaces
| Interface | Pins | Protocol |
|---|---|---|
| Serial | GPIO0 (RX), GPIO1 (TX) | UART |
| I2C | GPIO4 (SDA), GPIO5 (SCL) | I2C (TWI) |
| SPI | GPIO10 (SS), GPIO11 (MOSI), GPIO12 (MISO), GPIO13 (SCK) | SPI |
| Software Serial | Configurable | UART emulation |
Power Specifications
| Power Source | Input Voltage |
|---|---|
| USB connection | 5V (regulated from USB) |
| Barrel jack | 7-12V (recommended) |
| VIN pin | 6-20V (absolute max) |
| 5V pin | 5V (regulated output) |
| 3.3V pin | 3.3V (150mA max) |
Current Ratings
| Pin/Mode | Max Current |
|---|---|
| 5V pin output | 500mA (total for all 5V pins) |
| 3.3V pin output | 150mA |
| I/O pins | 20mA per pin (40mA absolute max) |
| Sleep mode | < 0.5 mA |
| Active mode | ~50mA (no peripherals) |
Arduino IDE Workflow and Code
3.1 AVR (Arduino Uno) – Arduino IDE
Setup:
- Install Arduino IDE
- Select Board: Arduino Uno
- Connect via USB
- Write and upload .ino sketch
- Monitor output using Serial Monitor
9. Arduino IDE Installation
In this section, I have explained how I installed and configured the Arduino IDE to work with both the Arduino Uno (AVR) and the ESP32-C3 board.
- I downloaded the latest version of the Arduino IDE from the official website:
https://www.arduino.cc/en/software - I installed it following the on-screen instructions.
- After installation, I opened the Arduino IDE and selected Board: Arduino Uno from the Tools menu to work with the AVR architecture. Preferences - Board Manager URL
- To add ESP32-C3 support, I opened Preferences and pasted the following URL into the "Additional Board Manager URLs":
https://raw.githubusercontent.com/espressif/arduino-esp32/gh-pages/package_esp32_index.jsonESP32 Board Installation in Board Manager - I then navigated to Tools > Board > Boards Manager and searched for "ESP32 by Espressif Systems". I installed it and selected Seeed XIAO ESP32-C3 as the board.
- I connected the board using a USB cable, selected the correct COM port under Tools > Port, and uploaded the example blink code successfully.
Arduino IDE Home Screen


Port and Board Selection

Blink Code:
                    void setup() {
                    pinMode(13, OUTPUT);
                    }

                    void loop() {
                    digitalWrite(13, HIGH);
                    delay(500);
                    digitalWrite(13, LOW);
                    delay(500);
                    }
Serial Output Code:
                    void setup() {
                    Serial.begin(9600);
                    }

                    void loop() {
                    Serial.println("Hello from AVR!");
                    delay(1000);
                    }
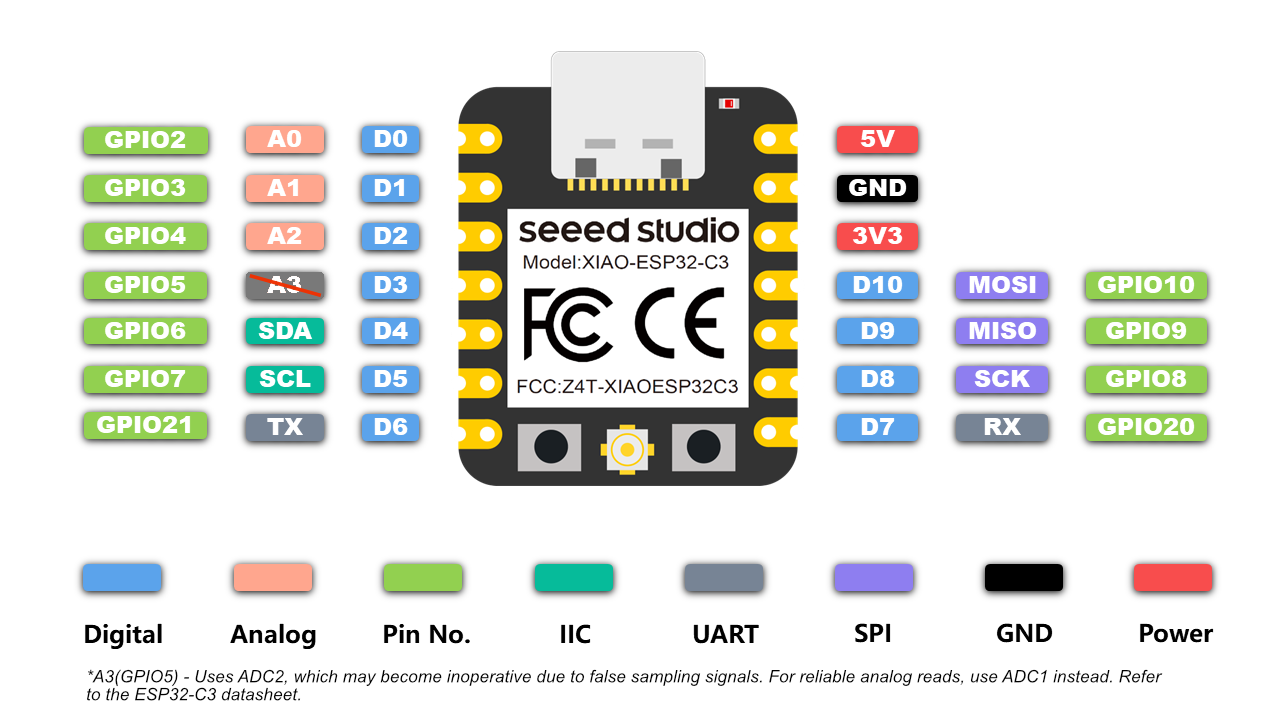
4. ESP32-C3 (RISC-V) Architecture
Alright, let's talk about the ESP32-C3! Imagine a tiny powerhouse chip, but instead of the usual brain you might expect, this one runs on an open-source RISC-V architecture. This means it's super energy-efficient and perfectly suited for your next smart home gadget or IoT project. Plus, it comes with built-in Wi-Fi and Bluetooth, so getting it connected to the internet is a breeze.
| Specification | Details |
|---|---|
| Microcontroller | ESP32-C3 (RISC-V single-core 32-bit) |
| Operating Voltage | 3.3V |
| Clock Speed | Up to 160 MHz |
| Flash Memory | 4MB (external SPI) |
| RAM | 400KB |
| Wi-Fi & BLE | Built-in Wi-Fi 802.11b/g/n and Bluetooth 5.0 LE |
| ADC | 12-bit ADC (6 channels) |
| Toolchain | Arduino Core for ESP32 or ESP-IDF (Espressif IoT Dev Framework) |
| Uploader | esptool.py via USB |
4.1 Communication Interfaces
| Interface | Pins | Protocol |
|---|---|---|
| Serial | GPIO20 (RX), GPIO21 (TX) | UART |
| I2C | Configurable (e.g., GPIO4 SDA, GPIO5 SCL) | I2C (TWI) |
| SPI | Configurable (e.g., GPIO10, GPIO7, GPIO6, GPIO11) | SPI |
| I2S | Configurable | Audio Interface |
| Bluetooth LE | Internal | BLE 5.0 |
| Wi-Fi | Internal | 802.11 b/g/n |
4.2 Power Specifications
| Power Source | Input Voltage |
|---|---|
| USB connection | 5V (regulated to 3.3V onboard) |
| 3V3 pin input | 3.0V to 3.6V |
4.3 Current Ratings
| Pin/Mode | Max Current |
|---|---|
| 3.3V pin | Depends on module regulator, usually up to 500mA |
| I/O pins | 20mA per pin |
| Deep Sleep | < 5 µA |
| Active Wi-Fi TX | ~180mA peak |
4.4 ESP32-C3 – Arduino IDE
Setup:
- Install Arduino IDE
- Add ESP32 Board Manager URL:
https://raw.githubusercontent.com/espressif/arduino-esp32/gh-pages/package_esp32_index.json - Select Board: Seeed XIAO ESP32-C3
- Connect via USB-C
- Write and upload .ino sketch
Blink Code:
                    void setup() {
                    pinMode(LED_BUILTIN, OUTPUT);
                    }

                    void loop() {
                    digitalWrite(LED_BUILTIN, HIGH);
                    delay(500);
                    digitalWrite(LED_BUILTIN, LOW);
                    delay(500);
                    }
Serial Output Code:
                    void setup() {
                    Serial.begin(115200);
                    }

                    void loop() {
                    Serial.println("Hello from ESP32-C3 using Arduino!");
                    delay(1000);
                    }
10. Thonny IDE and MicroPython Setup for ESP32-C3
This section covers how I installed Thonny IDE and configured it to work with the ESP32-C3 board using MicroPython.
- I downloaded Thonny IDE from the official site:
https://thonny.org/ - I installed Thonny using the default setup wizard.
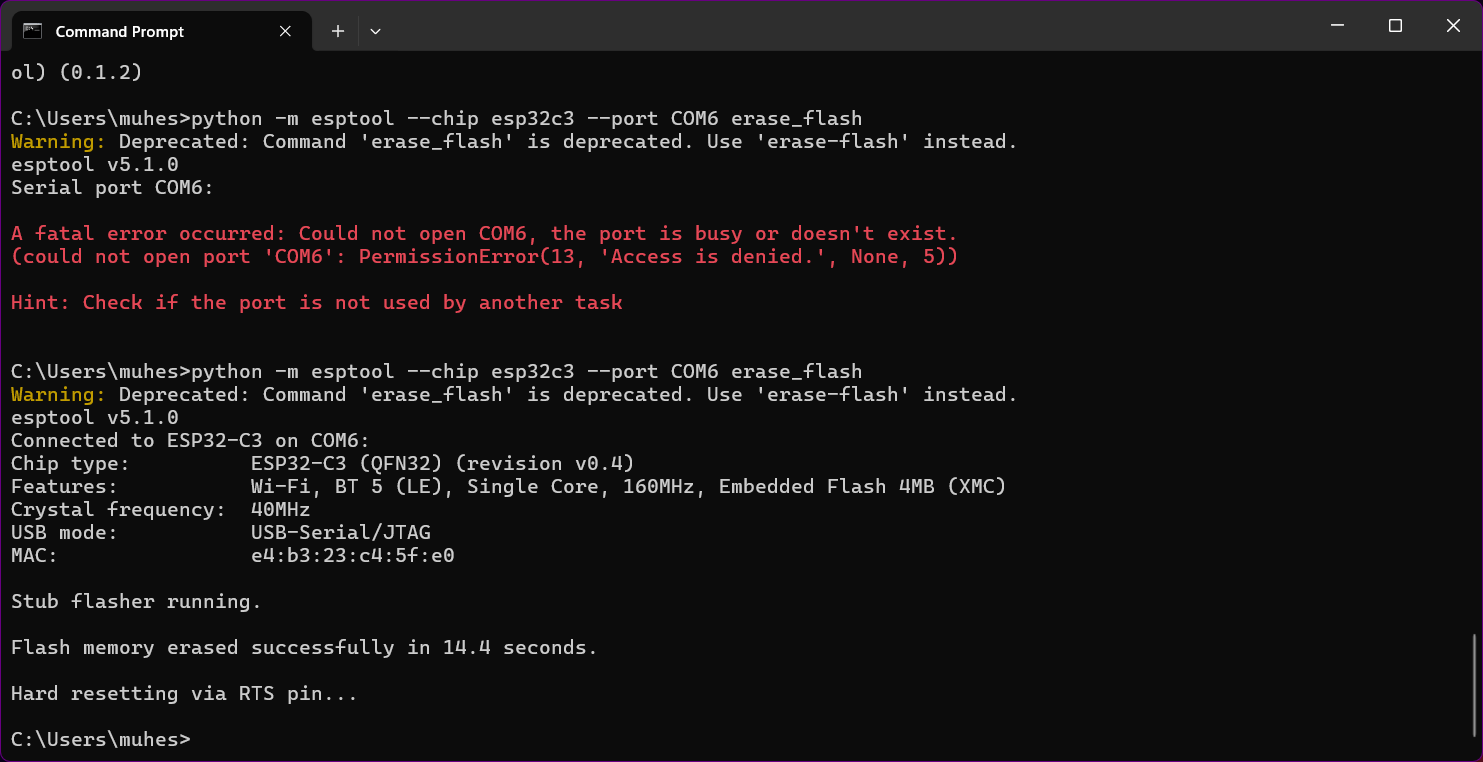
- To flash MicroPython firmware to ESP32-C3, I downloaded the appropriate firmware from:
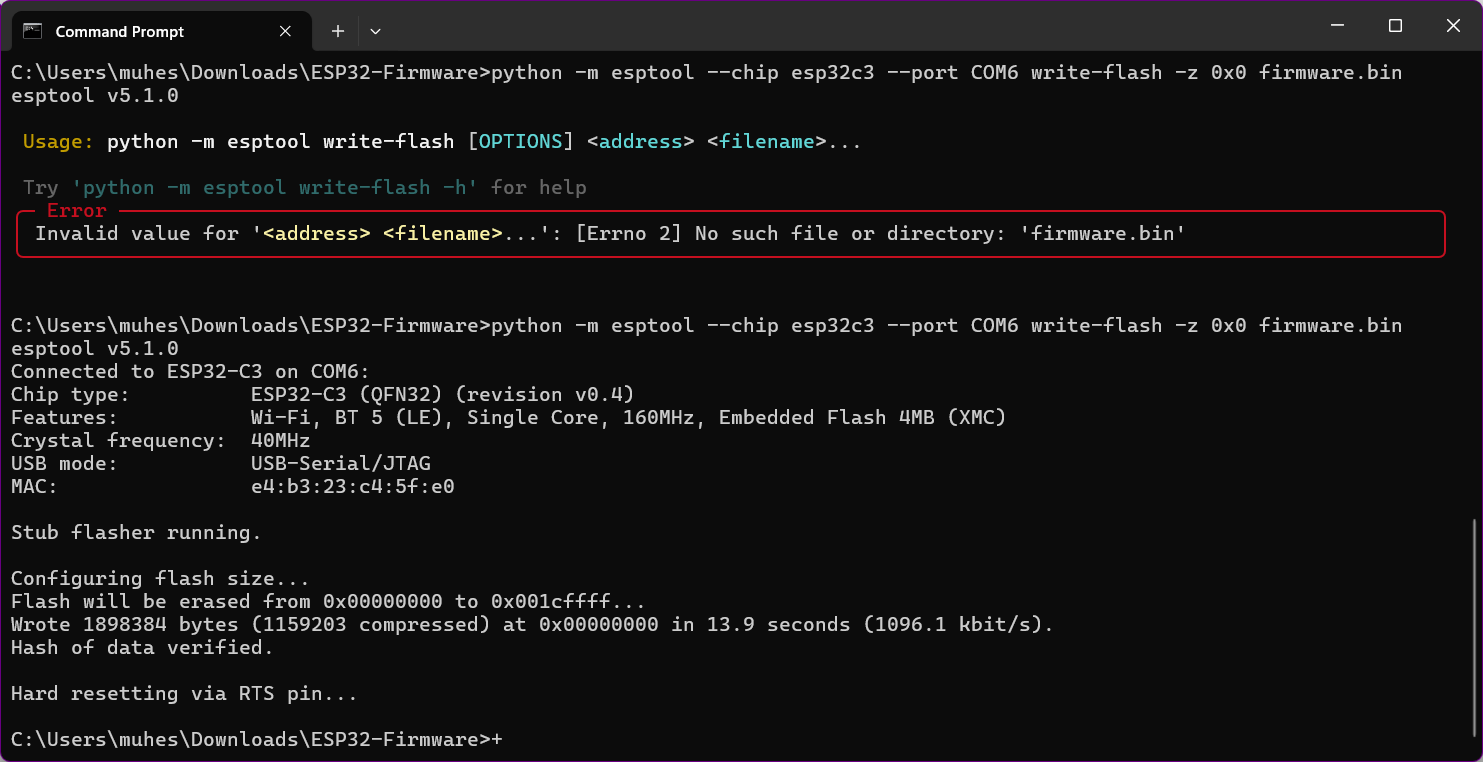
https://micropython.org/download/esp32c3/ - I used the following esptool.py commands to erase and flash the firmware:
- Once flashed, I opened Thonny and went to Tools > Options > Interpreter.
- I selected MicroPython (ESP32) and chose the appropriate COM port.
- I wrote and ran my first MicroPython program (LED Blink) directly from Thonny IDE.
                    esptool.py --chip esp32c3 --port COMx erase_flash
                    esptool.py --chip esp32c3 --port COMx write_flash -z 0x0 firmware.bin
Screenshot Attachments:
- Image 1: Thonny IDE Home Screen
- Image 2: Firmware Selection from MicroPython Site
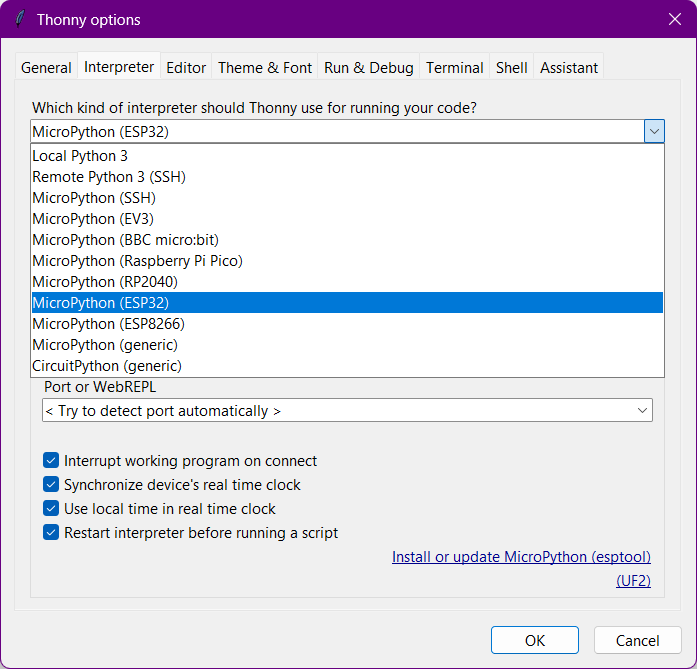
- Image 3: Setting up Interpreter in Thonny
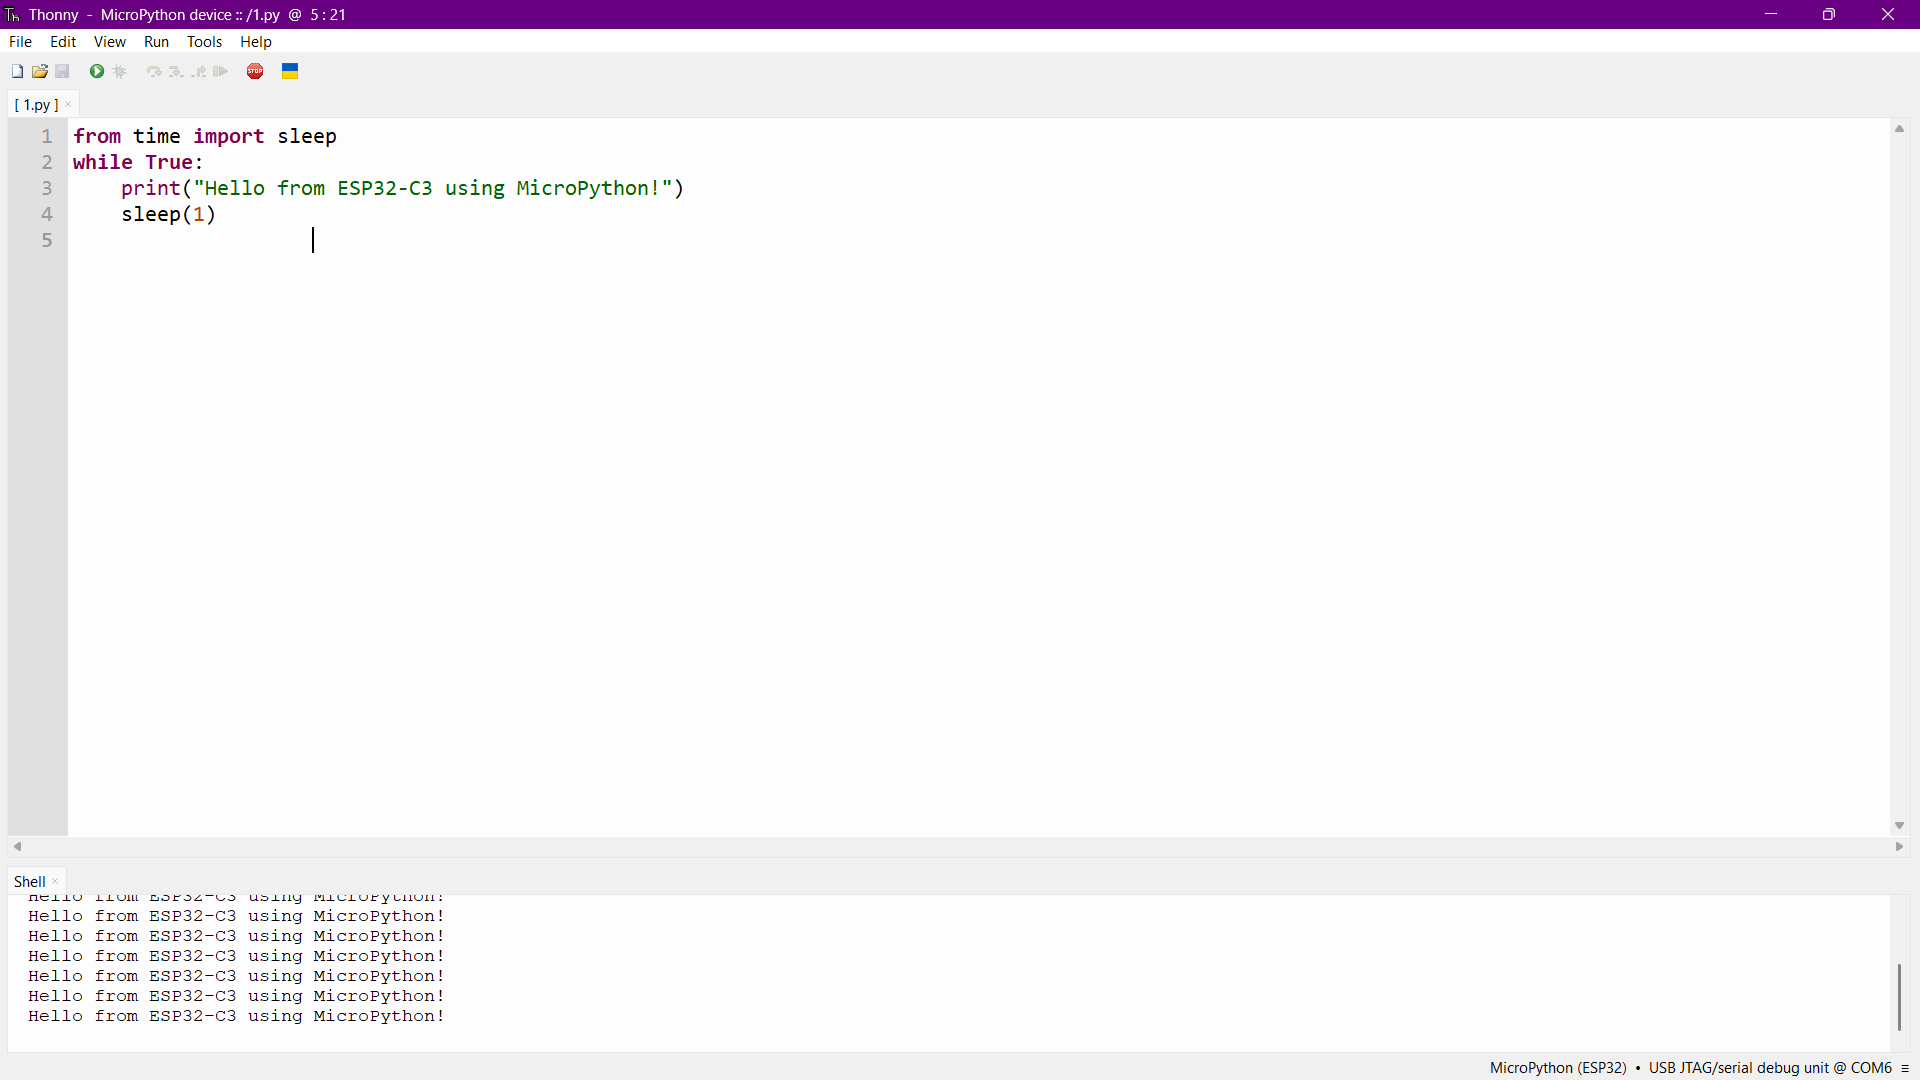
- Image 4: COM Port Detection and Running Code
4.5 ESP32-C3 MicroPython Workflow (Thonny IDE)
Setup:
- Download latest MicroPython firmware for ESP32-C3
- Flash using esptool.py:
-
                            esptool.py --chip esp32c3 --port COMx erase_flash

esptool.py --chip esp32c3 --port COMx write_flash -z 0x0 firmware.bin - Open Thonny IDE and select MicroPython (ESP32) from Tools > Interpreter
- Write and run Python scripts live
Blink Code:
                    from machine import Pin
                    from time import sleep

                    led = Pin(10, Pin.OUT)

                    while True:
                        led.value(1)
                        sleep(0.5)
                        led.value(0)
                        sleep(0.5)
Serial Output Code:
from time import sleep
while True:
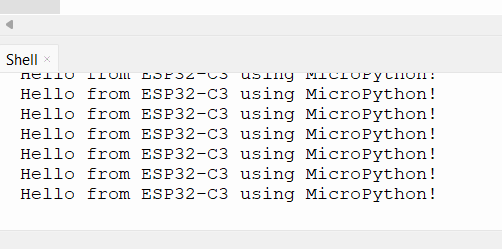
print("Hello from ESP32-C3 using MicroPython!")
sleep(1)
5. Toolchain Summary
| Platform | Language | IDE | Uploader | Serial Debug |
|---|---|---|---|---|
| AVR Uno | Arduino C++ | Arduino IDE | avrdude (USB) | Serial Monitor |
| ESP32-C3 | Arduino C++ | Arduino IDE | esptool.py | Serial Monitor |
| ESP32-C3 | MicroPython | Thonny IDE | esptool.py + Thonny | REPL Terminal |
6. Comparison Table
| Feature | XIAO ESP32-C3 | ATmega328P (Arduino Uno) |
|---|---|---|
| Architecture | 32-bit RISC-V | 8-bit AVR |
| Clock Speed | 160 MHz | 16 MHz |
| Flash Memory | 4MB | 32KB |
| RAM | 400KB | 2KB |
| Wi-Fi / BLE | Yes | No |
| Power Supply | 3.3V | 5V |
| Toolchain | riscv32-esp-elf-gcc, esptool.py | avr-gcc, avrdude |
| Ideal For | IoT Projects, Modern Applications | Basic Prototyping, Education |
| Programming Complexity | Intermediate | Beginner Friendly |
7. Conclusion
This experiment helped me understand how development flows differ between microcontroller architectures and IDEs. The Arduino Uno (AVR) is beginner-friendly and works seamlessly with the Arduino IDE, making it ideal for basic electronics. The ESP32-C3, on the other hand, supports both Arduino and MicroPython programming models and offers built-in Wi-Fi, BLE, and enhanced performance due to its 32-bit RISC-V core.
Arduino IDE is best suited for C/C++ development with direct hardware control. Thonny IDE, paired with MicroPython, offers faster prototyping and simplicity for scripting-style projects. The ESP32-C3’s flexibility in supporting both makes it highly suitable for modern IoT applications.