Interface and Application Programming
Back to HomeGoals
group assignment
- compare as many tool options as possible
Individual Assignment
- write an application that interfaces a user with an input &/or output device that you made
Group Assignment
Compare Multiple Human-Device Interface Development Tools
The goal of this group assignment is to research and compare various development tools suitable for “human-device interaction.” These tools help visualize sensor data read by microcontrollers or send control commands to devices through a user interface. We aim to select an interface development tool suitable for individual assignments, based on factors such as usability, scalability, platform support, learning curve, and functionality.
1. Tool Selection and Testing Preparation
We gathered a list of commonly used interface development tools from the internet and community resources, then compiled the following tools for testing:
| No. | Tool Name | Type | Required Language/Platform |
|---|---|---|---|
| 1 | Processing | Graphics Programming | Java-like, cross-platform |
| 2 | p5.js | Web Graphics Library | JavaScript, browser |
| 3 | Python + Tkinter + PySerial | Scripting + GUI | Python, local desktop |
| 4 | Arduino Serial Plotter | Serial Visualization | Arduino IDE |
2. Installation, Development Process, and Testing Records for Each Tool
1. Processing (based on XIAO ESP32S3)
A) Installation Process
- Visit the official Processing website: https://processing.org
- Download the version matching your system (e.g., Windows 64-bit)
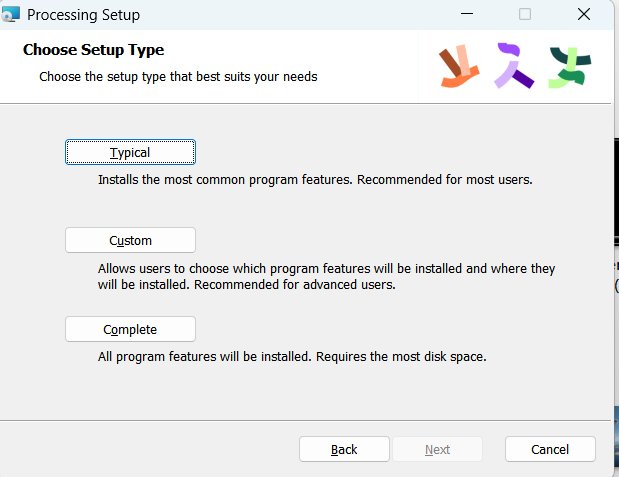
- Double-click the installer and follow these steps:
- Installation type: Select Typical
- Click Next through all steps to complete installation
- After installation, launch the Processing IDE. The interface is similar to the Arduino IDE
- No additional plugins are required to use serial communication (Serial library is included by default)

B) Test Connection Between XIAO ESP32S3 and Button
| Component | Wiring Description |
|---|---|
| Button | One end connected to XIAO’s D2 (GPIO2), the other end to GND |
| Microcontroller | Connected to the computer via Type-C USB cable |
| Power Supply | Powered through USB connection |
C) Arduino Code (Sending Button Status to Processing)
In the Arduino IDE, select the board as XIAO_ESP32S3, and upload the following code:
                    #define XIAO_ESP32S3_D2
                    const int buttonPin = 3;

                    void setup() {
                      pinMode(buttonPin, INPUT_PULLUP);
                      Serial.begin(9600);
                    }

                    void loop() {
                      int state = digitalRead(buttonPin);
                      if (state == LOW) {
                        Serial.println("ON");
                      } else {
                        Serial.println("OFF");
                      }
                      delay(200);
                    }
⚠️ Note: Make sure the serial port is not occupied by the Arduino Serial Monitor, otherwise Processing will fail to connect.
D) Processing Code (Receive Serial Data and Display It)
Open Processing and enter the following code (make sure to check and select the correct serial port — it's often not the first one in the list):
                import processing.serial.*;

                Serial myPort;
                String receivedData = "";

                void setup() {
                  size(400, 200);
                  println(Serial.list());  // Print all serial ports; manually select the one for XIAO ESP32S3
                  myPort = new Serial(this, Serial.list()[0], 9600); // Change to the correct port
                  myPort.bufferUntil('\n');
                }

                void draw() {
                  background(255);
                  fill(0);
                  textSize(32);
                  textAlign(CENTER, CENTER);
                  text("Button: " + receivedData, width / 2, height / 2);
                }

                void serialEvent(Serial p) {
                  receivedData = trim(p.readStringUntil('\n'));
                }
E) Actual Testing Process and Observations
- After uploading the Arduino program, close the Serial Monitor in the Arduino IDE;
- Run the Processing program — a display window should open;
- When the button is pressed → the window shows: Button: ON;
- When the button is released → the window shows: Button: OFF;
F) Summary of Advantages
- Supports graphical display of text, shapes, and even animations;
- Uses Java-like syntax but is very concise, easy for beginners to learn;
- Communicates efficiently with Arduino via serial port, suitable for sensor visualization or control-feedback interfaces;
- Rich community resources and plenty of official examples available.
2. p5.js (based on XIAO ESP32S3)
A) Installation p5.js
p5.js is an open-source JavaScript graphics programming framework evolved from Processing. It is designed for web-based interactive development, targeting artists, designers, and makers who want to easily create interactive programs. It inherits Processing’s simple and intuitive syntax and runs entirely in the browser. Its main features include:
- Runs fully in the browser with no software installation required;li>Visit the official Processing website: https://editor.p5js.org
- Comes with comprehensive libraries for drawing, animation, sound, and interaction;
- Supports serial communication via the Web Serial API;
- Can be embedded into web pages, making it ideal for showcasing creative projects;
- Highly compatible with Processing, with almost identical syntax and project structure.

Hardware Preparation
- Control Board: Seeed Studio XIAO ESP32S3
- Input Device: A button module (with built-in pull-up resistor)
B)Wiring Instructions:
| Button Module Pin | Connects to XIAO ESP32S3 |
|---|---|
| VCC | 3.3V |
| GND | GND |
| SIG (Signal) | GPIO3 (i.e., D2) |
Note: The button module has a default state of HIGH. When pressed, it goes LOW.
C) Arduino Code
The following code reads the state of the button and sends the result to p5.js via the serial port:
                #define XIAO_ESP32S3_D2
                #define BUTTON_PIN 3

                void setup() {
                Serial.begin(115200);
                pinMode(BUTTON_PIN, INPUT_PULLUP);
                }

                void loop() {
                int buttonState = digitalRead(BUTTON_PIN);

                if (buttonState == LOW) {
                    Serial.println("PRESSED");
                } else {
                    Serial.println("RELEASED");
                }

                delay(50);
                }
D) p5.js Code
The following is the complete p5.js code that receives serial data and controls the size of a circle based on button state:
                let serial;
                let latestData = "waiting for data";
                let circleSize = 50;

                function setup() {
                createCanvas(400, 400);
                serial = new p5.SerialPort();
                serial.list();
                serial.open('/dev/tty.usbmodemXXXX'); // Replace with your actual serial port

                serial.on('connected', serverConnected);
                serial.on('list', gotList);
                serial.on('data', gotData);
                serial.on('error', gotError);
                serial.on('open', gotOpen);
                serial.on('close', gotClose);
                }

                function draw() {
                background(220);
                if (latestData.trim() === "0") {
                    circleSize = min(circleSize + 5, 200);
                } else {
                    circleSize = max(circleSize - 5, 50);
                }
                ellipse(width / 2, height / 2, circleSize, circleSize);
                }

                function serverConnected() {
                print("Connected to Server");
                }

                function gotList(thelist) {
                print("List of Serial Ports:");
                for (let i = 0; i < thelist.length; i++) {
                    print(i + " " + thelist[i]);
                }
                }

                function gotOpen() {
                print("Serial Port is Open");
                }

                function gotClose() {
                print("Serial Port is Closed");
                }

                function gotError(theerror) {
                print(theerror);
                }

                function gotData() {
                let currentString = serial.readLine();
                trim(currentString);
                if (!currentString) return;
                latestData = currentString;
                }
⚠️ Note: Replace '/dev/tty.usbmodemXXXX' with your actual serial port name. You can find it from the printed serial port list in the console.
E) Testing and Verification Records
- Connect the XIAO ESP32S3 board and upload the Arduino program;
- Open the p5.js web editor and paste the code;
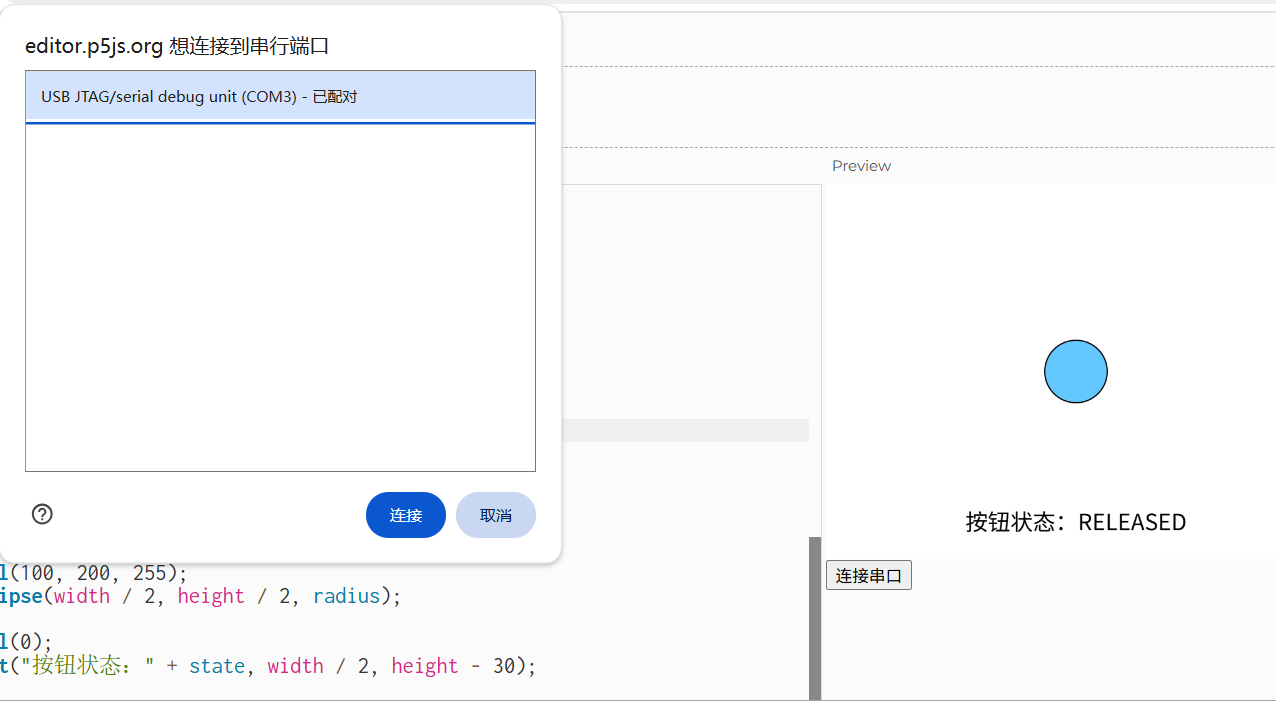
- Click the “Connect Serial” button on the webpage — the browser will prompt for serial port permission;
- Select the correct port (XIAO ESP32S3) and click Connect;
- The circle in the center of the page will scale according to the button state:
- When the button is pressed → the circle enlarges;
- When the button is released → the circle shrinks;
- If the browser does not show the permission prompt, check whether the Arduino Serial Monitor is still open;
- If the serial connection fails, refresh the webpage and try again.
F) Problems and Solutions
| Problem | Cause | Solution |
|---|---|---|
| Serial connection fails | Arduino Serial Monitor is occupying the port | Close the Arduino Serial Monitor |
| Browser unresponsive | Browser does not support Web Serial API | Use the latest version of Chrome or Edge |
| Data not updating on page | Arduino data format not parsed correctly | Send data line-by-line to avoid confusion |
G) Experiment Summary
In this experiment, I explored the use of p5.js — a web-based framework derived from Processing — to build an interactive system where a physical button controls a web animation. By using the Web Serial API, I successfully achieved real-time data interaction between a browser and a physical sensor device for the first time.
During the process, I became familiar with:
- Using the p5.js online development environment;
- The
navigator.serialmechanism for serial communication in browsers; - Programming dynamic visual feedback on web pages;
Compared to Processing, p5.js is better suited for directly showcasing interactive projects on the web. It is more aligned with front-end web development but also requires a deeper understanding of JavaScript.
3. Python + Tkinter + PySerial
A) Tool Overview
In this experiment, I explored how to use Python together with the Tkinter graphical user interface (GUI) library and the PySerial serial communication library to create a desktop-based interactive application. This method does not rely on the browser, making it more suitable for developing locally running programs with high compatibility and flexibility.
- Programming Language: Python 3.x
- GUI Framework: Tkinter (built-in Python GUI library)
- Serial Communication: PySerial (needs to be installed separately)
B) Installation Process
1. Installing Python
I installed Python 3.12 on a Windows system. The official download page is: https://www.python.org/downloads/
⚠️ Note: During installation, be sure to check “Add Python to PATH”; otherwise, Python will not be recognized in the command prompt.
2. Installing the PySerial Library
Open the Command Prompt (CMD), and enter the following command to install PySerial:
pip install pyserialC) GUI Framework Note
Tkinter is included as part of Python's standard library. It is automatically installed with Python, so no additional installation is required.
D) Development Process
My goal was to achieve the same visual effect as the previous p5.js example: to read the serial data sent from the Arduino (indicating whether the button is pressed or released), and reflect that state by animating the size of a circle in a graphical interface.
E) Arduino Code (Data Sender)
This updated Arduino code reads the state of a button connected to GPIO3 (D2) on the XIAO ESP32S3 and sends "1" when the button is pressed, and "0" when released.
This is used by both the p5.js and Python receiver programs to control the animation logic.
            #define XIAO_ESP32S3_D2
            #define BUTTON_PIN 3

            void setup() {
              Serial.begin(115200);
              pinMode(3, INPUT_PULLUP);  // Button connected to GPIO3 (D2)
            }

            void loop() {
              if (digitalRead(3) == LOW) {
                Serial.println("1");
              } else {
                Serial.println("0");
              }
              delay(100);
            }
F) Python GUI Code (Receiver + Animation Interaction)
This version of the Python program receives serial data from the Arduino,
and uses Tkinter to display a circle whose size changes based on the button state.
It also shows a label below the circle to indicate the status ("PRESSED" or "RELEASED").
The serial data is "1" when the button is pressed, and "0" when released.
- Open Notepad, and paste the following code.
-
Click File → Save As
- Set Save as type to All Files
- Name the file with a.pyextension, for example:button_gui.py -
Double-click the file, or run it via Command Prompt:
python button_gui.py
            import serial
            import tkinter as tk
            import threading

            # Serial port configuration
            ser = serial.Serial("COM3", 115200)

            # Initial value
            circle_radius = 50

            # GUI setup
            window = tk.Tk()
            window.title("Button-Controlled Circle Animation")
            canvas = tk.Canvas(window, width=400, height=400, bg="white")
            canvas.pack()

            # Create visual elements
            circle = canvas.create_oval(175, 175, 225, 225, fill="skyblue")
            text = canvas.create_text(200, 300, text="Button State: UNKNOWN", font=("Arial", 16))

            # Update circle and label
            def update_circle(radius, status_text):
                canvas.coords(circle, 200 - radius, 200 - radius, 200 + radius, 200 + radius)
                canvas.itemconfig(text, text="Button State: " + status_text)

            # Serial reader thread
            def read_serial():
                global circle_radius
                while True:
                    try:
                        data = ser.readline().decode().strip()
                        if data == "1":
                            update_circle(80, "PRESSED")
                        elif data == "0":
                            update_circle(40, "RELEASED")
                    except Exception as e:
                        print("Read error:", e)
                        continue

            # Start thread
            thread = threading.Thread(target=read_serial)
            thread.daemon = True
            thread.start()

            # Run GUI
            window.mainloop()
Save and Run the Python Program Using Notepad
- Open Notepad, and paste the following code:
# (Insert your Python code here)-
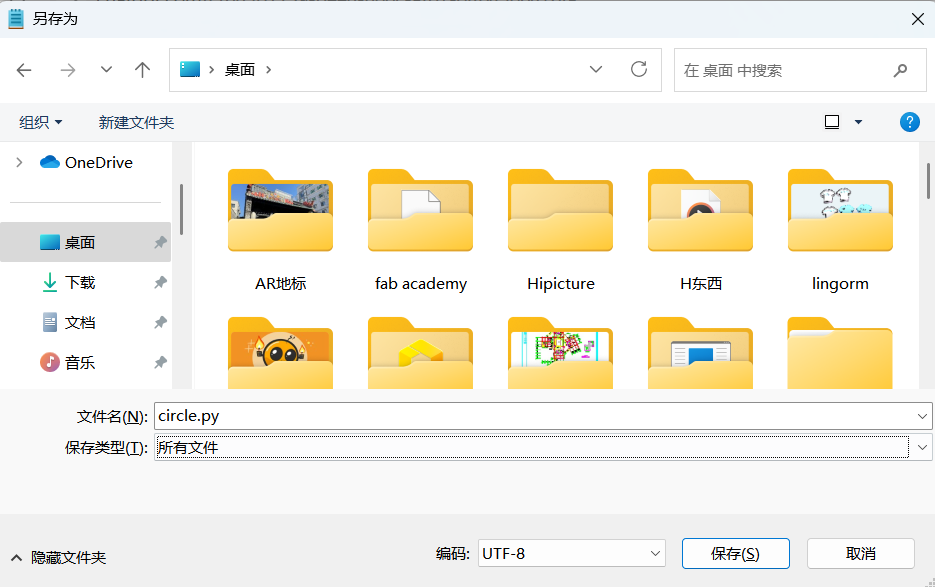
Click File → Save As, and save the file to your D drive Desktop.
File name:circle.py- Set Save as type to All Files
- Set Encoding to UTF-8
-
Double-click the file, or run it via Command Prompt:
python circle.py
Save and Run the Python Program Using Notepad
- Open Notepad, and paste the following code:
# (Insert your Python code here)-
Click File → Save As, and save the file to your D drive Desktop.
File name:circle.py- Set Save as type to All Files
- Set Encoding to UTF-8
-
Double-click the file, or run it via Command Prompt:
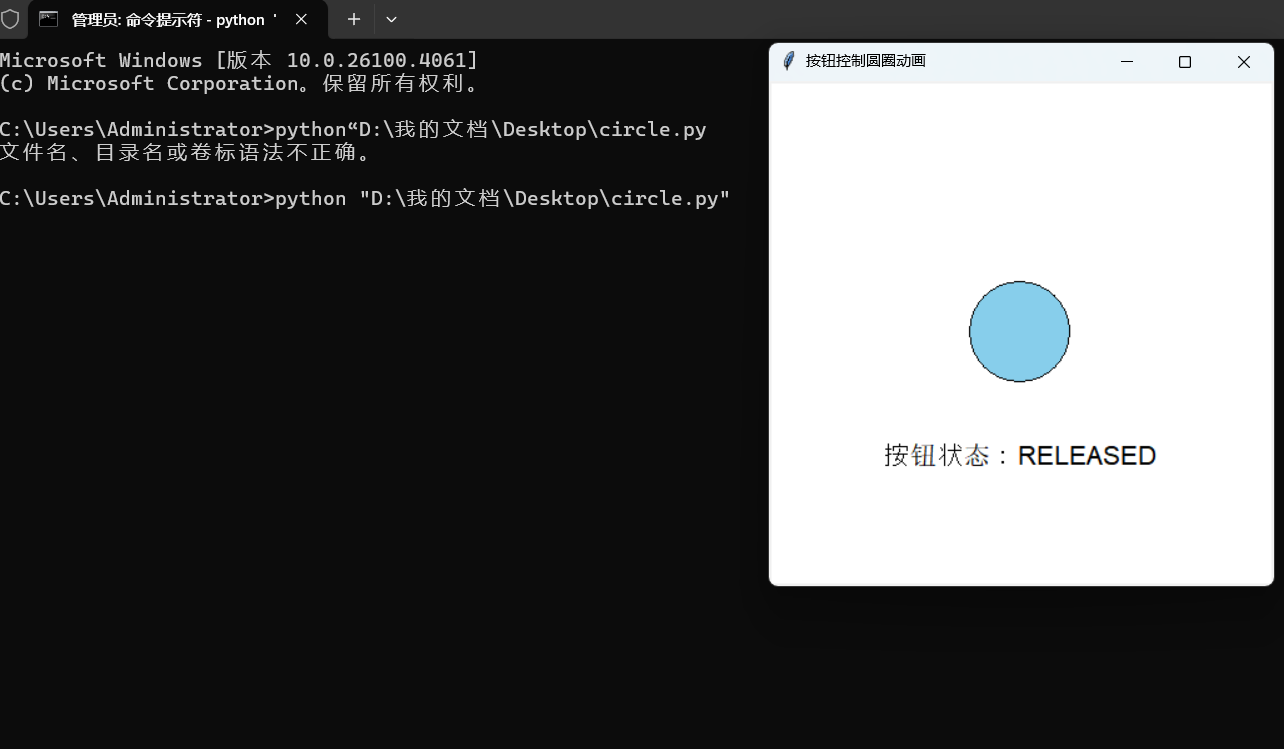
python circle.py -
Run the Program Using PowerShell:
- Right-click the Start menu → Select Windows PowerShell
- Enter the following to navigate to your desktop (replace with your actual path):
- Then run the Python file:cd "D:\Users\YourUsername\Desktop"python circle.pyIf everything is configured correctly, a white window will appear with a blue circle in the center. The circle’s size will change dynamically based on the button state.
G) Run-Time Behavior and Visual Feedback
| Button State | Serial Output | Circle Radius |
|---|---|---|
| Pressed | 0 | 80 px |
| Released | 1 | 40 px |
Visually, you will see the circle grow and shrink with smooth animation feedback.
H) Problems and Solutions
| Issue Description | Possible Cause | Solution |
|---|---|---|
Cannot run .py file in PowerShell |
Wrong path, file doesn't exist, or Python not set up | Use cd to navigate to the .py file’s directory, then run python circle.py |
Error: ModuleNotFoundError: No module named 'serial' |
PySerial is not installed | Run pip install pyserial in PowerShell |
| Circle does not change | Arduino serial is still open, or Python didn't open the port | After uploading Arduino code, close the Serial Monitor to release the COM port |
| Python window crashes or turns white/unresponsive | Code error or parsing issue | Check if port and baud rate match; ensure Arduino is sending correct data |
| Upload failed: port busy | Port is in use by another program (e.g., Serial Monitor) | Close all other serial tools before uploading |
| Cannot open COM3 | Incorrect port, USB driver issue, or board not connected | Confirm Arduino is connected to COM3; try rebooting or using another cable |
I) Experiment Summary
This experiment marks my first time combining Python GUI programming with Arduino hardware communication, creating an interactive system where a physical button controls the size of a graphical circle.
Throughout the process, I:
- Used Arduino to continuously send button state via serial;
- Built a live GUI using
tkinterin Python; - Applied
PySerial+threadingto receive data and refresh the display in real-time; - Wrote the code in Notepad and ran it from PowerShell outside any IDE;
- Solved multiple issues, such as path errors, occupied serial ports, and missing libraries.
This hands-on practice helped me understand:
- How serial communication works (data flow and parsing);
- How to coordinate between different programming languages;
- That it's entirely possible to build and run a complete system without a dedicated IDE like VS Code.
Compared to Processing or p5.js:
Python offers more freedom and control in GUI logic;
Although it lacks the visual appeal of web-based animation,
it is a very solid way to learn serial communication and desktop GUI programming.
4. Arduino Serial Plotter
A) Tool Overview
Arduino Serial Plotter is a built-in visualization tool in the Arduino IDE. It allows users to plot real-time data directly from the Serial output of their Arduino boards. It's especially useful for debugging sensor values, signal trends, or visualizing simple numeric output.
- Platform: Arduino IDE
- Usage Scenario: Visualize numeric data printed via
Serial.println() - Installation: Built-in with the Arduino IDE — no additional setup required
B) Steps to Use
- Upload a sketch that outputs numeric data via
Serial.println()(e.g., sensor values or button states). - In the Arduino IDE, go to Tools → Serial Plotter (or use shortcut Ctrl+Shift+L).
- The Serial Plotter will open in a new window and begin plotting values in real time.
Example Code (Button state visualization):
                #define XIAO_ESP32S3_D2
                #define BUTTON_PIN 3

                void setup() {
                Serial.begin(115200);
                pinMode(BUTTON_PIN, INPUT_PULLUP);
                }

                void loop() {
                int state = digitalRead(BUTTON_PIN);
                Serial.println(state);
                delay(100);
                }
C) Observation and Behavior
| Button State | Serial Output | Plot Behavior |
|---|---|---|
| Pressed | 0 | Line drops to bottom |
| Released | 1 | Line rises to top |
D) Advantages and Limitations
Advantages:
- Built into Arduino IDE, no installation required
- Instantly reflects data output changes
- Supports plotting multiple variables with labels
Limitations:
- Only supports numeric data (no graphics or UI elements)
- Visualization options are minimal (no customization)
- Can only be used when the Serial Monitor is closed
Individual Assignment
1. Development Goal
In this experiment, I aimed to create a serial interactive animation using Processing.
The goal is to use a potentiometer (knob sensor) connected to the XIAO ESP32S3 board as an input device.
The analog value will be sent to the computer via serial communication, and Processing will visualize this data
with a "cool-looking" real-time dynamic animation to enhance the interactive experience.
2. Tools and Environment
| Tool | Purpose |
|---|---|
| XIAO ESP32S3 | Microcontroller for reading analog input |
| Potentiometer (knob module) | Input device that adjusts analog voltage |
| Arduino IDE | For writing Arduino code to read and send sensor data |
| Processing 4 | To receive serial data and display interactive animation |
| USB Type-C Cable | Connects the board to the computer via serial port |
3. Circuit Connection
| Component Pin | Connected To |
|---|---|
| Potentiometer VCC | XIAO 3.3V |
| Potentiometer GND | XIAO GND |
| Potentiometer OUT | XIAO A0 (GPIO1) |
Note: The XIAO ESP32S3 supports multiple analog input pins. In this project, GPIO1 (A0) was selected as the analog input.
4. Arduino Code
Upload the following code to the XIAO ESP32S3. The program will:
- Continuously read the analog value from pin A0;
- Send the result to the computer via the serial port.
                #define XIAO_ESP32S3_A0
                #define POTENTIOMETER_PIN 1

                void setup() {
                  Serial.begin(115200);
                }

                void loop() {
                  int sensorValue = analogRead(POTENTIOMETER_PIN);
                  Serial.println(sensorValue);
                  delay(50);
                }
Once the code is uploaded successfully, you can open the Arduino Serial Monitor to verify whether the analog output changes as expected.
⚠️ Important: When using Processing, make sure to close the Arduino Serial Monitor first. Otherwise, the serial port will be occupied and Processing won’t be able to connect.
5. Processing Animation Design
To make the animation more “cool” and visually appealing, I designed a multi-ring pulsing effect. The potentiometer value controls both the background color and the dynamic ripple size.
The following is the Processing program:
            import processing.serial.*;

            Serial myPort;
            int sensorValue = 0;

            void setup() {
            size(600, 600);
            println(Serial.list());  // List available ports
            myPort = new Serial(this, "COM3", 115200);  // Replace with your actual port
            myPort.bufferUntil('\n');
            }

            void draw() {
            background(map(sensorValue, 0, 4095, 0, 255), 100, 200);

            translate(width / 2, height / 2);
            noFill();
            stroke(255);
            int rings = 10;
            for (int i = 0; i < rings; i++) {
                float radius = i * 20 + map(sensorValue, 0, 4095, 0, 100);
                ellipse(0, 0, radius, radius);
            }
            }

            void serialEvent(Serial myPort) {
            String inString = myPort.readStringUntil('\n');
            if (inString != null) {
                inString = trim(inString);
                sensorValue = int(inString);
            }
            }
⚠️ Reminder: Replace "COM3" with your actual serial port name from the Serial.list() output.
6. Run and Test Procedure
- Upload the Arduino code via the Arduino IDE, then close the Serial Monitor;
- Open Processing, and run the sketch provided above;
- If the serial port is correct (e.g.,
"COM3"), the animation window will open; - Rotate the potentiometer, and you will see the background color and ring animation dynamically respond — providing clear visual feedback.
7. Problems and Solutions
| Problem | Possible Cause | Diagnosis and Solution |
|---|---|---|
| Processing cannot open serial port; error: "port busy" | Arduino Serial Monitor is still open, COM3 is occupied |
I ran Processing right after uploading the Arduino code, and got a port access error.
It was due to the Serial Monitor being open. After closing it, the issue was resolved. Lesson: Only one program can use the port — close the other first. |
| Processing window opens but no animation appears | 1. Wrong port number 2. Serial data not read properly |
Used println(Serial.list()) to confirm port, verified baud rate was 115200.
Found that sensorValue stayed 0 because myPort.bufferUntil('\n') was missing.
After adding it, the issue was fixed.
|
| UI is laggy or unresponsive | Serial data sent too frequently; or data too large | Delay was set to 10ms in Arduino, sending over 100 messages/sec. Increased delay to 20–50ms and achieved stable 60 fps in Processing. |
| Animation is not visually responsive enough | Potentiometer value range not visually intuitive |
Potentiometer outputs 0–4095. Used map() to scale values for color and size,
which significantly improved visual feedback.
|
Other Insights:
serialEvent()in Processing is asynchronous.bufferUntil('\n')is required to trigger it.- Processing graphics and Arduino sensors are separate layers — the serial bridge must be clean and efficient.
8. Experiment Summary
This experiment — combining Processing, Arduino, and a potentiometer — was a complete journey from "sensor input" to "artistic output."
Hardware Side:
Used a potentiometer to collect analog input, transmitted via serial.
Learned analogRead() and Serial.println() on the ESP32.
Software Side:
Chose Processing for visualization. Its graphics capability is superior to Tkinter and p5.js. Mapped knob values to color and size, creating a center-expanding animation that felt intuitive and smooth.
Key Takeaways:
- Serial Communication:
- Not automatically two-way — requires careful formatting
- Only one app can use a port at a time
- Always end with
\nfor clean parsing
- Processing Graphics Programming:
- Used
ellipse(),translate(),map() - Dynamically visualized analog input
- Learned to connect data values to visual representations
- Used
- Mindset Shift:
- From “reading data” to “making it interactive and meaningful”
- From “just working” to considering feedback, UX, and design
- Learned how interfaces structure user interaction with systems