Week 16 [Wildcard]: CNC Embroidery
Table of Contents
This week, we were to choose our assignment ourselves. I designed patches with Inkscape with the Ink/Stitch extension and fabricated them using the brother PR-655 embroidery machine available at our university’s library.
This Week’s Tasks
- Design and produce something with a digital process (incorporating computer aided design and manufacturing) not covered in another assignment.
- Documenting the requirements that your assignment meets, and including everything necessary to reproduce it. Possibilities include but are not limited to wildcard week examples.
Choosing the Assignment
The assignment for this week is to learn about the basics of fabric processing and to design and produce a design for an embroidered patch. In no other assignment we dealt with fabric processing methods which is what distinguishes this assignment from all the other ones.
The Library’s Safety Guidelines
This week, I was working in the textile lab at the basement of our university’s library. To do that, I first read the safety instructions and completed a test. The most important points were as follows.
- No smoking or fires.
- No eating.
- Do not lock the textile lab from the inside.
- The uni library staff decides who is allowed to work in makerspace and/or organize events.
- The textile lab must not contain more than 6 people.
- Every use of a machine is to be recorded in the associated log book.
- When leaving the library, the windows are to be closed, the light is to be turned off, and the space is to be tidied up.
- Only instructed persons allowed to repair a machine.
Introduction to Sewing and (CNC) Embroidery
Details about sewing and embroidering are written in this section. The resources I took the information from were this YouTube channel regarding fabric manufacturing as well as material provided to us by the library.

TL;DR: What You Need
For Sewing
In case, you get interested in sewing stuff, this is what you would need to get.
- Universal sewing needles
- The sewing machine also requires a 130/705 shank.
- Optionally, one can get Jersey needles for sewing flexible fabrics.
- Polyester sewing yarn
- Sewing yarn is a bit more robust than embroidery yarn. Other tools that might be useful are fabric scissors and clamps for fixation.
For Embroidery

- Titanium universal embroidery needles.
- When choosing needles, it is important to check that they fit with the machine. Looking into the data sheet, it can be found that the necessary needle type is 130/705HAx130EBBR. The first six digits specify the shank of the needle. The rest of the name specifies the type of the needle eye and that they fit for embroidery.
- When needles are blind or bent they need to be changed. They are blind when they do not get through the fabric anymore.
- Stabilizer.
- Buy a bit more stabilizer when in doubt. There is a lot of residual stabilizer that gets thrown away.
- Alternative stabilizers are tear-away stabilizers and cut-away stabilizers.
- Patch base, polyester.
- We bought a bunch black and white sheets.
- Polyester embroidery yarn.
- We bought black, white (1001), grey (1011), and green (1212) yarn.
- (Optional) BSN foil, if you want to iron the patch onto something instead of sewing it.
Sewing Needles
The needle system needed for household sewing machines is 130/705 H. This indicates the shank of the needles one needs to buy. The thickness of needles is given in diameter, measured in 1/100 mm. For example, size 70 corresponds to 0.7 mm. The size and type of needle depend on the fabric. A Universal needle is particularly suitable for sewing beginners. It is versatile and can be used for most fabrics, such as cotton, polyester, and lightweight fabrics. A Jersey needle has a rounded point, making it particularly suitable for stretchy fabrics like jersey and knitwear, as it will not damage the fabric. A Stretch needle is especially suitable for highly elastic fabrics and fine fabrics, such as highly elastic knitwear, silk, and viscose jersey. A Jeans needle is very robust, making it ideal for thick fabrics like denim or canvas. These needles are extra strong and prevent breakage when sewing firm materials. A Microtex needle is particularly suitable for fine fabrics, such as microfiber fabrics, silk, and sequin fabrics. A Twin needle is particularly suitable for hemming stretch fabrics.
As a rule of thumb, the needle should be changed after every major sewing project. After about four or more hours of use, the first problems with the needle, such as skipped stitches, may occur. The needle should also be changed after a sewing accident, such as when the needle hits a pin or the presser foot.
Sewing Thread
Cotton thread is best suited for sewing projects made from pure cotton fabrics and non-stretch fabrics. It is particularly popular for patchwork and quilting work. It does not have much elasticity and therefore tears much faster. Cotton threads can be dyed very well and take on the color tone even when subsequently treated with textile dyes. Polyester yarn, in contrast to cotton yarn, is more elastic and significantly more tear-resistant. It is therefore also suitable for elastic fabrics. The thread is very easy to care for and is often mixed with natural fibers such as cotton. Most “all-purpose sewing threads” are made of polyester and, as the name suggests, can be used for all fabrics. It usually has a slight shimmer. Polyamide yarn, or nylon yarn, is mainly used for sportswear and weatherproof clothing. It is generally used in conjunction with polyamide fabric, which lets water vapor out but does not allow water to penetrate inside. Viscose yarn, or rayon, is often used for viscose fibers. It looks similar to cotton but is lighter and softer. Its silk-like shimmer makes it popular for machine embroidery. Buttonhole thread is a thicker polyester thread that is ideal for buttonholes and sewing on buttons. The thread consists of several yarns twisted together. Its high tensile strength makes it interesting for repair work by hand and for sewing sturdy fabrics such as canvas and sailcloth. Silk thread is mainly used for sewing silk fabrics and offers a beautiful sheen. It is often sewn by hand as it is extremely delicate but can also be processed by a sewing machine. Metallic thread consists of metallized synthetic fibres and can be sewn by hand or machine to create exciting colour accents. However, a special needle is required for sewing. Effect yarn is very durable yarn made from cotton and polyester. This thread can be sewn by hand or machine and is mainly used for decorative seams and buttons. Rubber thread is a thin, covered elastic thread and is very stretchy. It is normally used as a bobbin thread to achieve a stretch effect.
Upper & Bobbin Thread Tension
Sewing and Embroidery machines use techniques where a bobbin and an upper thread is used. Make sure to have the tension between threads correct. If it is too high, there might be loops between stitches of the upper thread. If it is too low, there might be loops between stitches of the bobbin thread. The threading and winding of the threads and the setting of the thread tension depend on the machine - looking at the operating instructions before use will help if anything is unclear.
Stitch Types
For stitch types specific to embroidering, the documentation of Inkstitch can be checked.
The following stitch types are taken from the sewing documentation of our library, but may also be relevant for both, sewing and embroidering. The running stitch is the standard stitch for most sewing work. It creates a straight line and is ideal for simple seams. This type of stitch is also often used for hemming. The stitch length should be set depending on the fabric: a short stitch length is suitable for light and thin fabrics, a medium length for fabrics of normal thickness, and long stitches for thick and firm fabrics. The basting stitch is similar to the straight stitch but longer in the stitch and only temporary. It is used for fixing the fabric for a short time or for gathering the fabric. The sewing machine should be set to the longest stitch length. The zigzag stitch is mainly used when sewing elastic fabrics. It prevents the seam from tearing when the fabric stretches. It can also be used for neatening fabric edges if there is no overlock machine available, or for decoration, appliqués, and buttons. The overlock stitch is used for cleanly finishing fabric edges and for sewing stretchy materials. The blind stitch is used for invisible hems, particularly on trousers, skirts, and curtains. Buttonholes can be sewn depending on the sewing machine, either in four steps or with an automatic buttonhole function. The exact procedure is explained in the machine operating instructions. Backtacking is used to secure a seam at the beginning and end, preventing the seam from coming undone. It can usually be recognized on the sewing machine by this symbol: ↷.
Useful Tools
- Measuring tape for measuring distance on rounded objects.
- Ruler for measuring distance on flat surfaces + marking.
- Chalk pen or tailor’s chalk.
- Fabric scissors or fabric roller for cutting fabric.
- Iron for flatting fabric before sewing.
- Pins or fabric clips for joining individual pieces.
- Seam ripper or thread scissors for undoing stitches.
Sewing Terms & Techniques to Look Into Later
- Fitting: Used to trim and reinforce the edges of the fabric.
- Hemming: Adds a professional hem to the finished garment to secure the fabric. → Hemming,
- Neating: Used to prevent the edges of the fabric from fraying.
- Seam allowance.
Embroidery Needles
There are needles for each fabric to use. The universal embroidery needle is used for most projects and is available in various sizes. Size 75 is used for all common embroideries on normal fabrics, and a higher size, such as 90, is used for heavier materials. The blue tip embroidery needle can be used for all types as well. Its special feature is a large needle eye. Embroidery needles SES differ from the other needles in that they have another tip shape. Jersey needles (sewing needles) are particularly suitable for loose embroidery on stretchy fabrics. Embroidery needles with a longer service life are provided with titanium nitride coating for longer durability. They are well suited for embroidering leather that is applied to adhesive backing. They have a light ball point and can therefore also be used for sewing stretchy materials. Embroidery needles with non-stick coating reduce glue residue on the needle and prevent the new thread from being difficult to thread. Metallic embroidery needles are used for metallic threads, especially for metallic threads with flat cross-sections. Typical needle sizes are 80 and 90. Topstitch needles are constructed the same as the metallic embroidery needle, but the needle size is 70 or 100. Wool embroidery needles have a pointed needle tip and can therefore penetrate wool more easily. A large eye and adapted groove prevent the yarn from unraveling. The size of the needle is suitable for thick yarn. Double eye needles are designed so that the threads lie on top of each other. They are well-suited for working with two yarns at the same time.
Embroidery Thread
Normal sewing thread is not particularly suitable for embroidery because it often makes embroidery look too tight and stiff. Other than that there is no problem using sewing yarn. For proper embroidery, there are special embroidery yarns. Polyester yarn is particularly tear-resistant and shiny. It is washable up to 95 degrees, suitable for high embroidery speeds, particularly strong, and suitable for machine embroidery. Viscose yarn is softer than polyester yarn but still suitable for textiles subject to heavy wear. It has high tear resistance. Cotton yarn is duller and rougher, and not as abrasion-resistant as polyester or viscose yarns. Bobbinette thread is particularly tear-resistant and perfect as an embroidery bobbin thread. A bobbin thread is a type of thread used in the bottom spool of a sewing machine, typically finer and thinner than the top thread. Its main purpose is to create strong and durable stitches that hold the fabric together during sewing. Metallic thread is suitable as bobbin thread and normal sewing thread. When using the thread, a lubrication unit should be used in general. It is to be checked if this is the case with the specific metallic thread one uses and with the embroidery machine that is used. The embroidery speed and the embroidery density of the motif should be reduced. Wool yarn gives a more voluminous appearance. However, only stitch patterns that are specifically for this type of yarn should be used.
Embroidery threads are available in different strengths. To make the right choice, you should look carefully at the embroidery design beforehand to see which thread is required. Otherwise, the embroidery file must be adapted.
Embroidery Tools
The embroidery frame stretches the fabric, making embroidery easier. There are different sizes and it can be perfectly adapted to the project. Embroidery scissors are small, sharp scissors that can be used to cut threads precisely. There are special embroidery scissors with a pointed blade to make it easier to cut the thread. A water-soluble pen or chalk is particularly suitable for tracing the motif onto a fabric. There are also special pens that disappear by themselves after a while.
Fabrics for Embroidery and Sewing
An overview of fabrics with respect to sewing can be found at this guide. Below, more details for fabrics are listed when considered for embroidery.
To achieve clean embroidery, it is important to choose the right fabric. It is possible to embroider any type of fabric. Some fabrics are simply easier to work with, especially if the right embroidery needle is used.
Woven fabrics (non-stretch) include:
- Cotton: perfect for beginners, smooth, and easy to use.
- Linen: coarser and very suitable for classic embroidery.
- Canvas and jeans: robust and require a thicker needle for embroidery than other fabrics.
- Felt: does not fray very quickly and is ideal for appliqués.
- Silk: slippery and sensitive. If a water-soluble stabilizer is used, it is still suitable to embroider.
Knitted fabrics (stretchable) include:
- Jersey: stretchy and requires a water-soluble stabilizer so that it is easier to embroider and has more stability.
- Fleece: very fluffy and can cause the embroidery design to sink into the fabric. To avoid this, an Avalon foil should be used.
- Stretch fabric: demanding and requires a special stabilizer and needles.
Special fabrics include:
- Faux leather and leather: special embroidery needles with a sharp point are required for this type of fabric.
- Organza and tulle: a water-soluble stabilizer is recommended for these transparent fabrics so that the embroidery motif can be applied well.
- Softshell and coated fabrics: tears quite quickly. Care must be taken to ensure the embroidery pattern is adapted to the fabric.
Embroidery Stabilizer
Embroidery stabilizer is an essential component in embroidery. Before embroidery, an embroidery backing is stretched together with the fabric into the hoop. Without it, nothing works. The type of stabilizer depends on the type of fabric and the project.
There are different ways in which the stabilizer is attached to the fabric to be embroidered and whether or how it should be removed after embroidery is complete. A distinction is made between tear-away, wash-away, and cut-away stabilizers.
- Embroidery stabilizer (tear-away) is suitable for almost all fabrics. Before hooping it in the embroidery hoop, it is lightly attached to the wrong side of the fabric with a spray adhesive. A textile adhesive that is free from acids and greenhouse gases is best suited for this. After embroidering, the excess stabilizer can simply be torn off.
- Fixing embroidery stabilizer (tear-away) is particularly suitable for elastic outer fabrics but can also be used for all other fabrics. It is temporarily ironed onto the wrong side of the fabric before embroidering. It stabilizes the fabric and ensures distortion-free embroidery. After embroidering, the excess edge can be torn off.
- Soluvlies (wash-away) is a water-soluble embroidery stabilizer. It is generally placed under the fabric before embroidering and washed out at 30 degrees. It can also be soaked in warm water. Intricate ornaments can be embroidered on the double-layered Soluvlies even without fabric.
- Solufix (wash-away) is a self-adhesive, water-soluble stabilizer that can also be applied to the right side of high-pile fabrics such as corduroy and velvet. Solufix is also very suitable for elastic fabrics. The embroidery motif can simply be drawn onto the rough side. The stabilizer dissolves later in warm water.
- Cut-away embroidery backings have a particularly high embroidery strength. They are very stable and are designed to prevent the fabric from warping. They remain permanently under the fabric. The remnants must be cut back along the edge of the motif with scissors after embroidering.
Embroidery Files
Embroidery files tell the embroidery machine what to do. They contain information about color, stitch type, shapes, and stitch angle. Suitable file types for the machine used are .pes, .phc, and .dst. As a software, Inkscape with the extension Ink/Stitch can be used.
Designing a Patch Using Ink/Stitch
For designing the embroidery file, I used Inkscape with the Ink/Stitch extension. For starting with Ink/Stitch, I checked this tutorial series. As a motive, I wanted to use the NERV logo from the anime Neon Genesis Evangelion. It was a request from a friend and I was happy to fulfill it. I downloaded the logo as a bitmap graphic and converted that to a path in Inkscape using the Trace Bitmap function. For a graphic element, Ink/Stitch automatically generates a default stitch pattern based on the element’s properties. For filled paths it generates a fill stitch. The stitch pattern can be adjusted by first selecting the considered element with the selector tool and then selecting Extensions > Ink/Stitch > Params. This provides the user with a menu of stitch parameters and a visual simulation of the process. I chose default patterns with the fill pattern option Auto. If just the simulation is of interest, one needs to select the considered objects and hit Extensions > Ink/Stitch > Visualize and Export > Simulator.

Assuming, one just wanted to add the embroidery to a finished piece of clothing, one could continue exporting the embroidery file now. Here, however, I wanted to fabricate a patch. That is, I wanted to have a separated rectangle of cloth where the shape should be embroidered onto. This requires some additional steps I took from this YouTube Video and this wiki article. First, the stabilizer is clamped into the frame. Then, the outline of the patch is embroidered onto that stabilizer with a running stitch for orientation. The previously-cut patch base is held onto the stabilizer and tacked down using a zig-zag stitch or a sparse satin stitch before embroidering the rest of the patch and finishing the seam with a dense satin stitch.
To add a running stitch, one needs to add a dashed line. It does not matter what thickness or what type of dashing the line has, but only that it is dashed. It can be open or close. I drew a rectangle and converted that into a path (just because I did not want to risk weird behavior). Ink/Stitch interpreted this line as a running stitch. For the running stitch, I used default parameters.

I then added the first satin stitch to tack down the patch base. A satin stitch is added by having two parallel lines as parts of one single path. The angle of the stitch is then determined by horizontal lines crossing the two lines. The direction of the single strokes is important for the stitch to be as desired. If a basic satin stitch that follows a line is desired (just like a zig-zag stitch), there is a shortcut for creating a satin stitch. First, I drew an un-dashed line (closed and open paths work; yes, this is contradictory to the Ink/Stitch tutorial, but it worked in this case) and set the thickness of the line as desired. Again, I used the rectangle tool for that and converted that to a path afterwards. Then, I selected (only) the newly-created line and hit Extensions > Ink/Stitch > Tools: Satin > Convert Line to Satin.


.pes file.
Cutting the Patch Bases
For cutting the patch bases I used a laser cutter as it is described in this article.


.dxf file and imported it to RDWorks (check the computer-controlled cutting week for a more detailed explanation).

Preparing the Embroidery Machine
Note the rotary knobs at the top of the machine. Those are to adjust the tension of the upper threads. They are not to be touched unless there is a problem with the tension. Otherwise, it takes much unnecessary time to re-adjust them.
Preparing the Upper Thread
The upper thread is mounted at the rods at the back of the machine. The machine manual describes in detail how exactly it is threaded.


Preparing the Bobbin Thread
Before every use, the bobbin thread mechanism needs to be oiled.


Preparing the Frame
The embroidery frame is where you clamp the fabric to be embroidered into. The frame is then mounted below the needle mounts of the embroidery machine.


- Make sure the outer part of the frame is tight enough to just fit onto the inner part. This already tightens the stabilizer a bit.
- Tighten the clamp with your hand as much as possible.
- Drag on the corners of the stabilizer to increase the stiffness of the stabilizer.
- Finally, tighten the frame with a screw driver or something similar to lock the stabilizer so it does not move anymore.

Embroidering
Patch “NERV”
The embroidery process is displayed in the following pictures.


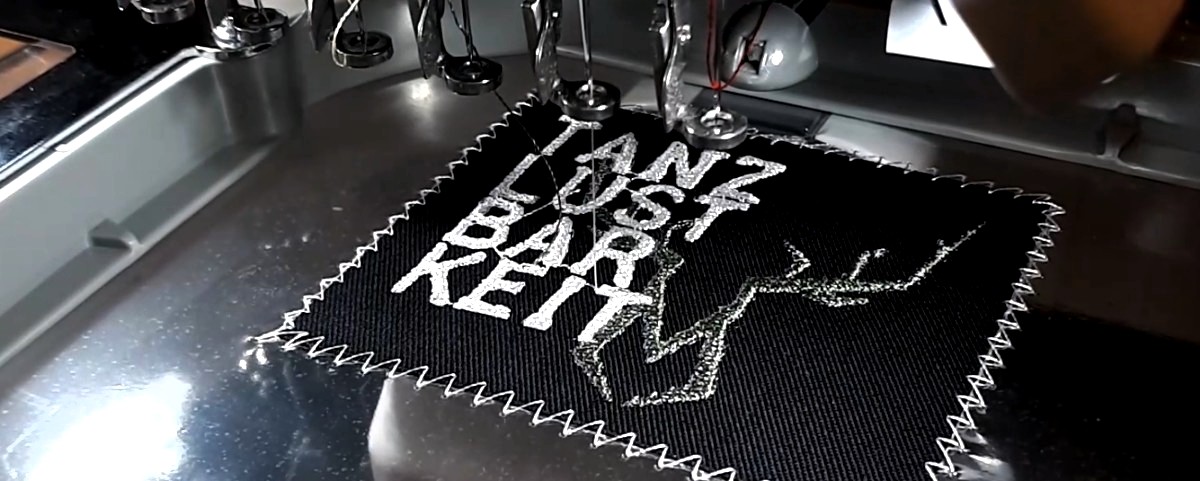
Patch “Tanzlustbarkeit”
Afterwards, I designed and embroidered a second patch. “Tanzlustbarkeit” is a bureaucratic german term for a gathering of people dancing.


Reflections
What I Learned
- Designing embroidery machine files, using an embroidery machine.
- Sewing.
- First, I only wanted to focus on embroidery. However, I noticed that knowledge about sewing helps with better understanding embroidery. Especially when it comes to stitch types, etc.
What Went Wrong
- When using the Embroidery Machine, sometimes the thread teared off. It then helped to fix the torn thread, go back a few stitches and continue stitching the pattern.
- When embroidering the second patch, the stabilizer broke. The reason might be a too dense stitching pattern with the satin stitch.
What Went Well
- The NERV patch was the first try to embroider something and it went very well, without any problems.
What I Would Do Differently
- Adjust the density of the satin stitch and check if that fixes the breaking-stabilizer problem.
Open Questions
- Why are normal needles not to be used for metallic threads?
- How to adapt embroidery pattern to a fabric?
- When to use Jersey vs. Stretch needle?
Digitial Files
- Laser benchmark polyester
- Patch “NERV”
- Patch “Tanzlustbarkeit”
Use of Language Models
During writing this report, I used the following prompts asking ChatGPT 4o mini to form bullet points to prose text.
1Take the following bullet points and form prose text out of them. Do not add any additional information. Only use those words used in the bullet points and, additionally, those that are absolutely necessary to build grammatical sentences out of the bullet points. Formulate those things in past tense that are describing what has been done (like in a report) and those points that describe facts in present tense. Correct spelling mistakes:
2
3<insert bullet points>