Week 13: Molding & Casting
Table of Contents
This week, we were introduced to basic molding and casting techniques. In my personal assignment, I created silicone molds from both printed and milled positives of an object. Those were used again for casting resin.
This Week’s Tasks
- Group assignment:
- Review the safety data sheets for each of your molding and casting materials
- Make and compare test casts with each of them
- Compare printing vs milling molds
- Individual assignment:
- Design a mold around the process you’ll be using, produce it with a smooth surface finish that does not show the production process, and use it to cast parts.
Introduction to Molding & Casting
In the following, I reflect on the group assignment. The page documenting the whole assignment can be found here.
Available Materials
Before considering available materials, the classification of hardness is addressed. It is reported in the Shore hardness scale, with three main types: Shore 00, Shore A, and Shore D. Shore 00 is used for measuring the softness of rubbers and gels. Shore A is used for flexible mold rubbers, ranging from very soft to semi-rigid, and also includes semi-rigid plastics. Shore D is used for harder rubbers, semi-rigid plastics, and hard plastics.
We worked with several molding and casting materials, each with their own properties regarding pot life, cure time, etc. There are many different materials that can be used for this. We used a very small selection of standard materials from Smooth-On. The materials used were Mold Star 15 Slow, Mold Star 30, Sorta-Clear 37, Smooth Cast 305, and Smooth Cast 326. All of these products contained two components which are liquid. When mixed together two components of a product in the correct ratio, they would react to become an more or less rigid object (rubbery, in the case one is dealing with silicones). The recommended vendor for those products was Smooth-On. The pot life of a material is how long it stays liquid after mixing the two components. The mix ratio depends on the product. It can be reported with respect to mass or with respect to volume. It was advised to take the mix ration with respect to mass as a reference as it was easier to measure the weight with a scale than estimating the volume of each component. The mix ratios are reported on each component’s packaging.
Mold Star 15 Slow has a pot life of 50 minutes and a cure time of 4 hours. It is capable of withstanding temperatures up to 232°C and as low as -53°C. It has a Shore hardness of 15A. Mold Star 30, which has a pot life of 45 minutes and a cure time of 6 hours, shares similar properties with Mold Star 15 Slow, including the temperature tolerance, though it has a slightly higher Shore hardness of 30A. Sorta-Clear 37 has a pot life of 25 minutes and a cure time of 4 hours. Furthermore, it is food-safe.

The both Smooth Cast products are resins. They have a much shorter pot life (seven to nine minutes) and cure time (30 to 50 minutes). They also are rather hard after curing. We used those to cast the final positives. Compared to the silicones, the resins have a lower viscosity before the components are mixed.

There are more recipes for making soft materials, alternative to the silicones from Smooth-On. For a soft material from gelatine and glycerine one takes one volume part of glycerin, one volume part of gelatine and one volume part of water. If the glycerine is bought as solution, it has to have high-concentration of glycerine. In experiments in our lab it worked with a concentration of greater than 99 percent. Mix everything together, heat it up as much as possible, but so that it does not boil. Cast the hot mixture and let it cool down for curing. For a soft material from silicone and cornstarch, mix three parts of silicone and one part of starch. The material can cure in rather thick layers. It cures within two hours.
Safety
Safety is a very critical consideration when it comes to working with these materials. For all materials it was advise to work in a well-ventilated area. Safety glasses, long sleeves, and rubber gloves (vinyl only, as latex gloves inhibit the curing process) must be worn. Parts of the Smooth Cast products are suspected to cause cancer. Vapors can cause lung damage and sensitization if heated or sprayed. Adequate ventilation is essential. Further details (what to do in case of a hazard, etc.) can be read on the packages of the products.
Milling vs. Printing Molds
One way to make a mold is to first fabricate a positive that is then used to create a soft negative mold (e.g. by casting silicone). This can then be used to cast the desired rigid positive. The original positive object can be milled or printed.

To achieve a smooth surface finish, the milled original positive is first milled roughly using an end mill with a larger diameter. Following that, a tool of a smaller diameter is used to mill the details of the object.
To achieve a smooth surface finish with printing, there are several possibilities. The one we used this week was printing the object with ABS filament and then applying acetone vapor on it. This smooths the surface of the printed object.
Making Molds
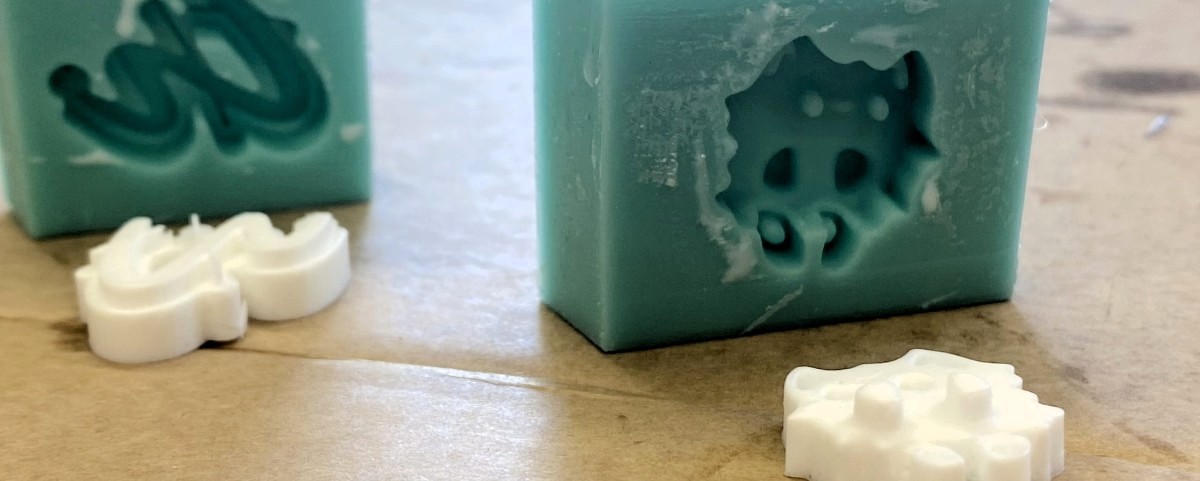
For my individual assignment, I created silicone molds for casting resin. I tried out two procedures to do so: casting a mold from a milled positive and from a printed one. Apart from that, in the regional review at the end of the week, I recognized a tutorial by another instructor for creating two-sided molds in FreeCAD. As a motive I chose Fabi, the mascot of our FabLab. There was an .stl file of it existing somewhere in our FabLab’s cloud. This is where I started editing it.
https://www.vectric.com/products/vcarve/

.svg graphic plus some additional features. The next step was rounding the edges. I did so by switching to edit mode, marking all vertices, and applying the smooth vertices operation (hit F3 to search for it). The menu that popped up in the bottom left of the 3D Viewport, I interacted with to adjust the operation’s parameters. The Smoothing parameter I turned to be 1 and Repeat, I set to 100. To flat the bottom, I marked the bottom vertices and scaled them with a factor of zero with respect to the z axis. This made all selected vertices to be on one level. The final model, I used for printing.


Casting
After making the first mold, the silicone mold was casted from that. It is recommended to have at least two people involved in the process. One person would be responsible for stirring and pouring. While doing this, they do not have the ability to do everything else since their gloves are contaminated with casting materia. The other person then does any other task that involves handling devices that must not get into contact with the casting material. Those tasks include handling the clock, the vacuum chamber, the scale for weighing. Optionally, a third person can be assigned to document the process.
During the casting process, several issues could arise. Depending on the material, it cures rather fast. This was less a problem for the silicones, but for the resins. There was no need for haste, but the workflow needed to be well-structured and executed without wasting time. When mixing the components and when pouring the material, it needed to be done in a way where so that no bubbles were created in the mixture. If one has a vacuum chamber to pull out the bubbles, this is not as critical though. When mixing the components, it is to made sure that the mixing ratio is correct. The mixing ratio differs depending on if the volume or the weight is considered. When only small amounts are mixed, small drops of the component can already make a difference. At the bottom of the cup used for mixing, any leftover material cures. If it cannot be removed, the cup needs to be thrown away. Because of this and the large effort for preparing everything, it is a good idea to synchronize with other people in the lab and make fixed appointments where everybody does their casting work.
Preparations
Preparations included collecting all materials (the wax and the printed molds, tissues, a scale, tape, a vacuum chamber, cups and tools for mixing) and preparing the workspace to be protected from the casting material and to be well-ventilated.


Casting Silicone Molds
The casting process is described in the following pictures. For organizational reasons it was done in a group. I took part in one session casting silicone and in another one casting the resin two days later.


Casting the Resin Positive
The process of casting the resin was very similar to the silicone casting process. Differences were that the resin was more liquid and different to handle. It also hat a shorter pot life so a stricter workflow was required.


Reflections
What I Learned
Depending on the material, it cures rather fast. This was less a problem for the silicones, but for the resins. There was no need for haste, but the workflow needed to be well-structured and executed without wasting time. When mixing the components and when pouring the material, it needed to be done in a way where so that no bubbles were created in the mixture. If one has a vacuum chamber to pull out the bubbles, this is not as critical though. When mixing the components, it is to made sure that the mixing ratio is correct. The mixing ratio differs depending on if the volume or the weight is considered. When only small amounts are mixed, small drops of the component can already make a difference. At the bottom of the cup used for mixing, any leftover material cures. If it cannot be removed, the cup needs to be thrown away. Because of this and the large effort for preparing everything, it is a good idea to synchronize with other people in the lab and make fixed appointments where everybody does their casting work.
It is recommended to have at least two people involved in the process. One person would be responsible for stirring and pouring. While doing this, they do not have the ability to do everything else since their gloves are contaminated with casting materia. The other person then does any other task that involves handling devices that must not get into contact with the casting material. Those tasks include handling the clock, the vacuum chamber, the scale for weighing. Optionally, a third person can be assigned to document the process.
Other than the curing process, I learned how to produce G-code for 2.5D objects.
What Went Well
The whole casting process only needed to be done once. There were no major obstacles. It was good to do a smaller project for this week as I was lacking energy from the previous machine-building assignment.
What Went Wrong
When I first generated the rough and the fine tool path for milling the mold, I used the 3D milling program for both. However, that generated a tool path just to mill along the surface of the 3D object. For the rough milling process, one wants to mill away the wax layer by layer. Such a tool path was could be generated using the 2.5D milling program.
When I then tried to generate the rough 2.5D tool path for milling the mold, I did not join the pocketed box and the FabLab mascot in Blender. This resulted in G-code hat would have milled away the mascot. Luckily, I noticed that before the milling process.
What I Would Do Differently
Other than using Blender, I would directly import an .svg file, import that into FreeCAD and extrude it. Then, I could use the FreeCAD CAM module just because I never used it before.
Digitial Files
- Milling a positive
- 3D design files
- G-code
- Printing a positive
Use of Language Models
During writing this report, I used the following prompts asking ChatGPT 4o mini to form bullet points to prose text.
1Take the following bullet points and form prose text out of them. Do not add any additional information. Only use those words used in the bullet points and, additionally, those that are absolutely necessary to build grammatical sentences out of the bullet points. Formulate those things in past tense that are describing what has been done (like in a report) and those points that describe facts in present tense. Correct spelling mistakes:
2
3<insert bullet points>