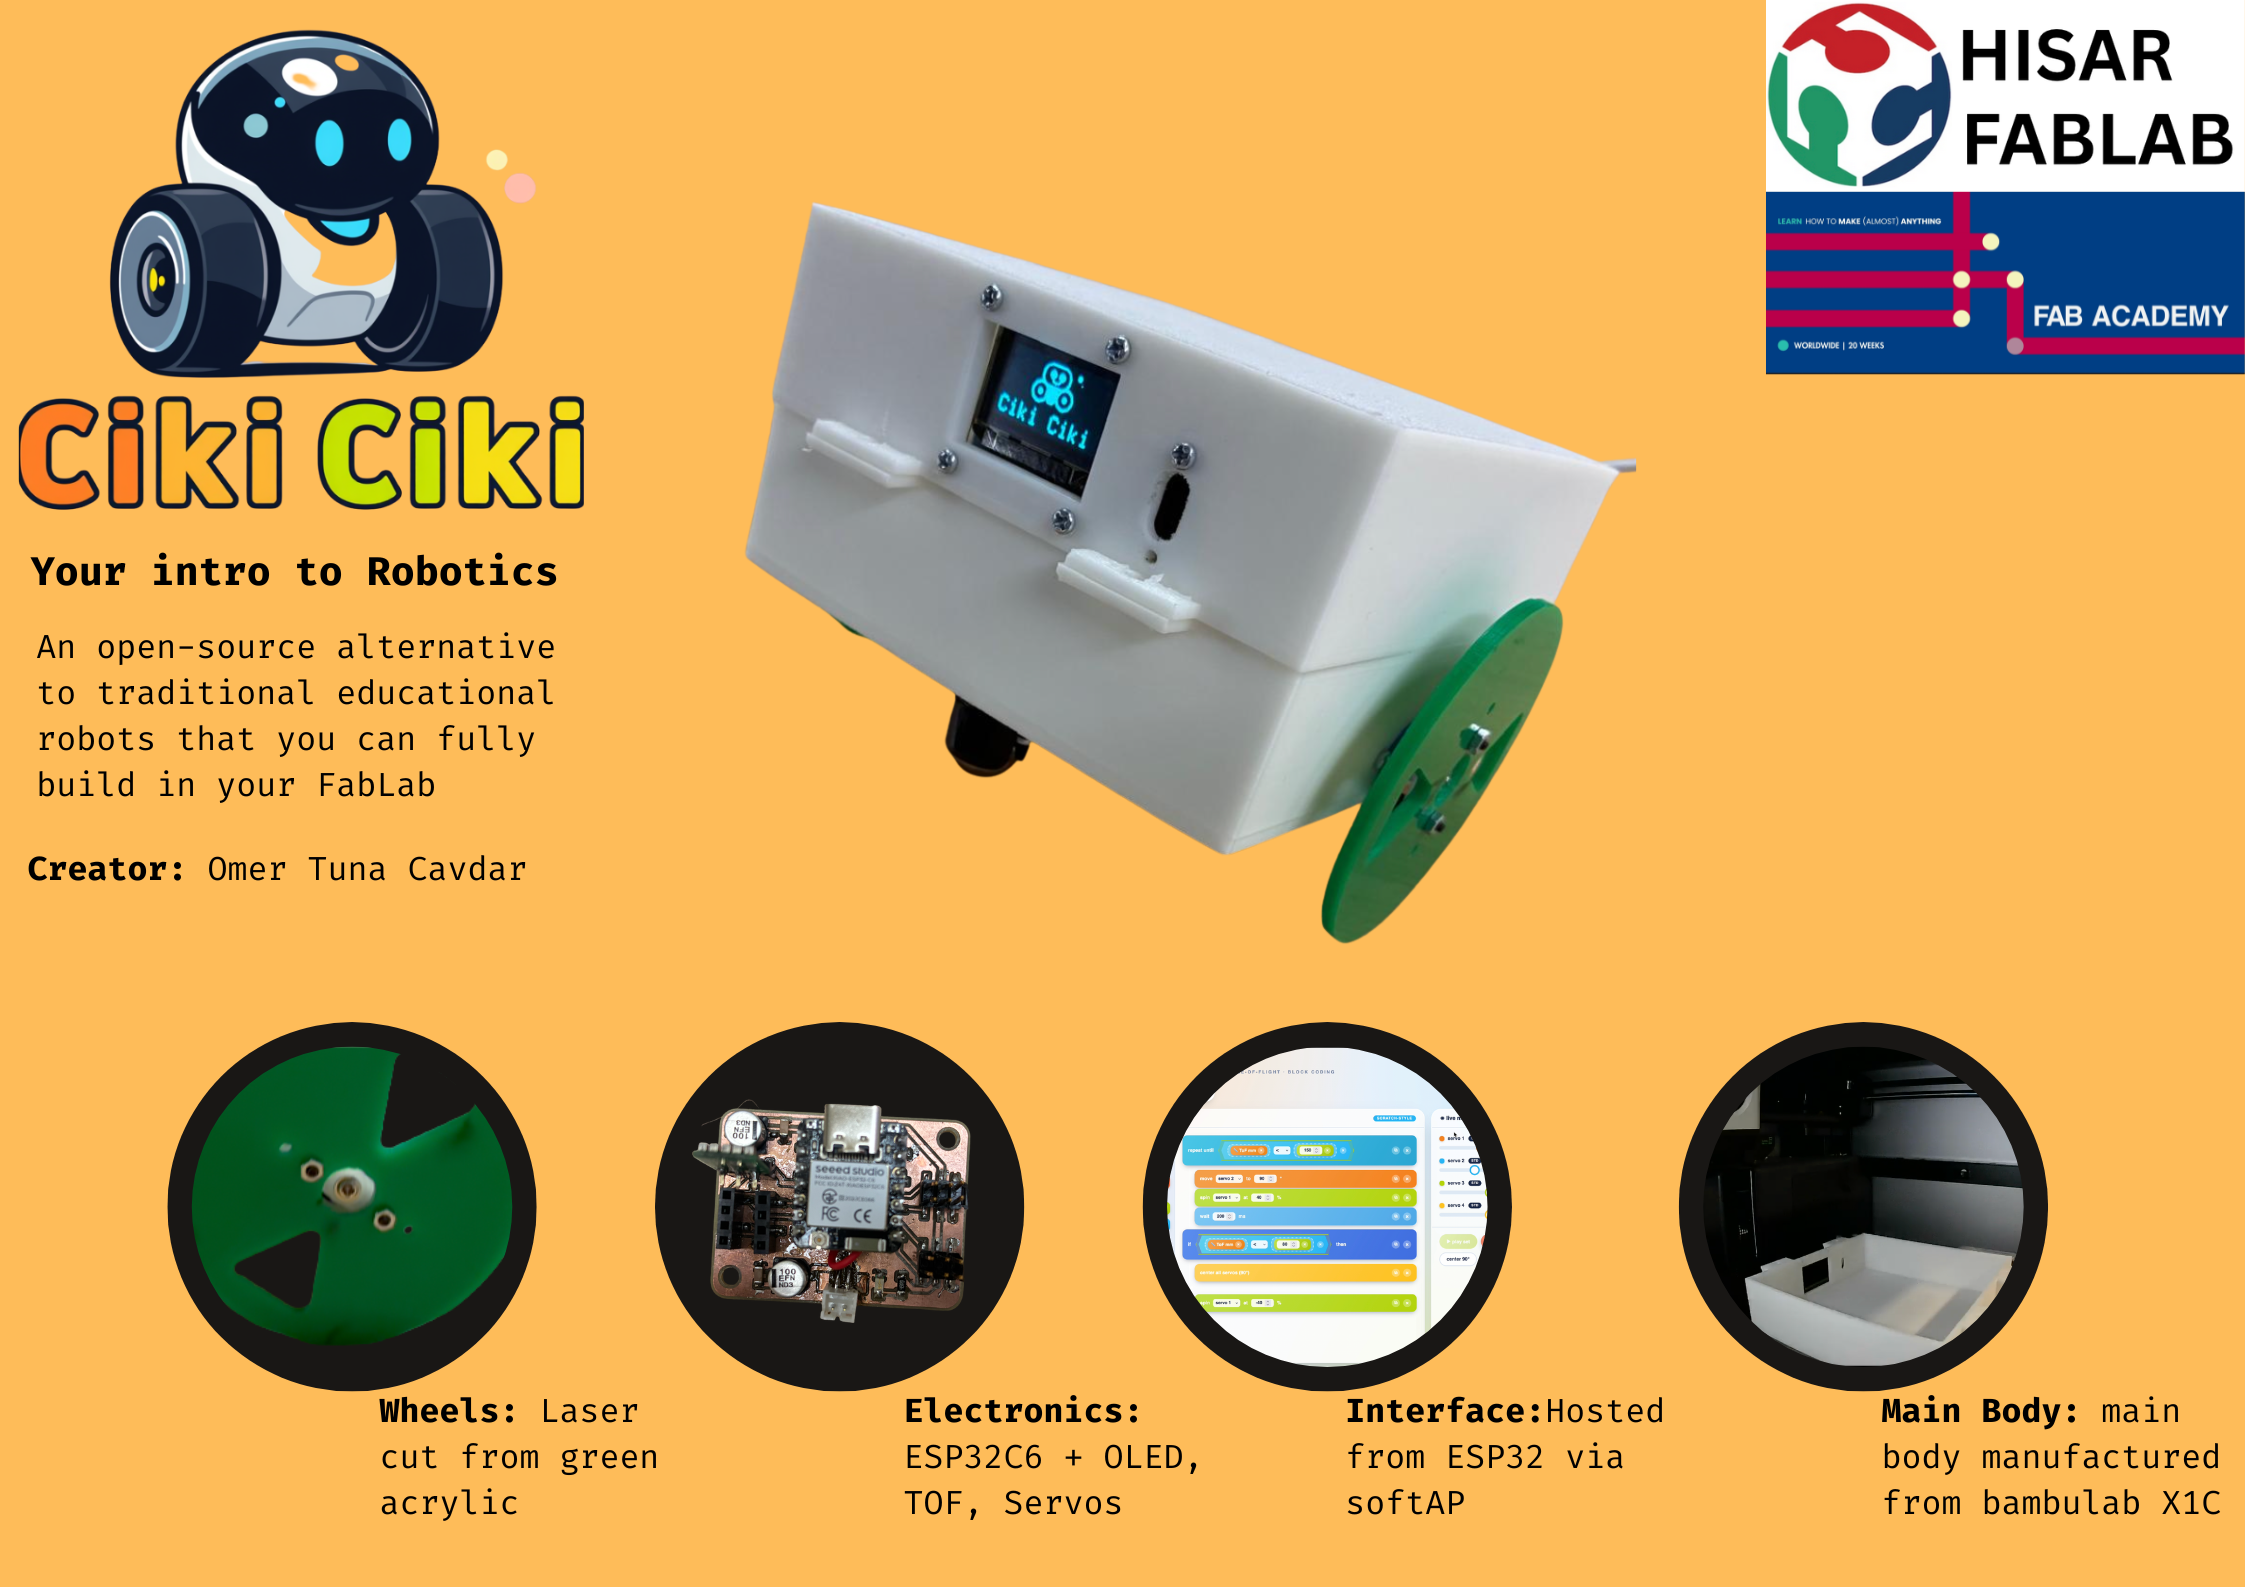
Featured image of post Final Project

Final Project

Is it done yet

Ciki Ciki(Not sure of the name)

What is it?

CikiCiki is a Land Based Open source modular robot education kit mainly focused on primary and middle school kids which aims to teach them basic robotics programming, mechanical mechanism, tinkering(what I mean to say is that a lot students some how have not seen a type of fastener or have seen it and has no clue what it does) etc_

Why is it?

_There is lots of similar educational kits like the Mbot which also our institution use but these educational kits are designed so that they only work within their ecosystem so if I was a High school senior or a University student that wanted to improve on the educational kit that wanted to improve or have an addition to one of these kits I wouldn’t be able to and since it is a closed system and the kits and modules start to add in price as well they are relatively expensive on their own but when you decide to buy them in numbers for example for a workshop as an edu institution it adds up quickly. The second reason of the existence of this project aside from being a fully open source alternative is the fact that it is to be designed to be fully modular so ideally you should be able to upgrade or make addition to this kits without reproducing the whole thing. And the final reason that this project exists is that it will reimagine an old concept so many of the robotics edu kits do not support ai integration on audio feedback, visual recognition or personality.

In short

  • It is an edu robot ment for primary and middle school students
  • It aims to be an open source alternative to existing retail solutions 
  • It aims to teach kids about software Along side mechanics and electronics on a basic level
  • It aims to be modular and the software to support you to add and build your own modules (Example module categories can be driving/movement systems, Sensors like ultrasonic or camera, out put devices like speakers or led matrices or even mechanical mechanism like arms or elevators)
  • It aims to integrate AI so users can program their own robots behavior and/or embed other models to achieve autonomous driving or other various tasks
  • It’s software aims to be a web based block programming focused text based programming optional user friendly software

Challenges(At least the ones I foresee)

  • How to achieve a simple block coddle way of programming behavior with ai that has a educational meaning and is also simple enough for the age range and block code
  • How to make electronically connections of the modules so it is flexible and robust enough also being accessible and easy to use
  • How to design the main module so it keeps a slim profile while being able to pack enough futures for module expendability(Ports spare motors etc)

Similar Project

Mbot 2

What is it?

it is the 2nd version of the one of the most popular edu robots by make block that aims to integrate concepts voice input, Enviorment interaction(they call it this it is image processing with a bit of more sensor data involved) they have more then 1 version of the mbot2(it is the same main frame with other add ons) like a rover one which changes the drivetrain from a 2 wheel supported by a caster wheel to a tank drive system. It has a smart world add-on which basicly allows for interaction with the world via mechanical mechanisms like a claw.

In short

  • Commercially available product that offers a classroom or a individual robot solution
  • Offers to integrate newer concepts through ai
  • offers digital fab solution through modulated electronics
  • They offer C and U chanelles and mechanical componenets to kids to build custom mechanical mechanisms using on board electronics

Example mBot project

Hp Otto

What is it?

The HP Robots Otto is a modular edu robot that focuses on modularity

In short

  • Modular, programmable robot
  • Obstacle avoidance
  • Line following sensors
  • Addressable color changing RGB lights
  • Integrated buzzer robot sounds
  • Wi-Fi connectivity
  • USB-C serial communication
  • Easy-clip connectors and no soldering is required

Otto example project Otto expansion example

Ciki Ciki Future List

  • Fully Open Source
  • 2 style drivetrain systems that are quick changable like otto and room for expension.
  • Additional spare motor outputs so it can power mechanical mechanism modules
  • Sensor modules with quick connection
    • Ultrasonic
    • Light
    • Color
    • Humidity and Temparature
  • built in sensors and output devices for basic and core functionality
    • Camera and image proccesing capibilities to make the robot have emitions and autonomus drive
    • IMU for both driving and detecting real world interaction like shaking
    • Round displays for displaying emotions
    • 2 spare motors for mechanical modules
    • 2 motors for the drivetrain
  • Plug and Play (Built by students pre designed) Mechanical Mechanisms
    • Pivot Basket
    • Claw
    • Elevator with Basket
  • WebApp:
    • Block code capabilities
    • Python Support
    • Behaviour Coding Support
    • Pose Estimation Support
    • Autonomus driving coding support
    • Course Material for Educators
    • Tutorials for Individual users

A pivot

So Unfortunatly I wasn’t able devote as much time to FabAcademy as I had hoped since other work related responsibilities has increased and thus I wanted to update my project so it would resamble the one I wanted to do but a bit more simpler. We as the Hisar Fablab have hosted an Robotics demo event this weekend for the FTC a middle school robotics program from FIRST a US based NGO that has theese programs internationally and also here in Turkey. There a co-host of ours from an other schools has mentioned wanting to buy XRP robotics kits. I want to do something similar since customs here in Turkey is a burden esspacialy buying for a classroom and also at this time this product is out of stock. I want to do something similar so fablabs or maker labs in similar citiations like ours in K-12 instution can build it from sckratch and I also want to add my own twist to it. I started by designing the V1 board to run some servos, sensors and motors, I used pico in my design similar to the orginal XRP which futures a RP2040 based board. I plan to use a Pico 2 so it will have the newer RP350. More on the V1 board desing can be found in my Electronics design week. So the final design hopefully will be a 2 motor little education kit robot that you can modify by pulliging in different sensors and motors/servos to modify and be able drive around that can be produced by anybody with accses to a Fablab.

Final Project Progress:

Version 1

For version 1 wanted to do something similar to the XRP robot.

Pico PCB:

So I tried to design a PCB for driving dc motors. I opted for using the TB67H451AFNG,EL that is also in the Fab Inventory for driving my brushed dc motors. I had two of them so I can drive two dc motors I used screw terminals for the connection to motors and included female sockets for driving servos and sensors. You can see more details about this V1 PCB at my Electronics Design Weekly Assingment. PicoPCB

Version 1 3D Design

I started by exporting my PCB as a Step File in KiCad to design a simple body to house the PCB and other electronic components. I used fusion 360 for my design. You can find more about this design in my Computer Aided Design Assignment Version1Design

Version 2

So since I wasn’t able to properly solder the DC motor drivers pads and I want to the design a bit more simple and accsesible I opted go a bit more in the direction of Otto by Hp and it’s predecessor DIY Otto which is also open source By using continuous rotation servos instead of dc motors

Esp32c6 PCB

So I updated my PCB to use a Xiao board esp32c6 to drive 4 servos 1 I2C Oled display and an 4 pin sensor at the same time. I used a 1S Lipo battery which is 1050mah to power the circuit for charging and 3v3 voltage regulation I used the Xiao’s Batt pins which have integrated charging and voltage regulation for 1S lipo’s. I used a boost converter by polulu to step up the 3.7 volts from t!he 1S lipo to 5 volts for powering the servo motors. I also Included 100uf al cap capacitors on both the battery line and the 5 volt line as well as 0.1 uf decoupling capacitor.

Servo Test video #### 3D Design I tried to make a simple design which would have the xiao encolsed with the servos similar to the Otto which would have laser cut wheels and a 3d chassis I would Use M3 bolts and brass insert nuts to fasten everything.

Closed View

Internal View

This is the initial design to test everything. Also I want to adda turn on and off switch will not cut the connection of the xiao to the battery to enable charging while powered of since I use the Xiao’s usb-c for that.

Built with Hugo
Theme Stack designed by Jimmy