Week 5. 3D Scanning and Printing
Group Assignment
This week, Areg introduced us to our 3D printers, specifically:
We divided the printers among ourselves: I printed on the Qidi, Zhirayr worked with the Enders, and Derenik used the Elegoo Neptune.
We performed various tests on these printers, including:
Temperature Test

Temp test is Determining the optimal printing temperature for a filament by printing a model with varying temperatures to identify the best quality setting.
Maximum Volumetric Speed Test

This test is measuring how fast the printer can push filament through the nozzle before under-extrusion occurs, helping to set speed limits.
Tolerance Test

Tolerance test is Evaluating the printer’s ability to print precise clearances by testing different gap sizes to see the smallest it can accurately reproduce.
VFA Test

Vertical Fine Artifacts test is identifying mechanical issues like vibrations or motor inconsistencies by analyzing vertical surface artifacts on printed models.
All results are in our Group Assignments page. There, we describe everything in more detail.
3D Printing
For the 3D printing week, I decided to try printing two parts: a propeller and a check valve. I understand that the propeller can be made subtractively using 6-axis machines, but for my final project, it will be very necessary for me. As for the check valve, it will meet the requirements.
Designing Prop
So, in the computer-controlled cutting week, I already made a propeller, but it was not effective. I decided to design a more realistic and efficient one for better performance.
And as usual, I made the propeller parametric.

To create the blades, I used the solid coil function. By making two coils with a small number of revolutions at the inner and outer diameters, I could use the loft function to form the blade.

Here is how it all looks.(Creating coil in outer diameter.)

As you can see, in the “Revolutions” parameter, I set the value to 0.2. It’s really cool that Fusion understands that using a decimal value means the revolution will be 20% of a full turn.
Here is the second coil:

Then I created a sketch and, using the “Include 3D Geometry” function, I projected lines from the coils.

Using the “Loft” function, I created the blade by selecting the lines I projected in the previous sketch.

Then, by adding fillets, creating a circular pattern, and combining all the bodies, I got a finished propeller.
There was very little left to start printing, but I decided to see what submarine propellers actually look like and realized that I made a design of a fan! 😄
That’s how it should actually look.

This image was taken from an article on Wikimedia, which are free of charge to use.
After that, I made a new design of Prop V2.
Then I exported the prop by right-clicking on the body, selecting “Save as Mesh,” then “Export,” and finally “OK.”

3D Printing Prop
For 3D printing, I used Orca Slicer. First, I imported the STL file.

To get a higher-quality part, I set it to 0.12mm, which means the layer height is smaller, resulting in finer details and a smoother surface finish on the printed part. I also set the infill to 100% so that the part would be as solid as possible.

Then, I added supports and placed them only on the bed.

After selecting “Slice plate,” I got the G-code and simulated the printing path to see the trajectory it would follow.

Here is the simulation of Printing.
Then I exported the G-code file to a flash drive and started printing.
I assembled it on the shaft and it looks good.

Designing Check Valve
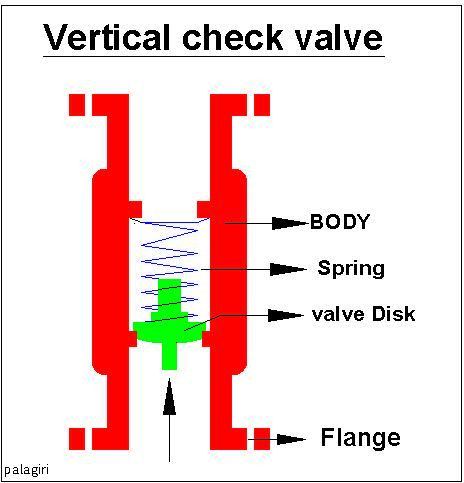
What is Check Valve?
For first I want to describe you what is check valve.

This image was taken from an article on Wikimedia, which are free of charge to use.
A check valve is a type of valve that allows water or air to flow in only one direction. Inside, there is usually a ball or some kind of spring-loaded closure that ensures flow in only one direction.
Designing and Printing Valve
I made several designs of check valves—big, small, with a ball, and with a cone—and here is what I got.

I first tried making it with and without a spring. At the same time, I attempted to print the ball together with the housing so that I could later insert the spring and continue printing. I Added a pause in slicer to add the spring.

Adding the spring.

Here is the timelaps.
And it failed. The spring was not strong and also ball was not smooth so there are lot of leaks.
Then I Started to design valve with conical ball to make leaks off.

And during slicing, I set a pause to insert the valve and spring into the case.

On the valve, where the conical part is, I applied silicone glue to prevent leaks.

Then I placed the valve with the spring into the case and continued the printing.

This is the timelaps of printing.
Testing Valve
I came across a wheel inner tube from an air compressor, and I decided to test my check valve on it.
Visually, the valve works, but it was clear that there must be some leaks… So I decided to test it in water.
In the future, I plan to add a rubber seal or even try printing a seal and testing it. I will publish all of this sometime later when I have time for this experiment.
3D Scaning
For 3D scanning, I used the Sense 1-st Generation scanner.
As strange as it may sound, I scanned a vacuum cleaner. Sometimes the most interesting things to scan are the unexpected ones! 😄

I placed the vacuum cleaner on the table and started scanning.

Then, using the Sense scanner software, I fixed the poorly scanned surfaces by making them smoother.

Since I wanted to print in different colors, I split the vacuum cleaner hose in Fusion 360.

Here is the model in slicer.

Printing process.
Here is the final Result of Vacuum Cleaner.

Conclusion
Technology is developing very fast, and there are many different 3D printers that print with various materials. However, despite this, it is very important to run tests to understand the printer’s capabilities, regardless of its price. I was very impressed by testing different printers and learned a lot about our printers.
I am also interested in how to make parts waterproof. I watched several videos and read various articles on websites, and I will continue working on this because it is very important for my final project (the submarine).
Regarding 3D scanning, I used a scanner that is not very popular or user-friendly, as the reviews for this device are not good. During scanning, I noticed many frustrating moments, especially when tracking was lost. However, I found it very interesting, and I also want to mention that the background and scanning setup are very important to getting a good scan.
Files of this Week
- Prop V1 (Fusion 360)
- Prop V2 (Fusion 360)
- Check Valve V1 (Fusion 360)
- Check Valve V2 (Fusion 360)
- Vacuum Cleaner Model