Computer-Aided Design
Assignment
- Model (raster, vector, 2D, 3D, render, animate, simulate, …) a possible final project, compress your images and videos, and post it on your class page
To-Do List:
- Modelled experimental objects/part of a possible project in 2D and 3D software
- Shown how you did it with words/images/screenshots
- Included your original design files
Learning-Outcomes:
- Evaluate and select 2D and 3D software
- Demonstrate and describe processes used in modelling with 2D and 3D software
Time Management
Here is my updated timetable for this week. As Professor Neil mentioned about Supply-side time management, I will try to apply it throughout this course.

You can access my timetable here.
2D Design
Types of Images
After the class with Professor Neil, I found out that there are two types of images- raster image and vector image.

Raster images are images made up of pixels, each with its specific colour and position. When scaling up raster images, they lose their quality as they rely on a fixed resolution. JPEG, PNG, and BMP are some examples.
Vector images, on the other hand are made up of mathematical equations, instead of pixels. It can be scaled up without losing the quality of the images. Some examples of Vector images are SVG, AI, and EPS.
GIMP
For 2D designing, I started off with GIMP. GIMP, which stands for GNU Image Manipulation Program, is a free and open-source raster graphics editor which offers various tools for image manipulation, image editing, and many more. You can download GIMP by clicking here. It will take you to a website where you can press on the download tap for your operating system.
I already had a basic understanding of how GIMP was suppposed to work thanks to the local classes. Here is a screenshot of how the zoom class looked like while we were learning GIMP:

Removing background
To learn how to remove the background from any image, I used this tutorial. This is how you do it:
-
Once you have opened GIMP, go to Files and tap on Open. There, choose the image you want to remove the background from:

-
Next, go to ‘Layer’, then ‘Transparency’, and ‘Add Alpha Channel’.

-
You need to select your subject. This can be done by selecting the free select tool in the toolbox. An easier way to do this is by simply pressing ‘F’ on your keyboard.

-
Now, outline your subject node after node by clicking along the edges of your subject. If you made a mistake, you can enter ‘backspace’. Click ‘enter’ once you are done. This is what my image looks like afterwards:

-
Next, under ‘Free select’, select ‘subtract from the current selection’.

-
Go to select and tap on ‘invert’.

-
Finally, go to ‘edit’ and tap on ‘clear’.

-
To place our subject somewhere, go to ‘select’ and ‘copy’. Now, open a new image(like a place for your subject to be pasted). Then, select your second image, go to ‘edit’, ‘paste as’, and enter ‘new layer’.

-
You can scale your image by pressing here:

You can also move your subject by clicking on the ‘move’ icon.
-
Finally export your image. If you are just exporting your first image without the background, make sure to convert it into png first!
Here are the results(of a chill dude in Bhutan):

This is the picture of a chill dude without its background:

Inkscape
Inkscape is a vector graphics editor to create and edit scalable vector graphics(SVG). It is mainly used for designing logos, create illustrations, and many more. You can download Inkscape by clicking here.
During our local session, we also went through a simple tutorial to get started with Inkscape.

For context, this is what the user interface of inkscape looks like:

For my logo, I wanted to draw a lock symbolising security with the text ‘iManage’(the name of my project) in the middle.
I went through the following tutorials to make my logo:
These are the steps I went through to create my logo:
-
I changed the dimensions of the page to 200 by 200. To do so, press ‘ctrl + shift and then D’ in your computer. This will open the ‘Document Properties’ from which you can change the width and height of your page.

-
If you want to align the box to the centre, you can do so in the Align and Distribute menu.

-
I dragged a rectangle from the toolbox, changed its color, and smoothed out its edges.

-
Then, I used the pen tool to add more features to my lock.

-
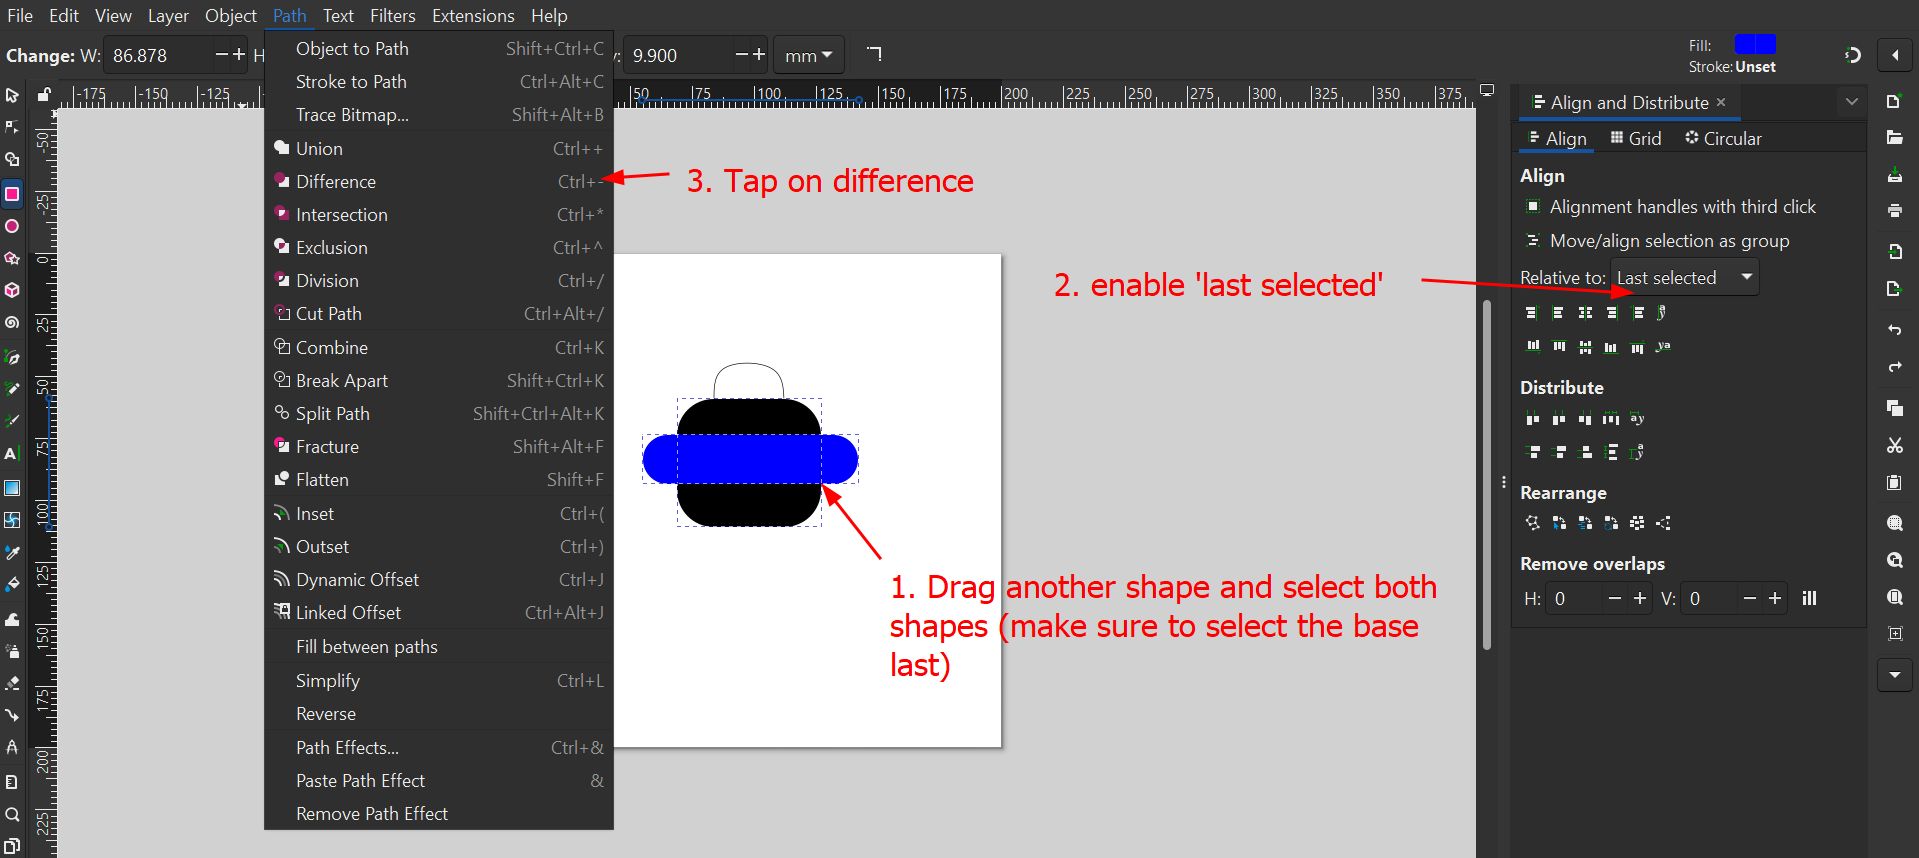
To create a space in the middle of the box, I dragged a square (you can choose any shape in accordance to the shape you’re are going for).
Note: If you’re aligning just one object, you don’t need to enable “Last Selected”. That option is used when aligning two or more objects relative to one another.
-
To write down my text, I selected the text tool.

-
After editing it a bit, I ended up with this final logo!

3D Design
Blender
To download Blender, you can go through this tutorial.
We had local session on Blender with Rico where we got the basics we needed for us to work on the software. First, he introduced us to the workspace which consisted of the model space, outliner, properties panel, and many more.

Here is a list of some basic shortcuts along with its functionalities that we used throughout the class:
-
Add commands : ctrl + A Transformation commands :
-
Move the object : G + X/Y/Z
- Scale the object : S + X/Y/Z
- Rotate : R + X/Y/Z
- Cancle : esc
- Undo commands : ctrl + Z
- Group nodes : ctrl + J
- Duplicate : ctrl + D
- Name the group of nodes : fn + F2
To work on our design, we enabled the Geometry Nodes Editor, which resulted in two default nodes: Group Input and Group Output.

Click ‘Shift+A’ to add nodes. Here, we added the ‘transform geometry’ node.

I was not able to document the whole process since the class was very fast-paced but this is what my Geometry Workspace looks like in the end with an addtion of a few more nodes:

We can also group nodes together by selecting the nodes you want to group together and pressing ‘ctrl + G’.

This is the result. It doesn’t look THAT great but the process is what matters(right?).

Unfortunately, the blender file of the above is not available, so I was not able to put it here.
Fusion 360
Fusion 360 is a 3D computer-aided design (CAD) software developed by Autodesk. It integrates various aspects of product development, such as design, engineering, simulation, and manufacturing, into one platform.
You can download Fusion 360 by visiting this link.
Here is a screenshot of my local class when we were learning Fusion 360:

I went throught this beginner’s tutorial to make a lego block. You can follow along step by step here:
-
Let us get familiar with the workspace first.
-
I restored my ‘defaults settings’ to make it easier to follow along the tutorial.


-
To 3D model our toy block, we will create a new component for each new part. To do so, go to ‘assemble’ and ‘new component’

Give it a name and press ‘Ok’ once you are done. The component will be listed in your Fusion 360 browser.

-
We will start by designing the 2D sketch first. Click on ‘Create sketch’. This should enable you to select 1 of the 3 planes(one for each axis). Select the bottom XY origin plane.
-
From the toolbar, select the rectangle.

-
With the mouse cursor at the origin point, drag it to form the square. Input the values of its dimensions.


-
Now, we shall extrude our design. Select ‘Ok’ once you are done.

-
To create the circles on the top, go to ‘sketch’ and select the top of the box as your plane. Then, select the circle on the toolbar.

-
On top of your plane, create a circle by dragging your mouse. Press ‘enter’. You will be able to move the circle

-
Select the dimension tool from the toolbar. Select the center of your circle and the top edge of the rectangle and drag it out. Repeat the step in the other direction. Set its values as the following:

-
Extrude the circle.

-
In the toolbar, select the ‘rectangular pattern’. Set the object type to ‘features’ and select your axes. The circle will be able to get duplicated in the direction of your selected axes.

-
Enter the following values in the dialouge box.

-
This is what it looks like. However, we still need to make the hole at the bottom of the box.

-
Go to ‘Modify’ and ‘Shell’. Select the bottom phase of the block. Define the thickness of the inside of the box as 1.49 mm.
-
To make the three center columns at the bottom, select the base and create sketch. Select the line command from the toolbar. Make sure that your line type is ‘construction’. Now make a line from one circle to the other like so:

-
Create another circle like so.

-
Select ‘offset’ from ‘modify’ and set the distance to 1mm. Then extrude it. Using the rectangular pattern, duplicate the shape created.

-
To smooth out the edges, select ‘fillet’ from the toolbox, and select your edges. Specify radius value to 0.2 mm.
Here are the results:
This tutorial was very helpful to me. I was able to get familiar with Fusion 360’s user interface.
Designing the structure of my final project
My iPad Management System (a.k.a iManage) will consist of a box with 4 compartments inside. In Fusion 360, I created the box with the compartments. As for the door hinges, I think I will buy them and attach them manually instead of designing and 3D printing them since it will be more durable and stronger that way.
To create the box without the door, I went through this tutorial. If you went through my above tutorial on how to create a lego block, I’m assuming you must’ve gotten hang of the basic user interface of Fusion 360.
-
For the box, I firstly created a sketch with the following dimensions. I then extruded it by 1 cm.

-
I then created an offset of -1 cm on the front of the box. I extruded it by 30 cm.

-
I created another skecth like so.

-
I extuded it as well by 30 cm.

Here are the results:
AI Tools
Stable Diffusion AI
Stable Diffusion AI is a generative AI model that produces unique and realistic images from the users’ prompt.
You can access the AI by clicking here
Stable Diffusion is a generative artificial intelligence (generative AI) model that produces unique photorealistic images from text and image prompts. It originally launched in 2022. *- Stable Diffusion website
This is the prompt I entered:

It generated me this image:

I am not that impressed with the result, so let’s try some more AI tools!
Midjourney
Midjourney is also another genrative AI tool, which generates images from prompts. You can vist its website by clicking here.
We are a small self-funded team focused on design, human infrastructure, and AI. - Midjourney website
After I signed in, I was hit with the realisation that we have to pay for the software😭 Therefore, I resorted to other softwares.
Dall-E
Let us try to generate some images using DALL-E. Hopefully, it will give us some good results this time.
Like GPT-3, DALL·E is a transformer language model. It receives both the text and the image as a single stream of data containing up to 1280 tokens, and is trained using maximum likelihood to generate all of the tokens, one after another. *- Dall-E website
This is the link for Dall-E 3, which is the latest version right now. The website took me to chatGPT and this is the prompt I entered:

The result:

I made some adjustments and it looks like this:

Meshy AI
Meshy is a very powerful AI tool used to generate 3D models and animations from images and prompts entered by the user. I used it to generate a 3D model of my final project. You can visit its website by clicking here.
Meshy is an AI 3D model generator that helps 3D artists, game developers, 3D printing hobbyists and XR prototypers to turn text and images into high-quality 3D models. It streamlines the process of 3D modeling and animation, empowering millions of people who have no prior 3D knowledge to create stunning 3D assets and unleash their creativity. -Meshy website
This is my prompt:
design a box with 4 compartments inside. The front of the box should look like the face of a robot. its eyes will the rfid scanner. when it is scanned it will be opened, revealing a box with 4 horizontal comaprtments. That is where i will keep an ipad in. One compartment should be able to fit in one iPad.
The results:
design_a_box_with_4_c_0201162921_texture_obj
by tsheyangPT
on Sketchfab
Text-to-CAD
This is the second AI I am trying out to generate a 3D model. You can access website here.
I entered the same prompt I had used for the previous website, but sadly it wasn’t able to do a very good job😔

Logo Maker
Since I needed some inspiration for my logo, I searched for an AI that can generate logos based off of texts. That is when I came across Logo Maker. You can visit it here.
After entering the name of my device (iManage) and some other questions, I chose 5 words as the keywords for my logo.

It generated a lot of logos. This is the one I liked the best:
![]()
How do I embed 3D models on my website?
After you are done publishing your work in sketchfab, tab on ‘Embed’.

Click on the ‘copy to clipboard’ tap.

Paste it in your HTML file or Markdown-supported platform.
Additional Softwares
Some important softwares that I used for documenting are Flameshot(for taking screenshots and editing them) and XnConvert(to compress files).
Flameshot

Flameshot is a powerful, open-source screenshot tool designed for Linux, Windows, and macOS. It allows users to capture, annotate, and edit screenshots quickly and efficiently. Here are some of the basic instructions you should follow to start:
mouse: select screenshot area
Ctrl + S: save screenshot
Ctrl + C: Copy selection to clipboard
Mouse wheel: chang tool size
Right click: chnage color
Space: open side panel
Esc: exit
XnConvert

XnConvert is a very user-friendly application that reduces the sizes of images by a very significant amount. Here is how you use it.
- Input

- Action

- Output

Video editing and compressing
Unfortunately I had some trouble downloading Fmpeg, which was the recommended app for video editing and compression😔
However, my support instructors mentioned that we can find some websites online which serves the same purpose.
Video compressor: FreeConvert
I use FreeConvert to compress all my videos. You can access the link to it here.
Video Trimmer: Online Video Trimmer
I use this online website to trim videos that are way too long. It is very easy to use.
Note: I usually don’t edit my videos much. When I have to crop it though, I directly do it from my gallery.
Original Design Files
Thank You!
The template for this website was provided by Mr. Anith Ghalley and used with his permission