4. Embedded Programming
Tasks
-
Individual
- Browse through the data sheet for a microcontroller.
- Write a program for a microcontroller and simulate its operation.
-
Group
- demonstrate and compare the toolchains and development workflows for available embedded architectures.
Data Sheet
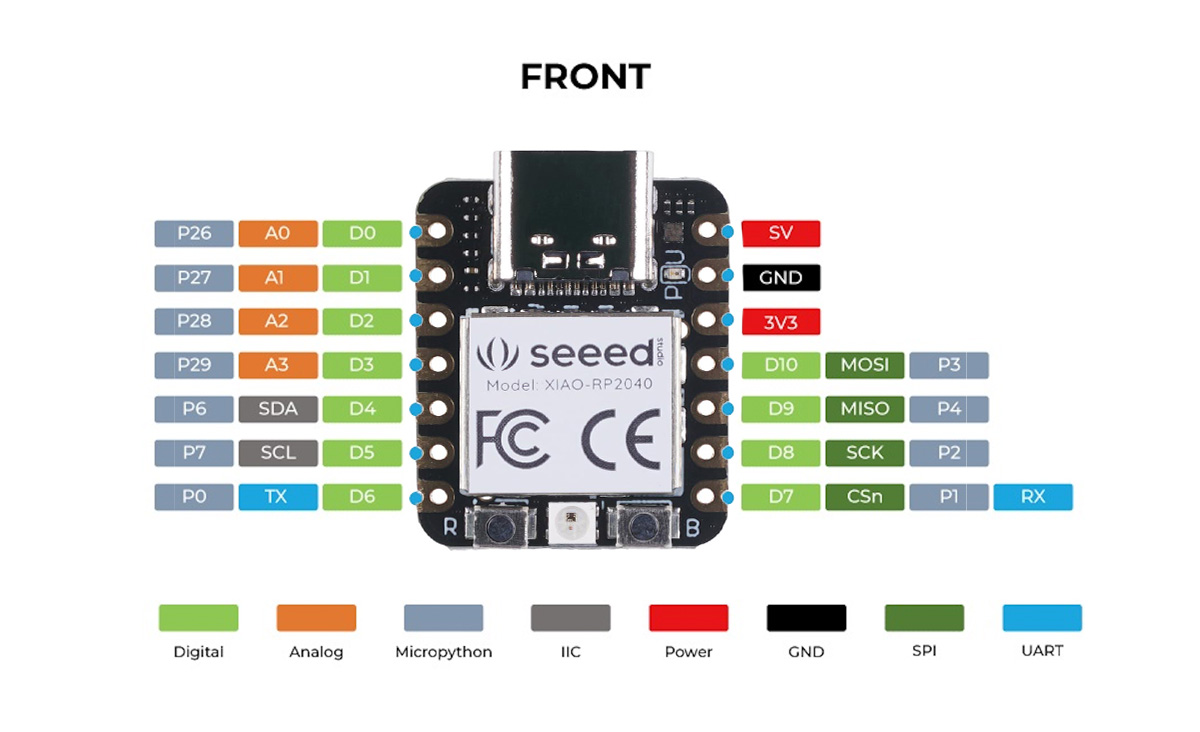
Here is the PDF for the data sheet of the XIAO RP2040.
Summary RP2040:
The RP2040 is a low cost high-performace microcontroller made y Raspberry Pi. It has a dual arm cortex-M0+ processor core that runs up to 133 MHz, 264 KB of embedded SRAM, and supports for up to 16 MB of external flash memory. The chip offers 30 multifunction of GPIO pins, with additional dedicated pins for SPI flash it includes hardware support for common peripherals. Other features are a 4-channe 12-bit ADC, USB 1.1 host support, and various low-power modes for battery-powered applications.
Here Here is the PDF for the data sheet of the ESP-32_C3
Summary for ESP-32_C3:
The Seeed Studio XIAO ESP32C3 is a compact IoT development board featuring the Espressif ESP32-C3 SoC, which includes a 32-bit RISC-V single-core processor operating at up to 160 MHz. It supports IEEE 802.11 b/g/n Wi-Fi and Bluetooth 5 protocols, with an external antenna to enhance wireless performance. The board offers 400 KB of SRAM, 4 MB of onboard flash memory, and various interfaces: 1x I2C, 1x SPI, 1x I2S, 2x UART, 11x GPIO , and 4x ADC. Additional features include a built-in battery charging chip, a reset button, and a bootloader mode button. Its small form factor makes it suitable for wearable devices and compact projects.
Here is the PDF for the data sheet of the ATTiny412.
The ATtiny412 is an 8-bit microcontroller from Microchip’s tinyAVR® 1-series, featuring a high-performance AVR RISC architecture running at up to 20 MHz. It has 4 KB of in-system self-programmable Flash memory, 256 bytes of SRAM, and 128 bytes of EEPROM. The device includes a variety of peripherals: a 16-bit Timer/Counter Type A with three compare channels, a 16-bit Timer/Counter Type B with input capture, a 12-bit Timer/Counter Type D optimized for control applications, a 16-bit Real-Time Counter, and communication interfaces such as USART, SPI, and TWI. Analog features comprise a 10-bit ADC, an 8-bit DAC, and an Analog Comparator with low propagation delay. Additional functionalities include a 6-channel Event System, Configurable Custom Logic with two programmable lookup tables, and multiple clock options, including internal oscillators and external crystal support. The ATtiny412 is available in an 8-pin SOIC package and supports operating temperatures up to 125°C
For my group assignment, I was assigned the ESP32-C3. I demonstrated the toolchain setup and developed a structured workflow for the C3. This allowed for a comparison with other microcontrollers.
Here is the link to my group’s site
XIAO ESP-32-C3
First I used WokWi to simulate C++ blinking LED using a button for a C3.
 My original code for this did not work so I asked Tyler Russell for help and he provided me this code to stimulate the C3.
int buttonState = 0;

void setup()
{
 pinMode(D6, INPUT);
 pinMode(D2, OUTPUT);
}


void loop()
{
 // read the state of the pushbutton value
 buttonState = digitalRead(D6);
 // check if pushbutton is pressed.  if it is, the
 // buttonState is HIGH
 if (buttonState == HIGH) {
   // turn LED on
   digitalWrite(D2, HIGH);
 } else {
   // turn LED off
   digitalWrite(D2, LOW);
 }
 delay(10); // Delay a little bit to improve simulation performance
}
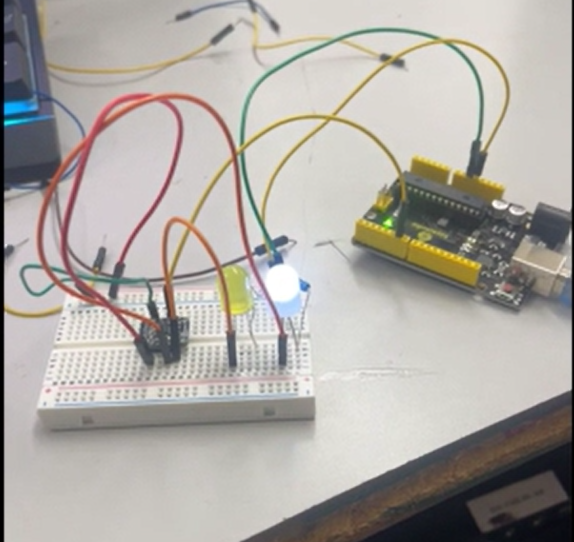
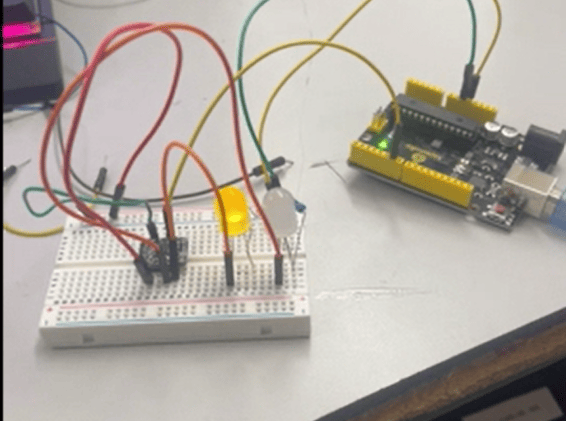
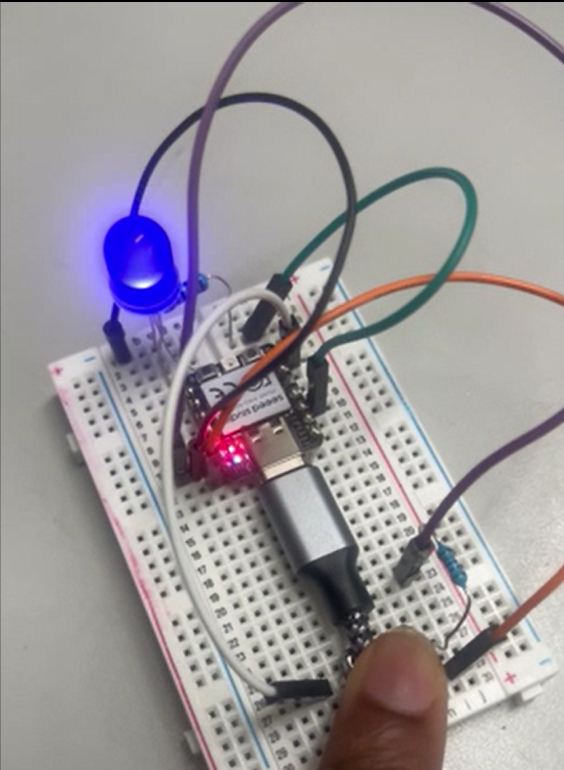
I then took the C++ code and used Arduino IDE to light up. The only problem with this was my button placement. I placed my button across the USB-C port, so it was over the button when I put the cord in the C3.


After I got my WokWi simulation working and lit up my LED using ardunio IDE, I followed this tutorial to download and set up Thonny onto my device.
First I downloaded Thonny and when I was in Thonny I went into tools and selected options. In the option I go under the interpreter tab and select MicroPython ESP32.

After I choose my device I plug my C3 while holding the boot button on it. After my device is plugged in I go back into the interpreter and select Install or update MicroPython(esptool) I then select these options to install esptool.

After I successfully installed Thonny, I asked ChatGPT to change my original C++ code to micro python language.
from machine import Pin
import time

# Setup pin modes
button = Pin(0, Pin.IN, Pin.PULL_UP)  # GPIO 6 (D6 pin) as input with internal pull-up resistor
led = Pin(28, Pin.OUT)                 # GPIO 2 (D2 pin) as output

while True:
    # Read the state of the button
    button_state = button.value()

    # If the button is pressed, the button_state will be 0 (since we use a pull-up resistor)
    if button_state == 1:
        led.value(1)  # Turn LED on
    else:
        led.value(0)  # Turn LED off

    time.sleep(0.01)  # Delay a little bit to improve simulation performance
I used this code given to me by Chatgpt and put it into Thonny.

ATTINY412
To blink a ATtiny I first had install ardunio Uno and then to upload the library onto it. I followed Teddy Warner’s documation to install the jtag2updi library. His documentation led me to this link, where I then downloaded the library.
 I then went into the jtag2updi, unzipped it, and opened this file in arduino.

Once I downloaded the library I went to File and then to Preferences. In preferences I pasted the URL provided by Mr. Dubick into Addional Board Manager URL(https://raw.githubusercontent.com/espressif/arduino-esp32/gh-pages/package_esp32_index.json).
Then under Tools I went to Board and selected ATtiny 412/402/212/202. Once I set it up I connect my 412 using an ardunio and uploaded the library.

I then went to file then examples and selected 01.basics and finaly blink. I then changed the code to match the my selected pins on the 412 and connected it to an Arduino Uno.
void setup() {
// put your setup code here, to run once:
}
void loop() {
// put your main code here, to run repeatedly:
}
// the setup function runs once when you press reset or power the board
void setup ()
// initialize digital pin LED_BUILTIN as an output.
pinMode (2, OUTPUT) ;
pinMode (1 OUTPUT) ;
// the loop function runs over and over again forever
void loop() {
digitalWrite (2, HIGH): // turn the LED on (HIGH is the voltage level)
delay (1000) : // wait for a second
digitalWrite (2, LOW): // turn the LED off by making the voltage LOW
delay (1000) :
digitalWrite (1, HIGH): // turn the LED on (HIGH is the voltage level)
delay (500) : // wait for a second
digitalWrite (1, LOW) : // turn the LED off by making the voltage LOW
delay (500) ;
}
```
## XIAO RP2040
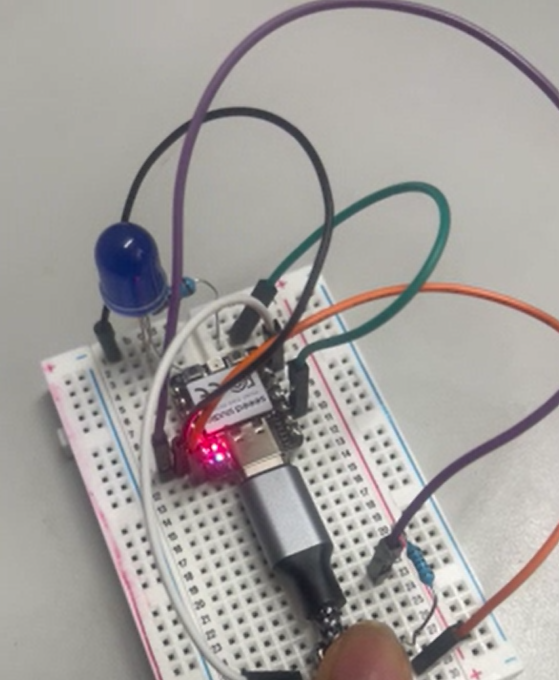
Here is my Wokwi simulation for a the RP2040. I had to use raspberry pi pico 2020 since the exact 2040 was not availiable on Wokwi

I then asked chatgpt to give me a code that blinks a LED using a pushbutton. This was the code it provided me:
Int buttonState = 0;
void setup() { pinMode(6, INPUT_PULLUP); // GPIO 6 as input with pull-up resistor for the button pinMode(2, OUTPUT); // GPIO 2 as output for the LED }
void loop() { // Read the state of the pushbutton buttonState = digitalRead(6); // Read the state of GPIO 6 (button)
// Check if the pushbutton is pressed. If it is, buttonState will be LOW (since we use INPUT_PULLUP) if (buttonState == LOW) { // Turn the LED on digitalWrite(2, HIGH); } else { // Turn the LED off digitalWrite(2, LOW); }
delay(10); // Delay to improve simulation performance }
I reviewed the RP2040 pinouts and modified the original code in the Arduino IDE to make sure that it matched.
Here is the video using the RP2040 im Ardunio IDE.
I used [this](https://wiki.seeedstudio.com/XIAO-RP2040-with-MicroPython/) tutorial to light up the RP2040 with micropython.
I then ask Chatgbt to change my C++ code into micropython. This is the code it provided me:
from machine import Pin import time
Set up the button and LED pin
button = Pin(21, Pin.IN) # D6 pin (input for button) led = Pin(4, Pin.OUT) # D2 pin (output for LED)
while True: # Read the state of the pushbutton value buttonState = button.value()
# Check if the button is pressed (buttonState is 1 when pressed)
if buttonState == 1:
    # Turn LED on
    led.value(1)
else:
    # Turn LED off
    led.value(0)

time.sleep(0.01)  # Delay to improve performance
```
Issues I faced
ESP-C3: * I was following the steps on the website to install esptool, but I kept running into issues getting it on my computer. I asked Angel for help, and we figured out that the problem was that I wasn’t running Command Prompt as an administrator. Because of that, every time I tried to install esptool for my C3, it wasn’t actually downloading onto my device. * When I first tried to power up the ESP-C3, it didn’t work. After checking the pinout diagram for the C3, I discovered that the digital pin wasn’t compatible with Thonny. I then realized that the RP2040 pinout diagram I had referenced was specifically labeled for MicroPython.
Reflection of the week
This week, I deepened my understanding of microcontrollers through hands-on experience with the XIAO ESP32-C3, ATtiny412, and XIAO RP2040. I faced several challenges, from debugging simulation issues to installing esptool properly. Seeking help from peers and referencing datasheets helped me overcome these obstacles. Through this process, I improved my problem-solving skills and gained confidence in using both C++ and MicroPython for microcontroller programming. Overall, it was a good experience that reinforced the importance of attention to detail in embedded programming.
Here are my file for this week