Week 1 - Setting Up Gitlab Site
Task: Setup Gitlab on our computers, gain a basic understanding of how to use Gitlab through Visual Studio Code, and setup documentation framework.
Plan and Sketch of a Possible Final Project
For my Fab Academy Final Project, I will partially re-create the remote controlled "hampster ball" known as Sphero(at least the movement abilities of it). I was inspired to make this because one of the reasons I went into engineering was because I was always loved to play with this toy as a kid and always wondered, how does that work?
Sphero Inspiration:

This is a rough sketch of my RC Hampster Ball. The outer casing will be made out of a semi-transparent glass that can open up for replacing batteries and inspecting the inner parts. Also there will be a motor that will be to the shape of the inner case, allowing the ball to move.


In order to carry out this possible final project, I would first need 2 DC motors, LEDs, Gyroscope/Accelerometer, a motor driver, a micro controller, a battery pack, molded plastic shell, and some type of wireless communication unit.
First, I would simulate the electronics to the best of my abilities, actually assemble and test them, and then create all the non-electronic components. Finally I would assemble all the pieces together.
Intro to Gitlab
I was introduced to GitLab through the student bootcamp that explained the basics of using GitLab and what we should expect when using GitLab. Later, Dr. Taylor, an instructor at Charlotte Latin Fab Academy, gave us more specifics and guided us in navigating Gitlab. He also warned us the dangers of overloading the servers and explained how to set it up using this slideshow. In this presentation, we also learned what version control was: a system that manages changes to code that allows us to collaborate on projects, revert to previous versions, and manipulate the timeline. This is similar to the timeline in Fusion 360 that uses version control, which I am familiar with. We are using GIT versus others because of its ability to branch and merge and its speed and performance. Using its branching and merging capabilities, group projects are easy to document. Also, Git is designed for speed and is able to handle large repositories with many commits, which is good for Fab Academy where many commits are happening.
Getting the Repository on my Computer
With the help of my fellow peer, Noah Smith, I was able to set up this website using Markdown as lightweight markup language to make coding the website easier and more efficient. First, I downloaded GitBash. Then, I got my SSH key by entering the following inside my computer's command prompt and replacing the email with the email associated with my GitLab account.
**I also learned that the command prompt does not like using Ctrl+V to paste text. To solve this, I right clicked and selected paste instead.
Generating my SSH Key
When it asks for the file to save your key to, press enter and the key will be automatically be saved inside your files most likely under a file named ".ssh". Then it will ask for a passphrase that you can optionally fill out. After following these steps, your command prompt will give you a square with dots inside. This is your SSH key.
Adding the SSH Key to GitLab
By now, your ssh key will have been generated and saved inside your files.
Then, go to your GitLab and click your profile icon in the top left. Click Preferences/SSH Keys/Add new key.
 Access your key by typing this command after Windows Key + R:
I opened the PUB file by opening in Notepad and copied the text. Going back to GitLab, I pasted the copied text as shown below.
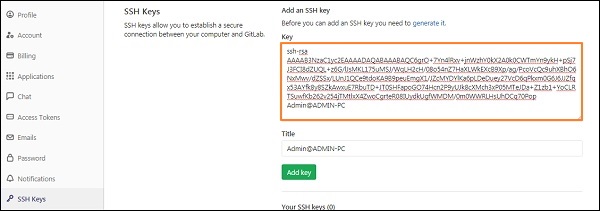
N.B. This is from an example picture I found from this website
Scroll down and make sure the key is set to never expire. I set the usage type to "Authentication & Signing" and then pressed add key.
Installing and Setting Up Visual Studio Code (VS)
I would recommend to use this software because it is easy to edit my documentation, save progress, and commit. It's version control, merging, branching, and multiple project capabilities allow me to document efficiently. To install, download from this website and select your computer's operating software.
Go to your project and click "Code" then copy the text under "Clone with SSH". I opened GitBash and cloned the repository onto my computer by creating a new file then typed the following in GitBash:
Press Enter
Press Enter
Paste your copied text from GitLab. Now my repo is cloned on my computer.
Coding in VS
Between the choices of using HTML and Markdown, I chose Markdown for more efficient documenting. To install MkDocs, I followed this guide and used this reference to help me navigate using Markdown. The reason why I am using MkDocs is because of its live preview feature, making documenting easy when I am not writing blindly and having to commit every time in order to see the product.
Organizing Files in VS
When adding images into my website, I struggled to get the images from my computer's files because I did not know how to reference the image. So I looked to ChatGPT to help me. (Chat GPT log). Using Chat GPT, I learned that in order to upload images that are in my personal computer, I have to put them in a specific folder in my file explorer, which I named "Images", so that when I have an image that I want to use, I just have to simply drag that file from the file explorer into the folder and reference that image.
I also learned that whenever I add a new page to my website, after pressing the new file, I have to name the file the the ending of ".md" so that VS recognizes it as a markdown file, therefore creating a new page.
Here is what the folder looks like with the folder with images inside and my pages marked with ".md":
