Project Summary
About “Chirp and Clean” device
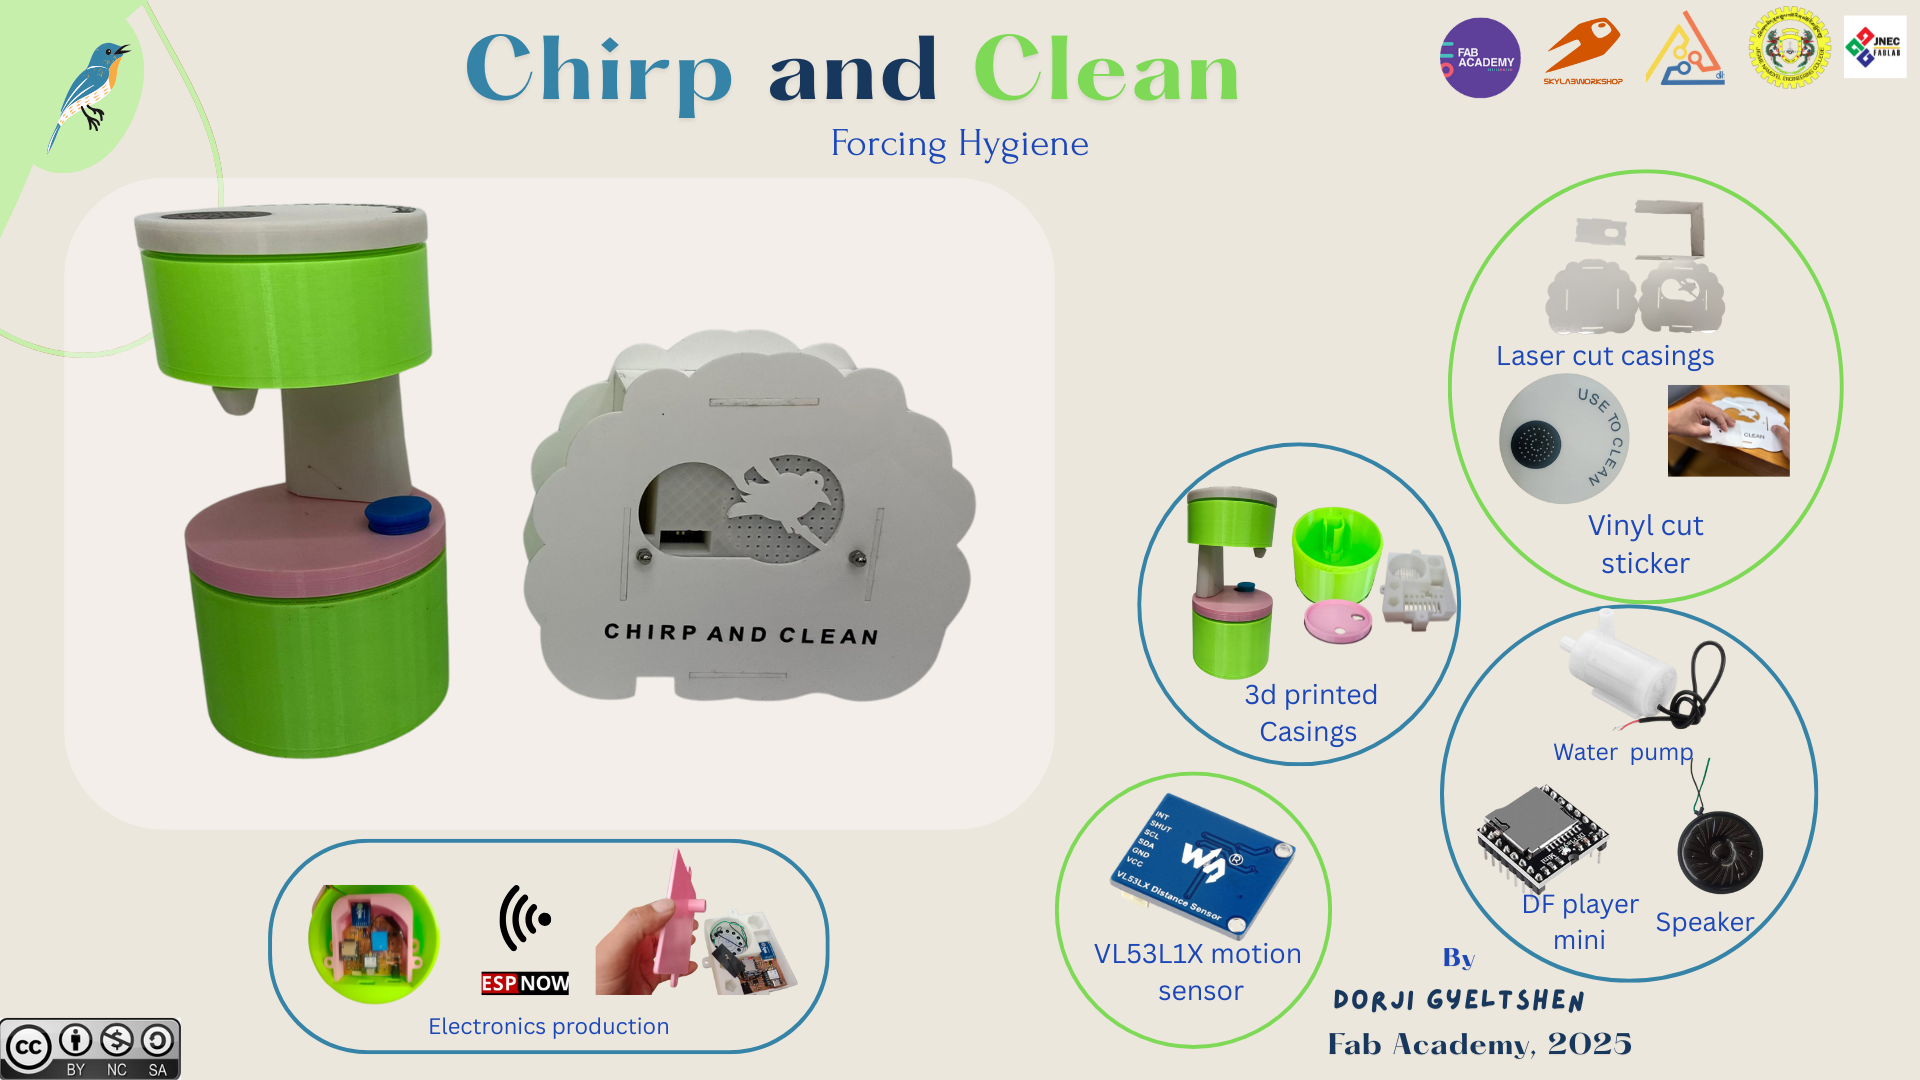
My project is a simple basic system but it can useful to encourage the people with proper hand washing habbits although such kinds of systems exist in the markets.Moreover, it can solve hygiene problem as we usually neglect to practice in our daily life.People still use manual soap bottles or bar soaps which require contact and may spread germs, and time consuming too.You will see an user interaction as i have developed a system where the wash room user is introduced to the system and making them to wash hands compulsorily.
It consists of two main parts, namely “Chirp” which can detect person in the washroom and allows the other device with same wifi module to communicate between them.The other “Clean” device will receive message and works untill the user wash hands.I have used ESP NOW protocol to communicate between my two fabricated PCB with XIAO ESP32 C3 modules.
This system will encourage hand hygiene, prevents spread of germs, teaches clean habbits early especially for children, safe and easy to use with the emerging technlogy.
Final project presentation and slide.
Here is the youtube link for my final project.
Here is my final project presentation video and slide.
My final project presentation video can availed from this link
Here is the link for the presentation slide
System diagrams for Chirp and Clean
My final project requires the ESP NOW as the protocol for communication between the two XIAO ESP32C-3 PCB.Here is my system diagram that will show communication between my two fabricated PCB.

This information is also available under the mid-term review under system diagram
Bill of Materials(BOM)
| Component | Quantity | Unit Price ($) | Total Price ($) | Source |
|---|---|---|---|---|
| Seeed XIAO ESP32-C3 | 2 | $7.49 | $14.98 | JNWSFL, Thimphu |
| Speaker (8 ohm, 0.5 watt) | 2 | $4.44 | $8.88 | JNWSFL, Thimphu |
| 5V USB adapter | 2 | $2.50 | $5.00 | JNWSFL, Thimphu |
| VL53L1X sensor | 2 | $4.48 | $8.96 | JNWSFL, Thimphu |
| 3D print filament (PLA) | 1 | $2.10 | $2.10 | JNWSFL, Thimphu |
| DFPlayer Mini | 2 | $4.99 | $9.98 | JNWSFL, Thimphu |
| Power jack | 2 | $0.29 | $0.58 | JNWSFL, Thimphu |
| Screw terminal | 3 | $0.60 | $1.80 | JNWSFL, Thimphu |
| LED 1206 | 2 | $0.0035 | $0.007 | JNWSFL, Thimphu |
| Resistor (499/0/1K ohm) | 6 | $0.05 | $0.30 | JNWSFL, Thimphu |
| Mini water pump | 1 | $2.00 | $2.00 | JNWSFL, Thimphu |
| Diode IN4007 | 1 | $0.24 | $0.24 | JNWSFL, Thimphu |
| Transistor BC547 | 1 | $0.093 | $0.093 | JNWSFL, Thimphu |
| Relay SRD-05VDC-SL-C | 1 | $2.50 | $2.50 | JNWSFL, Thimphu |
| Acrylic sheet, 3mm | 1 | $3.50 | $3.50 | JNWSFL, Thimphu |
| Copper clad | 1 | $1.00 | $1.00 | JNWSFL, Thimphu |
| Vinyl sticker, black | 1 | $2.10 | $2.10 | JNWSFL, Thimphu |
| Total = $64.02 |
So the total amount cost for my final project was approximately $64 which is equal to Ngultrum(Bhutanese)
**5495**/- only.
You can access about Bill of materials for my final project under week 17 assignment
Electronics design and production
As my final project consists of two parts, i have designed two PCB, one for the chirp part(MCU-1) and Clean(Soap dispenser).I designed using KICAD.Here is the design for CHIRPING bird(PCB-1)

Then i milled it using the SRM-2O Milling machine and soldered and check for the continuity after aech soldering actions.


Similarly, I also made my second PCB where it can be named as CLEAN(MCU-2).
 After milling, i cxhecked for connections and it was working.
For more detailed, you can refer to my final project site under Electronics Design and Production
Design and Manufacturing
CAD for my final project
I have designed using Fusion 360.For MCU-2(CHIRP), I had additive manufacturing and combination of additive and subtractive manufacturing for MCU-1(CLEAN).
Design and laser cutting for MCU-1
I exported DXF files and took to the laser cutting machine.


Design and 3D Printing case for MCU-1
I did slicing using the Bambu Lab software and 3D Printed the case using the Bambu lab A1 printer.I had used prusa MK3S printer to 3D print its lid.


Design and 3D printing for soap dispenser container and MCU-2 case.
Firstly i designed the base for storing the soap solution and the slot for mounting the mini water pump.I planned to make threaded lid as i wanted to make it removable.I have also added connector to joint with the MCU-2 case.


I designed the MCU-2 case with lid, speaker case and the top lid and 3D printed them.


The more details on my CAD for my final project can be available at my final project site under Design and Manufacturing
Testing VL53L1X distance sensor with Mini water pump
During week 13, i had tried with VL53L1X distance sensor with mini submersible water pump programming.My Instructor Tshering Wangzom help me and this was the code to dispense the soap solution.I will be integrating this code after i am done with PCB board fabrication.
The code i developed:
#include <Wire.h>
#include <VL53L1X.h>

VL53L1X sensor;

#define RELAY_PIN D3            // Relay control pin (connect to IN on relay module)
#define TRIGGER_DISTANCE_MM 10    // Hand detection distance (adjustable)
#define DISPENSE_TIME_MS 1000      // Pump ON duration (1 second)

bool handDetected = false;         // Tracks if a hand was already detected

void setup() {
  Serial.begin(115200);
  while (!Serial) {}

  Serial.println("Starting Automatic Soap Dispenser...");

  // Initialize I2C
  Wire.begin();
  Wire.setClock(400000); // Fast I2C

  // Setup relay pin
  pinMode(RELAY_PIN, OUTPUT);
  digitalWrite(RELAY_PIN, LOW); // Ensure relay is OFF initially

  // Initialize VL53L1X sensor
  sensor.setTimeout(500);
  if (!sensor.init()) {
    Serial.println("Sensor not found or failed to initialize!");
    while (1); // Halt
  }

  sensor.setDistanceMode(VL53L1X::Long);           // Use long-range mode
  sensor.setMeasurementTimingBudget(50000);        // 50ms measurement time
  sensor.startContinuous(50);                      // Continuous measurements
}

void loop() {
  sensor.read(); // Read new measurement

  uint16_t distance = sensor.ranging_data.range_mm;
  uint8_t status = sensor.ranging_data.range_status;

  Serial.print("Distance: ");
  Serial.print(distance);
  Serial.print(" mm | Status: ");
  Serial.println(VL53L1X::rangeStatusToString((VL53L1X::RangeStatus)status)); // FIXED casting

  if (status == VL53L1X::RangeValid) {
    if (distance < TRIGGER_DISTANCE_MM) {
      if (!handDetected) {
        Serial.println("Hand detected → Dispensing soap...");
        digitalWrite(RELAY_PIN, HIGH);      // Turn ON pump
        delay(DISPENSE_TIME_MS);            // Run pump
        digitalWrite(RELAY_PIN, LOW);       // Turn OFF pump
        handDetected = true;                // Mark hand detected
      }
    } else {
      handDetected = false;                 // Hand moved away, reset
    }
  }

  delay(10); // Small delay
}
code to test VL53L1X sensor with DF player mini and speaker.
Connections details:
- VCC of VL53L1X distance sensor to 3.3V of XIAO ESP32C3
- GND of VL53L1X to GND of XIAO ESP32C3
- SDA of VL53L1X to SDA(D4) of XIAO ESP32C3
- SCL od VL53L1X to TX(D6) of XIAO ESP32C3
- VCC of DF Player mini to 5V of XIAO ESP32C3
- GND of DF Player mini GND of XIAO ESP32C3
- RX of DF Player Mini via 1kohm resistor to MOSI(D10) of XIAO ESP32C3
- TX of DF Player mini to MISO(D9) of XIAO ESP32C3
#include <Wire.h>
#include <VL53L1X.h>
#include <DFRobotDFPlayerMini.h>
#include <HardwareSerial.h>

// I2C pins for VL53L1X
#define SDA_PIN D4
#define SCL_PIN D6

// Hardware Serial for DFPlayer Mini (UART1)
#define DF_RX_PIN 9   // ESP32 RX (connect to DFPlayer TX)
#define DF_TX_PIN 10  // ESP32 TX (connect to DFPlayer RX)

// Distance threshold (in mm)
#define PERSON_DETECTED_THRESHOLD 800
#define DEBOUNCE_COUNT 3  // Require consecutive readings to trigger

// Globals
VL53L1X sensor;
HardwareSerial dfSerial(1);  // Use UART1
DFRobotDFPlayerMini dfplayer;

bool personPresent = false;
uint8_t debounceCounter = 0;
bool isPlaying = false;

void setup() {
  Serial.begin(115200);

  // Initialize I2C
  Wire.begin(SDA_PIN, SCL_PIN);

  // Initialize VL53L1X
  if (!sensor.init()) {
    Serial.println("Failed to initialize VL53L1X!");
    while (1);
  }
  sensor.setTimeout(500);
  sensor.setDistanceMode(VL53L1X::Long);
  sensor.setMeasurementTimingBudget(50000);
  sensor.startContinuous(50);

  // Initialize DFPlayer
  dfSerial.begin(9600, SERIAL_8N1, DF_RX_PIN, DF_TX_PIN);
  delay(300);  // Wait for DFPlayer initialization

  if (!dfplayer.begin(dfSerial)) {
    Serial.println("DFPlayer not responding!");
    while (1);
  }
  dfplayer.volume(15);
  dfplayer.stop();  // Ensure player is stopped initially

  Serial.println("System ready");
}

void loop() {
  static uint32_t lastCheck = 0;
  if (millis() - lastCheck >= 50) {  // Non-blocking delay
    lastCheck = millis();

    int distance = sensor.read();
    Serial.print("Distance: ");
    Serial.print(distance);
    Serial.println(" mm");

    if (sensor.timeoutOccurred()) {
      Serial.println("Sensor timeout!");
      return;
    }

    // Debounce detection
    if (distance < PERSON_DETECTED_THRESHOLD) {
      if (debounceCounter < DEBOUNCE_COUNT) debounceCounter++;
    } else {
      if (debounceCounter > 0) debounceCounter--;
    }

    // State changes
    if (!personPresent && (debounceCounter >= DEBOUNCE_COUNT)) {
      personPresent = true;
      playSound(1);  // Entry sound
    }
    else if (personPresent && (debounceCounter == 0)) {
      personPresent = false;
      playSound(2);  // Exit sound
    }
  }
}

void playSound(uint8_t track) {
  if (!isPlaying) {
    dfplayer.play(track);
    isPlaying = true;
    Serial.print("Playing track ");
    Serial.println(track);

    // Reset playing status after track duration (approximate)
    uint32_t duration = (track == 1) ? 3000 : 3000; // Set actual durations
    delay(duration); // Blocking delay for demo purposes - adjust as needed
    isPlaying = false;
  }
}