1.My Final Project Progress and Tracking page
Final Project Progress and Tracking page
Initially, I have decided to choose Automatic Hand Sanitizer Dispenser as my final project.
During my third week of Fab Academy, my local instructors called upon me to present my final idea and discussed for the requirements of the materials required.

project idea discussion
I have got some recommendatons to look for container feature, that include both laser cut and 3D printing, top lid should be able to open/close to replace solution.I was also advised to plan to place the electronic devices on board, and to add vinyl stickers to look good.
First Prototype using Cardboard for Final Project.
During, fifth week, i have prototyped the casing for my final project.
I am slightly changing my project name as Automatic hand washing system as recommened by my instructors.
Here is my work using cardboard.I have created two case boxes, one for detecting while entering to washroom with ultrasonic sensor, sound and ESP32 microcontroller.
 detect system
Another case box created was for soup dispenser along with motor and pump, ultrasonic sensor which can be displayed near wash basin.

Further, i was instructed to study on the force required to pour/dispense the soap solution and its mechanism to develop.Also to look on motor and its position, load for dispenser container.
Flow chart for Automatic Soap Dispenser System
During my 6th week of Fab Academy, i tried to develop a flow chart for my project but can be edited later as i go.

Materials list for Project
I also made a list of materials required and tried to see the pins for the components while i go along with my week 6 assignment.

First trial PCB board fabrication for my final project.
I have used design from my week 6 assignment.The link for my design is here

I have exported SVG files from KiCad and the exported further in png format as i was using KiCad 9.o version.My png files of traces and edge cuts looked like this.

During week 8, i have fabricated my first trial PCB board where i can have used XIAO SAMD21 as microcontroller.I have used SRM-20 milling machine to produce it and soldered the components.


To refer the pinouts of XIAO SAMD21.

I have displayed the pins included in my design to make convenient myself.

link of miriam for project reference
First trial Soap Container Design.
During week 9 of my Fab Academy, i designed my first trial soap container where i am planning to make it by 3D printing.
Here is the Prototype that i made before i went on with its actual design.


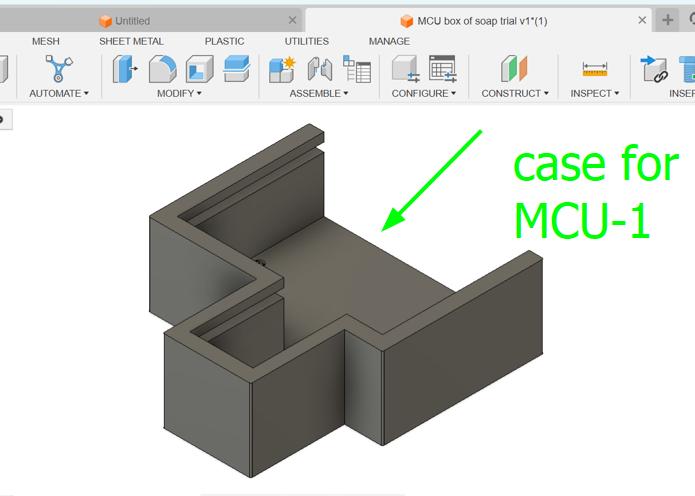
It consists of lid on top to for replacing the soap solution, distance sensor slot in the front for detecting the hand, mini water pump hose in front for dispensing soap, a case at back of container for MCU board.There are holes in between for the hose and wirings of the components and slot at back for the power supply.
Here is how i designed my first trial soap container using Fusion 360.

You can find more detailed of first trial design here under Design and Manufacturing section of Final Project.
Trial test of my project input devices.
During Week 9th of Fab Academy, i tried to run by input devices with the PCB fabricated.
1) VL53L1X Distance sensor
Pinouts of VL53L1X distance sensor:
- VCC: 3.3V/5V power input
- GND: ground
- SDA: I2C data pin
- SCL: I2C clock pin
- SHUT: shutdown control, connects to IO pin
-
INT: interrupt output, connects to IO pin
-
Adding library for VL53L1X distance sensor in Arduino IDE.

- Connections of Sensor pins with a PCB board fabricated.


2) AM321 PIR sensor.
Pinouts of AM321 PIR sensor.
- VCC(3.3V/5V) for power supply.
- GND
- OUT(Signal) as output pin.

 pin outs of my PCB board with XIAO SAMD21
Connections:
- VCC of AM321 PIR sensor to 3.3V of my PCB board
- GND of PIR sensor to GND of my PCB board.
- OUT(Signal) of PIR sensor to GPIO03 OR D3

Note: For more details of first trial test for above distance sensor and PIR sensor, please refer here under my week9 Input Devices assignment
Second Trial soap container.
During week 10, my idea of soap container was changed as i wanted it to look quit customized.I planned to design the soap container with a base threaded which can be screwed with its threaded stand that will connect to top part.

The threaded stand has 10mm hole through to enclose mini pump outlet hose and its terminals.
Testing Output Devices.
- *Mini water pump with 3V Relay module.
I will be using this mini water pump with my microcontroller board to dispense the soap solution.For now i have XIAO SAMD21 as microcontroller for board.

3V Relay Module v2.0 (HF3FD DFROBOT) for Mini water pump.

Pinouts of the 3V Relay module


2.Testing Mini speaker with DF Player mini.

However an amplifier is necessary for this speaker.I will be using the DF Player as it has built-in amplifier.
Pin Description of DF Player mini


The more detailed test on my final project output devices can be availed from Week 10 assignment.
Final concept about my Final Project
My project is a simple basic system but it can useful to encourage the people with proper hand washing habbits although such kinds of systems exist in the markets.Moreover, it can solve hygiene problem as we usually neglect to practice in our daily life.People still use manual soap bottles or bar soaps which require contact and may spread germs, and time consuming too.You will see an user interaction as i will be developing a system where the wash room user is introduced to the system and making them to wash hands.
This system will encourage hand hygiene, prevents spread of germs, teaches clean habbits early especially for children, safe and easy to use with the emerging technlogy.
How my Hand washing system works?

I will choose to fix my hand washing system in the washroom.It will consists of a small box at washroom cabin having a PIR sensor,speaker,DF player and XIAO ESP32C3.While the soap dispenser bottle will be at the wash basin with distance sensor, water pump with a 3V relay module and XIAO ESP32C3.
When the user enters the washroom, the motion sensor detects entering to the wash cabin and first it will play welcome sound followed by song play while doing the toilet.When he/she is done with toilet, the morion sensor will observe and directs to wash hand from the soap dispenser.If the person do not go to wash hand then it will play alarming sound, letting the user use the soap dispenser.The distance sensor at soap dispenser will trigger the water pump to dispense required amount of soap.The thank you sound plays from the washroom cabin box after using the soap to wash hand.
First trial Soap dispenser bottle(3D printed)
This is my first trial design of soap dispenser using Fusion 360 and was 3D printed during week 12.


Testing VL53L1X distance sensor with Mini water pump
During week 13, i had tried with VL53L1X distance sensor with mini submersible water pump programming.My Instructor Tshering Wangzom help me and this was the code to dispense the soap solution.I will be integrating this code after i am done with PCB board fabrication.
The code i developed:
#include <Wire.h>
#include <VL53L1X.h>

VL53L1X sensor;

#define RELAY_PIN D3            // Relay control pin (connect to IN on relay module)
#define TRIGGER_DISTANCE_MM 10    // Hand detection distance (adjustable)
#define DISPENSE_TIME_MS 1000      // Pump ON duration (1 second)

bool handDetected = false;         // Tracks if a hand was already detected

void setup() {
  Serial.begin(115200);
  while (!Serial) {}

  Serial.println("Starting Automatic Soap Dispenser...");

  // Initialize I2C
  Wire.begin();
  Wire.setClock(400000); // Fast I2C

  // Setup relay pin
  pinMode(RELAY_PIN, OUTPUT);
  digitalWrite(RELAY_PIN, LOW); // Ensure relay is OFF initially

  // Initialize VL53L1X sensor
  sensor.setTimeout(500);
  if (!sensor.init()) {
    Serial.println("Sensor not found or failed to initialize!");
    while (1); // Halt
  }

  sensor.setDistanceMode(VL53L1X::Long);           // Use long-range mode
  sensor.setMeasurementTimingBudget(50000);        // 50ms measurement time
  sensor.startContinuous(50);                      // Continuous measurements
}

void loop() {
  sensor.read(); // Read new measurement

  uint16_t distance = sensor.ranging_data.range_mm;
  uint8_t status = sensor.ranging_data.range_status;

  Serial.print("Distance: ");
  Serial.print(distance);
  Serial.print(" mm | Status: ");
  Serial.println(VL53L1X::rangeStatusToString((VL53L1X::RangeStatus)status)); // FIXED casting

  if (status == VL53L1X::RangeValid) {
    if (distance < TRIGGER_DISTANCE_MM) {
      if (!handDetected) {
        Serial.println("Hand detected → Dispensing soap...");
        digitalWrite(RELAY_PIN, HIGH);      // Turn ON pump
        delay(DISPENSE_TIME_MS);            // Run pump
        digitalWrite(RELAY_PIN, LOW);       // Turn OFF pump
        handDetected = true;                // Mark hand detected
      }
    } else {
      handDetected = false;                 // Hand moved away, reset
    }
  }

  delay(10); // Small delay
}
code to test VL53L1X sensor with DF player mini and speaker.
This code programming is for testing the detection of motion and playing music which can be integrated with other code for the communication between two XIAO ESP32C3 after i finish designing my new PCD boards for final project.
Connections details:
- VCC of VL53L1X distance sensor to 3.3V of XIAO ESP32C3
- GND of VL53L1X to GND of XIAO ESP32C3
- SDA of VL53L1X to SDA(D4) of XIAO ESP32C3
- SCL od VL53L1X to TX(D6) of XIAO ESP32C3
- VCC of DF Player mini to 5V of XIAO ESP32C3
- GND of DF Player mini GND of XIAO ESP32C3
- RX of DF Player Mini via 1kohm resistor to MOSI(D10) of XIAO ESP32C3
- TX of DF Player mini to MISO(D9) of XIAO ESP32C3
#include <Wire.h>
#include <VL53L1X.h>
#include <DFRobotDFPlayerMini.h>
#include <HardwareSerial.h>

// I2C pins for VL53L1X
#define SDA_PIN D4
#define SCL_PIN D6

// Hardware Serial for DFPlayer Mini (UART1)
#define DF_RX_PIN 9   // ESP32 RX (connect to DFPlayer TX)
#define DF_TX_PIN 10  // ESP32 TX (connect to DFPlayer RX)

// Distance threshold (in mm)
#define PERSON_DETECTED_THRESHOLD 800
#define DEBOUNCE_COUNT 3  // Require consecutive readings to trigger

// Globals
VL53L1X sensor;
HardwareSerial dfSerial(1);  // Use UART1
DFRobotDFPlayerMini dfplayer;

bool personPresent = false;
uint8_t debounceCounter = 0;
bool isPlaying = false;

void setup() {
  Serial.begin(115200);

  // Initialize I2C
  Wire.begin(SDA_PIN, SCL_PIN);

  // Initialize VL53L1X
  if (!sensor.init()) {
    Serial.println("Failed to initialize VL53L1X!");
    while (1);
  }
  sensor.setTimeout(500);
  sensor.setDistanceMode(VL53L1X::Long);
  sensor.setMeasurementTimingBudget(50000);
  sensor.startContinuous(50);

  // Initialize DFPlayer
  dfSerial.begin(9600, SERIAL_8N1, DF_RX_PIN, DF_TX_PIN);
  delay(300);  // Wait for DFPlayer initialization

  if (!dfplayer.begin(dfSerial)) {
    Serial.println("DFPlayer not responding!");
    while (1);
  }
  dfplayer.volume(15);
  dfplayer.stop();  // Ensure player is stopped initially

  Serial.println("System ready");
}

void loop() {
  static uint32_t lastCheck = 0;
  if (millis() - lastCheck >= 50) {  // Non-blocking delay
    lastCheck = millis();

    int distance = sensor.read();
    Serial.print("Distance: ");
    Serial.print(distance);
    Serial.println(" mm");

    if (sensor.timeoutOccurred()) {
      Serial.println("Sensor timeout!");
      return;
    }

    // Debounce detection
    if (distance < PERSON_DETECTED_THRESHOLD) {
      if (debounceCounter < DEBOUNCE_COUNT) debounceCounter++;
    } else {
      if (debounceCounter > 0) debounceCounter--;
    }

    // State changes
    if (!personPresent && (debounceCounter >= DEBOUNCE_COUNT)) {
      personPresent = true;
      playSound(1);  // Entry sound
    }
    else if (personPresent && (debounceCounter == 0)) {
      personPresent = false;
      playSound(2);  // Exit sound
    }
  }
}

void playSound(uint8_t track) {
  if (!isPlaying) {
    dfplayer.play(track);
    isPlaying = true;
    Serial.print("Playing track ");
    Serial.println(track);

    // Reset playing status after track duration (approximate)
    uint32_t duration = (track == 1) ? 3000 : 3000; // Set actual durations
    delay(duration); // Blocking delay for demo purposes - adjust as needed
    isPlaying = false;
  }
}
Final PCB designs and fabrication.


Final system diagram

Designing the microcontroller case for soap dispenser container.