Week 14
Molding and casting
 Week assignment
- Group assignment:
- review the safety data sheets for each of your molding and casting materials, then make and compare test casts with each of them ✔
- compare mold making processes ✔
- Individual assignment:
- design a mold around the process you’ll be using, produce it with a smooth surface finish that does not show the production process toolpath, and use it to cast parts ✔
- extra credit: use more then two mold parts ✔
Group assignment
In the group assignment, we were able to closely examine the characteristics of the materials we will be using this week. We also prepared the negative molds using both milling and 3D printing. Ensuring the mesh quality of the piece is crucial, focusing on smoothing and correcting any potential errors. Additionally, the initial milling test on a piece of foam allows for verification of the proper selection of the milling tool for its manufacturing.
In my opinion, milling provides higher-quality finishes, although it requires more working time. For the preparation of the negative mold in PLA, I set the layer height to 0.05 mm, and even so, the layer lines are still visible. I even activated the ironing option in PrusaSlicer. The printed mold looks good, but the smoothness when running a finger over the surface is noticeably superior in the milled negative made of wax.
I found it very interesting to test the validity of the silicone mold by freezing water, as it allows us to obtain a part and analyze it over a sufficient period of time.
Link to week 14 group assignment
Individual Assignment
After the presentation of our machine and the Easter break, it was difficult to resume the weekly activities and complete the assigned tasks. On Thursday, April 24th, we met with Luis, who complemented Neil’s class and answered the questions we had about this week’s topic.
In the class, Luis emphasized the safety measures we must take when working with resins. It is mandatory to use protective equipment to avoid skin and eye contact with the material, and to protect the respiratory system from gases and vapors generated during the casting process.

In my case, I had no prior experience using two-component silicone, although I had previously worked with various types of resins to repair dents on windsurf boards and had also worked with fiberglass and gelcoat to repair dinghy hulls.
For the mold fabrication model, I had several options. I was looking for something not particularly simple that would allow me to prepare a two-part mold.
Some time ago, I had designed a parametric family in Revit for a cover for a table support. The real object’s size was too large, so I decided to scale it down to fit the volume of machinable wax I was going to use.
Autodesk Revit family editor

As documented in the group assignment, Luis provided each of us with a block of machinable blue File-A-Max wax, approximately 92 x 152 x 38 mm in size.
To optimize time, Francisco would use the large CNC router, Pablo would use 3D printing, and I would use the Roland PNC-2300 to machine the mold cavity in the wax block.
I exported the object from Revit in .obj format and imported it into Rhinoceros to prepare the geometries that would form the two parts of the mold.
In the image below, you can see two views: the object itself and the two mold parts I needed to prepare.
The vertical cylinder on one side would shape the pouring hole. I had discussed with Luis the need to add a couple of air escape holes; for some reason, I forgot, and later had to drill them manually with a small bit to prevent air pockets inside the material during the curing process.

Following Luis’s recommendations, I first prepared the machining strategies in VCarve and tested them on foam.
I defined a vector boundary that covered a quarter of the figure.
Among the available options, I chose to use a straight Alarsys Frut 2 Router bit with a 2 mm diameter for the initial roughing pass, with a 50% toolpath overlap.

For the finishing pass, I kept the same tool but reduced the step-over to 0.15 mm (7.5% of its diameter).
In both cases, I set the feed rates conservatively at 150 mm/min.

As shown in the image, the result of the test was satisfactory, so I prepared the wax block to start machining the complete piece.
At this point, I encountered a small issue: the machine’s clamps could not reach the 92 mm width of the block, so I had to cut it down to 80 mm along the Y-axis.
This allowed me to securely fix the wax piece in the machine’s clamps.

As usual, I set the origin using enter + home and the machining top surface with enter + Z0, and repeated the test run on one face of the wax block.
Based on the tool’s performance, I decided to increase the feed rate to 200 mm/min.
It probably could have gone even faster, but I did not want to risk ruining the wax block with a machining error.
For the same reason, I preferred to machine the two mold parts separately.
However, I made a beginner’s mistake when defining the origin for the second machining job: as seen in the image below, I reached the right limit of the material, causing one of the side walls to be slightly affected.
 Fortunately, this was a minor issue that I was able to easily fix, and the mold was valid for silicone casting.
The next step consisted in filling the wax block with water, I tared the scale to zero before filling and the registered weight of water was 49 grams.
Fortunately, this was a minor issue that I was able to easily fix, and the mold was valid for silicone casting.
The next step consisted in filling the wax block with water, I tared the scale to zero before filling and the registered weight of water was 49 grams.
 This value helped me determine the amount of silicone I needed to prepare. According to the technical datasheet, the two components of the silicone had to be mixed in a 1:1 ratio. Since it is expected that some amount will stick to the walls of the containers during the preparation process, it’s necessary to include a small surplus. In this case, I mixed 39 grams of component A and 38 grams of component B.

Although I was especially careful while stirring the mixture and poured it very slowly, I was surprised by the number of small bubbles that started to appear. They gradually disappeared, but I spent over 20 minutes gently tapping the container to help the bubbles rise and escape.
 Once poured, the curing time indicated by the manufacturer was three hours at 23°C. The temperature where I live does not exceed 19°C at that time, so I estimated a longer curing time and left the mold to rest overnight to avoid any issues. The final result was acceptable; I was surprised by how easy it was to demold and by the flexibility of the resulting compound.
Once I had the silicone mold, I followed Luis’ recommendation and ran a small test with water. I filled the mold with fresh water and placed it in the freezer. To give the pieces greater rigidity and apply some pressure, I used two old CDs and some rubber bands.
After a few hours in the freezer, I removed the auxiliary parts and, this time with less care, took off one of the mold halves. I mention the lack of care because, during the demolding process, I broke a thin section of the outer wing of the piece.
A few minutes later, the ice melted and the piece disappeared, but the test confirmed that the silicone mold functioned correctly.
However, before pouring the epoxy resin, I will need to open an additional vent hole to allow internal air to escape and prevent bubbles from appearing in the final object—something I didn’t fully achieve, as we’ll see later on.
At this point, I realized that the piece I was trying to fabricate was quite complex in both shape and size. When I scaled it down to fit into the wax block, the peripheral wing became very thin. For this reason, on the morning of Thursday the 28th, I prepared a new figure to fabricate the mold again and repeat the process. This time, I used a model I had worked on previously based on the original data obtained from the Easter Island Statue Project.

It’s a Moai figure. Once the mesh was optimized, I sliced it with a flat mesh and combined both parts with boxes to help guide the silicone fill. I also added larger locating pins than the ones I had used on the lid to improve the alignment between both parts. Once I reviewed the final geometry, I exported it to STL format and decided to begin generating the molds for epoxy resin casting using two methods: the first by milling the wax block, and the second through 3D printing.
On Tuesday morning, I began milling and 3D printing the Moai molds. However, at 12:30 PM, a nationwide power outage affected all of Spain. Our building is equipped with a backup generator, which allowed us to continue working for a while. But what we initially thought would be a short disruption ended up lasting nearly 15 hours. The situation caused significant problems across the country, and the University of A Coruña issued an order to shut down all its facilities. The jobs I had started on the 3D printer and the milling machine were abruptly interrupted, as shown in the image below:

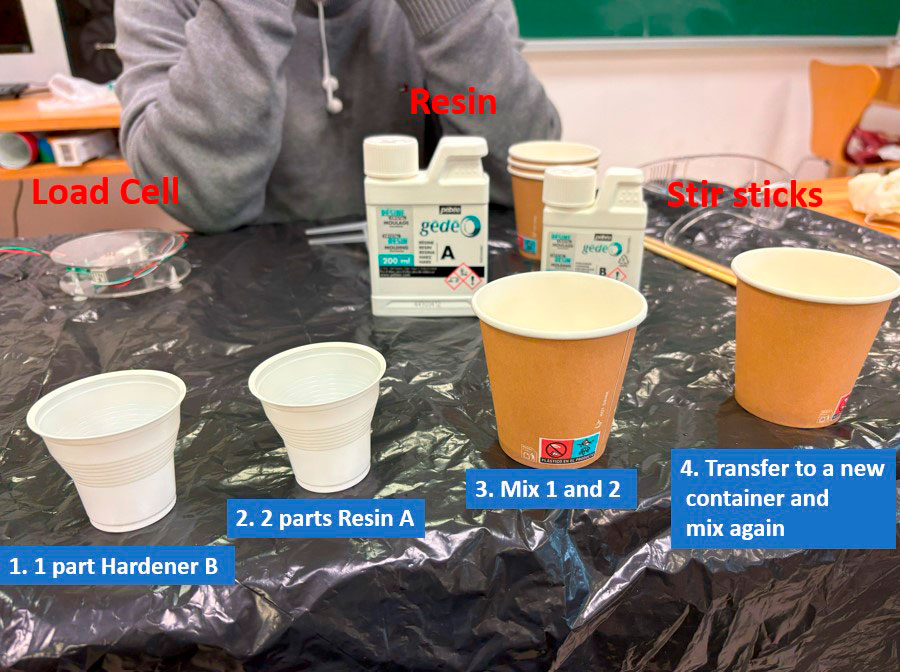
I had to return home. Fortunately, I had taken the resin with me, so I was able to cast the lid piece in the silicone mold that same afternoon. I prepared the two-part resin, which in this case had a mixing ratio of 2:1. I followed the same method used with the silicone: pouring each component into separate cups, then combining them in a third container and stirring gently until achieving a homogeneous mixture.
Following the manufacturer’s recommendations, I then poured the mixed resin into a clean container and stirred it again softly to ensure a uniform result. The working time for this resin was approximately 1 hour, with a curing time of 16 hours. To be safe, I let the resin cure for more than 24 hours. Before pouring, I also drilled small vents at the top of the mold to allow trapped air to escape.

On Tuesday the 28th, from 12:30 PM onwards, we had neither electricity nor internet. I worked offline, documenting locally to make progress on the week’s assignments until my laptop battery ran out. As night fell, we had a cold dinner, and thanks to an old battery-powered radio, we managed to stay informed about the ongoing situation. We went to bed not knowing when the power would return.

University officials decided to keep all centers closed until midday. Later, the closure was extended for the full day. However, at 2:00 PM, I was able to access the Fab Lab and restart the milling machine and 3D printer. I expect the molds to be ready for silicone casting by Wednesday morning.
As mentioned earlier, I had already cast the resin into the silicone mold and allowed nearly 24 hours for curing. After removing the rubber bands that held the mold closed under pressure, I demolded the part. The process was successful, but I encountered a major issue: internal air bubbles were present in the cast piece. This was most likely caused by a design error in the location of the fill and vent channels.

When I prepare a new batch of resin to cast the Moai molds, I will probably recast the lid piece as well, aiming to eliminate bubbles. I also plan to redesign the placement of venting columns to ensure better evacuation of trapped air from within the mold.
On the morning of Wednesday, April 30, I was able to complete the milling of the wax block. This time, in addition to performing a roughing pass and a final finishing pass using the Frut2 flat-end mill (the same one I used for the lid machining), I decided to improve the surface quality by increasing the toolpath overlap in the finishing pass to 0.05 mm, which corresponds to 2.5% of the tool diameter.

As shown in the image above, the surface finish is quite good. However, this time my goal was to achieve the smoothest and most continuous surface possible. Therefore, I changed the tool to a ball nose end mill with a 2 mm diameter, set an overlap of 0.05 mm, and started the final finishing process.

Meanwhile, I checked the mold that had been printing overnight on the Prusa. As I mentioned earlier, for some reason this week I’ve been particularly clumsy when generating 3D geometries. The material inlet and air outlet channels are still not correctly positioned, which means I have to manually adapt both the printed parts and the milled parts to ensure they are suitable for pouring epoxy resin and properly generating the molds.
Caution
This week, I’m breaking learning records through trial and error.

I will need to prepare a small box measuring 17x10x12 mm and print two parts for the PLA mold bases and cut two more wax blocks for the mold bases.

Five minutes after starting the April 30th review, the fine finishing work on the milling machine was completed. I’m very pleased with the result as there are no visible toolpaths, and the resulting surfaces are extremely smooth. And luckily, I’ll be able to show it if I get picked in the random selection for the review with Neil.

The next step was to determine the amount of silicone required to fill the negative mold. This time, I used the scale I had prepared during the Input and Output Devices weeks. The total weight of water needed to fill both parts of the mold negative amounted to 70 grams.

On this occasion, we poured silicone into the negative molds of Pablo, Francisco, and my own. Following the procedure described on the group page, we used several containers to ensure a proper mixture. For the silicone, we mixed one part of Component A with one part of Component B. For the resin, the ratio was two parts of Component A to one part of Component B. It is crucial to stir the mixture slowly to avoid the formation of internal air bubbles.
After pouring the silicone slowly, we spent a significant amount of time vibrating the molds and gently tapping them to encourage any trapped air bubbles to rise to the surface. We dedicated approximately 30 minutes to this process. The curing time of the mixture was three and a half hours. It was 7:00 PM on Wednesday, May 30th. Since May 1st is a national holiday in Spain, we allowed more than enough time before demolding, which we carried out on Friday, May 2nd.

After carefully examining the results, the silicone piece showed some small air bubbles, which this time will not affect the final piece’s quality. With the silicone molds ready, we prepared the resin mixture in a 2:1 ratio. We used a set of rubber bands to ensure proper alignment and compression of the two mold halves.
We thought it might be useful to have funnels to facilitate resin pouring and allow air to escape from the inside of the mold. Using Grasshopper, we designed a parametric model and 3D printed several versions with different geometries. After preparing the resin mixture, we carefully filled the molds, paying special attention to minimize the presence of air bubbles inside. We spent several minutes gently tapping the molds to help dislodge any bubbles that may have remained trapped.

Now we just have to wait for the resin to cure. According to the manufacturer’s specifications, the curing time is 18 hours. Since today is Friday, we will check the final result on Monday, May 5th.
On Monday, I removed the mold and was able to observe the resin part. I hadn’t mentioned the size of the MOAI before: it now forms a cube measuring 21x14x42 mm. The level of detail in the resulting piece is excellent, the surface is smooth, and there are no visible manufacturing marks, as required by the assignment. Upon close inspection, however, I identified several issues that I have noted for future mold-making processes:


Optimize venting channels
In areas such as the Moai’s chin, where air pockets are likely to form, I must provide a vent to facilitate air evacuation. In this case, a small bubble formed at that point.Take extreme care to prevent foreign particles in the mixture
In this cast, an eyelash appeared embedded in the chest area. Despite wearing both a mask and protective glasses, it must have fallen into the mixture at some point and went unnoticed until now.

Final Thoughts
It has been a very unusual week. Perhaps due to the effort spent during Mechanical and Machine Design week, I felt genuinely exhausted and made modeling errors that I had never encountered before. However, the continuous trial-and-error process helped me better understand the challenges involved in mold fabrication and the complexities of producing the chosen model.
I’m writing this text at 01:14 AM on April 30th. I hope the machines at the lab have completed their jobs and that I can continue developing new tools to cast the final piece.
Completing the text I had written a few days ago, I can now state that this week, which initially appeared relatively simple, unexpectedly became complicated for me. I cannot pinpoint any specific cause for the numerous mistakes I made, other than the pressure to properly complete all the pending tasks from previous weeks, a goal that, on the other hand, I have successfully achieved.
Files week 14
Lid Rhinoceros 8. zip
Mesh Lid SketchFab
Mold_Lid Vcarve 8.5
Mesh Moai. SketchFab
Mesh Two Sides Moai before Box. SketchFab
Mold_Moai Vcarve 8.5. zip
Mold_Box_Moai
Chimney Resine.gh