week 1 Principles and Practices, Project Management
Principles and Practices (part 1 of 2)
- Plan and sketch a potential final project
Project Management (part 2 of 2)
- Work through a git tutorial.
- Build a personal website describing you and your final project. Refer to the lecture material for examples.
- Upload parts 1 and 2, to the class archive.
What I already knew before the course
1. VS Code
Visual Studio Code (VS Code) is a lightweight, open-source code editor develop by Microsoft. It is widely used by developers for a varaiety of programming tasks, from a simple scripting to large scale softwares. Compared to other editors it has some advantages that makes it a very good option to develop the FabAcademy, those are:
It is very easy to install, just go to the page of Visual Studio and follow the “download steps”. It runs on windows, macOS and Linux, what makes it very flexible if you changed your computer or want to learn another platform.
It supports every major programming lenguage, so I knew I wouldn’t have problems with the FabAcademy page development. (HTML, Markdown, Python, C#, C++, Powershell, etc.)
It has integrated a terminal so you can use just use vs to write and run your code.
It has an extensions marketplace with a vast library and is very easy to install everything.

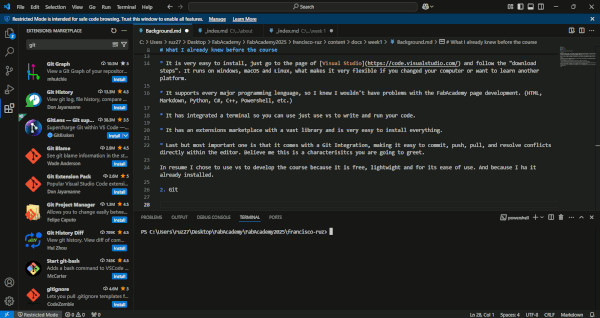
- Last but most important one is that it comes with a Git Integration, making it easy to commit, push, pull, and resolve conflicts directly within the editor. Believe me this is a characterisitcs you are going to greet very much.
In resume I chose to use vs to develop the course because it is free, lightwight and for its ease of use, also because I like its appereance. And last but not least because I had it already installed.
2. Git
Eventhough when I started the course I had installed and had use git, I have to sincerely say that I never understand completely what it is, so this week was the perfect time to gave it a second chance.
To understand what is git there are many articles and guides explaining what, when, how, why it is used and possibly what will help you more to understand is not there. Here I explain you a diagram which after several videos makes me see with more clarity how it works:

Eventhough it’s a youtube video, I explain it here just in case in the future is lost. First of all, it is important to know these four areas, which represent differents stages of your project’s control version:
Local working directory: The actual files and folders on your computer where you make changes. Inside there are untracked files: new files not yet added to git, tracked files: files previously added to git, which can be in one of three states;
- Modified: Files that have been changed but not yet staged
- Unmodified: files that haven’t changed since the last commit. Its purpose is where you work and modify your project files.
Staging area: A virtual area where you prepare changes (files) for the next commit. Inside you have Files that you’ve explicitly added using git add. These changes are staged and ready to be committed. Its purpose is to To select which changes will be part of the next commit. This allows you to commit only some changes while leaving others in the working directory.
Local repository: Is the the .git directory inside your project. This contains all the history and metadata for your repository. inside there are:
- Commits: Snapshots of your staged files at specific points in time.
- Branches: References to specific commits.
- Tags: Specific labels for commits. Its purpose is to store a complete history of your project’s commits locally
Remote repository: A Git repository hosted on a remote server, in our case we are using Gitlab. Inside you have a copy of your project’s commit history, branches, and tags; and changes pushed from different contributors. Its purpose is to collaborate with others and act as a centralized backup for your local repository.
The instalation of git is easy and I did it previous the course started. Additionally, there is a very good tutorial on the fabacademy page follow the installation and also to study if you are still with doubts.
Don’t forget to git pull before git add:
git pull is a command used in Git to update your local repository with the latest changes from a remote repository. It combines two actions: git fetch, which downloads new data from the remote repository, and git merge, which integrates those changes into your current working branch. This allows you to stay up to date with what others have committed to the shared project.
git add is a command used in Git to stage changes for the next commit. When you modify files in your working directory, they are not automatically included in a commit. You need to use git add to mark the specific files (or all files) that you want to include in the next snapshot of your project. It’s the first step in the Git commit process.
% git config --global user.nameyourname% git config --global user.emailyour@email.com% ls .ssh/id_rsaid_rsa_pub% cat .ssh/id_rsa.pub
% git add .% git status% git commit -m "comment"% git push
First week
Clonning a repository
Since I have already installed and editor and git, It was time to start working. What i had to do first was to clone my fabacademy repository. For this I followed the following steps:
I did a new folder call fabacademy in the desktop and inside a folder call FabAcademy2025
Second I had to know my public password so I texted the following command
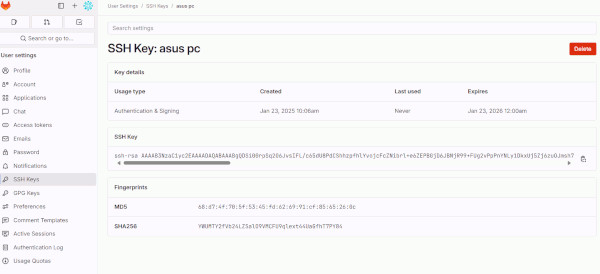
cat ~/.ssh/id_rsa.pubOnce you have your public key, you have to add it to your gitlab account. It is going to look like this:
SSH Key: is a secure way to authenticate yourself to a remote server without the need for a password. There are two parts to an SSH key public and private.

- Finally, once I completed the previous steps, I went to the repository given by email from the FabAcademy address and in the terminal I git cloned with
git clone git@gitlab.fabcloud.org:academany/fabacademy/2025/labs/aindustriosa/students/francisco-ruz.git. If you did it well, you should see something like the following:

Doing the web-page before the first Commit
For this part, I must give many thanks to FabAcademy, As it was when the structure of the course make complete sense to me. Because as we saw in classes, we can see the work of all the students that have done FabAcademy, what they did and how. Without this, honestly I would have been lost. So to proceed with my work, what I did first was to go to the previous years and saw some students works, also in other years but the material is endless. So I decided to proceed with hugo, because I saw it in different projects, and I wanted to do an minimalist, modern, elegant, responsive site. I liked very much the web page from the student Zaid Abusini
Hugo: is a fast and flexible static site generator (SSG) designed to create websites quickly and efficiently. It converts text written in formats like Markdown into static HTML, CSS, and JavaScript files that can be hosted anywhere, such as on GitHub Pages, Netlify, or your own server.
But there is a lot of hugo themes, you can see al of them in the link. I decided to give it a go with Hextra theme.
For the installation and the management of the theme I jus t Googled hextra FabAcademy and found the page from the student Vera Schepers, which was a life saivour for me. Also my collegue Pepe Vazquez is doing his work with Hextra I firmly recommend you to go to study from his page, its very detailed and well explained.
To start a new hugo site in your repository type the next codes:
- Go to your repository on the local directory
- type hugo new site pagina-web –format=yaml for creating a folder with the hugo configuration
- type git submodule add https://github.com/imfing/hextra.git themes/hextra . Adds the Hextra theme repository as a Git submodule to your Hugo project.
Git submodules are a way to include one Git repository inside another as a dependency. This is useful when you want to track an external repository (like a theme) and keep it synchronized.
The Hextra theme’s repository is cloned into the themes/hextra directory of your project. The submodule is added to your Git repository, but it is referenced as a pointer to a specific commit in the external repo (not a direct copy)
Why this ?
Version Tracking: You can lock the theme to a specific commit. If the theme author updates the theme, you won’t automatically get those changes unless you choose to update.
Easy Updates: To pull the latest changes from the theme’s repository, use:
git submodule update --remote --merge.No Direct Copy: Instead of copying the theme files into your project, you’re linking them, keeping your project cleaner and easier to manage.
To add content to the page add:
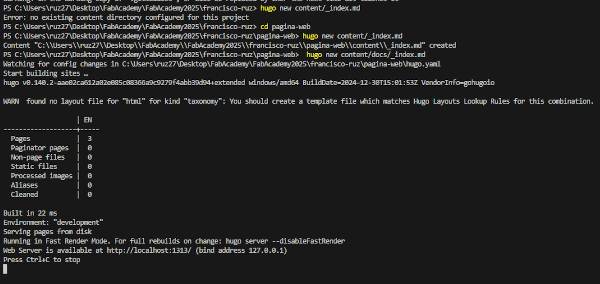
PS C:\Users\ruz27\Desktop\FabAcademy\FabAcademy2025\francisco-ruz\pagina-web> hugo new content/_index.mdTo watch your static page generated you should ype
hugo serverand in your browser go to the page http://localhost:1313/
If you did all the steps well, you should see:

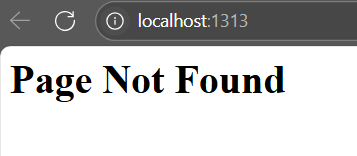
First time I did all this I saw this:

After this I went to bed because it was late, the next day when i woke up the first thing I did was change the hugo.yaml code after opening the site it worked:
What I wrote on the code:
baseURL: https://fabacademy.org/2025/labs/aindustriosa/students/francisco-ruz/
# Hugo configuration file
title: Francisco Ruz Q.

# import hextra as module
module:
  imports:
  - path: github.com/imfing/hextra

markup:
  # allow raw html
  goldmark:
    renderer:
      unsafe: true

  # enable hextra syntax highlight
  highlight:
    noClasses: false

menu:
  main:
    - name: Docs
      pageRef: /docs
      weight: 1
    - name: about
      pageRef: /about
      weight: 2
    - name: Contact ↗
      url: "https://gitlab.com/fsruz"
      weight: 3
    - name: Search
      weight: 4
      params:
        type: search
    - name: Instagram
      weight: 5
      url: "https://www.instagram.com/franciscoruzq"
      params:
        icon: instagram


params:
  page:
    width: wide
  navbar:
    displayTitle: true
    displayLogo: false
    logo:
      path: images/logo.svg
      dark: images/logo-dark.svg
      # width: 40
      # height: 20
      # link: /
    width: wide


  footer:
    displayCopyright: false
    displayPoweredBy: true

  editURL:
    enable: false
    base: "https://github.com/imfing/hextra-starter-template/edit/main/content"
First commit
Once I had the page working and ready to assemble, I modify just a little bit to put on the content and when I was done with the about page I did the first commit.

And it worked without problem: The link I got from mail from the FabAcademy adress, it is also on the FabAcademy page and in the Gitlab repository.
Organizing files
Why organizing files: “By default, Hugo searches for Markdown files in the content directory, and the structure of the directory determines the final output structure of your website” -Hextra
You can look of the detail in the Hextra Organize files page. Moreover my oganization files looks like the following diagram:
- _index.md
- _index.md
- _index.md
- _index.md
- _index.md
- image.jpg
- image.jpg
- image.jpg
- image.jpg
Note
In Hugo, the static and assets directories serve different purposes, and the distinction is important for organizing your files efficiently and managing their behavior during the site’s build process. Static contains files that are directly copied to the final public directory (/public) without any processing. Assets Contains files meant for processing or transformation before being included in the final site.