Week 1
Project management
Time management
In the Student bootcamp week, the week before week 1. I’ve received a lot of tips about time management. This is so important because we only have a week (from wednesday till wednesday) to finish the subject from it’s week. Since i’m combining the Fab academy with my job I want to be prepared. So I looked up final projects and started thinking about my own final project and made my first sketches. When week 1 starts I can focus on the website and getting used to git, since this is all new for me. I will work through a git tutorial and build a personal site in the class archive describing me and my final project and how I build this website.
Things I have to finish by the end of the week:
| checklist | |
|---|---|
| Sketched your final project idea(s) | |
| Described briefly what it will do and who will use it | |
| Made a website and described how you did it | |
| Created a section about yourself on that website | |
| Added a page with a sketch and description of your final project idea(s) | |
| Documented steps for setting up your Git repository and adding files to it | |
| Pushed to your class GitLab repository | |
| Signed and uploaded Student Agreement |
Links and installations
Installed the following programs:
- GIT - for my origin repository and project management
- Visual Studio Code - text editor
- FFmpeg - for compressing pictures
- Image Magick - for compressing photo’s
- Hugo extended- static site generator
Started looking up information about building a site and using git:
- Git tutorial go
- Git explanation go
- Documentation week 1, SSH from Key Ardián Torres go
- Documentation of Michelle Vossen week, working in the terminal and image magick go
- Tutorial deploy Hugo site go
- cheat sheet markdown go ang go
Terminal
Outputs you need to know for working in the terminal in my case windows power shell
| Command | output |
|---|---|
| cd | redirect to the right folder |
| ls | showing the content inside the folder |
| hugo server | starts the collecting from my computer to the local host |
| ctrl C | stops building the website locally |
Git started (get it?)
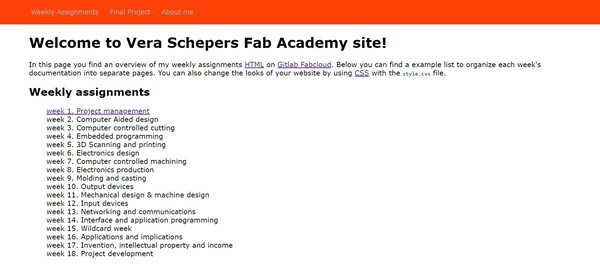
Before doing things in a local directory (on your own computer not in a browser) I started out as Neil suggested in his class to make the first changes directly in Git, I navigated to the default page that was created for me and edited the HTML and also the CSS code after following a quickstart I made my first changes in Git Edit IDE: typing my name and changing the color of the header in HTML ans CSS. I used the commit button to make the changes. Then I opened the website and saw it worked! Since this is the first time working in Git and working with code editing (I only used Wix and Wordpress before) It was a happy start.
I read the Git tutorial and try to understand the concept of git, but truth be told I only started really understanding it after starting working with it myself. All the terms just didn’t make sense to be honest. Now that I’m typing this text, the picture below finally makes sense to me.
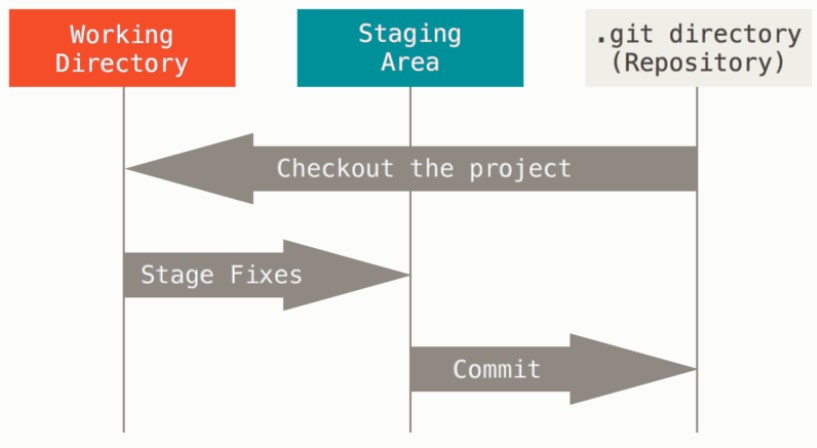
Git is a place to store files and work on projects (such as build a website) and the nice thing is that it tracks your changes! It’s especially useful when working together with other people because you can work simultaneous on a project and easily collect each others changes en merge it again. Git does this by making snapshots of you content and it then compares the snapshots of different stages that you worked on the project. You can make the changes on the project your own computer simultaneously with other people. And when you decide to send your changes (snapshots) git will make a new version of the file updating the changes with everything that hasn’t changed in the same file. So instead of making a whole new document it tracks the document.
For Git to work properly my computer needs to be able to receive and send data to the git repository and visa versa, this is where we need the SSH-Key.
SSH-Key
At Fablab Waag we worked through the steps of generating a SSH-Key We will create two keys a private and public key. We will use the keys for encrypted communication between my laptop and git. After this I can work locally (on my computer) on the project. It generates two keys one private and one public key. we only have to do this one time for my laptop. If I want to work on another device I have to do this again. It was hard for me to keep up with my instructor Henk because working in the terminal is something I’m not used to but I managed with some extra help from Michelle. Since it’s went so fast for me the documentation was messy. Adrian’s documentation helped me remembering all the steps we did and getting the order of steps right.
steps for generating the keys:
- Identify myself: open terminal and type:
git config --global user.email <vera.schepers@han.nl> - Check if a SSH-Key is created before and type
cat ~/.ssh/ed25519a.pub - If not generate the SSH-Key: Type
ssh-keygen -t rsa -C “vera.schepers@han.nl”Now press enter and look at your private key!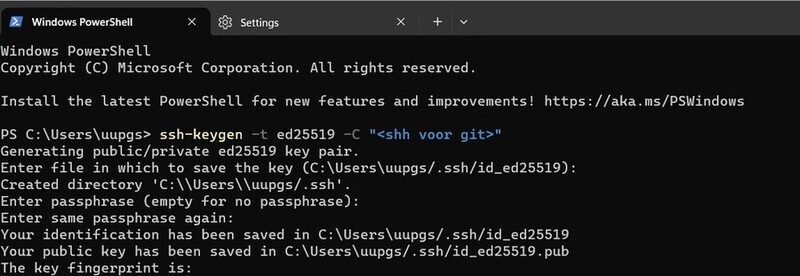 I made a mistake here and typed
 shh voor gitbetween the brackets would be better to know for which email account I make the keys. - To show the public key type:
cat ~/.ssh/ed25519.pub - To show the private key type:
cat ~/.ssh/id_ed25519.pub | clip - Go to your profile in Git Lab ->preferences ->ssh key -> click on Add new key
- copy your private ssh key in the terminal
- Go to git and paste it with ctrl V: add a description of the computer your working on and check if the keys can connect
Cloning the online repository (on git) on my local computer.
I started by making a new folder and got lots of tips from Michelle about naming your files, folders and pictures. (no space bar, short names, watch out for jpeg JPG jpg) this will help me out later when navigating in the terminal. I named the folder ‘fabacademy’
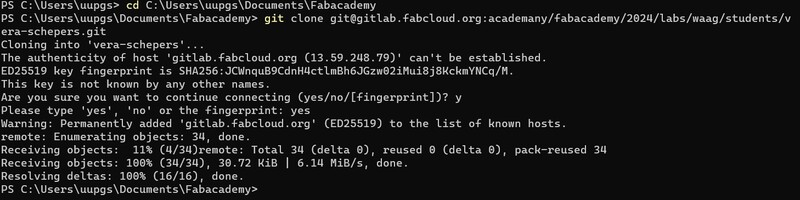 First use the cd command in your terminal to get to the right location, in my case:
 PS C:\Users\uupgs\Documents\fabacademy> here you want to clone your project. I made a mistake because I closed the terminal and then opened it again. The direction changed and I was in the wrong folder. I had to delete the repo and do it again in the right folder.Note to self: Double check and don’t be hasty Vera!This one goes especially for working in the terminal.
Now I opened Visual Studio Code (the test editor I downloaded) and I opened the project folder. By simply clicking open folder, how nice.
Git commands
Henk tells about the git commands we need to know, to send changes to git via the SSH key using the terminal on your computer:
- Git status : When you make changes in git local repo and you want to push it you use git status to start collecting al the changes
- Git add : adds the changes (Git add. with a dot makes sure you add all the changes at once) Note: you can not send more then 10 mb per time to the fablab git repo
- Git status : again, to check if the changes are added
- Git Commit -m : “type out what did you change’" and confirm
- Git config user: tell the computer who you are email address en name
- Git push -u origin master : to actually make the changes on the repository online (Tip: check Gitlab to see if it worked)
Commands usefull when working together on projects:
- Git fetch : collect all the changes everybody makes (fetching)
- Git pull : update all the changes teammates and I made on the repository, do this at the startbrr ohshitgit.comUsing Visual code studio I can do the same thing inside the program aAfter changing files: go to source control add the things you changed and type commit. don’t forget to give it a good name. And when go press synch you will do a git push. On Git, Pages executes the actions in the script and then it builds (in this case) the website
Hugo
I chose hugo as the static website generator because at the Fablab Arnhem (where I work) my college Niels build a new website using Hugo and a theme called doks. I want to be able to work on this project in the future so I think it will be good to stick with Hugo. I found a theme I liked for my fab academy website called Hexta. It’s developed for documenting, is responsive and I like look of it.
Static website generatorsHugo is a static website generator. A few of the benefits are:
- You can type text in markdown, when you have no experience in CSS and HTML this is easier to learn and understand
- When designing and editing the website you can run it locally before pushing it on the repository.
Installing Hextra theme
To install the theme I started following the tutorial I will follow the Hugo Modules installation as it comes recommended. I will install the theme as a add on so that the site receive updates. The design is a package sample that I will import in the folder (vera-schepers) so that I have a sample to work from.
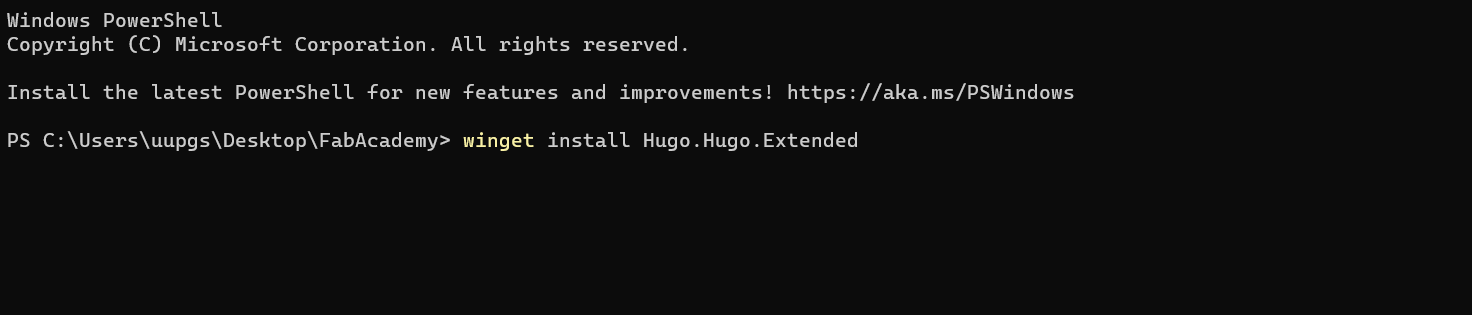
- Install Hugo extended on the computer.
- Install Go as the theme asked me to do.
- Go to local folder and empty the preview website that was there.
- Start making a new site with the following commands:
hugo new site my-site --format=yaml, I change my-site in this line to the foldername vera-schepers for overwriting the old content i used--forceas suggested in the terminal. - I got the error ‘go’ not found I got help from my college Niels and the conclusion might be that we first need to git push the new hugo files to the git origin. So I tried. Still the same error, We quick googled is and it says restart the terminal. Seems to simple but lets try, fixed it!

- Next step in the tutorial is to download the theme with the name Hextra, this worked well!
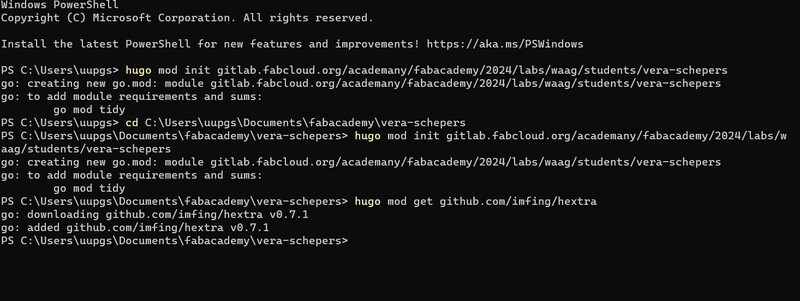
- The tutorial now asked to change the .yaml file so I open the folder in visual studio code and open the file: hugo.yaml and change the text to the following:
"module:
  imports:
- path: github.com/imfing/hextra!"- Now i’m going to create content using:
hugo new content/docs/_index.md- then preview the site locally using:
hugo server --buildDrafts --disableFastRenderAnd try to open it with my local host http://localhost:1313/ This went wrong because the page was empty.I was lost again and asked Niels for help. He gave my the tip to download the content directly from the github example site page of the theme. So I made a copy of the content folder and pasted it in my local repository, and shan we did a git push. forgot to make a snapshot here..
Deploy
At Waag Henk and Michelle worked us through deploying a website this for me was very hard to understand. I also was a bit worried about doing this on myself. So I started working on my site friday afternoon and evening. In the afternoon I could ask my college Niels to help out is I got really stuck which helped me a lot.
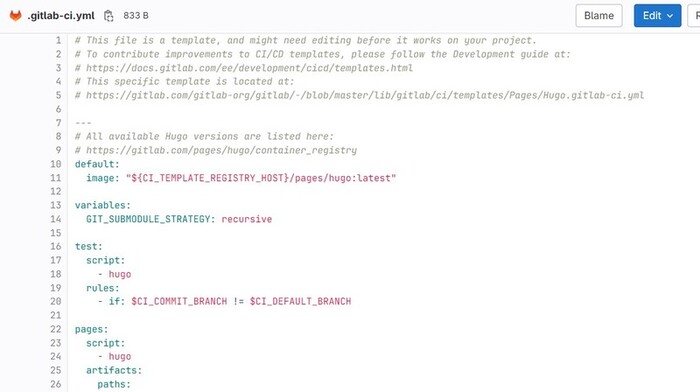
To deploy the site I looked at the following tutorial. I started at step 4 of the tutorial where we will build the site using a CI/CD pipeline and then deploy the site with GitLab pages.
- create a gitlabpages config file gitlab-ci.yml for hugo using the steps of the tutorial in this file we typed:
before_script: - apk add --update --no-cache git go - try go give it a go with Commit changes
- Navigate (in gitlab) to main brach-> build -> pipelines, error stating that a “go” dependency was missing.
- We found the answer to the missing dependance
- We continued following the tutorial and changed the yml file. This command build a hugo website converting the markdown and other files and minifies the HTML and CSS and JS filles for a faster website as the tutorial explained.
script: - hugo --gc --minify - We got the first green pipeline YEAH! missing go dependency! but when we opened the website we missed the CSS style sheet.
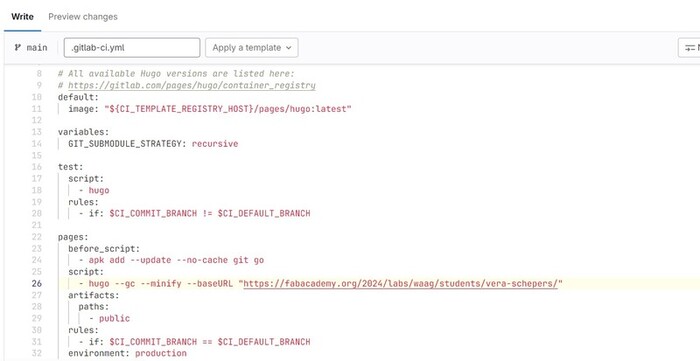
- We added the following line: –baseURL : “paste your url” This line helps the terminal that build the site to find the CSS style sheet!
Things I messed up and learned from
I got my repository and pipeline working. I’m happy at this moment and went home. There I started my Git fuck up. Eventually Erwin helped me out of via Mattermost Node Waag channel, thank you Erwin! The problems were:
- I didn’t understand the git commit button and used it as a save button because I thought this was the only was to view my website changes locally. Now I know I only need to save it to see the changes and I use Git commit when I want to make a snapshot of the changes to stage it before pushing it to the online repo.
- I pressed an internal Git panic button when my website showed only errors and no content (did something wrong with uploading a picture), and wanted to undo so fast that I didn’t read the error massages properly and I tend to go for the trail and error method which made it worse.
- Because I made so much commits, I went to far with the button undo commit. And now I was missing complete files. My online repo was still good so I wanted a clean start with my local repo. I didn’t have my notes organizes on the website like now and looked it up on the internet instead of thinking of the git clone(Erwin suggested later).
- I used something called git hard reset which gave me empty folders. Now it completely makes sense to me to clone the repo, but then I though this was a one time only thing.
- My local host still didn’t show the website it showed nothing. Eventually restarting the terminal and using hugo server solved this. I will now never forget the hugo server command!
- I messed up the .yaml and .yml files. I tried to paste my menu setup in the .yml file..
- Compressed the first photo’s without making a back-up, some could have better quality.
I did learn a lot from the whole experiment and now when I type out my notes everything just makes a lot more sense!
I now was not so worried anymore about making mistakes cause I can fix the above problems myself. I took my time to read the Hextra theme get started properly and start making some changes in markdown and I added new .md files to make content. After setting up my webpages I wanted to add a menu and this took my a while, see things i messed up number 6. It did help me understand the yaml file better and I made it work after reading more. I started organizing my website layout and my documentation.I’m using Image Magick to compress my pictures and screenshot. I know that Michelle also uses windows so I got the commands from her website. I now want to explore more options for Markdown and changing the yaml file for the structure of the site but before I do so I will make sure I checked all the boxes of week 1.
Image magick commands
Note: Keep the images well below 100 kb, if they are bigger you need a good reason. Note: Mogrify overwrites the current image, you can use is with or without
| command | output |
|---|---|
| magick mogrify -resize “800>” .jpg | resize the image in width |
| magick identify “picture name” | collect all the info about the picture |
| magick convert | convert it to jpg for example |
| quality magick mogrify -quality ..% | reduces the quality with a percentage |
| quality magick mogrify -quality 90% -resize 800 * .jpg | reduces the quality with 10 percentage and set width to 800 |
| convert input.png output.jpg | convert all PNG’s to JPG |
ffmpeg commands
Note: down to order of megabytes to minutes cheat sheet
| command | output |
|---|---|
| ffmpeg -i input.avi output.mp4 | convert media file to different format |
| ffmpeg -i input.mp4 -c:v libx264 -crf 24 -preset slow output.mp4 | set video bitrate to the output file to 64 kbit/s |
| ffmpeg -i input.avi -r 24 output.mp4 | frame rate output file 24 fps |
| ffmpeg -i input.mp4 -vf scale=1280:-1 output.mp4 | scales the video width to 1280 |
| $ ffmpeg -i input.mp4 -ss 00:05:10 -to 00:15:30 -c:v copy -c:a copy output2.mp4 | cut video by time |
editions
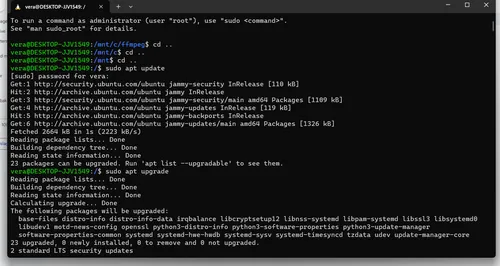
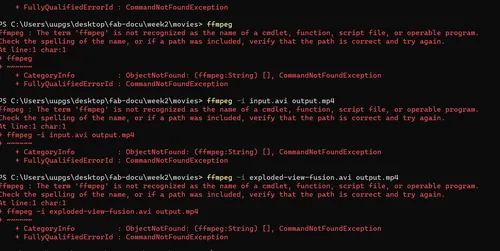
So after I saw the local review of Neil I knew I had to start downloading Linux on my laptop. I planned on downloading Git again and make a new SSH key but since I did not got errors whats so ever I forgot about it. However when I wanted to use ffmpeg the errors ocurred!
 I first tried to fix it and made a environmental variable called bin as you can read in Leo’s documentation it didn’t work. I quickly stopt and continued in Linux. I had great help from my Fabacademy college Leo
He helped my understanding how I can work in the terminal and also how I can go from windows to linux and visa versa.
So I installed linux with windows subsystem running
I first tried to fix it and made a environmental variable called bin as you can read in Leo’s documentation it didn’t work. I quickly stopt and continued in Linux. I had great help from my Fabacademy college Leo
He helped my understanding how I can work in the terminal and also how I can go from windows to linux and visa versa.
So I installed linux with windows subsystem running wsl --install the upfollowing steps are pretty easy you have to give yourself a password. The password in not shown when you type it so watch out for this.
linux mount> connects and un connect a device to linux my docs
- cd ~ (home directory)
- cd .. (folder higher up)
- cd :/ (highest folder)
- ls -la (open folder)
- ls (list)
- la (hidden files).files
- commando - certain option
- In the mount, you can find the windows C
- letter + tab fills in the name automatically
- sudo (super user do)
- apt (package manager) to install stuff. Have to be a sudo to be able to do the command
I used sudo apt install ffmpeg and I had it running in no time!