
WEEK 3 COMPUTER-CONTROLLED CUTTING
For week 3 we will learn a little about computer-controlled cutting. As in previous weeks, we will carry out an activity and explain the process.
WHAT IS COMPUTER-CONTROLLED CUTTING?
When we hear "computer-controlled cutting," we often think of related things, but in reality, we rarely understand the true concept or function of this work. CNC is a process where, through software, we can control cutting on machines based on digital instructions, offering greater precision and faster production of parts. Furthermore, there are different types of cutting to be able to cut a wider variety of materials.
TYPES OF CUTS

Laser cutting
One of the most common types, which works through thermal energy, concentrates light on a point that cuts the material with high precision.

Milling cut
It is a rotary cut that cuts the material, especially used for making precision holes or curves.

Vinyl cutting
With this type of cutting we can cut designs such as logos onto adhesive vinyl sheets, all using a lettering technique.

Water jet cutting
This type of cutting uses a high-pressure, high-speed water jet, allowing for high-precision cuts. Unlike other cutting methods, this one produces less waste, making it more efficient.s
VINYL CUTTING ACTIVITY
After learning a little more about CNC and its types, we will carry out an activity in which we will work with vinyl cutting and explain the process to better understand how it works.
Design
The first step is to create the design in cutting software; in my case, I used CutStudio. The design includes both graphic elements and text. In this case, I designed a "Golden Fitness" logo. It's important that the entire design is in vector format, since the vinyl cutter works by following paths defined by lines and nodes.


Vinyl placement
The physical material is prepared, then the vinyl roll is placed in the cutting machine. We must ensure that it is correctly aligned and well secured by the pressure rollers to prevent it from moving during cutting. This ensures correct placement of the material and avoids cutting errors.

Material scanning
As we can see at the beginning of the process, the cutting plotter is in the initialization phase, displaying the message "LOADING". This means that the machine is moving its print head to detect, using sensors, the position of the pressure rollers. This is an essential step for material recognition.
When this loading process is complete, the LCD screen now displays the actual working dimensions, indicating a width (W) of 31mm and a length (L) of 18mm. With this information, we can see the values that we must configure in our cutting software to ensure that the vector fits perfectly to the detected vinyl scrap, avoiding overflow errors or material waste before sending the final execution command.


Cutting process
Once the design, previously prepared from the software, has been sent and I have ensured that the dimensions and settings are correct, we can see in the video how the machine follows the design's paths, making precise cuts on the vinyl material.
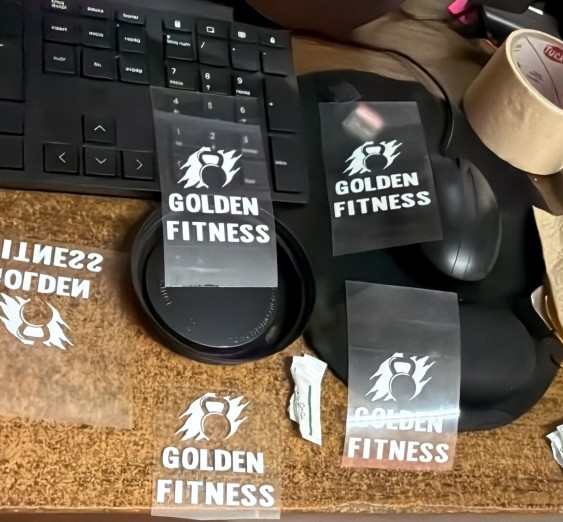
Once this entire process is complete, we obtain the vinyl already cut with the shapes of our design; we can observe the logos completely defined on the material.

Vinyl heat transfer
Finally, I placed the design on the garment, positioning it correctly in the desired area. I used a heat press to apply heat and pressure for a specific time, which allowed the vinyl to adhere correctly to the fabric. Then I removed the protective film from the vinyl.

RESULT
