Website Creation.
1. Used GPT chat for code generation.
2. Copied the code into MS Word. Edited it for my needs – inserted my data, changed section names.
3. Saved the document with the .html extension.
I use to edit the site code SUBLIME Text

I used this code for creating Title of page.

To create lines with a link to other pages of the site, I use the following code

I am improving my site oll time. This week I learned how to make expandable links. Made them for all the upcoming weeks. In week two, I added a table and formatted it.
28.02. I divided my site into separate pages. To do this, Oremi created html files with the code of each page. On the main page, I wrote a link to each of the created pages
Creating an account on GitLab is a simple process. Here are the steps you need to follow:
Go to the GitLab website:
Open your web browser and go to https://gitlab.com/.
Choose "Sign up":
Click on the "Sign up" button, usually located in the top right corner of the page.
Fill out the registration form:
You will be presented with a form where you need to enter your email address, choose a username, password, and other required information. It's important to select a secure password and remember it.
Complete the registration:
After entering the necessary details, click the "Register" button or its equivalent to complete the registration process.
Activate your account:
You may receive a confirmation sent to the provided email address. Check your inbox and follow the instructions to activate your account.
Log in to your account:
After activating your account, return to the GitLab homepage and log in using your username and password.
Creating a new repository on GitLab is also a straightforward process. Here are the steps:
Log in to your account:
Sign in to your GitLab account using your username and password.
Go to your profile:
After logging in, click on your username in the top right corner of the screen and select "Your profile."
Create a new project:
In your profile, choose the "Projects" tab and click the "New project" button.
Choose the project type:
You will be prompted to choose the type of the new project: "Blank," "CI/CD for external repository," "Import project," etc. Select "Blank" to create an empty repository.
Fill in project information:
Project name: Enter the name of your project.
Project slug: This is automatically filled based on the name and can be changed if needed.
Visibility Level: Choose the visibility level of your project (Public, Internal, Private).
Initialize repository with a README: Select this option if you want to create a README.md file for your repository.
Click "Create project":
After entering all the necessary information, click the "Create project" button.
In order to set up easy uploading of files to gitlab, I used the generation of SSH keys. For this you need to use the terminal

after your keys are generated, the .ssh folder will appear in the user folder, since it is most likely hidden, you need to use the command "Command (⌘) + Shift (⇧) + ."

it will contain two files. You need to choose the one with the public extension. Open this file using the Notepad text editor.


go to the gitlab page. Click on the profile icon. select ssh settings there. and on this page choose to add a new key. Abracadabra insert the key in the field and click add key


First you need to clone the repository
git cloneTo download files from a computer to the repository, you can use the terminal and the commands at this link
git commit git pushyou can also use desktop to use gitlab. I tried using github desktop. It is very convenient if there is not enough command visualization. all necessary tasks are implemented in the form of buttons.

My final project
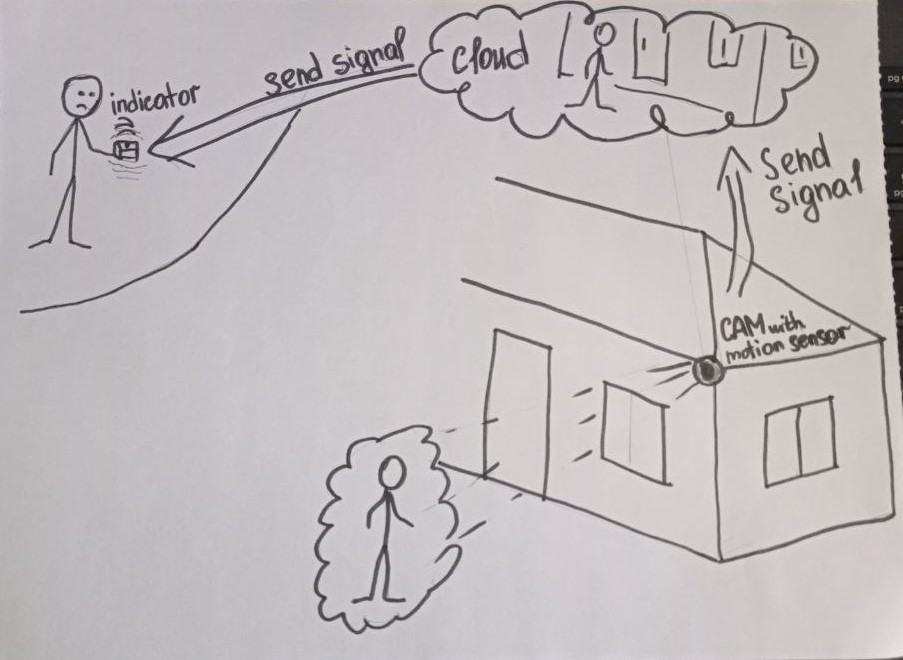
In my final project, I plan to make a system for remote monitoring of the house. It is possible to make something like an alarm that will trigger when someone is in the field of view of the system. Sketch of the project in the photo, and more detailed information in the section
The surveillance system for the area.
Camera with built-in motion sensor:

The camera can automatically activate when motion is detected within the private property.
The motion sensor helps in timely detection of potential intruders.
Notification to a remote indicator (LED remote control):
If the camera detects motion or potential intrusion, the system sends a notification to a remote indicator, such as an LED remote control.
The LED can flash or stay lit continuously, indicating the presence of an event.
Remote control:
The user can have a remote control to arm/disarm the system or check the security status.
Convenient control can be particularly useful for homeowners who are away from home.
Data storage system:
Provide a system for storing recordings or changes on a server or cloud storage.
Allow the homeowner to view archived recordings for event analysis. Mobile application:Develop a mobile application for devices so that homeowners can receive notifications and view video recordings in real-time.
Provide the ability to remotely control the system through the application.
I want to use ESP32-CAM to implement such a system
The combination of a Wi-Fi module with a high-performance microcontroller ESP32, OV2640 video camera, micro-SD memory card slot, and additional 4MB of RAM allows for the creation of portable devices for security systems, video surveillance, and smart home systems.
Student's agreement
To view my student agreement
Click here