Week 15 Assignment
WILDCARD
EDM Wire Cutting Process
Overview
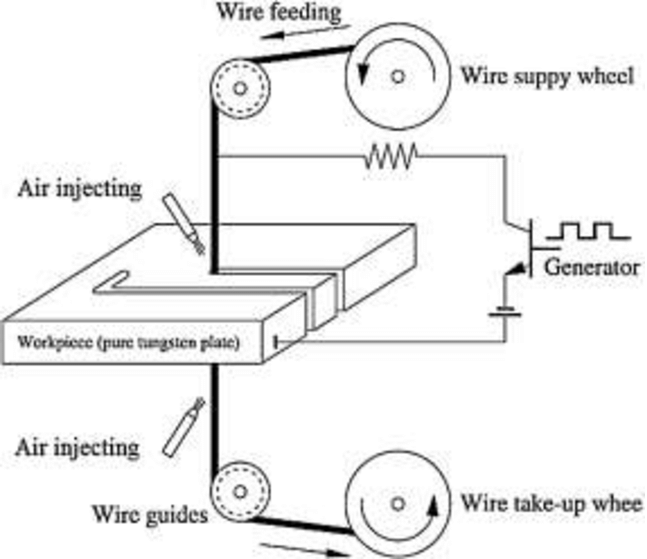
EDM wire cutting, also known as wire EDM (Electrical Discharge Machining), is a non-traditional machining process used to cut complex shapes in electrically conductive materials. It utilizes electrical sparks (discharges) between a thin, electrically charged wire (electrode) and the workpiece to erode material.
Process Steps
The EDM wire cutting process typically involves the following steps:
Step 1: Setup
- Workpiece Preparation: Secure the workpiece, which is typically a metal, in the EDM machine.
- Tool Preparation: Mount a thin wire electrode made of brass or other electrically conductive material onto the machine. The wire is continuously fed through the workpiece during cutting.
Step 2: Electrical Discharge
- Generate Electrical Discharge: Apply a controlled electrical discharge (high-frequency pulses of electricity) between the wire electrode and the workpiece.
- Material Removal: The electrical discharge creates intense heat, melting and vaporizing small particles of the workpiece material, which are then flushed away by a dielectric fluid (usually deionized water).
Step 3: Cutting Process
- Automatic Feed: The wire electrode is continuously fed through the workpiece, guided by computer numerical control (CNC), following a programmed path to cut the desired shape.
- Precision Control: The process allows for high precision, with minimal mechanical force applied to the workpiece, resulting in very fine cuts and intricate details.
Applications
EDM wire cutting is used in various industries for manufacturing parts and components where high precision and intricate shapes are required, including:
- Tool and die making
- Aerospace components
- Medical devices
- Automotive parts
- Electronics
- Mold making
- Prototyping
Advantages
- Precision: Capable of cutting complex shapes with high accuracy.
- Versatility: Works with a wide range of electrically conductive materials.
- No Mechanical Contact: Minimal tool wear and no mechanical forces applied to the workpiece.
- Automation: CNC control allows for automated and repeatable cutting processes.
Mitsubishi MV1200-S Advance Wire EDM Machine

Overview
The Mitsubishi MV1200-S Advance is a high-precision Wire Electrical Discharge Machining (EDM) machine designed for intricate and complex cutting tasks in various industries. It incorporates advanced features to enhance productivity, precision, and ease of operation.
Key Features
- Auto Threading System: Automatically threads the wire electrode through the workpiece, improving efficiency and reducing downtime.
- High-Speed Machining: Capable of high-speed cutting with improved machining speeds and reduced cycle times.
- Advanced Motion Control: Utilizes Mitsubishi's advanced M800 series control technology for precise and accurate cutting operations.
- Energy Saving Features: Incorporates energy-saving functions to optimize power consumption during operation.
- Automatic Wire Changer: Allows for automatic spooling and changing of wire electrodes, enhancing operational efficiency.
- Wire Tension Control: Ensures consistent wire tension during machining, contributing to stable and reliable cutting performance.
- Large Work Area: Offers a spacious work area suitable for handling large workpieces and accommodating complex cutting geometries.
- User-Friendly Interface: Equipped with a user-friendly interface for intuitive operation and programming, enhancing ease of use.
EDM Machine Specifications
Overview
Below are the specifications for the EDM (Electrical Discharge Machining) machine:
Specifications
| Feature | Details |
|---|---|
| Machine Travel (X x Y x Z) | 400 mm x 300 mm x 220 mm (15.75 in x 11.81 in x 8.66 in) |
| Maximum Workpiece Dimensions (W x D x H) | 810 mm x 700 mm x 215 mm (31.89 in x 27.56 in x 8.46 in) |
| U/V Travels (from center) | ±60 mm x ±60 mm (±2.36 in x ±2.36 in) |
| Taper Angle at Thickness | 45° at 1.8" (45° at 45.72 mm) |
| Wire Diameter Possible | 0.1 mm to 0.3 mm (0.004 in to 0.012 in) |
| Auto Threader Technology | Improved non-contact Cylindrical Drive System with non-contact auto-threading system, capable of fast threading and re-threading of 0.25 mm brass wire. |
Features
- Precision machining capabilities with ±60 mm U/V travels.
- Large workpiece capacity up to 810 mm x 700 mm x 215 mm.
- Capable of achieving a taper angle of 45° at 1.8 inches thickness.
- Flexible wire diameter range from 0.1 mm to 0.3 mm.
- Advanced auto-threading technology for enhanced productivity.
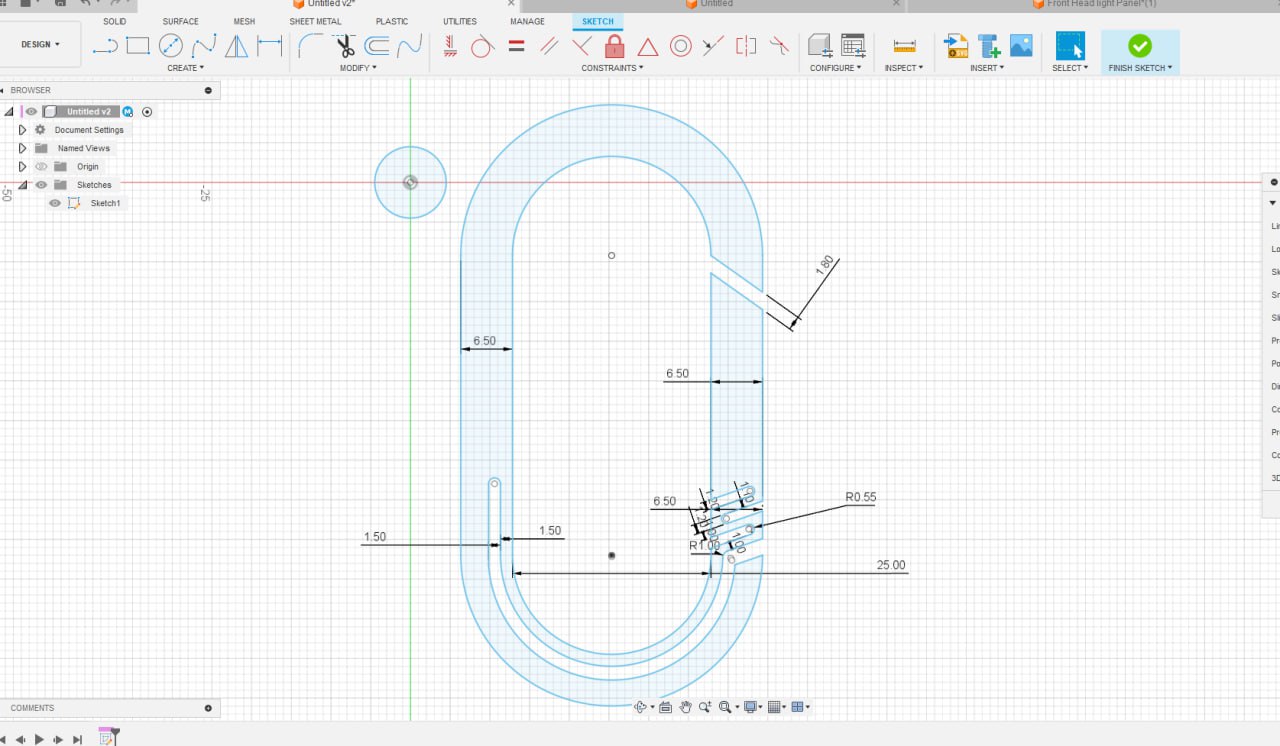
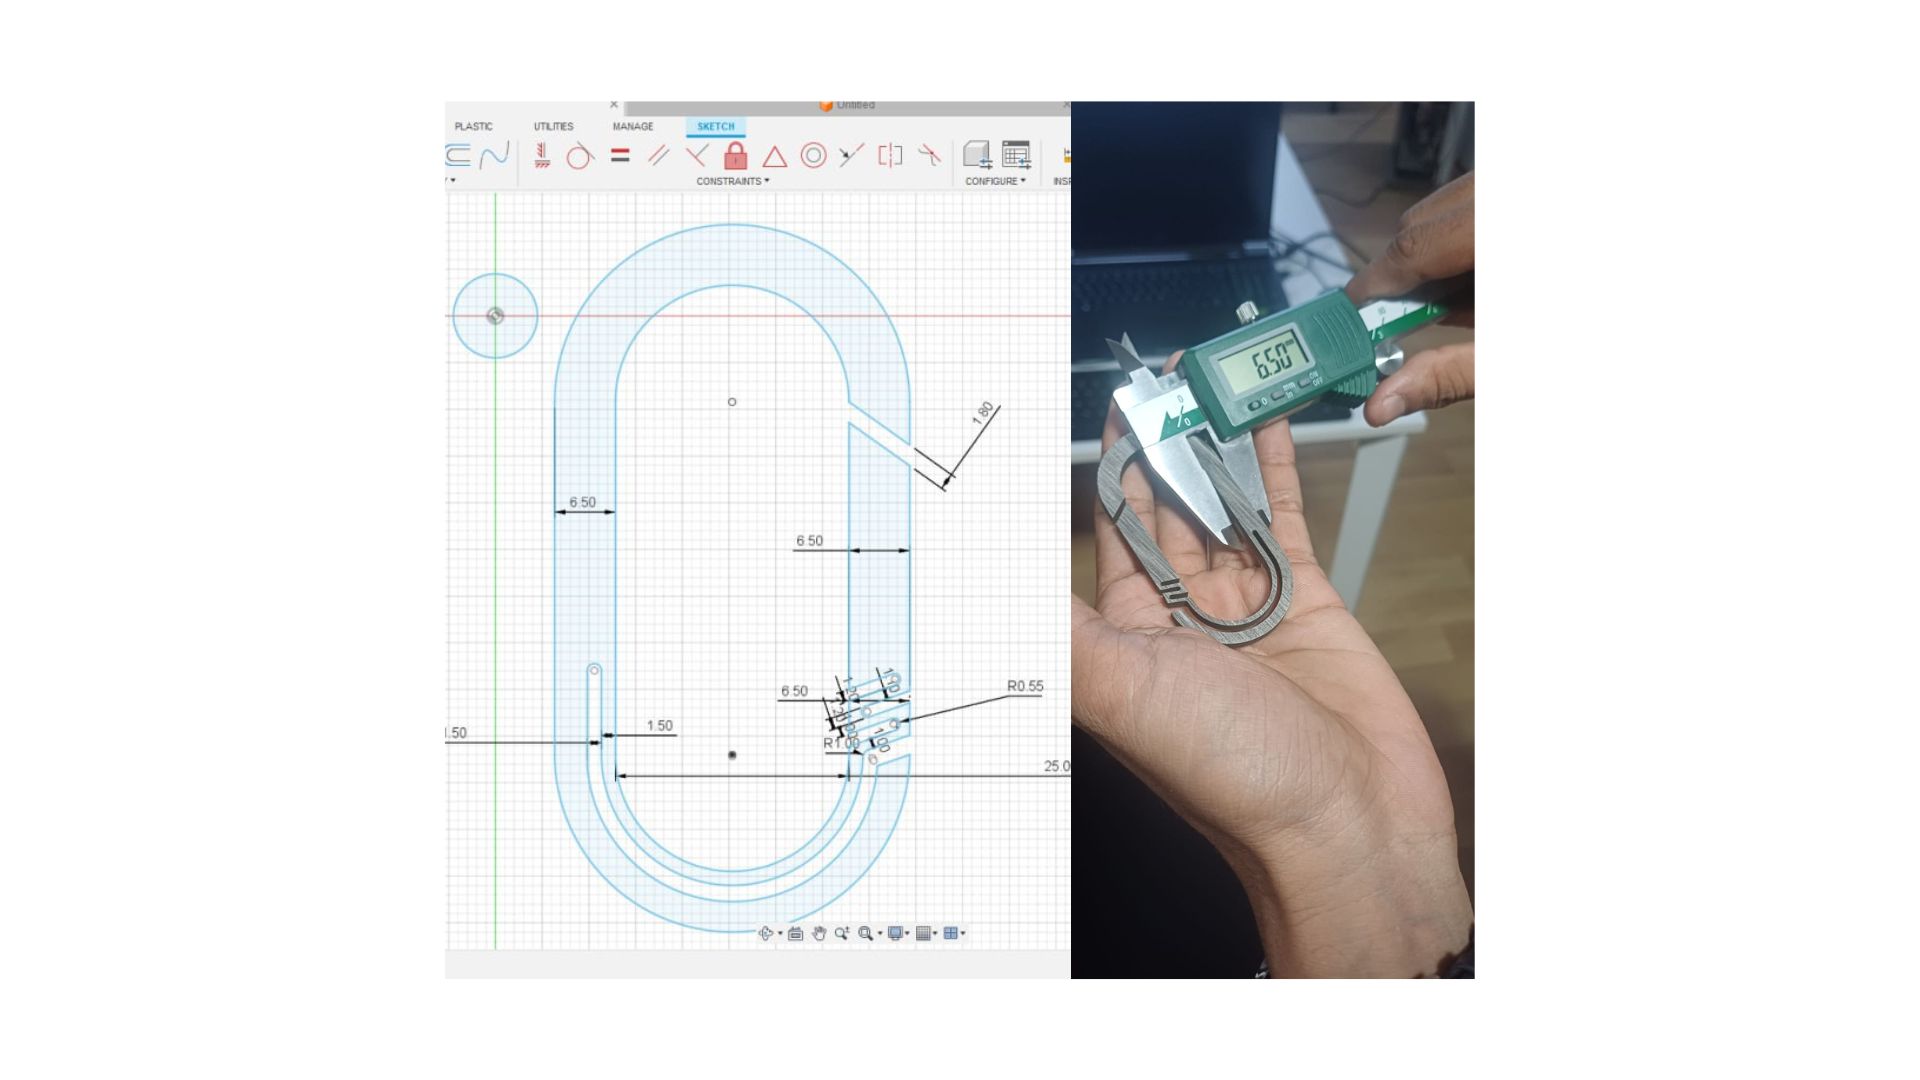
Designing a Carabiner in Fusion 360
Creating the Design:
- Opened Fusion 360 and started a new design project.
- Used sketch tools to draw the profile and features of the carabiner, ensuring it meets the required dimensions and functionality.
- Incorporated details such as the gate, nose, spine, and other structural elements typical of a carabiner.
Modeling and Refinement:
- Utilized Fusion 360's parametric modeling capabilities to refine the design, adjusting dimensions and angles as necessary to achieve the desired shape and strength.
- Applied fillets and chamfers to smooth edges and enhance durability.
- Once satisfied with the design, exported the carabiner model to a DXF (Drawing Exchange Format) file.
- DXF format is widely compatible and suitable for sharing with manufacturing processes such as laser cutting or CNC machining.
DRILL
drilling is a key point in wirecut edm as it acts asa entry point for the wire the work piece that i choose was pre drilled in advance
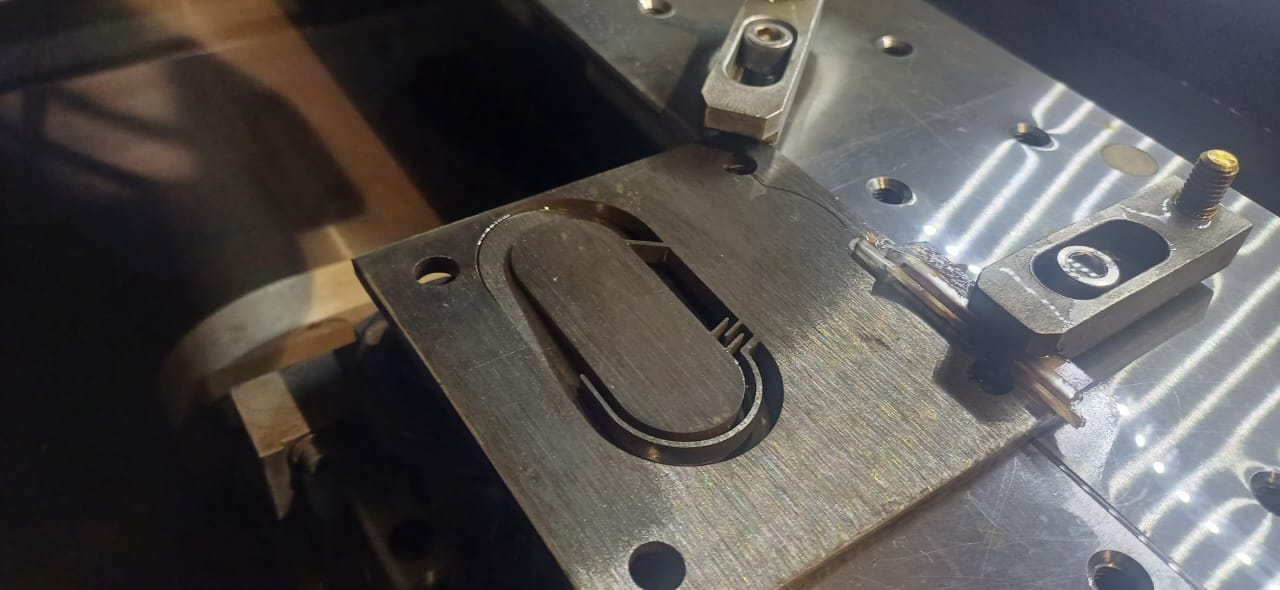
WORK HOLDING
Using Edge Clamps to Hold Workpieces
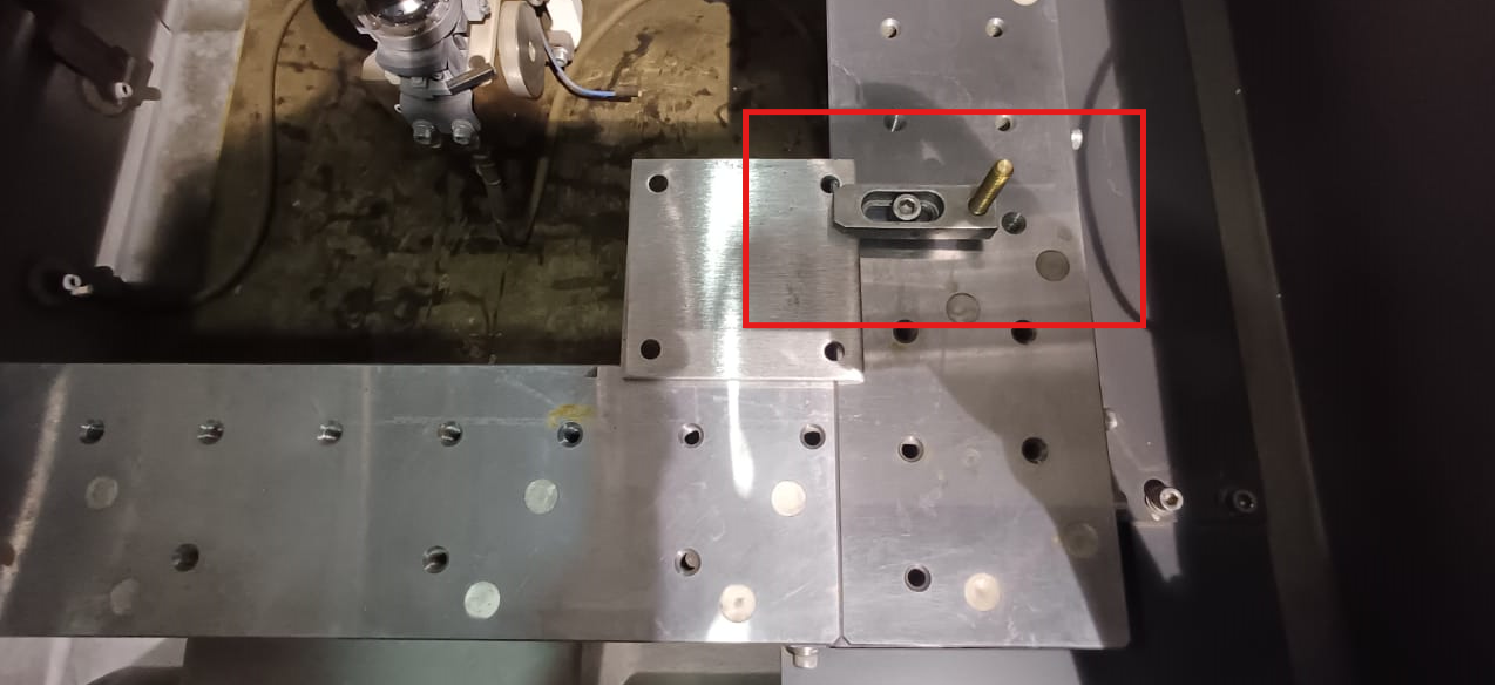
When working with manufacturing processes, such as CNC machining or EDM (Electrical Discharge Machining), securely holding the workpiece to the machine's bed is crucial for precision and safety. Edge clamps are commonly used for this purpose.
Edge Clamp Application:
- Function: Edge clamps secure the workpiece by clamping its edges firmly against the machine bed or fixture plate.
- Types: There are various types of edge clamps, including manual and pneumatic versions, each suitable for different applications and workpiece materials.
- Installation: Position the edge clamps strategically along the edges of the workpiece to ensure even and secure clamping without interfering with machining operations.
- Adjustability: Many edge clamps offer adjustable features to accommodate different workpiece sizes and shapes, providing flexibility in setup.
- Benefits: Using edge clamps helps prevent workpiece movement during machining, ensuring consistent machining accuracy and reducing the risk of errors or damage.
Setting Up and Operating the Wire EDM Machine
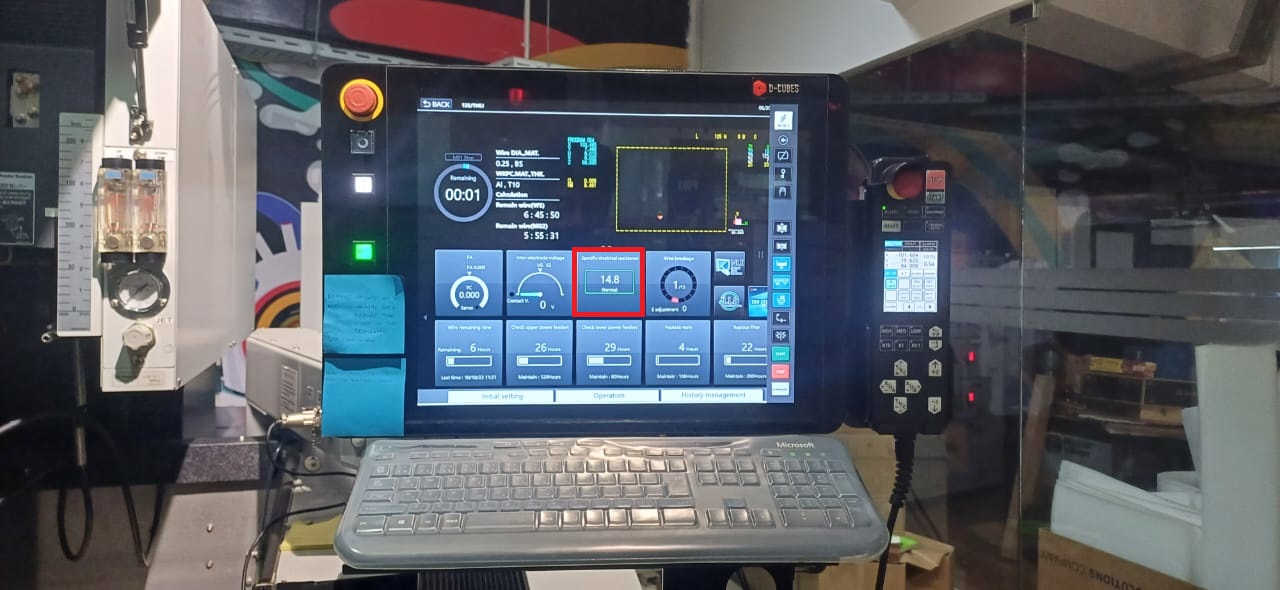
Pre-Operation Checks
- Specific Electrical Resistance (SER): Ensure the SER value is within the normal range before proceeding.
- G92Clear Button: Check that the G92Clear button on top of the machine is illuminated in blue. If it's not, press Reset until it turns blue to ensure proper initialization.
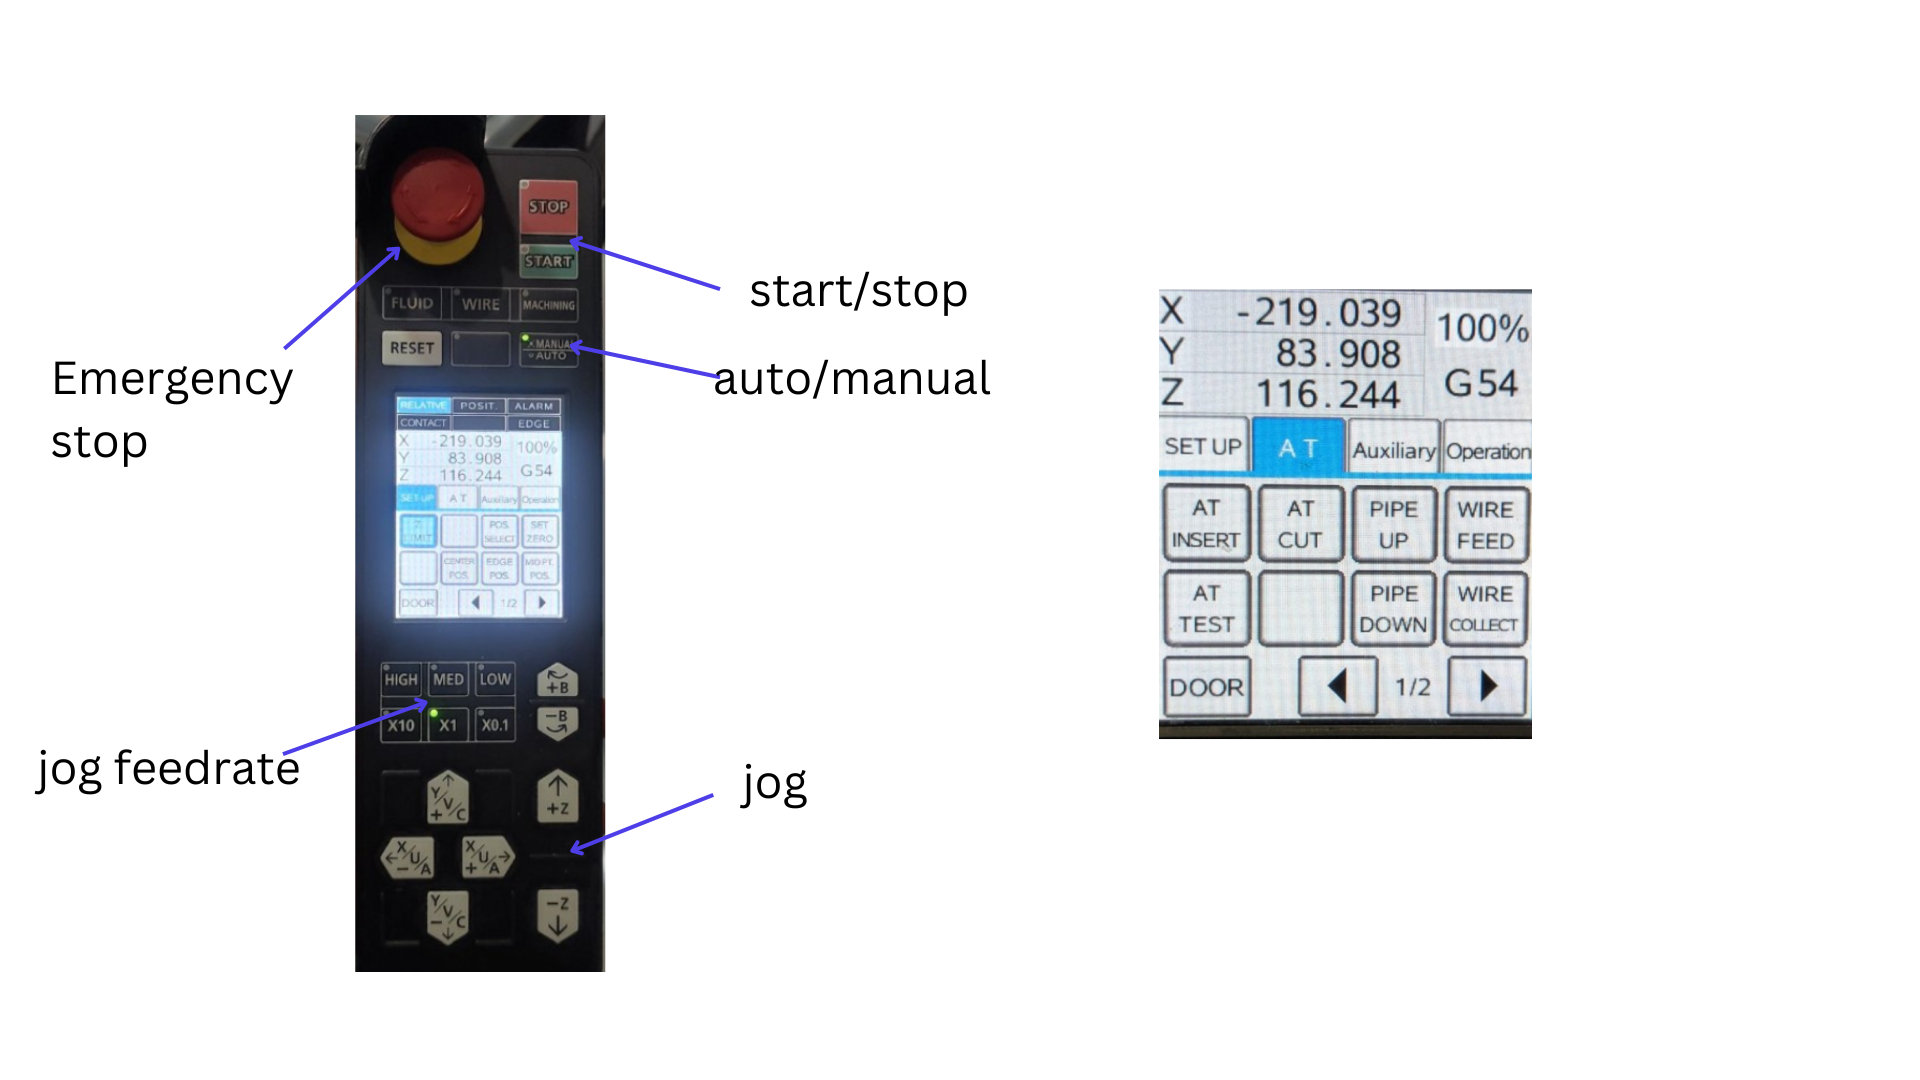
Pendant Controls Overview
The pendant serves as your primary control interface for manipulating the machine's functions. Here's a quick rundown of its key controls:
- AT Insert and AT Cut: Used for automatic thread insertion and cutting operations, respectively.
- AT Test: Verifies nozzle alignment by allowing water flow through the nozzle.
- Pipe Up and Pipe Down: Manual controls for wire insertion during AT Insert failures.
- Movement Controls: Adjust speed (High, Med, Low) and move the nozzle in specific axes (+X, +Y, +Z).
Setting Up for Operations
-
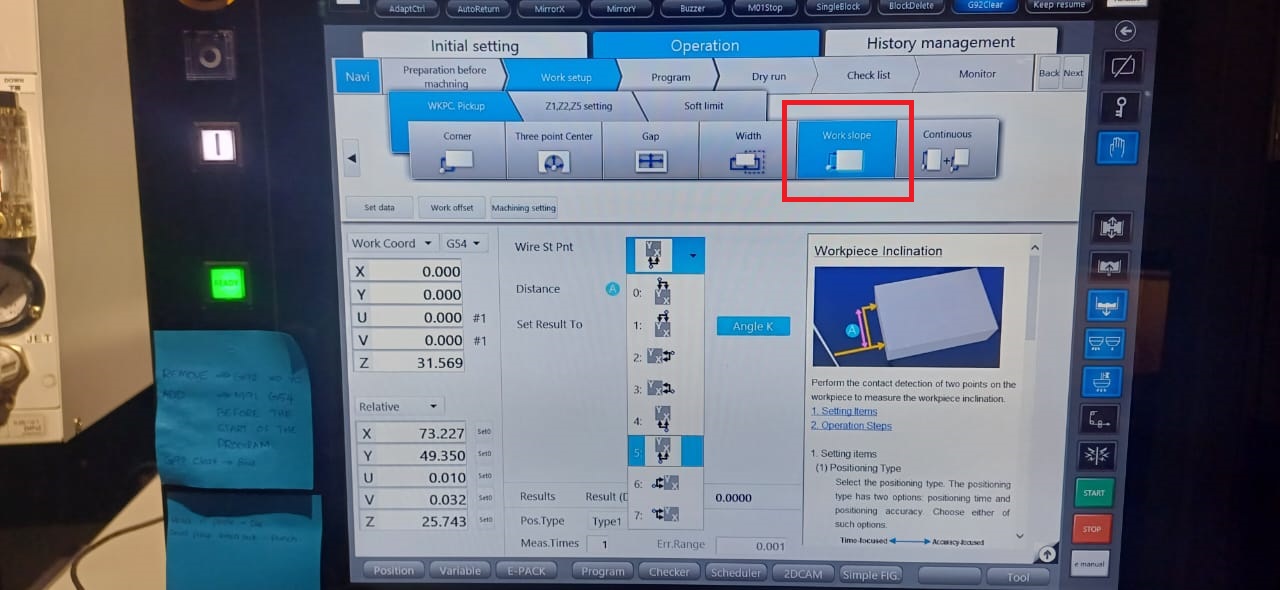
Work Slope Measurement
Begin by pressing AT Insert to load the wire.
Navigate to "Work Setup" on the pendant and select the appropriate slope measurement method.
Initiate the process by pressing "Start" on the pendant to determine the slope.
-
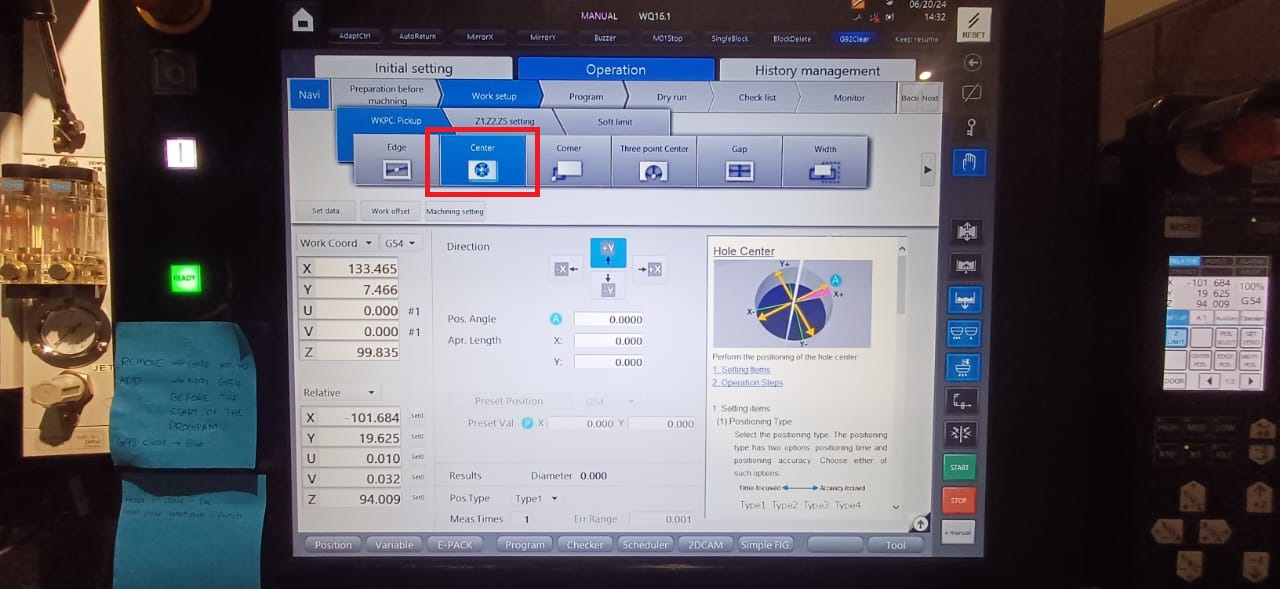
Origin Setup
Before starting each operation, ensure the nozzle is positioned accurately.
Use "AT Test" to verify water flow through the hole and confirm proper alignment.
Insert the wire using "AT Insert" after alignment is verified.
Navigate to "Work Setup > Center" to find and set the center of the workpiece, ensuring to specify details such as angle (e.g., 20.0 deg) and coordinate values (X and Y as 0.0).
Machining Operations
-
CAM Setup
Load .dxf file and select "Specify Machining" to define machining conditions.
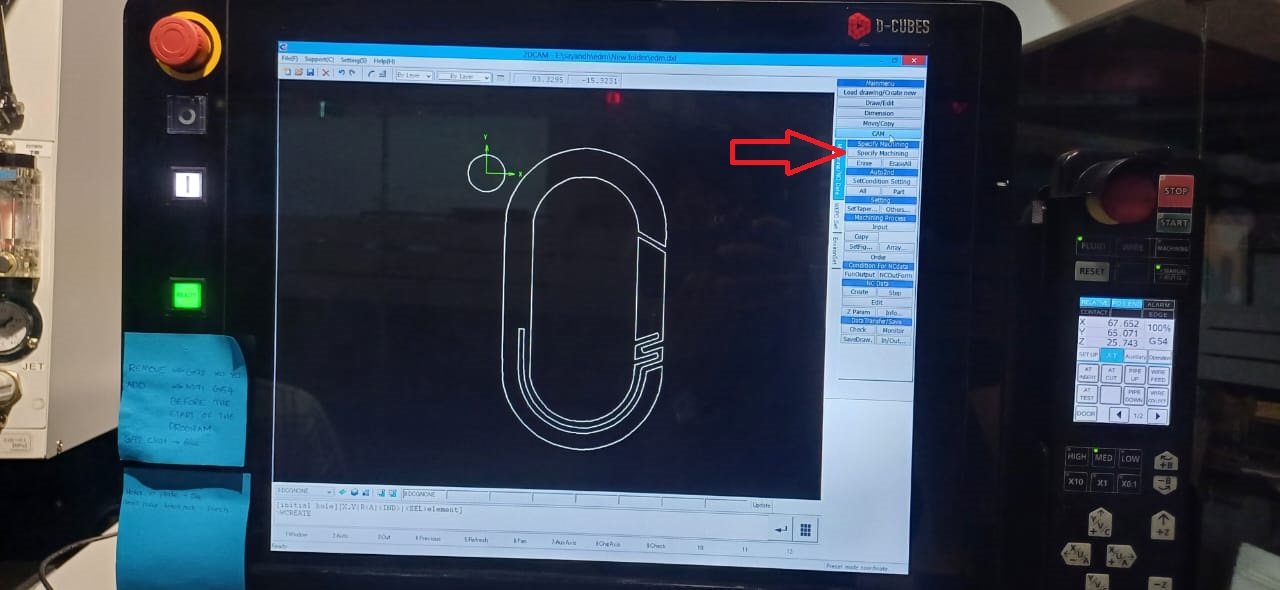
Use the pendant to set starting points and adjust operation parameters under "SetCondition Setting."
Generate G-Code by selecting "NC Data > Create" and save it using "Data Transfer/Save." Make necessary adjustments such as adding "M91G54" for the origin and removing unnecessary codes like "G92X0Y0."
Preparing for Production
-
Dry Run Verification
Perform a Dry Run under "Program > Dry Run" to simulate the machining process and verify the tool path.
This step ensures that all settings are correct before actual production begins.
-
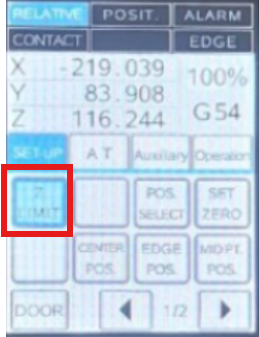
Setting Z Limit
Adjust the upper nozzle to set the Z limit, ensuring it's positioned closely to the workpiece.
Hold down "Z limit" on the pendant to set this limit effectively.
Starting the Operation
-
Initiating the Process
Once all preparations are complete and verified, navigate to "Program" on the pendant.
Select "Start" to commence the machining process.
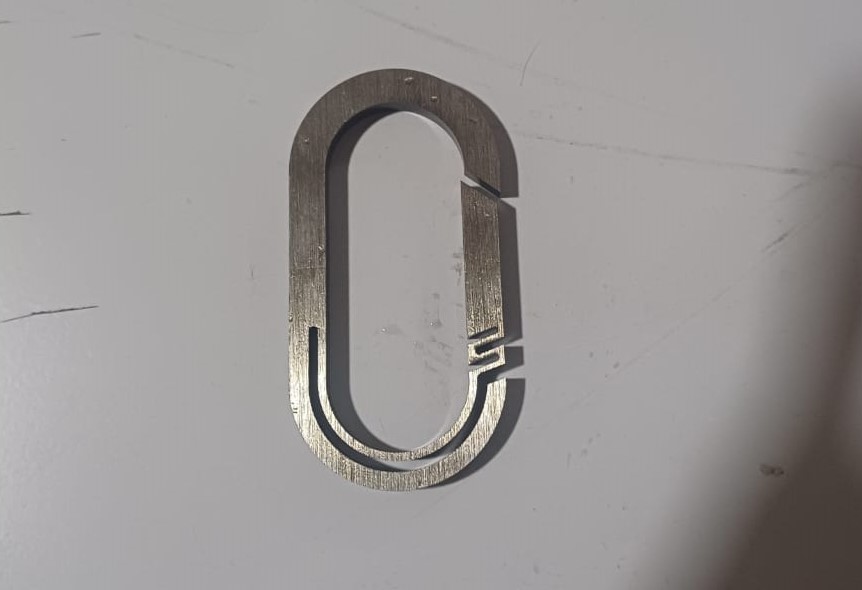
PART
once the process is completed the machine will stop then lift the z axis using the pendant and at> at cut in pendant to cut the wire of and i removed the work from the bed
"I measured the part using a vernier caliper and found it to be 6.5 mm. However, due to the vernier's least count of 0.02 mm and the machine's tolerance was said to be 5 microns, I couldn't accurately messure the fine tolerances."
it is really impressive that we got such tolerances
By following these steps, you'll be able to effectively set up and operate the Mitsubishi MV1200-S Advance wire EDM machine for precise and efficient machining tasks. Remember to always perform checks and validations to ensure smooth operations and optimal results.
DOWNLOAD THE FILES
download the DESIGNFILES