
Week 13: Molding & Casting
Design of the Mold
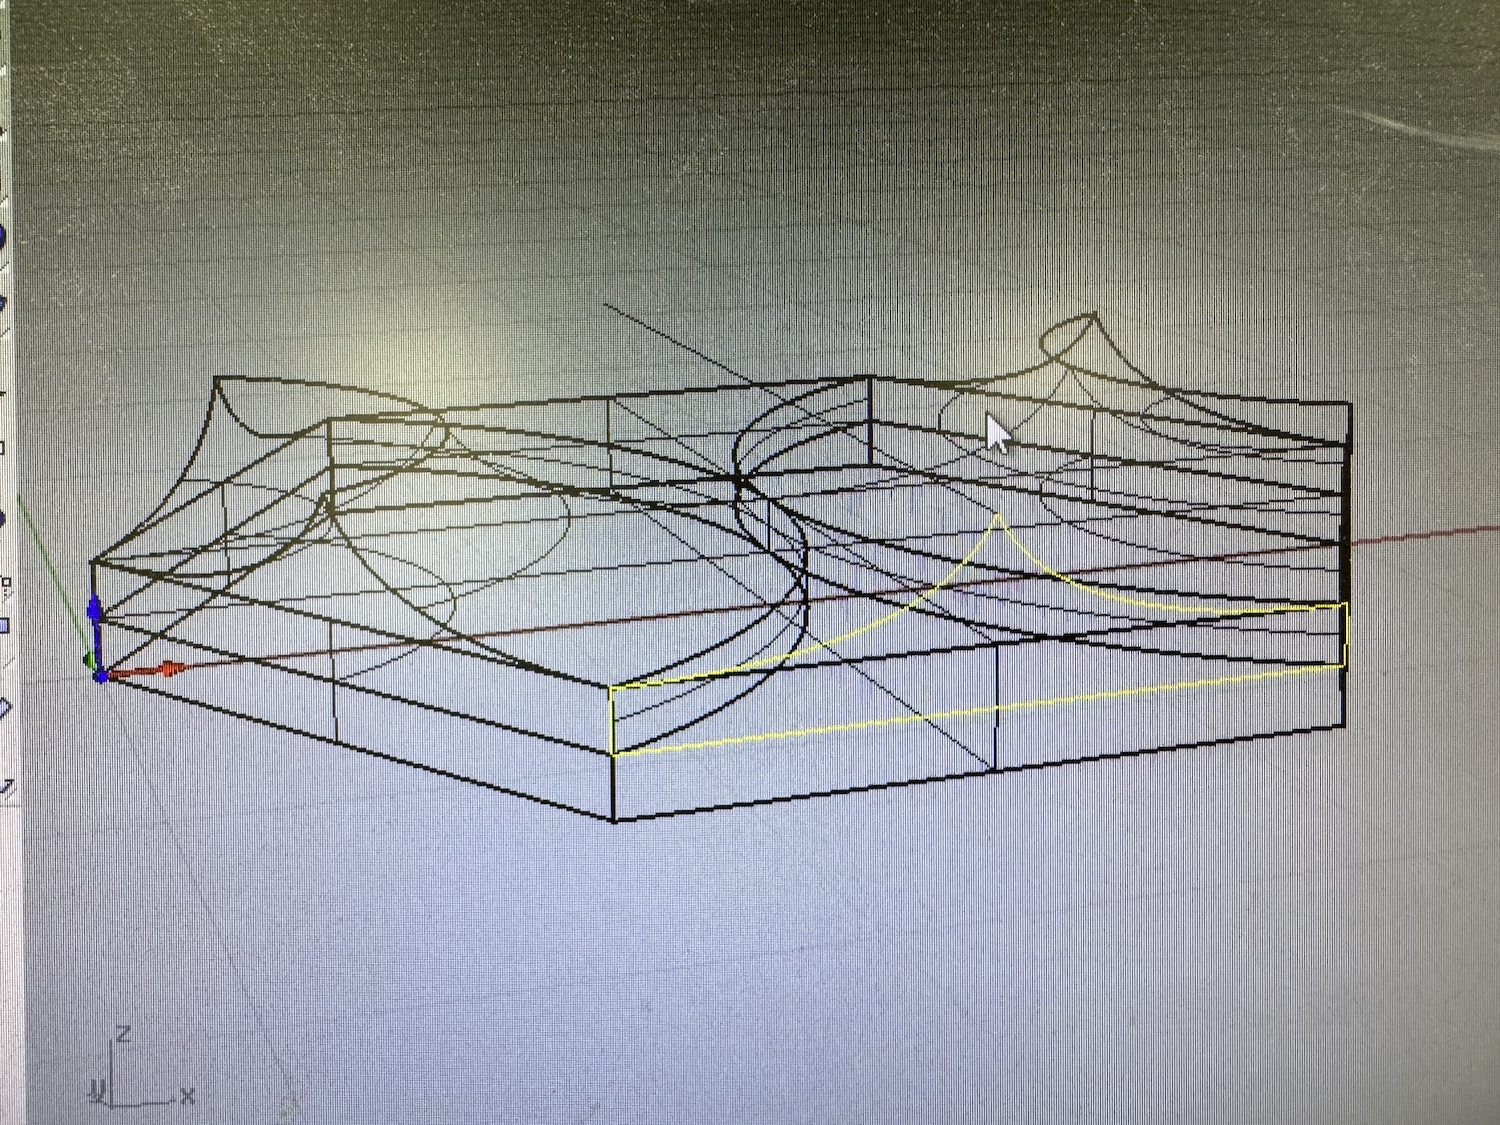
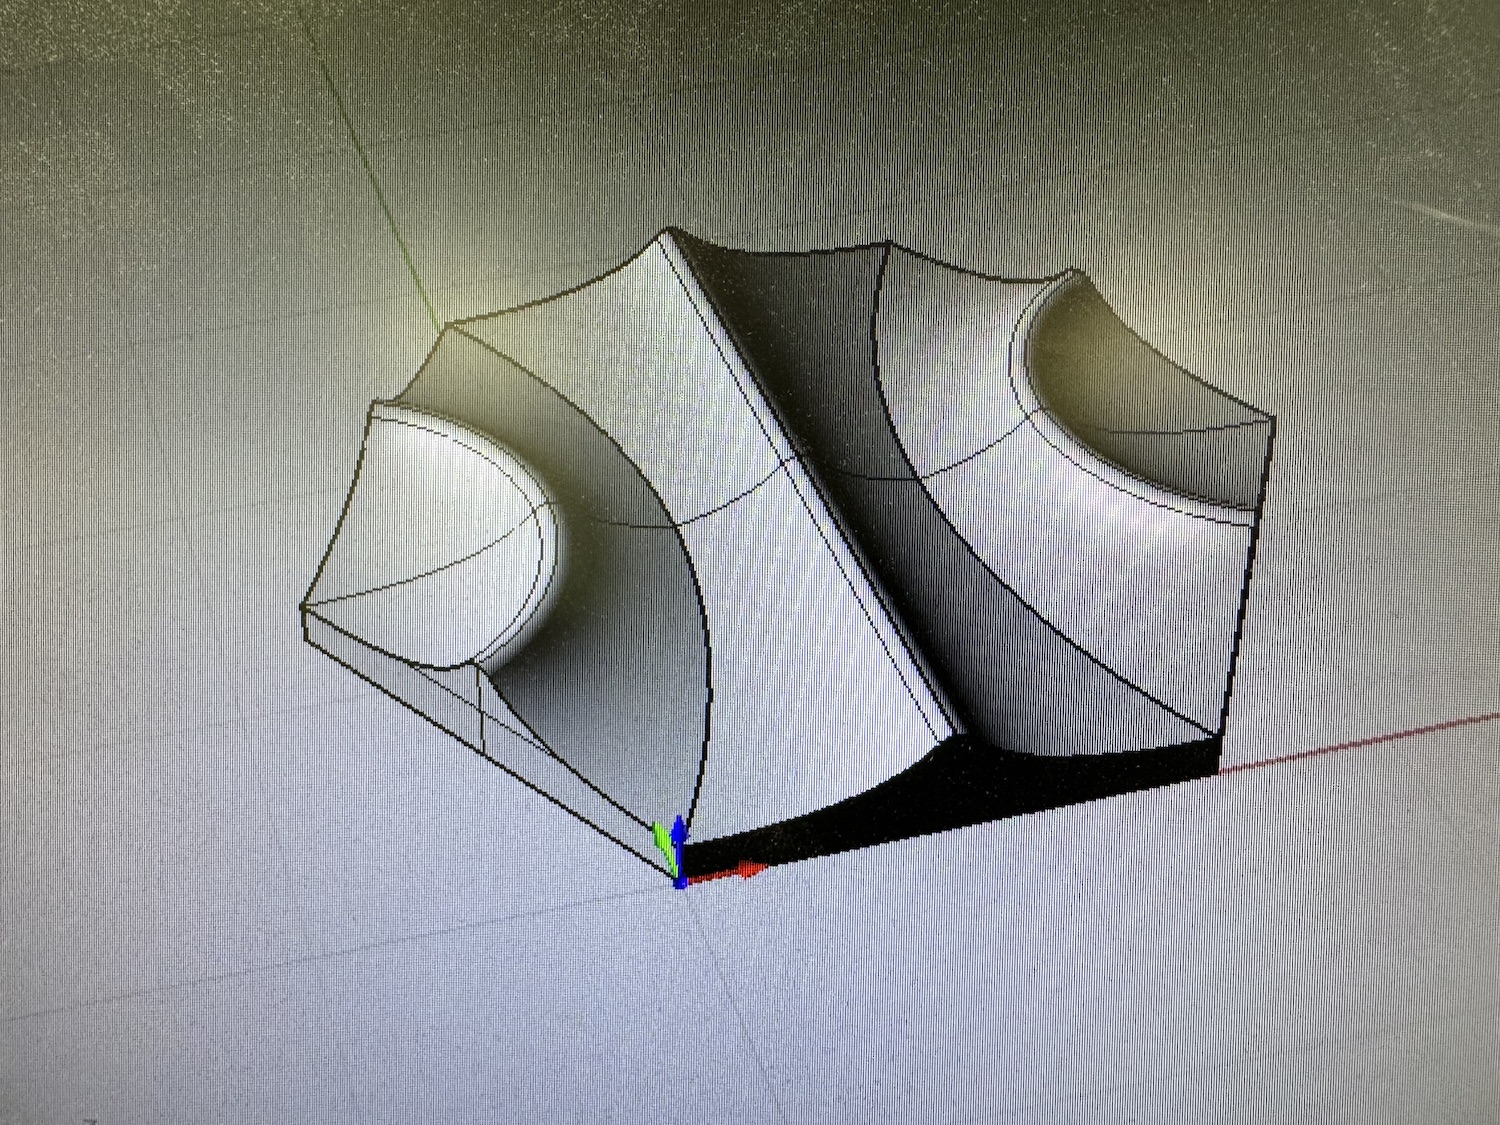
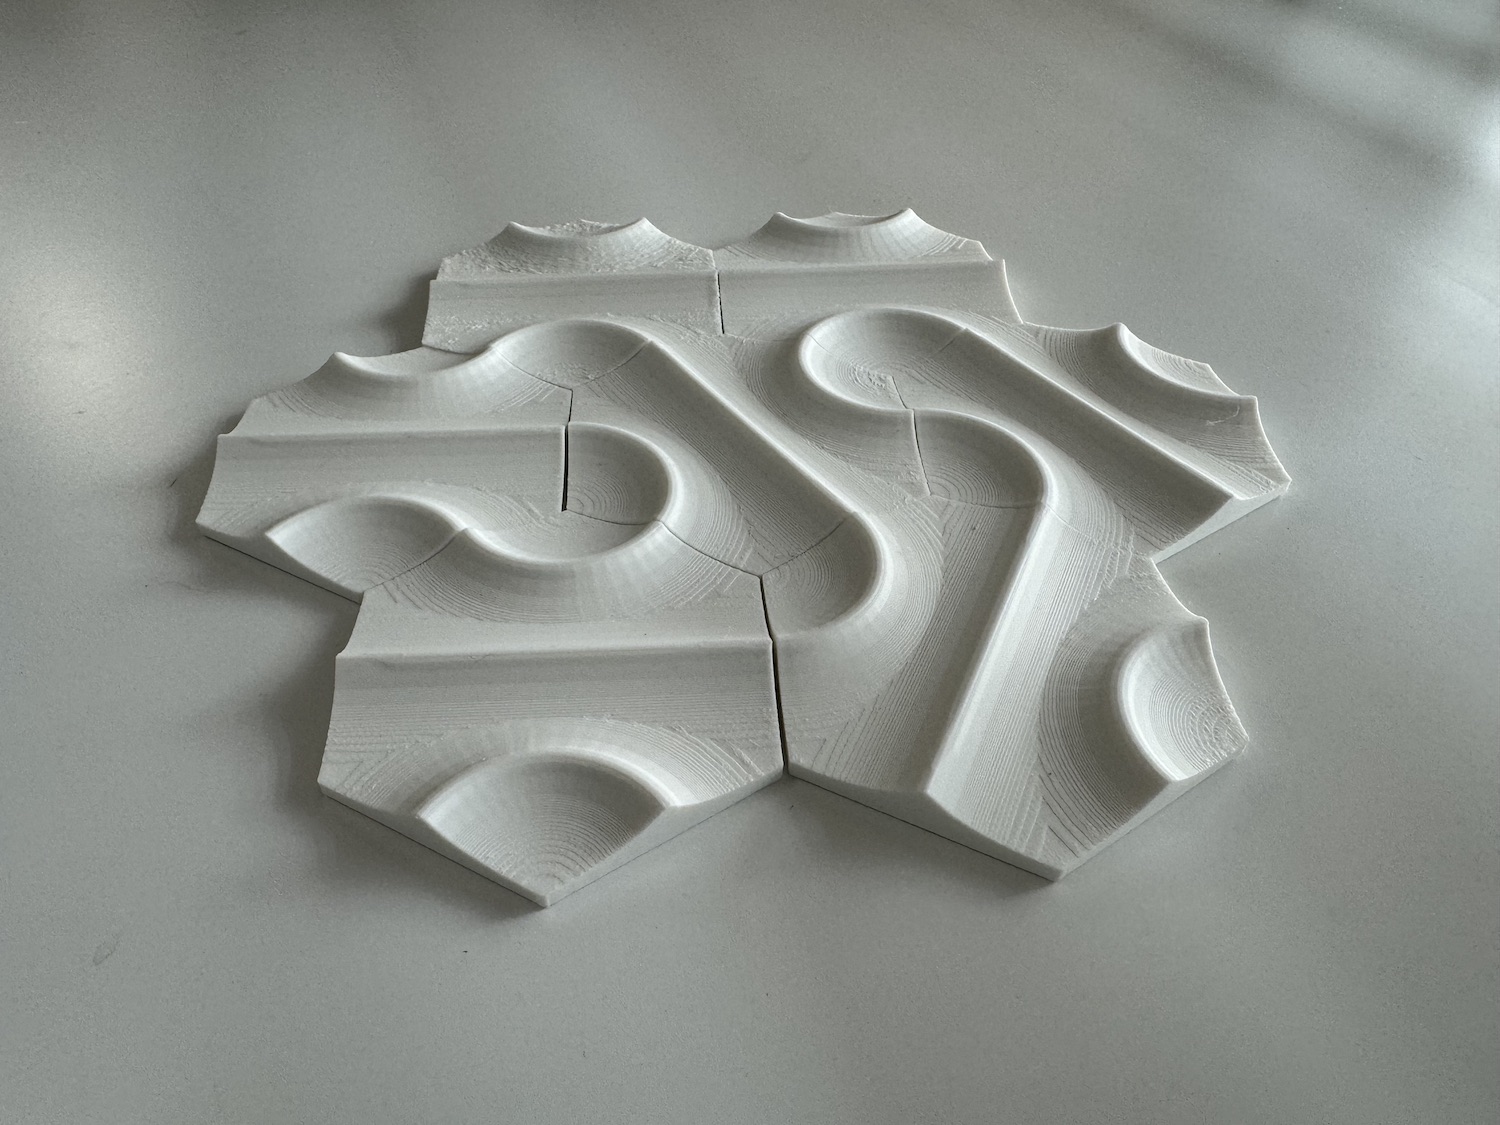
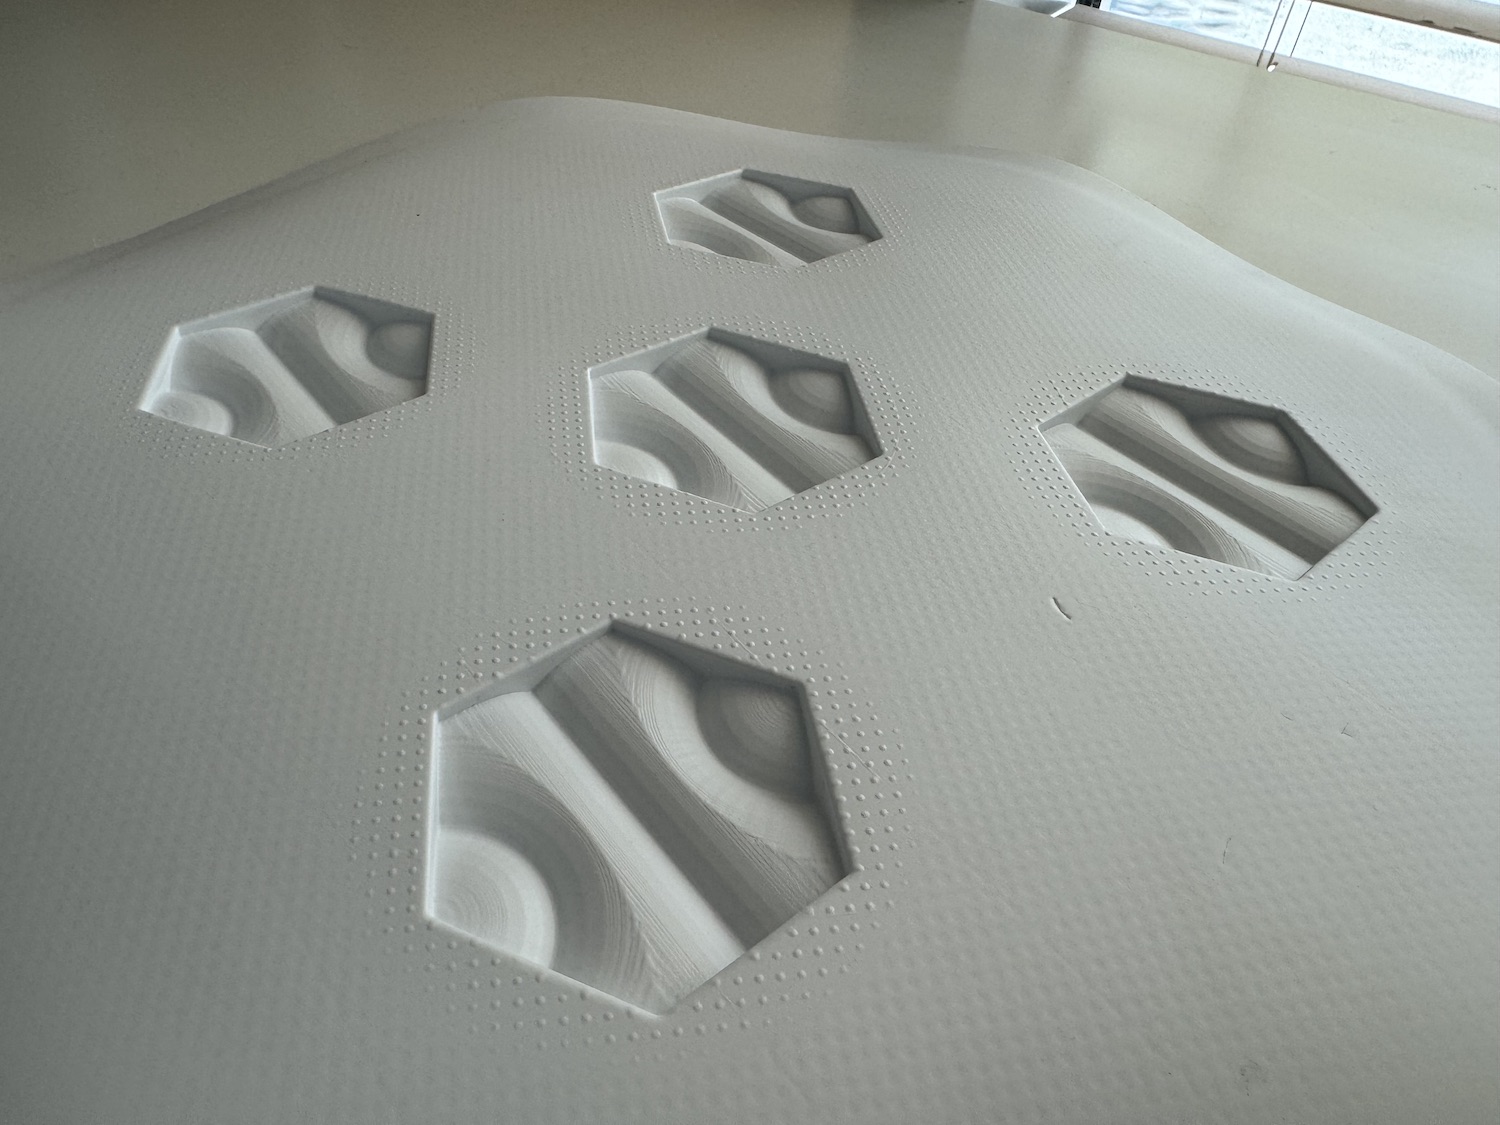
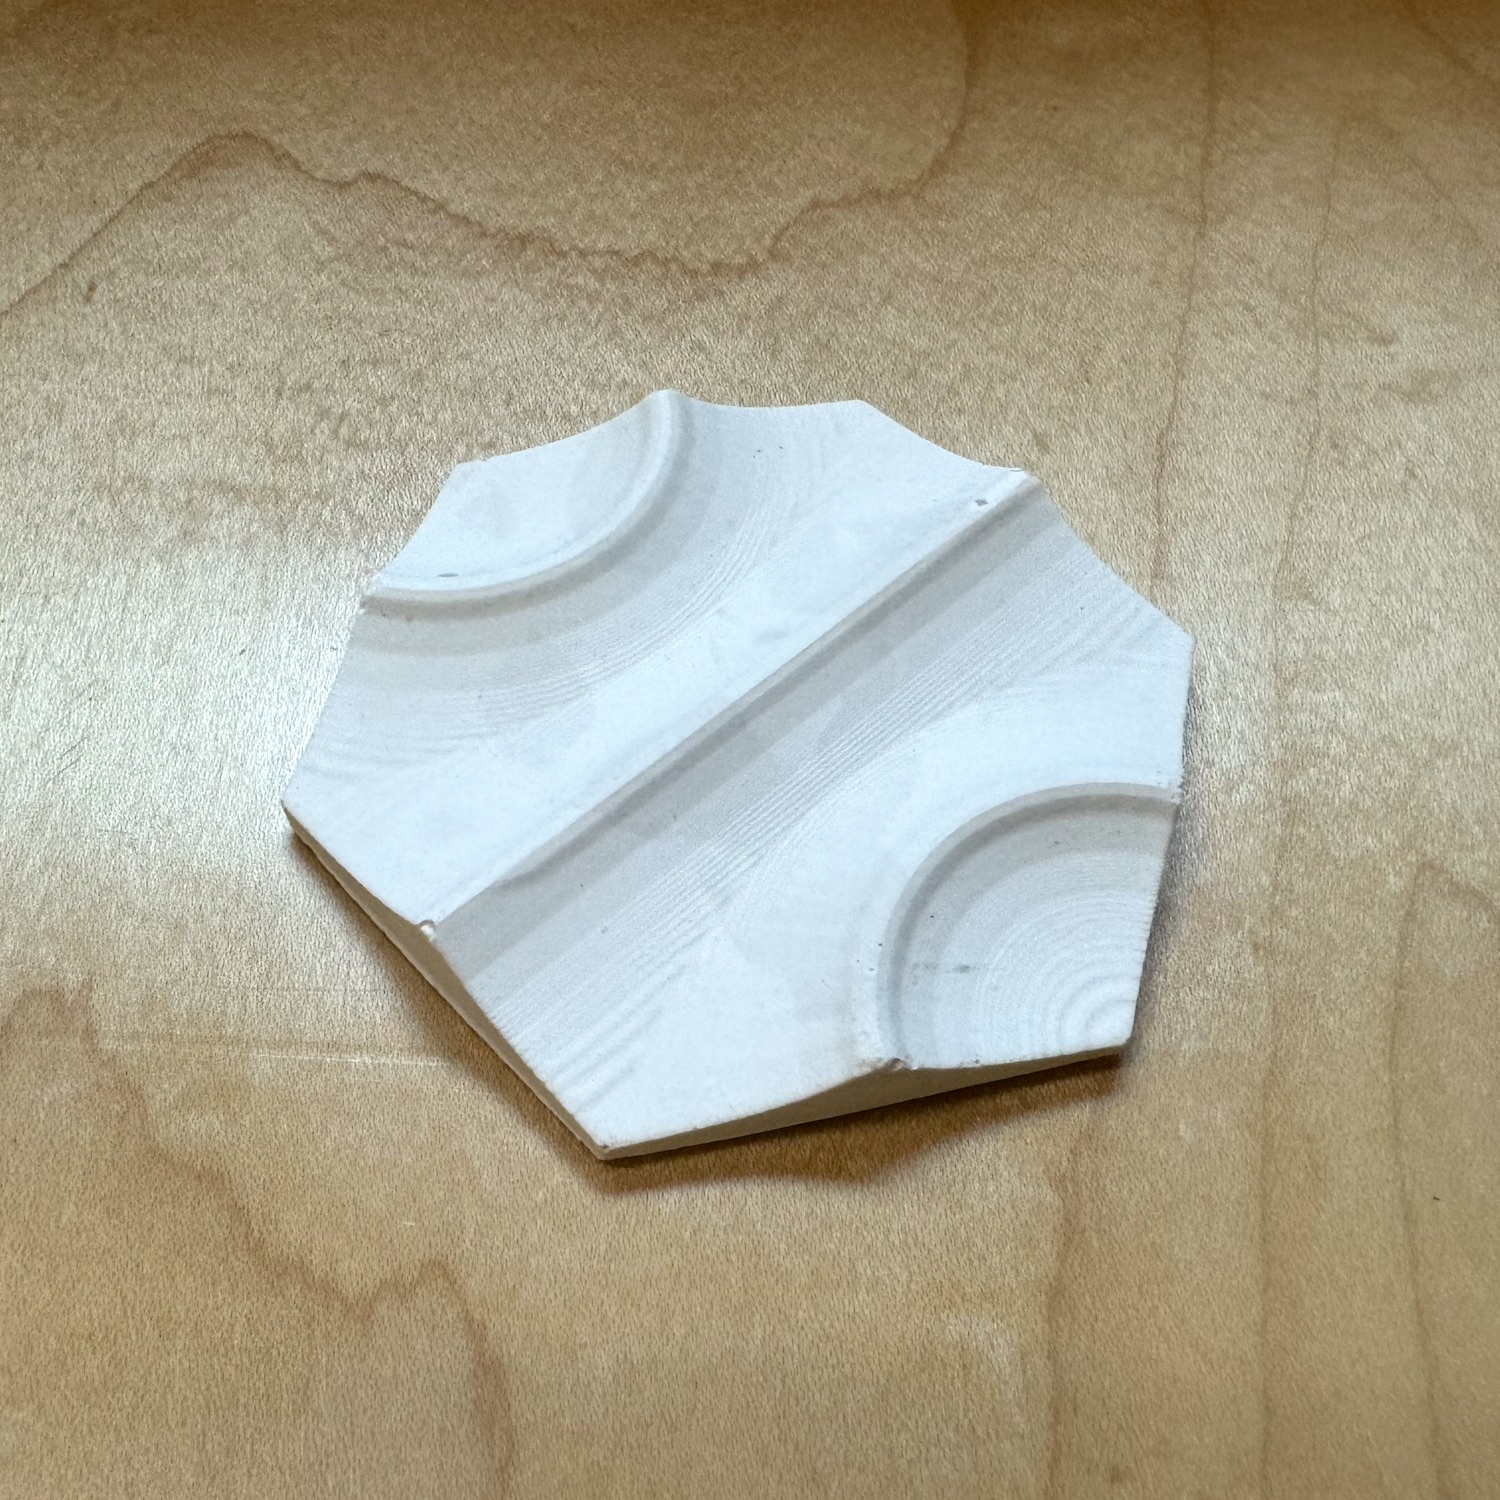
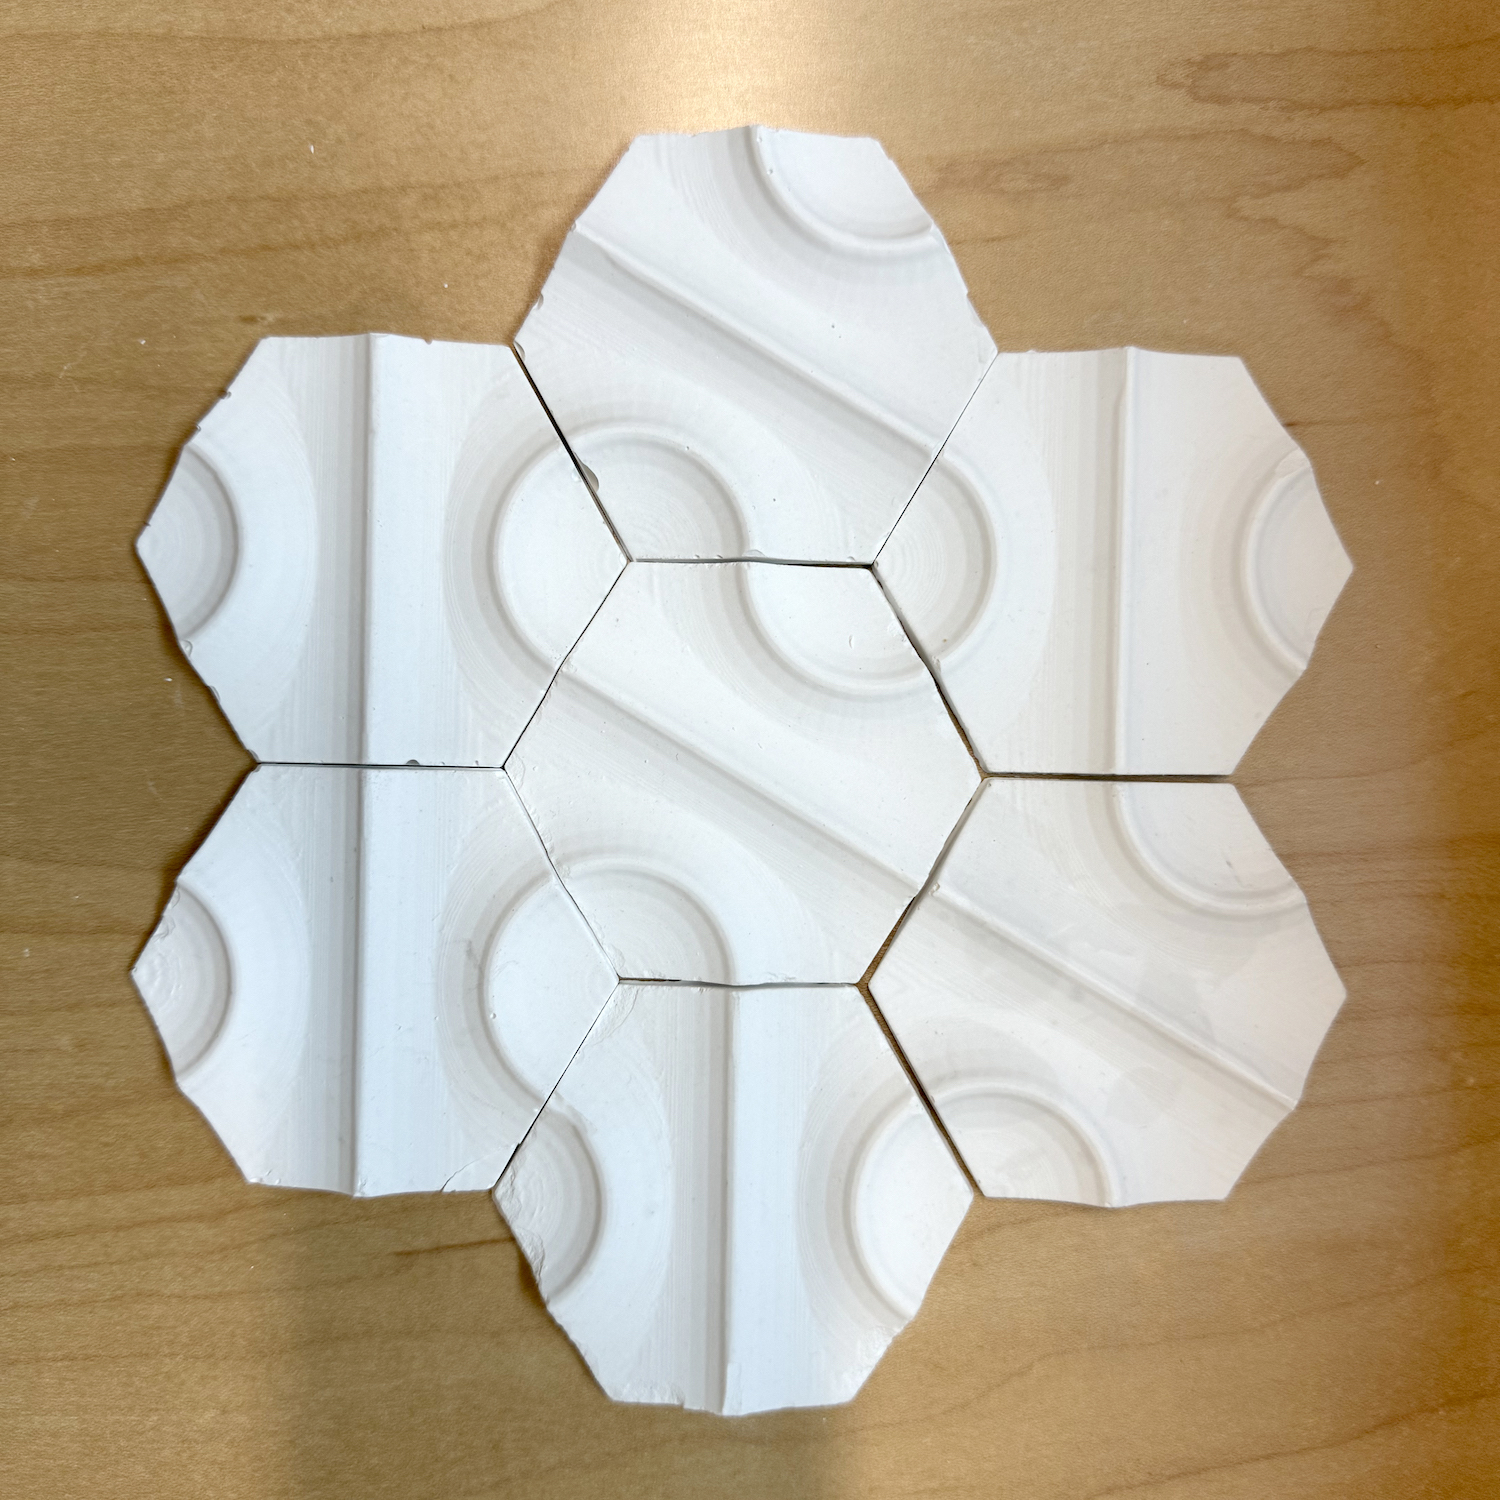
I decided to create a hexagonal tile that can create a changing 3d pattern depending on the rotation its placed. I started by modeling a simple geometry in Rhino3D with a shape that has the same profile on all 6 sides but on the face has a form on two opposing corners and a linear element down the middle. This allows for a continuous surface no matter which angle it is placed, but changes the pattern on the surface. To achieve this, I drew the profile and placed them on the edge faces of the extruded hexagon. I then created two types of curves, one linear element that connected the midpoint of two opposing sides, and a curved element that connected the midpoint of two adjacent sides. I used those curves as a path from which to extrude the profile along the rail. The result was two curves on opposite ends and a line down the center of the hexagon. I ensured that all of the surfaces were capped and then used the boolean union command to fuse the three geometries into one shape.

3D Printing the Form
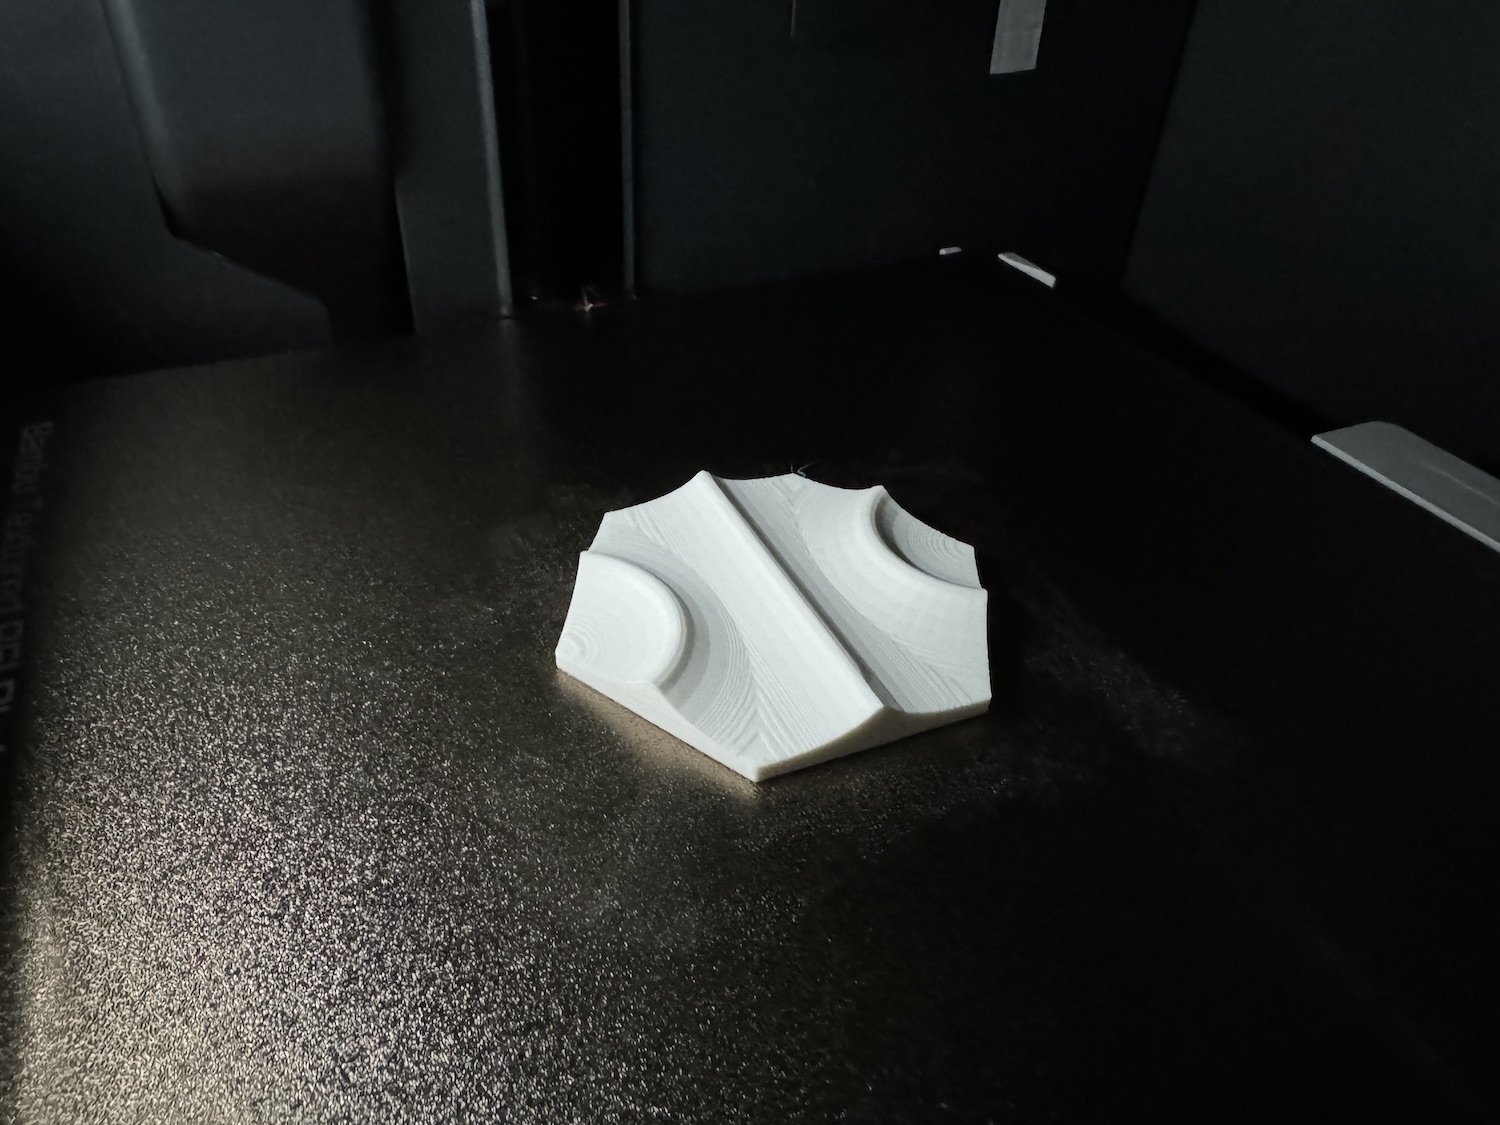
The exported STL was sent to the Bambu Studio slicer and printed with a strong infill so that it could withstand the pressure and heat of the vacuum former without deforming.
Vacuum Forming the Mold
Using Mayku Multiplier pressure former, I added a circular sheet of High Impact Polystyrene (HIPS) and followed the command prompts on the machine, which does a great job of leading you step-by-step through the whole process. You select what material you are using and the thickness of the material and it automatically sets the trmperature and timing. It tells you when to close and lock the lid and when to release the air pressure for forming, as well as the cool down time for the plastic to harden. It even calculates a percentage of optimal success based on how accuarately and timely each task was completed.
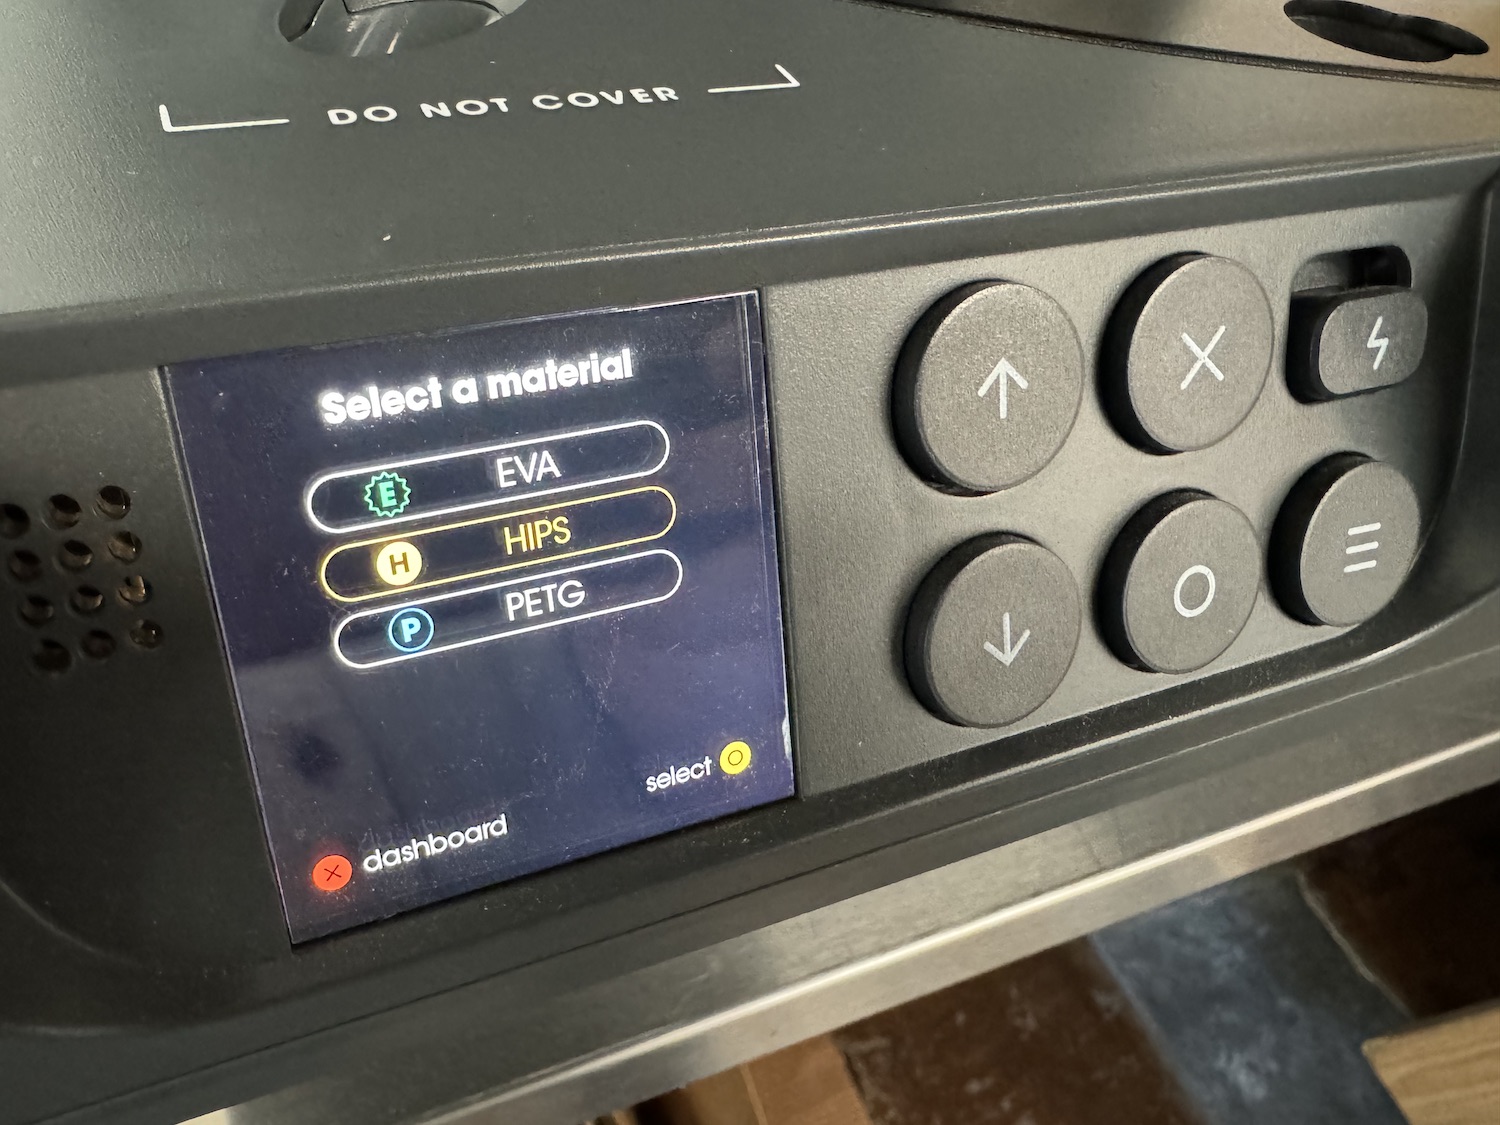
Vacuum Forming Process
Prepare the 3D Printed Tiles: Ensure your tile is clean and free of any debris. It should be designed with the desired details that you want to replicate in the mold.
Set Up the Multiplier: Turn on the Mayku Multiplier and allow it to heat up to the required temperature for your plastic sheet. It will also begin to fill the air tank.
Insert the Plastic Sheet: Place the plastic sheet into the Multiplier. Close the lid, twist the lock knob, and reopen ther lid. The plastic sheet will be attached to the top where the heating mechanism is located. The sheet should be larger than the mold to cover it completely when formed.
Place the tiles on the Bed: Position the 3D printed tiles on the bed of the Multiplier, making sure they are centered and secure.
Heat the Plastic: Let the Multiplier heat the plastic sheet until it becomes soft and pliable. The machine will alert you when the plastic is ready.
Pressure Forming: Once heated, the Multiplier will alert you to close the lid, slide the bottom locking mechanism, and press the pressure form button. This will cause the machine to use up to five tons of pressure to push the plastic sheet over your 3D printed tile. This high pressure ensures the plastic captures all the details from the tile.
Cool and Remove: Allow the plastic to cool and harden. After it has cooled down sufficiently, remove the formed plastic from the Multiplier. Then remove the 3D printed molds from the sheet.
Characterization of the Plaster
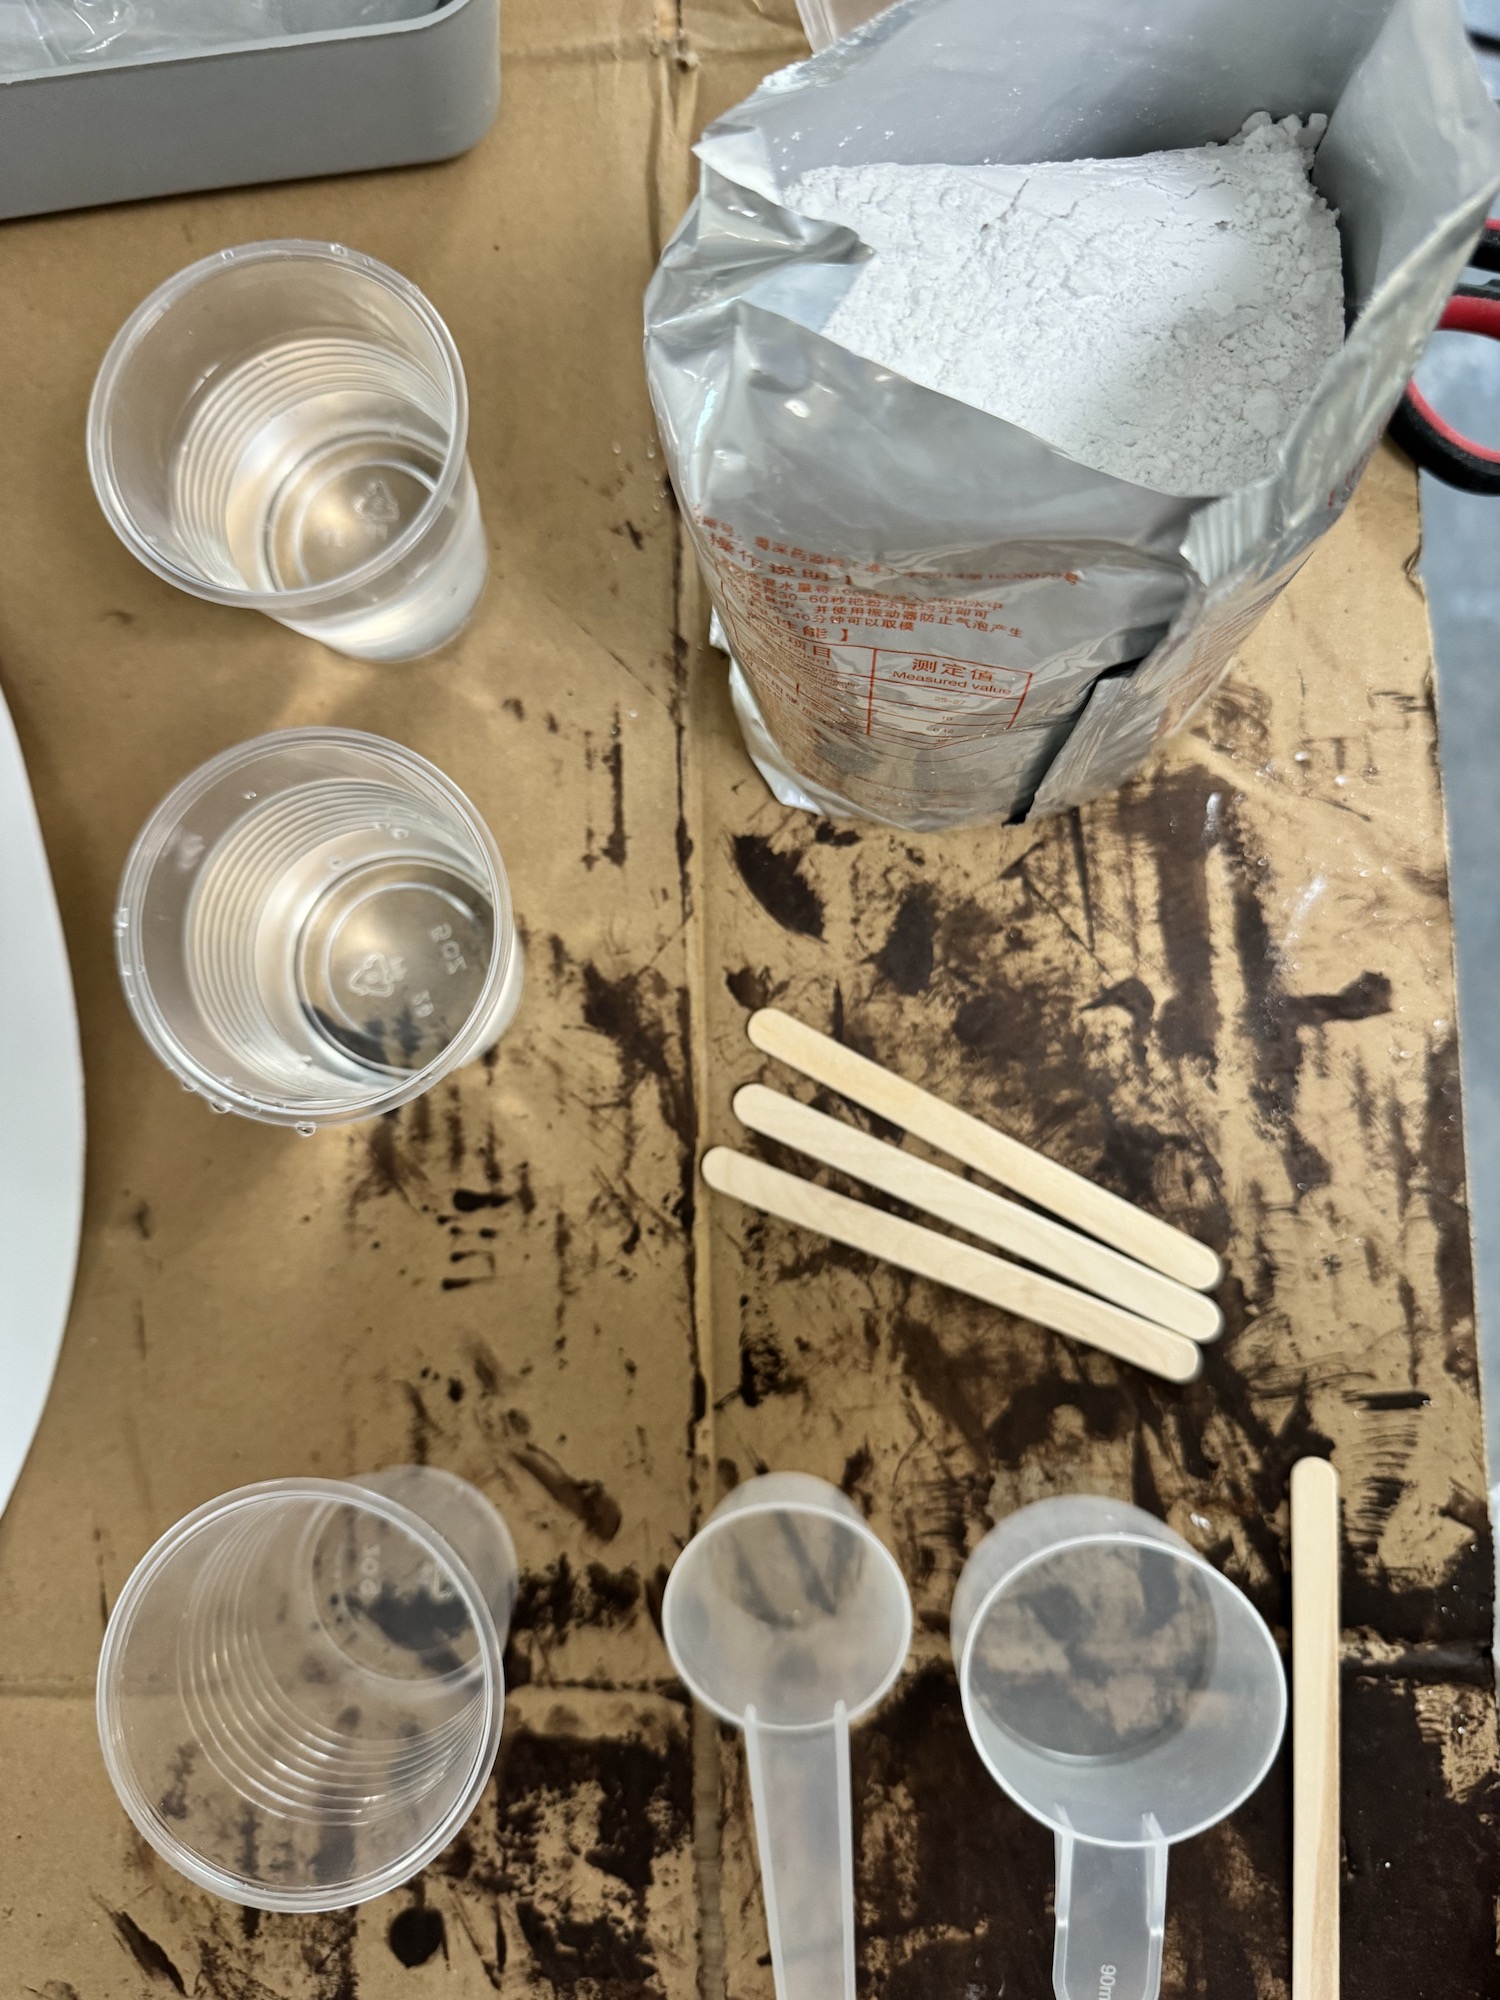
Preparation
Workspace Setup: Ensure your workspace is clean and free from dust. Lay down protective sheets to catch any spills.
Mold Preparation: Clean the plastic mold thoroughly and apply a release agent to ensure easy de-molding later. Make sure the mold is dry before pouring the plaster.
Mixing the Plaster
Measure Ingredients: Use a plaster to water ratio of 3.57:1 by weight. This translates to 100 parts plaster to 28 parts water.
Combine Ingredients: Slowly add the measured plaster into the water. This helps to prevent lumps and ensures a smoother mixture.
Mixing: Stir the mixture for 2 to 4 minutes until it reaches a homogenous consistency. Adjust the mixing time if necessary to achieve a smooth, lump-free mixture.
Pouring the Plaster
Pouring: Carefully pour the mixed plaster into the prepared mold. Tap the sides of the mold gently to release any trapped air bubbles, which can cause imperfections in the final product.
Curing
Initial Setting: Allow the plaster to sit undisturbed for about 18 minutes for the initial setting. This is the time when the plaster starts to harden.
Final Setting: The final setting time is approximately 48 hours. During this period, the plaster will harden completely.
Curing Environment: Ensure the environment is dry and at a stable temperature. High humidity or cold temperatures can affect the setting and strength of the plaster.
De-Molding
Check for Hardness: Before attempting to de-mold, ensure the plaster is fully set and hard. This usually takes around 48 hours but may vary slightly depending on environmental conditions.
Remove from Mold: Carefully remove the plaster tile from the plastic mold. If you used a release agent, this step should be relatively easy. Gently flex the mold if needed to release the tile.
Post-Casting Considerations
Drying: Allow the casted tile to dry completely. This may take several hours to a day depending on the size and thickness of the tile.
Finishing Touches: Once dry, you can sand any rough edges or surface imperfections. If you plan to paint or seal the tile, ensure it is completely dry before applying any coatings.
Storage and Handling
Storage of Plaster: Keep the Crystacast plaster stored in a dry, cool place. Ensure the bag is properly sealed after each use to prevent moisture absorption, which can alter its properties.
Shelf Life: The plaster has a shelf life of 9 months when stored under appropriate conditions.
Safety Considerations
Personal Protection: Wear appropriate personal protective equipment (PPE) such as gloves, a dust mask, and safety goggles when handling and mixing the plaster.
Ventilation: Work in a well-ventilated area to avoid inhaling any plaster dust during mixing.
Pouring the Plaster
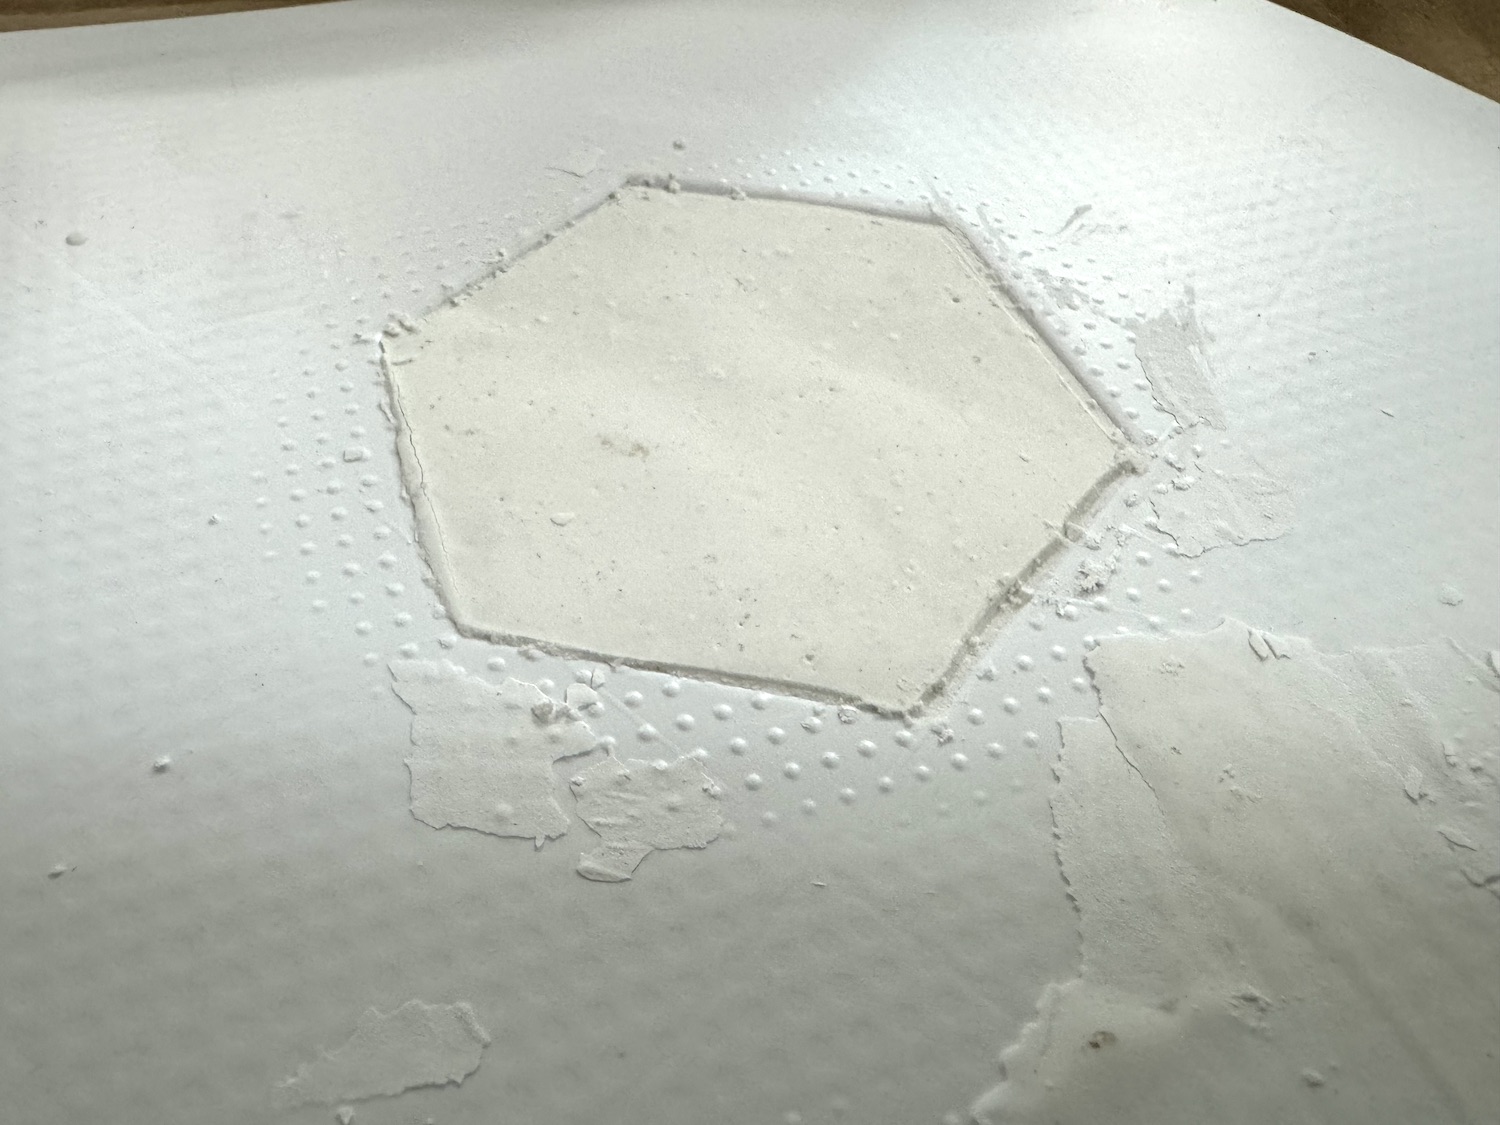
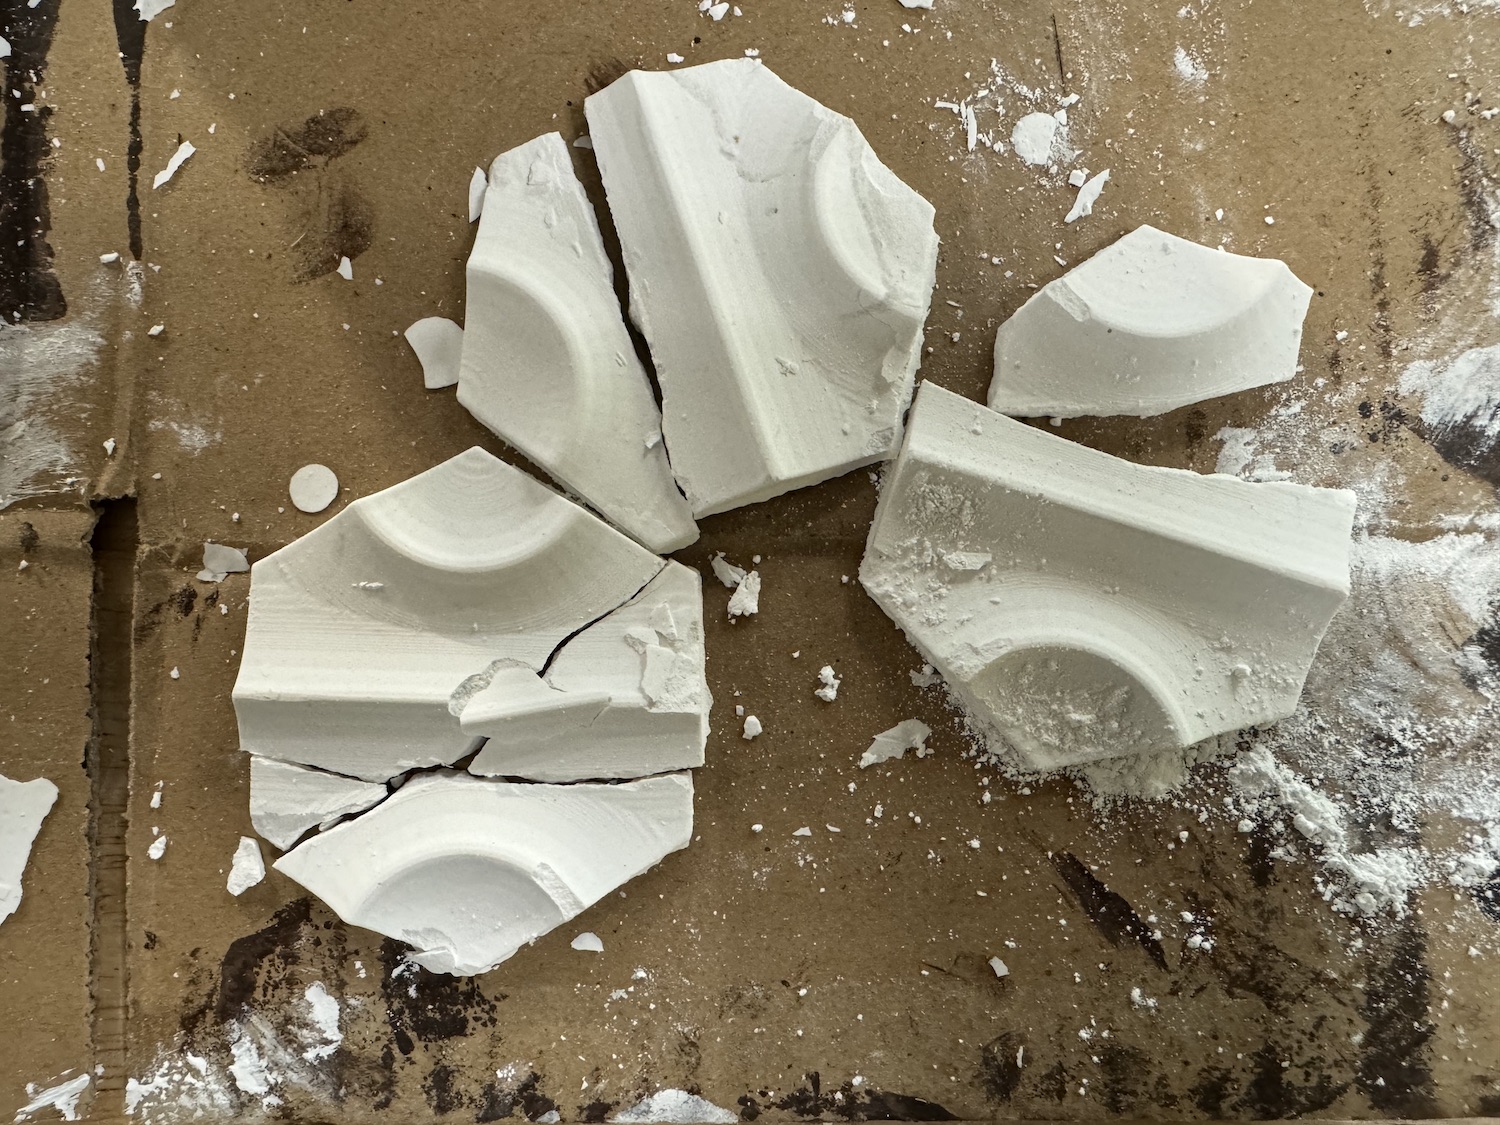
I mixed the powder with the specified amount of water and ensured a smooth mix, then I poured it into each of the molds on the sheet. I let it harden overnight and removed the parts in the morning. They were a bit tough to removed, but by carefully bending the mold and tapping the top, I was able to get them free. This plaster was a bit brittle, so the corners were susceptible to chips and fracturing. Of the twelve I poured, three were damaged significantly and most had surface imperfections, only one or two tiles were near perfect.
Troubleshooting Failures
After de-molding my first set of tiles, I discovered a few issues:
Discolored/Splotchy Tiles
This was caused by an inconsistent mixture of the plaster and the powder.
Solution:I solved this in my next set by ensuring more accurate ratios in the mixture and more stirring to ensure an even mixture throughout the whole batch.
Holes/Missing Pieces in Tiles
This was caused by air bubbles in the mixture. The plaster hardens with these bubbles which effects the accuracy of the original form.
Solution:I solved this in my next set by tapping the mold after pouring the viscous plaster into the mold. Also, smoother stirring in place - ensuring the stirring instrument isn't coming in and out of the mixture multiple times helps mitigate this problem.
Chipping/Broken Tiles When De-Molding
This was caused because the tiles were not fully cured. I tried removing them after 12 hours and realized that the specs require 48 hours for full drying and curing.
Solution:In my next set, I let them set for the full 48 hours before removing them from the mold.
Successful Tiles
Files Download 3D Model Download Crystacast Powder MSDS
Group Assignment
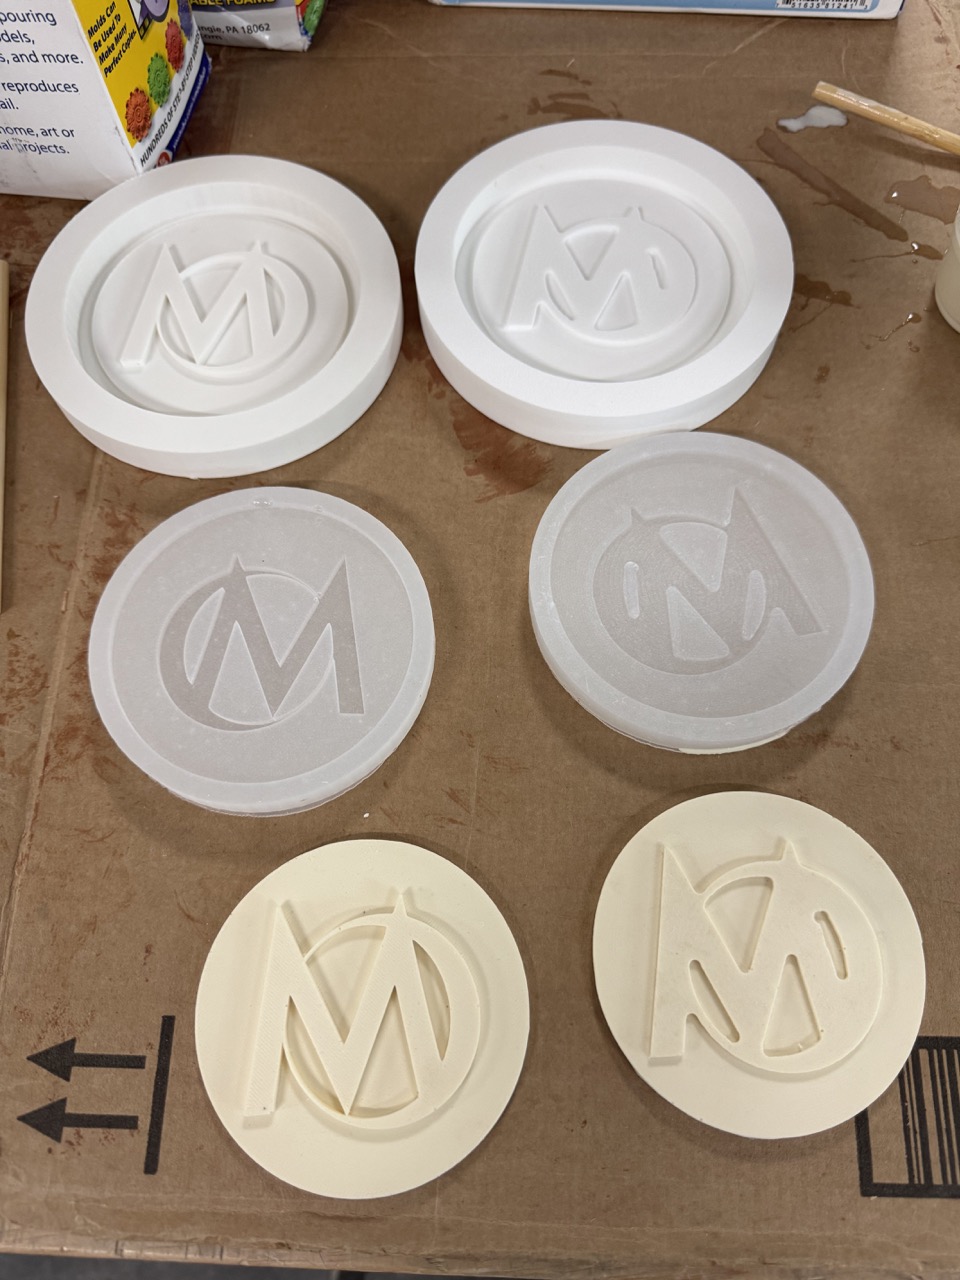
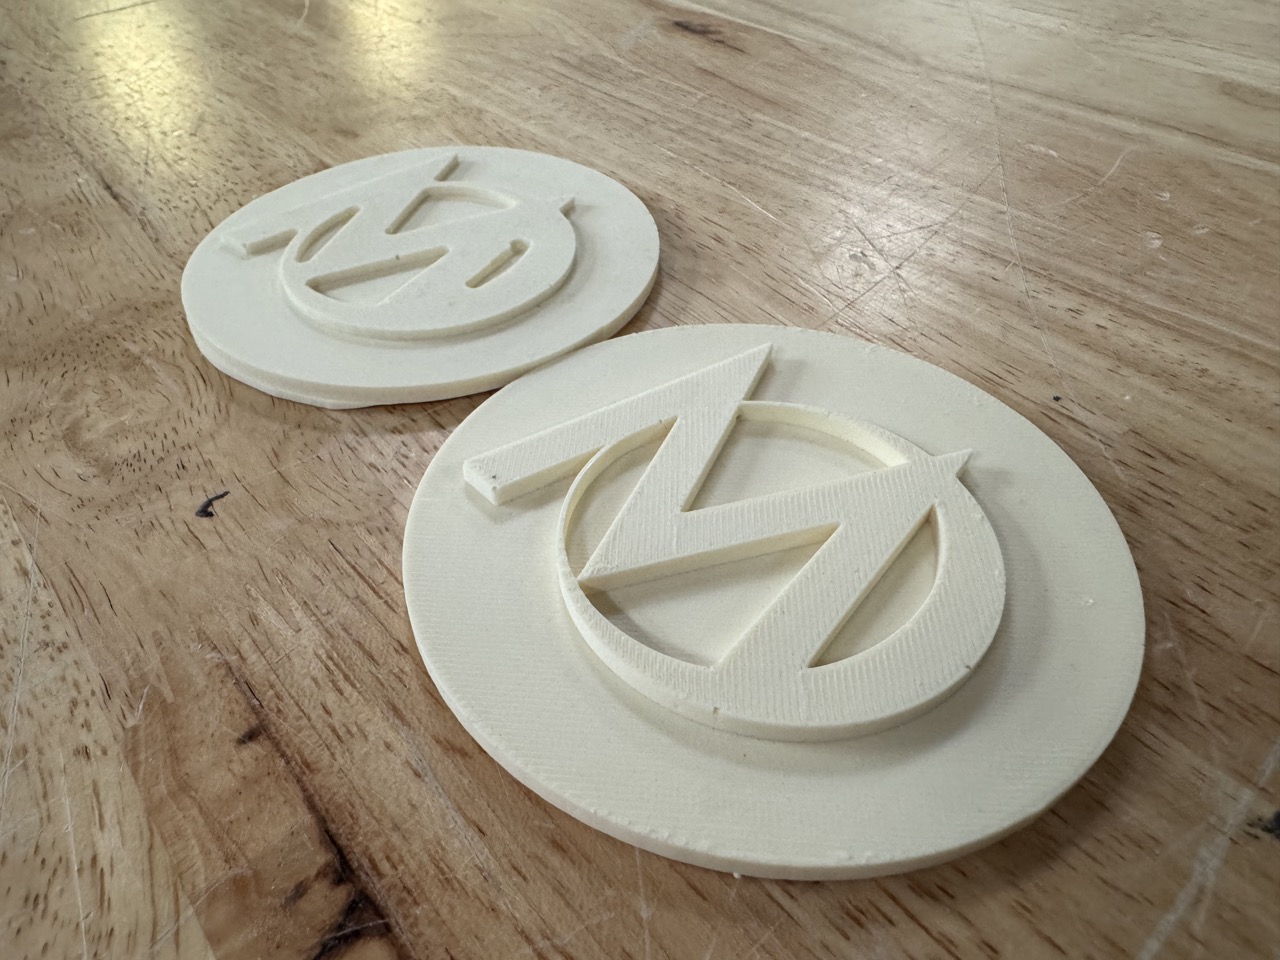
We decided to test the difference between a milled mold and a 3D printed mold of a Moonlighter Logo on a 5" circular base. Because this design has very thin details, tight interior corners, and balance of linear and curved forms, we thought it'd be a good piece to test the pros and cons of each fabrication technology. We made them at the same exact scale, the printed mold was made on a Bambulabs printer with PLA, and the milled mold was made on a ShopSabre 4896 using 3/4" thick HDPE. It was much faster to mill the part (~10min) as opposed to printing it (~1hour). The milled part had much smoother surfaces, but the details were limited by the thickness of the bit, (1/8") in this case. Even if we were to use a smaller bit, that would have made the milling process longer and you would still have a slight radious to every inside vertex.
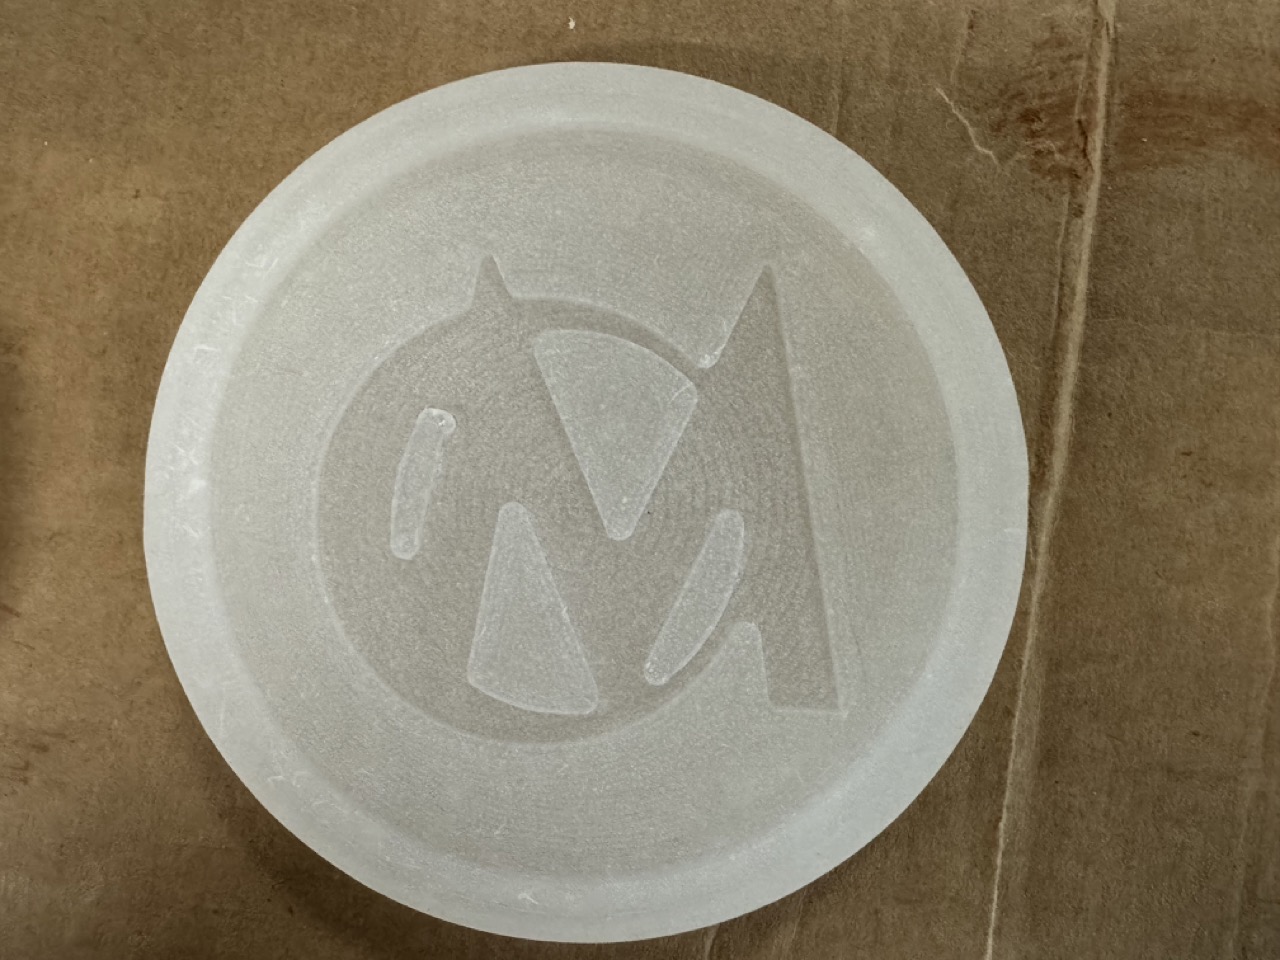
Removing The Mold
The 3D printed mold was much sharper and more detailed. But the surfaces had visible printed layer paths that accentuated the fact that it was made with a 3D printer.
 To create the silicone mold, we used Dragon Skin 10 Very Fast Platinum Silicone Rubber. FULL MSDS SHEET
Manufacturers Instructions for Use:
Safety - Use in a properly ventilated area (“room size” ventilation). Wear safety glasses, long sleeves and rubber gloves to minimize contamination risk. Wear vinyl gloves only. Latex gloves will inhibit the cure of the rubber.
Store and use material at room temperature (73°F/23°C). Warmer temperatures will drastically reduce working time and cure time. Storing material at warmer temperatures will also reduce the usable shelf life of unused material. These products have a limited shelf life and should be used as soon as possible.
Cure Inhibition - Addition-cure silicone rubber may be inhibited by certain contaminants in or on the pattern to be molded resulting in tackiness at the pattern interface or a total lack of cure throughout the mold. Latex, tin-cure silicone, sulfur clays, certain wood surfaces, newly cast polyester, epoxy or urethane rubber may cause inhibition. If compatibility between the rubber and the surface is a concern, a small-scale test is recommended. Apply a small amount of rubber onto a non-critical area of the pattern. Inhibition has occurred if the rubber is gummy or uncured after the recommended cure time has passed.
To prevent inhibition, one or more coatings of a clear acrylic lacquer applied to the model surface is usually effective. Allow any sealer to thoroughly dry before applying rubber. Note: Even with a sealer, platinum silicones will not work with modeling clays containing heavy amounts of sulfur. Do a small scale test for compatibility before using on your project.
Because no two applications are quite the same, a small test application to determine suitability for your project is recommended if performance of this material is in question.
Applying A Release Agent - Although not usually necessary, a release agent will make demolding easier when pouring into or over most surfaces. Ease Release™ 200 is a proven release agent for making molds with silicone rubber. Mann Ease Release™ products are available from Smooth-On or your Smooth-On distributor.
IMPORTANT: To ensure thorough coverage, lightly brush the release agent with a soft brush over all surfaces of the model. Follow with a light mist coating and let the release agent dry for 30 minutes.
If there is any question about the effectiveness of a sealer/release agent combination, a small-scale test should be made on an identical surface for trial.
Measuring & Mixing - Before you begin, pre-mix Part B thoroughly. After dispensing required amounts of Parts A and B into mixing container (1A:1B by volume or weight), mix thoroughly for 3 minutes making sure that you scrape the sides and bottom of the mixing container several times. After mixing parts A and B, vacuum degassing is recommended to eliminate any entrapped air in liquid rubber. Your vacuum pump must pull a minimum of 29 inches of mercury (or 1 Bar / 100 KPa). Leave enough room in container for material expansion. Vacuum material until it rises, breaks and falls. Vacuum for 1 minute after material falls.
Pouring - For best results, pour your mixture in a single spot at the lowest point of the containment field. Let the rubber seek its level up and over the model. A uniform flow will help minimize entrapped air. The liquid rubber should level off at least 1/2” (1.3 cm) over the highest point of the model surface.
Curing / Post Curing - Allow rubber to cure as prescribed at room temperature (73°F/23°C) before demolding. Do not cure rubber where temperature is less than 65°F/18°C. Optional: Post curing the mold will aid in quickly attaining maximum physical and performance properties. After curing at room temperature, expose the rubber to 176°F/80°C for 2 hours and 212°F/100°C for one hour. Allow mold to cool to room temperature before using.
If Using As A Mold - When first cast, silicone rubber molds exhibit natural release characteristics. Depending on what is being cast into the mold, mold lubricity may be depleted over time and parts will begin to stick. No release agent is necessary when casting wax or gypsum. Applying a release agent such as Ease Release™ 200 (available from Smooth-On) prior to casting polyurethane, polyester and epoxy resins is recommended to prevent mold degradation.
Pouring the Plastic in the Mold
To create the final plastic part, we used Smooth-Cast 320 - Off-White, Ultra Low Viscosity Liquid Plastic. FULL MSDS SHEET
Manufacturers Instructions for Use:
Safety - Materials should be stored and used in a warm environment (73° F / 23° C). These products have a limited shelf life and should be used as soon as possible. All liquid urethanes are moisture sensitive and will absorb atmospheric moisture. Mixing tools and containers should be clean and made of metal, glass or plastic. Mixing should be done in a wellventilated area. Wear safety glasses, long sleeves and rubber gloves to minimize contamination risk.
Applying A Release Agent - A release agent is necessary to facilitate demolding when casting into or over most surfaces. Use a release agent made specifically for mold making (Universal™ Mold Release or Mann’s Ease Release™ 200 available from Smooth-On or your Smooth-On distributor). A liberal coat of release agent should be applied onto all surfaces that will contact the plastic.
IMPORTANT: To ensure thorough coverage, apply release and brush with a soft brush over all surfaces. Follow with a light mist coating and let the release agent dry for 30 minutes. Smooth-On silicone rubber molds usually do not require a release agent unless casting silicone into the mold. Applying a release agent will prolong the life of the mold.
IMPORTANT: Shelf life of product is reduced after opening. Remaining product should be used as soon as possible. Immediately replacing the lids on both containers after dispensing product will help prolong the shelf life of the unused product. XTEND-IT™ Dry Gas Blanket (available from Smooth-On) will significantly prolong the shelf life of unused liquid urethane products.
Measuring and Mixing...
Liquid urethanes are moisture sensitive and will absorb atmospheric moisture. Mixing tools and containers should be clean and made of metal, glass or plastic. Materials should be stored and used in a warm environment (73°F/23°C).
Stir or shake both Part A & Part B thoroughly before dispensing. After dispensing equal volumes of Parts A and B into mixing container (100A:90B by weight) and mix thoroughly. Stir deliberately making sure that you scrape the sides and bottom of the mixing container several times. Be careful not to splash low viscosity material out of the container.
Pouring - Pour your mixture in a single spot at the lowest point of the containment field and let the mixture seek its level. This will help minimize air entrapment.
For Best Results . . . Best results are obtained using a pressure casting technique. After pouring the mixed compound, the entire casting assembly (mold, dam structure, etc.) is placed in a pressure chamber and subjected to 60 PSI (4.2 kg/ cm2) air pressure for the full cure time of the material.
Curing - Important: Use this product with at least room size ventilation or in proximity to a forced outlet air vent and do not inhale/breath fumes. Fumes, which may be visible with a significant mass concentration, will quickly dissipate with adequate ventilation. Castings with significant mass may be hot to the touch and irritate skin immediately following cure. Let casting cool to room temperature before handling.
Demold time of the finished casting depends on mass and mold configuration. Low mass or thin-walled castings will take longer to cure than castings with higher mass concentration. Smooth-Cast™ 320 will cure in 7 - 10 minutes (Smooth-Cast™ 321 in 30 – 40 minutes and Smooth-Cast™ 322 in 2 - 4 hours) depending on mass and mold configuration.
If making rotational or hollow castings, backfilling with a rigid foam (Foam-iT!™ 5 or other) will provide lightweight reinforcement. Foam backfilling is recommended if castings will be subjected to temperatures above 85°F / 30°C.
Post Cure - Castings will reach “full cure” faster and achieve maximum physical properties if post cured. Allow material to cure for recommended cure time at room temperature followed by 4 - 6 hours at 150°F/65°C. Allow casting to come to room temperature before handling.
Performance - Cured castings are rigid and durable. They resist moisture, moderate heat, solvents, dilute acids and can be machined, primed/painted or bonded to other surfaces (any release agent must be removed). If machining cured material, wear dust mask or other apparatus to prevent inhalation of residual particles. Castings can be displayed outdoors after priming and painting. Unpainted castings will yellow over time - more quickly when exposed to ultra-violet light.
Because no two applications are quite the same, a small test application to determine suitability is recommended if performance of this material is in question.
Removing The Final Parts
Conclusion
Milling will provide a smoother surface, but small details and inside corners will be more difficult to achieve. 3D printing provides a sharp part with very accurate and thin details, but will require post processing the mold before poring the silicone if you want a smooth surface.
Files Download Mold 3D Model
Copyright 2024 Thomas Pupo - Creative Commons Attribution Non Commercial
Source code hosted at fabcloud/fabacademy/2024/thomas-pupo