design, build, and connect wired or wireless node(s) with network or bus addresses and local input &/or output device(s)
Group Assignments
send a message between two projects
Finally, I can learn how I2C works
When I watched last week's class and noticed what we were doing this week I already knew what this week's assignment would be: figuring out I2C
I have spent many years teaching Arduino content but at a surface level and it always comes up, what do these extra letters on the chip mean? I would respond as probably not many teachers do: I have no idea but for right now it doesn't matter. And then go on with my day. That same philosophy kept going until I reached this point in time where my project depended on I2C working... Well thats an opportunity if I have ever seen one.
The first thing I needed to do was figure out what I2C was. So I watched a few videos that were far too technical for the amount of time I had but elucidating on the basics.
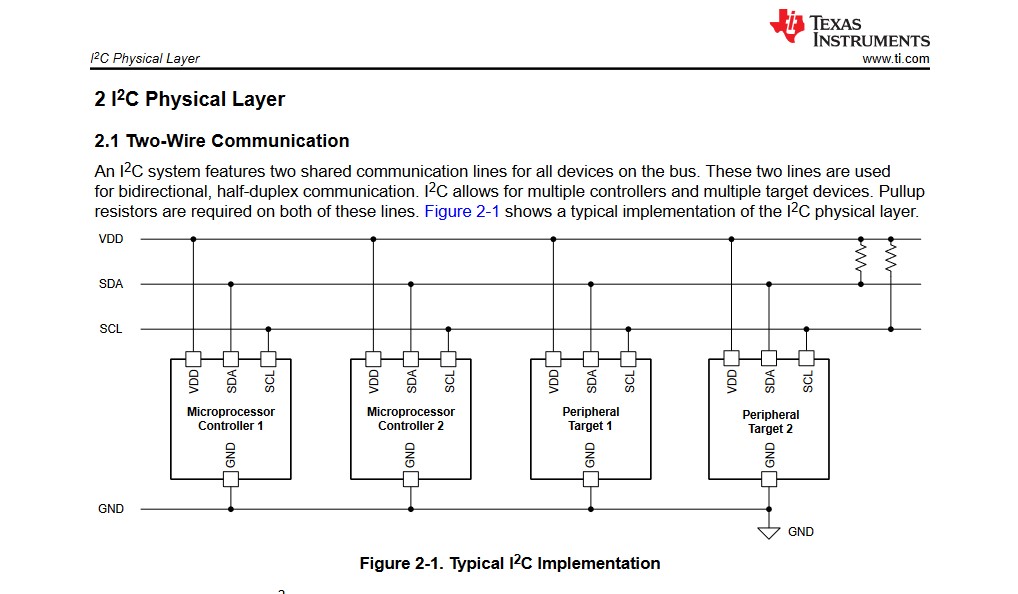
But in essence, every I2C device is connected to one main device, and then all the other ones are connected on one wire together, well two. SDA - Serial Data, and SCL, Serial Clock. These are then both pulled up to 5V or whatever power is by a pull up resistor because I2C only pulls down. This prevents things from getting a little messy and interfering with each other.
Now my question was the one that I am sure many people have. How do I talk to individual devices if they are connected on one wire? I have only done 1:1. Well. Like little houses in a row, they each have an address.
Like in this image by DroneBotWorkshop each one of the different devices has a different code that can be 7,8, or 10 bit. Though most protocols use a 7 bit number. In my case I knew the address of one of my devices, the Mu Vision Sensor that I used in Input Week Because that device has switches that can set the I2C Address I set that one to 0x60. Now I needed to find the addresses of the screen and the Servo controller I had. I am not going to use this controller, but I am doing it to see what 3 I2C devices look like because I have a distance sensor that is still coming in the mail.
Learning the Addresses to my Devices
Like every week I did what any good creator does. I looked on youtube to see if someone had solved my problem first. And luckily someone had. There exists an I2C scanner for Arduino that I could run using these devices.
In my searches I found the video below:
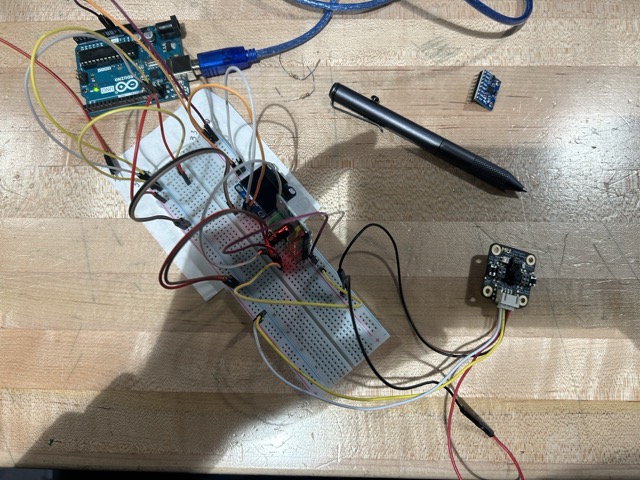
Using a simple Breadboard you can build an I2C scanner to get the addresses for all of your devices. I felt like this would come in handy so I copied the video's wiring diagram and then used the breadboard to plug in my peripherals. It ended up looking something like this:
I know it is an abomination of wires so here is a nicer diagram of the project:
After doing this I ran the code that was attached to the video above. If you would like to run it yourself you can find the .ino file here:
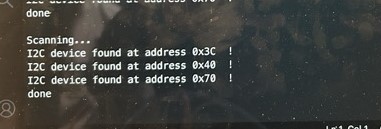
As long as all your cables are connected right you will get an output that looks like this:
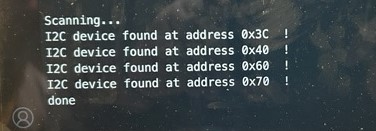
In this image I had only attached the screen and the servo controller so I decided to add the camera to see if there was any change in the output. Lo and Behold it was truly working!
So due to the order I plugged them in I found out I was dealing with the following addresses:
0x3c: Screen
0x40 AND 0x70: Servo Controller
0x60: Mu Vision Sensor
Working with more than one I2C device
Now I had to figure out how to work with two I2C Devices at once and have them work properly. So I set out a simple goal:
Get the screen to react to a camera input
Luckily I already had code for both of these found in Input week and Output week. When I looked closely at the code I had found online I used these two I2C devices separately and had defined them as such. So how could I go about putting them together. What I did was slice and dice the code into one segment. Because of the bitmaps it would be unwieldy to paste the code directly into the website so instead I will paste in chunks and explain them. Or if you want to scroll through them you can download the whole code here:
Here what is happening is that when the Mu Vision Sensor sees a person, it triggers an event which causes the eyes of the system to look "scared." If no human is detected, the screen is just looking casually. This is a great first step for my project because I want the robot to react to the presence of a person.